Ibiza sound LP200 User manual

©Copyright LOTRONIC 2014 LP300 1
B
Be
el
lt
t-
-D
Dr
ri
iv
ve
e
U
US
SB
B
T
Tu
ur
rn
nt
ta
ab
bl
le
e
P
Pl
la
at
ti
in
ne
e-
-d
di
is
sq
qu
ue
e
U
US
SB
B
à
à
e
en
nt
tr
ra
aî
în
ne
em
me
en
nt
t
p
pa
ar
r
c
co
ou
ur
rr
ro
oi
ie
e
U
US
SB
B
P
Pl
la
at
tt
te
en
ns
sp
pi
ie
el
le
er
r
m
mi
it
t
R
Ri
ie
em
me
en
na
an
nt
tr
ri
ie
eb
b
U
US
SB
B
d
dr
ra
aa
ai
it
ta
af
fe
el
l
m
me
et
t
s
sn
na
aa
ar
ra
aa
an
nd
dr
ri
ij
jv
vi
in
ng
g
P
Pr
ra
at
to
o
B
Be
el
lt
t-
-D
Dr
ri
iv
ve
e
c
co
om
m
U
US
SB
B
G
Gi
ir
ra
ad
di
is
sc
co
os
s
U
US
SB
B
p
po
or
r
t
tr
ra
ac
cc
ci
ió
ón
n
c
co
or
rr
re
ea
a
U
US
SB
B
G
Gr
ra
am
mo
of
fo
on
n
P
Pl
la
at
ta
an
n
U
US
SB
B
c
cu
u
a
an
nt
tr
re
en
na
ar
re
e
p
pr
ri
in
n
c
cu
ur
re
ea
a
Ref.: LP200 (15-2331)
USER’S MANUAL
MANUEL DE L’UTILISATEUR
BEDIENUNGSANLEITUNG
MANUAL DE INSTRUÇÕES
Manual de Instrucciones
NAVODILA ZA UPORABO
MANUAL DE UTILIZARE
Imported from China by:
LOTRONIC SA
Avenue Zénobe Gramme 11
1480 Saintes
Belgium

©Copyright LOTRONIC 2014 LP300 2

©Copyright LOTRONIC 2014 LP300 3
Read these Instructions
Read these Instructions.
Keep these Instructions.
Heed all Warnings.
Follow all Instructions.
Do not use this apparatus near water.
Clean only with a damp cloth.
Do not block any of the ventilation openings. Install in accordance with the manufacture’s instructions.
Do not install near nay heat sources such as radiators, heat registers, stoves, or other apparatus (including
amplifiers) that produce heat.
Do not defeat the safety purpose of the polarized plug. The wide blade is provided for your safety. If the provided
plug does no fit into your outlet, consult an electrician for replacement of the obsolete outlet.
Protect the power cord from being walked on or pinched particularly at plug, convenience receptacles, and point
where they exit from the apparatus.
Only use attachments/accessories specified by the manufacturer.
Use only with a cart, stand, tripod, bracket, or table specified by the manufacturer, or sold with the
apparatus. When art is used, use caution when moving the cart/apparatus combination to avoid injury
from tip-over
Unplug this apparatus during lighting storms or when unused for long periods of time.
Refer all servicing to qualified service personnel. Serving is required when the apparatus has been damaged in any
way, such as power-supply cord or plug is damaged, liquid has been spilled or objects have fallen into the apparatus,
the apparatus has been exposed to rain or moisture, does not operate normally, or has been dropped.
This mains plug is used as the disconnect device, the disconnect device shall be readily operable.
Safety instruction
GB

©Copyright LOTRONIC 2014 LP300 4
1– Start/stop buttons Tonearm lift
Press this button to start or stop the platter.
2– Platter
The platter is equipped with a slip mat. This makes it easier to manipulate the record for scratch performances.
3– 33 rpm Speed select buttons
Press the “33” button to select the 33rpm speed.
4– 45 rpm Speed select buttons
Press the “45” button to select the 45rpm speed.
5– Headshell
Install cartridge here. When installing a cartridge, refer to the installation instructions supplied by the manufacture of
that cartridge. During installation, attach the stylus protector to guard the stylus tip from damage. Attach wires as
follows:
White (L+) Left channel +
Blue (L -) Left channel –
Red (R+) Right channel+
Green (R-) Right channel –
6– Headshell locking nut
Attach the head shell by inserting it into the front end of the tone arm and then turn the locking nut clockwise.
7– Tone arm
This is a fully manual tone arm. To start playback, gently place the stylus on the record using head shell finger
support OR use the tone arm lifter (see 9).
8– Tone arm stand with lock
This aluminum nut is used to secure the head shell and cartridge assembly to the tone arm tube.
9– Tonearm lift
Controls the up and down action of the tone arm.
10– Counterweight
Adjustment creates the proper downward pressure of the stylus to the record. We have installed the counterweight at
our factory and it should be perfectly adjusted. If this is not the case, twist it lightly until the tone arm is perfectly
balanced.
11– Output L & R
This is the standard analog output (RCA jacks) which can be connected either to phone or line input on any DJ mixer,
depending on the setting of the phone/line selector.
12– USB SOCKET
Plug USB device. The USB lead length is limited to 3m.
13– AUX TO PC
Audio input for connection of an iPod, MP2 player, etc. to a PC.
14– Ground
Ground lug for turntable connection. Always use this connection when using turntables (your turntable cable should have
a grounding wire).
15– Power cable
This power cable should be plugged into a wall receptacle AFTER all audio connections have been made.
Description

©Copyright LOTRONIC 2014 LP300 5
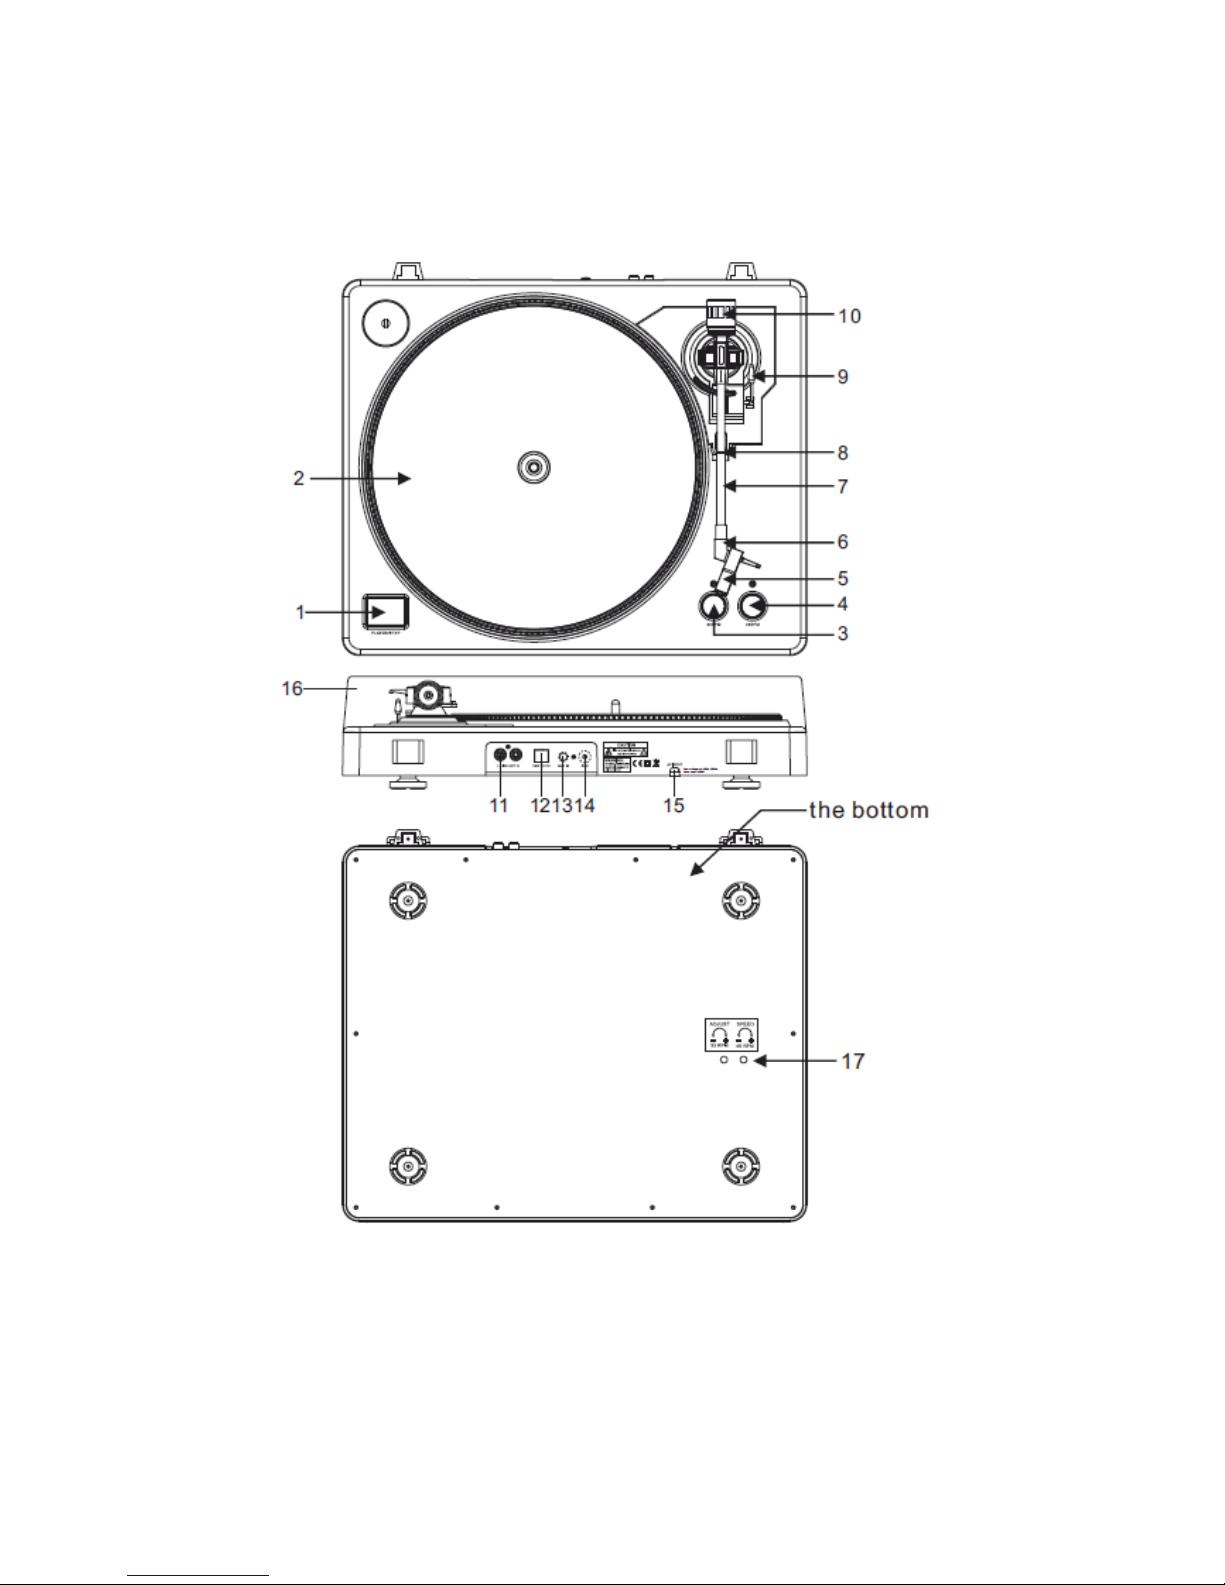
16– Dust cover
Close the dust cover when not in use to protect the unit against dust. Open and remove during use.
17– Adjustments
The unit has already been adjusted at works. However if you need to adjust the rotation speed, use these controls.
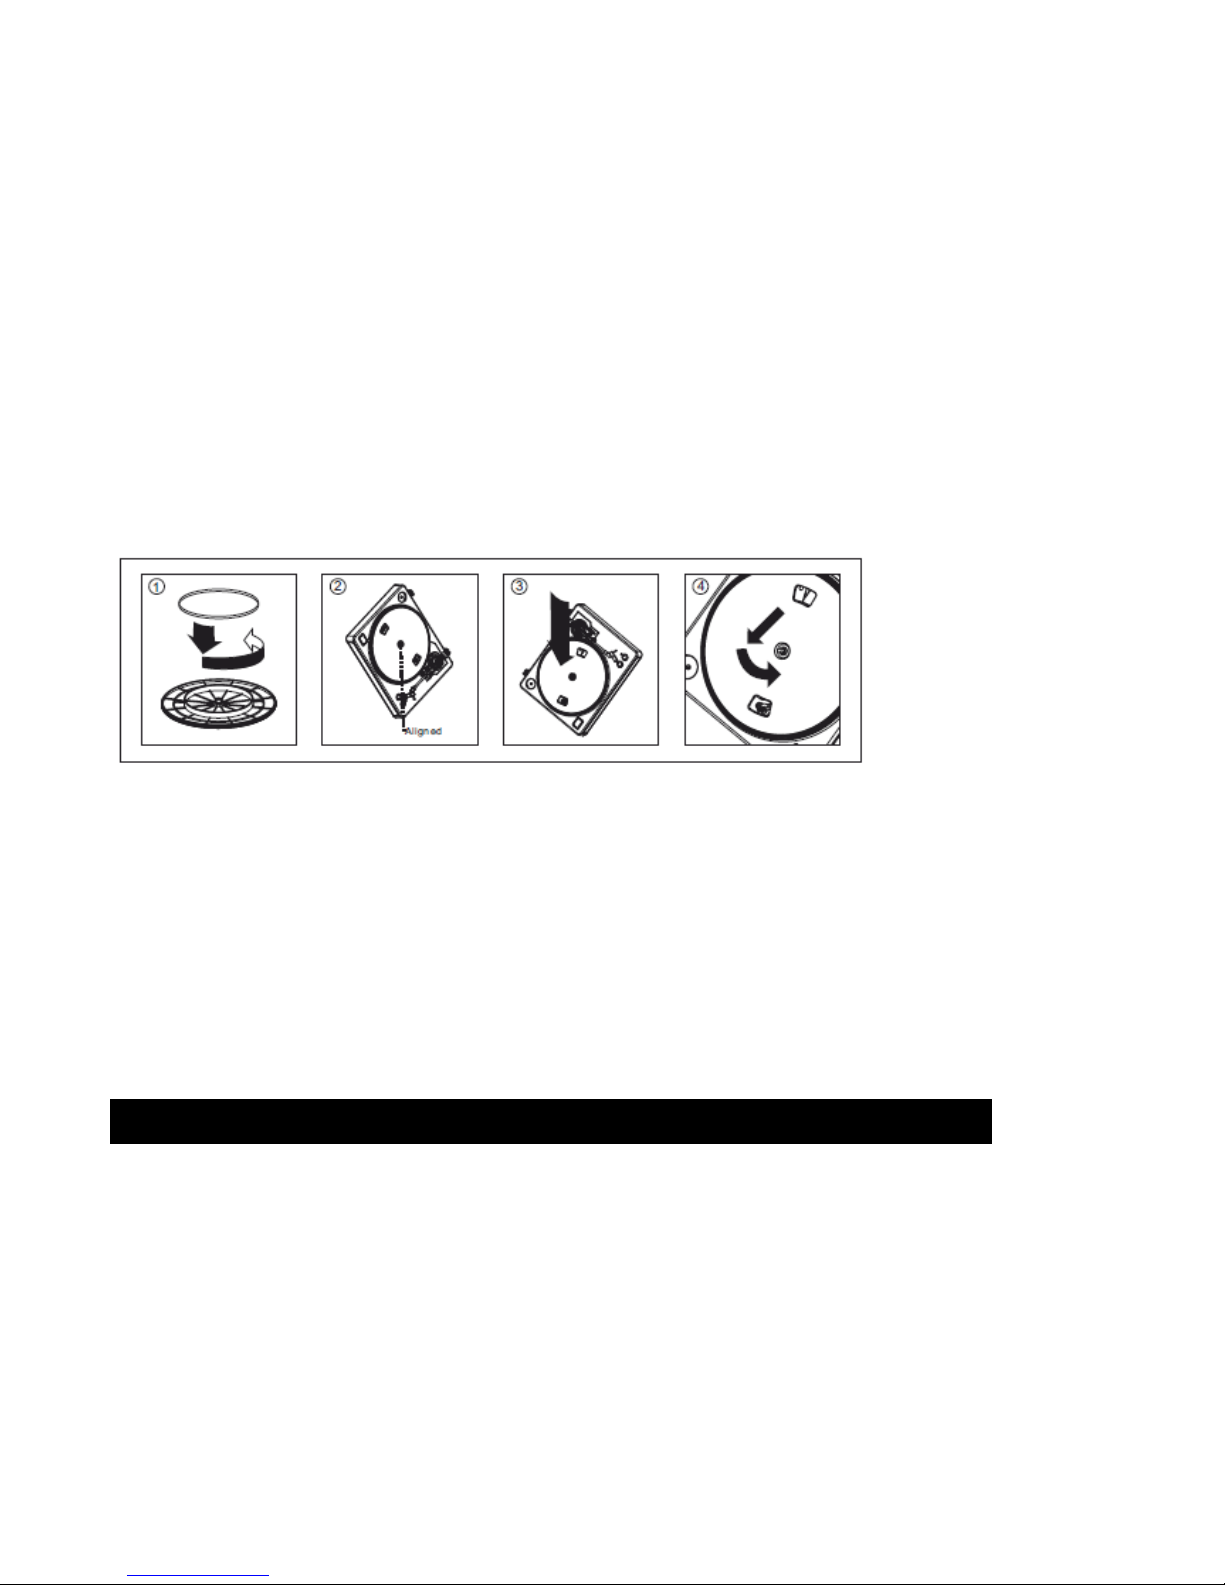
Warning:Incorrect platter setup can lead to poor turntable performance, platter instability or permanent motor
damage.
1. The rubber belt has been pre-installed onto the turntable platter. However, please turn the platter over and make sure
that the belt is attached and is not twisted. If the belt has come off during shipping, please place it around the inner bottom
ring of the turntable platter, as shown in NO. 1 above.
2. Place the platter on the center spindle and press it down firmly. Rotate the platter until the brass motor spindle is visible
through one of the holes. Check to make sure that it rotates uniformly and does not wobble excessively.
3. Pass your fingers through the hole, grip the rubber drive belt and install it over the motor spindle. Be careful not to twist
the rubber drive belt during this step. Check to make sure the platter rotates uniformly. If the drive belt is properly installed,
there should be a slight amount of tension that brings the platter to a stop after spinning it freely.
Motor: DC motor
Driving Method: Belt Drive
Starting & braking time: Less than 1sec
Speed adjustment: 33 1/3, 45 rpm
Computer interface; USB 1.1 compliant, Windows XP SP3, VISTA, Windows 7 and or MACOS X
Power supply: AC 115/230V, 60/50Hz, User Selectable
Single Voltage: AC 230V, 50Hz (Europe, U.K., New Zealand, South Africa, and Singapore)
Dimensions: 418 x 355 x 110 mm
Power Consumption: 6 Watts
Weight: 2.9 Kgs
Audacity is free software, licensed under the GNU General Public License (GPL).
Note: Please ensure you have installed the software before starting.
Setting up your PC to work with Audacity
1.Connect an input source to the unit
2.Connect the USB lead to your computer
3.Install the Audacity recording software
4.Open the Audacity program
5.Select Preference from the Edit tab in the Audacity menu
Audacity software overview
Specifications

©Copyright LOTRONIC 2014 LP300 6
Recording Albums with Audacity
1. Saving a project
Audacity write all the changed and recorded audio to directory called projefcftname data, which is located right
where you saved the project file itself
Thus , select Save project as from your Audacity File tab and choose a location and filename for your project
Please note that when you startup Audacity fresh, only the “Save As…”menu option is available.
Audacity software overview

©Copyright LOTRONIC 2014 LP300 7
2.How to record
Set your USB turntable up to play the song or album you want to record
Click on the red Play button to start the recording.
Lower tone arm on USB Turntable onto album and track you want to record.
Click on the blue Pause button to pause the recording. Press it again to continue.
Click on the yellow Stop button.
That’s it. You can now play around with your recording and explore the editing capabilities of Audacity.
Remember that you can use the Undo function almost without limits while the project is open.
Note: CD’S cannot be burned directly from the Audacity application. Other CD burning applications should be used.
FAQ:
Software:
F: can not listen to record while recording
A: please activate "software playthrough" in audacity like shown in IM.
check the record source (USB Audio Codec) like shown in IM
check volume settings of your computer
F: can not store songs as MP3
A: please download LAME MP3-Codec from the internet
F: can not record
A: first the player has to be connected with the computer, then AUDACITY may be started.
F: can only record MONO
A: mostly this occurs with VISTA. please select in Windows config recording source as "stereo" not "mono" or
"microphone"
Player:
F: sound is crackling
A: please make sure that this player is connected to a high-level-input of your amplifier. High-level inputs are:
CD, AUX, TAPE. The input PHONE is not suitable. The player has a built-in pre-amplifier.
clean the stylus and the vinyl
check for correct counterweight setting
check for correct anti-skating-level
F: direct recoding is not possible
A: USB-Stick/Card is write-protected
check correct file system (FAT16)
F: direct recoded songs are recorded oversteered
A: check for correct recording level, see point 20 of IM
If at any time in the future you should need to dispose of this product please
Note that: Waste electrical products should not be disposed of with household waste.
Please recycle where facilities exist. Check with your Local Authority or retailer for
recycling advice. (Waste Electrical and Electronic Equipment Directive)

©Copyright LOTRONIC 2014 LP300 8
PLATINE-DISQUES A ENTRAINEMENT PAR COURROIE
Lire les instructions
Lire les instructions.
Conserver ces instructions.
Respectez tous les avertissements.
Respectez toutes les consignes.
Ne pas utiliser cet appareil à proximité de l’eau.
Nettoyer uniquement avec un chiffon humide.
Ne pas bloquer les fentes de ventilation. Installer conformément aux instructions du fabricant.
Ne pas installer à proximité de sources de chaleur telles que radiateurs, poêles, fours et autres appareils (y compris
des amplificateurs) qui génèrent de la chaleur.
Ne pas modifier la fiche polarisée. La lame large est prévue pour votre sécurité. Si la fiche fournie ne rentre pas dans
votre prise, consultez un électricien pour remplacer votre prise obsolète.
Ne pas marcher sur ni écraser le cordon secteur, notamment à proximité d’une prise, d’une multiprise ou du point de
sortie de l’appareil.
Utilisez uniquement des fixations/accessoires spécifiés par le fabricant.
Utiliser uniquement avec un chariot, un trépied, étrier ou table spécifiés par le fabricant ou vendus avec
l’appareil. Si vous utilisez un chariot, soyez particulièrement prudent lors des déplacements afin d’éviter
des accidents suite à un chute.
Débrancher l’appareil pendant un orage ou en cas de non-utilisation prolongée.
Confiez toutes les réparations à un technicien qualifié. Il est nécessaire de réparer l’appareil lorsque le cordon ou la
fiche ont été endommagés, du liquide a été déversé ou des objets sont tombés dans l’appareil, si l’appareil a été
exposé à la pluie ou à l’humidité, ne fonctionne pas normalement ou est tombé.
La fiche secteur permet de déconnecter complètement l’appareil.
Consignes de Sécurité
F

©Copyright LOTRONIC 2014 LP300 9
1– Touches de Démarrage/Arrêt et soulèvement du bras de lecture
Appuyez sur la touche pour démarrer ou arrêter la platine.
2– Platine
La platine est équipée d’une feutrine qui facilité la manipulation du disque pour le scratch.
3– Touche de sélection de vitesse 33 rpm
4– Touche de sélection de vitesse 45 rpm
Appuyez sur la touche “45” pour sélectionner la vitesse de 45 tours
5– Tête de lecture
Installez la tête de lecture. Reportez-vous aux instructions du fabricant de la tête de lecture. Pendant l’installation,
fixez le capot de protection pour protéger la pointe contre des dommages.
Fixez les fils de la manière suivante:
Blanc (L+) Canal gauche +
Bleu (L -) Canal gauche –
Rouge (R+) Canal droit +
Vert (R-) Canal droit –
6– Vis de fixation de la tête de lecture
Fixez la tête de lecture en l’insérant dans la partie avant du bras de lecture et tournez l’écrou de fixation vers la
droite.
7– Bras de lecture
Le bras de lecture est entièrement manuel Pour commencer la lecture, placez doucement le diamant sur le disque
ou bien utilisez le levier du bras de lecture (voir 9).
8– Support du bras de lecture avec verrou
Cet écrou en aluminium sert à fixer la tête de lecture sur le bras de lecture.
9– Levier du bras de lecture
Contrôle le mouvement vertical du bras de lecture.
10– Contrepoids
Il règle la bonne pression de la cellule sur le disque. Le contrepoids est installé d’usine sur le bras de lecture. S’il a
besoin d’un ajustement, tournez-le légèrement jusqu’à ce que le bras soit parfaitement équilibré.
11– Sortie G & D
Il s’agit de la sortie analogique standard (RCA) qui se branche sur une entrée phono ou ligne d’une table de mixage
DJ, en fonction du réglage du sélecteur phono/ligne.
12– Fiche USB
Le cordon USB ne doit pas dépasser une longueur de 3m.
Description

©Copyright LOTRONIC 2014 LP300 10
13– AUX TO PC
Entrée audio pour un lecteur MP3, iPod etc. vers un PC
14– Masse
Contact de mise à la masse pour la platine. Utilisez toujours ce contact lorsque vous travaillez avec des
platines-disques (votre table de mixage doit comporter un fil de masse).
15– Cordon d’alimentation
Branchement sur le secteur APRES avoir effectué tous les branchements audio.
16– Capot
Le capot permet de protéger la platine contre la poussière. Gardez le capot fermé lorsque la platine n’est pas utilisée.
Pendant son utilisation, vous pouvez l’enlever complètement.
17– Vis de réglage
La platine a été parfaitement calibrée en usine. Ces vis de réglage permettent d’ajuster la vitesse si besoin est.
ATTENTION : Une mauvaise installation du plateau entraîne des pertes de performance, de l’instabilité et risque
d’endommager définitivement le moteur.
1. La courroie en caoutchouc a été pré-installée sur le plateau. Toutefois, retournez la platine et vérifiez que la courroie
est bien attachée et non tordue. Si la courroie s’est détachée pendant le transport, placez-la atour du cercle intérieur du
plateau comme indiqué dans l’image no. 1 ci-dessus.
2. Placez le plateau sur l’axe central et appuyez fermement dessus. Tournez-le jusqu’à ce que l’axe du moteur soit visible
à travers un des deux trous sur le plateau.
3. Passez vos doigts dans le trou et passez doucement la courroie par-dessus l’axe du moteur. Veillez à ne pas vriller la
courroie pendant cette manipulation. Faites tourner le plateau pour vérifier qu’il tourne uniformément. Si la courroie est
bien en place, vous devez sentir une légère résistance qui freine le plateau après avoir tourné librement.
Moteur: Moteur DC
Entraînement: Courroie
Temps de démarrage & de freinage: Moins de 1sec
Réglage de vitesse: 33 1/3, 45 tpm
Interface d’ordinateur : Compatible USB 1.1, Windows XP SP3, VISTA, Windows 7 ou MACOS X
Alimentation: AC 115/230V, 60/50Hz, sélection faite par l’utilisateur
Dimensions: 418 x 355 x 110 mm
Consommation: 6 Watts
Poids: 2,9 Kg
Caractéristiques techniques

©Copyright LOTRONIC 2014 LP300 11
Audacity est un logiciel libre sous licence GNU General Public License (GPL).
Note: Installez le logiciel avant de commencer !
Configuration de votre PC pour Audacity
1. Branchez une source d’entrée sur l’appareil.
2. Connectez le cordon USB sur votre ordinateur
3. Installez le logiciel d’enregistrement Audacity
4. Ouvrez le programme Audacity
5. Selectionnez Preference dans l’onglet Edit dans le menu d’Audacity
Enregistrement d’un album avec Audacity
1. Sauvegarder un projet
Audacity écrit tous les enregistrements dans un répertoire appelé projefcftname data, qui se trouve là où vous
avez enregistré le fichier de projet.
Ainsi, sélectionnez Save project as dans l’onglet ‘File’ et choisissez un emplacement et un nom de fichier pour
votre projet.
Lorsque vous démarrez Audacity pour la première fois, seule l’option “Save As…” (Enregistrer sous…) est disponible.
Logiciel Audacity
Logiciel Audacity

©Copyright LOTRONIC 2014 LP300 12
2. Enregistrement
Réglez votre platine USB pour passer la chanson ou l’album que vous voulez enregistrer.
Cliquez sur le bouton rouge d’enregistrement pour commencer l’enregistrement.
Abaissez le bras de lecture de la platine USB sur l’album et le titre que vous voulez enregistrer
Cliquez sur la touche bleue Pause pour suspendre l’enregistrement. Appuyez à nouveau pour le
reprendre.
Cliquez sur la touche jaune d’arrêt.
C’est tout. Vous pouvez maintenant vous amuser avec votre enregistrement et explorer les capacités d’édition
du logiciel Audacity.
Rappelez-vous que vous pouvez utiliser la fonction Undo (annuler) presque sans limites tant que le projet est
ouvert.
Note: Il n’est pas possible de graver directement un CD à partir de l’application Audacity. Vous devez utiliser d’autres
applications de gravure de CD.

©Copyright LOTRONIC 2014 LP300 13
FAQ:
Logiciel:
F: Je ne peux pas écouter le disque pendant l’enregistrement
A: Activez "software playthrough" dans Audacity comme indiqué ci-dessus.
Vérifiez la source (USB Audio Codec) comme indiqué ci-dessus
Vérifiez les réglages de volume de votre ordinateur
F: Je ne peux pas enregistrer des chansons au format MP3
A: Téléchargez LAME MP3-Codec d’internet
F: Je n’arrive pas à enregistrer
A: Il faut d’abord brancher le lecteur sur l’ordinateur et ensuite démarrer Audacity.
F: Je ne peux enregistrer qu’en MONO
A: Ceci se produit surtout avec VISTA. Sélectionnez dans Windows la configuration de la source
d’enregistrement comme "stéréo" et non pas "mono" ou "microphone"
Lecteur:
F: Le son comporte des craquements
A: Vérifiez que le lecteur est branché sur une entrée haut niveau de votre amplificateur. Des entrées haut
niveau sont : CD, AUX, TAPE. L’entrée PHONE ne convient pas. Le lecteur possède un préamplificateur
intégré.
Nettoyez la cellule et le disque
Vérifiez le réglage du contrepoids
Vérifiez le niveau anti-dérapage
F: L’enregistrement direct n’est pas possible
A: La clé USB/la carte est protégée contre l’écriture
Vérifiez qu’il s’agit du bon système de fichier (FAT16)
F: Les titres enregistrés directement présentent des défauts
A: Vérifiez le bon niveau d’enregistrement
NOTE IMPORTANTE : Les produits électriques ne doivent pas être mis au rebut avec les ordures
ménagères. Veuillez les faire recycler là où il existe des centres pour cela. Consultez les
autorités locales ou votre revendeur sur la façon de les recycler.

©Copyright LOTRONIC 2014 LP300 14
Anleitung lesen
Anleitung aufbewahren.
Warnungen beachten.
Anweisungen befolgen.
Das Gerät nicht in Wassernähe benutzen.
Nur mit einem feuchten Tuch reinigen.
Nicht die Belüftungsschlitze blockieren. Gemäß den Anweisungen des Herstellers installieren.
Nicht in der Nähe von Wärmequellen wie Heizkörpern, Öfen oder anderen Hitze erzeugenden Geräten (wie
Verstärker) aufstellen.
Nicht die Sicherheitsfunktion des polarisierten Steckers umgehen. Die breite Klinge ist zu Ihrer Sicherheit. Wenn der
mitgelieferte Stecker nicht in Ihre Steckdose passt, wenden Sie sich an einen Elektriker, der Ihnen eine moderne
Steckdose einbauen kann.
Das Netzkabel nicht quetschen oder betreten. Besondere Vorsicht ist am Stecker, an der Steckdose und am
Geräteaustritt geboten.
Nur vom Hersteller empfohlene Befestigungen/Zubehörteile benutzen.
Nur mit einem Wagen, Stand, Dreifuss, Halter oder Tisch benutzen, die vom Herstelle empfohlen oder
mit dem Gerät zusammen verkauft wurden. Wenn ein Wagen benutzt wird, darauf achten, dass das
Gerät nicht kippen kann.
Das Gerät bei Unwetter oder längerer Nichtbenutzung vom Netz trennen.
Reparaturarbeiten nur vom Fachmann vornehmen lassen. Reparaturen sind notwendig, wenn das Gerät in
irgendeiner Weise beschädigt wurde, das Netzkabel oder der Stecker Schäden aufweisen, Flüssigkeiten oder
Gegenstände ins Gerät gedrungen sind, des Gerät Regen oder Feuchtigkeit ausgesetzt war, nicht normal
funktioniert oder gefallen ist.
Der Netzstecker muss jederzeit leicht zugänglich sein, um das Gerät im Problemfall sofort vom Netz trennen zu
können.
Sicherheitsanweisungen
D

©Copyright LOTRONIC 2014 LP300 15
1– Start/Stopp Tasten Tonarmhebel
Startet und stoppt den Plattenteller.
2– Plattenteller
Der Plattenteller besitzt eine Rutschmatte, die das Scratchen erleichtert.
3– 33 rpm Geschwindigkeitswahlschalter
Zur Einstellung der gewünschten Geschwindigkeit.
Die “33” Taste drücken, um 33 Umdrehungen zu wählen.
4– 45 rpm Geschwindigkeitswahlschalter
Die “45” Taste drücken, um 45 Umdrehungen zu wählen.
5– Tonabnehmer
Den Tonkopf hier montieren. Bei der Montage die Anleitung des Herstellers beachten. Während der Montage die
Nadel schützen.
Wie folgt verkabeln:
Weiß (L+) Linker Kanal +
Blau (L -) Linker Kanal –
Rot (R+) Rechter Kanal +
Grün (R-) Rechter Kanal –
6– Tonabnehmerfeststellring
Den Tonabnehmer befestigen, indem Sie ihn auf das vordere Ende des Tonarms schieben und dann den
Feststellring nach rechts drehen.
7– Tonarm
Vollständig manueller Tonarm. Zum Abspielen vorsichtig den Tonarm auf die Platte legen ODER den Hebel
benutzen (s. 9).
8– Tonarmstütze mit Verriegelung
Blockiert den Tonarm, so dass er nicht wegrutschen kann.
9– Tonarmhebel
Steuert die Auf- und Abwärtsbewegung des Tonarms.
10– Gegengewicht
Erzeugt den richtigen Druck des Tonkopfes auf der Platte. Schieben Sie das Gegengewicht auf das hintere Ende
des Tonarms. Leicht drehen, um es auf den Tonarm zu schrauben. Den Tonarm mit dem Gegengewicht genau in die
Wasserwaage bringen. Normalerweise ist der Tonarm bereits ab Werk richtig kalibriert.
11– L & R Ausgang
Es handelt sich hierbei um einen analogen Standardausgang (Cinch), der entweder an den Phono oder Line
Eingang eines DJ Mischpults angeschlossen wird, je nachdem wie der Phono/Line Wahlschalter eingestellt ist.
12– USB Buchse
Die Länge des USB Kabels ist auf 3m begrenzt.
13– AUX TO PC
Audio Eingang für den Anschluss eines MP3 Spielers, iPods, usw. zu einem PC
14– Masse
Massekontakt zum Anschluss eines Plattenspielers. Alle Plattenspieler mit Masseleiter müsse hier geerdet werden.
15– Netzkabel
Das mitgelieferte Netzkabel an eine Wandsteckdose anschließen NACHDEM alle Audioanschlüsse vorgenommen
Beschreibung

©Copyright LOTRONIC 2014 LP300 16
worden sind.
16– Schutzhaube
Bei Nichtgebrauch immer die Haube schließen, um Staub zu vermeiden. Die Haube kann während des Betriebs
auch ganz abgenommen werden. .
17– Stellschrauben
Das Gerät wird ab Werk genau kalibriert. Falls eine neue Einstellung nötig ist, können Sie die Geschwindigkeit mit
diesen Stellschrauben einstellen.
Achtung: Unsachgemäßer Einbau des Plattentellers kann zu schlechter Leistung des Plattenspielers, Unstabilität und
Motorschaden führen.
1. Der Antriebsriemen ist bereits im Plattenteller installiert. Bitte drehen Sie den Plattenteller um, um sich zu vergewissern,
dass er sich beim Transport nicht gelöst hat und nicht verdreht ist. Fall sich der Riemen während des Transports gelöst
hat, legen Sie ihn um den inneren Kreis auf dem Boden des Plattentellers; wie in Abb. 1 oben angegeben ist.
2. Setzen Sie den Plattenteller auf die mittlere Achse und drücken Sie ihn fest herunter. Drehen Sie den Plattenteller, bis
die Messingmotorachse durch eines der beiden Löcher sichtbar ist.
3. Stecken Sie die Finger durch das Loch, um den Riemen zu fassen und ihn vorsichtig um die Motorachse zu führen.
Achten Sie darauf, den Riemen nicht zu drehen. Prüfen Sie, ob sich der Plattenteller gleichmäßig dreht. Wenn der
Riemen richtig eingesetzt ist, müsste ein leichter Widerstand spürbar sein, der den Plattenteller zu stehen bringt.
Motor: Gleichstrommotor
Antriebsart: Riemen
Start- & Bremszeit: Weniger als 1 Sek.
Geschwindigkeitseinstellung: 33 1/3, 45 U/Min
Computer Schnittstelle; USB 1.1, Windows XP SP3, VISTA, Windows 7 und/oder MACOS X
Versorgungsspannung: AC 115/230V, 60/50Hz, Von Benutzer einstellbar
Einzelspannung: AC 230V, 50Hz
Abmessungen: 418 x 355 x 110 mm
Verbrauch: 6 W
Gewicht: 2,9 Kg
Technische Daten

©Copyright LOTRONIC 2014 LP300 17
Audacity ist eine freie Software, die unter die Lizenz GNU General Public License (GPL) fällt.
Hinweis: Erst die Software installieren, bevor Sie anfangen!
Einstellung des PC für Audacity
1. Eine Eingangsquelle ans Gerät anschließen
2. Das USB Kabel an Ihren Computer anschließen
3. Die Audacity Recording Software installieren
4. Das Audacity Programm öffnen
5. Wählen Sie Preference im Edit Tab im Audacity Menü
Aufnahme von Alben mit Audacity
1. Speichern eines Projekts
Audacity schreibt alle geänderten und aufgezeichneten Audiodateien in ein Verzeichnis mit dem Namen
projefcftname data, das sich dort befindet, wo Sie die Projektdatei selbst gespeichert haben.
Also wählen Sie Save project as in dem File Tab und einen Platz und einen Namen für Ihr Projekt.
Wenn Sie Audacity neu starten, ist nur die Option “Save As…” aktiviert.
Audacity Software
Audacity Software Überblick

©Copyright LOTRONIC 2014 LP300 18
2. Aufnahme
Den USB Plattenspieler auf den Titel oder das Album einstellen, das Sie aufnehmen möchten.
Auf den roten Aufnahmeknopf klicken, um die Aufnahme zu starten.
Den Tonarm auf die Platte legen.
Auf die blaue Pause Taste klicken, um die Aufnahme zu unterbrechen. Erneut klicken, um weiter
aufzunehmen.
Auf die gelbe Stopp Taste klicken.
Das war’s schon. Sie können nun mit Ihren Aufnahmen herumexperimentieren und alle Möglichkeiten der
Software ausschöpfen.
Solange das Projekt offen ist, können Sie praktisch unbegrenzt die Löschfunktion benutzen.
Hinweis: CD’S können nicht direkt von der Audacity Applikation gebrannt werden. Dazu benötigen Sie eine CD
Brennapplikation.
FAQ:
Software:
F: Während der Aufnahme kann ich den Titel nicht hören.
A: "software playthrough" in der Audacity Software aktivieren
Die Audioquelle prüfen (USB Audio Codec)
Lautstärkeeinstellung des Computers prüfen
F: Die Titel können nicht im MP3 Format gespeichert werden
A: LAME MP3-Codec vom Internet downloaden
F: Keine Aufnahme

©Copyright LOTRONIC 2014 LP300 19
A: Der Spieler muss erst an den Computer angeschlossen und dann muss die AUDACITY Software gestartet
werden.
F: Nur MONO Aufnahme
A: Dies passiert meistens bei VISTA. Bitte wählen Sie in Windows Config recording source "stereo" nicht
"mono" oder "microphone"
Spieler:
F: Der Ton knackt
A: Prüfen Sie, ob der Spieler an einen Hochpegeleingang des Verstärkers angeschlossen ist.
Hochpegeleingänge sind: CD, AUX, TAPE. Der PHONE Eingang ist ungeeignet, denn der Spieler besitzt
schon einen Vorverstärker.
Tonkopf und Schallplatte reinigen
Einstellung des Gegengewichts prüfen
Anti-Skating Einstellung prüfen
F: Direktaufnahme ist nicht möglich
A: USB-Stick/Karte ist gegen Speicherung geschützt
Dateisystem prüfen (FAT16)
F: Direkt aufgenommene Titel sind übersteuert
A: Prüfen Sie den Aufnahmepegel
WICHTIGER HINWEIS: Elektrogeräte gehören nicht in den Hausmüll. Sie müssen in speziellen
Betrieben recycelt werden. Bringen Sie sie zu einer speziellen Entsorgungsstelle für Elektrokleingeräte
(Wertstoffhof)!

©Copyright LOTRONIC 2014 LP300 20
Alleen met een droge doek reinigen.
Niet de ventilatie openingen verstoppen. Installeer het toestel naar de instructies van de fabrikant.
Niet in de buurt van warmtebronnen zoals verwarmingen en andere hitte genererende toestellen zoals versterker
opstellen.
Aandachtig de handleiding lezen en bewaren
Alle veiligheidsinstructies en waarschuwingen moeten worden nageleefd. Ze maken deel uit van de handleiding en
moet worden bewaard met de handleiding
Wees zeker dat u het toestel op de juiste spanning aansluit en dat de lichtnetspanning niet hoger dan de spanning
op de onderzijde van het toestel is.
Dit toestel is alleen voor binnen gebruik!
Om vuur en schok te vermijden stel het toestel niet aan regen en vochtigheid bloot.
Altijd het toestel uit de stopcontact trekken alvorens het toestel wordt gerepareerd of gereinigd. Indien u de zekering
vervangt, gebruik alleen een identieke zekering.
Maximale ruimte temperatuur (Ta) is 104°F (40°C). Het toestel niet bij hogere temperaturen gebruiken.
In geval van een ernst storing, schakel het toestel direct uit. Repareer het toestel nooit zelfs. Alle reparaties moeten
van een ervarene technicus uitgevoerd worden. Gebruik altijd onderdelen van hetzelfde typ.
Nooit de stroomkabel klemmen of beschadigen.
Trek de stekker alleen uit het stopcontact via het ervoor bepaalde oppervlak. Niet aan het kabel trekken.
Ontkoppeling van het net
Indien het toestel via het stopcontact wordt uitgeschakeld, moet de contactdoos altijd makkelijk bereikbaar zijn
Verklaring van de tekens
De bliksem in de driehoek vestigt de aandacht van de gebruiker op een elektrische schokrisico.
De driehoek met het uitroepteken vestigt de aandacht van de gebruiker op belangrijke gebruik- of
onderhoudsinstructies..
De hand-symbool verwijst naar nuttige tips en aanvullende informatie over het gebruik van het apparaat.
OPGELET - GEVAAR VAN
ELEKTRISCHE SCHOK – NIET OPENEN
NL
This manual suits for next models
1
Table of contents
Languages:
Other Ibiza sound Turntable manuals