Ibiza sound FREE-VINYL User manual

B
Be
el
lt
t-
-D
Dr
ri
iv
ve
e
T
Tu
ur
rn
nt
ta
ab
bl
le
e
w
wi
it
th
h
D
Di
ir
re
ec
ct
t
R
RE
EC
CO
OR
RD
D
P
Pl
la
at
ti
in
ne
e-
-d
di
is
sq
qu
ue
e
à
à
e
en
nt
tr
ra
aî
în
ne
em
me
en
nt
t
p
pa
ar
r
c
co
ou
ur
rr
ro
oi
ie
e
a
av
ve
ec
c
e
en
nr
re
eg
gi
is
st
tr
re
em
me
en
nt
t
d
di
ir
re
ec
ct
t
P
Pl
la
at
tt
te
en
ns
sp
pi
ie
el
le
er
r
m
mi
it
t
R
Ri
ie
em
me
en
na
an
nt
tr
ri
ie
eb
b
u
un
nd
d
D
Di
ir
re
ek
kt
ta
au
uf
fn
na
ah
hm
me
e
P
Pr
ra
at
to
o
B
Be
el
lt
t-
-D
Dr
ri
iv
ve
e
C
Co
om
m
G
Gr
ra
av
va
aç
çã
ão
o
D
Di
ir
re
ec
ct
ta
a
Ref.: FREE-VINYL (15-2330)
USER’S MANUAL
MANUEL DE L’UTILISATEUR
BEDIENUNGSANLEITUNG
MANUAL DE INSTRUÇÕES

Read these Instructions
zRead these Instructions.
zKeep these Instructions.
zHeed all Warnings.
zFollow all Instructions.
zDo not use this apparatus near water.
zClean only with a damp cloth.
zDo not block any of the ventilation openings. Install in accordance with the manufacture’s instructions.
zDo not install near nay heat sources such as radiators, heat registers, stoves, or other apparatus (including
amplifiers) that produce heat.
zDo not defeat the safety purpose of the polarized plug. The wide blade is provided for your safety. If the
provided plug does no fit into your outlet, consult an electrician for replacement of the obsolete outlet.
zProtect the power cord from being walked on or pinched particularly at plug, convenience receptacles, and
point where they exit from the apparatus.
zOnly use attachments/accessories specified by the manufacturer.
zUse only with a cart, stand, tripod, bracket, or table specified by the manufacturer, or sold with the
apparatus. When art is used, use caution when moving the cart/apparatus combination to avoid
injury from tip-over
zUnplug this apparatus during lighting storms or when unused for long periods of time.
zRefer all servicing to qualified service personnel. Serving is required when the apparatus has been damaged in
any way, such as power-supply cord or plug is damaged, liquid has been spilled or objects have fallen into the
apparatus, the apparatus has been exposed to rain or moisture, does not operate normally, or has been
dropped.
zThis mains plug is used as the disconnect device, the disconnect device shall be readily operable.
Safety instruction

Description

1– Start/stop buttons Tonearm lift
Press this button to start or stop the platter.
2– Platter
The platter is equipped with a slip mat. This makes it easier to manipulate the record for scratch performances.
3– USB&SD SOCKET
Plug USB stick and SD card into, the LED will indicate while worked.
4– Target light
Insert target light to the deck and it will light up.
5– 33 rpm Speed select buttons
Press the “33” button to select the 33rpm speed.
6– 45,78 rpm Speed select buttons
Press the “45” button to select the 45rpm speed.
Press the “33” and “45” at the same time to select the 78rpm speed.
7– Reverse button
This button is used to reverse rotate the platter.
8– Headshell
Install cartridge here. When installing a cartridge, refer to the installation instructions supplied by the
manufacture of that cartridge. During installation, attach the stylus protector to guard the stylus tip from
damage. Attach wires as follows:
White (L+) Left channel +
Blue (L -) Left channel –
Red (R+) Right channel+
Green (R-) Right channel –
9– Headshell locking nut
Attach the head shell by inserting it into the front end of the tone arm and then turn the locking nut clockwise.
10– Tone arm
This is a fully manual tone arm. To start playback, gently place the stylus on the record using head shell finger
support OR use the tone arm lifter(see 12).
11– 45rpm adaptor
Place on center spindle for playing 7” records with large center holes.
12– Tonearm lift
Controls the up and down action of the tone arm.
13– Anti-skate knob
This applies inward force to the tone arm so it does’ skip outward across the record due to the centrifugal force
of the record spinning. Cartridge manufacturers usually specify the proper setting of this.
Description

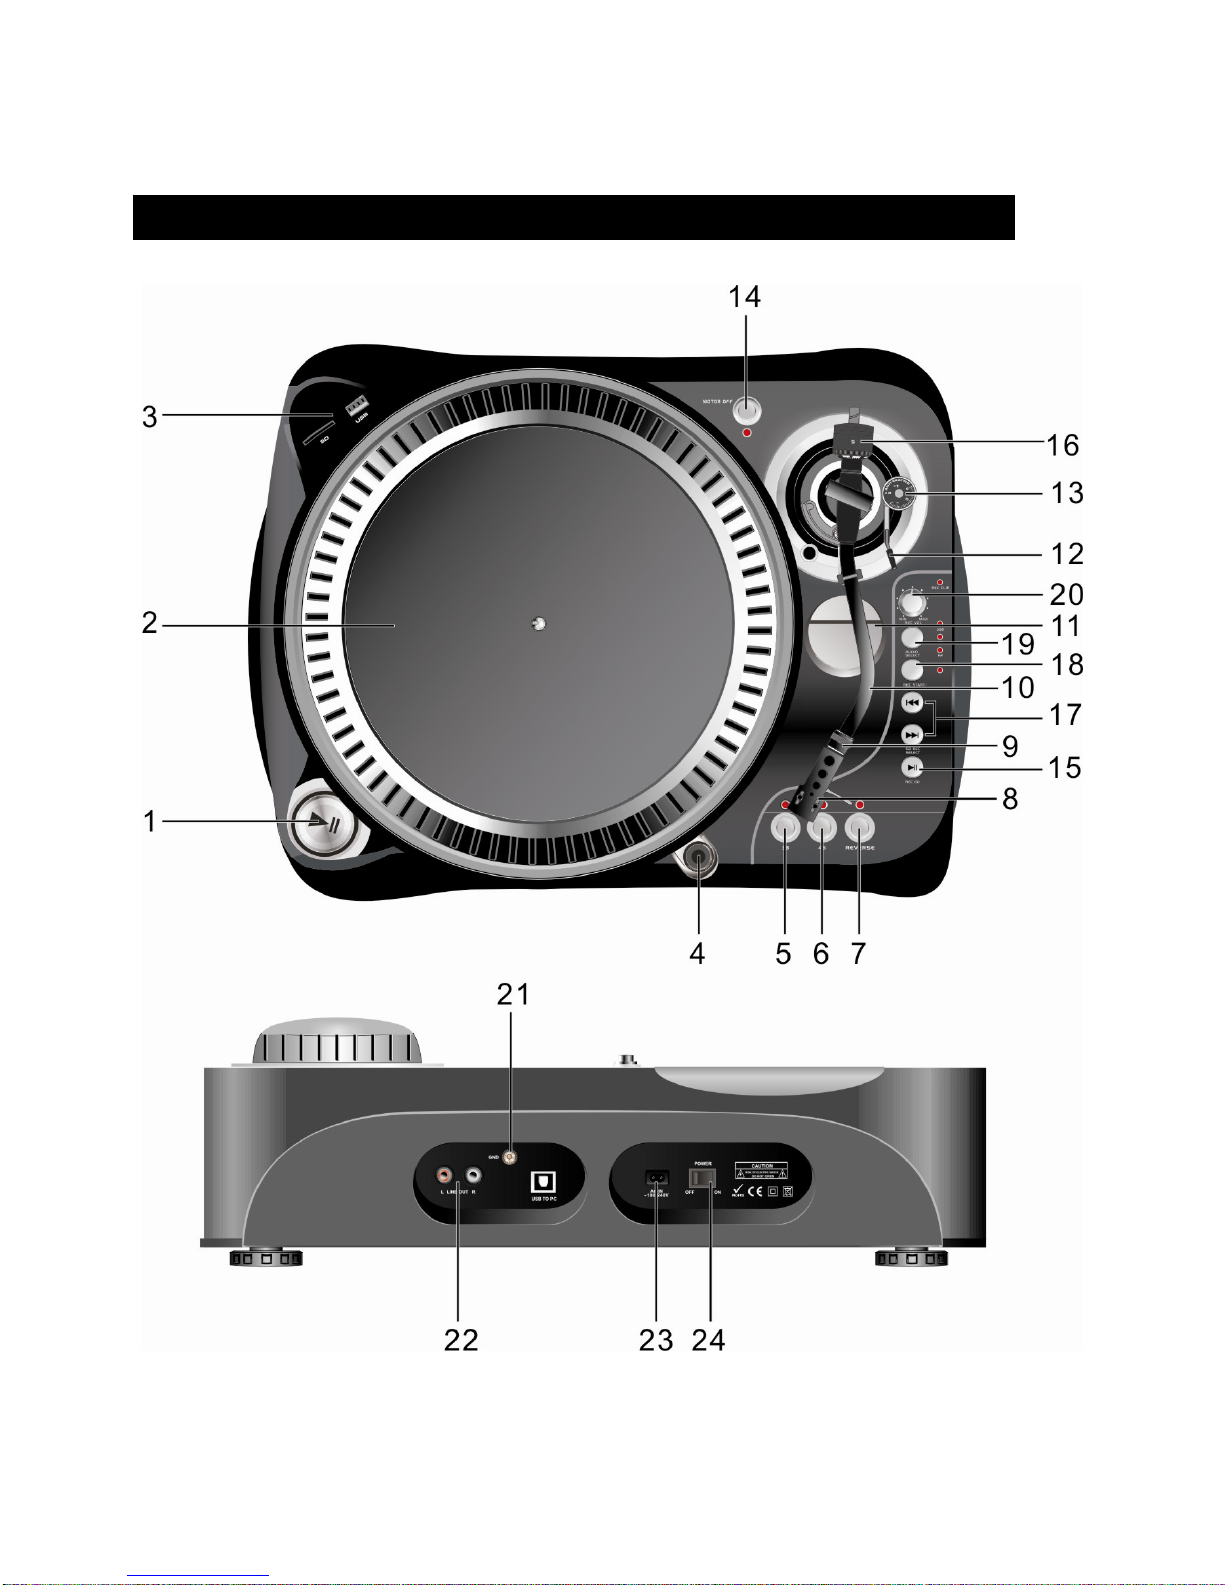
14– Motor off button
Press the button to enable motor off, and the led will be flash. Press the button again to disable function.
15– Play & pause the song of the USB & SD and start recording
Each press of this button toggles PLAY/PAUSE during playback from USB or SD. In addition, this button starts and
pauses recording of the vinyl to SD/USB when record is armed before (see 18)
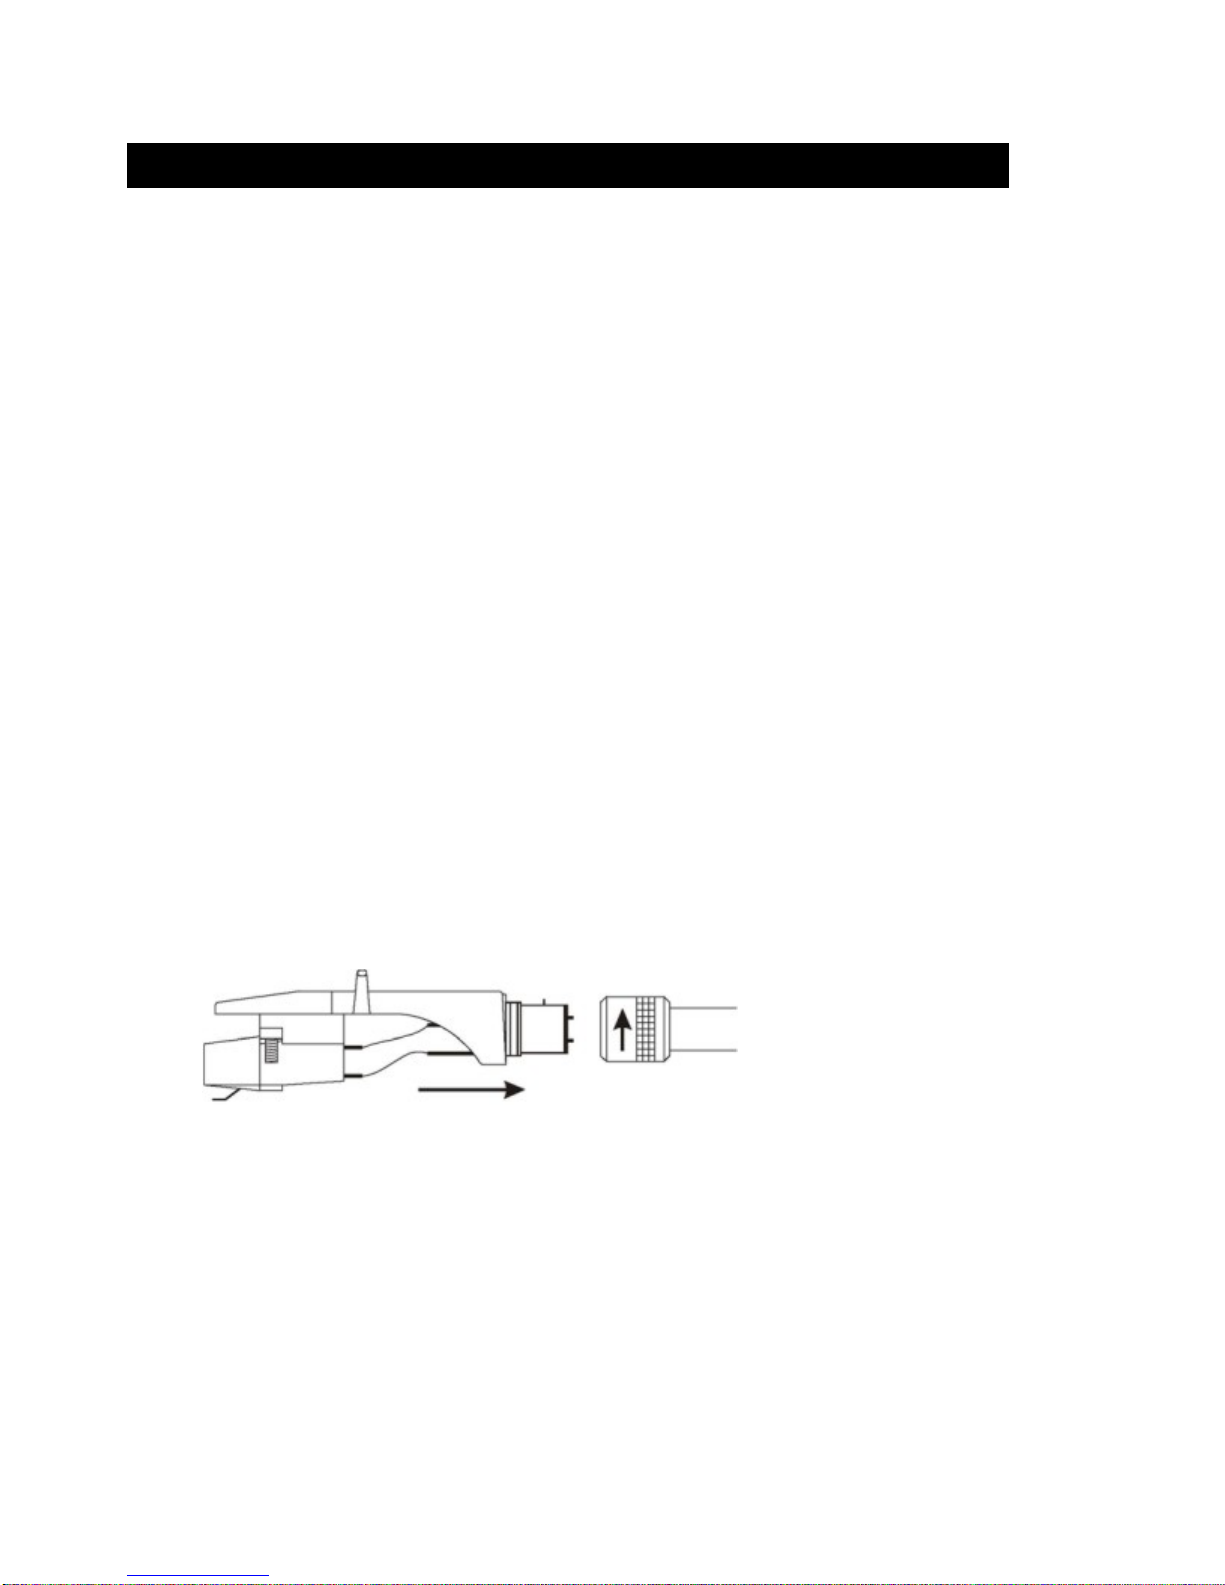
16– Counterweight
Adjustment creates the proper downward pressure of the stylus to the record. Attach now by sliding the
counterweight onto the rear of the tone arm. Twist it lightly and it will screw onto the rear shaft of the tone arm.
counterweight adjustment: bring tone arm in 0-level with counterweight. When leveled set scale on
counterweight to 0 (watch the stripe). Now turn we counterweight until it shows the specified downward
pressure in gram. The right downward pressure is given in stylus specifications.
17– Skip button (+/-)
Press it to select the any one track of the USB stick and SD card.
18– Start & pause recording action
This button(de) activates record function. In order to record a vinyl the LED besides this button has to be lit
19– Audio select
This button selects the source to listen to. In order to record/listen to a vinyl the LED “PH” must be lit.
20– Record volume
Used to adjust the level of volume which be recording.
21– Ground
22– Output L & R
This is the standard analog output (RCAjacks) which can be connected either to phone or line input on any DJ
mixer, depending on the setting of the phone/line selector.
23– Power cord connector
Used to connect to the mains, using the supplied power cord.
24– Power ON/OFF switch
Used to turn the turntable on and off.
Motor: DC motor
Driving Method: Belt Drive
Starting & braking time: Less than 1sec
Speed adjustment: 33 1/3, 45, 78 rpm
Wow & Flutter: +/-10%
Tone arm type: Static balanced S-shaped tone arm
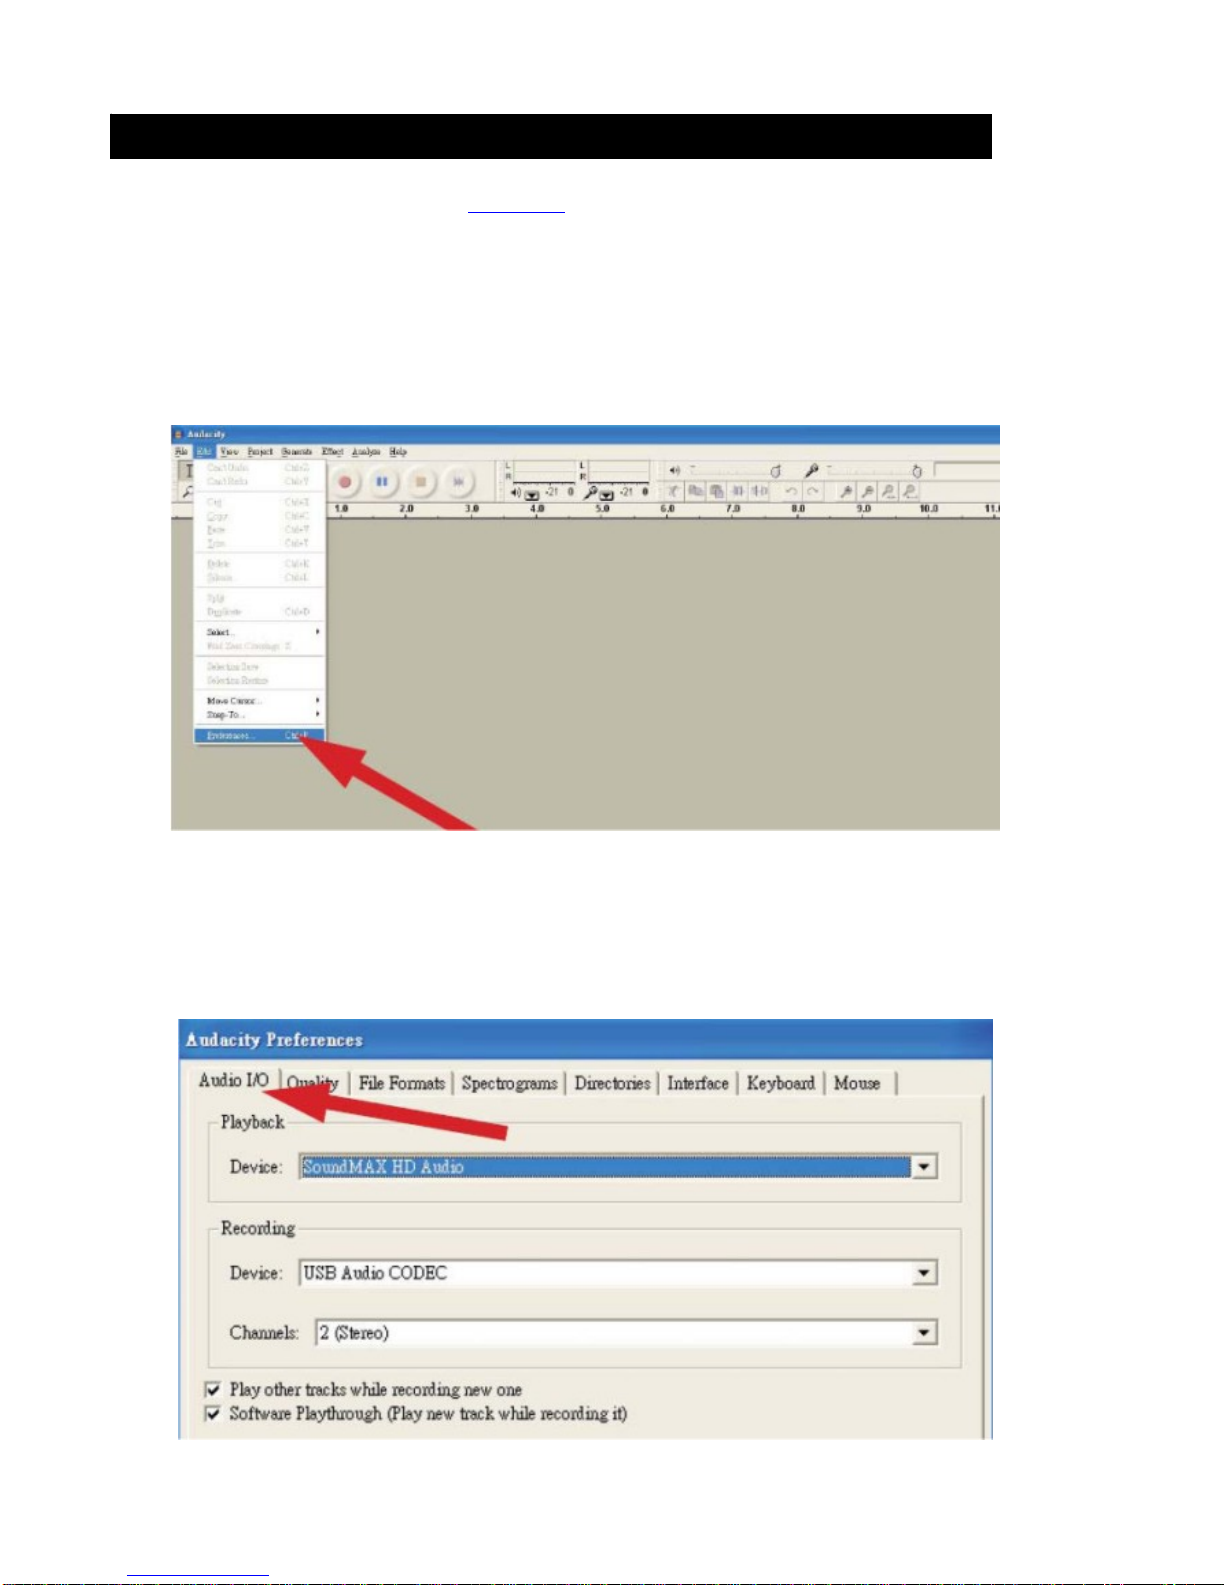
Computer interface; USB 1.1 compliant, Windows XP or MACOS X
Power supply: AC 115/230V, 60/50Hz, User Selectable
Single Voltage: AC 100V, 50/60Hz (Japan)
AC 120V, 60Hz (U.S.A and Canada)
AC 127V, 60Hz (Mexico)
AC 220V, 50Hz (Chile and Argentina)
AC 240V, 60Hz (Australia)
` AC 220V, 60Hz (Philippines and Korea)
AC 230V, 50Hz (Europe, U.K., New Zealand, South Africa, and Singapore)
Dimensions: 449 x 370 x 145 mm
Power Consumption: 5.5 Watts
Weight: 4 Kgs
Description
Specifications

Audacity is free software, licensed under the GNU General Public License (GPL). More information as well as open
source code can be found on the wed at http://www.
Note: Please ensure you have installed the software before starting.
Setting up your PC to work with Audacity
1.Connect an input source to the unit
2.Connect the USB lead to your computer
3.Install the Audacity recording software
4.Open the Audacity program
5.Select Preference from the Edit tab in the Audacity menu
6.Select Audio I/O tab at the top left
zUnder Playback, Device, select you internal sound card
zUnder Recording, Device, select USB AUDIO CODEC
zUnder Recording, Channels, select 2 (stereo)
zCheck the box marked Play other tracks while recording new one
zCheck the box marked software Play through
Audacity software overview

Recording Albums with Audacity
1. Saving a project
zAudacity write all the changed and recorded audio to directory called projefcftnam
e
data, which is located
right where you saved the project file itself
zThus , select Save project as from your Audacity File tab and choose a location and filename for your project
zPlease note that when you startup Audacity fresh, only the “Save As…”menu option is available.
2.How to record
zSet your USB turntable up to play the song or album you want to record
zClick on the red Play button to start the recording.
zLower tone arm on USB Turntable onto album and track you want to record.
zClick on the blue Pause button to pause the recording. Press it again to continue.
zClick on the yellow Stop button.
That’s it. You can now play around with your recording and explore the editing capabilities of Audacity.
Remember that you can use the Undo function almost without limits while the project is open.
Note: CD’S cannot be burned directly from the Audacity application. Other CD burning applications should be used.
Audacity software overview

FAQ:
Software:
F: can not listen to record while recording
A: please activate "software playthrough" in audacity like shown in IM.
check the record source (USB Audio Codec) like shown in IM
check volume settings of your computer
F: can not store songs as MP3
A: please download LAME MP3-Codec from the internet
F: can not record
A: first the player has to be connected with the computer, then AUDACITY may be started.
F: can only record MONO
A: mostly this occurs with VISTA. please select in Windows config recording source as "stereo" not
"mono" or "microphone"
Player:
F: sound is crackling
A: please make sure that this player is connected to a high-level-input of your amplifier. High-level inputs
are: CD, AUX, TAPE. The input PHONE is not suitable. The player has a built-in pre-amplifier.
clean the stylus and the vinyl
check for correct counterweight setting
check for correct anti-skating-level
F: direct recoding is not possible
A: USB-Stick/Card is write-protected
check correct file system (FAT16)
F: direct recoded songs are recorded oversteered
A: check for correct recording level, see point 20 of IM
If at any time in the future you should need to dispose of this product please
Note that: Waste electrical products should not be disposed of with household waste.
Please recycle where facilities exist. Check with your Local Authority or retailer for
recycling advice. (Waste Electrical and Electronic Equipment Directive)

Lire les instructions
zLire les instructions.
zConserver ces instructions.
zRespectez tous les avertissements.
zRespectez toutes les consignes.
zNe pas utiliser cet appareil à proximité de l’eau.
zNettoyer uniquement avec un chiffon humide.
zNe pas bloquer les fentes de ventilation. Installer conformément aux instructions du fabricant.
zNe pas installer à proximité de sources de chaleur telles que radiateurs, poêles, fours et autres appareils (y
compris des amplificateurs) qui génèrent de la chaleur.
zNe pas modifier la fiche polarisée. La lame large est prévue pour votre sécurité. Si la fiche fournie ne rentre pas
dans votre prise, consultez un électricien pour remplacer votre prise obsolète.
zNe pas marcher sur ni écraser le cordon secteur, notamment à proximité d’une prise, d’une multiprise ou du
point de sortie de l’appareil.
zUtilisez uniquement des fixations/accessoires spécifiés par le fabricant.
zUtiliser uniquement avec un chariot, un trépied, étrier ou table spécifiés par le fabricant ou vendus
avec l’appareil. Si vous utilisez un chariot, soyez particulièrement prudent lors des déplacements
afin d’éviter des accidents suite à un chute.
zDébrancher l’appareil pendant un orage ou en cas de non-utilisation prolongée.
zConfiez toutes les réparations à un technicien qualifié. Il est nécessaire de réparer l’appareil lorsque le cordon
ou la fiche ont été endommagés, du liquide a été déversé ou des objets sont tombés dans l’appareil, si
l’appareil a été exposé à la pluie ou à l’humidité, ne fonctionne pas normalement ou est tombé.
zLa fiche secteur permet de déconnecter complètement l’appareil.
Consignes de Sécurité

Description

1– Touches de Démarrage/Arrêt et soulèvement du bras de lecture
Appuyez sur la touche pour démarrer ou arrêter la platine.
2– Platine
La platine est équipée d’une feutrine qui facilité la manipulation du disque pour le scratch.
3– FICHE USB&SD
Branchez une clé USB ou une carte SD dans la fiche. Une LED indique le fonctionnement.
4– Eclairage plateau
Montez l’éclairage pour illuminer le plateau.
5– Touche de sélection de vitesse 33 rpm
6– Touches de sélection de vitesse 45,78 rpm
Appuyez sur la touche “45” pour sélectionner la vitesse de 45 tours
Appuyez simultanément sur les touches “33” et “45” pour sélectionner la vitesse de 78 tours.
7– Touche Reverse
Inversion du sens de rotation du plateau.
8– Tête de lecture
Installez la tête de lecture. Reportez-vous aux instructions du fabricant de la tête de lecture. Pendant
l’installation, fixez le capot de protection pour protéger la pointe contre des dommages.
Fixez les fils de la manière suivante:
Blanc (L+) Canal gauche +
Bleu (L -) Canal gauche –
Rouge (R+) Canal droit +
Vert (R-) Canal droit –
9– Vis de fixation de la tête de lecture
Fixez la tête de lecture en l’insérant dans la partie avant du bras de lecture et tournez l’écrou de fixation vers la
droite.
10– Bras de lecture
Le bras de lecture est entièrement manuel Pour commencer la lecture, placez doucement le diamant sur le
disque ou bien utilisez le levier du bras de lecture (voir 12).
11– Adaptateur 45rpm
Placez l’adaptateur sur l’axe central pour passer des 45 tours pourvu d’un grand trou central.
12– Levier du bras de lecture
Contrôle le mouvement vertical du bras de lecture.
13– Bouton anti-dérapage
Cette touche applique une force centrale au bras de lecture afin d‘éviter qu’il ne glisse vers l’extérieur en raison
de la force centrifuge du disque en rotation. Les fabricants de têtes de lecture spécifient généralement le bon
réglage.
Description

14– Touche d’arrêt du moteur
Appuyez sur la touche pour éteindre le moteur. La LED clignote. Appuyez à nouveau pour désactiver la
fonction.
15– Lecture & pause du titre de la clé USB & SD et débuter l’enregistrement
A chaque pression sur cette touche, le lecteur bascule entre lecture et pause de la clé USB ou de la carte SD.
En plus, cette touche démarre et suspend l’enregistrement du disque vers le support SD/USB lorsque le disque
a été activé auparavant (voir 18).
16– Contrepoids
Il règle la bonne pression de la cellule sur le disque. Faites glisser le contrepoids par l’arrière sur le bras de
lecture. Tournez-le légèrement et il se vissera sur le bras de lecture. Réglage du contrepoids : Mettez le bras
de lecture au niveau 0 à l’aide du contrepoids. Lorsqu’il est à niveau, réglez l’échelle du contrepoids sur 0
(regardez la marque). Tournez maintenant le contrepoids jusqu’à ce qu’il indique la bonne pression en
grammes. La bonne pression est indiquée dans les caractéristiques techniques de la cellule.
17– Saut de titre (+/-)
Appuyez pour sélectionner un titre sur la clé USB ou sur la carte SD.
18– Start & pause d’enregistrement
Cette touche (dés)active la fonction d’enregistrement. Pour enregistrer un disque vinyle, la LED à côté de la
touche doit être allumée.
19– Sélection Audio
Cette touche sélectionne la source à écouter. Pour écouter ou enregistrer un disque vinyle, la LED « PH » doit
être allumée.
20– Volume d’enregistrement
Règle le niveau de volume auquel vous allez enregistrer le son.
21– Masse
22– Sortie G & D
Il s’agit de la sortie analogique standard (RCA) qui se branche sur une entrée phono ou ligne d’une table de
mixage DJ, en fonction du réglage du sélecteur phono/ligne.
23– Prise d’alimentation
Branchement sur le secteur du cordon fourni.
24– Interrupteur M/A
Marche/Arrêt de la platine-disques.
Moteur: Moteur DC
Entraînement: Courroie
Temps de démarrage & de freinage:Moins de 1sec
Réglage de vitesse: 33 1/3, 45, 78 tpm
Wow & Flutter: +/-10%
Bas de lecteur: Statique, équilibré, en forme de ‘S’
Interface d’ordinateur : Compatible USB 1.1, Windows XP ou MACOS X
Alimentation: AC 115/230V, 60/50Hz, sélection faite par l’utilisateur
Dimensions: 449 x 370 x 145 mm
Consommation: 5.5 Watts
Poids: 4 Kg
Description
Caractéristiques techniques

Audacity est un logiciel libre sous licence GNU General Public License (GPL). Vous trouverez d’autres informations
ainsi que le code open source sur le site http://www.
Note: Installez le logiciel avant de commencer !
Configuration de votre PC pour Audacity
1. Branchez une source d’entrée sur l’appareil.
2. Connectez le cordon USB sur votre ordinateur
3. Installez le logiciel d’enregistrement Audacity
4. Ouvrez le programme Audacity
5. Selectionnez Preference dans l’onglet Edit dans le menu d’Audacity
6.Sélectionnez l’onglet Audio I/O en haut à gauche
zSous Playback, Device, sélectionnez votre carte son intégrée
zSous Recording, Device, sélectionnez USB AUDIO CODEC
zSous Recording, Channels, sélectionnez 2 (stéréo)
zCochez la case marquée Play other tracks while recording new one
zCochez la case marquée software Play through
Logiciel Audacity

Enregistrement d’un album avec Audacity
3. Sauvegarder un projet
zAudacity écrit tous les enregistrements dans un répertoire appelé projefcftnam
e
data, qui se trouve là où
vous avez enregistré le fichier de projet.
zAinsi, sélectionnez Save project as dans l’onglet ‘File’ et choisissez un emplacement et un nom de fichier
pour votre projet.
zLorsque vous démarrez Audacity pour la première fois, seule l’option “Save As…” (Enregistrer sous…) est
disponible.
4. Enregistrement
zRéglez votre platine USB pour passer la chanson ou l’album que vous voulez enregistrer.
zCliquez sur le bouton rouge d’enregistrement pour commencer l’enregistrement.
zAbaissez le bras de lecture de la platine USB sur l’album et le titre que vous voulez enregistrer
zCliquez sur la touche bleue Pause pour suspendre l’enregistrement. Appuyez à nouveau pour le
reprendre.
zCliquez sur la touche jaune d’arrêt.
C’est tout. Vous pouvez maintenant vous amuser avec votre enregistrement et explorer les capacités
d’édition du logiciel Audacity.
Rappelez-vous que vous pouvez utiliser la fonction Undo (annuler) presque sans limites tant que le projet
Logiciel Audacity

est ouvert.
Note: Il n’est pas possible de graver directement un CD à partir de l’application Audacity. Vous devez utiliser
d’autres applications de gravure de CD.
FAQ:
Logiciel:
F: Je ne peux pas écouter le disque pendant l’enregistrement
A: Activez "software playthrough" dans Audacity comme indiqué ci-dessus.
Vérifiez la source (USB Audio Codec) comme indiqué ci-dessus
Vérifiez les réglages de volume de votre ordinateur
F: Je ne peux pas enregistrer des chansons au format MP3
A: Téléchargez LAME MP3-Codec d’internet
F: Je n’arrive pas à enregistrer
A: Il faut d’abord brancher le lecteur sur l’ordinateur et ensuite démarrer Audacity.
F: Je ne peux enregistrer qu’en MONO
A: Ceci se produit surtout avec VISTA. Sélectionnez dans Windows la configuration de la source
d’enregistrement comme "stéréo" et non pas "mono" ou "microphone"
Lecteur:
F: Le son comporte des craquements
A: Vérifiez que le lecteur est branché sur une entrée haut niveau de votre amplificateur. Des entrées haut
niveau sont : CD, AUX, TAPE. L’entrée PHONE ne convient pas. Le lecteur possède un préamplificateur
intégré.
Nettoyez la cellule et le disque
Vérifiez le réglage du contrepoids
Vérifiez le niveau anti-dérapage
F: L’enregistrement direct n’est pas possible
A: La clé USB/la carte est protégée contre l’écriture
Vérifiez qu’il s’agit du bon système de fichier (FAT16)
F: Les titres enregistrés directement présentent des défauts
A: Vérifiez le bon niveau d’enregistrement
NOTE IMPORTANTE : Les produits électriques ne doivent pas être mis au rebut avec les ordures
ménagères. Veuillez les faire recycler là où il existe des centres pour cela. Consultez les
autorités locales ou votre revendeur sur la façon de les recycler.

Anleitung lesen
zAnleitung aufbewahren.
zWarnungen beachten.
zAnweisungen befolgen.
zDas Gerät nicht in Wassernähe benutzen.
zNur mit einem feuchten Tuch reinigen.
zNicht die Belüftungsschlitze blockieren. Gemäß denAnweisungen des Herstellers installieren.
zNicht in der Nähe von Wärmequellen wie Heizkörpern, Öfen oder anderen Hitze erzeugenden Geräten (wie
Verstärker) aufstellen.
zNicht die Sicherheitsfunktion des polarisierten Steckers umgehen. Die breite Klinge ist zu Ihrer Sicherheit.
Wenn der mitgelieferte Stecker nicht in Ihre Steckdose passt, wenden Sie sich an einen Elektriker, der Ihnen
eine moderne Steckdose einbauen kann.
zDas Netzkabel nicht quetschen oder betreten. Besondere Vorsicht ist am Stecker, an der Steckdose und am
Geräteaustritt geboten.
zNur vom Hersteller empfohlene Befestigungen/Zubehörteile benutzen.
zNur mit einem Wagen, Stand, Dreifuss, Halter oder Tisch benutzen, die vom Herstelle empfohlen
oder mit dem Gerät zusammen verkauft wurden. Wenn ein Wagen benutzt wird, darauf achten,
dass das Gerät nicht kippen kann.
zDas Gerät bei Unwetter oder längerer Nichtbenutzung vom Netz trennen.
zReparaturarbeiten nur vom Fachmann vornehmen lassen. Reparaturen sind notwendig, wenn das Gerät in
irgendeiner Weise beschädigt wurde, das Netzkabel oder der Stecker Schäden aufweisen, Flüssigkeiten oder
Gegenstände ins Gerät gedrungen sind, des Gerät Regen oder Feuchtigkeit ausgesetzt war, nicht normal
funktioniert oder gefallen ist.
zDer Netzstecker muss jederzeit leicht zugänglich sein, um das Gerät im Problemfall sofort vom Netz trennen zu
können.
Sicherheitsanweisungen

Beschreibung

1– Start/Stopp Tasten Tonarmhebel
Startet und stoppt den Plattenteller.
2– Plattenteller
Der Plattenteller besitzt eine Rutschmatte, die das Scratchen erleichtert.
3– USB&SD BUCHSE
Zum Anschluss eines USB Sticks oder einer SD Karte. Die LED leuchtet bei Betrieb.
4– Target Licht
Zur Beleuchtung des Plattentellers.
5– 33 rpm Geschwindigkeitswahlschalter
Zur Einstellung der gewünschten Geschwindigkeit.
Die “33” Taste drücken, um 33 Umdrehungen zu wählen.
6– 45,78 rpm Geschwindigkeitswahlschalter
Die “45” Taste drücken, um 45 Umdrehungen zu wählen.
Gleichzeitig auf “33” und “45” drücken, um 78 Umdrehungen zu wählen.
7– Reverse Taste
Der Plattenteller dreht sich in die andere Richtung.
8– Tonabnehmer
Den Tonkopf hier montieren. Bei der Montage die Anleitung des Herstellers beachten. Während der Montage
die Nadel schützen.
Wie folgt verkabeln:
Weiß (L+) Linker Kanal +
Blau (L -) Linker Kanal –
Rot (R+) Rechter Kanal +
Grün (R-) Rechter Kanal –
9– Tonabnehmerfeststellring
Den Tonabnehmer befestigen, indem Sie ihn auf das vordere Ende des Tonarms schieben und dann den
Feststellring nach rechts drehen.
10– Tonarm
Vollständig manueller Tonarm. Zum Abspielen vorsichtig den Tonarm auf die Platte legen ODER den Hebel
benutzen (s. 12).
11– 45rpm Adapter
Auf die Mittelachse stecken, um 45er Platten mit großem Mittelloch abzuspielen.
12– Tonarm Hebel
Steuert die Auf- und Abwärtsbewegung des Tonarms.
13– Anti-skate Knopf
Dies übt eine Innenkraft auf den Tonarm aus, so dass er nicht durch die Zentrifugalkraft der Plattendrehung
nach außen wegrutscht. Die Hersteller von Tonabnehmern geben in der Regel die richtige Einstellung an.
Beschreibung

14– Motor Aus Taste
Schaltet den Motor aus und die LED blinkt. Erneut drücken, um diese Funktion zu desaktivieren.
15– Titel von einem USB Stick & SD Karte abspielen, pausieren und aufnehmen
Bei jedem Tastendruck wechselt der Spieler zwischen Abspielen und Pause von einem USB Stick oder SD Karte.
Außerdem startet und pausiert diese Taste die Aufnahme einer Vinylschallplatte auf ein SD/USB Gerät, wenn
die Aufnahme vorher aktiviert wurde (s. 18)
16– Gegengewicht
Erzeugt den richtigen Druck des Tonkopfes auf der Platte. Schieben Sie das Gegengewicht auf das hintere
Ende des Tonarms. Leicht drehen, um es auf den Tonarm zu schrauben. Einstellung des Gegengewichts:
Den Tonarm mit dem Gegengewicht genau in die Wasserwaage bringen. Wenn das Gleichgewicht erreicht ist,
die Skala auf dem Gegengewicht auf 0 stellen (s. den Streifen). Nun das Gegengewicht drehen, bis der
angegebene Druck in Gramm erreicht ist. Der richtige Druck ist bei den technischen Daten des Tonabnehmers
angegeben.
17– Titelsprungtasten (+/-)
Zur Wahl eines Titels auf dem USB Stick oder der SD Karte.
18– Start & Pause & Aufnahme
Diese Taste (des)aktiviert dieAufnahmefunktion. Wenn eine Vinylschallplatte aufgenommen werden soll, muss
die LED neben der Taste leuchten.
19– Audio Wahl
Mit dieser Taste wird die Audioquelle gewählt. Um eine Vinylschallplatte zu hören oder aufzunehmen, muss die
“PH” LED leuchten.
20– Lautstärke der Aufnahme
Einstellung der Aufnahmelautstärke.
21– Masse
22– L & R Ausgang
Es handelt sich hierbei um einen analogen Standardausgang (Cinch), der entweder an den Phono oder Line
Eingang eines DJ Mischpults angeschlossen wird, je nachdem wie der Phono/Line Wahlschalter eingestellt ist.
23– Netzanschlussbuchse
Zum Anschluss des mitgelieferten Netzkabels.
24– Ein/Aus Schalter
Motor: Gleichstrommotor
Antriebsart: Riemen
Start- & Bremszeit: Weniger als 1 Sek.
Geschwindigkeitseinstellung: 33
1/3, 45, 78 U/Min
Wow & Flutter: +/-10%
Tonarmtyp: Statisch ausgewogener S-förmiger Tonarm
Computer Schnittstelle; USB 1.1, Windows XP oder MACOS X
Versorgungsspannung: AC 115/230V, 60/50Hz, Von Benutzer einstellbar
Einzelspannung: AC 230V, 50Hz
Abmessungen: 449 x 370 x 145 mm
Verbrauch: 5.5 W
Gewicht: 4 Kg
Beschreibung
Technische Daten

Audacity ist eine freie Software, die unter die Lizenz GNU General Public License (GPL) fällt.
Hinweis: Erst die Software installieren, bevor Sie anfangen!
Einstellung des PC für Audacity
1. Eine Eingangsquelle ans Gerät anschließen
2. Das USB Kabel an Ihren Computer anschließen
3. Die Audacity Recording Software installieren
4. Das Audacity Programm öffnen
5. Wählen Sie Preference im Edit Tab im Audacity Menü
6.Audio I/O Tab oben links wählen
zUnter Playback, Device, Ihre eingebaute Soundkarte wählen
zUnter Recording, Device, USB AUDIO CODEC wählen
zUnter Recording, Channels, 2 (stereo) wählen
zDas Kästchen Play other tracks while recording new one ankreuzen
zDas Kästchen software Play through ankreuzen
Audacity Software
Table of contents
Languages:
Other Ibiza sound Turntable manuals