auna Billy Bob Series User manual

www.auna-multimedia.com
Billy Bob
Plattenspieler mit BT
Turntable with BT
Tocadiscos con BT
Platine vinyle BT
Giradischi con BT
10032836 10032837


3
DE
English 9
Español 15
Français 21
Italiano 27
Sehr geehrter Kunde,
wir gratulieren Ihnen zum Erwerb Ihres Gerätes. Lesen Sie die folgenden
Hinweise sorgfältig durch und befolgen Sie diese, um möglichen Schäden
vorzubeugen. Für Schäden, die durch Missachtung der Hinweise und
unsachgemäßen Gebrauch entstehen, übernehmen wir keine Haftung.
Scannen Sie den folgenden QR-Code, um Zugri auf die aktuellste
Bedienungsanleitung und weitere Informationen rund um das Produkt zu
erhalten:
INHALTSVERZEICHNIS
Sicherheitshinweise 4
Geräteübersicht 4
Inbetriebnahme und Bedienung 6
Reinigung und Pege 8
Hinweise zur Entsorgung 8
TECHNISCHE DATEN
Artikelnummer 10032836, 10032837
Stromversorgung 220-240 V ~ 50/60 Hz
KONFORMITÄTSERKLÄRUNG
Hersteller:
Chal-Tec GmbH, Wallstraße 16, 10179 Berlin,
Deutschland.
Dieses Produkt entspricht den folgenden
Europäischen Richtlinien:
2011/65/EU (RoHS)
2014/53/EU (RED)
Die vollständige Konformitätserklärung des
Herstellers nden Sie unter folgendem Link:
https://use.berlin/10032836
10032836
10032837

4
DE
SICHERHEITSHINWEISE
1. Wählen Sie einen sicheren Standort aus und stellen Sie das Gerät nicht
in direktes Sonnenlicht oder neben eine Wärmequelle.
2. Vermeiden Sie Umgebungen, an denen das Gerät Vibrationen,
übermäßigem Staub, Kälte oder Feuchtigkeit ausgesetzt ist.
3. Um Stromschläge zu vermeiden, darf das Gehäuse nicht geönet
werden. Sollte ein Fremdkörper versehentlich in das Innere des Gerätes
gelangen, wenden Sie sich bitte an einen Fachhändler.
4. Reinigen Sie das Gerät nicht mit chemischen Lösemitteln, da diese
die Oberäche beschädigen könnte. Benutzen Sie zur Reinigung ein
sauberes, trockenes Tuch.
5. Bewahren Sie dieses Handbuch zur späteren Verwendung auf.
GERÄTEÜBERSICHT

5
DE
1Tonarm-Verriegelung 8Kopfhöreranschluss
2AUTO STOP ein/aus Schalter 9Nadel-Kartusche
3Drehzahlsteuerungs-
Wahlschalter
10 Spindel
4Pitch-Regler 11 L/R Cinch-Ausgänge
5Funktionsknopf 12 AUX-Eingang
6Kontrollleuchte 13 Stromanschluss
7Ein-/Aus-Schalter und
Lautstärkeregler
14 Lautsprecher

6
DE
INBETRIEBNAHME UND BEDIENUNG
Stecken Sie das Netzkabel fest in den Anschluss am Plattenspieler und
stecken Sie dann den Stecker in die Steckdose.
Eine Platte abspielen
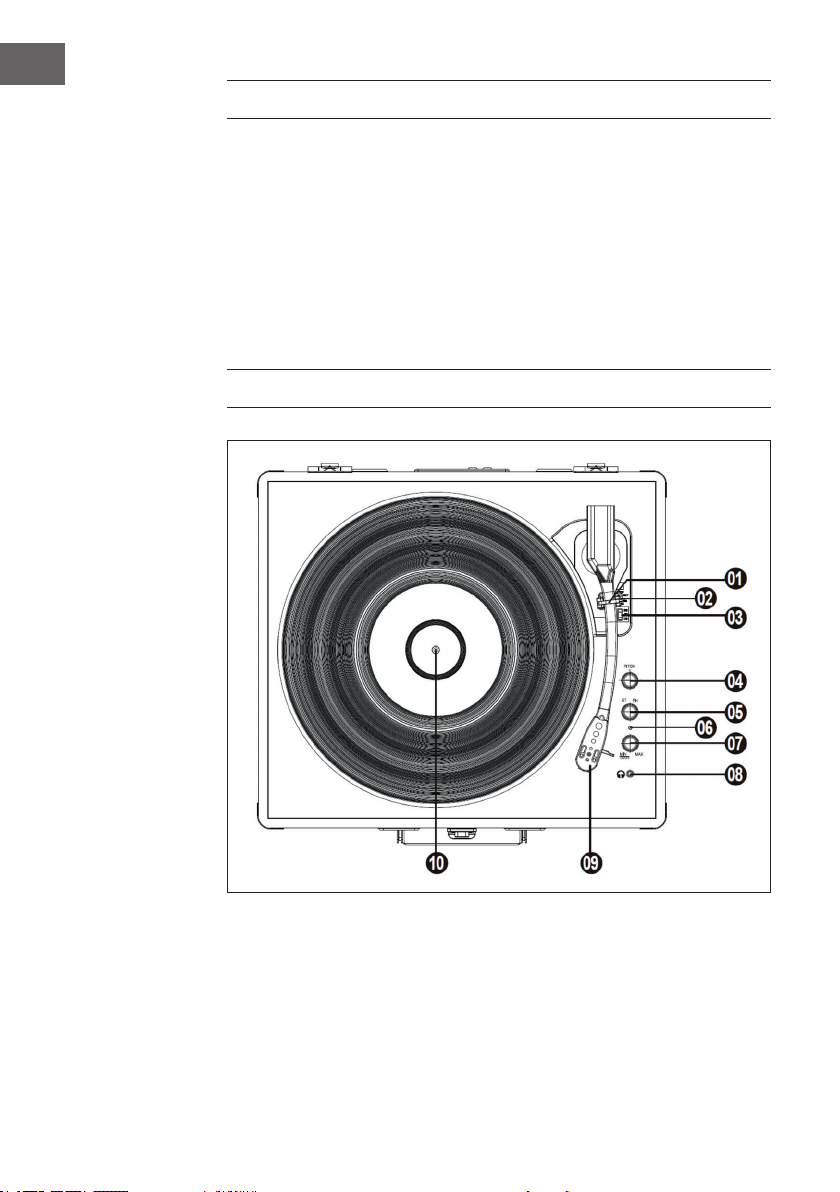
1. Stellen Sie den Funktionsknopf auf PH. Schalten Sie den Netzschalter
ein. Die Kontrollleuchte wird rot.
Hinweis: Vergewissern Sie sich, dass sich kein Audiokabel am AUX-
Eingang bendet. Wenn ein Audiokabel angeschlossen ist, ist der
Standardmodus AUX IN.
2. Legen Sie eine Platte auf den Plattenteller und wählen Sie die
gewünschte Geschwindigkeit (33/45/78) entsprechend der Platte.
Hinweis: Wenn Sie eine 45 RPM-Aufnahme abspielen, verwenden Sie
den mitgelieferten 45 RPM-Adapter.
3. Entfernen Sie den Nadelschutz. Önen Sie die Tonarm-Verriegelung,
um den Tonarm zu lösen. Drücken Sie den Hubhebel nach hinten, um
den Tonarm anzuheben und bewegen Sie den Tonarm vorsichtig in die
gewünschte Position über der Platte. Der Plattenspieler beginnt sich zu
drehen, wenn der Arm auf die Platte zu bewegt wird. Drücken Sie den
Hubhebel nach vorne, um den Tonarm langsam auf die gewünschte
Position auf der Platte abzusenken und mit der Wiedergabe der Platte
zu beginnen.
Hinweis: Der Teller beginnt sich bei Tonarmbewegung nur dann
automatisch zu drehen, wenn der AUTO STOP eingeschaltet ist.
4. Wenn der Schalter für AUTO STOP eingeschaltet ist, wird die Platte
automatisch gestoppt, wenn sie beendet ist. Wenn der Schalter für
AUTO STOP ausgeschaltet ist, wird die Aufnahme am Ende nicht
automatisch gestoppt.
Hinweis: Die AUTO STOP-Funktion funktioniert mit den meisten 33 RPM-
Platten. Bei sehr wenigen Schallplatten dreht sich die Platte am Ende
weiter, obwohl AUTO STOP eingeschaltet ist.

7
DE
5. Drehen Sie den Lautstärkeregler, um die Lautstärke einzustellen.
6. Benutzen Sie den Pitch-Regler, um die Geschwindigkeit stufenlos
einzustellen.
BT-Modus
1. Stellen Sie den Funktionsknopf auf BT. Die Kontrollleuchte wird blau
und blinkt.
2. Schalten Sie Ihre BT-Funktion auf Ihrem Handy oder Tablet ein und
suchen Sie dann den Plattenspieler mit dem Namen „Billy Bob“. Nach
der erfolgreichen Verbindungsherstellung leuchtet die Kontrollleuchte
durchgängig blau, ohne zu blinken. Sie können nun Musik von Ihrem
Handy oder Tablet auf diesem Plattenspieler abspielen.
3. Drehen Sie am Lautstärkeregler, um die Lautstärke einzustellen.
4. Die Lautstärke des Mobiltelefons oder des Tablets wirkt sich auch auf
die Gesamtlautstärke aus, bitte stellen Sie diese ebenfalls ein.
Hinweis: Vergewissern Sie sich, dass sich kein Audiokabel am AUX-
Eingang bendet. Wenn ein Audiokabel angeschlossen ist, ist der
Standardmodus AUX IN.
AUX IN-Modus
1. Schließen Sie im BT- oder Platten-Modus Ihren iPod, MP3-Player, oder
Mobiltelefone mit einem 3,5 mm-Audiokabel (nicht im Lieferumfang
enthalten) an den AUX-Eingang an.
2. Sie können dann die Musik von iPod, MP3-Player oder Handys über die
Lautsprecher des Plattenspielers genießen.
3. Drehen am Lautstärkeregler, um die Lautstärke einzustellen.
4. Die Lautstärke von iPod, MP3-Player und Mobiltelefonen wirkt sich
ebenfalls auf die Gesamtlautstärke aus, bitte stellen Sie diese ebenfalls
ein.

8
DE
REINIGUNG UND PFLEGE
1. Önen und schließen sie den Deckels vorsichtig.
2. Berühren Sie die Nadelspitze nicht mit den Fingern und vermeiden Sie
es, die Nadel gegen den Plattenteller oder die Plattenkante zu stoßen.
3. Reinigen Sie die Nadelspitze häug. Verwenden Sie dafür eine weiche
Bürste.
4. Wenn Sie eine Nadelreinigungsüssigkeit verwenden müssen,
verwenden Sie diese sehr sparsam.
5. Wischen Sie das Gehäuse des Plattenspielers vorsichtig mit
einem weichen Tuch ab. Verwenden Sie nur eine kleine Menge
Geschirrspülmittel, um den Plattenspieler zu reinigen.
6. Verwenden Sie zur Reinigung niemals scharfe Reiniger oder Lösemittel.
HINWEISE ZUR ENTSORGUNG
Bendet sich die linke Abbildung (durchgestrichene
Mülltonne auf Rädern) auf dem Produkt, gilt die
Europäische Richtlinie 2012/19/EU. Diese Produkte
dürfen nicht mit dem normalen Hausmüll entsorgt
werden. Informieren Sie sich über die örtlichen
Regelungen zur getrennten Sammlung elektrischer
und elektronischer Gerätschaften. Richten Sie sich
nach den örtlichen Regelungen und entsorgen
Sie Altgeräte nicht über den Hausmüll. Durch die
regelkonforme Entsorgung der Altgeräte werden
Umwelt und die Gesundheit ihrer Mitmenschen
vor möglichen negativen Konsequenzen geschützt.
Materialrecycling hilft, den Verbrauch von Rohstoen
zu verringern.

9
EN
English
Español
Français
Italiano
Dear Customer,
Congratulations on purchasing this equipment. Please read this manual carefully and
take care of the following hints to avoid damages. Any failure caused by ignoring the
items and cautions mentioned in the instruction manual is not covered by our warranty
and any liability. Scan the QR code to get access to the latest user mannual and other
information about the product
CONTENT
Safety Instructions 10
Product Overview 10
Start and Operation 12
Cleaning and Care 14
Hints on Disposal 14
TECHNICAL DATA
Item number 10032836, 10032837
Power supply 220-240 V ~ 50/60 Hz
DECLARATION OF CONFORMITY
Producer:
Chal-Tec GmbH, Wallstraße 16, 10179 Berlin, Germany.
This product is conform to the following European
Directives:
2011/65/EU (RoHS)
2014/53/EU (RED)
The complete declaration of conformity of the
manufacturer can be found at the following link:
https://use.berlin/10032836
10032836
10032837

10
EN
SAFETY INSTRUCTIONS
1. Choose a safe location and avoid placing the unit in direct sunlight or
near any heat source.
2. Avoid environments subject to vibration, excessive dust, cold or
moisture.
3. Due to the risk of electrical shock, do not open the cabinet. Should
a foreign object accidentally nd its way into the interior of the unit,
contact your local dealer.
4. Do not attempt to clean the unit with chemical solvents as this might
damage the nishing. A clean, dry cloth is recommended for cleaning.
5. Keep this manual for future reference.
PRODUCT OVERVIEW

11
EN
1Tone-arm lock 8Headphone jack
2AUTO STOP on/o Switch 9Stylus (Needle) Cartridge
3Speed Control Selection
Switch
10 Spindle
4Pitch Control Knob 11 L/R RCA Output Jack
5Function Knob 12 AUX IN Port
6Indicator 13 DC IN Power Jack
7Power Switch and Volume
Control Knob
14 Speakers

12
EN
START AND OPERATION
Firmly and securely insert the DC plug of the adaptor to the DC IN Jack on
the back of the unit. Plug the adaptor’s AC plugs into a power outlet.
Phono Mode
1. Switch the function knob to PH mode. Turn on the power switch. The
indicator will become red color.
Note: During the phono mode, please make sure that the AUX IN jack
was not plugged in with the audio cable. If there is an audio cable
plugged in, the default mode is AUX IN.
2. Place a record on the turntable platter and select the desired speed
(33/45/78) according to the record.
Note: when playing a 45RPM record, use the included 45RPM adaptor.
3. Remove the stylus protector. Open the tone-arm clip to release the
tone-arm. Push the lift lever backward to raise the tone-arm and
gently move the tone-arm to the desired position over the record. The
turntable will begin to spin when the arm is moved toward the record.
Push the lift lever forward to lower the tone-arm slowly onto the desired
position on the record to begin playing the record.
Note: The record will begin to spin only when the tone-arm is moved
toward the record if the Auto Stop is turned on.
4. If the Auto Stop Control Switch is turned ON, the record will stop
automatically when nished. If Auto Stop Control Switch is turned OFF,
the record will NOT stop automatically when nished.
Note: AUTO STOP function applies to most 33RPM vinyl records.
However, for very few vinyl records, it will stop when it does not come to
the end, or it will not stop when it comes to the end when AUTO STOP
is ON.

13
EN
5. Turn the VOLUME CONTROL KNOB to adjust the volume.
6. Adjust the pitch control knob to adjust the speed gradually
BT Mode
1. Switch the function knob to BT. The indicator will become blue color
with ashing.
2. Turn on your BT function on your mobile phone or tablet PC and then
search the turntable player with its name „Billy Bob“. After pairing
and connection, the indicator will become blue color without ashing,
and you can play your music of your mobile phone or tablet PC on this
turntable player.
3. Turn the VOLUME CONTROL KNOB to adjust the volume.
4. The mobile phone or tablet PC volume level also impact the overall
volume, please adjust that as well.
Note: During the BT mode, please make sure that the AUX IN jack was
not plugged in with the audio cable.
AUX IN Mode
1. At BT or PHONO mode, connect your iPod, MP3 player, mobile phones
etc. to the AUX IN port with a 3.5mm audio cable (not included).
2. You can enjoy the music of iPod, MP3 player, mobile phones etc. at the
turntable player.
3. Rotary the volume knob to adjust the volume.
4. The iPod, MP3 player, mobile phones volume level also impact the
overall volume, please adjust that as well.

14
EN
CLEANING AND CARE
1. When opening or closing the turntable cover, handle it gently.
2. Do not touch the needle tip with your ngers; avoid bumping the needle
against the turntable platter or record edge.
3. Frequently clean the needle tip-use a soft brush in a “back-to-front’
motion only.
4. If you must use a needle cleaning uid, use very sparingly.
5. Gently wipe the turntable player housing with a soft cloth. Use only a
small amount of mild detergent to clean the turntable player.
6. Never apply harsh chemicals or solvents to any part of the turntable
system.
HINTS ON DISPOSAL
According to the European waste regulation 2012/19/
EU this symbol on the product or on its packaging
indicates that this product may not be treated as
household waste. Instead it should be taken to the
appropriate collection point for the recycling of
electrical and electronic equipment. By ensuring this
product is disposed of correctly, you will help prevent
potential negative consequences for the environment
and human health, which could otherwise be caused by
inappropriate waste handling of this product. For more
detailled information about recycling of this product,
please contact your local council or your household
waste disposal service.

15
ES
Estimado cliente:
Le felicitamos por la adquisición de este producto. Lea atentamente el
siguiente manual y siga cuidadosamente las instrucciones de uso con el
n de evitar posibles daños. La empresa no se responsabiliza de los daños
ocasionados por un uso indebido del producto o por haber desatendido las
indicaciones de seguridad. Escanee el código QR para obtener acceso al
manual de usuario más reciente y otra información sobre el producto:
ÍNDICE DE CONTENIDOS
Indicaciones de seguridad 16
Vista general del aparato 16
Puesta en marcha y uso 18
Limpieza y cuidado 20
Retirada del aparato 20
DATOS TÉCNICOS
Número de artículo 10032836, 10032837
Suministro eléctrico 220-240 V ~ 50/60 Hz
DECLARACIÓN DE CONFORMIDAD
Fabricante:
Chal-Tec GmbH, Wallstraße 16, 10179 Berlín
(Alemania).
Este producto cumple con las siguientes directivas
europeas:
2011/65/UE (refundición RoHS)
2014/53/UE (RED)
Encontrará la declaración de conformidad completa
del fabricante en el siguiente enlace:
https://use.berlin/10032836
10032836
10032837

16
ES
INDICACIONES DE SEGURIDAD
1. Seleccione una ubicación segura y no coloque el aparato bajo la luz
directa del sol ni junto a una fuente de calor.
2. Evite entornos en donde el aparato se pueda ver expuesto a
vibraciones, demasiado polvo, frío o humedad.
3. Para evitar descargas eléctrica, la carcasa no debe abrirse. Si un cuerpo
extraño termina por accidente en el interior del aparato, contacte con
un técnico especializado.
4. No limpie el aparato con disolventes químicos, pues la supercie podría
dañarse. Para limpiar el aparato, utilice un paño seco.
5. Conserve este manual para usos posteriores.
VISTA GENERAL DEL APARATO

17
ES
1Bloqueo del brazo del
tocadiscos
8Conexión para auriculares
2Interruptor para activar/
desactivar AUTO STOP
9Cartucho de la aguja
3Interruptor de selección
giratorio
10 Eje
4Regulador de modulación
(Pitch)
11 Salida RCA L/R
5Botón de función 12 Entrada AUX
6Indicador luminoso de
control
13 Toma para suministro
eléctrico
7Interruptor on/o y
regulador de volumen
14 Altavoz

18
ES
PUESTA EN MARCHA Y USO
Conecte el cable de alimentación a la toma del tocadiscos y conecte el
enchufe a la toma de corriente.
Reproducir un disco
1. Ajuste el botón de función a PH. Active el interruptor principal. La luz de
control se ilumina en color rojo.
Nota: Asegúrese de que no exista ningún cable de audio conectado en la
entrada AUX. Si hay un cable de audio conectado, el modo por defecto
será AUX IN.
2. Coloque un disco en el tocadiscos y seleccione la velocidad deseada
(33/45/78) según corresponda al disco.
Nota: Si reproduce una grabación a 45 RPM, utilice el adaptador 45 RPM
incluido.
3. Retire la protección de la aguja. Abra el bloqueo del brazo para soltarlo.
Presione la palanca hacia atrás para levantar el brazo y mueva el brazo
con cuidado a la posición deseada por encima del disco. El tocadiscos
comienza a girar cuando el brazo se mueva sobre el disco. Presione la
palanca hacia adelante para bajar el brazo lentamente hasta la posición
deseada y comenzar con la reproducción del disco.
Nota: El disco comienza a moverse automáticamente con el movimiento
del brazo solo cuando la función AUTO STOP está activada.
4. Cuando el botón de AUTO STOP está activado, el disco se detiene
automáticamente cuando se nalice. Cuando el interruptor AUTO STOP
esté desactivado, la reproducción no se detiene al nal.
Nota: La función AUTO STOP funciona con la mayoría de discos 33 RPM.
No obstante, con algunos discos estos continúan girando al nal aunque
la función AUTO STOP esté activada.

19
ES
5. Gire el regulador de volumen para regular el volumen.
6. Utilice el regulador de modulación (pitch) para ajustar la velocidad por
niveles.
Modo BT
1. Coloque el botón de función en BT. El testigo luminoso se ilumina en
color azul y parpadea.
2. Active la función BT de su móvil o tablet y busque el tocadiscos con
el nombre de Billy Bob. Tras el establecimiento satisfactorio de la
conexión, el indicador luminoso se ilumina de manera permanente en
azul sin parpadear. Puede reproducir música desde su móvil o tablet en
este tocadiscos.
3. Gire el regulador de volumen para regular el volumen.
4. El volumen del teléfono móvil o de la tablet funciona como el volumen
total, regúlelo también.
Nota: Asegúrese de que no exista ningún cable de audio conectado en la
entrada AUX. Si hay un cable de audio conectado, el modo por defecto
será AUX IN.
Modo AUX IN
1. Conecte en modo BT o disco su iPod, reproductor de MP3 o teléfono
móvil con un cable de audio d 3,5 mm (no incluido en el envío) a la
entrada AUX.
2. Puede disfrutar de la música del iPod, reproductor MP3 o móvil a través
de los altavoces del tocadiscos.
3. Gire el regulador de volumen para regular el volumen.
4. El volumen del iPod, reproductor MP3 y teléfono móvil actúa como
volumen general, ajústelo también en dichos dispositivos.

20
ES
LIMPIEZA Y CUIDADO
1. Abra y cierre la tapa con cuidado.
2. No toque la punta de la aguja con los dedos y evite golpear la aguja
contra el tocadiscos o el borde del disco.
3. Limpie la punta de la aguja con regularidad. Para ello, utilice un cepillo
con cerdas suaves.
4. Si debe utilizar un limpiador de agujas, hágalo con cuidado.
5. Frote con cuidado la carcasa del tocadiscos con un paño suave.
Utilice solamente una pequeña cantidad de lavavajillas para limpiar el
tocadiscos.
6. Nunca utilice disolventes ni productos abrasivos para limpiar el
tocadiscos.
RETIRADA DEL APARATO
Si el aparato lleva adherida la ilustración de la
izquierda (el contenedor de basura tachado)
entonces rige la normativa europea, directiva
2012/19/UE. Este producto no debe arrojarse a un
contenedor de basura común. Infórmese sobre las
leyes territoriales que regulan la recogida separada
de aparatos eléctricos y electrónicos. Respete las
leyes territoriales y no arroje aparatos viejos al cubo
de la basura doméstica. Una retirada de aparatos
conforme a las leyes contribuye a proteger el medio
ambiente y a las personas a su alrededor frente a
posibles consecuencias perjudiciales para la salud.
El reciclaje ayuda a reducir el consumo de materias
primas.
Table of contents
Languages:
Other auna Turntable manuals

auna
auna NR-620 User manual

auna
auna TT-10 BT User manual

auna
auna Jerry Lee BT User manual

auna
auna The Player User manual

auna
auna Jerry Lee Series User manual

auna
auna TT-Pure User manual

auna
auna TT-Classic Plus User manual

auna
auna TBA-928 User manual

auna
auna TT-18SB User manual

auna
auna TT1200 User manual

auna
auna TT-931 User manual

auna
auna Challenger LP User manual

auna
auna 10032018 User manual

auna
auna 10031933 User manual

auna
auna 182TT User manual

auna
auna 10008633 User manual

auna
auna 10027864 User manual

auna
auna TT-Classic Light User manual

auna
auna Retro Plattenspieler User manual

auna
auna Verticalo SE User manual