Iceco STEEL VL60S Series User manual

Please email us at: official@icecofreezer.com
VL60/74S

Catalogue
1 1
-----------------------
What's Inside
2 2
---------------------------
Operation
3 8
--------------
Care And Maintenance
4 9
- - - - - - - - - - - -
Error Codes & Solutions
5 11
- - - - - - - - - -
Warranty & Return Policy
6 12
- - - - - - - - - - -
Troubleshooting (Q & A)
7 17
- - - - - - - - - - - - - - - -
Safety Instructions

Refrigerator x1 Wired Basket x2
01
6 Feet 110V AC Wall
Outlet Cable x1
8 Feet 12/24V
DC Cigarette
Lighter Plug Cable x1
VL60S
External dimensions
(LxWxH)
Net weight
Supply voltage
Temperature setting
Insulation
Shell material
24.0 kg (52.9 lbs)
DC 12/24V & AC 110-120V & 50/60 Hz
C-pentane
Metal cabinet
693×401×584 mm
(27.3x15.8x23 inch)
-18°C to + 10°C (0°F to 50°F)
What's Inside
1
820×493×498 mm
(32.3x19.5x19.7 inch)
28.4 kg (62.6 lbs)
VL74SMODEL
Storage volume 60 liters 63 quarts ( ) 74 liters 78 quarts ( )

Operation
2
ATemp. Setting UP
BTemp. Setting DOWN
CPower (Press & Hold to turn on/off)
DMode Button
02

2.1 Temperature Compensation Mode
In standby mode (fridge turned off but plugged
into power), press and hold Button D for 3
seconds, with "F1/F2/F3" flashing, press
Button D to switch between F1, F2 and F3 to
set the Temperature Compensation Mode.
03
NOTICE: Please adjust under the
guidance of customer service. We do not
recommend changing the original setting,
which may cause temperature control
problems.

04
2.2 Switch Between °C to °F
With the fridge standby (plug-in, without
pressing Power Button C to turn on), press
and hold Button D for 3 seconds to enter
adjustment mode. Press Button D for times,
with "F/C" flashing, press Button A/B to switch
between Celsius & Fahrenheit. (Default: °F)

05
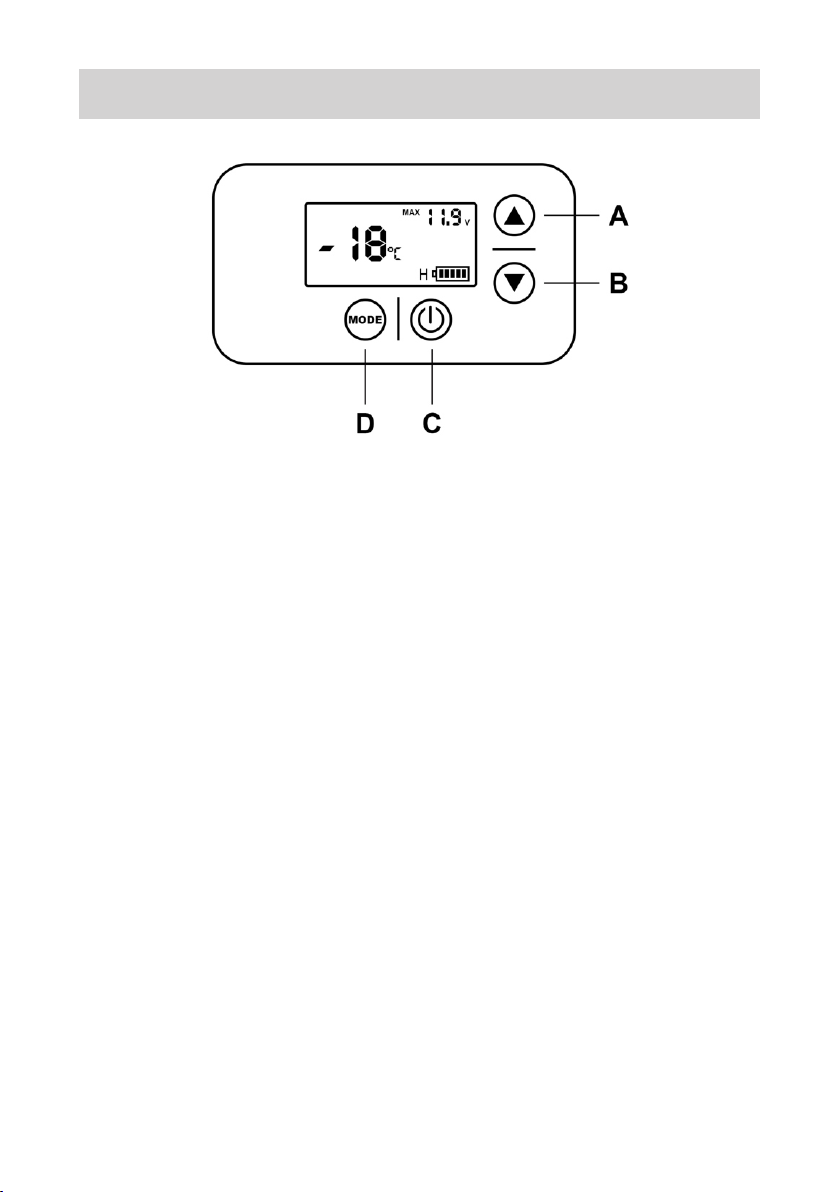
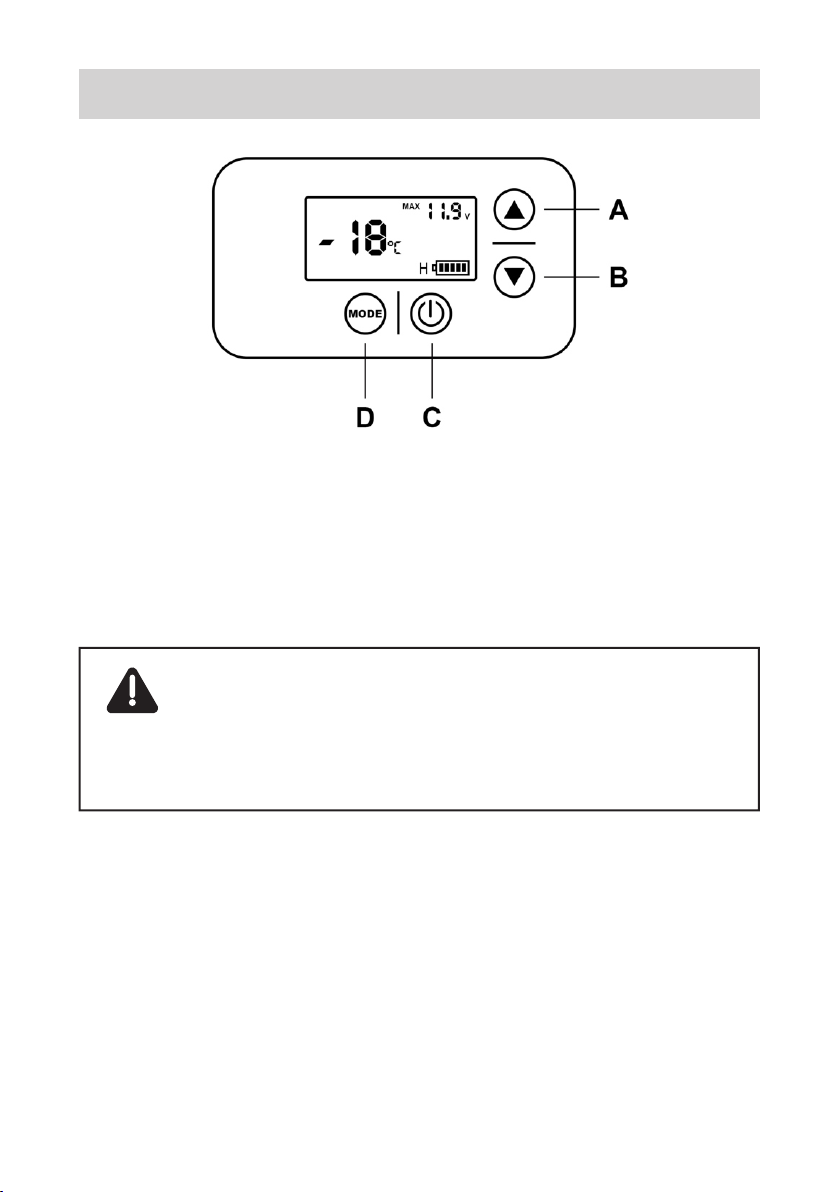
After the fridge turned on, the fridge's CURRENT
interior temperature reading will appear on the
display, as a solid/non-flashing number.
To change the fridge's set temperature: Press
Button D with the number flashing; press either
the Temperature UP (A) or Temperature DOWN
(B) Button to adjust the fridge's SET
temperature.
The SET temperature will appear as a
FLASHING number, and after the temperature is
SET, the display will return to showing the
fridge's CURRENT interior temperature.
2.3 Setting Temperature

06
After the fridge turned on(Press & Hold
C/Power Button), you can short press Mode
Button D with "MAX/ECO"flashing, press Button
A/B to switch between MAX or ECO
compressor speed for the fridge.
2.4 MAX & ECO Mode

After the fridge turned on, press Mode Button D
with "L/M/H" flashing,press Button A/B to adjust
the level of the battery protection(L for LOW,M
for MEDIUM,H for HIGH).
2.5 Triple Battery Protection Operation
NOTICE: Details of Battery Protection
Mode could be found in Page 14.
07

08
Care And Maintenance
3
Please use a wet cloth and warm water mixed
with gentle non-abrasive detergents to clean
the interior and exterior of your fridge.
Please power off and unplug the unit before
cleaning
Please use non-abrasive detergent to cleaning
the interior/exterior of the fridge
Please don't scrap the interior of the fridge to
defrost/de-ice the fridge
Please don't pressure-wash/spray the fridge
with a running water hose
3.1 Cleaning
3.2 DOs and DON'Ts

09
Error Codes & Solutions
4
The DC voltage is below the protection
settings and the battery protection
mode is activated.
E1
Code Description
The cooling fan is over-loaded with
more than 1A of current.
E2
Motor start error
The motor of compressor is blocked or
the pressure difference in the
refrigeration system is too high.
E3
Minimum motor speed error
The compressor is over-loaded, and the
motor cannot maintain its minimum
speed of 1850 rpms.
E4
Thermal cut-out of electronic unit
Thermal cut-out error. If the refrigeration
system overloads, or the ambient
temperature is too high, the thermal
sensor is overheated.
E5
NTC failure (open circuit)
LL
NTC failure (short circuit)
HH

10
Solutions
If this error code appears when the fridge is
operating on 12V DC, please try to lower the
battery protection setting and see if the error
is resolved. The battery protection mode may
be triggered prematurely on certain vehicles
due to small wiring imperfections, contributing
to a measured DC voltage drop at compressor
start-up. Lowering the battery protection
setting may resolve this issue.
Please also care about the reading of your
battery voltage to make sure it is not
depleted/discharged.
If possible, please connect the AC power to try
if the refrigerator appears error code.
Please contact us directly if the error persists.

11
Warranty & Return Policy
5
30 days refund guarantee upon receiving.
For returns or exchanges, please call us,
or fill out the following return and exchange
registration form in the package as a proof
of return. All materials must be returned in
the original condition and packaging. Thank
you for your cooperation.
If the product is received damaged or
defective during transportation, you will
need to contact our customer service
within 2 business days. Make sure to
provide relevant photos or videos, your
order ID number, and your name. A
customer service agent will help assist
into solving the issue at a timely manner
(Return, Exchange, or Discount
Compensation). A free return label will be
provided if needed.
5 years warranty on the compressor.
1 year warranty for other parts or accessories.

12
Troubleshooting (Q & A)
6
1. Heat resistance & water resistance
ICECO refrigerators are engineered to operate at
an ambient temperature of up to 55 °C(131 °F).
Heat resistance
ICECO refrigerators can operate under light rain
conditions. Please keep the vents above clear
of water, and please add some clearances to
the bottom of the fridge if the ground is wet.
Weather Proof
We DO NOT recommend exposing the fridge
to moderate or heavy rain.
As with all electrical appliances, over-exposure
to moisture may shorten the fridge’s life.

Model Insulation Test
VL60S
VL74S
Ambient temperature of 25°C (77°F),
refrigerator temperature from -18°C
(0°F) to 20°C (68°F) needs 5 hours
on average.
13
2. How long can the ICECO refrigerator
keep the temperature after powering
off?
The following data only represented the result of
the lab experiment with empty box. Everything
is based on the actual situation.
Insulation Performance
3. Why did it change back to the original
temperature after setting the
temperature?
The Solid/Non-Flashing number on the display
is the CURRENT interior temperature.
The Flashing number is your SET temperature
after adjustment. The compressor will shut off
when the SET temperature is reached.

14
4. What should I do if the refrigerator is
upside down when it is delivered?
Please leave your refrigerator upright for 24
hours to allow the compressor lubricant to
resettle before powering on the fridge.
Otherwise it may contribute to certain operation
abnormalities.
5. What is the function of triple battery
protection? How do they work?
The triple battery protection is designed to
prevent over-discharge and battery depletion.
When the measured DC voltage is below the
set value, the compressor is shut off to prevent
battery depletion.
LOW
VOLTAGE
PROTECTION
POSITION
DISPLAY
12V
CUT OFF
(V)
CUT IN
(V)
CUT OFF
(V)
CUT IN
(V)
24V
1 Bar
2 Bars
3 Bars
9.6 10.9 21.3 22.7
10.4 11.7 22.8 24.2
11.1 12.4 24.3 25.7
MED
HIGH

15
For example, when you switch to a LOW MODE,
the battery voltage is under 9.6 volts, the
refrigerator will automatically cut the power OFF;
The refrigerator will start again till the battery
voltage reached back to 10.9 volts.
6. What is the power draw in max/ fast
cooling mode?
Model Electrical
Power
GO12 50W
Model Electrical
Power
JP42 55W
GO20 50W VL35
Series 65W
JP Series 60W VL Series 85W
This data is only suitable for laboratory testing,
and the actual power is subject to actual
conditions.
VL45 ProS 45W VL60 ProS 47W
VL75 ProD 57W VL90 ProD 61W

16
8. What kind of cable do I need to use in
the car and at home?
The DC cable is provided. You can power it
from your vehicle's cigarette lighter plug using
the DC cable. You can also power it at home,
but you need to use with AC cable as
precondition.
9. What is the specification of the fuse
of the refrigerator?
The supply line is protected by a 15A fuse
located in the refrigerator.
Because of the sinking nature of cold air, the
different temperatures may exist in different
locations in the refrigerator (the temperature of
the bottom will be the lowest). The panel only
shows the average temperature of the refrigerator.
7. Why is there a temperature difference
(between the actual temperature of the
refrigerator and the set temperature)?

17
SAFETY INSTRUCTIONS
Please read the user manual and safety
instructions carefully before using the appliance.
By ignoring the safety instructions, the
manufacturer cannot be held responsible for
the damage.
The use of accessories that are not
recommended by manufacturer can cause
injuries and will invalidate any warranty that
you may have.
The appliance shall not be exposed to
moderate/heavy rain.
Place the refrigerator on a dry, secure surface,
with adaquate ventilation.
Safety Instruction
7

18
Do not leave the refrigerator unattended
in uncovered, outdoor areas exposed to
the elements.
!
Do not use this appliance near direct
heatsources, such as an open flame or
radiator.
!
Do not place open containers of liquid
inside the fridge.
!
Please don't put hot/warm food into the
fridge directly without letting it cooling
off. Place/arrange the content of your
fridge securely when using the refrigerator
inside a moving vehicle.
!
To maximize energy savings, please make sure
the lid is closed and secure, and only open the
fridge when you need to.
The power cable must only be replaced by
qualified technical personnel and by an
assistant body authorized by the manufacturer.
Before carrying out any maintenance operations
on the refrigerator, disconnect all power sources
from the fridge.
This appliance is suitable for camping use.
Other manuals for STEEL VL60S Series
1
This manual suits for next models
1
Table of contents
Other Iceco Freezer manuals