icetro ISI-163SB User manual

ISI-163SB
● This product is for indoors, so do not use it outdoors.
● Before using the product, be fully familiar
with the contents in the manual.
Please store this manual in a place where you can
reach it easily for future reference.
● This user manual contains a product warranty.
● This appliance can be used by children aged
from 8 years and above and persons with reduced
physical, sensory or mental capabilities or lack
of experience and knowledge if the have been given
supervision or instruction concerning use of the
appliance a safe way and understand the hazards
involved.
Children should be supervised to ensure
that they do not play with the appliance.

2
Dear customers;
Contents
Acknowledgment
Method of Use
Cautions for your safety
- Power supply related items
- Installation related items
- During use
Part names and controllers
3~4
4
5
6~7
8
9
10
11
11
12
Check prior to use
Button display names and functions
How to make soft ice cream
Conversion function between
ice-cream mode and yogurt mode
How to set non-load
Carburetor control
Thank you very much for purchasing a soft ice cream maker made by ICETRO. For correct use of the
product and its maintenance, please read this manual carefully. If a problem occurs while using the
product, you can refer to this manual for troubleshooting. This manual contains a product warranty, so
keep it safely for future reference. This product can be installed only by someone qualified for installation.
If use of parts and accessories not provided or approved by ICETRO or any part or accessories made
by ICETRO but remodeled by other person causes a problem, we are not responsible for it financially.
(The functions and specifications shown in this manual and on the web site are subject to change
without notice. Please visit our website at http://www.icetro.com to obtain the latest specifications.
Cleaning Method
13~14
1 5
15
16
17
Cleaning Method
- Wash mode
- Washing of each parts
-
Condenser and filter cleaning method
Dasher cover assembly method
-
Dasher cover assembly
-
Dasher and dasher cover
ETC
18
19
20
21
22
23
24~27
28
29
Installation method
- Electrical connection
B e f o r e r e q u e s t i n g s e r v i c e
Error code types
Circuit diagram
Product specification
Refrigerant circuit
Part list
What to watch out for
Warranty

3
Cautions for your safety

4
30

5

6
Part names and controllers
FRONT
BACK SIDE
510
510
820
741
635592193 50
745
1470
BUTTON
DISPLAY
SIDE PANEL
FILTER
CONDENSER
MIXING TANK
COVER
POWER
SWITCH
DRAIN BOX
DASHER COVER
STAR
DASHER COVER
BOLT
LEVER

7
Included accessories
DASHER LUG FOAM
4EA
HINES
1EA
CARBURETOR TUBE
2EA
CARBURETOR TUBE
BODY
2EA
BRUSH
1EA
BRUSH 3
1EA
BRUSH 143
1EA
MANUAL
1EA
PATITION FOOD
2EA
BEARING DASHER
2EA
PACKING DOWN 143
2EA
PACKING PISTON
2EA
PACKING CARBURETOR
4EA
DASHER COVER PACKING
2EA
PACKING REMOVE HANDLE
1 EA

8
■ Make sure to check them prior to use ! ■
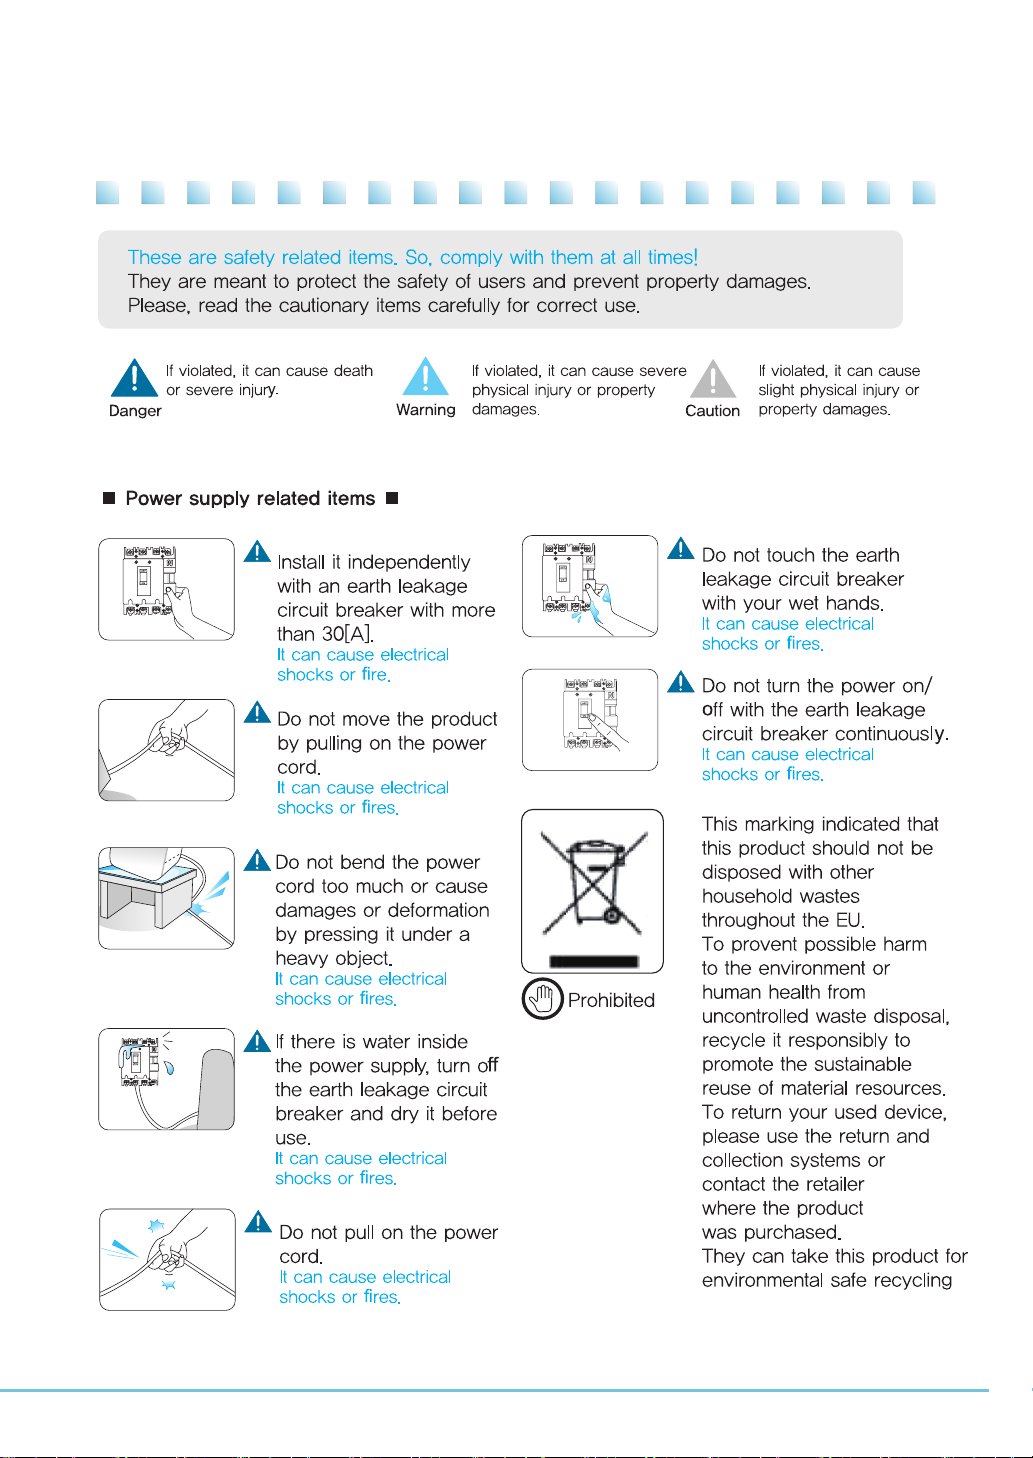
Install it independently with an earth leakage circuit breaker with more than 30 A
and provide anexternal grounding.
(Ask a qualified electrical technician for the installation.)
The power cable should be connected before the product can operate normally.
If you intend to leave it unused for a long time, wash it and turn off the water
supply valve and turn off the earth leakage circuit breaker.
The air suction and discharge should be facilitated so that the cooling
performance can be optimized.
If you leave it open, bugs or contaminants may enter the mixing tank.
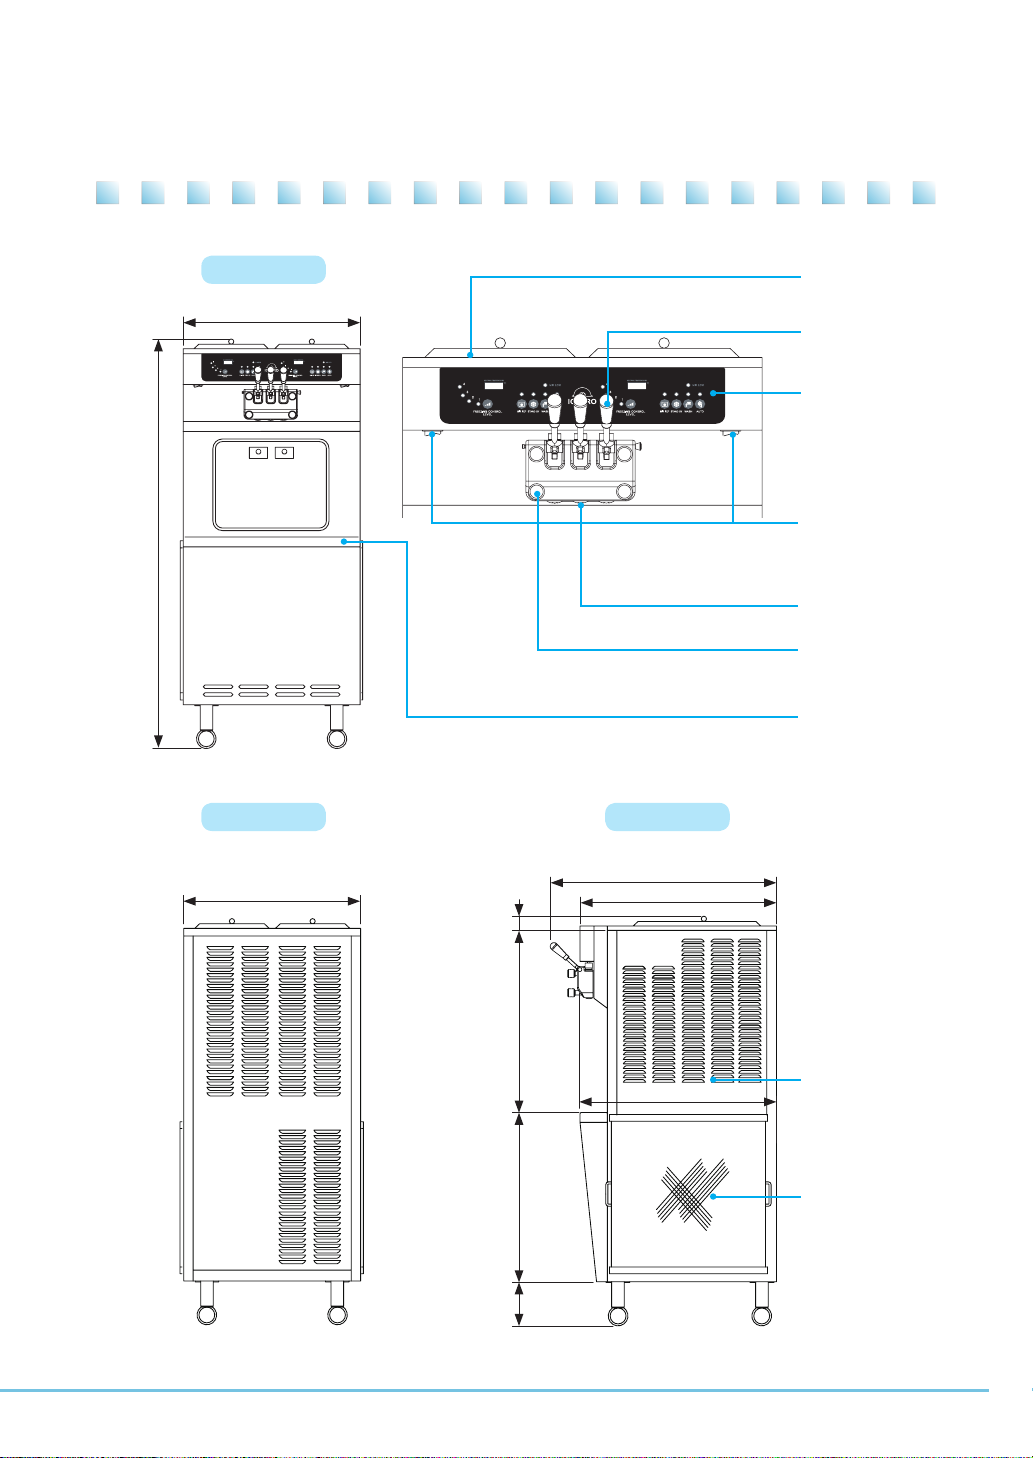
It is recommended to clean the cylinder, the mixing tank, the impeller,
the dasher, and the piston every day.
Clean the condenser at least once a month or more often.
The cylinder, mix tank, impeller, dasher, and piston inside the product make
contact with the ingredients, so you should clean them once every day.
This product is exclusively for 1Ø, 230 V~, 50 Hz / 220 V~, 60 Hz
■ Do not block the air vent.
■ Close the mixing tank.
■ Clean the condenser once a month.
■ Clean it at least once a day.
■ Clean the filter once a week.
Check prior to use
information
For your

9
Button display names and functions
③ “
FREEZING CONTROL LEVEL
”
BUTTON
Lamp blinks when there
are insufficient ingredients
and It blinks when there
is no ingredient.
Icecream Level Adjustment button
② “MIX LOW”
Display the ingredient
temperature inside the
hopper.
① “MIX TANK TEMPERATURE”
It is used to store ingredients.
④ “MIX REF” BUTTON
Turned on while the raw material in the
cylinder and the hopper is being
refrigerated
⑤ “STAND-BY” BUTTON
Button is used to wash.
It turns the dasher motor and the
impeller (applied model) in the tank.
⑥ “WASH” BUTTON
Button is used to make soft freezer.
⑦ “AUTO” BUTTON

10
How to make soft ice cream
1. Open the top cover and pour
ingredient into the hopper tank.
Please be aware of using soft
serve mix stored under -10℃.
Please check MIX LOW lamp
turns OFF.
2. After pouring the mix, please insert the carburetor body
and carburetor tube into the hole in the hopper.
3. Match carburetor medium-size hole and apply impellers
on the shaft in the hopper.
Carburetor body
Impeller
Medium-size hole Carburetor
Carburetor tube
4. Press AUTO button to start making soft ice cream.
● The smaller the caburator hole is, the higher the overrun (air content) is.
Instead, in case of continuous sales, the ingredients supply gets slower and the soft ice
cream is let out slowly.
● The caburator hole can get clogged, so check it and wash it periodically during use.
● The manufacturer shall not be responsible for any trouble (e.g., spoilage of materials,
overcooling, non-production of ice cream) caused by using materials in non-frozen
state (10℃).
For your
information

11
Conversion function between
ice-cream mode and yogurt mode
How to set non-load
1) The default mode is the ice-cream mode.
2) The modes can be distinguished by checking LED's; lighting for the ice-cream mode,
and blinking for the yogurt mode.
① Pressing 'FREEZING CONTROL LEVEL' button for two seconds converts
to other mode (The buzzer sounds when conversion is complete).
② The yogurt mode is used for freezing stronger than the ice-cream mode.
Press the freezing adjusting switch for five seconds after supplying power in the MIX OUT
(no material) condition to enter into the program.
Perform non-load setting for each of the following cases:
1) New installation
2) Moving the system to other position, and reinstalling the system
3) After replacing parts relevant to producing ice-cream
(e.g., Desher motor, LUG POM and compressor)

12
Carburetor control
A small hole can improve the overrun, but it may depend on the amount of ingredients in
the mixing tank. The fewer ingredient is in the mixing tank, the higher the overrun becomes.
The more the ingredient is, the lower the overrun becomes.
The more the ingredients, the lower the overrun is.
information
For your
The carburetor has two components.
The one inserted into the hopper is "BODY," with a “TUBE" going
into the body.
The tube is open on both sides and cannot be inserted in the
wrong direction.
The carburetor hole is closed.
Match the projecting part on the upper “BODY" to the upper part
of the "TUBE" without a hole so that the hole in the lower part of the
"BODY" is plugged.
Conditions : When making ice cream for the first time to enhanced over run
After the ice cream is created, it should be changed
to small, midium or bigger hole.
The carburetor is set to a bigger hole.
Match the projecting part on the upper “BODY” to the big hole
in the upper part of the "TUBE" without a hole so that the hole in the
lower part of the "BODY" matches the big hole.
This is to minimize overrun and increase the ingredient for the
continuous making of ice cream.
Conditions : For operation
The carburetor is set to a smaller hole.
Match the projecting part on the upper “BODY” to the smaller
hole in the upper part of the "TUBE" without a hole so that the hole
in the lower part of the "BODY" matches the smaller hole.
This is to increase overrun and decrease the ingredient when
demand for ice cream is low.
Conditions : For operation
Even if overrun is improved with a smaller hole, the amount of ice cream may vary depending
on the amount of ingredient in the hopper.
The smaller the amount of ingredient that the hopper has, the bigger the overrun will become,
and vice versa.
For your
information
The carburetor is set to a medium-size hole.
Match the projecting part on the upper “BODY” to the medium-size
hole in the upper part of the "TUBE" without a hole so that the hole in
the lower part of the "BODY" matches the smaller hole.
This is to set medium overrun and ingredient.
Conditions : For operation
In normal use
Carburetor tube
Carburetor tube body

13
Cleaning method
■ Wash mode ■
1. Press the wash button on the control panel.
(Wait until the soft cream in the cylinder is melted,
About 10 minutes.)
2. Remove the cover food pan and
Take out the carburetor (tube+body)
Please do not let water or ice cream mix get
into the agitator shaft.
3. Remove the soft ice cream liquid in the mixing
tank and pour faucet water into it.
Repeat it two or three times until you get clean
water from it.
5. Press the 'WASH' button and finally discharge
the water from the mixing tank.
Use fauce twater to rinse off the cleaning
agent residuals.
6. Press the wash button to stop the product
and Release the four dasher cover bolts.
(do not turn off the power switch)
4. Clean out the raw materials and foreign
objects from around the level sensor,
drain hole, and so forth from inside the
Mixing tank with a brush.
(The location of the level sensor may be different
depending on model types.)
level sensor
carburetor
impeller

14
7. Separate the dasher cover from the main body.
Disassemble parts of dasher assay.
8. Brush off the inner area of the cylinder
and wipe it off with a soft cloth.
9. Disassemble the dasher assembly, wash
all the parts using neutral detergent and
wipe them with soft cloth.
10. Clean up the dasher with a soft cloth.
11. Extract a handle shaft and separate the lever
from the dasher cover.
Dasher lug form
Handle
shaft
12. Pull out each piston from the dasher cover
and clean it up with brush (Please make sure
not to switch the middle piston with left
and the right piston.)

15
■ Washing of each parts ■
■ Condenser and filter cleaning method ■
■ Drain slug cleaning method ■
13. Disassemble the mixing shaft and wipe it off with a brush.
1. Pull out the condenser filter located on the right side
of the machine.
※ One time a week
14. Take out the piston of the dasher cover and clean
the edge of the piston with a soft towel.
2. Remove dust from the filter element or use a vacuum
cleaner, and wash it clean with water.
● Clean and dry the filter and insert in into the machine.
15. After cleaning off all parts, dry them and reassemble them
in the reverse order.
3. The condenser surface has lots of dust. Remove it by using
a household vacuum cleaner or hand held cleaner.
Clean and dry the filter and insert it into the machine.
Mixing shaft

16
Dasher and dasher cover assembly method
■ Dasher assembly ■
1. Please assemble the blades (LUG POM) on the dasher ass'y.
2. Please insert the assembled dasher into cylinder.
Dasher lug pom

17
■ Dasher cover assembly ■
1. Apply edible vegetable oil to the ring inserted
into the piston.
3. Insert the discharge lever into the piston and then
insert the lever in line with the dasher cover and
the discharge lever.
4. Insert the packing dasher to the dasher cover.
5. Insert the mixing shaft and align the dasher bearing.
Mixing shaft
Dasher bearing
6. Fasten the two pairs of dasher cover bolts facing
each other diagonally.
If they are loose, then the soft cream can leak.
Fasten it tightly.
2. Insert the piston in the dasher cover.
※Please make sure not to switch the middle
piston with left and the right piston.
※ When reassembling, the (A) part of the middle
piston should be placed as shown in the (Picture 1).
When the Partition Food (rubber packing) is inserted fully,
please turn the piston to look forehand as shown in the
(Picture 2). (Prevention of the rubber from getting entangled)
(Picture 1) (Picture 2)
A
(
Partition food)

18
Installation method
■ Electrical connection ■
1. Supply AC 1Ø 220/230V electricity to an
additional power distribution box with an
earth leakage circuit breaker of a capacity
of more than 30 A is individually installed.
3. Connect the 4.0 ㎟ cable at the bottom of the control box to the terminal block.
1) Floor space
when you have
2) Floor space
when there is no.
(The installation of
more than a set.)
※ Maintain space of 50cm or more each between the walls and the right and rear sides
20cm or more between the left of the system.
2. Remove the front panel at the bottom front
and remove the control box cover.
Electrical connections should be performed by an electrical technician to make sure
that each wire is correctly connected. If the connection is wrong, it can cause explosions
or ignition of the PCB in the product and electrical shocks or fires.
For your
information
L N G

19
Before requesting service
The soft ice cream machine can operate abnormally because you are not familiar with the method for use
or due to another insignificant reason. It does not necessarily mean a malfunction. In this case,
check the following items to resolve a simple problem on your own without the help from the service center.
If you still can’t resolve it after checking the following items, please contact our service center.
State Please check
The machine
does
not work!
1. Contact an electrician or the customer satisfaction team in case a phase error occurred.
2. Check whether the ELB and switch are turned off.
3. In case the display (front display) is on, turn the ELB (breaker) and switch on.
Does not stop but
continues to
operate!
1. Check whether dust is stacked in the ventilation hole. Take out the lter and remove the dust.
2. If the machine is close to the wall and has no ventilation, it can stop. Please,
secure it at least 20~50cm from the wall.
3. Check whether the carburetor hole is blocked and if so clean out the hole.
4. Check whether the temperature in the ventilation hole (inhalation hole) is high.
Set the inhalation temperature of the condenser lower than 38
℃
.
Soft ice cream
is thin!
1. Check whether the carburetor is inserted.
2. In case there are no sales for more than 3 hours, the soft ice cream can be melted and made one more time
by using the recycling function (cover the carburetor hole during recycling).
The noise is
disturbing!
1. This product is an industrial machine and has some operation noise when compared to household appliances.
This product is designed to generate noise that is less than 70dB.
the customer satisfaction team in case abnormal noise is generated during machine operation.
2. A clicking sound can be generated during the initial operation.
This is the sound of plastic blade (dasher blade)that cleans the wall of the cylinder while making soft
ice cream.
Soft ice cream dose
not come out
enough!
1. Is the raw material need lamp blinking? In the case of MIX LOW, the ejection amount can become small.
In the case of MIX LOW, replenish the raw material.
2. The ejection amount can change by carburetor hole. The ejection amount can be large when a large
hole is used.
3. Did you set up ice cream level too high?
(If you increase the level, you may have lower amount of ice cream,
If you decrease the level, you may get more amount of ice cream)
Soft ice cream
comes out too
much!
1. Soft ice cream becomes thin and ejection amount may become large as time passes.
Remake soft ice cream by using the recycling function to solve the problem.
2. Ejection amount can change by carburetor hole.
The ejection amount can be small when a small hole is used.
3. Did you set up ice cream level too low?
(If you control a high level, you may have lower amount of ice cream,
If you control a low level, you may get more amount of ice cream)
If setting up the ice cream too high, no ice cream can be discharged
Overrun is not
working correctly.
1. Be sure to familiarize yourself with the user instruction.
2. Overrun will be improved by replacing the carburetor with one having smaller holes.
3. In case to operate the machine for a long time, If soft serve mix left 2/3 capacity of cylinder, it may cause
bad overrun, therefore to increase it, please draw about half amount of the soft serve mix and then
please make new ice cream. After that, you can produce soft ice cream with good overrun. But, if there
is less than 1/3 amount of ice cream in cylinder, it might cause over freezing and can’t draw any soft ice
cream.
When having bad
texture of soft ice
cream
1. When you use soft ice cream ingredient with high milk fat, it makes a bit of milk fat chunk inside ice
cream. If you have low sales volume, please adjust the carburetor hole at the smallest hole to prevent
from it.
Soft ice cream
has gone bad.
1. This product must be cleaned daily.
The remaining raw material must be wasted and new raw material must be used to make Soft ice cream.
The manufacturer is not responsible if this is not observed.
When having dark
color of ice cream
1. Did you insert the carburetors?
You can make good overrun when using small size carburetor hole.
2. You can make soft ice cream with good overrun by opening carburetor hole and by discharging (drawing)
ice cream several times.

20
Error code types
Error code Error details Error
occurrence Release
condition Display
Cooling temperature
sensor is bad.(Open) Stop
Auto
release Stand by LED will blink
Cool temperature
sensor is bad.(Short) Stop
Auto
release Stand by LED will blink
Cool cylinder
entrance's temperature
sensor is bad.(Open)
Stop
Auto
release Auto LED will blink
Cool cylinder
entrance's temperature
sensor is bad.(Short)
Stop
Auto
release Auto LED will blink
Over current of the
dasher motor and current
detection failure.
Stop
Reset Auto LED will blink
Wash LED will blink
High voltage detected. Stop
Auto
release
Auto LED will blink
Wash LED will blink
Soft ice cream not formed Start
After a
dormancy
Auto LED will blink
Wash LED will blink
Stand by LED will blink
Table of contents
Other icetro Freezer manuals