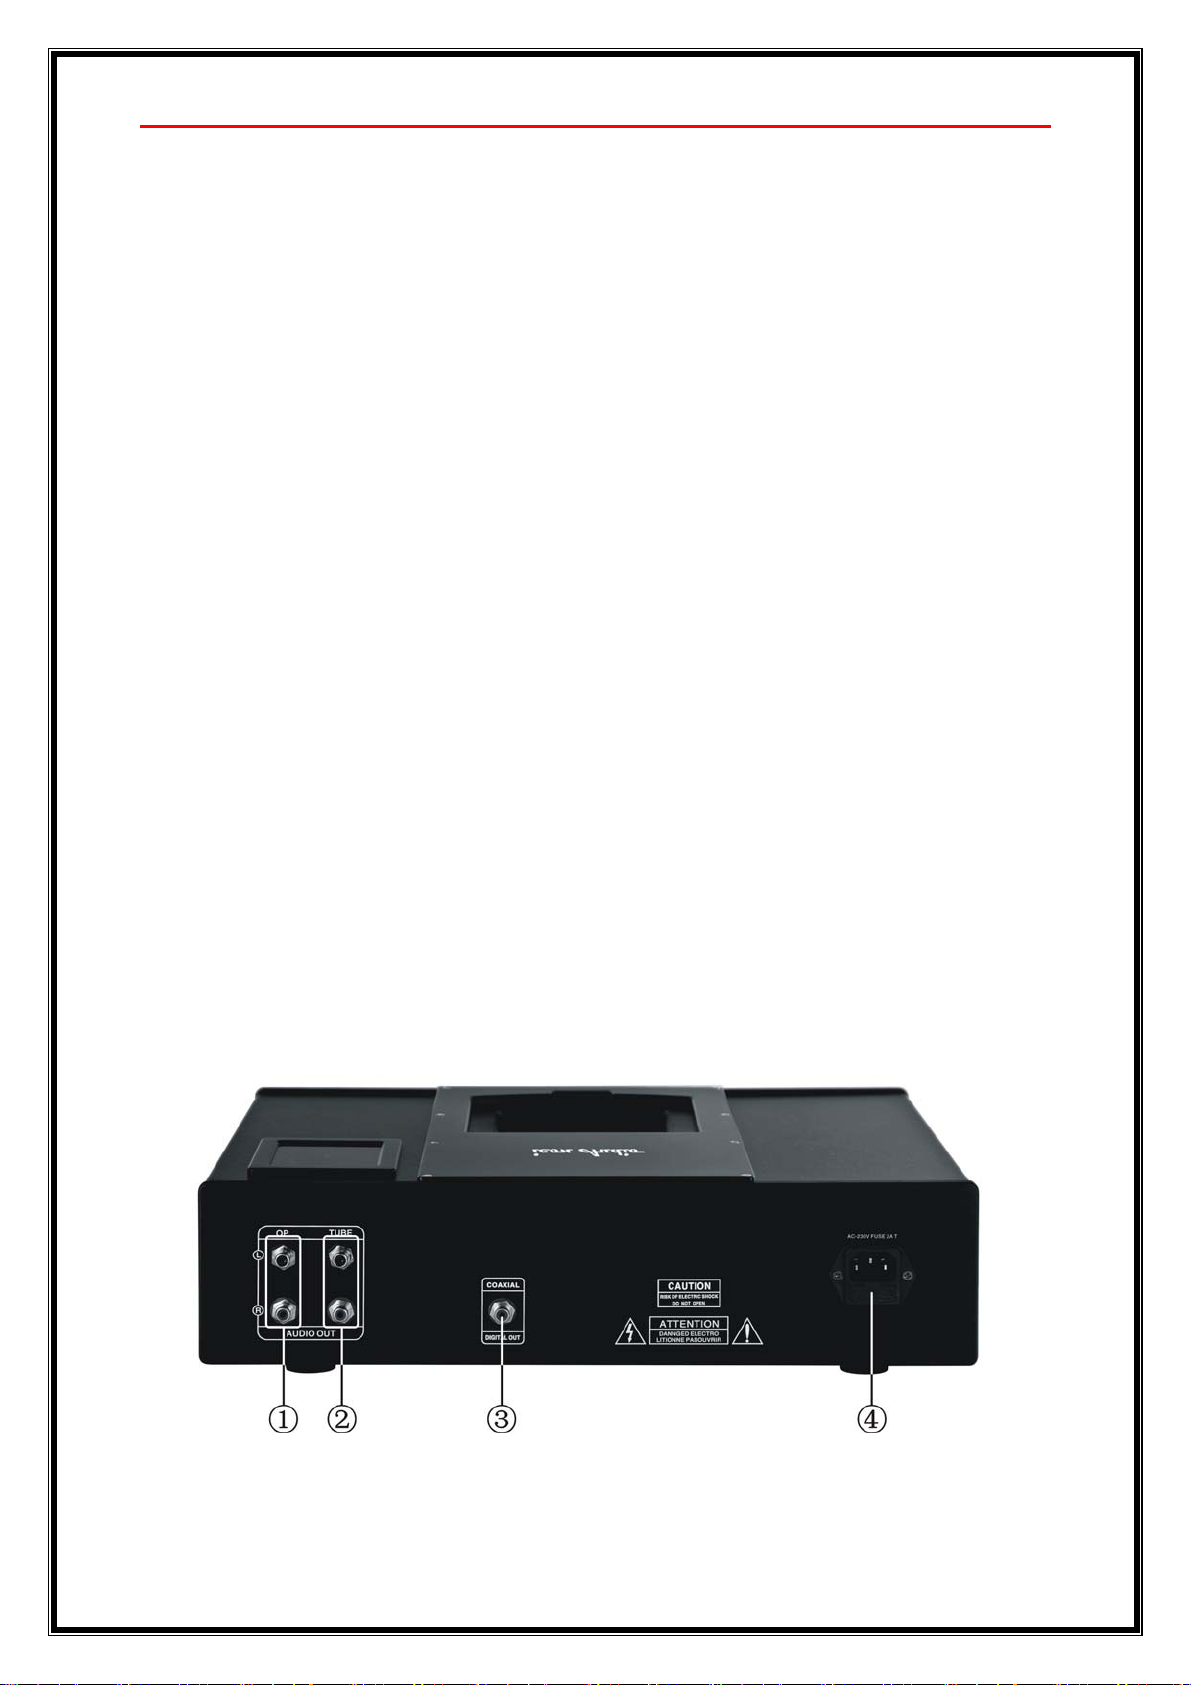
icon Audio CDX 2 User manual

Page 1
icon Audio
Instruction Manual Covering:
CDX 2 Compact Disc Player
Contents
1 Introduction & Final Inspection
2 Set Up Guide
3 Connecting inputs & outputs
4 Getting the best performance
5 Trouble Shooting
6 Valve Replacement
7 Specifications
8 Guarantee
9 Packing Instructions
1 Introduction
Thank you for purchasing the
CDX2
. This
advanced CD player uses the latest digital
technology to decode the optical digital signal
coming from the laser pickup, using 192 kHz
upsampling and 24 bit resolution. That is where any
similarity to other CD players ends. David Shaw and
the Icon team have always felt that the potential
sonic benefits of the Compact Disc have rarely been
realised compared with many of the CD players on
the market today, many are technically excellent but
are often “lack-lustre” and mechanical sounding,
whereas we believe that a CD player should be
similar to our unique pure valve vinyl phono pre
amps with a vivid layered and textured quality that
keeps you wanting “more”! So the CDX2 not only
needs to be technically good but to have the warm
relaxed easy listening analogue sonic qualities that
are so hard to achieve from the somewhat dated
1977 Philips/Sony Compact Disc system.
So after creating the initial design for the CDX2
many hours were spent auditioning different
combinations of valves and components in order to
achieve the desired results. It was self-evident that a
good digital decoding system is pre requisite to good
performance, but the analogue output stage rarely
gets a mention. We feel that this final link in the
audio chain is vital to audiophile performance and as
such a well-designed valve stage will enhance the
sound quality of the previous circuitry.
The excellent ECC82 also known as 12AU7 is used
as the output valve. The “son” of the venerable
6SN7 double triode probably the best sounding hi fi
valve ever. Its warm tonal balance is an excellent
counter to some of the less desirable characteristics
that digital systems present. It is very reliable and
long lasting to maintain performance.
You will notice that the weight of the CDX2 is
heavier and more solid than many other players
using alloy plate and heavy gauge steel this is to
provide mechanical stability and dampen unwanted
resonances.
The CDX2 is hand built using carefully selected
audiophile components. The transformers are hand
wound using low oxygen copper and long grain iron.
Finally each player is valved, carefully
commissioned and tweaked for best performance in
Leicester UK.
In order to get the best out of your CDX2, please
read the enclosed notes. Even if you are
experienced with hi fi please read the ‘quick set up
guide’. Should you be uncertain about anything
please contact your dealer or us for advice.
Valve equipment does need a little more attention
than its solid-state counterparts, such as
occasionally replacing the valve but the sonic results
are more than worth it. In this manual we have tried
to include everything that you need to know.
IMPORTANT!
THIS MANUAL CONTAINS
ESSENTIAL INFORMATION
FOR THE HEALTH & SAFETY
OF YOUR CDX2. PLEASE
READ & KEEP SAFE AND
REFER TO IF NECESSARY

Page 2
Final Inspection - Your Guarantee of Quality
To assure you of optimum performance and reliability, this amplifier has passed our rigorous
final inspection and listening test by the Icon Audio team in Leicester . During which the final set
up and adjustments were made.
Date …./…./….
Model CDX2……….
Serial Number ………………
Customer ……………………………
Check finish ……….
Internal wiring check ……….
Check Triode mode N/A
Run min 12 hour test ……….
Check input N/A
Output Valve Bias level N/A
Sound Quality ……….
Channel Balance ……….
Valve Microphony ……….
Valve Seating ……….
Noise level .....……
RF Test ……….
Display brightness ……….
Serial No sticker and recorded ……….
Mains voltage 110-120 / 230-240V
IEC Mains Fuse ……2 A
Mains plug Fuse (UK only) ……2 A
Remote Control Function ……….
Sales invoice ……….
Bottom label ……….
Credit card receipt .………
Customer survey form .………
Bias meter N/A
Transformer Protection N/A
Upgrades:
HT delay fitted? N/A
Output Valves ……....……….
Rectifier Valve N/A
Regulator Valve N/A
Capacitor upgrade (Audio) ……….
Capacitor upgrade (Power) ……….
Mains lead ……….
Interconnects ……….
Signed off by ……………………….
Notes:

Page 3
IMPORTANT READ THESE NOTES BEFORE CONNECTING TO AC MAINS!
2 SET UP GUIDE
1 Unpack unit carefully. Make sure that it is in
good condition. If not report to your supplier
immediately. It is important that you keep the
packaging for warranty/service return.
2 The contents of the box are:
1x CDX2,
1x mains cable,
1x remote control. (inc 2x AAA battieries)
1x CD retaining magnet,
1x instruction manual,
1x Allen key
1x star type screwdriver
No transit screw removal or setting up is required.
The output valve is already fitted. The CDX2 is ready
to use. Loosen back plate screws of remote control
using supplied screwdriver and remove piece of tape
insulating the batteries, ensure batteries are in place
and re-tighten back plate.
3. Connect to amplifier, or pre amplifier as shown.
USE THE “VALVE OUTPUT” RCA SOCKETS. If you
are intending to connect directly to a power amplifier,
you will need some form of volume control such as
our “Passive” pre-amp. The connections marked “OP
AUDIO OUTPUT” are transistor output only.
4. Before connecting to AC power, Check that the
power switch on the front is “off”. Then connect the
supplied IEC mains lead to a 220-240v supply (or
115v USA) If for some reason the UK welded plug
must be removed, please remove plug fuse and
dispose of immediately. (As they can be a danger
to children). The replacement plug should be wired in
the following way Brown to Live terminal, Blue to
Neutral terminal and Green/Yellow to Earth terminal.
5. Connect to your amplifier using the “TUBE”
output RCA output sockets. The other outputs are
not valve output.
6. Using the CD Player with a separate “DAC”.
Using the “COAXIAL DIGITAL OUT” connect a
suitable DAC Select the appropriate input on your
DAC. Your signal will be now be decoded through
your DAC without the CDX2 valve output circuit.
Any conventional integrated or pre-amplifier may
be used. Most “Passive” pre-amps including Icon
Audio may also be used.
SWITCH ON! The grey fluorescent display should
light up. To play a CD insert into the top
compartment, place magnetic clamp on top, close
door and press play when track information is
displayed.
7 All these things are normal for the CDX2
A, Mobile phone ‘breakthrough’ is normal. Move
the phone away from the CDX2
B, Some CDR CDs may not play
C, Some CDRW CDs may not play.
MP3 or other files are not compatible
SACD discs will only play the “CD” track if present.
8 Health and Safety. Always unplug from power
when making adjustments. Like all electronic
devices there are potentially lethal high
voltages inside, which when switched off can
take time to discharge. Do not remove the cover
unless you are a competent engineer. There are
no user serviceable parts inside. Like other
household electrical appliances do not leave
unattended whilst switched on. Do not use
valves other than specified.
Back Elevation
1. OP amp output
2. Valve/Tube output
3. Coaxial digital signal output(connect to DAC audio decoder)
4. Power input socket and fuse (Fuse should be 20mm F 2A, (Fast or QB) AC230 v±10%)
FOR USA 115v use 20mm F4A

Page 4
Wiring Diagram
3 Connecting inputs & outputs
Many problems associated with electronic
equipment involves connecting leads, which are
usually either ‘BAD CONNECTION’ or a
‘WRONG CONNECTION’. So it’s worth making
sure that you have good connections and that
your leads are the right way round.
Outputs
For normal use you should connect suitable
interconnects to the “TUBE OUTPUT” Left and
Right sockets on the rear, this will give the best
sound quality as this uses our specially designed
valve circuit.
Interconnect and mains Cables
In our experience Icon valve equipment is very
tolerant of cables the CDX2 having a very low
output impedance; therefore the benefits of some
very ‘exotic’ cables may be less apparent. But this
is also personal taste.
As all interconnect cables have losses, therefore
keeping the cables under 2-3 meters will be
advantageous. However the CDX2 is designed to
work with cables up to 10m with virtually no loss.
Choose either Tube (Valve) or OP amp output

Page 5
Front Elevation
① POWER button ② PLAY button ③ PAUSE button ④ STOP button
⑤ Replay. button. one previous song with one press of the button.
⑥ Next button. One next song with one press of the button.
⑦ Function displayer and window remote control sensor
Top View.
ECC82/12AU7 tube
Open / Close Cover

Page 6
Remote Control
① Play / Pause Button
② 1st-9th Track selection buttons. From the 10th song, press 1
and then the other number.(
eg:To play the 13th track, press 1 and then 3)
③ Replay Button. The first press of this gives a single replay with
a symbol“∽ ”appears in the lower-left corner of the display
screen. To replay all tracks indefinitely, press again, then an
“ALL” will appear. Press once more will disable this function
and there shows an “OFF” on the screen.
④ Track timing button. Every single press will separately indicate
single timing, single countdown and total countdown.
⑤ Press this button continuously to rewind (no sound will be
heard whilst you do this).
⑥ To replay from part A to part B in the track infinitely, press this
button and there will be a on the lower left corner of the
screen; Press again, this function will be removed.
⑦ Press this button continuously to fast forward.
⑧ Previous Button. One press (or two) of this button will play the previous track
⑨ Next Button. One press of this button moves forward to play the next track
⑩ Stop Play Button.
Note: The PLAY button will only work AFTER the CDX2 has read the TOC (Table Of
Contents) from the disc and displayed them in the display window.
The remote control has a range of about 6m. But this may be disrupted by certain types of
Infra Red light from fluorescent tubes and bright sunlight and reflections etc.
REPLACEMENT BATTERIES/CELLS
If the function of the remote control becomes intermittent or stops working, replace the
batteries with good quality leakproof ALKALINE batteries. Remove batteries from remote
control if stored for a long time to prevent leakage and corrosion.

Page 7
SAFETY PRECAUTIONS
WARNING
To prevent electric shock when making adjustments. Switch off
the power supply, and remove the plug from the AC socket.
Refer to your dealer or Icon Audio for maintenance and service.
Do not put anything containing water on the top of this machine
This will damage the player if it gets inside.
Do not let any foreign objects drop into the machine
If any metal or inflammable liquid articles get inside through the
cover may cause fire or electric shock.
Do not cover the CD Player
Allow ventilation around the CD Player and keep away from
flammable material.
Do not disassemble the machine
No user serviceable parts inside, Refer to Icon Audio or a suitable
service agent. (If replacing the valve, refer to section 6)
Connecting power line
Insert the IEC plug firmly. Avoid using multi-sockets if possible.
Volume adjustment
Beware of adjusting the volume level too high. Because of the low noise and high dynamic
range of the CDX2 player, a change in recording level may overload the amplifier and or
speakers causing damage. We suggest you adjust the maximum volume carefully.
Moving and Placement
Do not put this machine on uneven place, like shelf.
Be sure to switch off the power and pull out the plug before moving.
*Specificationsandexternalappearancearesubjecttochangewithoutnoticeasaresultofproductimprovement.

Page 8
4 Getting the best performance from your CD Player
DO NOT LEAVE PERMANENTLY SWITCHED ON!
Whilst it is common for solid state equipment to
left on 24/7 without switching off, there is no
advantage in doing this with the CDX2. It only
takes a few minutes for the CDX2 to fully warm
up. Long periods on “idle” will consume valve life.
We would always advise that any item of home
electronics is switched off when unattended.
‘Burning in’
Although the CD Player should sound good within
about 5 mins it can take up to an 30 mins to
sound at its best and will take several months of
regular use before it is fully ‘run in’.
Connecting Cables
INTERCONNECT: The CDX2 output is very
strong, therefore does not require special
interconnects, even if they are long. Although
Exotic cables may change the sound.
POWER CABLE: The CDX2 only needs a few
watts of AC power, the supplied cable can handle
3000! So is perfectly adequate for the CDX2, but
feel free to experiment!
A level solid surface will always sound better.
Keep at least a small distance away from other
electronic items to minimise RF noise.
The CDX2 is designed to play normally recorded
CDs the recorded density of CDR and CDRW
discs is lower so quality and playability may vary
THIS IS NOT A FAULT! Scratched or soiled discs
may not play properly. If a disc cannot be read it
will not play. If a known good disc will not play try
re-inserting at a 90° angle or clean the disc.
Cabinet Care
To remove dust, brush with a soft paintbrush.
Other marks can usually be removed with a damp
cloth. Never use anything wet on the amplifier,
and always clean with the power disconnected.
5 Trouble Shooting
Service: Should you suspect a problem, you could
return the unit to your dealer or Icon Audio for a
periodic service or return the valve for testing free of
charge. Use the original carton and packing this will
protect your CD player. Or ensure well packed to
prevent damage.
Mains Supply
This amplifier is hard wired to work on 230/240v ac.
Some models may be re-configured for 110/120v ac by
a qualified engineer. Contact for more information.
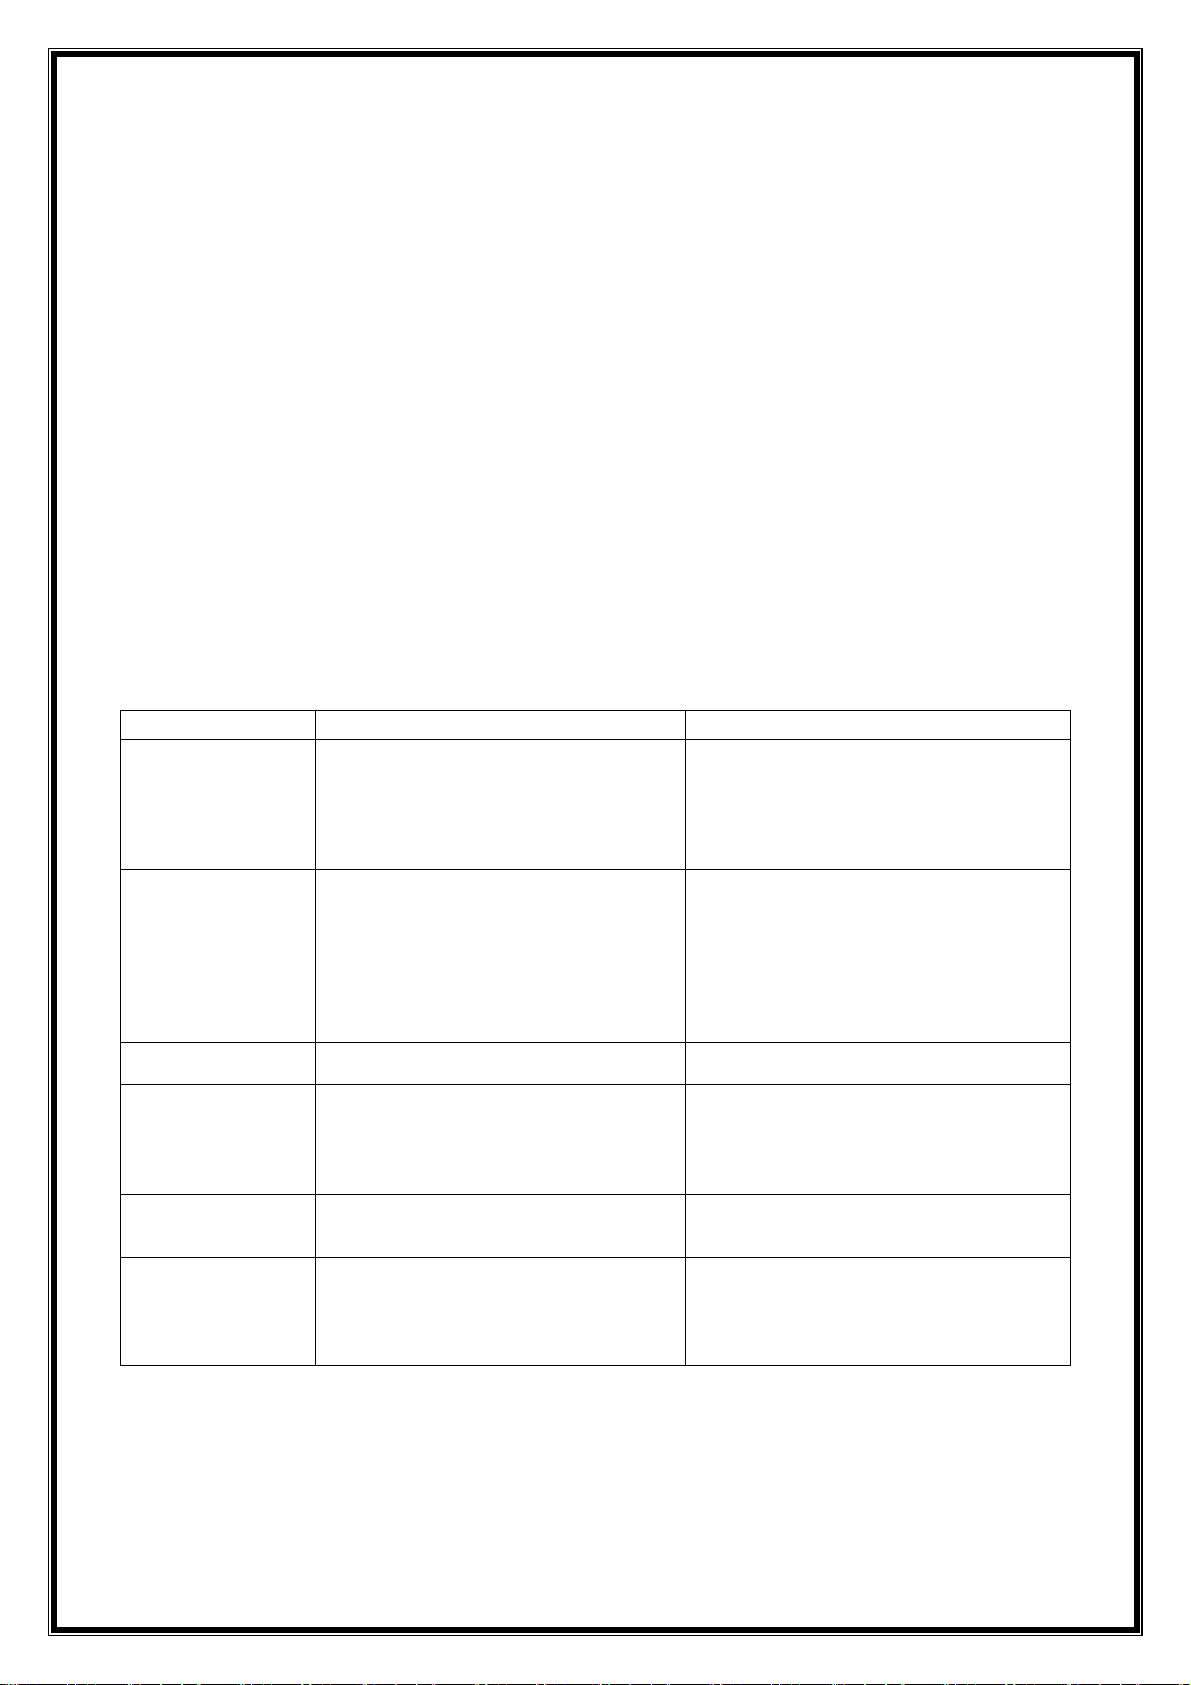
Symptom Possible Reasons Solutions
No sound through
speakers.
① The power switch is off;
② The audio cable or the speaker is not
connected.
③ The amplifier volume is turned down.
Or wrong input selected.
④ Valve failed in CD player
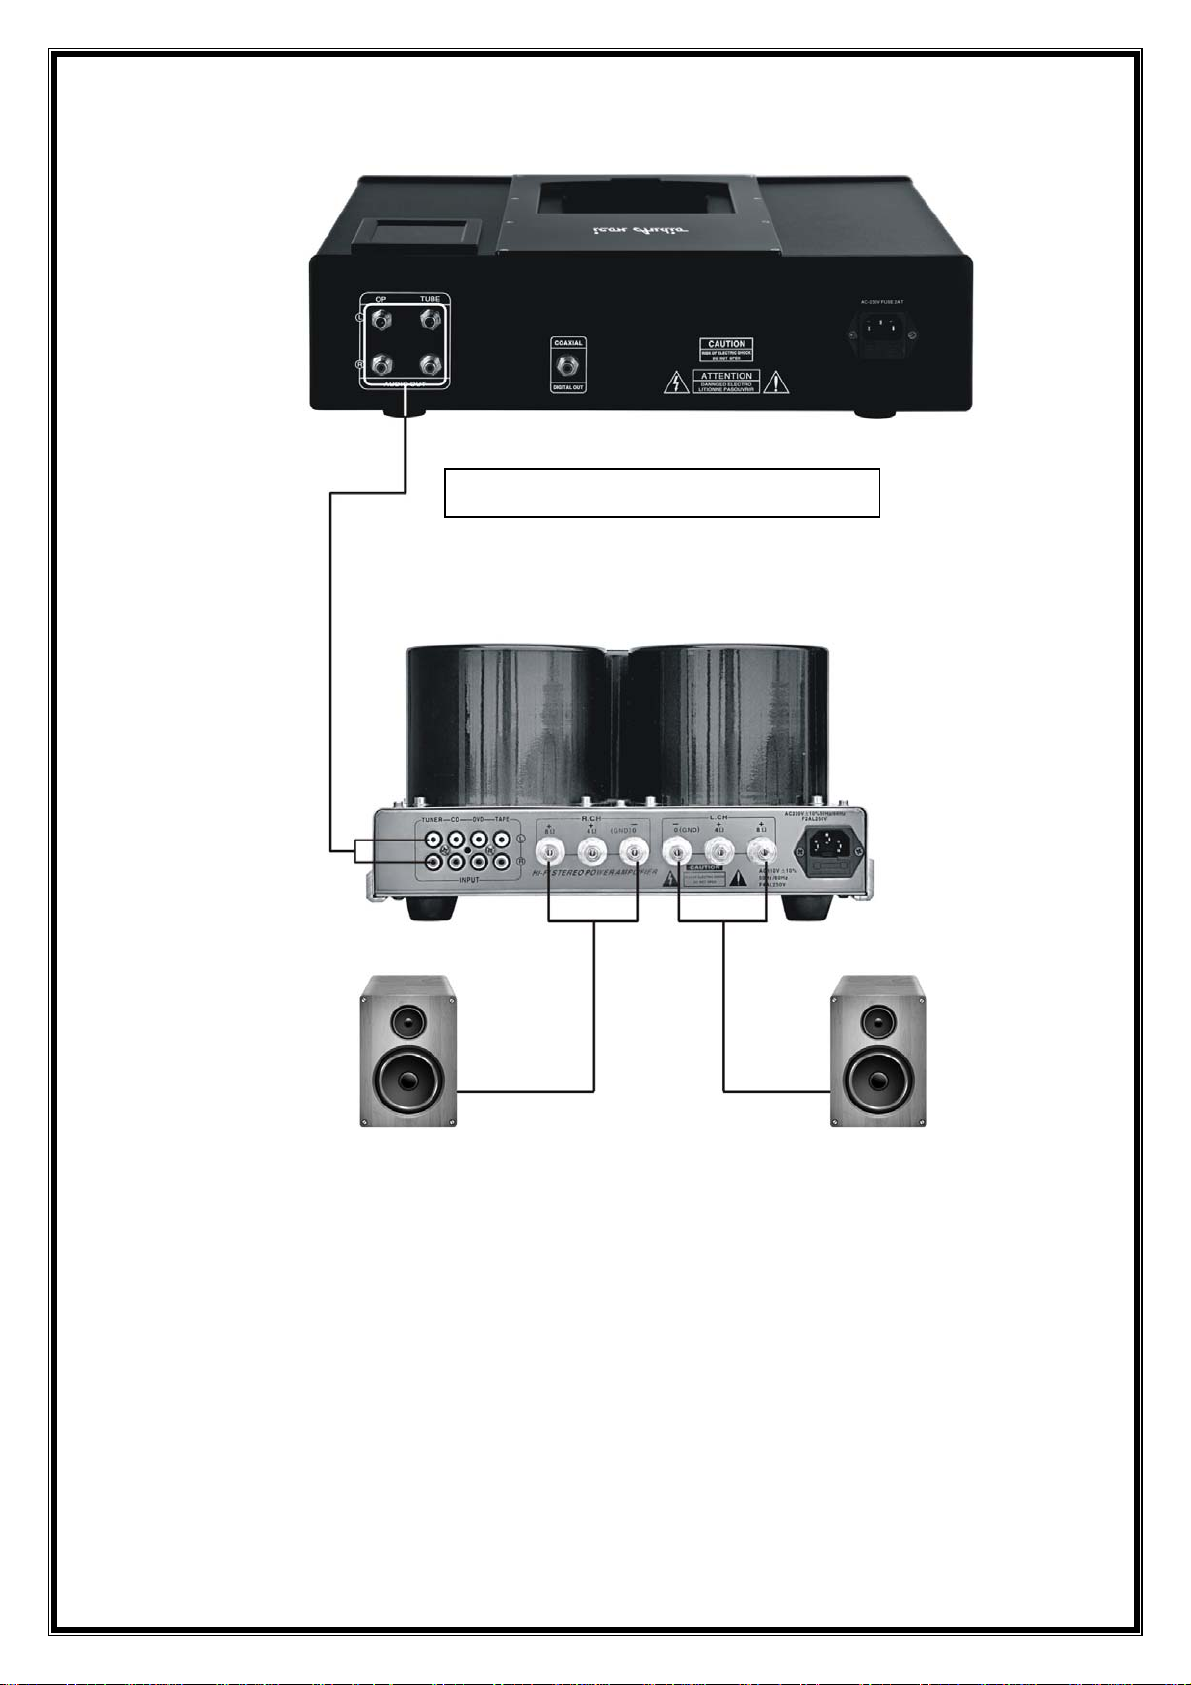
① Turn on the power switch.
② Connect as diagram.
③ Increase the volume, or select correct
input on amplifier.
④ Try OP output
CD cannot be read.
① Poor copy CD, or not compatible
② There are scratches, dust, jam or
deformation on the CD.
③ CD is upside down or not positioned
properly.
④ CD player has difficulty with known
good CDs.
⑤ Check magnetic clamp is in place
① Please use genuine CD.
② Clean the CD or try another CD in better
condition.
③ Invert or replace the CD.
④ Possible Laser fault seek service.
⑤ Fit magnetic clamp
Power indicator does
not light up. The fuse has blown. Replace with 20mm F2A (F4A 115v USA)
If the replacement fuse blows seek service
Remote Control does
not work.
① Beyond the remote control distance.
② It’s not aimed at the CD player.
③ The batteries are dead or incorrectly
inserted.
④ There are obstacles in the way.
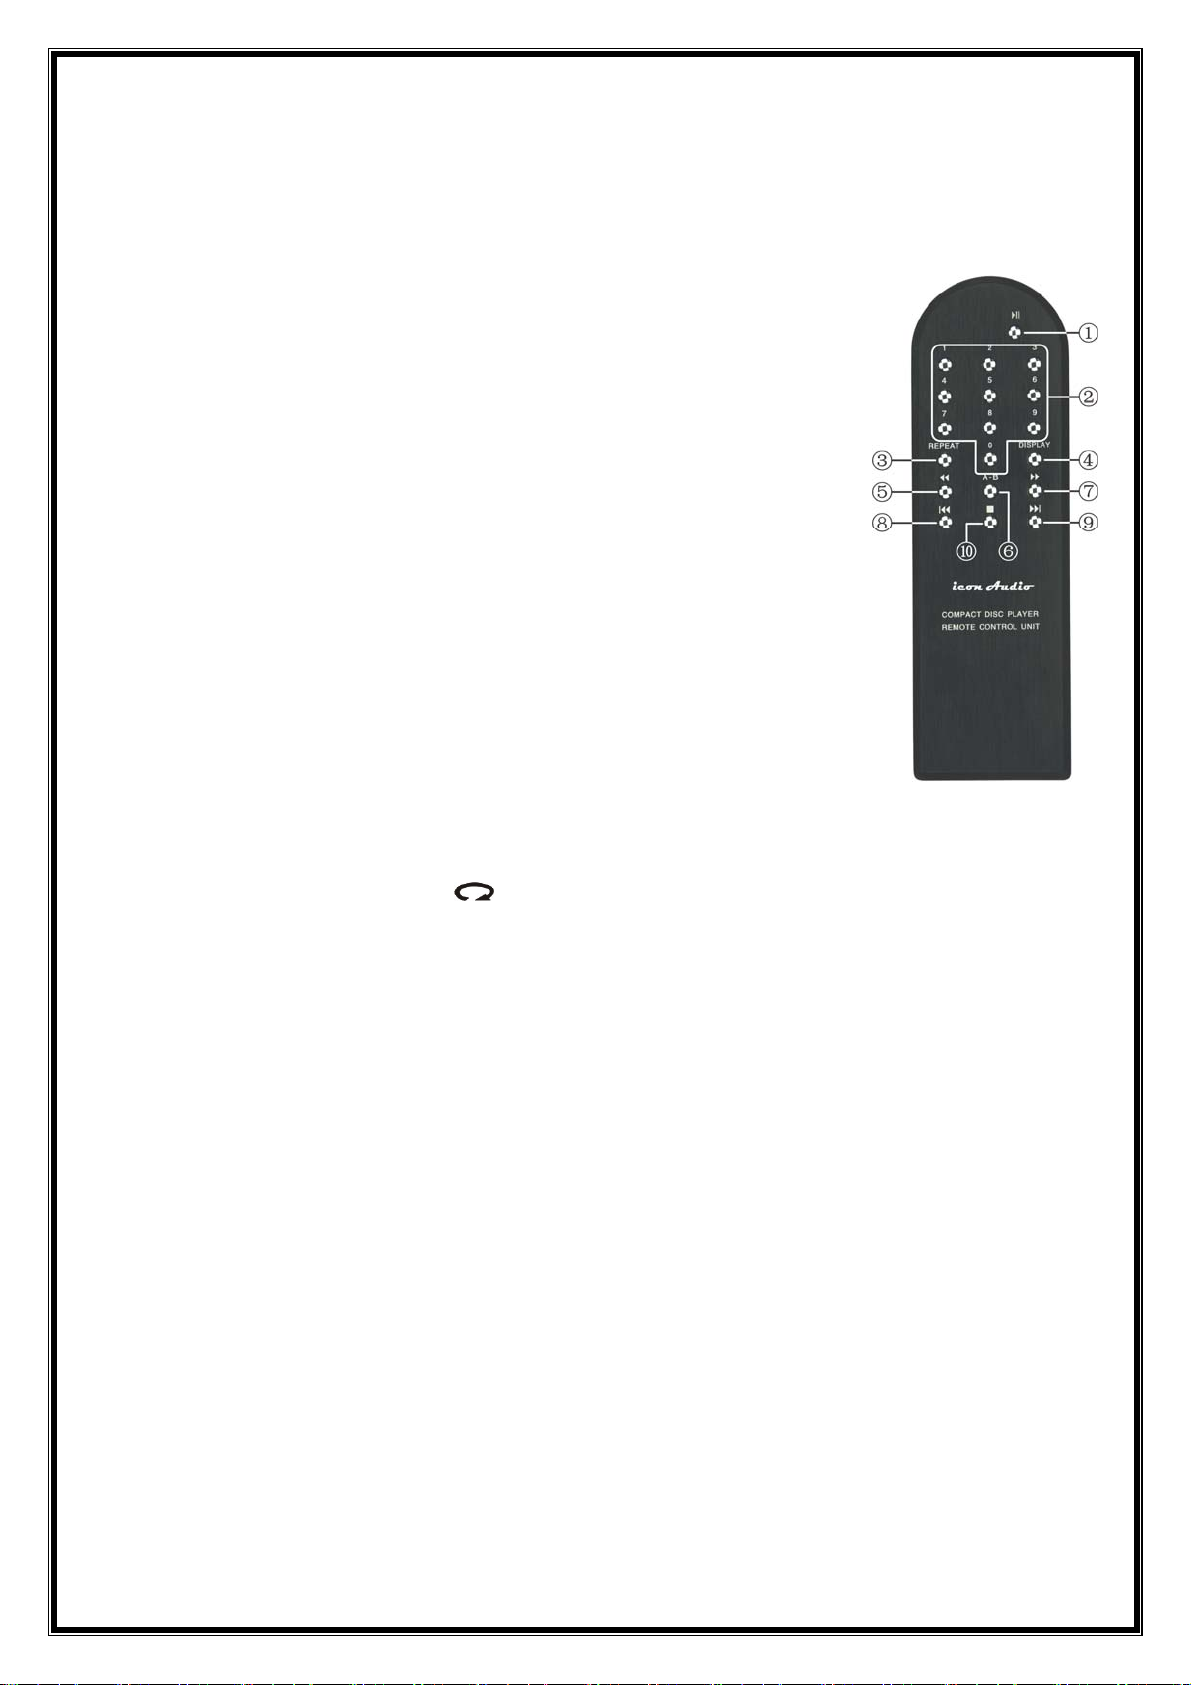
① Reduce the distance
② Aim it at the window of the CD Player.
③ Replace batteries or check inserted
correctly. (2x AAA Alkaline)
④ Remove the obstacles.
The Position of the
Sound Field is wrong
Both speakers cables do not follow the +
and – convention. One is the wrong way
round
Check speakers are “In Phase” by checking
speaker wiring, or poor CD recording, try
another CD
If there is hum or
other noise
① You are using unshielded cable
② Noise from adjacent equipment
③ The “grounding” of the cable or system
is at fault.
① Change to shielded/screened cable
② Move equipment or connecting cables
③ Correct the system or seek advice.

Page 9
6 Valve Replacement
Health & Safety; High voltages are present inside the
unit and on exposed valve sockets when valves are
removed, so take suitable care. Beware valves get
hot in operation!
Only if you feel confident should you attempt to
dismantle the CDX2 by first isolating from the mains
power by removing the plug from the back panel.
How do I know when to replace valves?
Valve life will depend upon such things as hours of use
and number of on/off cycles. It is not good practice to
remove the valves unnecessarily as this can strain the
pins and cause tiny air leaks.
Generally speaking the ECC82/12AU7 valve should give
about 2-3 years of normal use. With heavier use this
valve should be replaced every 12 months.
Symptoms could be: Loss of volume, loss of clarity, poor
channel balance, distorted sound, excessively
“Microphonic”, intermittent noise.
Catastrophic Failure:
This could be due to heater failure, air in the valve, or a
short. Although unlikely this could happen at any time.
If the CDX2 sounds OK the valves are probably fine or
least useable.
If the solid state output is working OK or sounds better,
the tube probably needs replacing. Icon Audio will test
the valve free of charge (non UK customers should
include the cost of return postage).
7, Replacement Valves. Use only valves marked
ECC82/12AU7. The ECC81/12AT7 may also be used.
The ECC83 will work, but not as well. So not
recommended
DO NOT USE ECC99 (heater current too high), ECC88,
6922/6DJ8/6N6 (wrong pin connections/heater ratings)
or any other valves which may be “close” as the
performance will be impaired or damage may result.
Ideally a “near perfect” match between the two halves is
needed to guarantee perfect channel balance. We
suggest that you choose from our recommended tested
valves. “Used” premium valves often give disappointing
results. We take no responsibility for valves not supplied
by Icon Audio damaging the CDX2.
Take care that you orient the valve correctly before
inserting and removing. Make sure the pins are straight,
beware excessive bending can cause air leaks.
How replace the 12AU7/ECC82 Valve
You will need a medium/large crosshead screwdriver
and a set of Allen keys (size 2mm).
1. Disconnect the power/audio connections,
remove any CD and the clamp and place the
CDX2 face down on a soft surface.
2. Remove the 3 screws that secure the right hand
side plate to the base.
3. Turn the CDX2 the correct way up and remove
the 4 socket head bolts on the RIGHT HAND
(valve window side) that secure the CD deck
door top plate.
4. Carefully remove the RIGHT HAND steel top
plate/side panel.
5. Change the valve by pulling back the retaining
spring and gently but firmly pulling the 12AU7
valve out. A small amount of rocking motion may
help.
6. Insert new valve and replace spring, making
sure the pins are clean.
7. TO RE-ASSEMBLE first fit the side plate and
insert the 3 bolts from the underside. Do not
tighten at this stage.
8. Re-fit the deck door top plate and secure with
the 8 Allen head bolts.
9. Tighten the all the bolts.
10. Test CD player output working OK.

Page 10
7 Specification & Features
(Typical conditions @ 230/120v? 50/60Hz)
2v Audio Output for full modulation
192 kHz 24 bit DAC
1x ECC82/12AU7 double triode analogue output
Burr Brown chipset
Frequency Response: 20Hz-20kHz(±0.5dB)
Signal to noise ratio: ≥105dB(A Weighted)
Distortion:≤0.005% (1kHz NORMAL)
Digital Output:coaxial
Dynamic Range:≥110dB
2 separate power supplies for digital circuit
Hand inserted components
Ceramic valve base for low noise/leakage
High quality metal film resistors
Audiophile polypropylene audio caps
Optional upgrade to Jensen Copper foil capacitors
Valves carefully matched for best performance
Gold plated output terminals
220/240volts, 40watts
W:41cm. D:35cm. H:11cm 9KG (allow for connections)
Shipping Info W:50cm D:47 H:23 12kg (0.058m2)
IEC mains lead, (5amp fused)
CE certified. ROHS & WEEE compliant
Specification subject to change without notice.
Malfunction and anomalies check points
Many malfunctions are caused by some simple operational mistakes. Thus some common malfunctions
can be eliminated on your own as per following instructions. If malfunctions still exist after examination,
please contact your dealer or Icon Audio.
ATTENTION
1. The machine should be placed in a ventilated and dry environment.
2. When cleaning, unplug the power socket to prevent electric shock.
3. Please use the machine within the specified voltage range.
4. No user replaceable parts inside refer to professional Engineer.

Page 11
8 Guarantee
Thank you for purchasing one of our products. We
hope you will be pleased with it.
This CD Player is guaranteed by your retailer you
purchased from for 12 months from the date of
purchase for parts and labour, excluding
shipping. Valves are consumables and therefore
on a 12 months pro-rata basis. Please keep your
receipt as proof of purchase, this will be needed.
In the UK “Manufacturers guarantee” does not exist. It is
the responsibility of the retailer to care for your purchase.
Where a unit is purchased direct from Icon Audio, Icon
Audio will be directly responsible for your guarantee.
All units are individually tested for performance for at
least six hours before despatch to you. In the unlikely
event that you believe the unit is not functioning
correctly, it may be helpful to contact us first as we
may be able to assist you. Then we would request
that you return the item to us for further action.
You are advised to inform us of any change of
address or change of ownership in order that we may
keep you up to date of any upgrades or
improvements. Check our website.
Warranty Limitations
① Damage caused by incorrect operation or
damage by dropping, liquid, damage to Laser
assembly.
② Unauthorized modification or upgrades.
③ This warranty does not cover commercial use
without written approval. Contact Icon Audio.
Claims for any damage to either amplifiers or valves
must be reported within three days of receipt.
9 Packing Instructions
It is essential that the original box and packing be
kept in good condition, as this provides vital
protection during transit. Please do not write on
box, but use removable labels.
Use packing and tape to secure the CD door.
Re-use the supplied plastic bag to keep the
unit clean and free from damp.
The mains lead fits in a foam cut-out
underneath the amplifier.
Remove the batteries in the remote control
during shipping and storage.
If the CD player is stored in the box, keep
upright.
Do not store in damp conditions as this will
cause damage and corrosion.
If the CD player is shipped insurance is
desirable due to the high unit value.
icon Audio UK LTD
351 Aylestone Road Leicester LE2 8TA
www.iconaudio.com
Phone +44 (0) 116 244 0593 Cell +44 (0) 778 715 8791
2017-02-06 G version
Notes:
Table of contents
Other icon Audio CD Player manuals
Popular CD Player manuals by other brands

Sony
Sony CFD-E95 - Cd Radio Cassette-corder Service manual

Pioneer
Pioneer PD-M406 operating instructions

Denver
Denver DM-17 operating instructions

Sony
Sony CDX-CA750X Primary User Manual (English, Espanol,... operating instructions

Philips
Philips EXP2461 Expanium Specifications

Sony
Sony CDP-CX55 Service manual