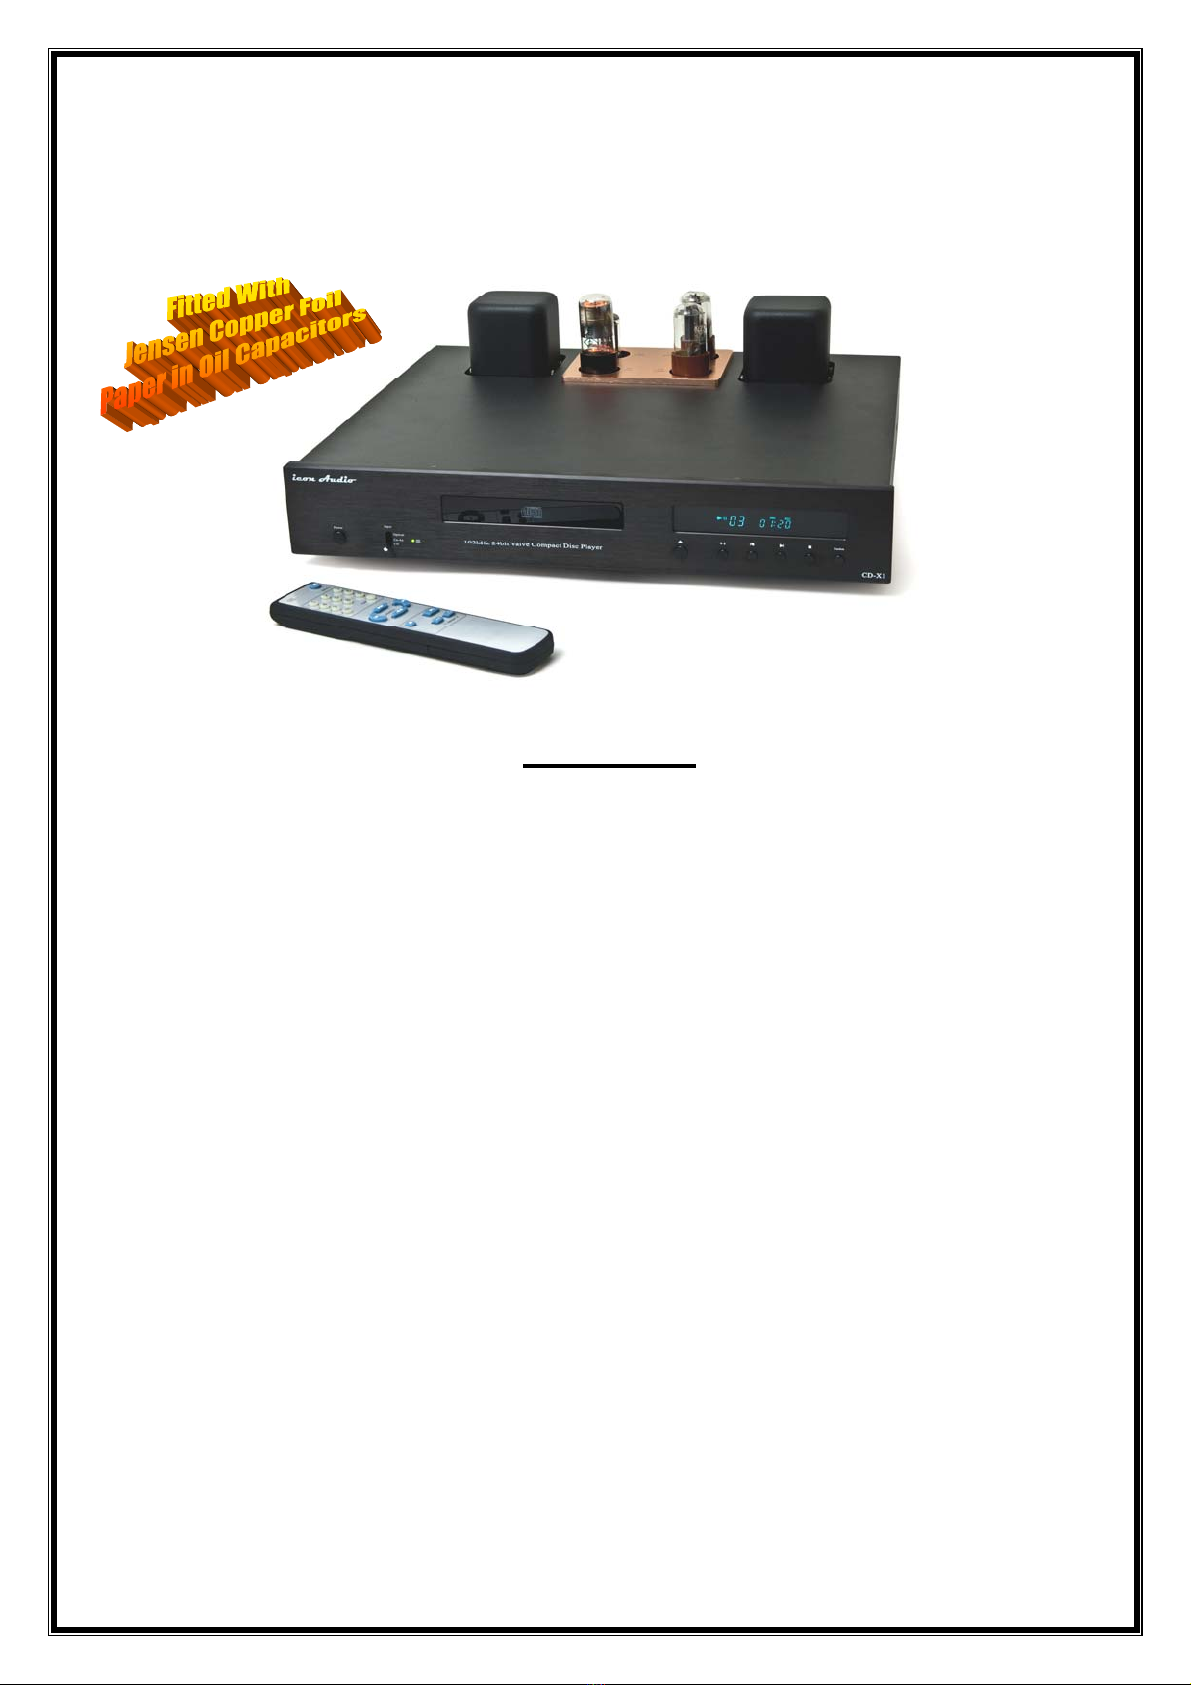
icon Audio CDX1 User manual

Page 1
icon Audio
Instruction Manual Covering:
X1 Compact Disc Player
Contents
1 Introduction & Final Inspection
2 Set Up Guide
3 Connecting inputs & outputs
4 Getting the best performance
5 Trouble Shooting
6 Valve Replacement
7 Specifications
8 Guarantee
9 Packing Instructions
1 Introduction
Thank you for purchasing the
CDX1
. This is an
advanced CD player using the latest digital
technology to decode the optical digital signal
coming from the Laser pickup using 192 kHz
upsampling and 24 bit resolution. That is where any
similarity to other CD players ends. In order to get
the best results from digital sound David Shaw and
the Icon team believe that the pure valve analogue
part of the sound needs the same careful treatment
as our famous PS1 and PS3 phono pre-amps. The
CDX1 is the result of years of design in order to offer
the same relaxed, warm sound that we offer from
vinyl and our amplifiers. This required some radical
thinking.
Apart from some of the better known befits of valves
in audio, we have paid great attention to eliminating
Radio Frequency interference from the audio output,
something ever present in the high speed digital
processing.
To do this we have no less than six unique
features:-
1. A large dedicated valve power supply
completely isolated from the two digital
power supplies.
2. A large high value choke (smoothing
transformer) is employed, this allows the
rectifier to operate without drawing sharp
spikes of current.
3. Valve Rectifier. Valve amplifiers always
sound better if a valve rectifier can be
employed. The slow start during warm up
also avoids “cathode stripping” of the
6SN7s.
4. The 0D3 valve regulator ensures a constant
HT voltage to the output stage, and is also
excellent at absorbing RF noise.
5. The venerable 6SN7 output valve is
probably the best sounding hi fi valve ever.
Its warm tonal balance is an excellent
counter to some of the less desirable
characteristics that digital systems present.
Also very reliable and long lasting to
maintain performance.
6. Like our other amplifiers the pure valve
analogue section is completely hard wired.
This allows the use of full sized components
and future upgrading with the large Jensen
capacitors act.

Page 2
You will notice that the build quality and weight is
much higher than many other players. The heavy
gauge steel chassis help to dampen unwanted
resonances.
The CDX1 is hand built using carefully selected
audiophile components. The transformers are hand
wound using low oxygen copper and special
Japanese long grain iron. Finally each player is
valve, carefully commissioned and tweaked for best
performance in Leicester UK.
In order to get the best out of your amplifier, please
read the enclosed notes. Even if you are
experienced with hi fi please read the ‘quick set up
guide’. Should you be uncertain about anything
please contact your dealer or us for advice.
Valve equipment does need a little more attention
than their solid-state counterparts, but the sonic
results are more than worth it. In this manual we
have tried to include everything that you need to
know. Please let us know if you find any errors or
feel that we have missed anything out.
Hi Fi reproduction is a long chain of events that
includes the recording, editing, mixing etc, before
being transferred to a medium such as LP, Digital,
etc, before being played through your own source
unit, the amplifier and finally loudspeakers.
Please note V2 is 0D3 not 0A3 as shown (early photograph)

Page 3
Final Inspection - Your Guarantee of Quality
To assure you of optimum performance and reliability, this amplifier has passed our rigorous
final inspection and listening test by the Icon Audio team in Leicester . During which the final set
up and adjustments were made.
Date …./…./….
Model CDX1……….
Serial Number ………………
Customer ……………………………
Check finish ……….
Internal wiring check ……….
Check Triode mode N/A
Run min 6 hour test ……….
Check input N/A
Output Valve Bias level N/A
Sound Quality ……….
Channel Balance ……….
Valve Microphony ……….
Valve Seating ……….
Noise level .....……
RF Test ……….
Display brightness ……….
Serial No sticker and recorded ……….
Mains voltage 110-120 / 230-240V
IEC Mains Fuse ……1 A
Soft Start Fitted N/A
Sales invoice ……….
Bottom label ……….
Credit card receipt .………
Customer survey form .………
Bias meter N/A
Transformer Protection N/A
Upgrades:
HT delay fitted? N/A
Output Valves ……....……….
Rectifier Valve ……………….
Regulator Valve ……………….
Capacitor upgrade (Audio) ……….
Capacitor upgrade (Power) ……….
Mains lead ……….
Interconnects ……….
Signed off by ……………………….
Notes:
Please note the standard mains lead has not been tested.

Page 4
INSERTION OF VALVES IN CDX1
Viewed from the front
DO NOT REPLACE OR CHANGE AROUND 0D3 WITH 6SN7s
THIS IS DANGEROUS AND WILL DAMAGE THE CD PLAYER.
USE ONLY THE VALVES INDICATED OR DIRECT EQUIVALENT
On/Off Input Select CD Drawer Open Play Back Fwd Stop Random
CD/Co-Ax/Optical (insert label up) /Close /Pause (Track) Play
Digital In/Out Transistor Outputs Valve Output Mains Input
Top: Optical Out Middle: RCA Right & Left Right and Left with 1A Fuse
Middle: Co-Ax In Outer: Bal Right & Left
Bottom: Optical in

Page 5
IMPORTANT READ THESE NOTES BEFORE CONNECTING TO AC MAINS!
2 SET UP GUIDE
1. Unpack unit carefully. Make sure that it is in
good condition. If not report to Icon Audio. It is
important that you keep the packaging for
warranty/service return. The contents of the box are:-
1x CDX1, 2x 6SN7, 1x EZ80, 1x 0D3, 1x mains
cable, 1x remote control. 1x instruction manual
2. If Necessary fit the valves or check that they
are firmly in place as shown on PREVIOUS PAGE
INSERTION DIAGRAM.
Fit the valves according to the type printed on the
chassis. The 2 6SN7s should be on the right hand
side when viewed from the front. With the 0D3 to the
left. The EZ80 has a unique small 9 pin socket.
Be careful to align the central “spigot” of the
6SN7 and 0D3 valves before insertion. They can
be easily broken and is not covered by the
warranty!
NOTE: The 0D3 and 6SN7s are NOT
interchangeable! This will result in damage and
could be dangerous!
3. Connect to amplifier, or pre amplifier. USE THE
“VALVE OUTPUT” RCA SOCKETS. If you are
intending to connect directly to a power amplifier, you
will need some form of volume control such as our
“Passive” pre-amp. The connections marked “AUDIO
OUTPUT” are transistor output only.
4. Before connecting to AC power, Check that the
power switch on the front is “off”. For normal CD
playing the front selector switch should be in the “CD”
position (otherwise there will be no sound). Then
connect the supplied IEC mains lead to a 220-240v
supply. If for some reason the UK welded plug
must be removed, please remove plug fuse and
dispose of immediately. (As they can be a danger
to children if plugged in). The replacement plug
should be wired in the following way Brown to Live
terminal, Blue to Neutral terminal and Green/Yellow
to Earth terminal.
5. Connect to your amplifier using the “valve
output” RCA output sockets. The other outputs are
not valve output. The 3 pin Cannon sockets offer
“balanced” output which is also not using the valve
stage.
6. Using the CD Player as a “DAC”.
Connect a CD Transport to either the OPTICAL or
CO AX socket on the rear. Select the appropriate
input on the front panel. Your signal will be now be
decoded through the CDX1 DAC and valve
analogue circuits.
SWITCH ON! The green fluorescent display should
light up. After about 30 seconds the valve regulator
will start. After this time the player is ready for use
in the normal way. The EZ80 rectifier and the two
6SN7s will have a visible heater glow (when
viewed from a certain angle).
7 All these things are normal for the CDX1
A, Valves can get very hot, BEWARE!
B, The left transformer cover will get quite warm
C, Audio valves may be a little microphonic.
D, Mobile phone ‘breakthrough’ is normal.
E, Some CDR CDs may not play
F, Some CDRW CDs may not play.
8 Health and Safety. The valves when operating
have hot to the touch surface temperatures. Keep
out of reach of children and pets. Always unplug
from power when making adjustments. Like all
electronic devices there are potentially lethal
high voltages inside, which when switched off
can take twenty minutes to discharge! Do not
remove the cover unless you are a competent
engineer. There are no user serviceable parts
inside. Like other household electrical
appliances do not leave unattended whilst
switched on. Do not use valves other than
specified.

Page 6
3 Connecting inputs & outputs
Many problems associated with electronic
equipment involves connecting leads, which are
usually either ‘BAD CONNECTION’ or a
‘WRONG CONNECTION’. So it’s worth making
sure that you have good connections and that
your leads are the right way round.
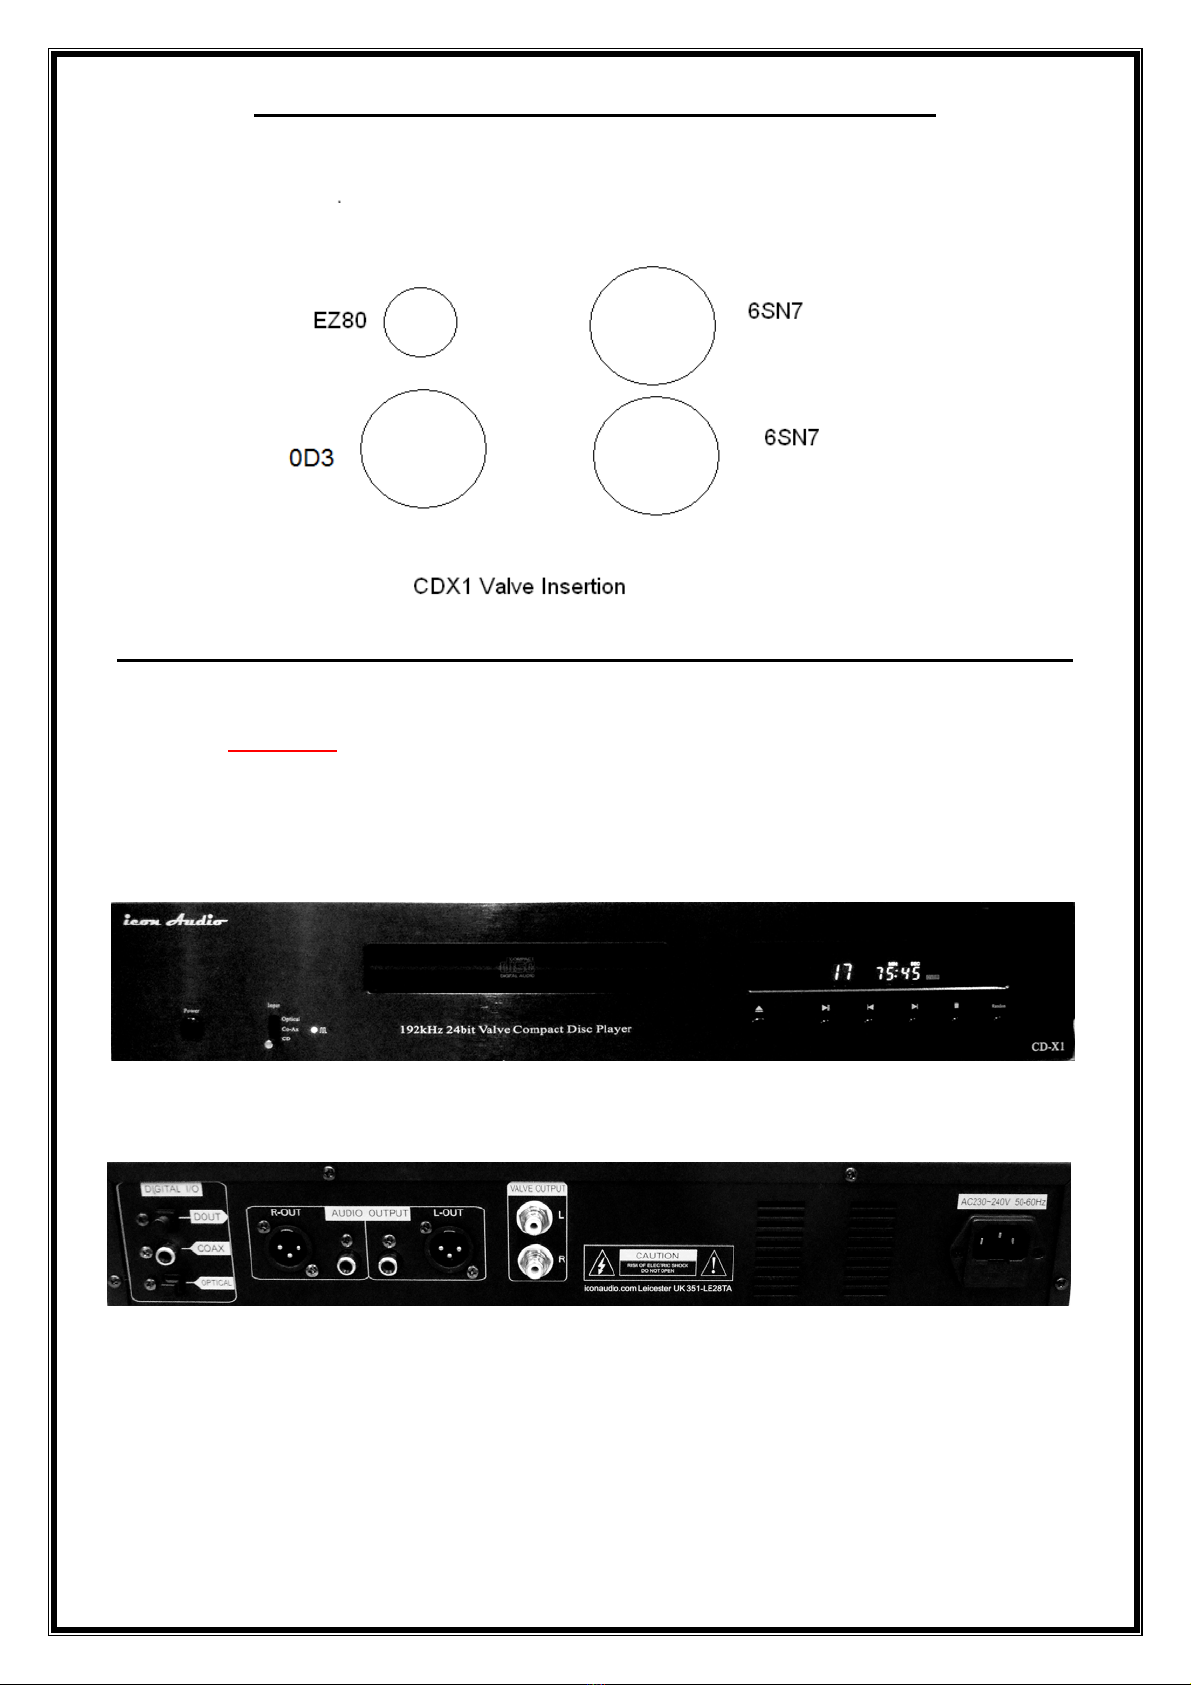
Outputs
For normal use you should connect suitable
interconnects to the “VALVE OUTPUT” Left and
Right sockets on the rear, this will give the best
sound quality as this uses our specially designed
valve circuit.
The four sockets marked “OUTPUT” in the white
line box, are both transistor RCA and transistor
“balanced” output.
Interconnect and mains Cables
In our experience Icon valve equipment is very
tolerant of cables; therefore the benefits of some
very ‘exotic’ cables may be less apparent. But this
is also personal taste.
As all interconnect cables have losses, therefore
keeping the cables under 2-3 meters will be
advantageous. However the CDX1 is designed to
work with cables up to 10m with minimal loss.
4 Getting the best performance from your CD Player
Do not leave the CDX1 switched on all the time. This is not necessary
Do not use valves other than listed as there could be danger of shock or damage
DO NOT LEAVE PERMANENTLY SWITCHED ON!
Whilst it is common for solid state equipment to
left on 24/7 without switching off, there is no
advantage in doing this with the CDX1. It only
takes a few minutes for the CDX1 to fully warm
up. Long periods on “idle” will consume valve life.
We would always advise that any item of home
electronics is switched off when unattended.
‘Burning in’
Although the CD Player should sound good within
about 5 mins it can take up to an 30 mins to
sound at its best and will take several months of
regular use before it is fully ‘run in’.
Upgrading and Changing Valves!
6SN7 Valves are very rugged and sound better
than the more modern miniature types, and have
a reputation for a very long life. The valves
supplied with selected models are the result of
careful comparison with other makes. But beware
of paying a premium for “New Old Stock” valves
where you may be paying for rarity value and not
performance. Icon Audio keeps a range of
standard and various upgrade valves in stock.
Cabinet Care
To remove dust, brush with a soft paintbrush.
Other marks can usually be removed with a damp
cloth. Never use anything wet on the amplifier,
and always clean with the power disconnected.
5 Trouble Shooting
CD Player Dead
Check the fuse in the UK supplied IEC plug. You could
also try another IEC cable. Also check the 1A fuse in the
small drawer under the IEC socket (see P 4). Spares are
available free of charge from Icon Audio.
The fuse in the wall plug should be a 3 or 5 amp fuse.
If either there is no sound or the CDX1 is dead you
should refer to your dealer or Icon audio for assistance.
If the TRANSISTOR (AUDIO OUT) output is working
then there is a fault with the valve analogue section.
No sound
Have you selected the right input on your amplifier?
Is the display indicating disc playing?
Distorted sound.
Could be you’re your amplifier, try another music source
to your amplifier to prove this. Check all wiring, and try
swapping things around to eliminate or prove which
component is causing the problem the problem.
Hum Problems
If you experience hum, try disconnecting all inputs, if
hum persists this is probably an amplifier fault.
If not, identify which input is causing hum. Connect one
input at a time. A common cause is a ‘hum loop’ caused
by having too many earths, and may be identified by
unplugging each input source from the mains. One
remedy for this is to use an interconnect which only has
the screen connected at one end. Other causes of low-
level hum can be from adjacent equipment, so
experiment with moving equipment around to see if
this makes the hum better or worse.
Strange noises coming from speakers
Turn volume to minimum on unused input, if the
noise disappears, the fault is with the source or the
connection. If noise persists, the problem is with
amplifier.
If a whole output valve glows red (other than the
heater), often accompanied by a hum through the
speakers, switch off immediately, and refer to Icon
Audio or a service engineer, as this could be valve
failure.
Service: Should you suspect a problem, you could
return the unit to your dealer or Icon Audio for a
periodic service or return the valves for testing free of
charge. You should carefully remove the valves
numbering them with a marker from left to right as
you do so in order that that may be replaced in the
same position. They should be well packed in
cardboard & foam or similar, and returned to Icon
Audio for testing. (Valves are very rugged if packed
properly).
Mains Supply
This amplifier is hard wired to work on 230/240v ac.
Some models may be re-configured for 110/120v ac
by a qualified engineer. Contact for more information.

Page 7
6 Valve Replacement
Health & safety; High voltages are present inside the
unit and on exposed valve sockets when valves are
removed, so take suitable care. Beware valves get
hot in operation!
How do I know when to replace valves?
Generally speaking the 6SN7 is a very strong reliable
valve. We estimate that in normal use the all the valves
should give at least 5 years light domestic use.
Symptoms could be: Loss of volume, loss of clarity, poor
channel balance, distorted sound, excessively
“Microphonic”, intermittent sound. One way to check is to
try the AUDIO OUTPUT RCA sockets , this should not
sound as good.
Catastrophic Failure:
This could be due to heater failure, air in the valve, or a
short. Although unlikely this could happen at any time.
If the CDX1 sounds OK the valves are probably fine.
Valve life will depend upon such things as hours of use
and number of on/off cycles. It is not good practice to
remove the valves unnecessarily as this can strain the
pins and cause tiny air leaks.
If the CDX1 is working correctly and the 0D3 regulator
valve is lit, the power supply is working normally.
7, To avoid damage to the CDX1 and electric shock
hazard you must use only the correct valves marked
6SN7 (6N8/CV181) 0D3 and EZ80. Use only valves
which you know to be new or good condition.
Take care that you orient the valve correctly before
inserting and removing. Line up the centre “Spigot”
first. They are easy to break, do not bend
excessively to the side.
Icon Audio offer a free valve testing service. (See
“service” P6)
7 Specification & Features
(Typical conditions @ 230v 50Hz)
192 kHz 24 bit DAC
2x 6SN7 double triodes Analogue output
Burr Brown chipset
2 separate power supplies for digital circuit
Hand wired point to point components
No printed circuit board for Valve section
Ceramic valve bases for low noise/leakage
Automatic HT delay circuit to protect cathodes
Signal to noise level -95db
Freq response 20Hz-20kHz +or- 0.5db
THD 0.05% THD typical 1khz 0db
Custom hand wound transformers using
Japanese long grain steel
Choke regulated valve power supply
0D3 valve regulator
High quality oversized metal film resistors
Audiophile High quality polypropylene audio caps
Optional upgrade to Jensen Copper foil capacitors
Internal wiring using silver gilt cable
Valves carefully matched for best performance
Gold plated output terminals
2.45v output at Valve Output sockets (ref 0 DB)
220/240volts, 40watts
CDX1 W:44cm. D:40cm. H:18cm
Shipping Info W:59cm D:53cm H:29cm W:22kg
IEC mains lead, (5amp fused)
CE certified. ROHS & WEEE compliant
Specification subject to change without notice.

Page 8
8 Guarantee
Thank you for purchasing one of our products. We
hope you will be pleased with it.
This CD Player is guaranteed by the company
you purchased from for 12 months from the date
of purchase for parts and labour, excluding
shipping. Valves are consumables and therefore
on a 12 months pro-rata basis. Please keep your
receipt as proof of purchase, this will be needed.
All units are individually tested for performance for at
least six hours before despatch to you. In the unlikely
event that you believe the unit is not functioning
correctly, it may be helpful to contact us first as we
may be able to assist you. Then we would request
that you return the item to us for further action.
You are advised to inform us of any change of
address or change of ownership in order that we may
keep you up to date of any upgrades or
improvements. Check our website.
Exclusions
Claims for any damage to either amplifiers or valves
must be reported within three days of receipt.
The CDX1 is designed for normal domestic hi fi use.
It is not guaranteed for commercial, Public Address
use, or use in other situations. The guarantee
becomes void if the unit has been modified in any
way not approved by Icon Audio.
9 Packing Instructions
It is essential that the original box and packing be
kept in good condition, as this provides vital
protection during transit. Please do not write on
box, but use removable labels.
Re-use the supplied plastic bag to keep the
unit clean and free from damp.
The mains lead fits in a foam cut-out
underneath the amplifier.
Valves should be removed, and packed in
the space in box provided, along with the
remote control.
Remove the batteries in the remote control
during shipping and storage.
If the amplifier is stored in the box, keep
upright.
Do not store in damp conditions as this could
cause damage and corrosion.
If the amplifiers are shipped insurance is
desirable due to the high unit value.
icon Audio UK LTD
351 Aylestone Road Leicester LE2 8TA
www.iconaudio.com
Phone +44 (0) 116 244 0593 Cell +44 (0) 778 715 8791
Fax 0116 244 0593
2015-02-25 G version
Table of contents
Other icon Audio CD Player manuals