IDM-Energiesysteme Terra CL 08-HGL Guide

Ausgabe 23/04/10
Heat pumps with freshwater technology
THE POWER FAMILY
www.idm-energie.com
Technical documentation
Installation instructions
TERRA CL 08-33 - HGL/BA (400V)
TERRA CL 08-33 - HGL-P/BA-P (400V)
reversible for cooling
with Navigator®1.0 Control
812215 Rev.7

THE POWER FAMILY
(C) IDM ENERGIESYSTEME GMBH
2
.
A
llgemei
n
e Beschreibu
ng
Installation instructions Terra CL
2
1
2
3
4
5
6
7
8
9
1
0
1
1
1
2
1
3
Contents
Contents
1. DESCRIPTION 4
1.1. General Information 4
1.2. Description 5
1.3. Application range 5
1.4. Scope of delivery 5
1.5. Protection of the environment 5
2. TECHNICAL DATA 6
3. DESIGN 7
4. DIMENSIONS 10
4.1. Heat Pump CL 10
4.2. Control cabinet 11
4.3. Intake box (optional accessories) 11
5. INTERIOR INSTALLATION 12
5.1. Installation Instructions 12
5.2. Heating Connection 12
5.3. Condensation run-off 12
5.4. Air Routing 12
5.5. Air Inlet and Outlet 12
5.6. Noise 13
5.7. Installation space 13
5.8. Corner installation 14
5.8.1. Space Required and Accessibility 14
5.8.2. Customer preparation 15
5.8.3. Accessories for corner installation 16
5.8.4. Assembly Instructions - Corner Installation 16
5.9. Installation – Standard air duct 17
5.9.1. Accessories – Standard air duct 18
5.9.2. Customer preparation – Option 1 19
5.9.3. Customer preparation – Option 2 20
5.9.4. Assembly instructions - Standard duct 21
5.10. Installation – Flexible air hose 22
5.10.1. Customer preparation – Flexible air hose 23
5.10.2. Accessories – Flexible air hose 24
5.10.3. Assembly instructions – Flexible air hose 25
5.11. Flexible air hose with air intake box 26
5.12. Conversion from left to right-side connection 27
6. EXTERIOR INSTALLATION 28
6.1. Customer preparation 28
6.2. Distances 29
6.3. Accessories – Exterior installation 29

THE POWER FAMILY
(C) IDM ENERGIESYSTEME GMBH Installation instructions Terra CL 3
1
2
3
4
5
6
7
8
9
1
0
11
1
2
13
Contents
Contents
General instructions on operating the heat
pump.
Important instructions on assembling and
operating the heat pump. It is imperative
that these are observed.
General instructions on assembling the heat
pump.
Space for customer service
telephone number
7. HEATING SIDE CONNECTION 30
7.1. Requirement heating side connection 30
7.2. Terra CL-HGL heat pump with IDM Hygienik with separation plate 31
7.3. Terra CL-HGL heat pump with IDM Hygienik and heating buffer 32
7.4. Terra CL-BA heat pump with Hygienik and separation plate 33
7.5. Terra CL-BA heat pump with Hygienik and without separation plate and heating buffer 34
7.6. Terra CL-BA oil/gas boiler, Hygienik with separation plate and heating buffer 35
7.7. Terra CL-HGL-P heat pump with process reversal for cooling and IDM Hygienik with separation plate 36
7.8. Terra CL-BA-P heat pump with process reversal for cooling and IDM Hygienik with separation plate 37
8. ELECTRICAL CONNECTION 38
8.1. Power supply 38
8.2. Connection Diagram Electrical Components 39
8.3. Power Supply Connection 40
8.4. Connection lines control cabinet - heat pump 40
8.5. EMC 41
8.6. Layout of the Inputs on the Central Unit 42
8.7. Sensor design 42
8.7.1. Sensor equipment 42
8.7.2. Flow temperature sensor 42
8.8. Impulse Inputs 42
8.9. Digital Inputs 42
8.10. Layout Outputs 43
8.10.1. Analogue Outputs (80-87) 43
8.10.2. Triac outputs (10-12) 43
8.10.3. Digital outputs 230V AC (20 -38): 43
8.10.4. Connection of the mixers 43
8.11. System Earthing 43
8.12. Maximum Restriction for Underfloor Heating 43
8.13. Composite signal zone valve 43
9. COMMISSIONING 44
9.1. Commissioning information 44
9.1.1. First switch-on of the heat pump 44
9.1.2. Operation 44
9.2. Malfunctions 46
All rights reserved for modifications to the technology and design.

THE POWER FAMILY
(C) IDM ENERGIESYSTEME GMBH
1
.
A
llgemei
n
e Beschreibu
ng
Installation instructions Terra CL
4
1
2
3
4
5
6
7
8
9
1
0
1
1
1
2
1
3
1
Description
1. Description
1.1. General Information
By purchasing this system you have acquired a
modern and efficient heating system. Ongoing qua-
lity controls and improvements as well as functional
checks at the plant guarantee you technically perfect
equipment.
Please read through this documentation carefully. It
contains important information for correct installation
and safe and economical operation of the system.
Safety instructions:
Installation and maintenance work can be hazardous
due to high system pressure, high temperatures and
live parts and may only be operated by specialist staff.
Heat pumps may only be installed by competent spe-
cialist staff and commissioned by a customer service
company trained to do so by IDM-Energiesysteme
GmbH. When working on the heat pump, the system
mustbedeactivatedandsecuredagainstreactivation.
In addition, all safety instructions in the relevant do-
cumentation, stickers on the heat pump itself and all
other applicable safety regulations must be observed.
Transport:
During transport, the heat pump must never be
inclined more than 30°. The heat pump must not be
transported on the connection fittings. The transport
packaging may only be removed if the heat pump is
located at its installation location.
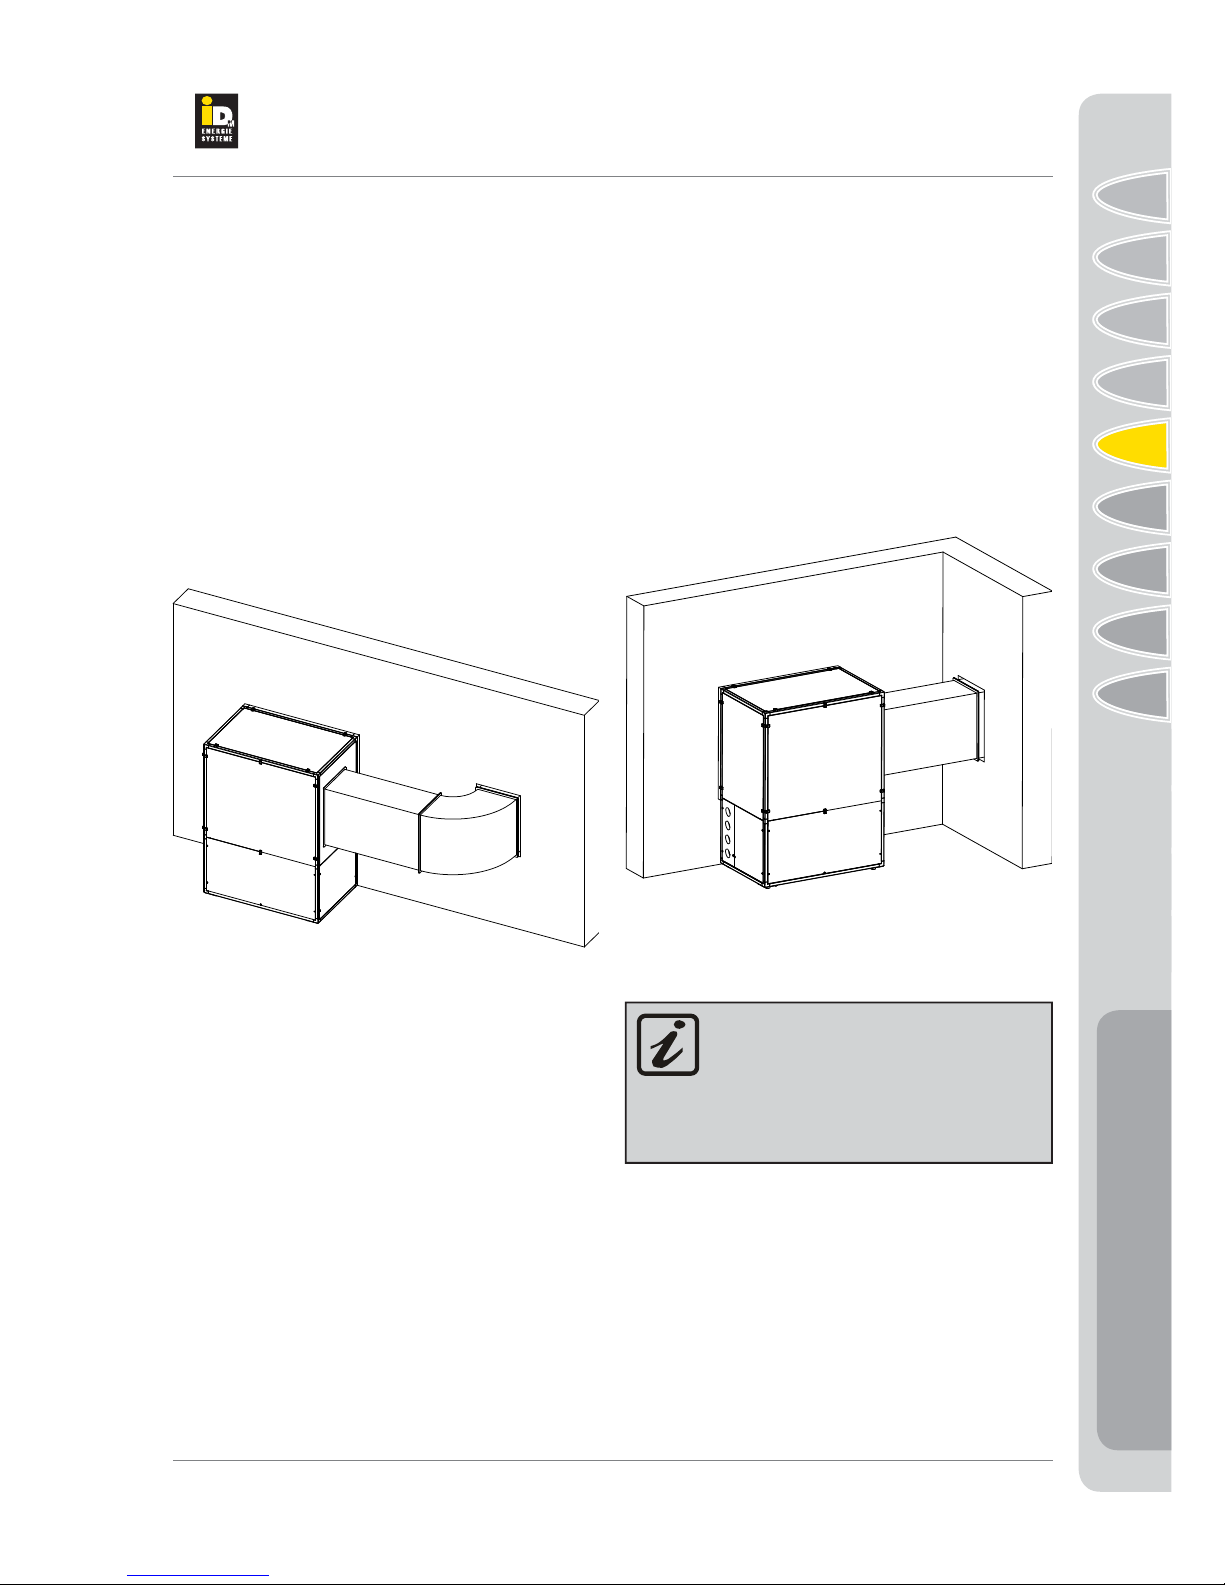
Sound emission:
TERRAheat pumps are very quiet in operation thanks
to their design. It is however important that the site of
the heater is situated as far as possible from noise-
sensitive living areas. A noise-insulating door should
be fitted door.
Construction drying and screed heating
The heat pump is not designed for the increased heat
requirements when drying out construction work or
heating plaster or screed. This must be covered by
equipment to be provided by the customer if required.
Servicing and maintenance:
Regular maintenance as well as checking and servi-
cing of all system components guarantee its safe and
economical operation in the long term. To achieve
this, we recommend a maintenance contract with the
relevant customer service company.
Cleaning:
If necessary, the TERRA heat pump can be cleaned
with a damp cloth. The use of cleaning agents is not
recommended.
Installing additional components:
The installation of additional components which
have not been tested with the equipment may impair
function. No liability is accepted and the guarantee
becomes void in the event of damage caused for this
reason.
Standards and directives:
Note for the installation of the heatpump
follow all effective national and inter-
national piping- and installation rules
same as rules for accident prevention and
safety regulations when installing pipeline
systems and electrical components and
equipment as well as the instructions of
this Installation instruction.
Thereto belongs among other things:
- the general effective rules for accident prevention
and safety regulations
- the regulations for environmental protection
- the provisions/regulations of the professional asso-
ciations.
- the effective laws, standards, guidelines and regu-
lations e.g. DIN,EN,DVGW,VDI and VDE
- regulations of the local suppliers/supply companies

THE POWER FAMILY
(C) IDM ENERGIESYSTEME GMBH Installation instructions Terra CL 5
1
2
3
4
5
6
7
8
9
1
0
11
1
2
13
1
Allgemeine Beschreibung
Description
1.2. Description
The TERRACLis an air-water heat pump with suction
gas cooled scroll compressor with large multi-row Al/
Cu finned evaporator.
Aspecial speed-controlled radial fan means that large
flow rates can be achieved at low speeds.
Aplate heat exchanger is used as the condenser.The
machine frame consists of a steel-reinforced plastic
profile. The cover panels are foam-insulated. This
means that the casing is completely protected from
cold bridges and has excellent sound insulation.
The heating controller is a modern controller that ful-
fils all the functions of standard heating regulation.
The heat pump has a compact design, the evaporator
is ready-fitted in the top of the heat pump casing. The
heat pump is filled with refrigerant and is checked in
the factory before shipping for reliable functioning.
1.3. Application range
For monovalent heating and cooling of detached and
semi-detached houses under appropriate environ-
mental conditions. The building must be equipped
with low-temperature heating (e.g. underfloor heating,
wall heating, low-temperature radiator heating).
TERRA CL heat pumps work using the R407C safety
refrigerant which, when correctly mounted and com-
missioned, circulates in a closed circuit. This minimis-
es its environmental impact.
1.4. Scope of delivery
- Heat pump unit with suction gas cooled scroll
compressor
- Stainless steel plate heat exchanger as condenser
- Finned tube Al/Cu evaporator package
- Speed-controlled radial fan
- Starting current limiter with rotary field monitoring
- Refrigerant collector and dryer
- Thermostatic expansion valve
- Refrigerant inspection glass
- Refrigerant heat exchanger
- pressure controller for high and low pressure moni-
toring
- Integrated switching valve for defrosting
- Switch cabinet with integrated regulation
- Defrost regulator
- Inlet air sensor
- Thermal relay to protect the compressor
- Thermally insulated basic frame
- Cladding, insulated against heat and noise
- Electric heating immerser for any re-heating
required (6 kW integrated in TERRA CL 08-15, for
TERRACL 20-33 a 9 kW heating immerser is avail-
able as accessories)
- flexible connection hoses
HGL heat pumps
- Built-in HGL valve
- Stainless steel plate heat exchanger as HGL
exchanger
Other accessories:
see also the IDM pricing list
1.5. Protection of the environment
The lower the maximum flow temperature
is set, the higher the efficiency of the heat
pump.
Heatpumps are electrical equipment
made from high valuable materials,
which are not allowed to be disposed
like normal household garbage, but
have to be disposed professional and
proper according the regulations of the
local authorities.
A non-proper disposal can cause, apart
from sanctions for the violator, environ-
mental damages and harm for your
health.
The charging pump is integrated in TER-
RA CL-HGL/BA 8-15, loosely suplied with
the TERRA CL-HGL 20-33 and available
as acessories for TERRA CL-BA 20-33!

THE POWER FAMILY
(C) IDM ENERGIESYSTEME GMBH
2
.
A
llgemei
n
e Beschreibu
ng
Installation instructions Terra CL
6
1
2
3
4
5
6
7
8
9
1
0
1
1
1
2
1
3
1
2
Technical data
2. Technical data
TERRA CL 08-33
to EN 14511
Type Unit8 10121520253033
Heat output for A2/W35 [kW] 8.6 10.4 12.5 15.2 20.8 24.6 30.4 32.6
Heat output for A7/W35 [kW] 11.1 13.6 16 18.9 27.2 32.0 37.8 39.2
Heat output for A-7/W35 [kW] 7.3 8.8 10.4 12.2 17.6 20.8 24.4 28
Power consumption for A2/W35 [kW] 2.44 2.97 3.57 4.47 5.90 7.10 8.90 9.59
Power consumption for A7/W35 [kW] 2.59 3.24 3.85 4.49 6.50 7.70 9.00 9.80
Power consumption for A-7/W35 [kW] 2.37 2.84 3.53 3.94 5,85 6,95 8,78 9.33
COP for A2/W35 3.5 3.5 3.5 3.4 3.5 3.4 3.4 3.4
Cooling output for A35/W7 [kW] 7.2 8.4 10.4 12.2 16.8 20.8 24.4 --
Cooling output for A35/W18 [kW] 9.8 11.5 14.4 16.8 23.0 28.8 33.6 --
Power consumption for A35/W7 [kW] 3.10 3.80 4.50 5.50 7.60 9.00 11.00 --
Power consumption for A35/W18 [kW] 3.60 4.40 5.30 6.70 8.80 10.6 13.40 --
COP for A2/W35 2.3 2.2 2.3 2.2 2.2 2.3 2.2 --
Weight HGL/Basic [kg] 254/240 269/255 306/290 326/310 413/395 468/450 488/470 498/480
Dimensions HxBxT [cm] 153x110x75 153x110x75 163x120x78 163x120x78 173x120x88 193x130x98 193x130x98 193x130x98
Condenser
Radiator flow and return pipe R1" AG R1" AG R1" AG R1" AG R 1¼" AG R 1 ½" AG R 1 ½" AG R 1 ½" AG
Max. flow temperature [°C] 55 55 55 55 55 55 55 55
Max. operational pressure [bar] 3 3333333
Min. heating circuit water volume [l/h] 1500 1800 2200 2650 3550 4200 5250 5650
Pressure loss - heating side [kPa] 10 11 15 17 15 16 17 18
Recommended or installed storage UPS 25-60 UPS 25-60 UPS 25-80 UPS 25-80 TOP S 30/10 TOP S 30/10 TOP S 30/10 TOP S 40/10
tank charging pump (Grundfos / Wilo) EAS 25/6 EAS 25/6
Remaining pressure of loading pump [kPa] 35 30 52 46 92 88 80 76
Installed or recommended [kW] 66669999
electric immersion heater
Condensation run-off R1" AG R1" AG R1" AG R1" AG R1" AG R1" AG R1" AG R1" AG
copper-soldered stainless steel plate heat exchanger
Not included as standard
Fan type
Nominal air volume [m³/h] 3500 4000 4500 5500 7000 8100 9500 10000
Externally available compression [Pa] 70 30 100 90 200 250 200 200
Refrigerant
Filling quantity [kg] 4.0 4.2 6.0 6.1 8.5 10.3 10.5 10.5
Electrical connection [V]
Operating current (compressor+fan) [A] 8.4 9.8 11.1 12.8 19.2 24.6 27.8 29.2
Starting current [A] 18.6 30.7 30 34.8 35.7 45.9 51.8 66.7
Upstream fuse primary current (Type C,K) [A] 13 13 13 16 20 25 32 32
Upstream fuse control current (Type C,K) [A] 13 13 13 13 13 13 13 13
Upstream fuse Electric heating element (Type C,K) [A] 13 13 13 13 ----
Acoustic power level [dB(A)] 61 62 64 65 66 67 68 69
Sound level in 5 m [dB(A)] 43 43 45 46 47 48 49 50
Sound level in 10 m [dB(A)] 37 37 39 40 41 42 43 44
3x400V / 50Hz
radial / speed-controlled
R407C

THE POWER FAMILY
(C) IDM ENERGIESYSTEME GMBH Installation instructions Terra CL 7
1
2
3
4
5
6
7
8
9
1
0
11
1
2
13
1
2
3
0
5
10
15
20
25
30
35
40
45
-20 -15 -10 -5 0 5 10 15 20
1
1
451
451
W35 EN14
W35 EN14
3
E
4
CL 33
CL 25
CL 20
CL 15
CL 12
CL 10
CL 08
{
{
CL 30
outside temperature [°C]
heating capacity [kW]
bivalence point of the
particular heatpump type
standard external temperature
electr. additional heating
at TERRA CL 15
service water required
electr. additional heating
at TERRA CL 20
building- characteristic line
required heating capacity at
standard external temperature
incl. service water required
Design
3. Design
The dimensioning of an air/water heat pump should
be such that the bivalence point is between -3 and
-10 °C. This will help ensure that more than 90° of
the annual heating requirement is covered by the
heat pump.
The maximum heating output of a building is deter-
mined in the design, including its water consumption
requirement.
In addition, the standard outside temperature is
required. This is determined by geographical location
and can be obtained from various institutions.
Example:
Single-family house in Germany
4 persons
Service water requirement: 4 x 0.25 kW = 1 kW
Heating output requirement: 16 kW
Standard - outside temperature
Germany: - 16 °C
Off-period factor: 1.1
Heating output required:
(Service water consumption required + heating output required) x off-period factor = 18.7 kW

THE POWER FAMILY
(C) IDM ENERGIESYSTEME GMBH
3
.
A
llgemei
n
e Beschreibu
ng
Installation instructions Terra CL
8
1
2
3
4
5
6
7
8
9
1
0
1
1
1
2
1
3
1
2
3
CL08
CL10
CL12
CL15
CL33
CL20
CL25
CL30
0
5
10
15
20
25
30
35
40
45
-20 -15 -10 -5 0 5 10 15 20
4511
4511
EN1
EN1
W35
W35
EN1
Outside temperature [°C]
Heating capacity [kW]
CL08
CL10
CL12
CL15
CL33
CL20
CL25
CL30
0
5
10
15
20
25
30
35
40
45
-20 -15 -10 -5 0 5 10 15 20
4511
4511
EN1
EN1
W45
W45
EN1
Outside temperature [°C]
Heating capacity [kW]
Design
Design
Performance charts

THE POWER FAMILY
(C) IDM ENERGIESYSTEME GMBH Installation instructions Terra CL 9
1
2
3
4
5
6
7
8
9
1
0
11
1
2
13
1
2
3
CL08
CL10
CL12
CL15
CL33
CL20
CL25
CL30
0
5
10
15
20
25
30
35
40
45
-20 -15 -10 -5 0 5 10 15 20
4511
4511
EN1
EN1
W55
W55
EN1
Heating capacity [kW]
Outside temperature [°C]
Design
Design

THE POWER FAMILY
(C) IDM ENERGIESYSTEME GMBH
4
.
A
llgemei
n
e Beschreibu
n
g
Installation instructions Terra CL
10
1
2
3
4
5
6
7
8
9
1
0
1
1
1
2
1
3
1
2
3
4
d
f
b
h
a
l
k
j
i
g
a d
e
t
m
1
2
3
4
5
Dimensions
4. Dimensions
Conduit bushings in Terra CL HGL:
1 ... HGL flow (flex. connection hose)
2 ... Heating flow (flex. connection hose)
3 ... Sensor and control lines
4 ... Heating return
5 ... Condensation run-off
Conduit bushings in Terra CL BA:
1 ... Heating flow (flex. connection hose)
2 ... Sensor lines
3 ... Control lines (CL 12-15 heating return)
4 ... Heating return (CL 12-15 control lines)
5 ... Condensation run-off
Typ b h t a d e f g i j k l m
8 1100 1535 750 640 865 690 1035 575 460 350 240 125 125
10 1100 1535 750 640 865 690 1035 575 460 350 240 125 125
12 1200 1635 780 640 965 720 1135 575 460 350 240 125 125
15 1200 1635 780 640 965 720 1135 575 460 350 240 125 125
20 1200 1735 880 740 965 820 1135 675 540 400 260 125 125
25 1300 1935 980 740 1165 920 1235 675 540 400 260 125 125
30 1300 1935 980 740 1165 920 1235 675 540 400 260 125 125
33 1300 1935 980 740 1165 920 1235 675 540 400 260 125 125
TERRA CL 08-33
Alle Maße in mm
4.1. Heat Pump CL

THE POWER FAMILY
(C) IDM ENERGIESYSTEME GMBH Installation instructions Terra CL 11
1
2
3
4
5
6
7
8
9
1
0
11
1
2
13
1
2
3
4
600
560
180
TB
H
Dimensions
Dimensions
4.2. Control cabinet
4.3. Intake box (optional accessories)
The control cabinet contains the complete heat pump
control system. It is separate from the heat pump,
mounted on a suitable wall with the frame screws
provided.
The connection cables are laid through the PG screw
connections provided on the bottom of the control
cabinet.
Type TERRA CL B H t
08-10 1098 924 600
12-15 1198 1024 700
All dimensions in mm

THE POWER FAMILY
(C) IDM ENERGIESYSTEME GMBH
5
.
A
llgemei
n
e Beschreibu
ng
Installation instructions Terra CL
12
1
2
3
4
5
6
7
8
9
1
0
1
1
1
2
1
3
1
2
3
4
5
Interior installation
5. Interior installation
5.1. Installation Instructions
Interior installation of the heat pump is recommended.
This means that the work involved in frost protection
and condensation run-off heating can be avoided.
It also means that the inlet air / outlet air can be con-
veyed to the heat pump with the least possible heat
losses. Various installation options are described in
detail in the following chapters.
All components of the heat pump are insulated so that
no condensation is formed on the external parts even
at outlet air temperatures of -20°C. However, it is still
advisable to air the room regularly.
The heat pump is decoupled via vibration dampers.
The installation location should consist of a solid
base.
5.2. Heating Connection
A flexible hose set is included as standard for heating
connections. See technical data for appropriate con-
nection sizes for specific machines. It is advisable to
use air source heat pumps only in combination with a
buffer tank such as the IDM Hygienik Tank.
5.3. Condensation run-off
Air source heat pumps generate condensation during
operation. With larger machines, up to 50l of water
can be extracted from the ambient air per day. The
condensation run-off should be conveyed into the
waste water channel via a siphon using the appropri-
ate pipe diameter for the machine.
5.4. Air Routing
The various air ducts (see accessories for interior
installation) and wall openings are designed specifi-
cally for the relevant machines in question. Efficient
and fault-free operation can only be ensured if the
appropriately sized connection elements are used.
5.5. Air Inlet and Outlet
The options for how the air inlet and air outlet are
designed are varied. The list below provides design
guidelines:
- Air inlet side and air outlet side should always be on
two different sides of the building.
- Openings in the masonry must always be protected
against the penetration of foreign bodies (leaves,
small animals). To do this, mesh grilles should be fit-
ted in light shafts, and weather-shield grilles should
be installed on visible walls.
- Wall openings must be created as per the specifica-
tions and insulated against damp penetration using
a closed-pore insulating material (minimum thick-
ness 50 mm).
Even light shafts which are too small
enlarge the pressure loss of the air rout-
ing. These must therefore be sufficiently
large.
Light shafts must have a rainwater
run-off.

THE POWER FAMILY
(C) IDM ENERGIESYSTEME GMBH Installation instructions Terra CL 13
1
2
3
4
5
6
7
8
9
1
0
11
1
2
13
1
2
3
4
5
Interior installation
5.6. Noise
Noise level in the installation room depends on
various factors such as room size, absorption
capacity, reflection, free noise propagation, etc.
For this reason, it is important that the heat pump
is situated as far as possible from noise-sensitive
areas. A noise-insulating door should be fitted.
The night-time reduction in the fan speed means that
noise can be reduced by up to 4 dB. Noise level on
the inlet and exhaust air openings are also reduced
by approx. 4 dB when using air shafts or ducts.
In case of exterior installation, the installation of the
heat pump in a corner can lead to a higher noise level.
Superposition of the sound waves means that noise
level can increase up to 3 dB.
5.7. Installation space
-The TERRA heat pumps should be
installed in a frost-proof room. (Room
temperature should be between 5°C
and 35°C)
-In case of a floating floor screed the screed and
the sound damping around the heat pump have
to be omitted.
-Heat pumps should not be installed in wet rooms
or in potentially dust or explosion-endangered
rooms.
-Gas from refrigerants in plant rooms must not es-
cape into vicinal rooms, stair rooms, courtyards,
walks or into the drainage system of the building.
The gas has to be channelled off safely.
-In case of danger, the plant room has to be eva-
cuated immediately.
-For powering off the cooling facility, a remote
power-off switch has to be installed nearby the
door of the plant room.
-In case a natural ventilation is not possible, a
mechanical ventilation has to be provided. A
mechanical ventilation has to be equipped with
an independent emergency control outside of the
machine room near the door.

THE POWER FAMILY
(C) IDM ENERGIESYSTEME GMBH
5
.
A
llgemei
n
e Beschreibu
ng
Installation instructions Terra CL
14
1
2
3
4
5
6
7
8
9
1
0
1
1
1
2
1
3
1
2
3
4
5
min. 500mm
Interior installation
5.8. Corner installation
The ideal position for the heat pump has proved to
be in a corner. Wall openings can be prepared by the
customer in advance. These openings must be insu-
lated with closed pore insulating material (minimum
thickness 50 mm).
5.8.1. Space Required and Accessibility
To guarantee maintenance and operation of the heat
pump, the following minimum distances must be
observed:
Front side (operation and maintenance side) =
800 mm
Maintenance side = 500 mm
Observing these distances will help ensure problem-
free system maintenance and operation.
A condensation run-off with siphon must normally be fitted opposite the exhaust air opening
for the heat pump.
Heating connection /
Condensation run-off/
Electrical connections

THE POWER FAMILY
(C) IDM ENERGIESYSTEME GMBH Installation instructions Terra CL 15
1
2
3
4
5
6
7
8
9
1
0
11
1
2
13
1
2
3
4
5
a
bd
c
ee
fg
a
b
d
c
e
e
f
g
Interior installation
Based on accessibility, the exhaust air
opening should ideally be on the right-
hand side.
Specified dimensions include clearances. Wall opening should be thicker around the wall
insulation. Minimum thickness of the wall insulation is 50 mm.
5.8.2. Customer preparation
Exhaust air opening to right Exhaust air opening to left
An even, solid installation surface must be selected.
After positioning the heat pump, it must then be lev-
elled. There are adjustable feet on the heat pump for
this purpose.
Typeabcdefg
8 1000 830 650 830 90 650 650
10 1000 830 650 830 90 650 650
12 1100 930 680 930 90 650 650
15 1100 930 680 930 90 650 650
20 1100 930 780 930 90 750 750
25 1200 1130 880 1130 90 750 750
30 1200 1130 880 1130 90 750 750
33 1200 1130 880 1130 90 750 750
TERRA CL 08-33
All dimensions in mm
Corner installation

THE POWER FAMILY
(C) IDM ENERGIESYSTEME GMBH
5
.
A
llgemei
n
e Beschreibu
ng
Installation instructions Terra CL
16
1
2
3
4
5
6
7
8
9
1
0
1
1
1
2
1
3
1
2
3
4
5
Pos. 341
Pos. 342 (343)
Pos. 345 (346)
Pos. 344
Interior installation
5.8.3. Accessories for corner installation
Pos. 341 .... Wall connection intake (for tight transfer)
Pos. 342 .... Weather shield grille intake
Pos. 343 .... Mesh grille intake
Pos. 344 .... Wall connection outlet (for tight transfer)
Pos. 345 .... Weather shield grille outlet
Pos. 346 .... Mesh grille outlet
5.8.4. Assembly Instructions -
Corner Installation
Wall connection is supplied separately. Vertical
connections must be affixed first. To do this, simply
remove the film on the rear side. The cellular rubber
can then be affixed flush with the external edge of
the heat pump. Additionally the horizontal elements
are also lined on the front. This will help ensure an
optimum seal.
Beforethemachineispositionedinthecorner,acheck
should be carried out to ensure that the wall opening
prepared by the customer has been insulated. The
machine can then be moved into the corner.
If there are any air gaps on the outlet or inlet open-
ings due to the ground being uneven, this can be
corrected using the adjustable machine feet.
Noise level in the installation room depends on vari-
ous factors such as room size, absorption capacity,
reflection, free noise propagation, etc. For this reason,
it is important that the heat pump is situated as far as
possiblefromnoise-sensitive areas.Anoise-insulating
door should be fitted.
Significant pressure against the wall
should be avoided.
The heat pump may only be moved with
the panels fitted.

THE POWER FAMILY
(C) IDM ENERGIESYSTEME GMBH Installation instructions Terra CL 17
1
2
3
4
5
6
7
8
9
1
0
11
1
2
13
1
2
3
4
5
Interior installation
5.9. Installation – Standard air duct
If there are no two external walls directly available for
installation, the air flow can be conveyed outwards
via insulated air ducts. Our range includes standard
air ducts which can be connected directly to the heat
pump without adaptation.
There are two ways to do this:
Option 1
Option 2
This method is used if there are no two external walls
available. As a short circuit may occur between the
supply and exhaust sides with this method, the inlet
and outlet should be positioned as far apart as pos-
sible. The unit can be separated from any shrubbery
by fitting dividing walls if necessary.
This method is equivalent to corner installation. This
method can be used if corner installation is not pos-
sible due to space restrictions or if a gap needs to be
bridged between the heat pump and outlet side.
Air ducts can be connected to the right
and left of the heat pump. Heating and
electrical connections can also be fitted
on both sides.

THE POWER FAMILY
(C) IDM ENERGIESYSTEME GMBH
5
.
A
llgemei
n
e Beschreibu
ng
Installation instructions Terra CL
18
1
2
3
4
5
6
7
8
9
1
0
1
1
1
2
1
3
1
2
3
4
5
Pos. 341
Pos. 342 (343)
Pos. 421 Pos. 423
(424) Pos. 425 Pos. 426
Pos. 427 (428)
Pos. 341
Pos. 342 (343)
Pos. 421 Pos. 423
(424) Pos. 426
Pos. 427 (428)
Interior installation
5.9.1. Accessories – Standard air duct
Option 1:
Option 2:
Pos. 341 ... Wall connection intake
Pos. 421 ... Outlet panel right / left
Pos. 423 ... Duct (1000 mm)
Pos. 424 ... Duct (1500 mm)
Pos. 425 ... Elbow 90°
Pos. 426 ... Wall connection
Pos. 342 .... Weather shield grille intake
Pos. 343 .... Mesh grille intake
Pos. 427 .... Weather shield grille outlet
Pos. 428 .... Mesh grille outlet
The air ducts are delivered with the
installation material (screws, washers,
nuts).

THE POWER FAMILY
(C) IDM ENERGIESYSTEME GMBH Installation instructions Terra CL 19
1
2
3
4
5
6
7
8
9
1
0
11
1
2
13
1
2
3
4
5
a
bc
d
e
f
g
Type a b c d e
f
g**
8 1000 830 500 700 650 720 1100
10 1000 830 500 700 650 720 1100
12 1100 930 500 700 650 770 1100
15 1100 930 500 700 650 770 1100
TERRA CL 08-15
All dimensions in mm
Standard duct - Version 1 (90°)
** for 1000 mm duct length / length can be cut to size as required
Interior installation
5.9.2. Customer preparation – Option 1
Specified dimensions include clearances. Wall opening should be thicker around the wall insula-
tion. Minimum thickness of the wall insulation is 50 mm.

THE POWER FAMILY
(C) IDM ENERGIESYSTEME GMBH
5
.
A
llgemei
n
e Beschreibu
ng
Installation instructions Terra CL
20
1
2
3
4
5
6
7
8
9
1
0
1
1
1
2
1
3
1
2
3
4
5a
b
c
d
ef
gh
Type a b c d e
f
g** h
8 1000 830 500 700 650 720 1100 270
10 1000 830 500 700 650 720 1100 270
12 1100 930 500 700 650 770 1100 270
15 1100 930 500 700 650 770 1100 270
TERRA CL 08-15
All dimensions in mm
Standard duct - Version 2 (180°)
** for 1000 mm duct length / length can be cut to size as required
Interior installation
5.9.3. Customer preparation – Option 2
Specified dimensions include clearances. Wall opening should be thicker around the wall
insulation. Minimum thickness of the wall insulation is 50 mm.
This manual suits for next models
28
Table of contents
Other IDM-Energiesysteme Heat Pump manuals
Popular Heat Pump manuals by other brands

Mark
Mark MISTRAL MDX 33 Technical manual

Ferroli
Ferroli HXW LT Installation and operation manual

COMFORTPOOL
COMFORTPOOL ECO+3 Installation instructions manual

Pfeiffer Vacuum
Pfeiffer Vacuum KS 0.5 operating instructions

Nibe
Nibe F110 installation manual

STIEBEL ELTRON
STIEBEL ELTRON WPL 19 A Operation & installation

Walter Roller
Walter Roller Silent Line WPV Mounting instructions

Raypak
Raypak 2350 Series Installation & operating instructions

Sanyo
Sanyo ECO-i APR-CHP680BA Submittal data

GE
GE NS18HMA installation instructions

AERMEC
AERMEC NRK 0700 installation manual

Sunrain
Sunrain BYC-007TF1 Installation & operation manual