Idylis I HUM 10 140 User manual
www. lowes.com
WHOLE-HOUSE HUMIDIFIER
ITEM #0484759
MODEL # I HUM 10 140
Français p. 17
Español p. 35
Idylis® is a registered trademark of LF, LLC.
All Rights Reserved.
Serial Number Purchase Date
Questions, problems, missing parts? Before returning to your retailer, call our customer
service department at 1-800-643-0067, 8 a.m. - 6 p.m., EST, Monday - Thursday, 8 a.m.- 5 p.m
.,
EST, Friday.
AB13406
ATTACH YOUR RECEIPT HERE
1
READ AND SAVE THESE INSTRUCTIONS

www. lowes.com
TABLE OF CONTENTS
PRODUCT SPECIFICATIONS
Package Contents........................................................................................................................ 3
Safety Information........................................................................................................................ 4
Preparation .................................................................................................................................. 4
Assembly Instructions .................................................................................................................. 6
Controls and Display .................................................................................................................... 9
Operating Instructions ................................................................................................................. 10
Care and Maintenance ................................................................................................................ 11
Troubleshooting........................................................................................................................... 14
Warranty....................................................................................................................................... 15
Replacement Parts List ............................................................................................................... 16
SPECIFICATIONS
14 gallons output per 24 hours
3,000+ sq. ft. coverage - Tight construction
2,900 sq. ft. coverage - Average construction
3 speed motor
Dual fans
120 Volts; 0.8 amps; 60 Hz; 46 dB
SPECIFICATIONS
Soft touch digital control panel
4 gallon reservoir capacity
Auto shutoff
Auto humidistat
Assembled Dimensions:
20.13” H x 24” W x 14.75” D
2

www. lowes.com
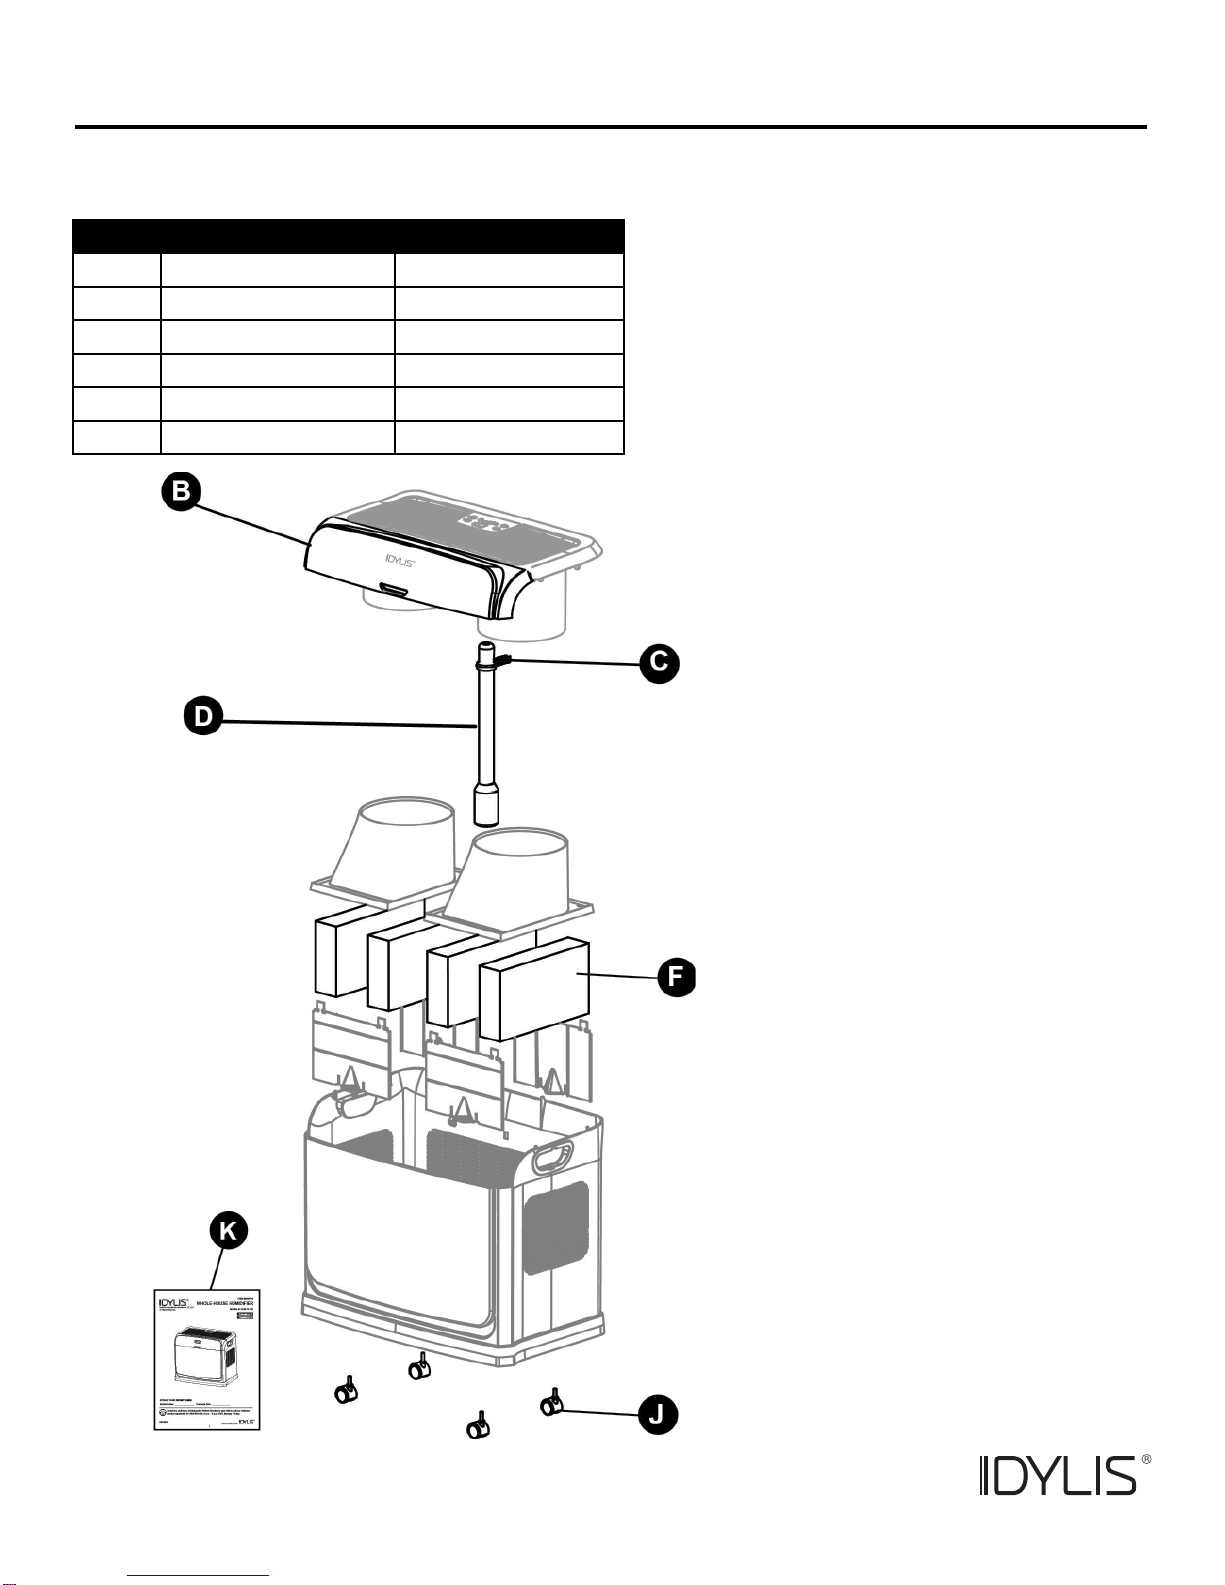
PART DESCRIPTION QUANTITY
A Chassis 1
B Pivot Lid 1
C Float Retainer Clip 1
D Float 1
E Chimney 2
F Wick 4
G Wick plate 4
H Cabinet 1
I Cord Peg 2
J Caster 4
3
PACKAGE CONTENTS

www. lowes.com
A Note About Locating Your Humidifier:
Before beginning assembly of product, certain considerations should be taken for locating the
unit for greatest efficiency.
Locate humidifier in area where humidity is most needed, keeping the following guidelines in mind:
• Humidifier should be placed near an inside wall, away from windows.
• Do not place in front of heat register, but, if possible, place near cold air return so that the
humidified air will can circulate throughout house.
• Unit should be level to operate correctly.
• Place at least 2 in. from wall or draperies for proper air flow.
• Direct air away from thermostat and hot air registers.
4
SAFETY INFORMATION
Please read and understand this entire manual before attempting to assemble, operate or install
the product.
DANGER: If not immediately observed, serious injury or even death may occur.
• To reduce the risk of fire or shock hazard, plug humidifier directly into a 120 V,AC electrical
outlet.
• To reduce the risk of fire hazard, never put the electric cord under rugs, near heat registers,
radiators, stoves or heaters.
WARNING: If not observed, serious physical injury or property damage may occur.
• To reduce the risk of electrical hazard or damage to humidifier, do not tilt, jolt or tip humidifier
while unit is running.
• To reduce the risk of scalds and damage to humidifier, never put hot water in humidifier.
• To reduce risk of fire, electric shock, or injury always unplug before servicing or cleaning.
• To reduce the risk of accidental electrical shock, do not touch the cord or controls with wet hands.
• To reduce the risk of fire, do not use near an open flame such as a candle or other flame source.
CAUTION: If not observed, minor physical injury or property damage may occur.
• Do not use extension cords. Keep the electric cord out of traffic areas.
• Do not position the unit directly in front of a hot air duct or radiator.
• Always unplug the humidifier before moving it, removing the fan assembly section, before
cleaning, or whenever the humidifier is not in service.
• Do not allow to be used as a toy. Close attention is necessary when used by or near children.
• Never use your humidifier while any part is missing or damaged in any manner. To reduce
the risk of damage to humidifier, unplug when not in use.
• Use only EPA Registered Bacteriostat. Under no circumstances should you use water treat-
ment products designed for Roto belt or Ultrasonic humidifiers.
• To reduce the risk of injury, fire or damage to humidifier, use only cleaners specifically recom-
mended for humidifiers. Never use flammable, combustible or poisonous materials to clean
your humidifier.
PREPARATION
Before beginning assembly of product, make sure all parts are present. Compare parts with pack-
age contents list. If any part is missing or damaged, do not attempt to assemble the product.
Estimated Assembly Time: 15 minutes
Tools required for assembly: None.
www. lowes.com
ASSEMBLY INSTRUCTIONS
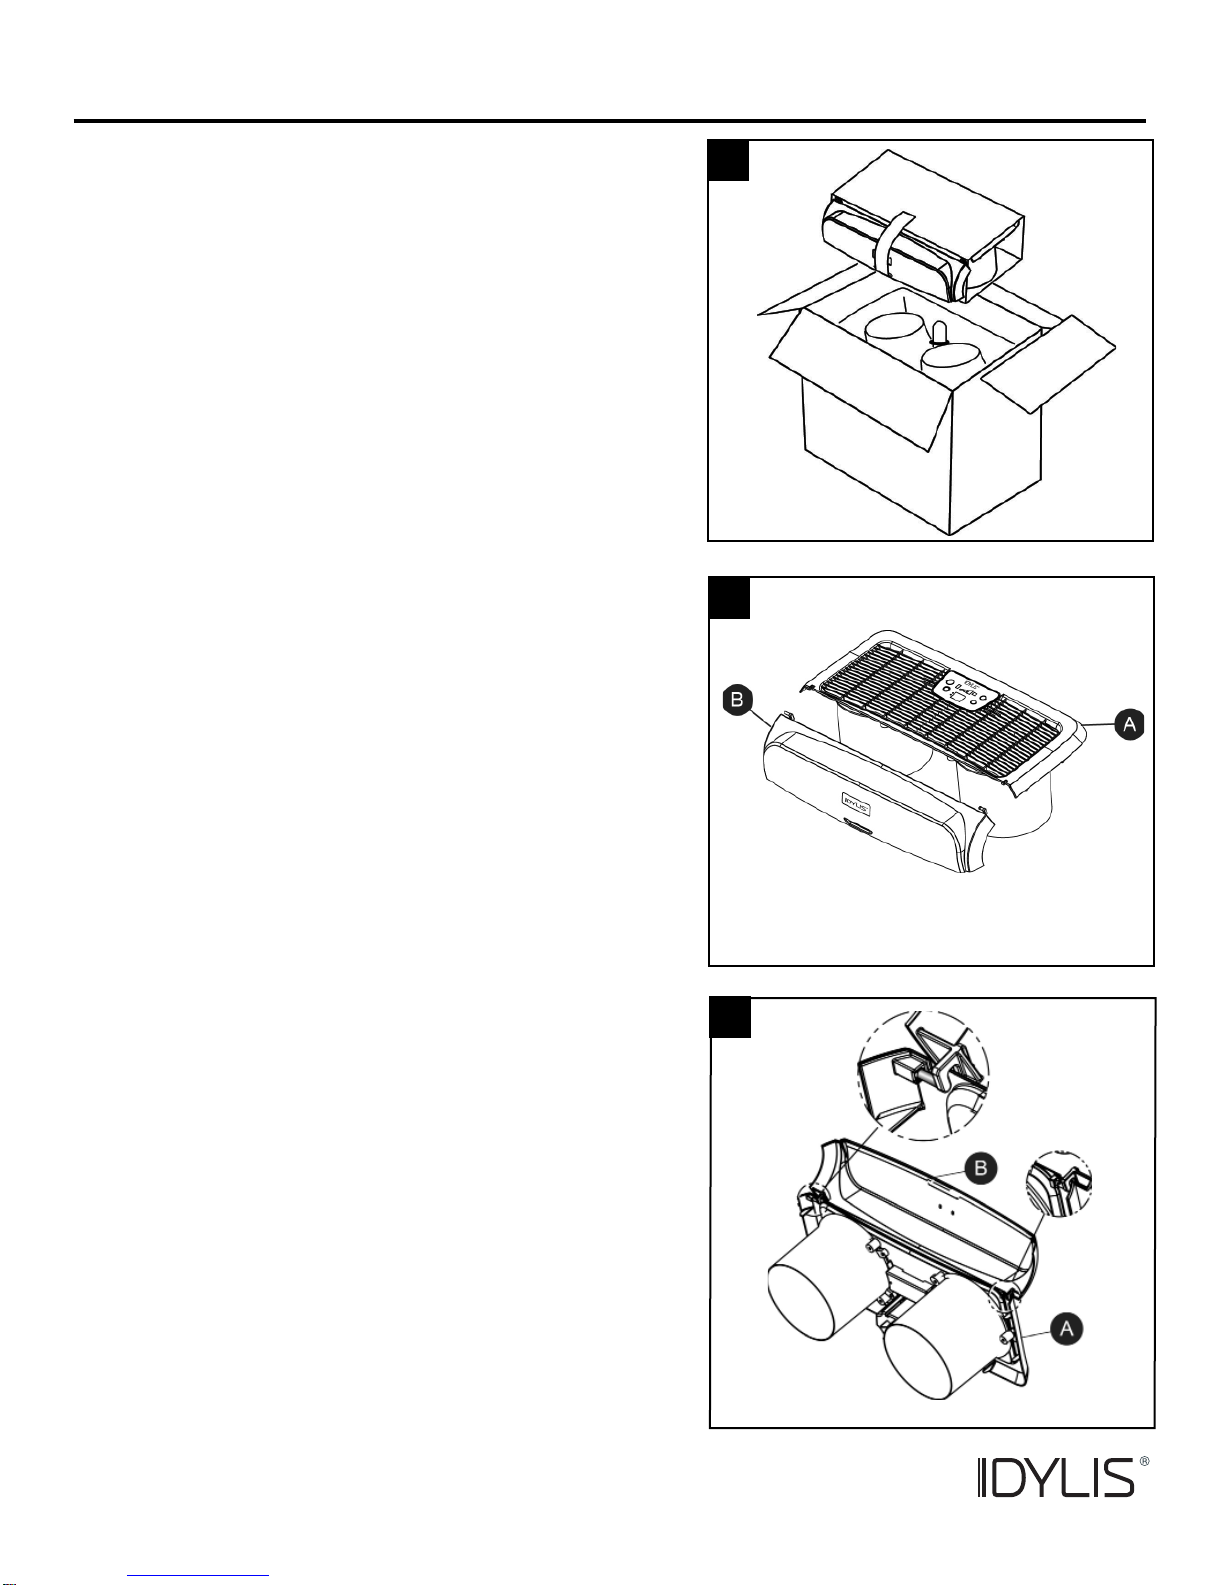
1. Open carton, and remove any top packing.
Lift out the taped up box holding the top portion of the
humidifier.
NOTE: Ensure all packing material from the carton
is removed.
2. The top portion of the humidifer is made up of a pivot
lid (B) that attaches to the chassis (A). Remove any
packaging material from the two sections.
3. Insert the hinge pegs from the pivot lid (B) into the
receptacles on the chassis (A).
1
2
3
5
www. lowes.com
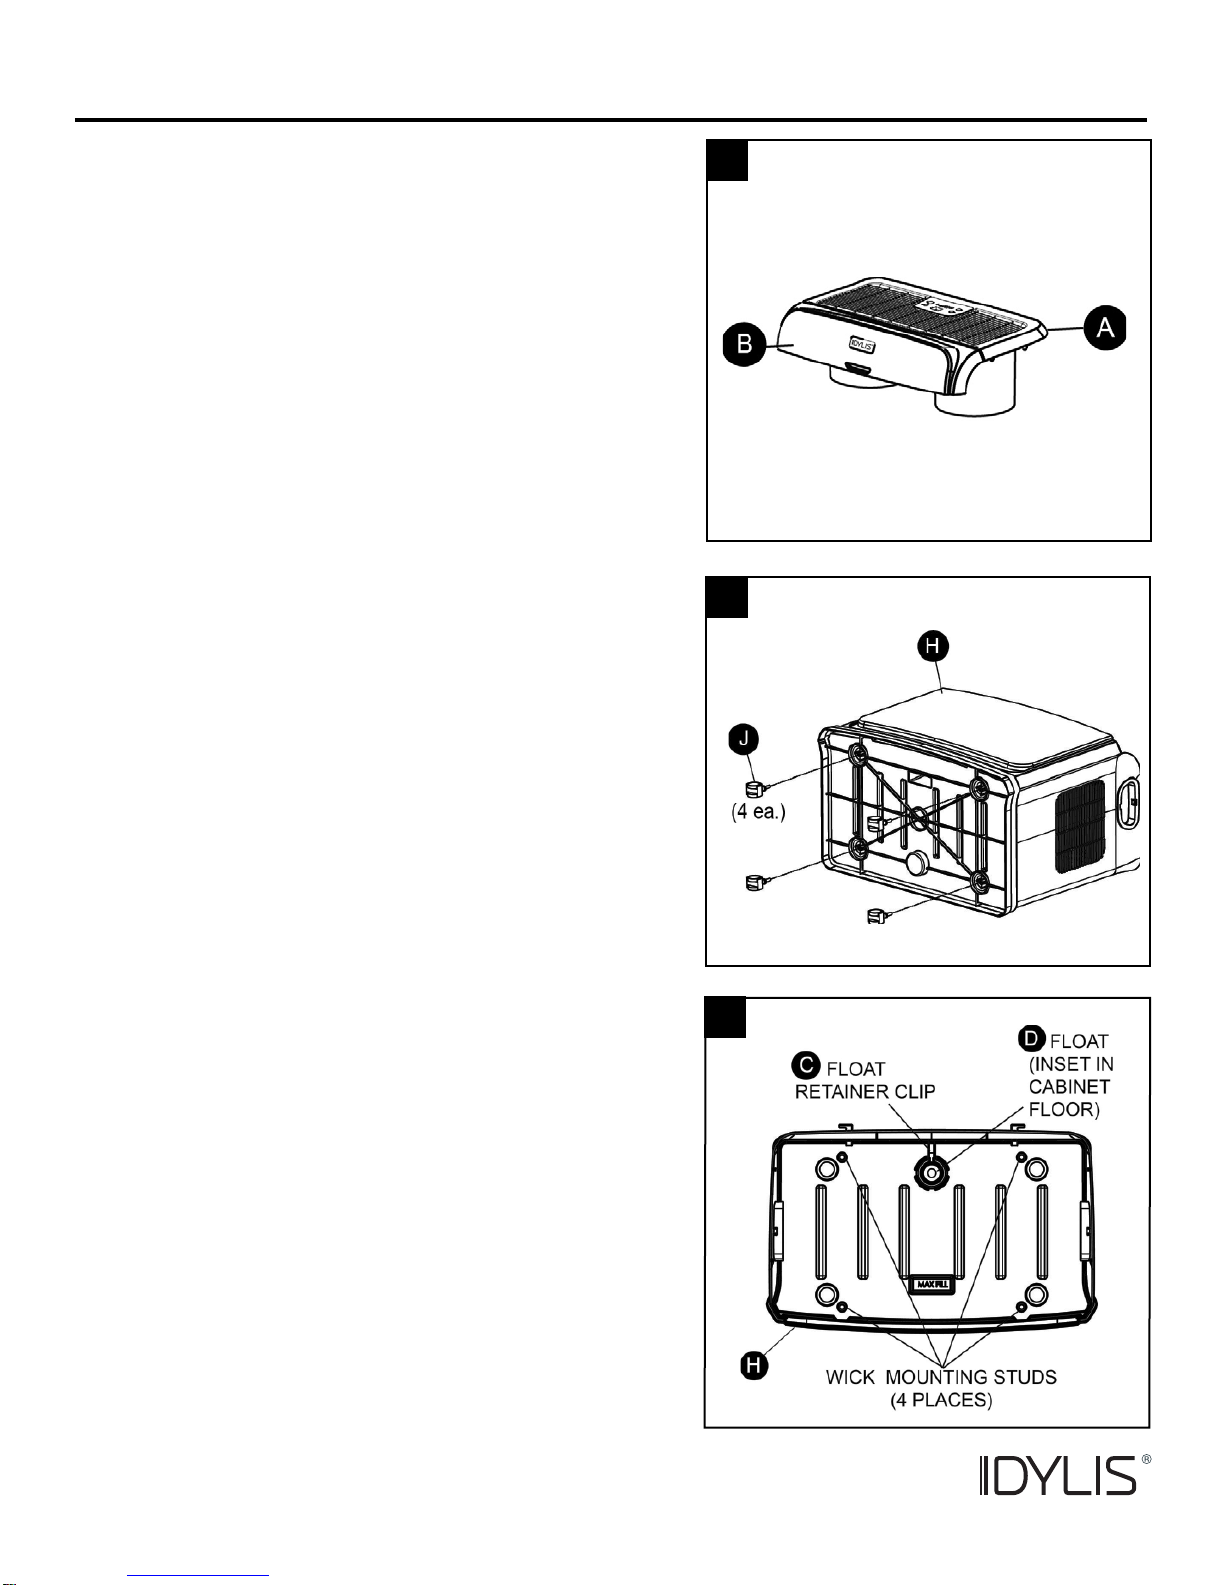
4. Ensure the chassis (A) with pivot lid (B) attached
opens smoothly. Set chassis aside while assembling
the rest of the humidifier.
5. Lay cabinet (H) down on front or sides on a soft
surface (to avoid scratching finish). Insert one caster
(J) into each corner of the cabinet. Insert fully until the
stem shoulder meets the cabinet.
6. Turn cabinet (H) right side up. The float (D) should stay
in place. If not, install the float into the floor inset using
the float retainer (C) as shown in illustration.
4
5
6
ASSEMBLY INSTRUCTIONS
6
www. lowes.com
ASSEMBLY INSTRUCTIONS
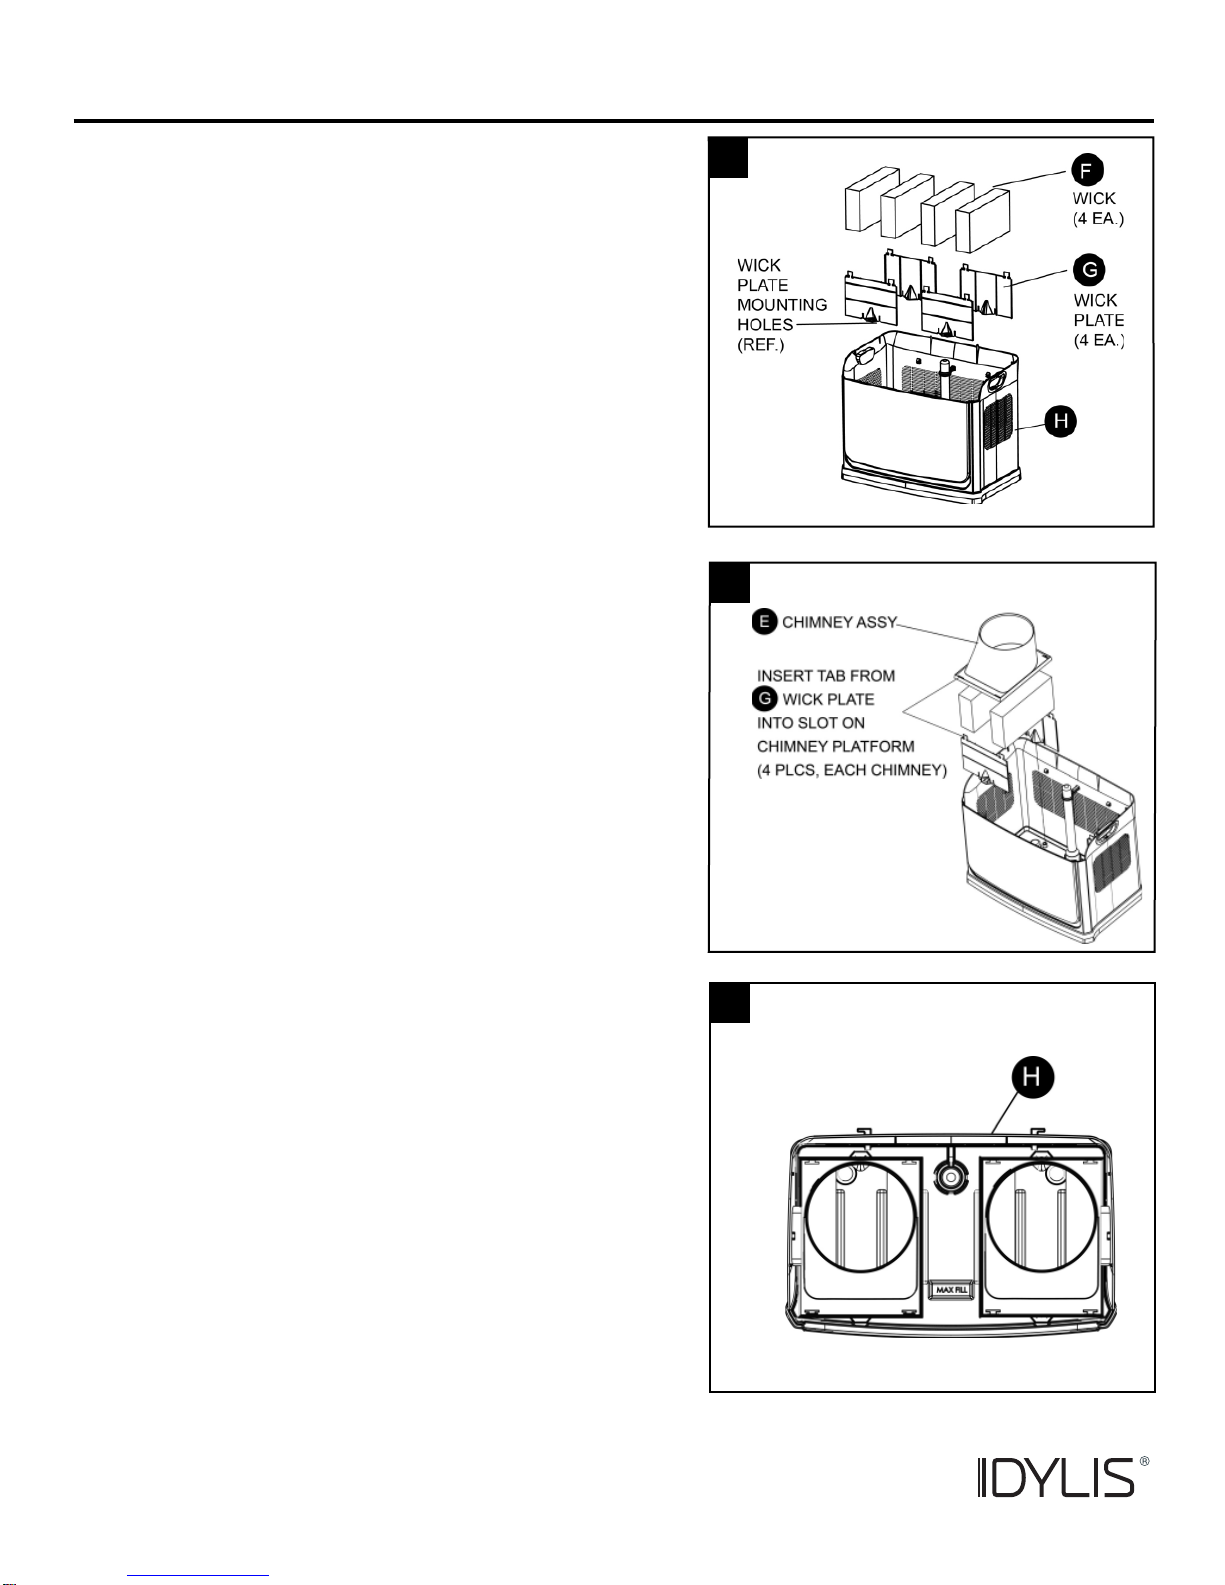
7. Begin replacing contents of cabinet (H) by inserting
wick plates (G) onto the wick plate studs. Place two
wicks (F) into each area between the wick plates.
8. Place chimney (E) on top of wicks, aligning the slot on
the chimney platform with the tab on the wick plate
(G). Attach at four places. Repeat for second chimney.
9. Ensure all internal items have been placed into the
cabinet (H) in accordance with illustration.
7
9
7
8

www. lowes.com
10. Place chassis (A) on top of cabinet (H).
11. Lift hinged pivot lid (B) and pour clean, cool water
from a pitcher into reservoir. Fill to MAX FILL level,
visible when lid is open.
12. Position unit in the appropriate place according to
“A NOTE ABOUT LOCATING YOUR HUMIDIFIER”
on page 5. Plug unit into an electrical outlet.
ASSEMBLY INSTRUCTIONS
10
11
12
8

www. lowes.com
9
CONTROLS AND DISPLAY
POWER Button
Turns unit ON and OFF.
FAN Button
Sets fan speed: LOW, MEDIUM, and HIGH
HUMIDITY % Knob
Turn clockwise to increase humidity output percentage.
LIGHTS ON/OFF Button
Controls panel lights
Water Refill Indicator
Indication illuminates when bottles are almost empty and unit needs refilling
Fan Speed Indicator
Indication of which fan speed is selected
Filter Change Indicator
Indication illuminates when filter needs to be replaced
Digital Display
Shows relative humidity and desired humidity when being set.
www. lowes.com
OPERATING INSTRUCTIONS
1. Turn the unit on by pressing the POWER button.
Turn the unit off by pressing the button for 2 seconds
again.
2. Set fan level by pressing the FAN SPEED
button. The speeds progress Low, Medium,
and High. Pressing the FAN SPEED
button again will reset it to Low.
3. Press the HUMIDITY button once for the knob
to pop out for adjustment. Rotate the HUMIDITY
knob clockwise (toward the Plus symbol) to increase
the humidity level and counterclockwise (toward the
Minus symbol) to reduce humidity level.
Press button in again as desired.
4. Press the LIGHTS ON/OFF (Night Mode) button to
turn off all lights on the control panel while leaving all
the settings the same. Touching any of the controls
will reilluminate the panel.
5. ADD WATER icon illuminates when the water supply
needs to be replenished. Follow instructions in the
Assembly Instructions.
6. The CHANGE FILTER icon will illuminate when
the filter (wick) has become too dirty to operate
correctly or after 720 hours of use.
NOTE: The CHANGE FILTER icon will automatically
reset after filter is changed.
1
2
3
4
5
6
10
www. lowes.com
1
CAUTION: TO REDUCE THE RISK OF SHOCK, ALWAYS UNPLUG HUMIDIFIER BEFORE
CLEANING OR SERVICING.
- Regular cleaning of your humidifier helps eliminate odors, bacterial and fungal growth.
-We recommend descaling/cleaning your humidifier once every two weeks (more often in areas
with hard water) and disinfecting your humidifier regularly to maintain your unit in optimum
operational condition.
-Always change your wicks at end of season or more often in hard water areas.
-We also recommend using an EPA-approved bacteriostat.
-Never use a water treatment intended for RotoBelt or Ultrasonic humidifiers.
CARE AND MAINTENANCE
1. Unplug humidifier and, if possible, roll humidifier to
area where floor coverings are not susceptible to
water damage, i.e.: kitchen or bath area.
2. Grasp the chassis (A) handholds on the sides, lift off
and set aside on a clean, flat surface. 2
11
www. lowes.com
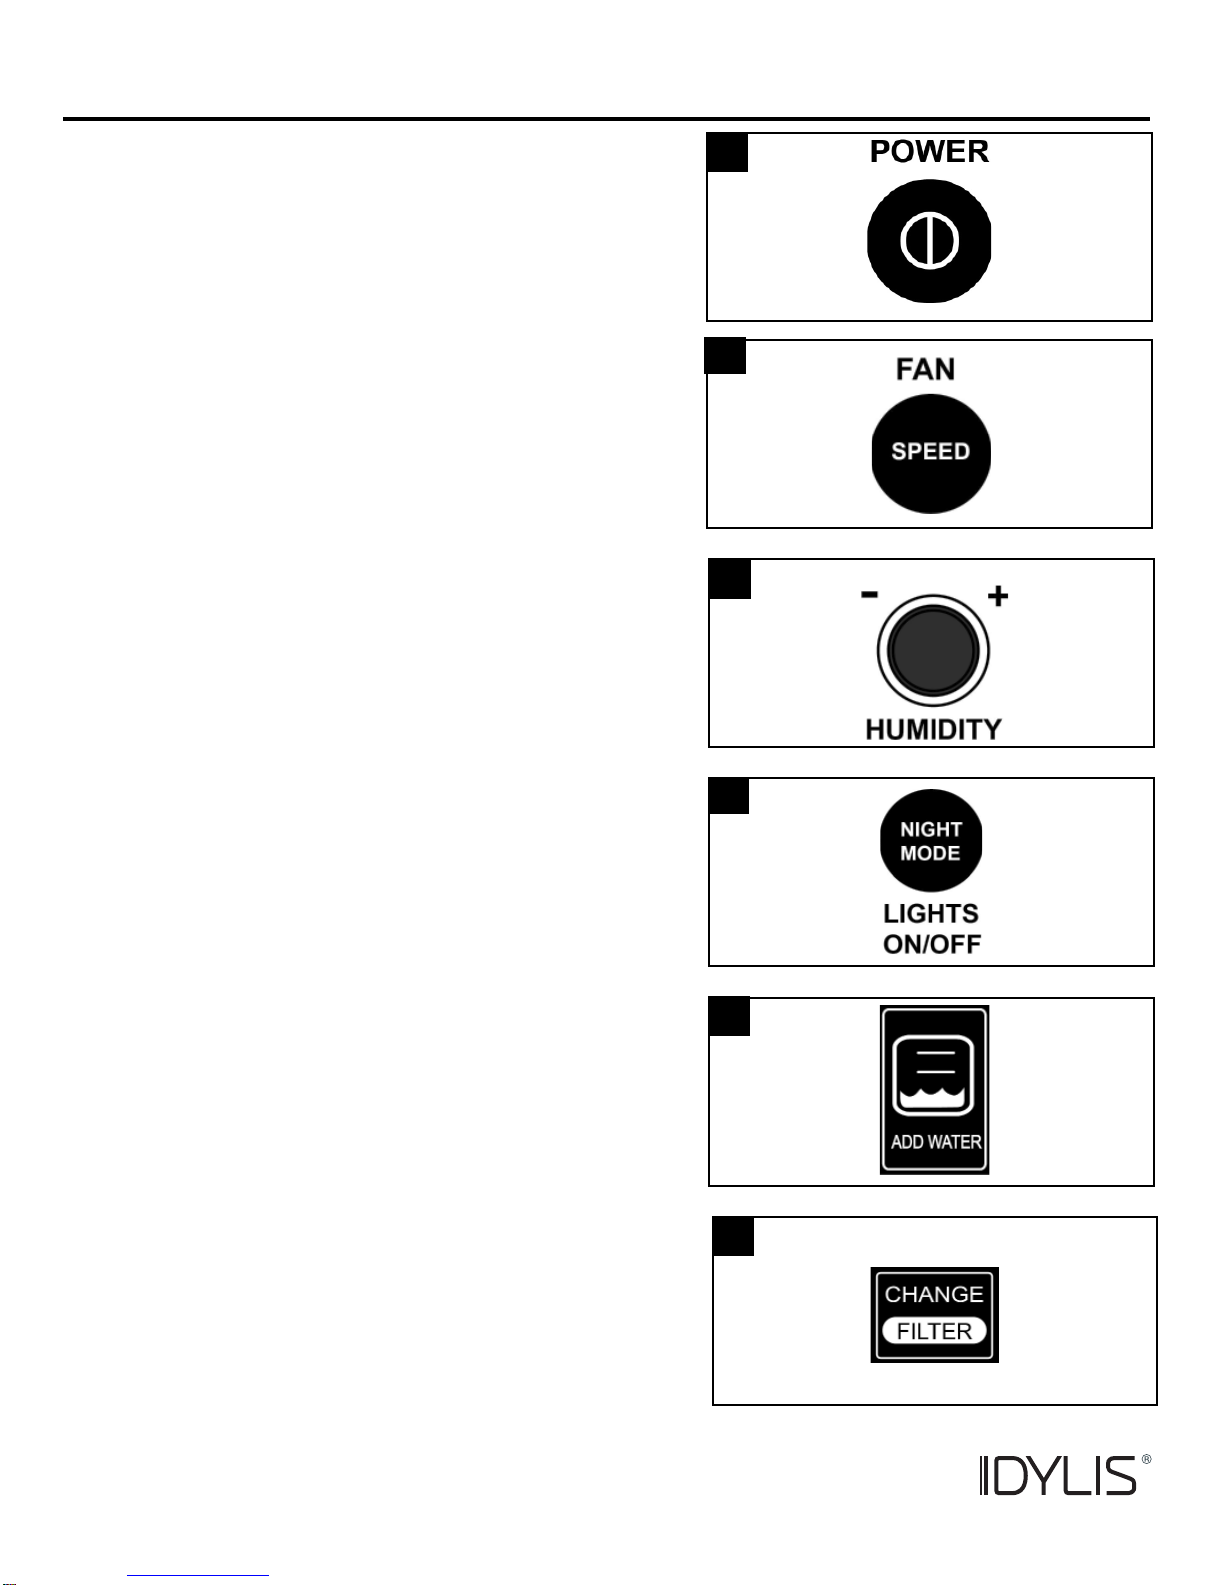
3. Lift out wick assembly. You can separate the chimney
(E) from the wick plates (G), or leave them attached.
Carefully lift the wicks (F) out and place them in the
sink. Rinse wicks with cool, clean water and leave
them to drain in sink. Do not use soap, detergent or
any other cleaners on wick.
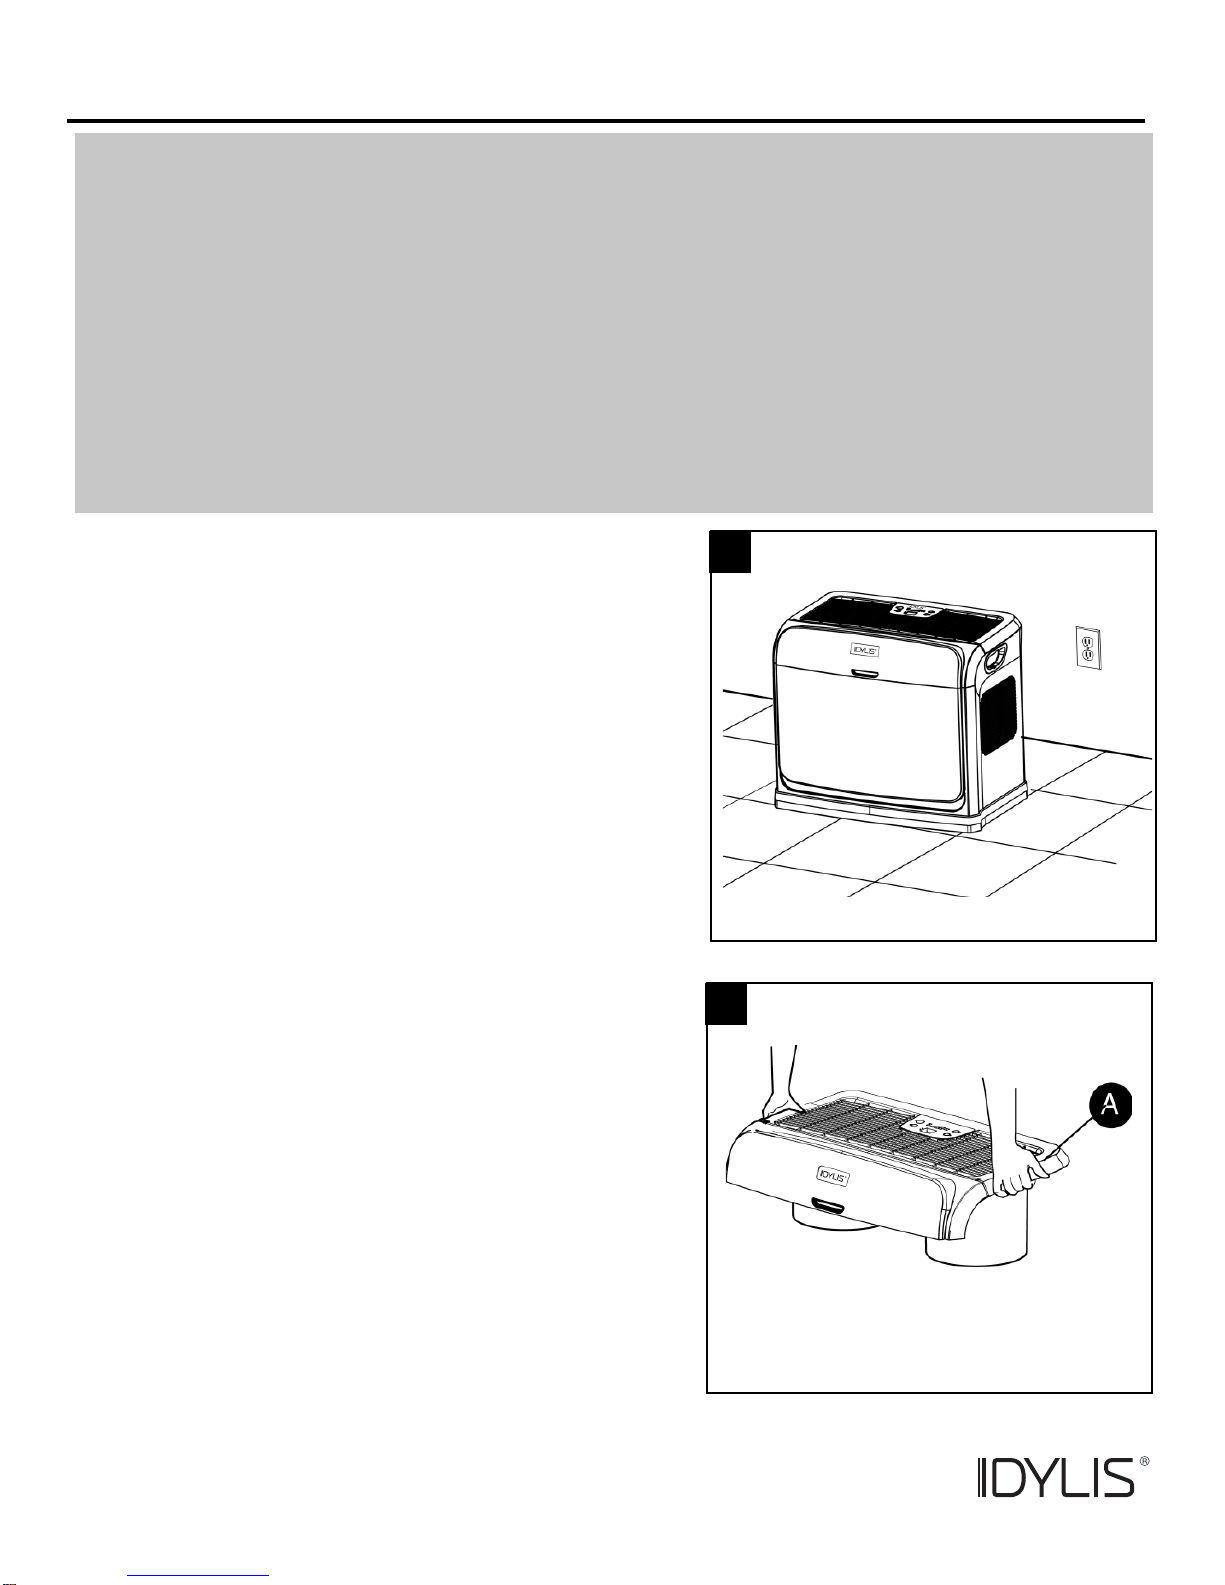
4. Remove the water level float (D) from the humidifier
cabinet by pinching the float retainer clip (C) to release
it from the cabinet.
Scoop out any water still in the bottom of the cabinet
(H). The cabinet should be empty and wiped out with a
soft cloth before performing regular cleaning or end of
season maintenance.
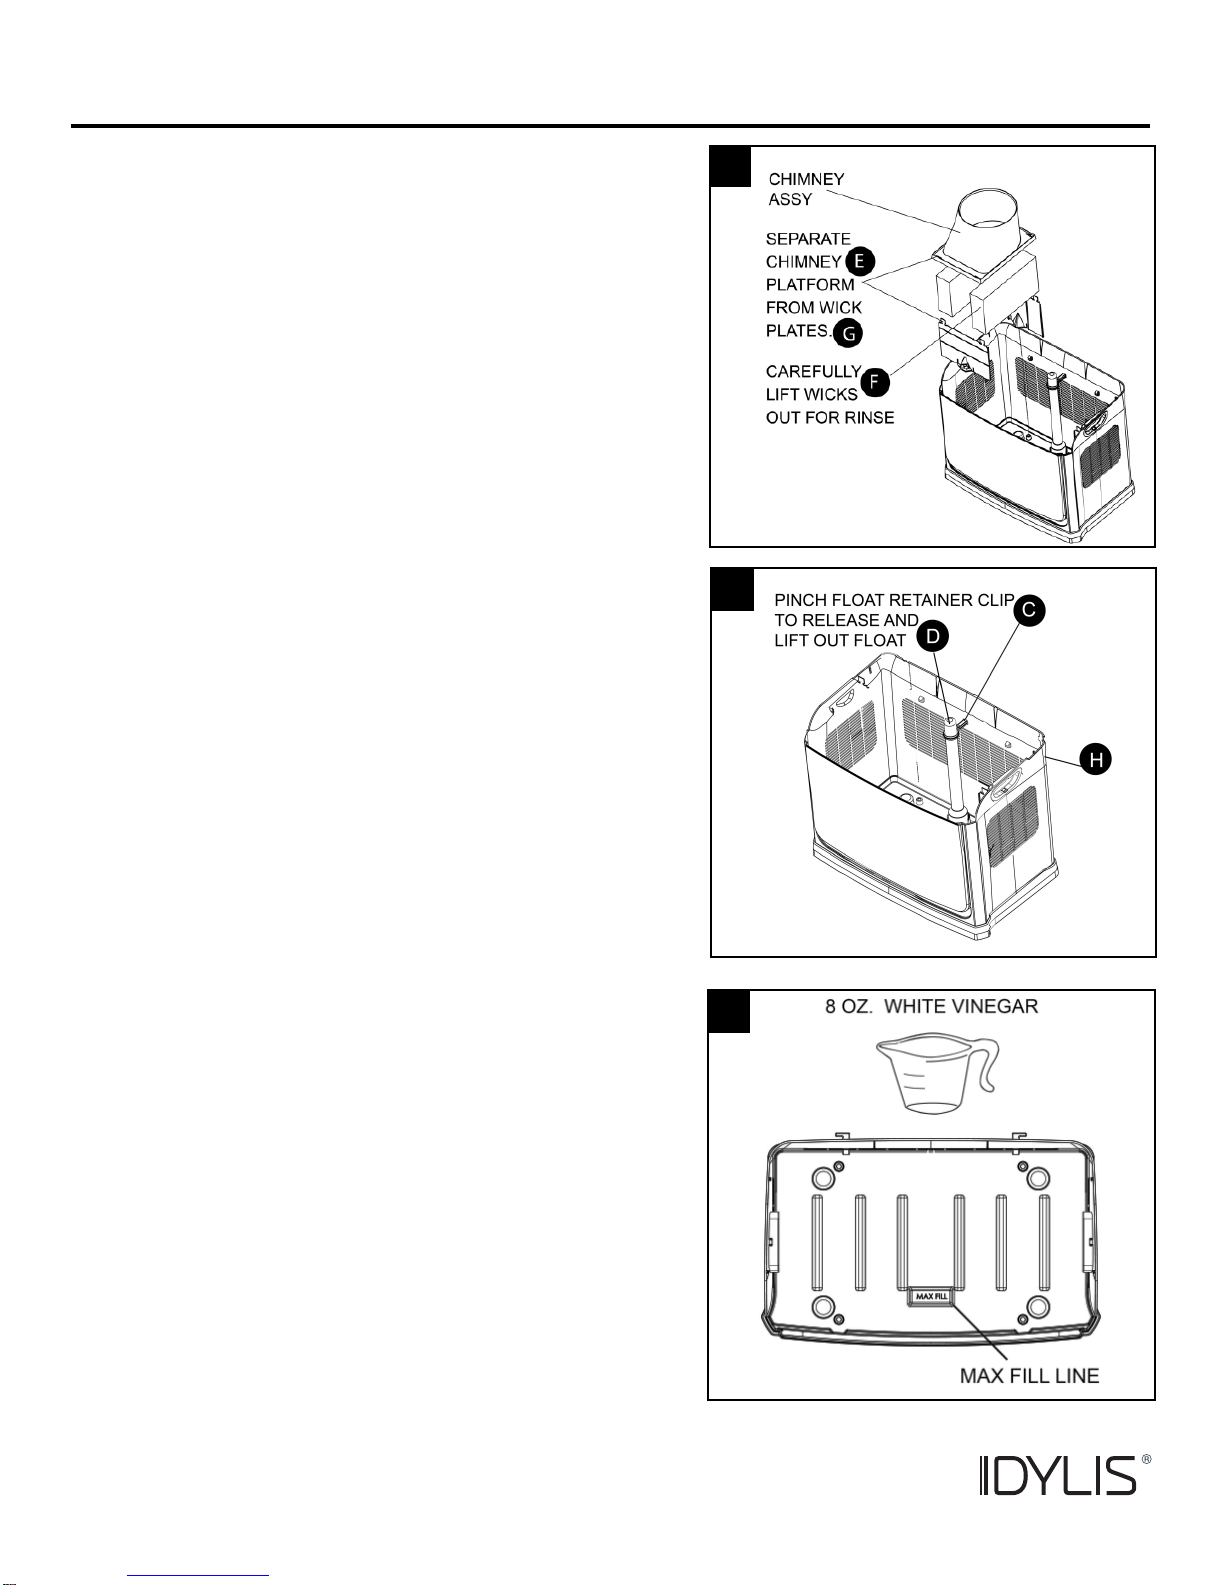
5. Regular Cleaning: (Recommended Biweekly)
De-scale the humidifier by filling cabinet with clean,
cool water to the MAX FILL line and adding 1 cup (8
oz.) of undiluted white vinegar. Let solution sit for 20
minutes.
With a soft, clean cloth, wipe the rest of the inside of
the cabinet and interior components with undiluted
white vinegar. A soft brush may be used to scrub stub-
born scale deposits inside cabinet, if necessary.
Rinse cabinet thoroughly with warm water to remove
scale and cleaning solution before proceeding to disin-
fecting the unit (as necessary).
NOTE: Do not use vinegar solution on exterior cabinet
finish. Use only water and soft, clean cloth to prevent
marring finish.
3
4
5
12
CARE AND MAINTENANCE
www. lowes.com
6. Reinstall cleaned components in accordance with
ASSEMBLY INSTRUCTIONS. When reinstalling
rinsed wicks (F), be careful to support them with both
hands to avoid tearing them.
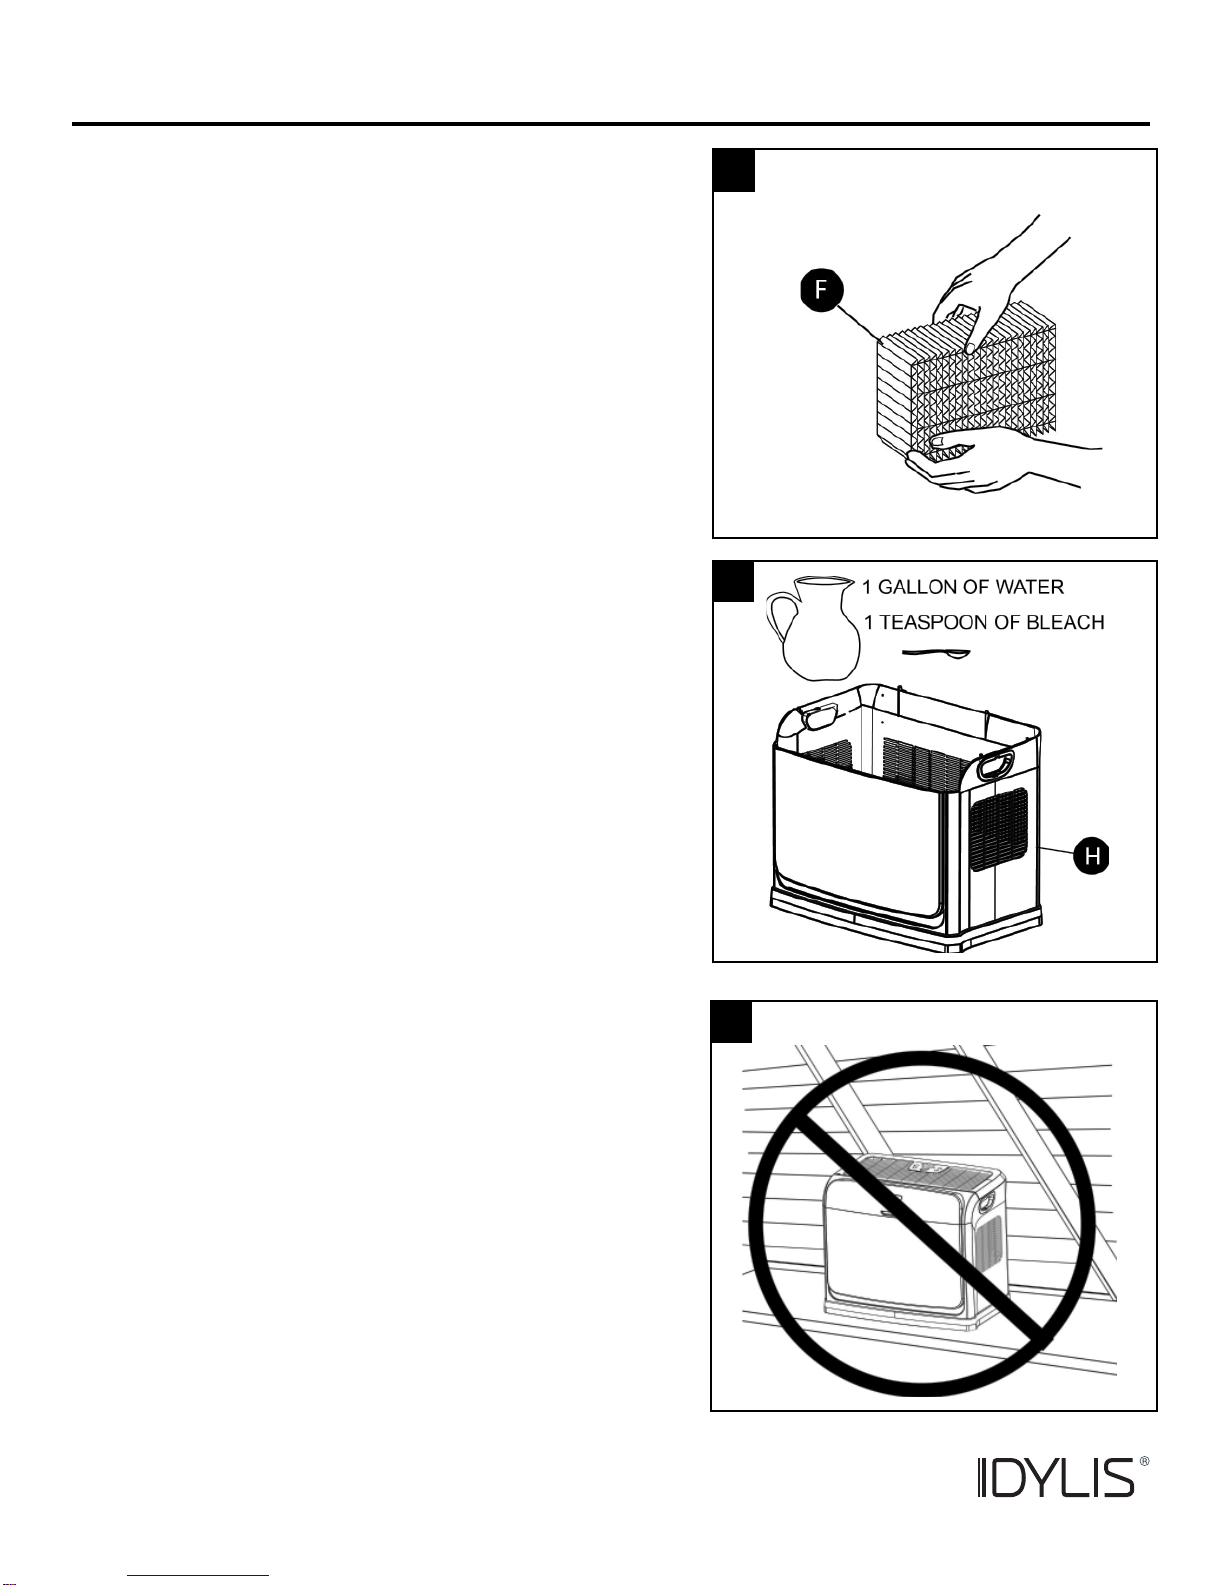
7. Disinfecting: (Recommended at end of season and if
you don’t plan to run the unit for more than a week)
Perform regular (biweekly) cleaning, then disinfect
your humidifier by pouring one (1) gallon of water and
one (1) teaspoon of chlorine bleach into the reservoir
and letting solution sit for 20 minutes. Swish solution
around for a few minutes, carefully avoiding splashing
bleach solution outside of cabinet (H). Wipe down all
interior surfaces with bleach solution. Rinse cabinet
and internal components with clean, warm water until
no bleach smell remains. Dispose of wicks (if end of
season). Allow interior of cabinet to dry completely.
8. End of Season Maintenance: (Perform before
putting unit away at end of humidifier season)
Clean and disinfect unit in accordance with instructions
above. Dispose of old wick. Fully dry the interior and all
components of humidifier. Store humidifier in cool, dry
area.
CAUTION: Do not store humidifier in attic or other
high temperature area as this may damage the unit.
7
6
8
13
CARE AND MAINTENANCE

www. lowes.com
14
PROBLEM PROBABLE CAUSE CORRECTIVE ACTION
Digital display not
illuminated
• No power
• Power button has not been
depressed.
• Check 120 volt power source,
• Press power button once to turn on.
Fan not operating (digital
display is illuminated).
• ROOM humidity level is not
3% or more below SET humid-
ity level.
• Reservoir is empty.
• Raise SET humidity level if desired.
• Increase fan speed.
• Fill humidifier with water.
Fan runs continuously.
• Float is obstructed.
• Humidity level has been SET
to 65%. ROOM humidity level
has not reached 1% or more
above SET humidity level.
• Free float from obstruction.
• A humidity SETTING of 65% operates
fan continuously. Adjust SETTING level
between 25% - 60%.
• Continue to run until desired humidity
level is achieved. This may take up to 48
hours initially.
Poor evaporation of water
• Mineral buildup on wicks • Replace wicks.
NOTE: Local water varies from area
to area and under certain conditions
minerals will build up more rapidly in the
filter.
CHANGE FILTER indica-
tor illuminates. • Mineral buildup on wicks • Replace wicks.
“CHANGE FILTER” mes-
sage does not appear
even when filter is dirty or
humidifier performance is
clearly reduced.
• Loss of power or a power fail-
ure has caused the CHANGE
FILTER message to prema-
turely reset.
• Replace wicks.
Display blinks or fan
moves slightly when hu-
midifier is plugged in.
• Normal • No action required.
HUMIDITY button is not
adjusting. • Button has not been extended
to make adjustment. • Press HUMIDITY button in momentarily
to extend knob out for adjustment.
No lights illuminated on
screen • NIGHT MODE (LIGHTS OUT)
has been initiated. • Press NIGHT MODE button and
control lights will re-illuminate.
Bad smell emanating
from humidifier
• Bacteria growth has developed
in reservoir. • Use an EPA-registered bacteriostat in
accordance with instructions on bottle.
• Clean reservoir biweekly (or more often
as needed) in accordance with Care and
Maintenance section of this manual.
TROUBLESHOOTING

www. lowes.com
15
WARRANTY
1-Year Manufacturer’s Limited Warranty
Subject to the terms and conditions of this limited warranty, the manufacturer warrants this product to
be free from defects for one year in material or workmanship and for two years on the motor and con-
trol from the date of its original retail purchase. This warranty does not apply to filters or wicks which
are customer replaceable parts.
What Does This Limited Warranty Cover? This warranty applies only to the original purchaser of
the product and covers any defects or malfunctions in factory installed components.
How Long Does The Coverage Last? This warranty is for a period of one year on workmanship
and materials, and two years on the motor from the date of its original retail purchase. This warranty
is not transferable and coverage terminates if you sell or otherwise transfer the product.
What Will Manufacturer Do? A copy of the sales receipt is required before authorization to return a
unit for repair is approved. The manufacturer will repair or replace the product, at its discretion, with
return freight paid by the manufacturer. It is agreed that such repair or replacement is the exclusive
remedy available from the manufacturer.
What Does This Warranty Not Cover? This warranty does not apply to damage from accident,
misuse, alterations, unauthorized repairs, unauthorized use, mishandling, unreasonable use, abuse,
including failure to perform reasonable maintenance, normal wear and tear, nor where the connected
voltage is more than 5% above the nameplate voltage, nor to the equipment or products being im-
properly installed or wired or maintained in violation of this Owner’s Manual.
Alterations include the substitution of name brand components including, but not limited to wicks and
bacteria treatment.
THIS PRODUCT IS NOT INTENDED FOR COMMERCIAL USE. THIS IS THE SOLEAND EXCLU-
SIVE WARRANTY GIVEN BY MANUFACTURER WITH RESPECT TO THE PRODUCTS AND,
TO THE MAXIMUM EXTENT PERMITTED BY LAW, IS IN LIEU OF AND EXCLUDES ALL OTHER
WARRANTIES AND CONDITIONS, EXPRESS OR IMPLIED, ARISING BY OPERATION OF LAW
OR OTHERWISE. INCLUDING WITHOUT LIMITATION, MERCHANTABILITYAND/OR FITNESS
FOR A PARTICULAR PURPOSE TO THE MAXIMUM EXTENT PERMITTED BY LAW. THE MANU-
FACTURER IS NOT RESPONSIBLE FOR DAMAGES OFANY KIND, INCLUDING INCIDENTAL
AND CONSEQUENTIAL DAMAGE OR LOSS OF PROFITS OR REVENUES.
This warranty will be null & void if purchaser attempts to repair or replace any parts which are me-
chanical or electrical.
The warranty gives the customer specific legal rights, and the customer may also have other rights
which vary from province to province, or state to state
How Do You Get Service? In order to be eligible for service under this warranty, proof of purchase
(original receipt) must be made available to the manufacturer or its service representative for all war-
ranty claims. Please call 1-800-643-0067 speak with an authorized representative of the manufactur-
er regarding this warranty. Your Rights Under State Law: This warranty gives you specific legal rights,
and you may also have other rights which vary from state to state.
www. lowes.com
REPLACEMENT PARTS LIST
For replacement parts, call our customer service department at 1-800-643-0067, 8 a.m. - 6 p.m. EST
Monday - Thursday, 8 a.m. - 5 p.m. EST, Friday.
PART DESCRIPTION PART NUMBER #
B Pivot Lid 1B72471
C Retainer clip 1B72478
D Float 1B71971
F Wicks (4) 828413B002
J Casters (4) 1B5460100
K Manual AB13406
16
Printed in China
Idylis©is a registered trademark of LF, LLC.
All Rights Reserved.

www. lowes.com
HUMIDIFICATEUR POUR
TOUTE LA MAISON
ITEM #0484759
MODÈLE I HUM 10 140
IDYLIS® est une marque de commerce déposée de
LF, LLC. Tous droits réservés.
Numéro de série Date d’achat
Des Questions, des problèmes, des pièces manquantes? Avant de retourner l’article au
détaillant, appelez notre service à la clientèle au 1 800 643-0067, entre 8 h et 18 h (HNE),
du lundi au jeudi, ou entre 8 h et 17 h (HNE) le vendredi.
Attachez votre reçu ici
17
LISEZ ATTENTIVEMENT CES DIRECTIONS ET CONSERVEZ-LES

www. lowes.com
TABLE DES MATIÈRES
CARACTÉRISTIQUES DU PRODUIT
Contenu de l’emballage....................................................................................................................19
Consignes de sécurité...................................................................................................................... 20
Préparation....................................................................................................................................... 21
Instructions pour l’assemblage ....................................................................................................... 24
Commandes et affichage ................................................................................................................. 26
Mode d’emploi ................................................................................................................................ 27
Entretien ........................................................................................................................................... 28
Dépannage....................................................................................................................................... 31
Garantie............................................................................................................................................ 32
Liste des pièces de rechange ........................................................................................................... 33
CARACTÉRISTIQUES
Rendement de 53 litres par 24 heures
Couvre plus de 278,71 m² – construction
étanche
Couvre 269,42 m² – construction moyenne
Moteur à 3 vitesses
Deux ventilateurs
1
20 V; 0,8 A; 60 Hz; 46 dB
CARACTÉRISTIQUES
Panneau de commande numérique à effleurement
Réservoir d’une capacité de 15,14 litres
Arrêt automatique
Humidostat automatique
Dimensions une fois l’article assemblé :
51,13 cm H x 60,96 cm l x 37,47 cm P
18

www. lowes.com
PIÈCE DESCRIPTION QUANTITÉ
A Couvercle 1
B Couvercle pivotant 1
C Bague de maintien du flotteur 1
D Flotteur 1
E Cheminée 2
F Mèche 4
G Plateau de mèche 4
H Corps 1
I Point d’appui du cordon 2
J Roulette 4
19
CONTENU DE L’EMBALLAGE
www. lowes.com
CONSIGNES DE SÉCURITÉ
Assurez-vous de lire et de comprendre l’intégralité du présent manuel avant de tenter
d’assembler, d’utiliser ou d’installer l’article.
DANGER: : Le non-respect de ces consignes peut causer de graves blessures ou
même entraîner la mort.
• Afin de réduire les risques d’incendie et de choc électrique, branchez directement
l’humidificateur sur une prise de 120 V c.a
• Afin de réduire les risques d’incendie, ne placez jamais le cordon d’alimentation sous un tapis
ou près d’une bouche de chaleur, d’un radiateur, d’un four ou d’une chaufferette.
AVERTISSEMENT : Le non-respect de ces consignes peut causer des blessures
graves ou entraîner des dommages matériels.
• Afin de réduire les risques de choc électrique ou de dommage, ne secouez pas, ne recou-
vrez pas et ne faites pas basculer l’humidificateur lorsqu’il est en marche.
• Afin de réduire le risque de brûlure et d’éviter d’endommager l’humidificateur, ne mettez ja-
mais d’eau chaude dans le réservoir.
• Afin de réduire les risques d’incendie, de choc électrique ou de blessure, débranchez
l’appareil de la prise avant d’en effectuer l’entretien ou le nettoyage.To reduce the risk of ac-
cidental electrical shock, do not touch the cord or controls with wet hands.
• Afin de réduire les risques de choc électrique accidentel, ne touchez pas au cordon ni aux
commandes lorsque vos mains sont mouillées.
• Afin de réduire le risque d’incendie, n’utilisez pas l’appareil près d’une flamme nue comme
une chandelle ou autre source d’inflammation.
ATTENTION : Le non-respect de ces consignes peut causer des blessures mineures ou
entraîner des dommages matériels.
• N’utilisez pas de rallonges électriques. Ne laissez pas le cordon d’alimentation dans un en-
droit où l’on circule beaucoup.
• Ne placez pas l’appareil directement devant un tuyau d’air chaud ou un radiateur.
• Débranchez toujours l’humidificateur avant de le déplacer, d’enlever l’ensemble de ventila-
teurs, de le nettoyer ou lorsque vous ne l’utilisez pas.
• Cet appareil ne doit pas être utilisé comme un jouet. Une surveillance étroite est de rigueur
lorsque l’appareil est manipulé par des enfants ou à proximité de ces derniers..
• N’utilisez pas l’humidificateur s’il y a des pièces manquantes ou endommagées de quelque
manière que ce soit. Afin de réduire le risque d’endommager l’humidificateur, débranchez-le
lorsque vous ne l’utilisez pas.
• Utilisez seulement un bactériostatique agréé par l’EPA. Vous ne devriez en aucun cas utiliser
des produits de traitement de l’eau conçus pour des humidificateurs Roto Belt ou Ultrasonic.
• Afin de réduire le risque de blessure, d’incendie ou de dommage à l’humidificateur, utilisez
seulement des produits nettoyants spécialement recommandés pour les humidificateurs.
N’utilisez jamais de produits inflammables, combustibles ou toxiques pour nettoyer votre
humidificateur.
20
Table of contents
Languages:
Popular Humidifier manuals by other brands


Young Living
Young Living Dewdrop Diffuser manual

Bergstrom
Bergstrom K811 24V manual

Wood’s
Wood’s WHU600 operating instructions

Stadler Form
Stadler Form Oskar Little operating instructions

GeneralAire
GeneralAire BREATHE HEALTHIER GF-4200PFT instructions

DriSteem
DriSteem XT Series Installation, operation and maintenance manual