iFan EVAPORATIVE IF7310 User manual

iFAN AIR COOLER 65W EVAPORATIVE WITH BUILT-IN IONISER
IF7310
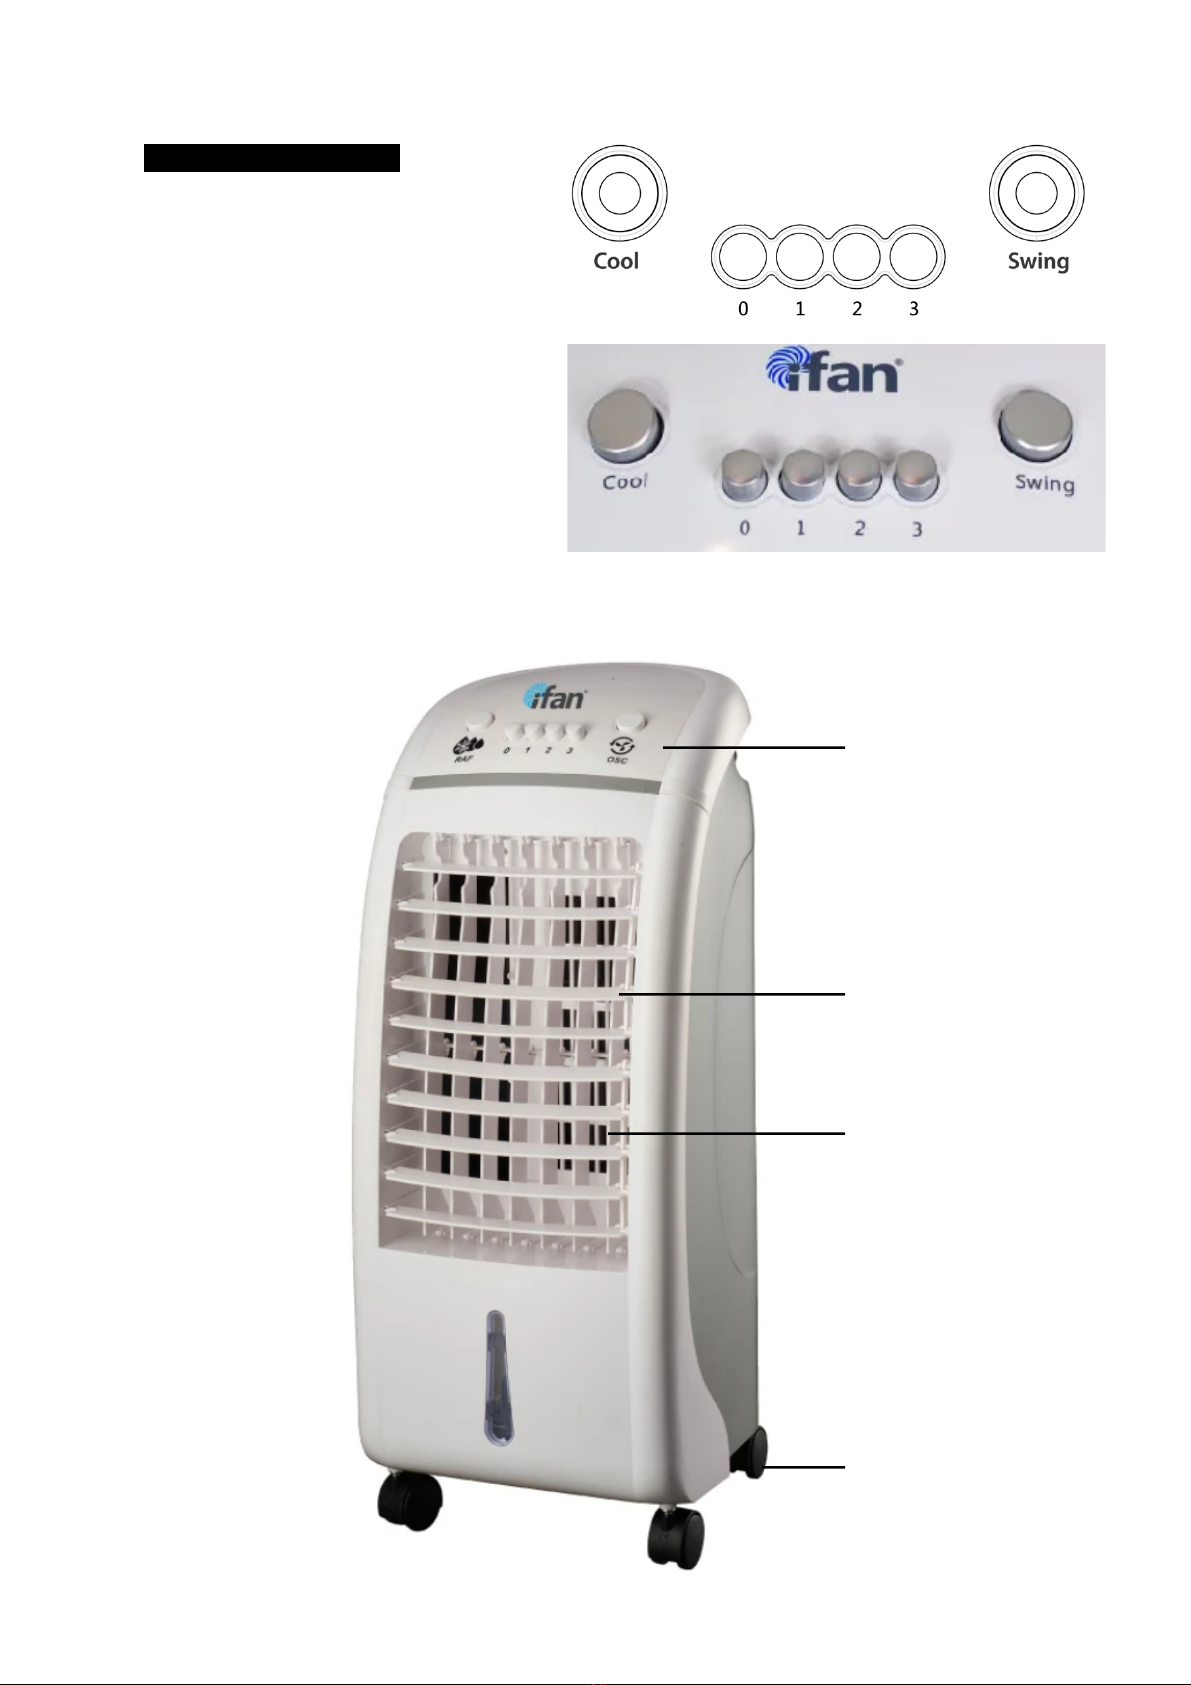
Parts & Description s
Control Panel
Control Panel
Short Louvers
Long Louvers
Wheel
Cooling Pad
Dust Filter
Water Tank
Ice Pack (two)
(for Water Tank)

Warnings s
ATTENTION :
Read this booklet carefully as it contains important instructions for a safe installation,
use and maintenance.
Important instructions to be kept for future reference.
The following basic precautions should always be followed when using electrical
appliances:
1. Read all instructions before using the appliance.
The Appliance
2. This appliance must be used only for the purpose it was expressly designed; any
use NOT complying with the instructions contained in the manual is considered
inappropriate and dangerous. The manufacturer is NOT responsible for possible
damages caused by the inappropriate and/or unreasonable use.
3. The installation/assembly of the appliance will be made in accordance with the
indications of the manufacturer. A wrong procedure may cause damages to
persons, animals or objects, for which the manufacturer cannot be considered
responsible.
4. Before use, check the integrity of the appliance and power cable. DO NOT operate
the appliance when its Motor Unit is damaged. In case you are not sure, contact
a qualified person. If the power cable is damaged, it must be replaced by the
manufacturer or its service agent, or a qualified technician in order to avoid a shock
hazard.
5. Before powering the appliance make sure the rating (voltage and frequency)
corresponding to the grid and the socket is suitable for the plug of the appliance,
and that the wall socket is properly grounded. This appliance is fitted with an earth
wire for extra safety.
6. Avoid the use of adapters and/or extension cables; if their use is absolutely
necessary, use only materials in compliance with the current safety regulations
and according to the electrical parameters of the adapters.
7. The appliance must NOT be switched on using external timers and/or other remote
control appliances which are not specified in this manual.
8. Only use original components & accessories provided by the manufacturer. Any
non-original component or accessory NOT recommended by the manufacturer
(including those made by other manufacturers or by the same manufacturer but
for other models) may cause injuries to persons or damage to the appliance.
9. The packing materials (plastic bags, expanded polystyrene, etc.) must be kept out
of the reach of children or disabled persons since they represent potential sources
of danger.

Location
10. This appliance is NOT suitable to be used or stored near heat sources (open flame,
ovens, heaters, stoves, etc.) and/or in an explosive environment (in the presence
of flammable substances such as gas, vapour, mist or dust, in atmospheric
conditions when, after ignition, the combustion is spread in the air). Items
containing these substances should never be placed in the appliance, and never
be used to clean the appliance in order to avert the risk of fire or explosion.
11. The appliance should NOT be placed on a surface, or in the vicinity of, objects
which can be damaged by heat, such as carpets or plastics. DO NOT locate
multiple portable socket outlets or power supplies at the bottom or rear of the
appliance. During operation, as heat is transferred away from the appliance, the
surface that the appliance is placed upon as well the surface immediately above
or adjacent to it may become very hot. There should be at least 10 cm of free space
from the back, left & right sides and at least 20 cm from the top to allow adequate
air circulation. Never put things on top of the appliance. If the appliance is operated
on wooden furniture, use a protective pad to prevent damage to delicate finishes.
12. Avoid placing the power cable on abrasive or sharp surfaces or in positions where
it can be damaged easily. Avoid placing heavy objects on the cable. The cable
must NOT be placed under carpets, or covered with throw rugs, runners or similar.
Arrange the cable away from the high traffic area, and where it will NOT be tripped
over. DO NOT pull or carry the appliance by the cable.
13. DO NOT operate the appliance next to an open window while it is raining, or use
it in the bathroom or other humid environments. Rainwater splashing onto the
appliance may cause an electric shock.
14. DO NOT use or store the appliance outdoors. Store and use the appliance only
indoors, or in any case, protected from weathering such as rain, direct radiation of
the sun and dust.
Operation
15. If you are using the appliance for the first time, you should:
a. Clean the exterior parts of the appliance thoroughly with warm water &
detergent with a non-abrasive sponge and wipe dry. DO NOT use metal
scouring pads. Make sure that the Motor Unit DOES NOT come into contact
with water. The Water Pump, however, is immersed in water.
b. Check that the Front Louvers, Air Inlet & Air Outlet are NOT damaged.
c. Place the appliance upright on a horizontal, stable, dry and heat-resistant
surface. Damage may occur if the appliance is placed on an incline or decline.
d. After opening the rear bottom hatch of the appliance, pull the Water Tank
halfway out. Put the frozen Ice Packs into the Water Tank and then add
sufficient water into the Water Tank but DO NOT add beyond the maximum
volume. Push the Water Tank back into the appliance and close the hatch.

e. To turn ON : Press the Speed Button 0 (OFF) on the Control Panel. Insert the
plug of the power cable directly into the wall socket and switch ON. Ensure that
the plug fits tightly into the socket.
f. Press any of the Speed Buttons on the Control Panel to turn the appliance ON.
The Speed Buttons correspond to the following wind speeds:
0 (OFF) ® 1 (Low) ® 2 (Medium) ® 3 (High)
(optional) Press the Swing Button on the Control Panel to keep the vertical
Front Louvers swinging from side to side continuously or to freeze the
movement.
g. (optional) Press the Cool Button to enter the COOL Mode.
h. Make sure to remove any label or protective sheet which may prevent its
proper functioning.
i. To turn OFF : Press the Cool Button to exit the COOL mode and the Speed
Button 0 (OFF) on the Control Panel.
j. Make sure to remove any label or protective sheet which may prevent its
proper functioning.
DO NOT:
• cover the appliance during functioning;
• obstruct totally nor partially the Air Inlet & Air Outlet;
• insert objects or body parts (including clothing and hair) through the air
inlet/outlet to avoid personal injury or damage to the appliance when in
operation;
• attempt to force the fan blades to turn or stop the blades from turning, which
may lead to the motor overheating. If the motor is operating, but the Fan Blades
do not move, switch the appliance off;
• touch the inside of the fan while it is operating. The blades are rotating at very
high speeds, which may lead to injury to your fingers and hands;
• push the Cool / Speed / Swing Buttons too forcefully;
• overload the Water Tank by filling it past the MAX volume indicated;
• operate the appliance under the COOL function when the Water Tank is NOT
filled with water;
• use the appliance to dry wet clothes or use the appliance in a damp
environment;
• use any of the following agents as a cleaner: gasoline, thinner, or benzene;
• operate the appliance for more than 6 hours without turning it off for at least 30
minutes to let the appliance cool down for a total usage of 12 hours a day –
failure to heed this warning may result in motor failure;
• leave the appliance unsupervised during operation.

16. During operation, DO NOT touch the appliance with wet body parts, and it is
recommended to have between you and the standing surface, an isolating element
(for example, wearing shoes with rubber soles).
17. DO NOT soak the appliance (especially the Motor Unit) in water or other liquids,
wash it under the tap, or let any liquid flow into the internal casing of the appliance
(especially the Control Panel) to prevent electric shock. In case of accidental fall
in water, DO NOT try to take it out, but first switch the appliance off.
18. Switch the appliance OFF before unplugging the appliance. Plug and unplug the
power cable firmly holding it with dry hands. Always unplug the power cable before
filling & emptying the appliance; to avoid overheating; if it is NOT used for a long
period and before storing, cleaning or performing any maintenance operation.
Prior to the latter, leave to cool for at least 30 minutes.
19. In case of malfunction or anomaly during the functioning, switch the appliance off
immediately, turn off the power and check the cause of the anomaly, if possible,
with the support of a qualified person.
20. If smoke is observed coming out of the appliance, switch the appliance off
immediately.
21. This appliance is NOT intended for commercial use but to be used in households
and similar applications, such as:
• Staff kitchen areas in shops, offices & other working environments;
• By clients in dormitories, hotels, motels & other residential environments;
• Bed and breakfast type environments.
22. This appliance can be used by children aged from 8 years and above and persons
with reduced physical, sensory or mental capabilities or lack of experience and
knowledge if they have been given supervision or instruction concerning use of
the appliance in a safe way and understand the hazards involved. Children shall
NOT play with the appliance. Cleaning and user maintenance shall NOT be made
by children unless they are older than 8 and supervised. Keep the appliance and
its cable out of reach of children less than 8 years old.
23. Save these instructions.

HOW TO USE s
Warning: The appliance comes fully assembled. DO NOT operate the appliance with
any of its parts disassembled. The entire assembled unit works as a single appliance.
The appliance must only operate in the upright position. Any other position will be
hazardous.
1. Avoid using the appliance in a closed environment. The appliance should be used
in an open and well-ventilated environment.
2. When the appliance operates under the COOL function, the Water Tank must be
filled with water. Although the appliance can be used as an ordinary fan without
using the COOL function, accidentally operating the appliance under the COOL
function with an empty Water Tank may result in possible damage to the appliance.
Thus, to be on the safe side, the Water Tank of the appliance should be filled with
water prior to operation.
3. When moving the appliance, be aware that water can spill out of the Water Tank.
Thus when moving an appreciable distance, it is recommended that all water be
drained from the Water Tank prior to the move.
Emptying & Filling the Water Tank
4. The Water Tank should be emptied and re-filled with fresh, clean water frequently.
DO NOT fill the Water Tank with other liquids.
To turn ON
5. Press the Cool Button OFF and Speed Button 0 (OFF) on the Control Panel.
6. Insert the plug of the power cable directly into the wall socket. Ensure that the plug
fits tightly into the socket. Switch the socket switch ON.
7. Press any of the Speed Buttons – 1, 2 or 3.
8. (optional) Press the Swing Button on the Control Panel to keep the vertical Front
Louvers swinging from side to side continuously or to freeze the movement.
9. (optional) Press the Cool Button to enter the COOL Mode.

What the Functions Buttons do:
Function
Cool
Press the Cool Button on the Control Panel once to enter
the COOL mode.
Press again to exit the COOL mode.
ON/OFF
Press the Speed 0 (OFF) Button on the Control Panel once
to turn the appliance OFF.
Speed
Press any of the Speed Buttons on the Control Panel to turn
the appliance ON.
0 (OFF) ® 1 (Low) ® 2 (Medium) ® 3 (High)
Swing
Press the Swing Button on the Control Panel once to keep
the vertical Front Louvers swinging from side to side
continuously.
Press again to stop the vertical Front Louvers from
swinging from side to side.
10. When the COOL mode is activated, the Water Pump in the Water Tank pumps
water to saturate the Cooling Pad at the back of the appliance. Air which flows
through the Cooling Pads lose heat to the water and exit at a slightly lower
temperature. Thus a decrease in temperature occurs; the exact decrease depends
on the relative humidity and air temperature. If the button is pressed when the
Speed is high, the fan speed will drop to its lowest speed for 30 seconds before
resuming normal operations.
To turn OFF
11. Press the Cool Button to exit the COOL mode and the Speed Button 0 (OFF) on
the Control Panel.
12. Switch the socket switch OFF and detach the plug from the socket on the wall.

HOW TO CLEAN s
1. Switch the appliance OFF. Wait for the appliance to cool down completely.
2. Clean the exterior parts of the appliance thoroughly with warm water & detergent
with a non-abrasive sponge and wipe dry. Take special care that the Control Panel
found at the top of the appliance is kept dry and that the Motor Unit DOES NOT
come into contact with water.
DO NOT use metal scouring pads.
DO NOT use any of the following agents as a cleaner: gasoline, thinners, or
benzene.
3. Open the hatch found at the bottom of the rear of the appliance and pull the Water
Tank halfway out.
a. Unlock the Water Pump.
b. Pull the Water Pump out and wash it.

c. Remove the Water Tank from the appliance completely.
d. Empty the Water Tank.
e. Clean the Water Tank with damp cloth moistened with warm water & detergent
with a non-abrasive sponge. DO NOT use metal scouring pads.
f. Push the empty Water Tank halfway into the appliance.
g. Put the Water Pump back into the Water Tank.
h. Lock the Water Pump.

i. (Put the frozen Ice Packs into the Water Tank only if you intend to use the
appliance immediately as an Air Cooler in COOL mode after cleaning the
appliance)
j. Re-fill the Water Tank with fresh, clean water using a hose or any clean
container until the water level indicator reaches the top of the Water Level
scale (above the minimum and below the maximum levels of the tank). DO
NOT fill the Water Tank with other liquids.
k. Push the Water Tank completely into the appliance and close the hatch.
4. Remove the Back Shutter on the back of the appliance. The Back Dust Filter
attached to the Back Shutter can be detached. Then remove the Back Cooling
Pad.
5. Clean the Dust Filter, Cooling Pad and Shutter under running water. Let the
components air-dry before replacing them in their respective positions on the
appliance.

6. Use a vacuum cleaner to suck up dirt from the Air Inlet and Air Outlet and around
the Motor Unit periodically, based on the frequency of use and the air quality of the
environment.
Dust (including smoke residue, hair, fur/feathers from pets, fibres
from clothes, towels, curtains and carpets, etc.) can collect on the
Grills, Fan blades and inside the Motor Unit. If not removed, it can
build-up over months or years.
During normal operation, the Motor will become hot and this is
normal. If not removed, dust can be a fire hazard.

PROBLEM SOLVING s
Fault symptom
Cause analysis
Troubleshooting
The appliance
does not
respond when
any of the
buttons are
pressed.
The power cable could be
damaged.
Please stop use and contact
customer service.
AC fuse could be damaged
or the circuit stops
functioning to prevent
overload.
Replace the fuse or restart
the unit. If problems persist,
please stop use and
contact customer service.
Remote Control or Control
Panel could be damaged.
Contact customer service
to replace the Remote
Control or to repair the
Control Panel.
Remote Control batteries
have run out.
Replace the Remote
Control batteries.
No air flows
out of the
appliance
while the
appliance is
operating.
The motor could be
damaged.
Please stop use and
contact customer service.
The wiring within the motor
or appliance could have
loosened.
Please stop use and
contact customer service.
Thermal protection inside the
motor has been activated as
appliance was used for
longer than 6 hours.
Please switch the
appliance off, unplug from
the wall socket and wait for
the appliance to cool down
completely before
attempting to operate the
appliance again.
If the appliance still does
not operate normally,
please stop use and
contact customer service.

Fault symptom
Cause analysis
Troubleshooting
The appliance
functions, but
the air coming
out is not cool
enough.
The Cooling Pad is dry or
contains an insufficient
amount of water due to either
insufficient amount of water
in the Water Tank or that the
Water Pump is not
functioning.
Clean the Water Tank and
replace the water in the
Water Tank.
Clean the Water Hose.
Remove dirt from the
Water Pump’s strainer.
Check that the Water
Pump is functioning
normally.
If the Water Pump is not,
please stop use and
contact customer service.
The Dust Filter and/or
Cooling Pad are clogged with
dust or dirt.
Clean or replace the Dust
Filter and/or Cooling Pad.
Excessive high relative
humidity in the room due to
environmental factors (of
which nothing can be done)
or that the appliance has
been turned on in its current
cycle that the room has been
saturated with moisture
(saturated vapour pressure
of water vapour is at
maximum) so much so that
the appliance is unable to
lower the temperature of the
room.
Turn the COOL mode off to
avoid releasing more
moisture into the room.
Water is
spurting out
from the air
inlet together
with air.
The Cooling Pad has strayed
out of position or that the
Water Tank is clogged with
debris.
Place the Cooling Pad in
the correct position.
Clean the Water Tank and
replace the water in the
Water Tank.
Just in case that debris has
entered the system, clean
the Water Hose and the
Water Pump’s strainer.

Fault symptom
Cause analysis
Troubleshooting
White
sediments in
the Water
Tank.
The water in the Water Tank
is saturated with salt.
As water is continually
removed from the Water
Tank, various salts are left
behind, which in time
become saturated and
exceed their Solubility
Product values (Ksp).
This is normal. Clean the
Water Tank and replace
the water in the Water
Tank. Clean the Water
Hose.
Undesirable
odour emitted.
The unit is placed in an
environment where
undesirable odours are
prevalent or that algae or
mould is growing on the
Cooling Pads or in the Water
Tank.
Clean the Cooling Pad or
Water Tank and replace
the water in the Water
Tank.
The appliance
is overheating.
There are
sparks coming
from the outlet
when the
appliance is
plugged in.
This could be caused by a
blockage of hair, dust or
some other obstruction in the
Air Inlet.
Power off the dryer and
unplug it from the power
source.
Use a soft bristle brush to
gently remove any lint or
hair present from both the
Air Inlet and its cover.
If this does not fix the
problem, please contact
customer service.

ENVIRONMENTAL TIP s
This appliance, along with all other electronic appliances, should, when it is no longer
capable of functioning, be disposed with the least possible environmental damage
according to the local regulations in your area. In most cases you can discard the
appliance at your local recycling centre.
DISPOSAL: Do not dispose this product as unsorted municipal waste. Collection of
such waste separately for special treatment is necessary.
Risk of child or animal entrapment
Before you discard this appliance, please remove all doors and leave the Water Tank
and Filter inside so that children or animals may not easily get trapped inside.
SPECIFICATION s
MODEL
VOLTAGE
POWER
IF7310
220 – 240 V ~50 – 60 Hz
65 W

WARRANTY s
Warranty Conditions
1. This warranty provides against defective materials and manufacturing faults
throughout for two years from the date of purchase of the appliance. The warranty
on the Compressor is 10 years subject to the same conditions as above.
2. This warranty also does not cover normal wear and tear, replacement of
consumable materials and accessories, and the cost of maintenance of the
appliance.
3. This warranty does not cover the repair or replacement of part/s damaged by
misuse, accidents, negligence, alterations, or modifications in any way, or repairs
done by any repair organisation without the prior consent of PowerPac Electrical
Pte Ltd.
4. Repair and service are to be performed at: 5 Changi South Lane #03-01 Singapore
486045. A transport fee will be charged for personal doorstep service.
5. The original purchaser of the appliance must furnish proof of purchase to our
Service Centre with the email or number as registered during submission of
warranty when this appliance is sent for repair/service. Failure to do so may delay
the receipt of said repair/service by the customer.
6. Under no circumstances whatsoever shall the serial number be erased, defaced
or altered by the customer and/or his representatives, or the dealer and/or his
agents. Failure to ensure this shall invalidate the warranty.
7. This warranty is deemed to be void if the defect is cause by the attack of household
pests, fire, lightning, natural disasters, pollution, abnormal voltage or the usage of
generators.
8. This warranty is valid in Singapore only.
9. This warranty will be honoured subject to the customer’s registration of the
warranty inclusive of original invoice or valid purchase receipt. Failure to present
these documents will result in denial of service. However, if the customer still
requests that the defective appliance be repaired, PowerPac Electrical Pte Ltd
may, at its discretion, repair the appliance but impose a labour charge, as well as
the costs of the replacement parts, to be borne solely by the customer.
10. Please refer to the attached picture for the location of
one of our appliance’s serial number, as an example.

Please complete the on-line registration warranty form available on our website. There
is no further requirement to send us any hard copy as part of our efforts to save the
environment.
In accordance with the terms and conditions of this limited warranty as stated above,
PowerPac Electrical Pte Ltd, at its expense shall provide free services for the
appliance within the warranty period from its date of purchase from our Authorised
dealers.
Table of contents
Other iFan Air Conditioner manuals


ABND3A2AI Service manual")


 Service manual")


