iFan IF9010 User manual

iFAN 3IN1 PORTABLE AIRCON AIR CONDITIONER / FAN / DEHUMIDIFIER
IF9010

Parts & Description s
LIST OF COMPONENTS
1.
Control Panel
5.
Top Cover
2.
Air Outlet Louvre
6.
Decorative Box
3.
Front Housing
7.
Side Plate
4.
Base Plate
8.
Rear Housing
9.
Caster
Control Panel ①
Air Outlet Louvre ②
Front Housing ③
Base Plate ④
⑤&&Top Cover
⑥&&Decorative Box
⑦&&Side Plate
⑧&&Rear Housing
⑨&&Caster
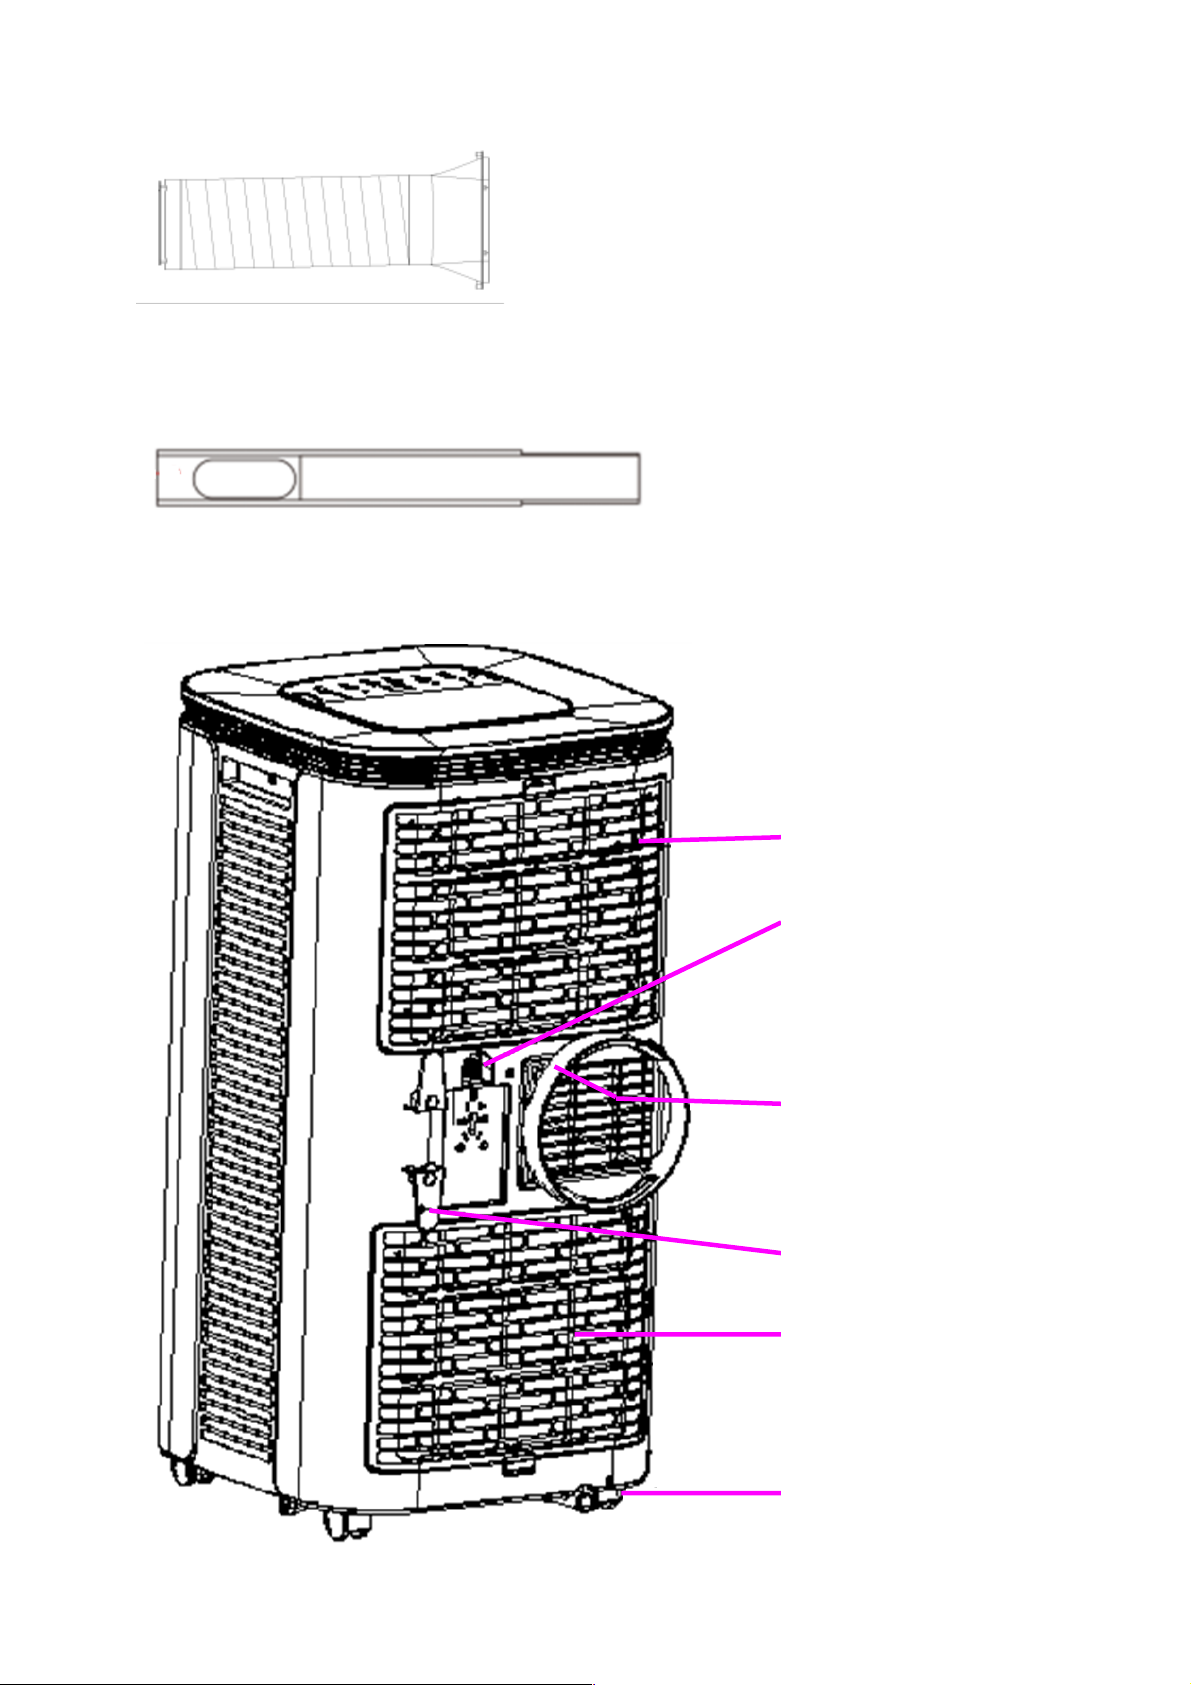
10.
EVA Filter
11.
Continuous Drainage Hole
12.
Air Vent
13.
Wrapping Post
14.
Con Filter
15.
Drainage Hole
⑩&&EVA Filter
⑪&&Continuous Drainage Hole
⑫&&Air Vent
⑬&&Wrapping Post
⑭&&Con Filter
⑮&&Drainage Hole
Exhaust Pipe Assembly
Window Sealing Plate Assembly

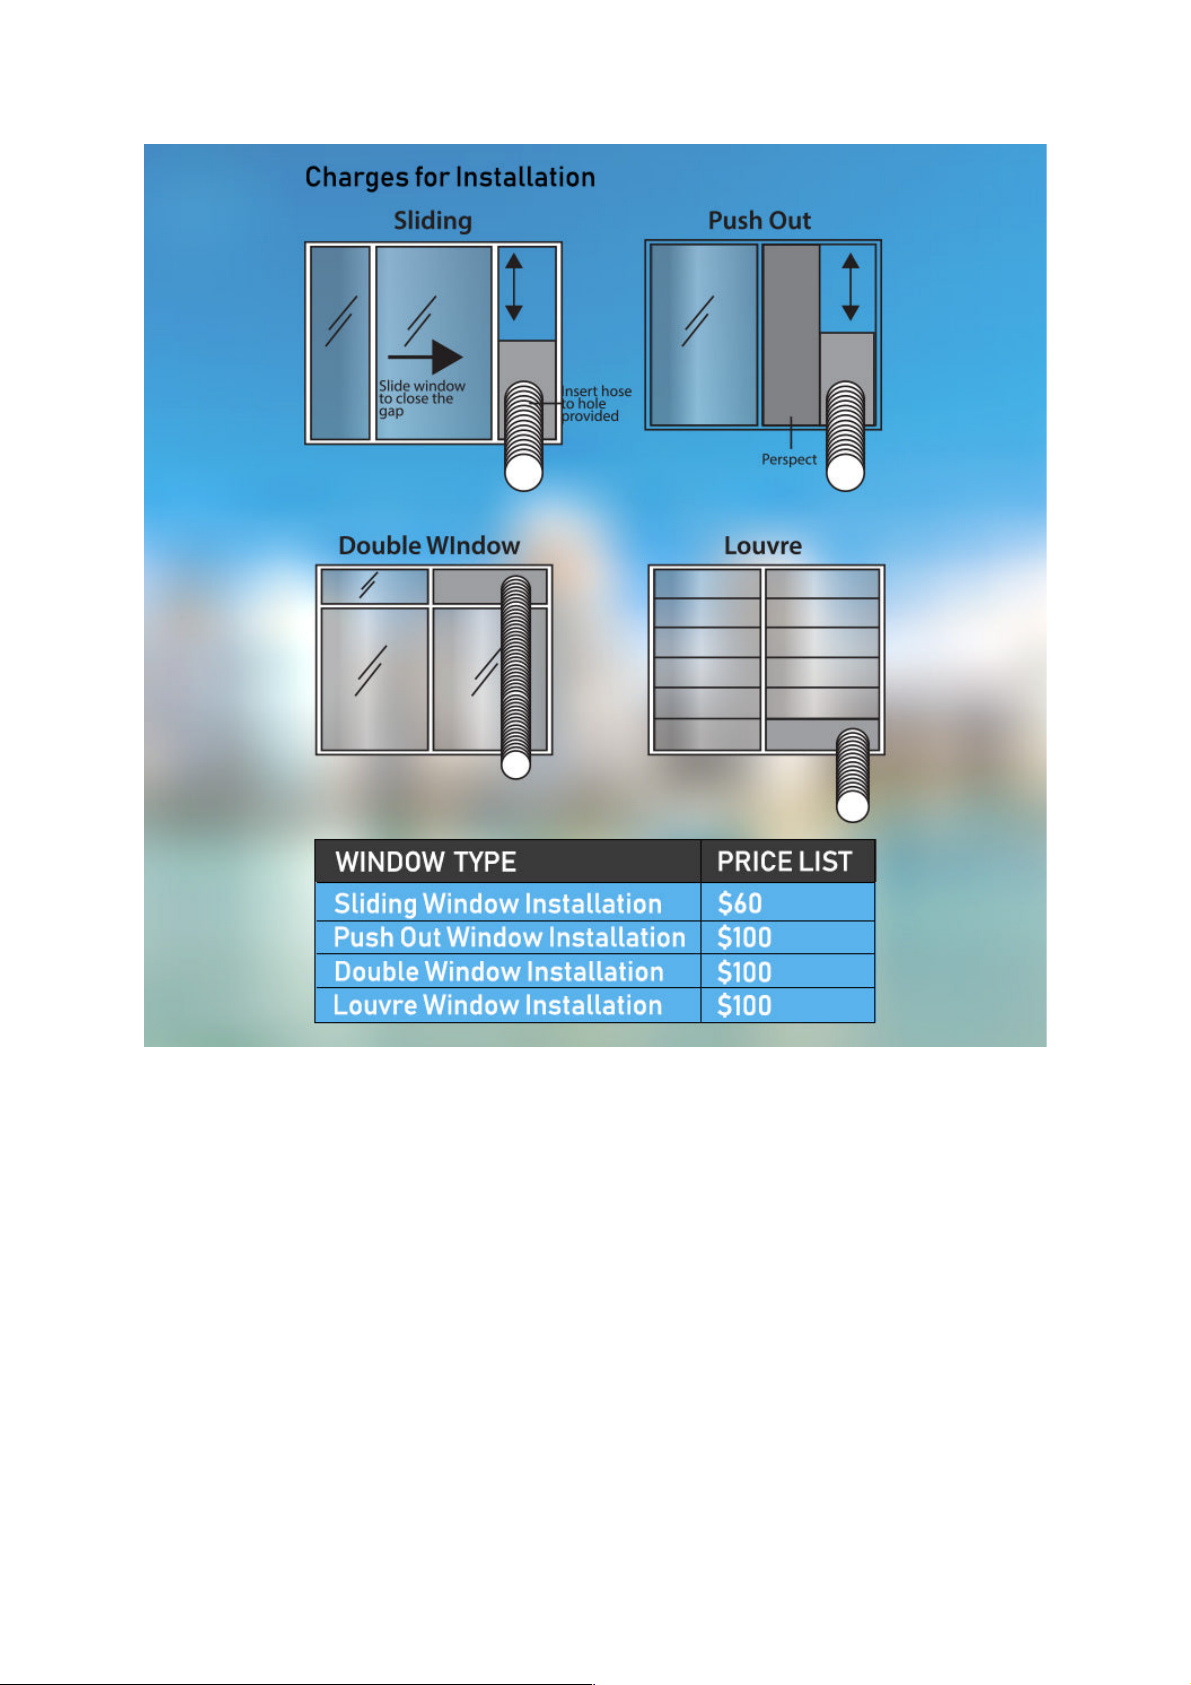
INSTALLATION GUIDE s
1.
INSTALLATION
Warning: before using the portable air conditioner, keep it upright for at least
2 hours. When moving the appliance, ensure that it is kept upright on a
horizontal and dry surface.
1.1
Screw the Exhaust Pipe Assembly (exhaust fitting end) into the exhaust port
on the rear panel (Fig. 1).
Exhaust Pipe Assembly Fig. 1
1.2
Half open the window, and mount the Window Sealing Plate Assembly to
the window in either horizontal (Fig. 2) or vertical (Fig. 3) directions.
To do so, you may have pull various components of the Window Sealing
Plate Assembly open to adjust their opening distance to bring both ends of
the assembly into contact with the window frame
Window Sealing Plate Assembly Fig. 2 Fig. 3
1.3
Place the Main Body with installed
Exhaust Pipe Assembly and fittings
before the window, and the distance
between the body and walls or other
objects shall be least 50 cm (Fig.4).
Fig. 4

2
Elongate the Exhaust Pipe. Snap the flat end of the Exhaust Pipe joints into
the hole of the Window Sealing Plate Assembly into place.
The Exhaust Pipe cannot be distorted nor subject to substantial turning
angle (greater than 45 °). Keep the ventilation of the Exhaust Pipe unlocked.
(Fig.5 & Fig.6).
Fig. 5 Fig. 6
Note:
The length of the Exhaust Pipe shall be between 280 ~ 1500 mm, and this
length is based on the specifications of the air conditioner DO NOT use
extension tubes or replace it with other different hoses, or this may cause a
malfunction. Exhaust Pipe must be unblocked; otherwise it may cause
overheating.
HOW TO USEs
LED CONTROL PANEL
REMOTE CONTROL PANEL
①""""""""""""""""" ②""""""""""""""""""""""""""""""""""""""""""""""" ③"""""""""""""""""""""""" ④ ⑤ ⑥
""""""""""""""" ②""""""""""""""""""""""""""""""""""""""""""""""""""""""""""""""""""""
④
③" UP
⑤
①"
③"DOWN
"
!
⑥
TIMER SPEED SWING SLEEP MODE POWER
SWING

①""
TIMER
When appliance is ON, press the TIMER key to exit. When appliance
is OFF, press the TIMER key to input.
Press the Timer key ® Symbol flashes ® Press UP or DOWN key to
set Timer (adjusted UP by one hour or Down by one hour, from
1 – 24 hours)
②""""
WIND
SPEED
SELECTION
When in FAN or COOL Mode (see 5), press key to toggle between
HIGH or LOW wind speed.
When in DEHUMIDIFY Mode, pressing the key does not work as it is
set to the LOW wind speed mode permanently.
③
UP / DOWN
Adjusts the Temperature or Timer settings.
④
SLEEP
In COOL mode, pressing the SLEEP key turns on Energy saving
operation. Does not work in DEHUMIDIFY or FAN modes.
⑤
FAN MODE
Press to toggle between
FAN ® DEHUMIDIFY ® COOL modes.
⑥
WATER
FULL
The lamp will light and buzzer will sound for several seconds to
indicate that the Water Pan inside the appliance is full.
POWER
To turn the appliance ON and OFF.

SAFETY FUNCTIONS
1.
Frost Protection Function
In COOL, DEHUMIDIFY or SLEEP mode, if the temperature of the exhaust pipe is
too low, the appliance will automatically enter protection status; if the temperature of
the exhaust pipe rises to a certain temperature, it automatically reverts to normal
operation.
2.
Automatic Defrosting
The appliance has Automatic Defrosting function.
3.
Protection Function of the Compressor
To increase the service life of the compressor, it has a 3-minute delay booting
protection function after the compressor is turned off.
4.
Overflow Protection Function
When water in the Water Pan exceeds the warning level, the appliance will
automatically sound an alarm, and the "FULL" indicator light will flash. The appliance
will stop operating. Follow the instructions below.
After the water is emptied, the appliance will automatically return to the original state.

HOW TO DRAIN AND STORE
1.
Manual Drainage
a.
Turn the wall switch OFF and unplug the power cable from the wall socket.
b.
Move the ②"Drainage Pipe connecting the appliance to a toilet or other drainage area
to empty the water. You may have to carefully move the appliance, as well.
c.
Unscrew the ①"Drainage Plug from the Drainage Hole. Water will automatically flow
out of the Water Pan. During drainage, the body of the appliance can be tilted slightly
backwards
d.
Re-attach the ①" Drainage Plug securely. Restart the appliance immediately.
Otherwise, condensate water of the appliance will flow to the floor.
Drainage Plug""
①"""""""""""""""""
②""Drainage Pipe!!!!!!!!!!!!!!!!!!!!!!!!!!!!!!!!!!!!!!!!!!!!!!

2
Storage instructions (after Manual Drainage)
a.
Repeat steps 1 (a) – (d). However, restart the appliance immediately in COOL mode
with LOW Wind Speed. Only switch OFF the appliance when the ②"Drainage Pipe
becomes dry.
b.
Turn the wall switch OFF and unplug the power cable from the wall socket. Wrap the
power cable around the Wrapping Post.
c.
Remove the Exhaust Pipe. Cover the appliance and the Exhaust Pipe in separate
plastic bags. Put them in a dry place, keep it out of the reach of children and take dust
control measures.
d.
Remove the battery of the Remote Control.
3.
Continuous Drainage (optional – only applicable to DEHUMIDIFY mode)
a.
Turn the wall switch OFF and unplug the power cable from the wall socket.
b.
Unplug the ③"Rubber Stopper from the Continuous Drainage Hole.
c.
Set the ④"Water Pipe into the water outlet, and its other end into a bucket. Water will
flow into the bucket.
Water Pipe""④
③ Rubber
Stopper""
Bucket""

Warnings s
ATTENTION :
Read this booklet carefully as it contains important instructions for a safe installation,
use and maintenance.
Important instructions to be kept for future reference.
The following basic precautions should always be followed when using electrical
appliances:
1. Read all instructions before using the appliance.
The Appliance
2. This appliance must be used only for the purpose it was expressly designed; any
use NOT complying with the instructions contained in the manual is considered
inappropriate and dangerous. The manufacturer is NOT responsible for possible
damages caused by the inappropriate and/or unreasonable use.
3. The installation/assembly of the appliance will be made in accordance with the
indications of the manufacturer. A wrong procedure may cause damages to
persons, animals or objects, for which the manufacturer cannot be considered
responsible.
4. When drainage pipes are installed, ensure that the drainage pipes are properly
connected, and are not distorted or bended.
5. Before use, check the integrity of the appliance and power cable. DO NOT operate
the appliance when its Compressor is damaged. In case you are not sure, contact
a qualified person. If the power cable is damaged, it must be replaced by the
manufacturer or its service agent, or a qualified technician in order to avoid a shock
hazard.
6. Before powering the appliance make sure the rating (voltage and frequency)
corresponding to the grid and the socket is suitable for the plug of the appliance,
and that the wall socket is properly grounded. This appliance is fitted with an earth
wire for extra safety.
7. Avoid the use of adapters and/or extension cables; if their use is absolutely
necessary, use only materials in compliance with the current safety regulations
and according to the electrical parameters of the adapters.
8. The appliance must NOT be switched on using external timers and/or other remote
control appliances which are not specified in this manual.
9. Only use original components & accessories provided by the manufacturer. Any
non-original component or accessory NOT recommended by the manufacturer
may cause injuries to persons or damage to the appliance.

10. The packing materials (plastic bags, expanded polystyrene, etc.) must be kept out
of the reach of children or disabled persons since they represent potential sources
of danger.
Location
11. This appliance is NOT suitable to be used or stored near heat sources (open flame,
ovens, heaters, stoves, etc.) and/or in an explosive environment (in the presence
of flammable substances such as gas, vapour, mist or dust, in atmospheric
conditions when, after ignition, the combustion is spread in the air). Items
containing these substances should never be placed in the appliance, and never
be used to clean the appliance in order to avert the risk of fire or explosion.
12. The appliance should NOT be placed on a surface, or in the vicinity of objects,
which can be damaged by heat or moisture, such as carpets or plastics. There
should be at least 50 cm of free space from the back, left & right sides and at least
20 cm from the top of the appliance to allow adequate air circulation. DO NOT put
things on top of the appliance. DO NOT locate multiple portable socket outlets or
power supplies at the bottom or rear of the appliance. Never use the appliance
near curtains or textiles. If the appliance is operated on wooden furniture, use a
protective pad to prevent damage to delicate finishes.
13. Place the appliance at a proper distance from the objects or surrounding walls
making sure that its functioning will NOT cause accidental damages.
14. Avoid placing the power cable on abrasive or sharp surfaces or in positions where
it can be damaged easily. Avoid placing heavy objects on the cable. The cable
must NOT be placed under carpets, or covered with throw rugs, runners or similar.
Arrange the cable away from the high traffic area, and where it will NOT be tripped
over. DO NOT pull or carry the appliance by the cable.
15. DO NOT operate the appliance next to an open window while it is raining, or use
it in the bathroom or other humid environments. Rainwater splashing onto the
appliance may cause an electric shock.
16. DO NOT use or store the appliance outdoors. Store and use the appliance only
indoors, or in any case, protected from weathering such as rain, direct radiation of
the sun and dust.
Operation
17. If you are using the appliance for the first time, you should:
a. Clean the exterior parts of the appliance thoroughly with warm water &
detergent with a non-abrasive sponge and wipe dry. DO NOT use metal
scouring pads. Make sure that the Compressor DOES NOT come into contact
with water.
b. Check that the Front Grilles, Air Inlet & Air Outlet are NOT damaged.

c. Place and use the appliance on a horizontal, stable and dry surface. When
moving the appliance, make sure that it is in an upright position. Damage may
occur if the appliance is placed on an incline or decline.
d. To turn ON : Insert the plug of the power cable directly into the wall socket and
switch ON. Ensure that the plug fits tightly into the socket.
e. Press the POWER Button on the Control Panel or the Remote Control once
to turn the appliance ON or OFF.
f. Press the FAN MODE Button on the Control Panel or the Remote Control to
select between FAN ® DEHUMIDIFY ® COOL modes.
g. Press the WIND SPEED SELECTION Button on the Control Panel or the
Remote Control to toggle between HIGH or LOW wind speed. When in
DEHUMIDIFY Mode, pressing the key does not work as it is set to the LOW
wind speed mode permanently.
h. Press the UP / DOWN Buttons on the Control Panel or the Remote Control to
make adjustments to the temperature or timer.
i. Make sure to remove any label or protective sheet which may prevent its
proper functioning.
DO NOT:
• cover the appliance during functioning;
• obstruct totally nor partially the Air Inlet & Air Outlet;
• insert objects or body parts (including clothing and hair) through the Air Inlet /
Air Outlet to avoid personal injury or damage to the appliance when in
operation;
• use insecticide sprays, aromatherapy oils or other flammable substances near
the appliance;
• push the buttons on the Control Panel or Remote Control too forcefully;
• use any of the following agents as a cleaner: gasoline, thinner, or benzene;
• leave the appliance unsupervised during operation.
17. During operation, DO NOT touch the appliance with wet body parts, and it is
recommended to have between you and the standing surface, an isolating element
(for example, wearing shoes with rubber soles).
18. DO NOT soak the appliance (especially the Compressor) in water or other liquids,
wash it under the tap, or let any liquid flow into the internal casing of the appliance
(especially the Control Panel) to prevent electric shock. In case of accidental fall
in water, DO NOT try to take it out, but first switch the appliance off.
19. Switch the appliance OFF before unplugging the appliance. Plug and unplug the
power cable firmly holding it with dry hands. Always unplug the power cable before
emptying the appliance; to avoid overheating; if it is NOT used for a long period
and before storing, cleaning or performing any maintenance operation. Prior to the
latter, leave to cool for at least 30 minutes.

20. In case of malfunction or anomaly during the functioning, switch the appliance off
immediately, turn off the power and check the cause of the anomaly, if possible,
with the support of a qualified person.
21. If smoke is observed coming out of the appliance, switch the appliance off
immediately.
22. This appliance is NOT intended for commercial use but to be used in households
and similar applications, such as:
• Staff kitchen areas in shops, offices and other working environments;
• By clients in dormitories, hotels, motels and other residential environments;
• Bed and breakfast type environments.
23. This appliance can be used by children aged from 8 years and above and persons
with reduced physical, sensory or mental capabilities or lack of experience and
knowledge if they have been given supervision or instruction concerning use of
the appliance in a safe way and understand the hazards involved. Children shall
NOT play with the appliance. Cleaning and user maintenance shall NOT be made
by children unless they are older than 8 and supervised. Keep the appliance and
its cable out of reach of children less than 8 years old.
24. Save these instructions.
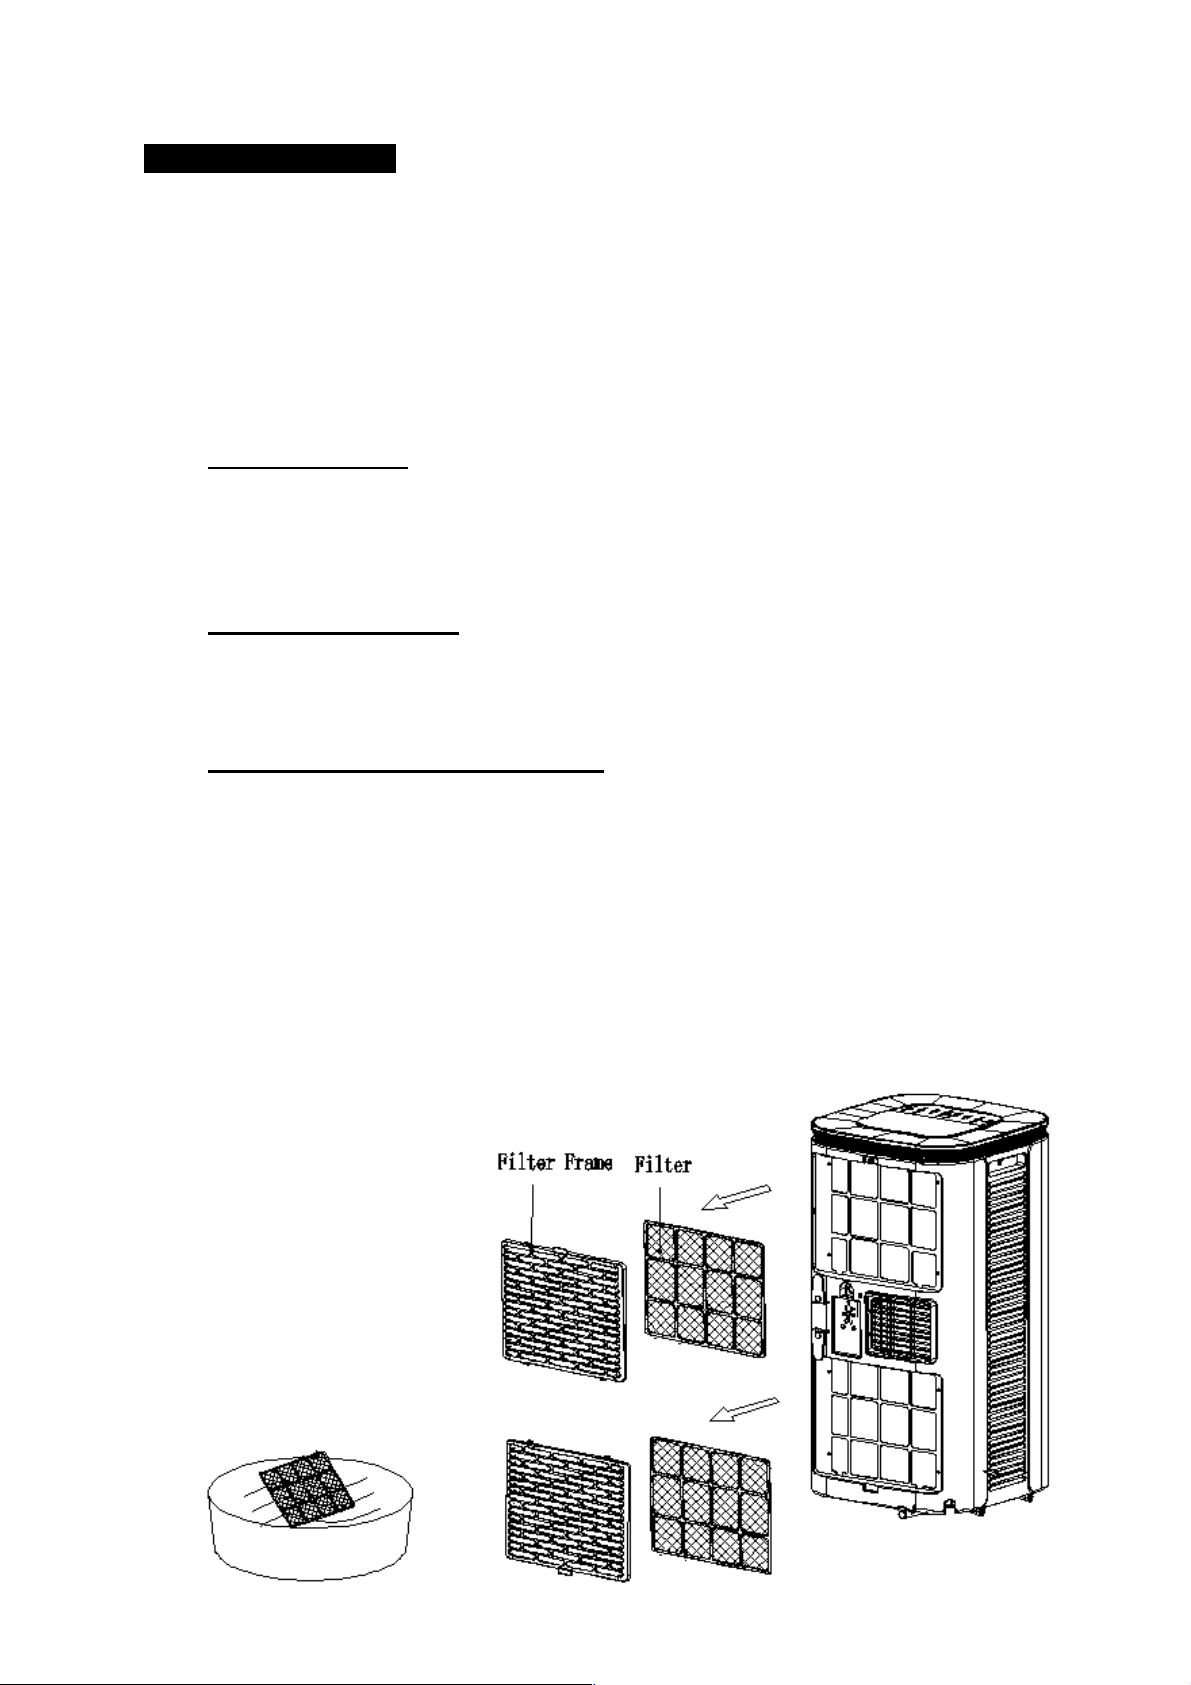
HOW TO CLEAN s
Warning: The appliance is fully assembled. DO NOT operate the appliance with any
of its parts disassembled. The entire assembled unit works as a single appliance. The
appliance must only operate in the upright position. Any other position will be
hazardous.
1.
Turn the wall switch OFF and unplug the power cable from the wall socket.
2.
Clean the surface
Clean with surface of appliance with a wet soft cloth. Don't use chemicals, such as
benzene, alcohol, gasoline, etc.; otherwise, the surface of the appliance will be
damaged.
3.
Clean the filter screen
If the filter screen is clogged with dust, and the effectiveness of the appliance is
reduced, clean the filter screen once every two weeks.
4.
Clean the upper filter screen frame
Clasp the wedging block of the EVA filter screen frame with hands. Force down from
the outside to remove the EVA filter screen frame. Unscrew four screws fixing the EVA
filter screen and the Rear Housing to remove the EVA filter screen (as shown in the
figure below).
Put the EVA filter screen into warm water with neutral detergent (about 40°C/ 104°F)
and dry it in the shade after rinsing clean.

PROBLEM SOLVING s
Fault
symptom
Cause analysis
Troubleshooting
The
appliance
does not
respond
when any of
the buttons
are pressed.
The Power Cable could be
damaged.
Please stop use and contact
customer service.
AC Fuse could be damaged
or the circuit stops
functioning to prevent
overload.
Replace the Fuse or restart the
unit. If problems persist, please
stop use and contact customer
service.
Remote Control or Control
Panel could be damaged.
Contact customer service to
replace the Remote Control or
to repair the Control Panel.
Remote Control batteries
have run out.
Replace the Remote Control
batteries.
The overflow indicator
displays "FULL".
Drain the water from the Water
Pan (refer to section on “How to
Drain”).
The ambient temperature is
too low or too high.
Use the appliance between 7 –
35 °C ℃ (44 – 95 °F).
In COOL mode, the room
temperature is lower than
the set temperature.
Decrease the set temperature.
In DEHUMIDIFY mode, the
ambient temperature is low.
Place the appliance in a room
with an ambient temperature
greater than 17 °C (62 °F).
No air flows
out of the
appliance
while the
appliance is
operating.
The Compressor could be
damaged.
Please stop use and contact
customer service.
The wiring within the
Compressor or appliance
could have loosened.
Please stop use and contact
customer service.
Fault
symptom
Cause analysis
Troubleshooting
The
appliance
functions,
but the air
coming out
is not cool
enough.
There is direct sunlight.
Shift the location of the
appliance or close the curtains.
Doors or windows are open
or keep being opened and
closed; there are a lot of
people in the same room; or
in cooling mode, there are
other sources of heat.
Close doors and windows, or,
switch off other sources of heat.
The Filter Screen is clogged
with dust or dirt.
Clean or replace the Filter
Screen.
The Air Inlet or Air Outlet is
blocked.
Clear the obstructions.
Compressor
does not
work.
Overheat protection
activated.
Wait for 3 minutes until the
temperature is lowered, and
then restart the appliance.
The
appliance
makes a lot
of noise.
The appliance is not placed
on a flat surface.
Put the air conditioning on a flat
and hard place (to reduce
noise).
The Remote
Control does
not work.
The distance between the
appliance and the Remote
Control is too far.
Move the Remote Control closer
to the appliance, and point the
Remote Control directly in the
direction of the receiver.
The Remote Control is not
aligned with the direction of
the remote control receiver.
The AA batteries are dead.
Replace with fresh AA batteries.
Displays
'E1'.
The Pipe Temperature
Sensor is abnormal.
Check the Pipe Temperature
Sensor and related circuitry.
Displays
'E2'.
The Room Temperature
Sensor is abnormal.
Check the Room Temperature
Sensor and related circuitry.
ENVIRONMENTAL TIP s
This appliance, along with all other electronic appliances, should, when it is no longer
capable of functioning, be disposed with the least possible environmental damage
according to the local regulations in your area. In most cases you can discard the
appliance at your local recycling centre.
DISPOSAL: Do not dispose this appliance as unsorted municipal waste. Collection of
such waste separately for special treatment is necessary.
SPECIFICATION s
MODEL
IF9010
RATED VOLTAGE
220 – 240 V ~50 – 60 Hz
POWER
1130 W
COOLING CAPACITY
10000 BTU
AIR FLOW VOLUME
350 m3 per hour
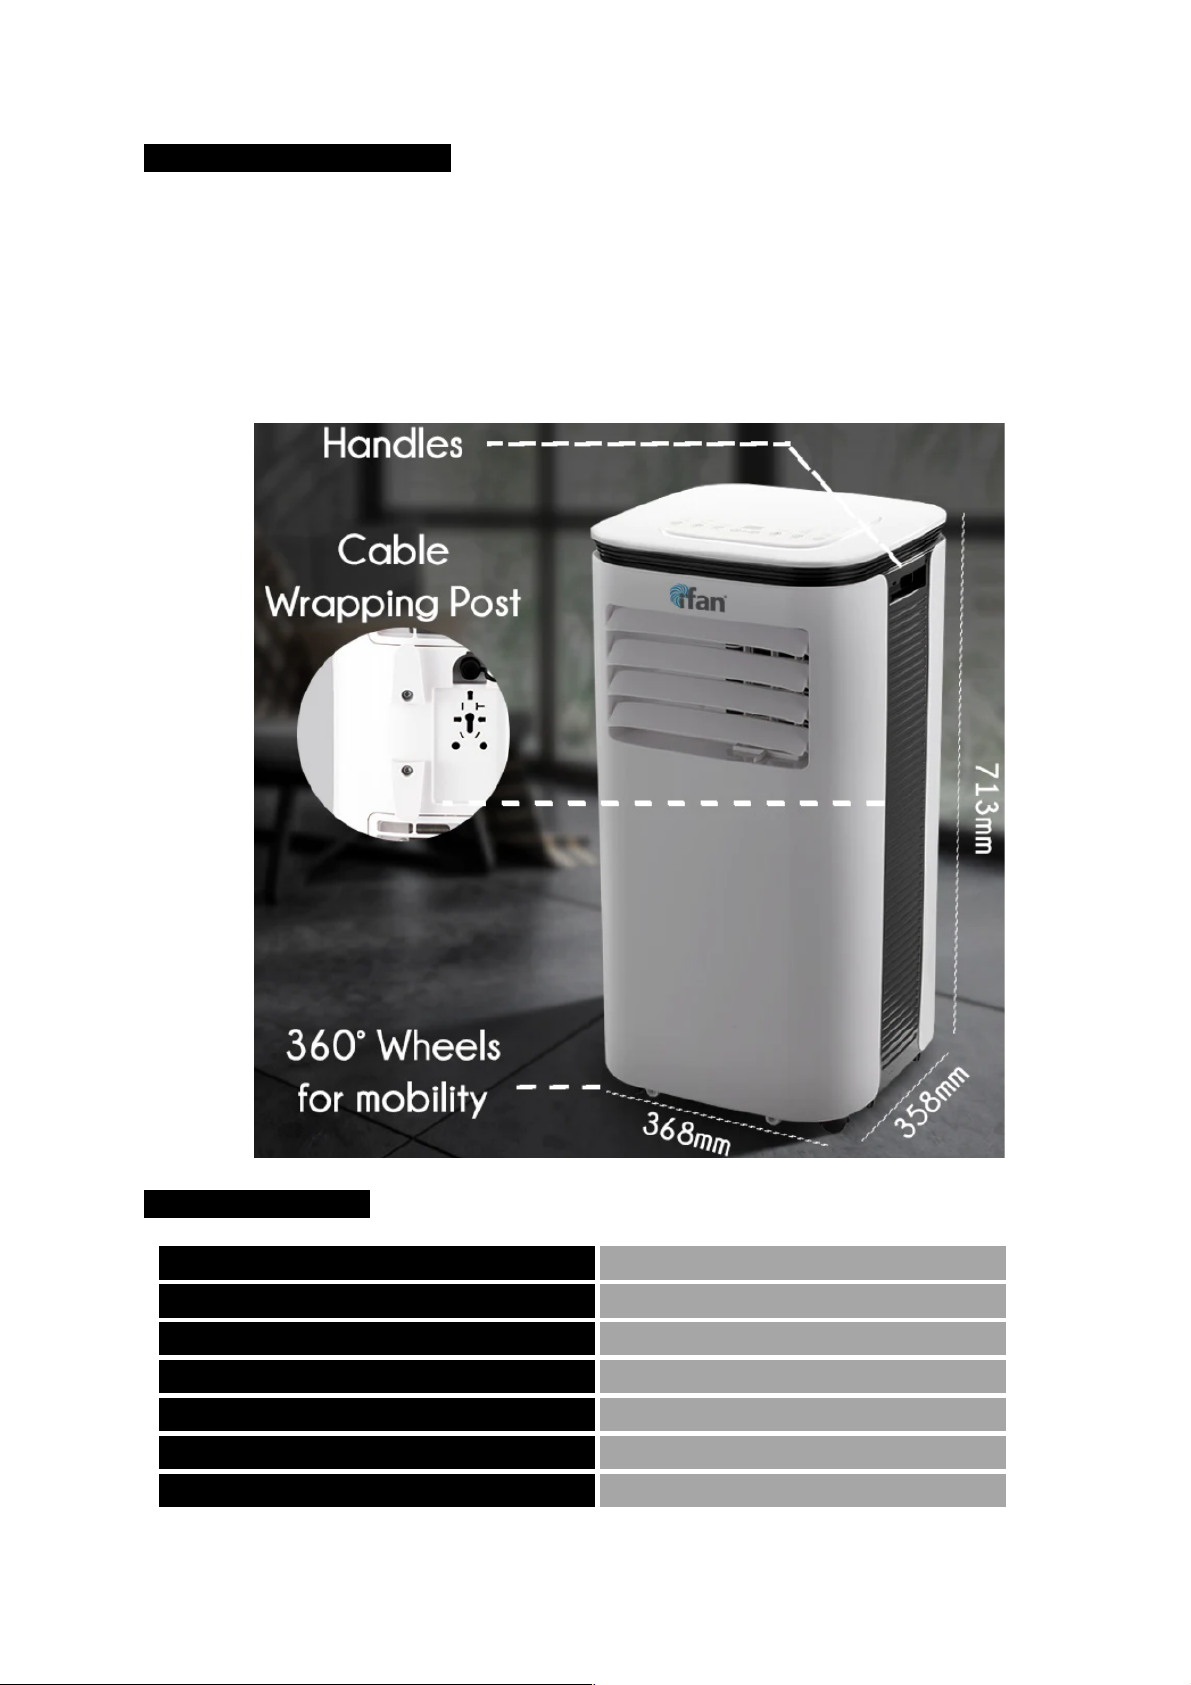
DIMENSIONS
368 x 358 x 713 mm
WEIGHT
27 kg (gross) / 24 kg (nett)

WARRANTY s
Warranty Conditions
1. This warranty provides against defective materials and manufacturing faults
throughout for two years from the date of purchase of the appliance.
2. This warranty also does not cover normal wear and tear, replacement of
consumable materials and accessories, and the cost of maintenance of the
appliance.
3. This warranty does not cover the repair or replacement of part/s damaged by
misuse, accidents, negligence, alterations, or modifications in any way, or repairs
done by any repair organisation without the prior consent of PowerPac Electrical
Pte Ltd.
4. Repair and service are to be performed at: 5 Changi South Lane #03-01 Singapore
486045. A transport fee will be charged for personal doorstep service.
5. The original purchaser of the appliance must furnish proof of purchase to our
Service Centre with the email or number as registered during submission of
warranty when this appliance is sent for repair/service. Failure to do so may delay
the receipt of said repair/service by the customer.
6. Under no circumstances whatsoever shall the serial number be erased, defaced
or altered by the customer and/or his representatives, or the dealer and/or his
agents. Failure to ensure this shall invalidate the warranty.
7. This warranty is deemed to be void if the defect is cause by the attack of household
pests, fire, lightning, natural disasters, pollution, abnormal voltage or the usage of
generators.
8. This warranty is valid in Singapore only.
9. This warranty will be honoured subject to the customer’s registration of the
warranty inclusive of original invoice or valid purchase receipt. Failure to present
these documents will result in denial of service. However, if the customer still
requests that the defective appliance be repaired, PowerPac Electrical Pte Ltd
may, at its discretion, repair the appliance but impose a labour charge, as well as
the costs of the replacement parts, to be borne solely by the customer.
10. Please refer to the attached picture for the location of
one of our appliance’s serial number, as an example.
Table of contents
Other iFan Air Conditioner manuals


Popular Air Conditioner manuals by other brands


 installation instructions")


Avallon
Avallon APAC140C user guide

Olimpia splendid
Olimpia splendid OS-CEBSH24EI Instructions for installation, use and maintenance

MAXA
MAXA HWA-A/FC 0127 Technical manual

Weltem
Weltem Icen WPC-9000 owner's manual

Premier
Premier AA-2831 instruction manual

Electrolux
Electrolux FAH125N2 Factory parts catalog