IFM O2D93 Series User manual

Operating instructions
LED dome light
O2D93x
80279745 / 01 08 / 2019
UK

Operating instructions O2D93x
2
Content
1 Preliminary note � � � � � � � � � � � � � � � � � � � � � � � � � � � � � � � � � � � � � � � � � � � � � � � � � 3
1�1 Symbols used� � � � � � � � � � � � � � � � � � � � � � � � � � � � � � � � � � � � � � � � � � � � � � � 3
1�2 Warnings used � � � � � � � � � � � � � � � � � � � � � � � � � � � � � � � � � � � � � � � � � � � � � � 3
1�3 Copyright and trademarks � � � � � � � � � � � � � � � � � � � � � � � � � � � � � � � � � � � � � 3
2 Safety instructions � � � � � � � � � � � � � � � � � � � � � � � � � � � � � � � � � � � � � � � � � � � � � � � 4
3 Functions and features � � � � � � � � � � � � � � � � � � � � � � � � � � � � � � � � � � � � � � � � � � � � 5
4 Items supplied� � � � � � � � � � � � � � � � � � � � � � � � � � � � � � � � � � � � � � � � � � � � � � � � � � � 5
5 Installation� � � � � � � � � � � � � � � � � � � � � � � � � � � � � � � � � � � � � � � � � � � � � � � � � � � � � � 6
5�1 Install device� � � � � � � � � � � � � � � � � � � � � � � � � � � � � � � � � � � � � � � � � � � � � � � � 6
5�2 Install vision sensor � � � � � � � � � � � � � � � � � � � � � � � � � � � � � � � � � � � � � � � � � � 6
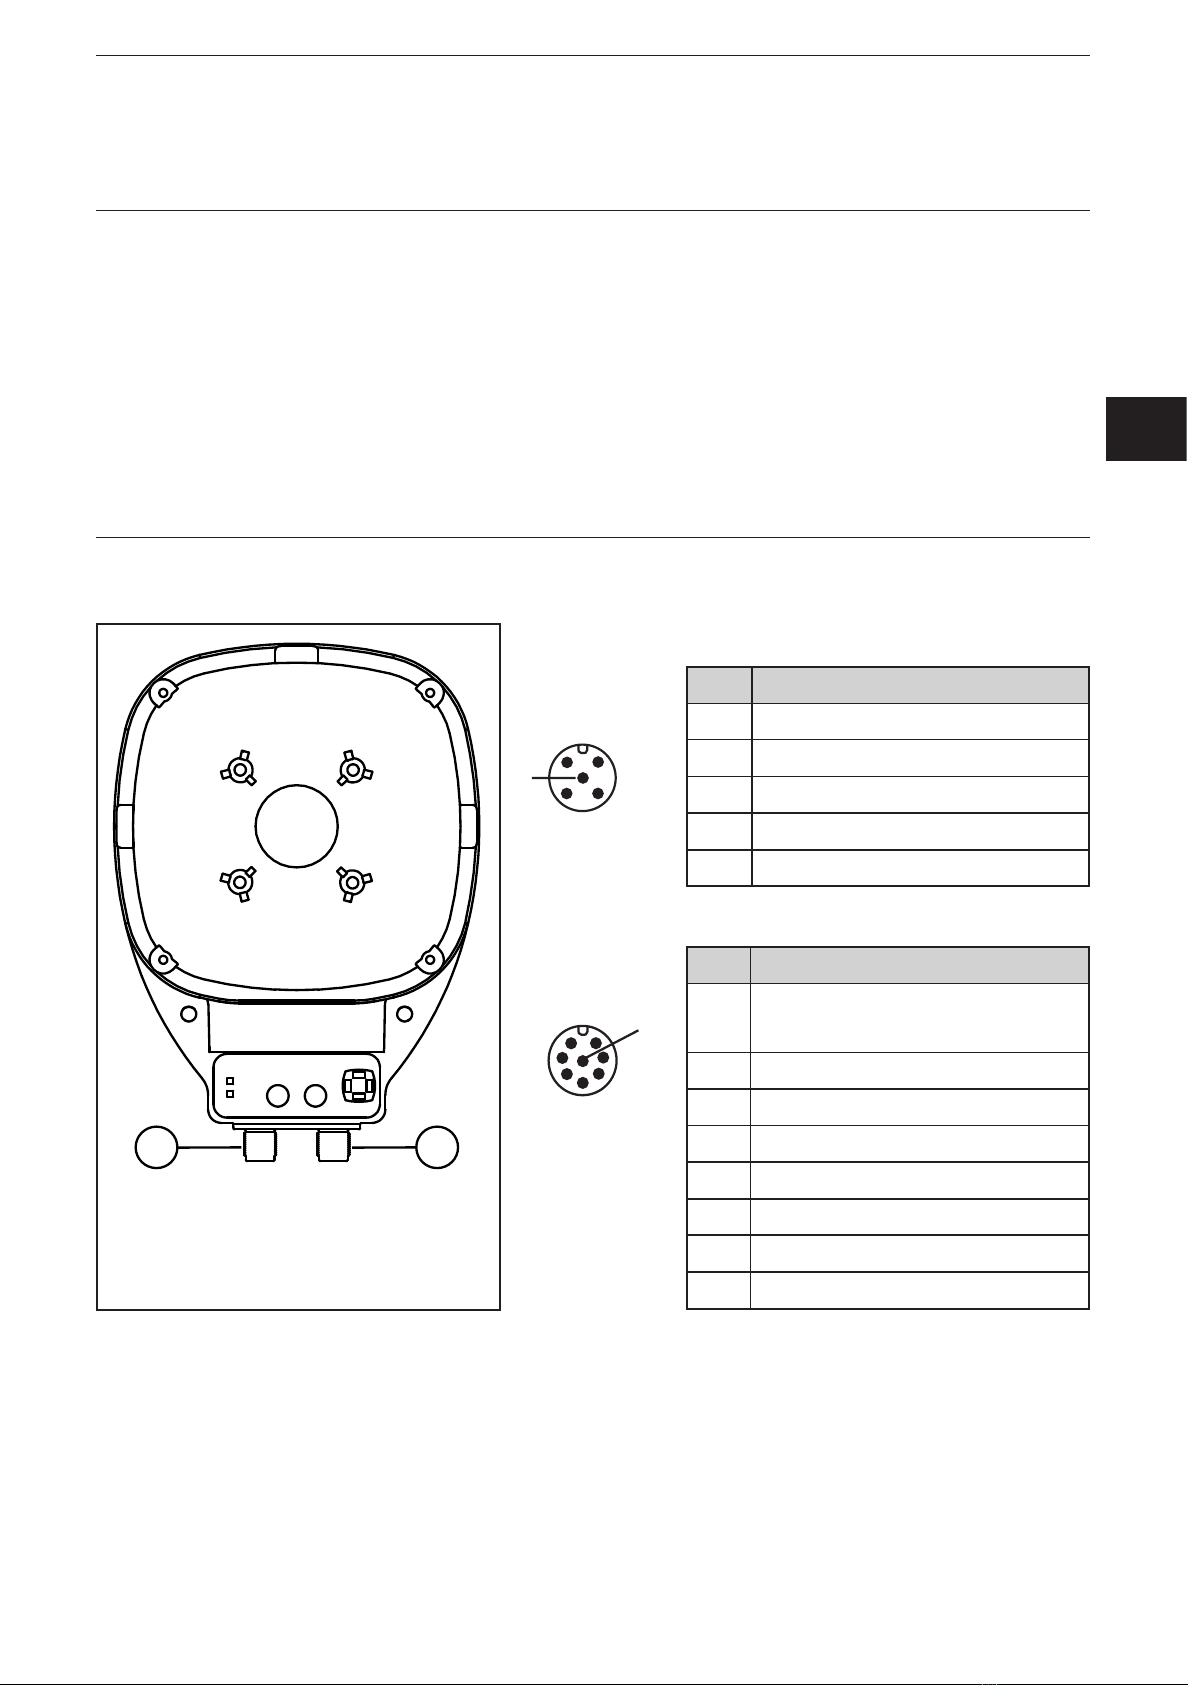
6 Electrical connection� � � � � � � � � � � � � � � � � � � � � � � � � � � � � � � � � � � � � � � � � � � � � � 7
6�1 Wiring � � � � � � � � � � � � � � � � � � � � � � � � � � � � � � � � � � � � � � � � � � � � � � � � � � � � � 7
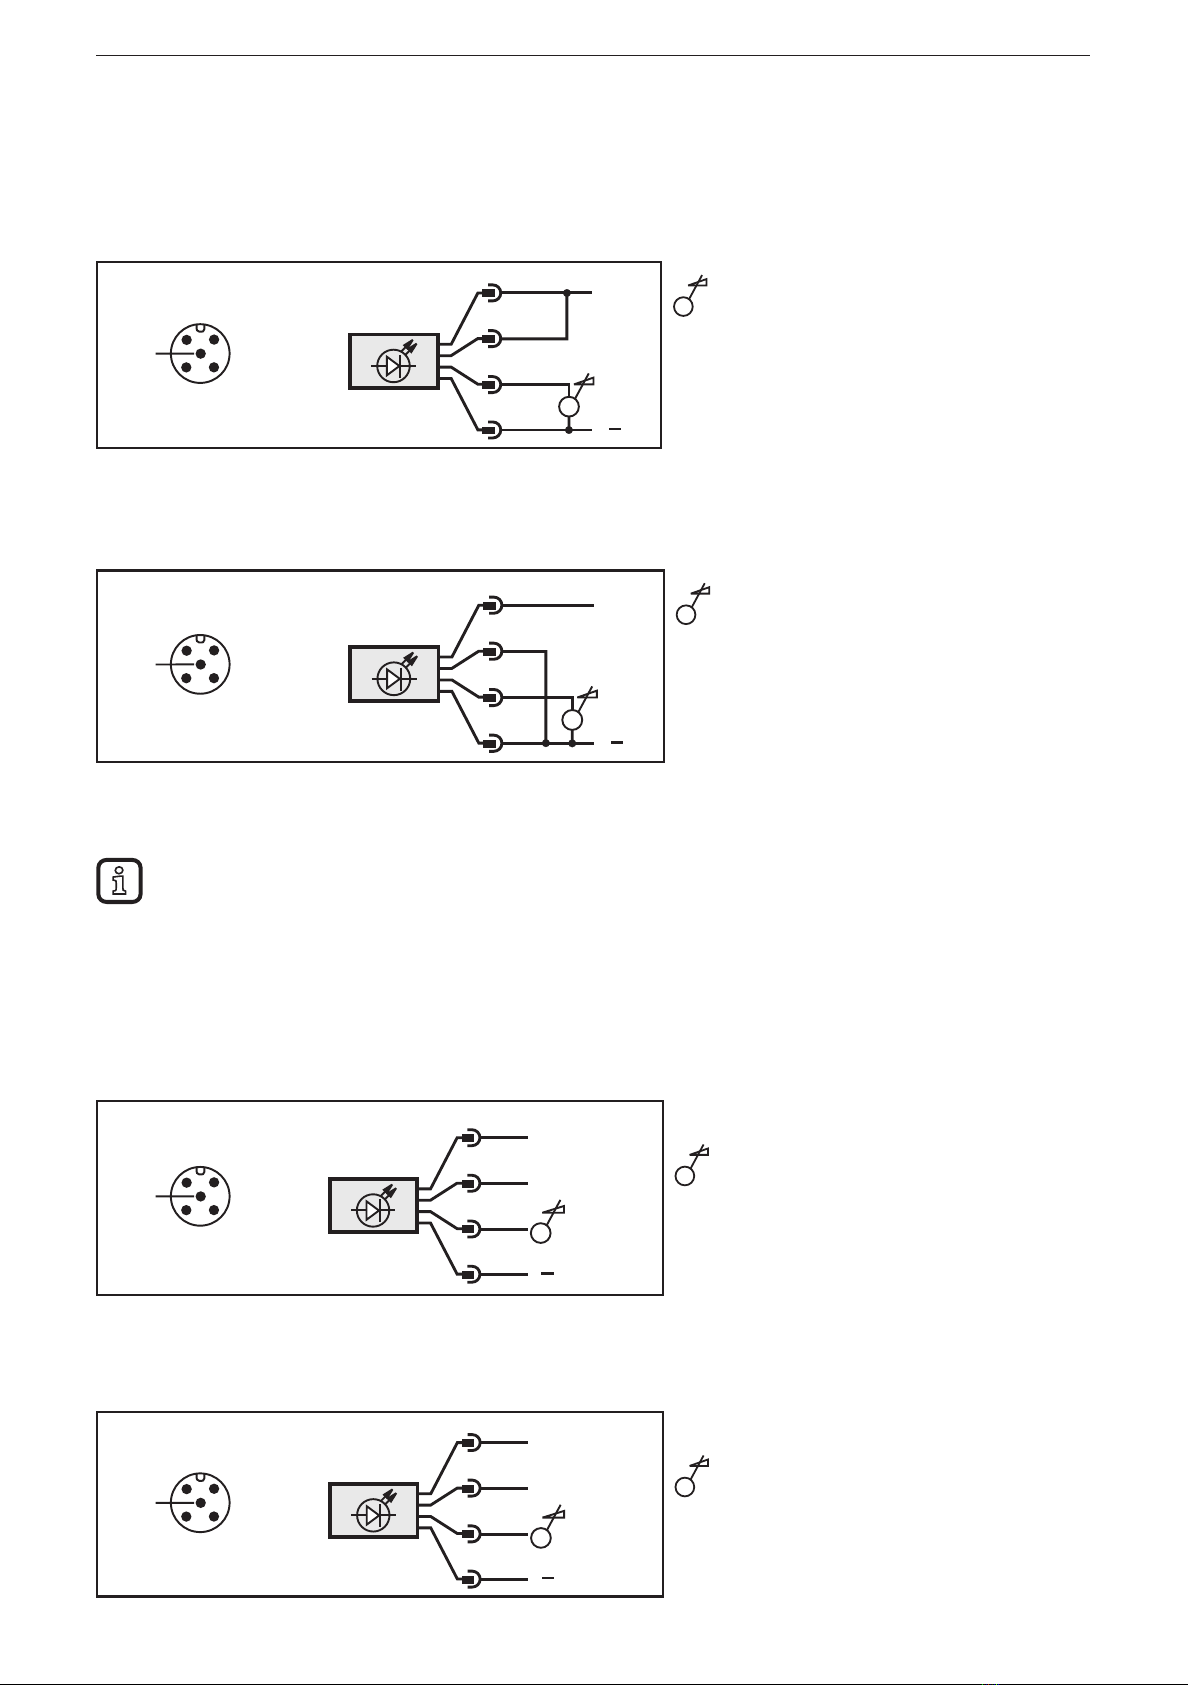
6�2 Mode continuous light � � � � � � � � � � � � � � � � � � � � � � � � � � � � � � � � � � � � � � � � 8
6�2�1 PNP � � � � � � � � � � � � � � � � � � � � � � � � � � � � � � � � � � � � � � � � � � � � � � � � � � 8
6�2�2 NPN � � � � � � � � � � � � � � � � � � � � � � � � � � � � � � � � � � � � � � � � � � � � � � � � � � 8
6�3 Mode pulse operation � � � � � � � � � � � � � � � � � � � � � � � � � � � � � � � � � � � � � � � � 8
6�3�1 PNP � � � � � � � � � � � � � � � � � � � � � � � � � � � � � � � � � � � � � � � � � � � � � � � � � � 8
6�3�2 NPN � � � � � � � � � � � � � � � � � � � � � � � � � � � � � � � � � � � � � � � � � � � � � � � � � � 8
7 Operating and display elements � � � � � � � � � � � � � � � � � � � � � � � � � � � � � � � � � � � � � 9
7�1 Set colours and segments � � � � � � � � � � � � � � � � � � � � � � � � � � � � � � � � � � � � � 9
8 Set-up � � � � � � � � � � � � � � � � � � � � � � � � � � � � � � � � � � � � � � � � � � � � � � � � � � � � � � � � 10
8�1 Mode continuous light � � � � � � � � � � � � � � � � � � � � � � � � � � � � � � � � � � � � � � � 10
8�2 Mode pulse operation� � � � � � � � � � � � � � � � � � � � � � � � � � � � � � � � � � � � � � � � 10
8�2�1 High lighting power � � � � � � � � � � � � � � � � � � � � � � � � � � � � � � � � � � � � � 10
8�2�2 Signal delay � � � � � � � � � � � � � � � � � � � � � � � � � � � � � � � � � � � � � � � � � � � �11
8�3 Dim lighting power � � � � � � � � � � � � � � � � � � � � � � � � � � � � � � � � � � � � � � � � � � �11
8�4 External control � � � � � � � � � � � � � � � � � � � � � � � � � � � � � � � � � � � � � � � � � � � � 12
9 Maintenance, repair and disposal� � � � � � � � � � � � � � � � � � � � � � � � � � � � � � � � � � � 12

UK
Operating instructions O2D93x
3
1 Preliminary note
Technical data, approvals, accessories and further information →
www�ifm�com�
1.1 Symbols used
►
Instruction
>
Reaction, result
[…]
Designation of keys, buttons or indications
→
Cross-reference
Important note
Non-compliance may result in malfunction or interference�
Information
Supplementary note�
1.2 Warnings used
CAUTION!
Warning of personal injury�
Slight reversible injuries may result�
ATTENTION!
Warning of damage to property
1.3 Copyright and trademarks
© All rights reserved by ifm electronic gmbh� No part of these instructions may be
reproduced and used without the consent of ifm electronic gmbh�
All product names, pictures, companies or other brands used on our pages are the
property of the respective rights owners�

Operating instructions O2D93x
4
2 Safety instructions
●The device described is a subcomponent for integration into a system�
– The manufacturer is responsible for the safety of the system�
– The system manufacturer undertakes to perform a risk assessment
and to create a documentation in accordance with legal and normative
requirements to be provided to the operator and user of the system�
This documentation must contain all necessary information and safety
instructions for the operator, the user and, if applicable, for any service
personnel authorised by the manufacturer of the system�
●Read this document before setting up the product and keep it during the entire
service life�
●The product must be suitable for the corresponding applications and
environmental conditions without any restrictions�
● Only use the product for its intended purpose (→ Functions and features).
●If the operating instructions or the technical data are not adhered to, personal
injury and/or damage to property may occur�
●The manufacturer assumes no liability or warranty for any consequences
caused by tampering with the product or incorrect use by the operator�
●Installation, electrical connection, set-up, operation and maintenance of the
product must be carried out by qualified personnel authorised by the machine
operator�
●Protect units and cables against damage�
CAUTION!
Invisible infrared light
The device emits infrared light of risk group 1 (IEC 62471) invisible to
the human eye�
The infrared light can cause damage to the retina�
►Use the device for its intended purpose�
►Avoid staring into the infrared beam�
CAUTION
Infrared light emitted from this product.
Classification to IEC 62471
Risk group 1

UK
Operating instructions O2D93x
5
3 Functions and features
The O2D93x illumination unit is an LED dome light for uniform illumination of
camera scenes� The LED dome light is split into 4 segments which are arranged
as a ring� The segments are programmable regarding light colour and switch-on/
switch-off characteristics� Programming is done on the LED dome light via the 2
operating buttons or via external control�
The active mode and the active segments are indicated via LEDs�
The device is designed for indoor use�
Because of the requirements for electromagnetic interference emissions, the
device is intended for use in industrial environments� The device is not suitable for
use in domestic areas�
The device may only be used under the operating conditions specified in the
data sheet�
4 Items supplied
●O2D93x illumination unit
●Operating instructions
►In the event of incomplete or damaged items supplied please contact ifm
electronic�
The device is supplied without mounting and connection accessories�

Operating instructions O2D93x
6
5 Installation
1
Power
Light on
Colour Segment
1
2
①: Mounting holes
②: Fixtures for accessory
Fig� 1: Installation
5.1 Install device
►Install the device via the mounting holes with 2x M5 screws�
For an additional locking of the screws seal them with a screw retaining
compound�
►Tighten the screws with a tightening torque of 0�5 to 1�5 Nm�
►Use strain reliefs for cables connected to the device�
5.2 Install vision sensor
►Mount the accessory E2D117 via the fixtures with 4x M3 screws�
►Tighten the screws with a tightening torque of 0�5 to 1�0 Nm�
►Mount the vision sensor to the accessory E2D117�
►Use strain reliefs for cables connected to the vision sensor�

UK
Operating instructions O2D93x
7
6 Electrical connection
Observe the following instructions before electrical installation�
ATTENTION!
The device must be connected by a qualified electrician� Observe the electrical
data in the data sheet�
Device of protection class III (PC III).
The electrical supply must only be made via PELV circuits�
For cable lengths > 30 m use an additional protection against surge voltages to
IEC 61000-4-5�
Disconnect power before connecting the device�
6.1 Wiring
1 2
Power
Light on
Colour Segment
①: Power supply: 5-pole M12 connector
4
2 1
3
5
Pin Connection
1 L+
2 trigger input NPN
3 GND
4 trigger input PNP
5 dimmer 0-10 V
②: External control: 8-pole M12 connector
6
21
45
7
3
8
Pin Connection
1 activate high lighting
power
2 activate colour 2
3 GND
4 activate segment 1
5 activate segment 2
6 activate segment 3
7 activate segment 4
8 deactivate buttons

Operating instructions O2D93x
8
6.2 Mode continuous light
6.2.1 PNP
5-pole M12 connector
4
2 1
3
5
EPS Source
Product Scale Drawing
Frame Size: 75 mm x 26 mm
AN_i_1870_G Original Scale Drawing (MTD)
L+
L
4
1
5
3
L+
L
2
1
5
3
L+
L
4
1
5
3
L+
L
2
1
5
3
: dimmer
6.2.2 NPN
5-pole M12 connector
4
2 1
3
5
EPS Source
Product Scale Drawing
Frame Size: 75 mm x 26 mm
AN_i_1870_G Original Scale Drawing (MTD)
L+
L
4
1
5
3
L+
L
2
1
5
3
L+
L
4
1
5
3
L+
L
2
1
5
3
: dimmer
6.3 Mode pulse operation
The EMC noise immunity of the unit can be increased:
►In the "mode pulse operation PNP" connect pin 2 to L+�
►In the "mode pulse operation NPN" connect pin 4 to L-�
As a result of the connection the antenna characteristics of the cables are reduced�
6.3.1 PNP
5-pole M12 connector
4
2 1
3
5
EPS Source
Product Scale Drawing
Frame Size: 75 mm x 26 mm
AN_i_xxxx_G Original Scale Drawing (MTD)
①
L+
L
4
1
5
3
①
L+
L
2
1
5
3
①: trigger input
: dimmer
6.3.2 NPN
5-pole M12 connector
4
2 1
3
5
EPS Source
Product Scale Drawing
Frame Size: 75 mm x 26 mm
AN_i_xxxx_G Original Scale Drawing (MTD)
①
L+
L
4
1
5
3
①
L+
L
2
1
5
3
①: trigger input
: dimmer

UK
Operating instructions O2D93x
9
7 Operating and display elements
6 7 8 1
2
345
Power
Light on
Colour Segment
①: LED 1
②: LED 2
③: LED 3
④: LED 4
⑤: LED Light on
⑥: LED Power
⑦: button Colour
⑧: button Segment
1
Power
Light on
Colour Segment
2
3
4
①: Segment 1
②: Segment 2
③: Segment 3
④: Segment 4
The LEDs "1" to "4" indicate what segments will be activated in case of a trigger
(→ 7.1 Set colours and segments).
Example: If LEDs 2 and 4 are on, segments 2 and 4 will be activated in case of a
trigger�
The LED "Light on" is on if a segment is active�
The LED "Power" is on if power is supplied�
The button [Colour] sets the colour of the segments�
The button [Segment] sets the active segments�
7.1 Set colours and segments
►Press the buttons [Colour] and [Segment] at the same time for 3-4 s�
> The LEDs "1-4" flash� The button lock is deactivated�
►Select the colours with the button [Colour]:
Device Colour 1 Colour 2
O2D930 white infrared
O2D931 red cyan
O2D932 white infrared
O2D933 red cyan
►Select the following combinations with the button [Segment]:
– Segments 2 and 4 active
– Segments 1 and 3 active
– Segments 1 to 4 active
►Press the buttons [Colour] and [Segment] at the same time for 3-4 s�
> The LEDs "1-4" flash� The button lock is activated� The settings are saved�

Operating instructions O2D93x
10
8 Set-up
After power on the device is put into operation�
8.1 Mode continuous light
In the mode "continuous light" the device is continuously on� This mode is
available after power on (→ 6.2 Mode continuous light).
8.2 Mode pulse operation
In the mode "pulse operation" the device flashes with the frequency of the signal at
the trigger input (→ 6.3 Mode pulse operation).
The voltage at the trigger input must have the following characteristics:
Circuit Voltage Function
PNP 0-4 V switch off lighting
PNP 5-24 V switch on lighting
NPN 2�2-24 V switch off lighting
NPN 0-2 V switch on lighting
The frequency at the trigger input must have the following characteristics:
Dmax tmin tmax fmax
100 % 5 µs continuous operation 50 kHz
8.2.1 High lighting power
In the pulse operation mode the lighting power can be increased� The high lighting
power is activated via the external control (→ 8.4 External control).
The frequency at the trigger input must have the following characteristics:
Dmax tmin tmax fmax
10 % 5 µs 2 ms 310 Hz
ATTENTION!
With an active high lighting power the maximum possible frequency is reduced�
A frequency higher than fmax can damage the device�
►fmax = remain continuously below 310 Hz with an active high lighting power�
With tmax = 2 ms the illumination is switched on for maximum 2 ms�
If the duty cycle Dmax = 10 % is exceeded, an internal protection circuit is
activated�
With an active high lighting power the response of the illumination is delayed
by 10 µs during switch-on and switch-off�

UK
Operating instructions O2D93x
11
8.2.2 Signal delay
Changing the colours and segments leads to a signal delay� The signal delay
concerns the mode pulse operation with PNP circuit�
1
2
3
65 µs 2 µs 80 µs 25 µs
65 µs 10 µs 10 µs65 µs
①: Trigger
②: Colour
③:
Segment
8.3 Dim lighting power
Lighting power can be dimmed in the modes continuous light and pulse operation�
For dimming connect a voltage of 0-10 V to pin 5�
1
2
2 4 6 8 10 V
20
40
60
80
100
%
0
①: Lighting power [%]
②: Voltage [V]
The device lights with 100 % at 0 V at pin 5�
The device lights with 30 % at 10 V at pin 5�

Operating instructions O2D93x
12
8.4 External control
The device can be controlled externally by connecting the respective pin of the
8-pole M12 connector to a 24 V voltage (→ 6.1 Wiring).
6
21
45
7
3
8
Pin Connection
1 activate high lighting power
2 activate colour 2
3 GND
4 activate segment 1
5 activate segment 2
6 activate segment 3
7 activate segment 4
8 deactivate buttons
The following colours are available:
Device Colour 1 Colour 2
O2D930 white infrared
O2D931 red cyan
O2D932 white infrared
O2D933 red cyan
9 Maintenance, repair and disposal
The device does not contain any components which can be maintained�
►Do not open the device
> The device must only be repaired by the manufacturer�
►Dispose of the device in accordance with the national environmental
regulations�

UK
Operating instructions O2D93x
13
Table of contents
Other IFM Outdoor Light manuals