IKI FLOAT User manual

Instruction manual
Float electric heater 13.8 kW
12/2018

Instruction manual | Float electric heater Page 1
This instruction manual is intended for the owner or the person responsible for the upkeep of the
sauna as well as for the electrician in charge of installation. Once installation is completed, the
instruction manual must be handed over to the owner or manager. The purpose of the heater is to
heat a sauna room to a temperature appropriate for sauna-bathing; any other use is prohibited.
Please note the following before beginning installation:
•Beware of sharp edges in the heater frame. Wear a long-sleeved shirt and
protective gloves during installation and laying of the stones.
•Before installation read through the instructions for installation and use.
•The warranty does not cover malfunctions caused by faulty installation or use.
Technical support
(Mon-Fri 9-16)
+ 358 600 550 133
(1,49 €/min + lnc)
Sales/Showroom
(Mon-Fri 8-16)
+358405162881
Hakaniemenkatu 11
00530 Helsinki
ikikiuas@ikikiuas.fi
Production,Pieksämäki
Niilontie 10
76150 Pieksämäki
tuotanto@ikikiuas.fi
CONTACT DETAILS
Warehouse, Helsinki
(Mon-Fri 8-16)
+358 404127123
Pälkäneentie 5
00510 Helsinki
vallila@ikikiuas.fi

Instruction manual | Float electric heater Page 2
Contents
Installation of the heater................................................................................................................................... 3
Installation of lighting:....................................................................................................................................... 3
Installation pictures........................................................................................................................................... 4
Connecting the heater to electricity.................................................................................................................. 5
Circuit diagram .................................................................................................................................................. 6
Heater measurements....................................................................................................................................... 7
Heater safety distances ..................................................................................................................................... 7
Installation of Gira dimmer light switch ............................................................................................................ 8
Quality requirements for water ........................................................................................................................ 9
Instructions for use............................................................................................................................................ 9
Troubleshooting ................................................................................................................................................ 9
Warranty.......................................................................................................................................................... 10
Sauna Ventilation .............................................................................................................................................. 0
Illustration of ventilation................................................................................................................................... 0
Warnings............................................................................................................................................................ 1
Notes ................................................................................................................................................................. 1
Contents of delivery:
1. Outer casing of the heater,
heater light and electric cord.
2. The heater base and heating
elements.
3. The light’s adaptor, dimmer unit
and connection box.
4. Wireless dimmer switch.
5. Embedding flange for lower
bench embedding.

Instruction manual | Float electric heater Page 3
Installation of the heater
1. Check that all the required items are included in the delivery. (See page 2: Content of delivery)
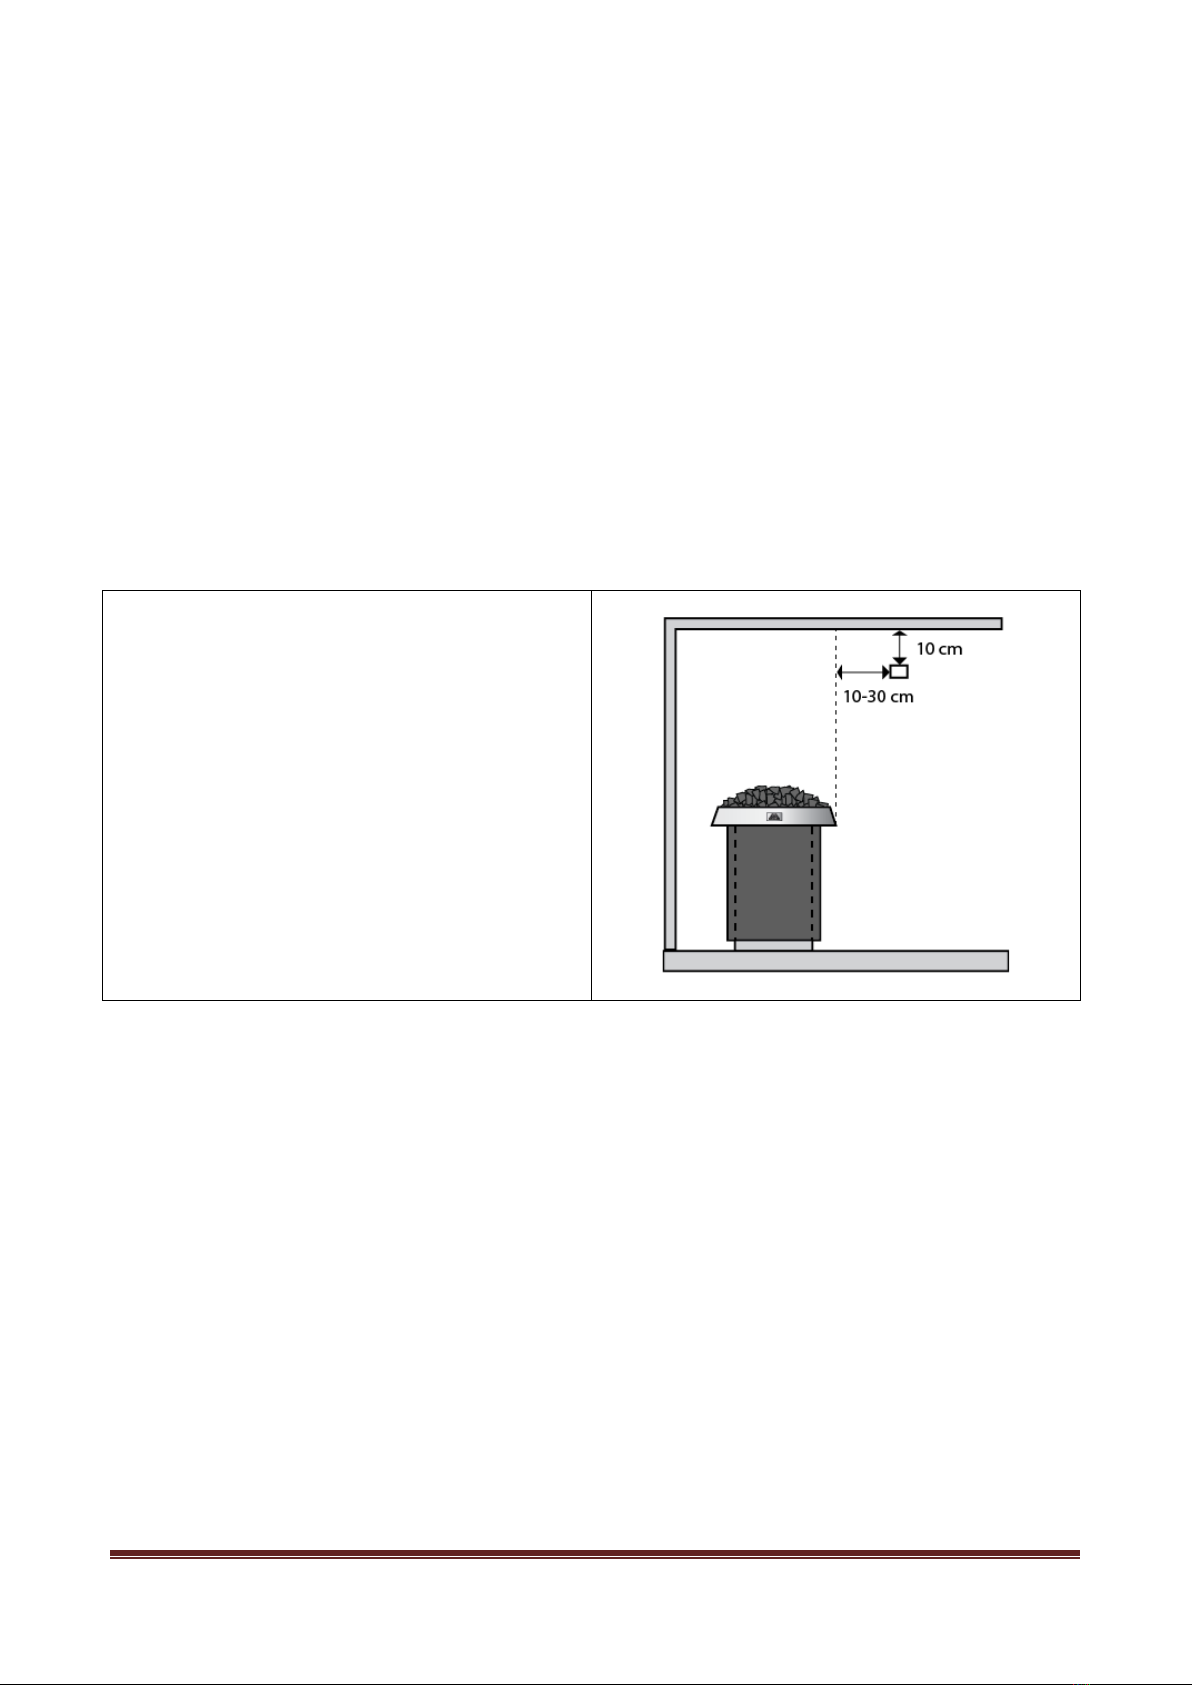
2. Select the location for the heater to be installed in, following the proper safety distances (Page 7).
3. Take into consideration the location of air vents, thermostat (page 5) and control unit (Ref. the
separate installation instructions for the control unit).
4. Lift off the outer casing to reveal the base unit and the heating elements (installation image 1).
5. Open the bottom plate of the base unit under the heater (installation image 2).
6. Make the electrical connections according to the circuit diagram on page 6. Note!Leave the
powercables (2 pcs. 5x2,5mm) leading off the box long enough to allow for the installation to be
performed above the lower bench.
7. Connect the heater to control unit according to the separate instructions in the control unit box.
8. After alle the connections are made, test that all heating elements are functioning properly by
switching the power on. If all the elements are working, close the base plate. if one or more of the
heating elements fail to heat up, or there is another problem, such as a fuse blowing, contact the
manufacturer.
9. Install the heater base in the hole made in the flooring (installation image 3).
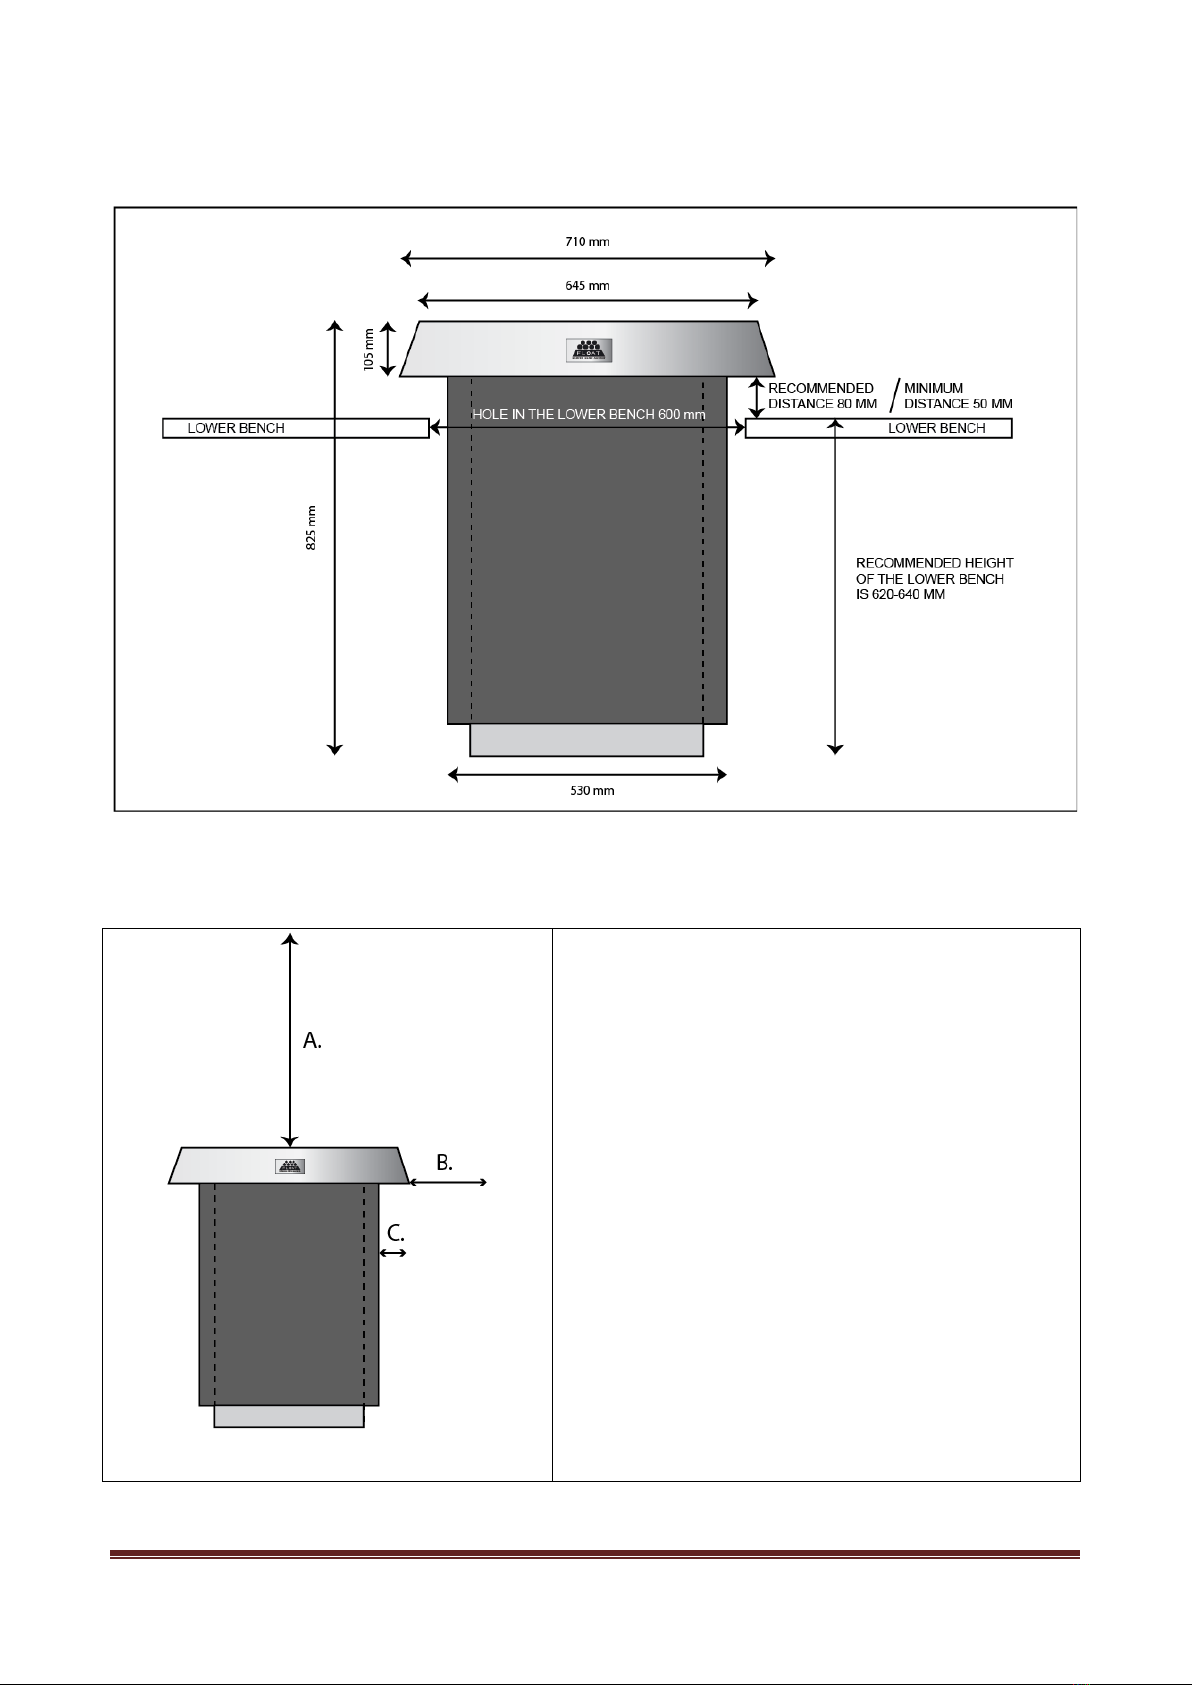
10. Place the integration collar around the hole on the lower bench (installation image 4).
11. Install the heater’s outer casing on top of the base making sure the grooves in the casing and the
electric cords fit together (installation image 5 and 6). Level the heater securely before laying in
the stones.
12. LAYING THE STONES: We recommend using KERKES ceramic interspace sauna stones around the
heating elements. The specially designed Kerkes stones support and protect the heating elements,
and they do not disintegrate prematurely. As surface stones, we recommend rough cut olivine,
olivine diabase or peridotite (e.g. Parhaat Löylyt) stones the size of 5 to 10 cm in diameter. Lay the
stones carefully, making sure there is room for air to flow freely around the stones. Make sure to
lay the stones so that the heating elements DO NOT touch one another, or the outer casing. NOTE!
Soapstone, rounded stones or natural stones may only be used at the surface level.
13. IKI-Kiuas recommends, for safety reasons, to build a safety railing around the heater if the heater is
in public or semipublic use.
14. As the stones settle down, when used, the surface will drop down a little. Add more stones, if
needed. The frequency with which the stones should be replaced depends on stone quality and
frequency of sauna use. Check the condition of the stones yearly, remove any broken ones and
replace them with new ones. Normally it is recommended to replace all the stones at once.
Installation of lighting:
1. Take the heater light’s white cable and connect the positive (+) brown wire and negative (–) yellow
wire and attach them to the corresponding terminal in the dimmer unit LL1-CV-SC (installation
images 7 and 8).
2. Connect the 230V supply voltage to the black connection box’s Wago connectors, L = 230V and N=
neutral 0 wire (installation image 9).
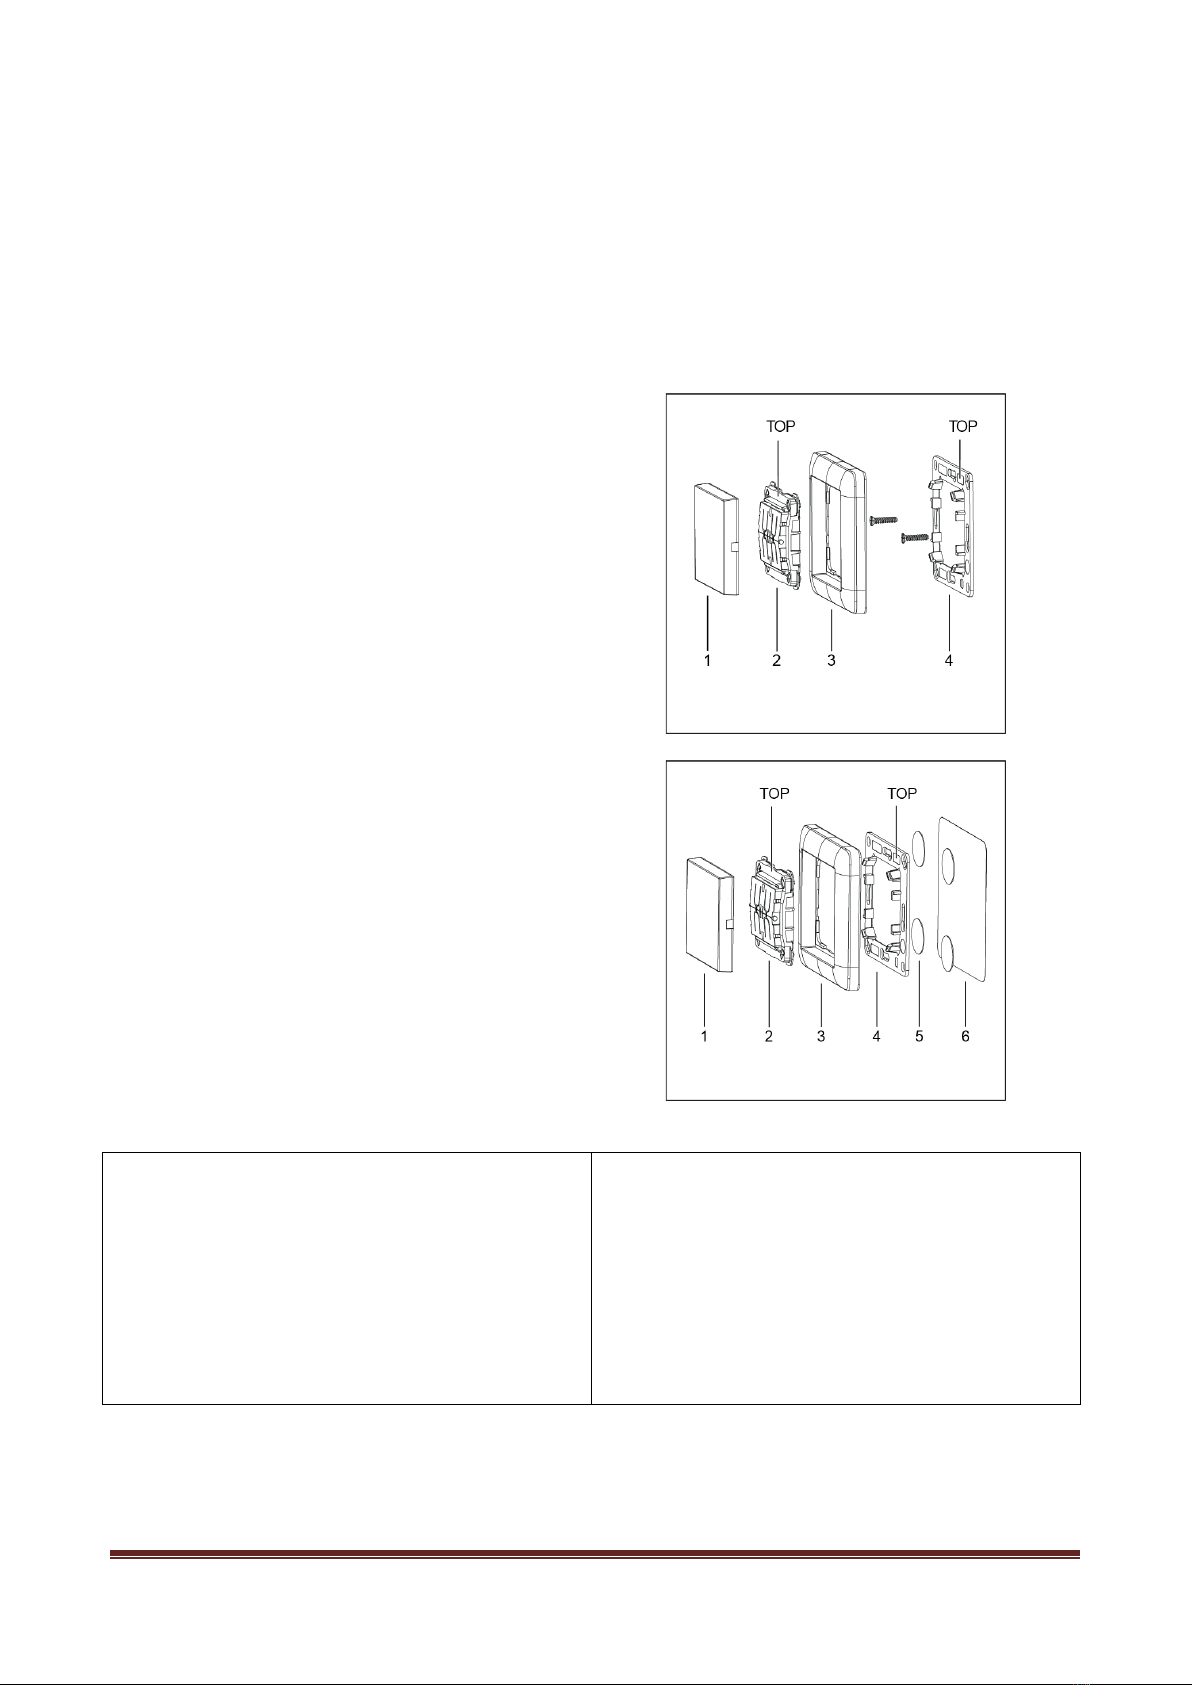
3. Install the Gira dimmer switch onto a wall according to the instruction on page 8. The dimmer
switch has been pre-paired with the receiver. When you touch the switch briefly, the lights go on
and off. Pressing the switch longer will dim and brighten the lights. Indoors, the operating range of
the dimmer switch is 30 metres. If installed inside the sauna room, the dimmer switch should be no
closer than 1000 mm to the heater and below the height of 1000 mm.
4. The dimmer unit, light’s adaptor and connection box should all be installed in a dry space.

Instruction manual | Float electric heater Page 4
Installation images
Image 1
Image 2
Image 3
Image 4
Image 5
Image 6
Image 7
Image 8
Image 9
flooring

Instruction manual | Float electric heater Page 5
Connecting the heater to electricity
The heater is connected to the electric supply with a H07RN-F, or similar, rubber cable. The use of PVC-
insulated cables is forbidden due to poor heat resistance. The electrical installation must be performed by
a licenced electrician and must adhere to current legislation. The cable must be installed safely away from
mechanical strain and heat radiation. If the rubber cable runs inside the wall panelling 1000 mm above the
floor rom it will need to be heat resistant up to 170 degrees Celsius (e.g. SSJ).
Control unit
For installation, refer to the separate installation instructions specific to the control unit.
Sauna’s temperature sensor and overheating fuse
Sensor location:
INSTALLATION TO THE CEILING:
- 10-30 cm from the outer casing of the heater.
INSTALLATION TO THE WALL:
- 10 cm from the ceiling
- 10-30 cm from the outer casing of the heater.
Note!
Make sure the temperature sensor is not located less than 1000 mm distance from un undirected air inlet
vent, or less than 500 mm from a vent that is directing air away from the sensor.
Temperature limiter will switch off the power from the heater if the temperature in the sauna raises
dangerously high (139) due to a malfunction.

Instruction manual | Float electric heater Page 6
Circuit diagram
Electrical two-way switch connection:
If the control unit requires an additional contactor, we recommend a two-way switch connection to
distribute the power evenly to the control unit and the additional contactor.
Electrical one-way switch connection:
5x2,5
5x2,5
5x6

Instruction manual | Float electric heater Page 7
Heater measurements
Heater safety distances
Safety distance to inflammable materials (e.g. wooden
wall panelling or benches):
A. 1200 mm upwards measured from the top of
the heater
B. 200 mm to the sides, back and front, measured
from the cylinder in the outer casing
C. 35 mm to the sides, back and front measured
from the bottom part of the outer casing

Instruction manual | Float electric heater Page 8
Installation of Gira dimmer switch
The electrical installation must be performed by a licenced electrician. The product adheres to the R&TTE
Directive, 1999/5/EC. It is certified for EU and EFTA. The product does not include a battery or an external
power source.
The dimmer switch must be installed on a level wall surface, attached by screws or adhesive film.
Screws:
1. Affix the base (4) to the wall by screws.
2. Attach the frame (3) to the base.
3. Attach the radio signal module (2) to the frame.
4. Attach the controller (1) on top.
Adhesive film:
Make sure the surface is even, clean and grease-free.
1. Attach the adhesive film (6) to a clean wall.
2. Attach the round stickers (5) to the adhesive
film.
3. Affix the base (4) by pressing it down firmly.
4. Attach the frame (3) to the base.
5. Attach the radio signal module (2) to the frame.
6. Attach the controller (1) on top.
Technical data:
NOTE! The radio signal penetration loss caused by
different materials when performing the installation:
Wood, plasterboard, appx. 90%
Brick, hardboard, appx. 70%
Concrete appx. 30%
Metal, metal sheet appx. 10%
Rain, snow, appx. 1% - 40%
868.3 MHz (ASK)
The signal range outside is 300 m and inside a building
appx. 30 m.
Ambient temperature: min. -25, max. +65 °C
Humidity 0 - 95%

Instruction manual | Float electric heater Page 9
Quality requirements for water
Water properties Effects Recommendations
Humus concentration
Colour, taste, precipitates
<12 mg/l
Iron concentration
Colour, odour, taste,
precipitates
<0,2 mg/l
Hardness: most important substances
are manganese (Mn) and lime, i.e.
calsium (Ca)
Precipitates
Mn: <0,05 mg/l
Ca: <100 mg/l
Chlorinated water
Health risk
Forbidden
Sea water
Accelerated corrosion
Forbidden
Instructions for use
•Before bathing for the first time, heat up the heater once to burn off protective oil solvents. Air out
the sauna room efficiently afterwards.
•The heating time is about 45–75 minutes depending on the size of the room and its ventilation.
Recommended bathing temperature with IKI heaters is 50–70 degrees. Pouring water on the stones
increases the temperature and humidity.
•Set the desired temperature from the control unit.
•Check that the heating elements do not become exposed as the stones shift about due to heat
•expansion.
•Check the condition of the stones once a year, and clean and replace as necessary.
•Do not throw water onto the heater when there are people close-by: the steam is burning hot. Do
not throw too much water on to the heater. Maximum amount is half a litre at a time.
Troubleshooting
If the heater fails to heat up, check that
•Electricity has been wired properly
•Fuses are intact
•Timer switch is set to i.e 1-4 h, for heating
•The thermostat is set to a higher temperature than current room temperature
•The overheating fuse has not gone off. If it has, the reason must be resolved before attempting to
re-heat the heater.
•The stones are laid correctly.
If you find discoloration in the wooden structures near the heater, check that the safety distances are
followed correctly, that the stones have been laid correctly and the heating elements are not exposed or
touching one another. The heat radiation from exposed resistors is extreme.

Instruction manual | Float electric heater Page 10
Warranty
IKI Kiuas Ltd (the manufacturer) assures a warranty to its products as stipulated here, guaranteeing the
quality and functionality of the products during the warranty period. The warranty applies to heaters sold
and used in Finland. The warranty requires that the buyer follow the instructions regarding the placement
of the heater, its installation, use and maintenance as well as those regarding the qualities of the stones
used in the heater. The length of the warranty period is 24 months from the day of purchase. The warranty
period for spa saunas and other public-use saunas is 6 months or determined according to the frequency of
use. Contact the manufacturer for more details.
1. In case of a defect or malfunction, the buyer must always contact the manufacturer or sales agent
before searching for the cause or attempting to repair it. Any repairs must be agreed upon in
writing with the manufacturer.
2. In private apartment use, the heater’s stone space needs to be cleaned and stones re-piled at least
once a year and weathered stones need to be replaced with new ones.
3. In institutional or professional use, the heater’s stones must be re-piled at least three times a year
during the warranty period. If this is not done, the warranty ceases to apply. In addition, the stones
must be changed to new ones at least once a year. Proof, such as the product’s purchase receipt,
must be presented at request. The use of ceramic heater stones (other than those form Kerkes) is
prohibited.
4. The warranty does not cover dismantlement or reinstallation on sauna benches, removal of sauna
stones nor re-piling them. IKI Kiuas recommends using for the lower levels sauna benches that can
be moved without using tools to dismantle structures.
5. The warranty for replacement parts is 12 months from the day of purchase. The replacement for
the damaged part will be delivered to the sales agent free of cost. The installation of the
replacement part must be carried out by a mechanic approved by the manufacturer. The
manufacturer is not liable to reimburse any costs due to the removal of the faulty part or the
installation of the replacement. The faulty part must be returned to the manufacturer at request
and at their expense. The manufacturer will issue its freight contacts number for the delivery of the
faulty part. Receipt from the reseller or certificate from a manufacturer’s authorized mechanic will
function as a warranty certificate.
6. Warranty based on the conditions set by The Electrical Contractors´ Association of Finland STUL.
STUL-warranty applies to electric heaters and control units if agreed upon in writing. In such cases,
the conditions STUL has set are attached to these warranty conditions. When the use of STUL
warranty has been agreed upon, they supersede these warranty regulations, if contradictory. For
details, visit: http://www.stul.fi/fi/in-english
7. Limitations to warranty: The product owner must take good care of the product. On receiving the
product, the owner is expected to check that it does not show signs of damage caused during
shipping or storage. In case of such damage, they must contact the sales agent or transport
company immediately. The manufacturer is not liable for any damages caused during shipping, or
by inappropriate storage, installation or use against manufacturer’s instructions, neglect of
maintenance, or damage caused by placement of the heater in a place which does not meet the
recommendations made by the manufacturer.
8. Damage notifications: The owner is responsible for notifying the manufacturer, the sales agent, or
manufacturer’s authorized mechanic of any damage or malfunction as soon as it appears and
within 14 days. Any warranty related claims must be submitted within 14 days from the closing
date of the product’s warranty period.
9. Manufacturer’s actions regarding warranty, continuation of warranty: In receipt of a substantiated
warranty claim, the manufacturer will repair or change the product. This is done in the
manufacturer’s expense, and the manufacturer is free to select the most cost-effective alternative.

Instruction manual | Float electric heater Page 11
The warranty for replacement parts is outlined above. The replacement part is granted warranty
according to specifications. The warranty for a repaired part continues as before.
The manufacturer is not liable for reimbursing any expenses, business loss or other direct or indirect harm
occurred to the buyer from damages or malfunction.
Quality guarantee / Freight guarantee
Guarantee of materials. The manufacturer guarantees the durability of the stainless steel parts (resistor
platform and frame) in private home use for 10 years. During the warranty period any defects that appear
in the heater's raw materials or are production-based will be repaired free of charge. For example, the use
of seawater on the heater is forbidden. Read through the requirements for water quality on page 9. The
warranty does not cover colour changes, slipping or hair-line fractures, characteristic to natural stones,
which do not affect the use or the safety of the heater.
Damages occurred while shipping must to be recorded in the waybill when the product is received or within
7 days of delivery. Shipping damage must also always be reported to the shipping company’s last contact.
The damaged part needs to be stored for inspection. Insurance compensates for the new part, which will
be delivered by a public transporter. In all issues concerning warranty contact the store the product was
bought from.

Ventilation
The ventilation in the sauna room needs to be considered carefully. Proper air-flow allows bathers to enjoy
fresh, oxygen-rich air. The air should fully change 6 times an hour. The supply air inlet should be installed
on the wall or the ceiling at about 500 mm above the heater. The supply air inlet vent should be 50-100 mm
in diameter. The outlet vent should be located as far away from the heater as possible, close to the floor.
The outlet vent should be twice the size of the inlet vent.
NOTE!
The thermostat sensor should be installed minimum of 1000 mm distance from an undirected supply air
vent or at least 500 mm away from a vent directing air towards the sensor.
Illustration of ventilation

Instruction manual | Float electric heater Page 1
Warnings
1. Staying in the hot sauna for long periods of time increases body temperature, which may be
dangerous.
2. Keep away from the heater when it's hot. The stones and outer surface of the heater may cause
burns when in contact with skin.
3. Prevent children from getting close to the heater.
4. Do not leave children, handicapped or ill people in the sauna without supervision.
5. Consult your doctor about any health concerns regarding sauna-bathing.
6. Consult child welfare clinic about taking babies to the sauna.
7. Always move carefully in the sauna, as the benches and floors may be slippery.
8. Never go to a hot sauna under the influence of alcohol, medication or narcotics
9. Never sleep in a hot sauna.
10. Sea-air and a humid climate may corrode the metal surfaces of the heater.
11. Do not hang clothes to dry in the sauna, as this may cause a risk of fire. Excessive moisture content
may also cause damage to the electrical equipment.
Notes

Instruction manual | Float electric heater Page 2

Instruction manual | Float electric heater Page 3
Copyright IKI Kiuas Plc | We reserve the right to make changes
Table of contents
Other IKI Electric Heater manuals
Popular Electric Heater manuals by other brands

Zibro
Zibro SRE 229 TC operating manual

Intertec Data Systems
Intertec Data Systems CP MULTITHERM DG.A HI operating instructions

Roberts Gorden
Roberts Gorden Vantage TF TF-200 Installation & operation

KAJO
KAJO TH3-45NB manual

Heylo
Heylo DE 20 Translation of the original instruction manual

Harvia
Harvia MD135 Instructions for installation and use