manuals.online logo
Brands
  1. Home
  2. •
  3. Brands
  4. •
  5. Ilti Luce
  6. •
  7. Outdoor Light
  8. •
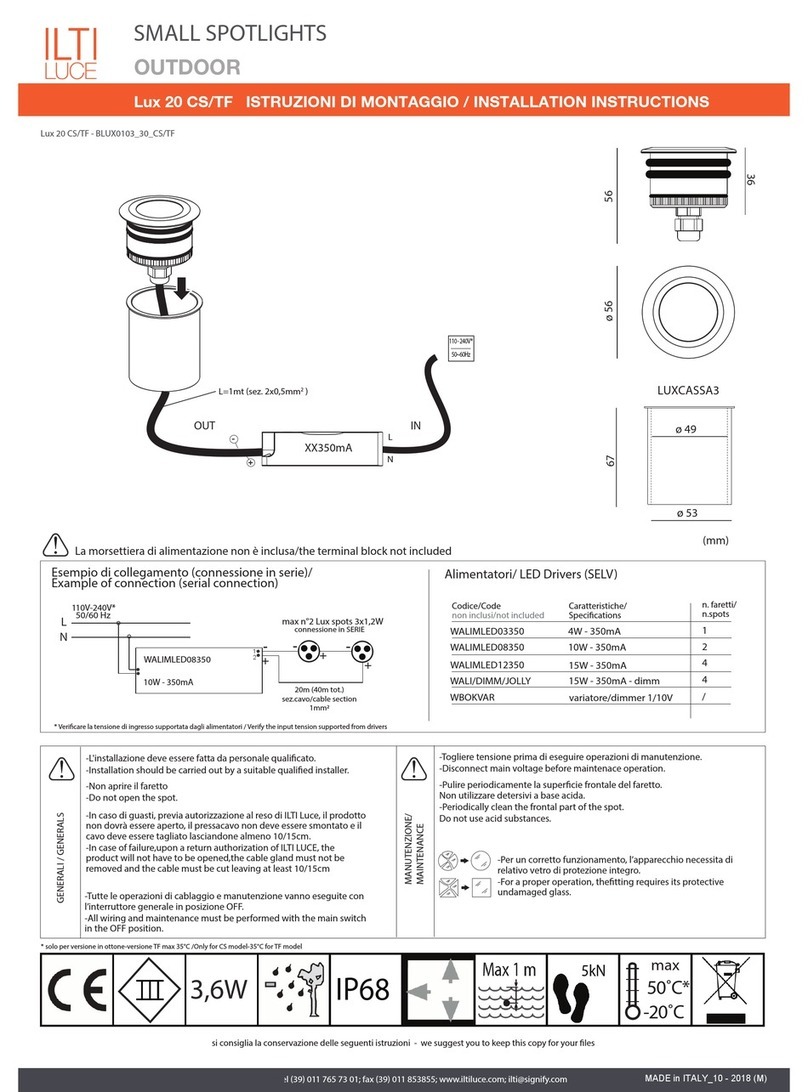
  9. Ilti Luce Velis OVE SAT Series User manual

Ilti Luce Velis OVE SAT Series User manual

ILTI LUCE srl · Lungo Dora P. Colletta, 113/9· 10153 Torino (Italy); tel (39) 011 765 73 01; fax (39) 011 853855; www.iltiluce.com; [email protected]
LINEAR SYSTEM
OUTDOOR
Velis ISTRUZIONI DI MONTAGGIO / INSTALLATION INSTRUCTIONS
OVE-_ _SAT
OVE-_ _TR
si consiglia la conservazione delle seguenti istruzioni - we suggest you to keep this copy for your les
MADE in ITALY_11 - 2018 (M)
Esempio di collegamento (connessione in parallelo/
Example of connection (parallel connection)
230V
50~60Hz
-L'installazione deve essere fatta da personale qualicato.
-Installation should be carried out by a suitable qualied installer.
-Non aprire la lampada
-Do not open the luminaire.
-Togliere tensione prima di eseguire operazioni di manutenzione.
-Disconnect main voltage before maintenace operation.
-Tutte le operazioni di cablaggio e manutenzione vanno eseguite con
l’interruttore generale in posizione OFF.
-All wiring and maintenance must be performed with the main switch in the
OFF position.
CABLAGGIO / WIRING
-In caso di guasti, previa autorizzazione al reso di ILTI Luce, il prodotto non
dovrà essere aperto, il pressacavo non deve essere smontato e il cavo deve
essere tagliato lasciandone almeno 10/15cm.
-In case of failure,upon a return authorization of ILTI LUCE, the product will
not have to be opened,the cable gland must not be removed and the cable
must be cut leaving at least 10/15cm
-Eettuare il cablaggio usando un sistema che garantisca almeno il
grado IP della lampada.
-Make the wiring using a system that guarantees at least the IP grade of
the luminaire.
Secondo la direttiva comunitaria WEEE (Waste Electrical and Electronic
Equipment) l’apparecchio non può essere smaltito con i riuti
indierenziati. Deve essere portato nelle strutture locali per lo
smaltimento ed il riciclaggio dei prodotti elettronici.
SMALTIMENTO/
DISPOSAL
In accordance with EU Directive WEEE (Waste Electrical and Electronic
Equipment), luminaires must not be disposed of with other household
waste. At the end of their life, luminaires must be taken to the appropriate
local facility available for the disposal or recycling of electronic products.
-Fissare la lampada tramite le due stae (incluse) con appositi tasselli da muro.
-Fix the lamp with 2 brackets (included) using the wall dowels.
GENERALI / GENERALS
LINE 230V
50Hz
L
N
Ø65
108
960 (39W) / 1260 (54W)
Ø65
2000 max
Ø65
133
electronic
ballast
VELIS
L
N
(mm)
39W
54W
max
35˚C
-20˚C
230V
IP65
T2
1,4 1,9
VELIS SOSPENSIONE/VELIS SUSPENDED VELIS PARETE/VELIS WALL VELIS SOFFITTO/VELIS CEILING
960 (39W) / 1260 (54W)
Ø1,2
si consiglia la conservazione delle seguenti istruzioni - we suggest you to keep this copy for your les
ILTI LUCE srl · Lungo Dora P. Colletta, 113/9· 10153 Torino (Italy); tel (39) 011 765 73 01; fax (39) 011 853855; www.iltiluce.com; [email protected]
LINEAR SYSTEM
OUTDOOR
Velis ISTRUZIONI DI MONTAGGIO / INSTALLATION INSTRUCTIONS
MADE in ITALY_11 - 2018 (M)
Discutere con l’ucio tecnico di ILTI LUCE qualsiasi eventuale dubbio relativo al posizionamento o alla sicurezza della lampada.
Discuss with ILTI LUCE technical dept. any possible doubts related positioning or safety of the luminaire.
Sconnettere la linea di alimentazione di rete
Disconnect the main voltage
Montare il set di ssaggio prescelto alla distanza consigliata, con viti o tasselli (presenti nel set di montaggio)
Install the select set (suspension - ceiling - wall - corner) to the recommended distance with screws or dowels (included in the montage set).
Inserire il cavo bipolare(4) attraverso il pressacavo(8), la staa e la guarnizione oring del
set, le ghiere di serraggio(1)(5) e connetterlo nel morsetto(6).
Insert the bipolar cable(4) through the gland (8), the bracket and the rubber gasket of
the set, the lock nuts (1) (5) and connect with the suitable buckle (6).
Svitare la ghiera di serraggio (1) e il pressacavo (8), slare la bandella cablata (2) dal
tubo (3).
Unscrew the lock nut (1) and the gland (8), unthread the buss bar (2) from the glass
rod (3).
Inserire la parte cablata nella posizione iniziale e chiudere avvitando la ghiera (1) sulla
controghiera con guarnizione (5).
Insert the wiring part in the initial position and close with lock nut (1)with the rubber
gasket (5).
Avvitare il tapo (9) attraverso la staa e la guarnizione oring sulla ghiera opposta,
serrare la stessa sul lato del tubo (3) in vetro.
Screw the cap (9) through the bracket and the rubber gasket (included in the
montage set) on the opposite lock nut. Firmly tight the lock nut on the glass rod (3).
NF
6
INPUT 220/240V
1
4
8
5
H05RN-F (OVE-ROS) - esterno
3
1
5
2
6
8
5
3
100mm
133mm
d. max. 2000mm
1220mm 54W
PG9
PG9
76mm
109mm
920mm 39W
1220mm 54W
PG9
3
9
920mm 39W
904 mm- 39W
1204mm -54W
VELIS SOSPENSIONE/VELIS SUSPENDED VELIS PARETE/VELIS WALL VELIS SOFFITTO/VELIS CEILING
si consiglia la conservazione delle seguenti istruzioni - we suggest you to keep this copy for your les
ILTI LUCE srl · Lungo Dora P. Colletta, 113/9· 10153 Torino (Italy); tel (39) 011 765 73 01; fax (39) 011 853855; www.iltiluce.com; [email protected]
LINEAR SYSTEM
OUTDOOR
Velis ISTRUZIONI DI MONTAGGIO / INSTALLATION INSTRUCTIONS
MADE in ITALY_11 - 2018 (M)
Discutere con l’ucio tecnico di ILTI LUCE qualsiasi eventuale dubbio relativo al posizionamento o alla sicurezza della lampada.
Discuss with ILTI LUCE technical dept. any possible doubts related positioning or safety of the luminaire.
Sconnettere la linea di alimentazione di rete
Disconnect the main voltage
Svitare la ghiera di serraggio (1) e il pressacavo (8), slare la bandella cablata (2) dal
tubo (3).
Unscrew the lock nut (1) and the gland (8), unthread the buss bar (2) from the glass
rod (3).
Avvitare il tappo (9) attraverso la staa e la guarnizione oring sulla ghiera
opposta, serrare la stessa sul lato del tubo (3) in vetro.
Screw the cap (9) through the bracket and the rubber gasket (included in the
montage set) on the opposite lock nut. Firmly tight the lock nut on the glass
rod (3).
3
1
5
2
6
8
100mm
133mm
d. max. 2000mm
1220mm 54W
PG9
PG9
76mm
109mm
920mm 39W
1220mm 54W
PG9
3
9
920mm 39W
904 mm- 39W
1204mm -54W
Smontare il set di ssaggio prescelto.
Dismount the selected xing set.
Togliere la lampadina uorescente dal poratalampada (7) e sostituirlo
Remove the uorescent bulb from the lamp-holder (7) and replace it.
7
Inserire la parte cablata nella posizione iniziale e chiudere avvitando la ghiera (1) sulla
controghiera con guarnizione (5).
Insert the wiring part in the initial position and close with lock nut (1) with the rubber
gasket (5).
5
3

This manual suits for next models

1

Other Ilti Luce Outdoor Light manuals

Ilti Luce Lux 12 User manual

Ilti Luce

Ilti Luce Lux 12 User manual

Ilti Luce Lux 20 CS User manual

Ilti Luce

Ilti Luce Lux 20 CS User manual

Popular Outdoor Light manuals by other brands

Kichler Lighting HELEN 37536 instructions

Kichler Lighting

Kichler Lighting HELEN 37536 instructions

Thorn OXANE L installation instructions

Thorn

Thorn OXANE L installation instructions

esotec Solar Globe Light multicolor 20 operating instructions

esotec

esotec Solar Globe Light multicolor 20 operating instructions

mitzi HL200201 ELLIS Assembly and mounting instructions

mitzi

mitzi HL200201 ELLIS Assembly and mounting instructions

HEPER TILA S AFX 3 Module Installation & maintenance instructions

HEPER

HEPER TILA S AFX 3 Module Installation & maintenance instructions

Designplan TRON 180 installation instructions

Designplan

Designplan TRON 180 installation instructions

Sealey LED37 instructions

Sealey

Sealey LED37 instructions

nordlux VEJERS Mounting instruction

nordlux

nordlux VEJERS Mounting instruction

SImx ELITE LED LHTC637 installation instructions

SImx

SImx ELITE LED LHTC637 installation instructions

GEV CAROLINE 10833 manual

GEV

GEV CAROLINE 10833 manual

WE-EF PFL540 LED Installation and maintenance instructions

WE-EF

WE-EF PFL540 LED Installation and maintenance instructions

HEPER DOGO Side LW6048.585-US Installation & maintenance instructions

HEPER

HEPER DOGO Side LW6048.585-US Installation & maintenance instructions

BEGA 84 253 Installation and technical information

BEGA

BEGA 84 253 Installation and technical information

HEPER LW8034.003-US Installation & maintenance instructions

HEPER

HEPER LW8034.003-US Installation & maintenance instructions

HEPER MINIMO Installation & maintenance instructions

HEPER

HEPER MINIMO Installation & maintenance instructions

LIGMAN BAMBOO 3 installation manual

LIGMAN

LIGMAN BAMBOO 3 installation manual

Maretti TUBE CUBE WALL 14.4998.04 quick start guide

Maretti

Maretti TUBE CUBE WALL 14.4998.04 quick start guide

Maxim Lighting Carriage House VX 40428WGOB installation instructions

Maxim Lighting

Maxim Lighting Carriage House VX 40428WGOB installation instructions

manuals.online logo
manuals.online logoBrands
  • About & Mission
  • Contact us
  • Privacy Policy
  • Terms and Conditions

Copyright 2025 Manuals.Online. All Rights Reserved.