imacon Ixpress User manual

User's Guide
Imacon Ixpress
English

© 2003 Imacon A/S. All rights reserved.
Imacon Ixpress User's Guide, Part No 70030033, revision C.
The information in this manual is furnished for informational use only, is subject to change
without notice, and should not be construed as a commitment by Imacon A/S.
Imacon A/S assumes no responsibility or liability for any errors or inaccuracies that may
appear in this manual.
Imacon A/S assumes no responsibility or liability for loss or damage incurred during or as a
result of using Imacon software or products.
Imacon, Ixpress and FlexColor are trademarks of Imacon A/S. Adobe and Adobe Photoshop
are trademarks of Adobe Systems, Inc. Macintosh, Mac OS and FireWire are registered
trademarks of Apple Computer, Inc. InfoLithium is a registered trademark of Sony
Corporation.
Printed in Denmark.
User's Guide - Imacon Ixpress
2
English

Table of Contents
User's Guide - Imacon Ixpress
Table of Contents 3
English
Introduction 5
Warnings and Restrictions 6
System Requirements 7
How the Ixpress System Works 9
The Ixpress Camera Back 11
General 11
Shooting Modes 12
Features 13
The Ixpress Control Panel 14
Using the Control Panel 16
Error Messages 29
The Image Bank 31
General 31
Features 32
Mounting/Dismounting the Battery 33
Battery Operation 34
Transferring Images 35
Assembly and Use 39
Assembling the Ixpress System 39
Ixpress/Camera Connection 42
Taking Pictures 43
continues...

User's Guide - Imacon Ixpress
Table of Contents
4
English
Care and Maintenance 45
Handling and Storage 45
Cleaning the Infrared Filter 46
Cleaning the Housings 48
Technical Information 49
Technical Specifications 49
Disposal 51
FCC Notice 51

Introduction
This manual gives information specific to the Imacon Ixpress digital
Camera Back and Image Bank. Refer to this manual to find out how your
digital camera system operates and how to care for and clean the units.
If you are having trouble, refer to the troubleshooting chapter of
the "Getting Started with Ixpress and FlexColor" manual for help.
To mount the camera back on your specific type of camera body, you
must have the correct Ixpress Camera Adapter Kit for your camera
model. See the documentation for your camera adapter for specific
instructions about fitting the camera back to your camera and for other
information specific to your configuration.
The capturing software for Ixpress is called FlexColor.
For information about using the software, please refer to the “FlexColor
Software Reference” manual.
User's Guide - Imacon Ixpress
Introduction 5
English

Warnings and Restrictions
General
•Read all instructions before attempting to use your new equipment.
•If your equipment requires service, please contact your Ixpress dealer.
•Keep this and all electronic equipment out of children’s reach.
Ixpress Camera Back and Image Bank
•Do not try to hold your camera by the digital back. The proper way to
hold the camera and back is to hold the camera. The camera back is
not a handle for the camera.
•Do not attempt to open your Ixpress Camera Back or Image Bank.
•Do not drop your Ixpress Camera Back or Image Bank.
•Keep your Ixpress Camera Back, Image Bank, and all other computer
equipment away from moisture. If your Ixpress Camera Back becomes
wet, disconnect from power and allow to dry before attempting to
operate again.
•Always replace the Ixpress Camera Back’s protective cover when it is
not connected to your camera - the exposed CCD sensor is vulnerable
to damage. Always keep the protective cover on when adding or
removing a camera body adapter to your Ixpress Camera Back.
•Store your Ixpress Camera Back and Image Bank away from heat and
moisture.
•Keep all wires connected to or from your Ixpress Camera Back, Image
Bank, and computer out of the way where they will not be tripped
over.
•Never cover the devices ventilation openings.
Using Flash Sync
The Ixpress "Flash Sync" connectors are specified for use with low
voltage flash generators. Do not connect to older high voltage flash guns.
Ixpress complies to ISO-10330 which limits voltages to 24V and currents
to 100mA.
External Power Supply
If you choose to power your system using an external power supply use
only a type approved by Imacon for use with Ixpress.
See “Technical Specifications” on page 49 for details.
User's Guide - Imacon Ixpress
Introduction
6Warnings and Restrictions
English

Lithium Battery
•If you choose to power your system with a battery, use only batteries
approved by Imacon for use with Ixpress.
See “Technical Specifications” on page 49 for details.
•Never short-circuit the battery terminals.
•CAUTION! Risk of explosion if battery is replaced by an incorrect
type.
System Requirements
Below are the basic hardware requirements for the PC or Macintosh
system to which the Ixpress Camera Back is to be connected.
For information about the processor, operating system, RAM and hard
disk requirements please refer to the “FlexColor Software Reference“
manual, that comes with the FlexColor software.
•Screen resolution of 800 x 600 pixels with true colors (24-bits).
•Mouse or other pointing device.
•FireWire interface.
User's Guide - Imacon Ixpress
Introduction 7
System Requirements
English

User's Guide - Imacon Ixpress
Introduction
8How the Ixpress System Works
English
C
B
G
F
E
D
A
In the Studio
Stand-alone
H
Figure 1: The Ixpress System

How the Ixpress System Works
The Ixpress system has the following components:
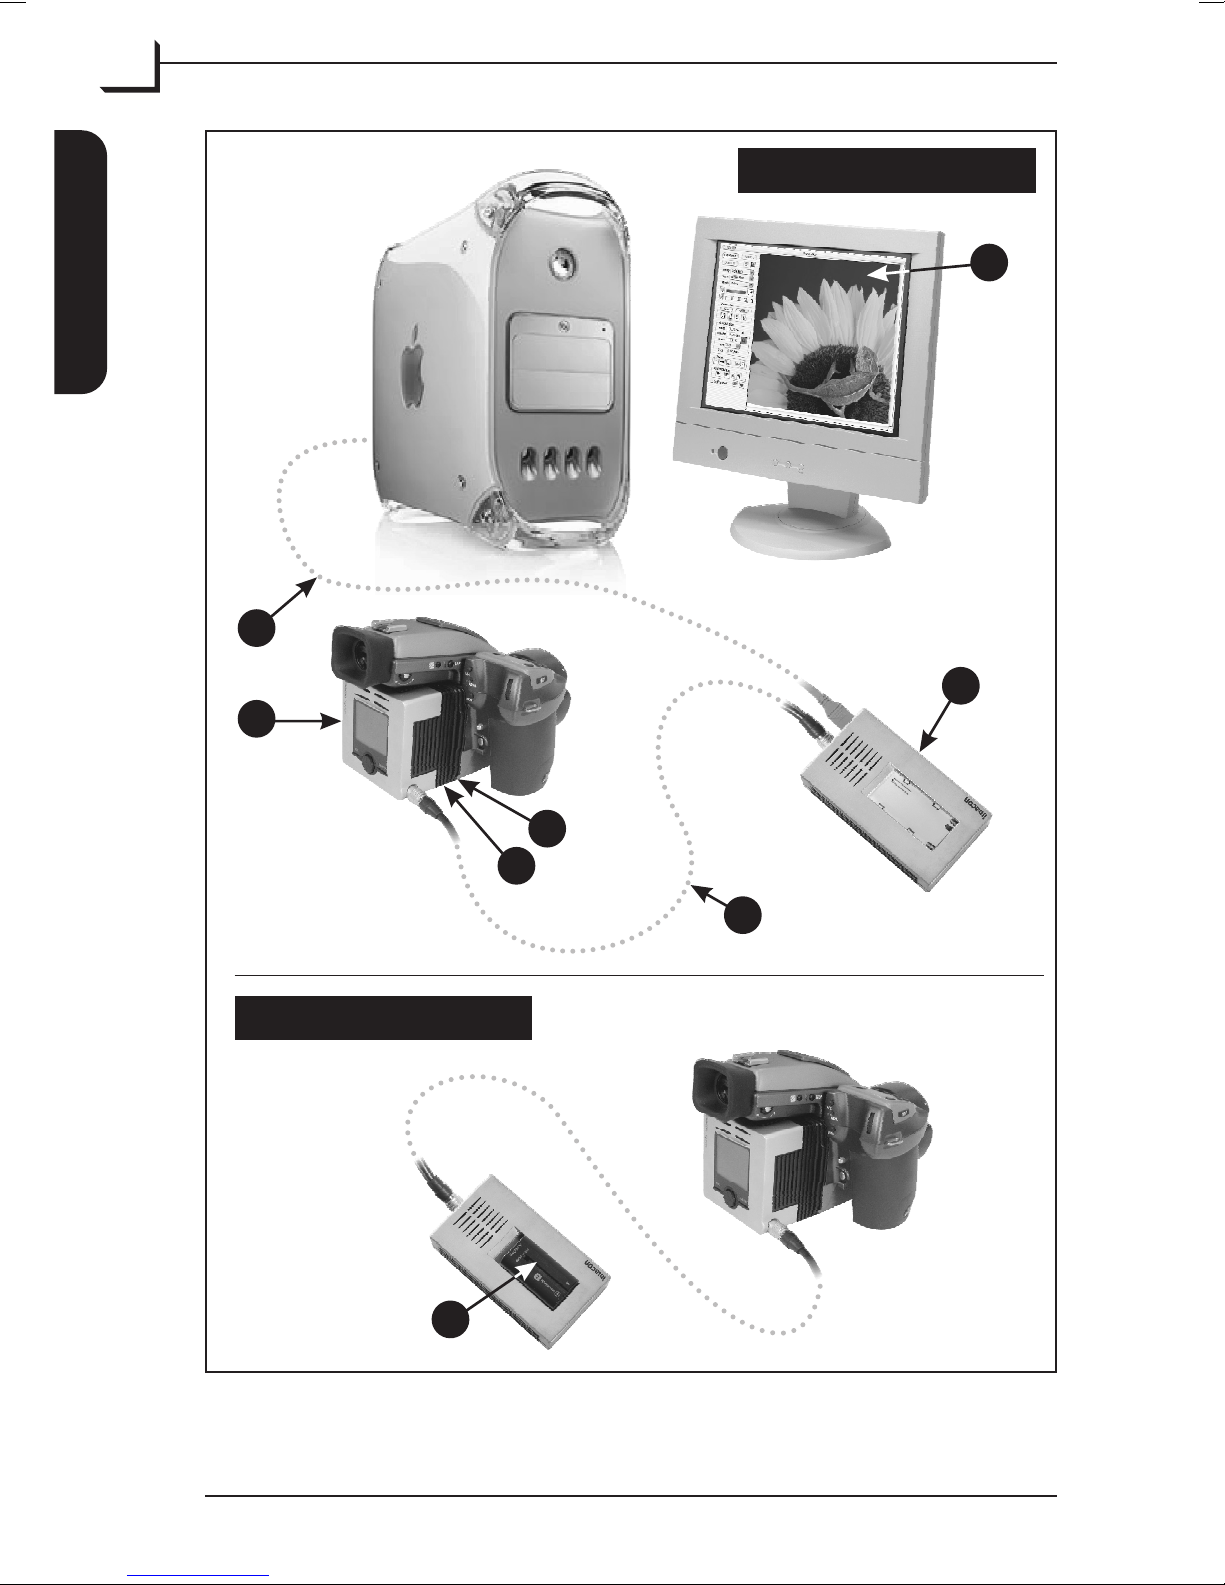
(See Figure 1 opposite)
AIxpress Digital Camera Back: enables high-end digital capturing.
See “The Ixpress Camera Back” on page 11 for a detailed
description.
BThe Image Bank: controls the communication between camera back
and computer and supplies power to the camera back. When using
the system as a stand-alone unit, the Image Bank can store more
than 1000 shots on its hard disk to be transferred to the computer
later.
See “The Image Bank” on page 31 for details.
CBattery: for powering the Image Bank and camera back when used
as a stand-alone unit. See “Technical Specifications” on page 49 for
appropriate battery types.
DCamera Back Adapter Kit: To connect the Ixpress Camera Back to
your camera body, you must use an adapter kit. Each camera type
requires a unique adapter because of their different contact point
locations and adaption mechanisms.
Every adapter kit includes everything required, including an
adapter plate, a focusing screen mask, a user’s manual, and possibly
more depending on the type of adapter you are using.
Adapter kits must be ordered separately - please contact your
Ixpress dealer for an up-to-date list of available kits.
E4*Res Module: When using the Ixpress system in a studio, the 4*Res
module can increase the resolution of the captures (up to 384 MB per
image). With the module you use multiple exposures to allow the
entire CCD area to capture each color without interpolation, thereby
providing maximum color fidelity and resolution.
NOTE! The 4*Res module is optional for Ixpress 96C and standard
for Ixpress 384C. Not available for Ixpress 132C.
FLink Cable: The Link cable connects the camera back to the Image
Bank. The system comes with 2 cables, a short one intended for
stand-alone use and a long one for studio use.
See “Assembly and Use” on page 39 for connection details.
GFireWire Cable: for connecting the Image Bank to a computer.
See “Assembly and Use” on page 39 for connection details.
HFlexColor Software: When working in a studio you can control all
the digital camera operations from your computer using the
FlexColor image capturing software.
See the “FlexColor Software Reference” manual for details.
User's Guide - Imacon Ixpress
Introduction 9
How the Ixpress System Works
English

User's Guide - Imacon Ixpress
Introduction
10
English

The Ixpress Camera Back
General
The Ixpress Camera Back houses a light-sensitive element called an area
array CCD (charge coupled device), which acts as computer-readable
electronic “film”. The surface of the CCD has 16 million (Ixpress 96C and
384C) or 22 million (Ixpress 132C) tiny light- sensitive areas, each of
which creates a pixel in your final digital image.
In a color digital image each pixel has three color components: red, green
and blue (abbreviated RGB). The pixels in the camera back’s CCD are
filtered to create three images - one of each color - which are later
combined by the software to create a single full color image.
Four capture modes exist - the mode you choose depends on your
situation (see “Shooting Modes” on page 12 for details):
•Preview mode takes fast shots for checking setup and exposure
•Single shot mode for moving objects
•* Multi-shot mode for high resolution shots of still objects
•* Micro-step mode for ultra-high resolution shots of still objects
* Only applies to devices fitted with the 4*Res module.
The camera back receives power via its connection to the Image Bank.
When working in a studio you can control all the digital camera
operations from your computer using the FlexColor software - see the
“FlexColor Software Reference” manual for details..
If using the system as a stand-alone unit the camera back’s built-in
digital light meter, with full histogram display and audio exposure
warnings, helps to ensure a perfect exposure, and all capturing settings
are controlled from the Ixpress Control Panel (see “The Ixpress Control
Panel” page 14 for details).
User's Guide - Imacon Ixpress
The Ixpress Camera Back 11
General
English

Shooting Modes
The Ixpress system is able to capture images in four different modes,
each of which is optimized for a different situation:
Preview Mode for Quick Setups.
Takes a single shot and applies minimal processing. This type of capture
appears most quickly on your screen. Use it to check your exposure and
composition and to make initial neutralization settings.
Single-Shot Mode for Moving Subjects
Takes a single shot and applies full processing. If you are shooting
people, animals, flowing water, or other moving objects, or if you are
shooting from a hand-held camera, then you must use single-shot mode.
Single shot images are fully rendered and processed so they take slightly
longer than previews, and the results are of production quality.
Multi-Shot Mode for High Resolution Stills
NOTE! Only applies to devices fitted with the 4*Res module (see page 9
for details).
If you are shooting unmoving objects, such as room interiors, studio
sets or product shots, then you can use multi-shot mode. In this mode,
four exposures are taken (one for each color, but with green shot twice
for extra sharpness), each of which uses the entire CCD. This means
that no interpolation is needed to create the final 48/96 MB color image.
Images taken in multi-shot mode will be sharper and contain more
detail than single-shot images. Multi-shot images will also stand up to
greater enlargement later in production.
Micro-Step Mode for Ultra High Resolution Stills
NOTE! Only applies to devices fitted with the 4*Res module (see page 9
for details).
Micro-step mode extends the multi-shot functionality by dividing each
tiny light-sensitive area into 4 pixels and taking a total of 16 exposures.
This creates a 8160 x 8160 pixel image and digital files of up to 384 MB.
Micro-step images will stand up to even greater enlargement than
multi-shot images.
User's Guide - Imacon Ixpress
English
The Ixpress Camera Back
12 Shooting Modes

Features
AControl Panel & Display: get instant image preview, browse
through all pictures currently saved in the Image Bank, read
information and exposure data from each picture and make basic
camera settings. See “The Ixpress Control Panel” on page 14 for a
detailed description.
B“Flash Sync from Camera” input: to be connected to “older”
mechanical cameras. When pressing the camera’s exposure button, a
signal is sent to the camera back. The flash is controlled from any
“Sync To Flash” output.
C“Flash Sync To Flash” output: Controls the flash. An identical
output is located on the Image Bank - see page 32.
D“Link” connector: This connector accepts the camera link cable,
which connects to the “link” connector on the Image Bank - see page
32.
E“AUX” connector: applies to certain types of cameras (normally not
used).
User's Guide - Imacon Ixpress
English
The Ixpress Camera Back 13
Features
B
C
D
E
A
Figure 2: Camera Back Features

The Ixpress Control Panel
When using the Ixpress Camera Back as a stand-alone unit it is entirely
controlled from the control panel built into the device. The 2" color
display shows instant preview of your image and the control panel
buttons enables you to browse through all pictures currently saved in the
Image Bank, to read information and exposure data from each picture,
and to make basic camera settings.
The control panel holds the following (see Figure 3):
AImage preview: generated within 2 secs.
BImage Info: shows info (items C,D, and E) for the image
currently previewed. From the Setup menu you can select whether
or not to display the info - see "Setup" on page 27 for details.
CPicture name: shows the name of the picture currently previewed.
The name given to each new shot is based on the setting of the
Batch... parameter - see page 23 for details.
User's Guide - Imacon Ixpress
English
The Ixpress Camera Back
14 The Ixpress Control Panel
OK MENU
EDA
C
B
KML
F
H
J
G
Figure 3: The Ixpress Control Panel

DImage counter: shows the number of images currently stored (456)
in the Image Bank and how many images there are left until the
Image Bank is full (703).
EShutter time: shows the current setting. The shutter time controls
how long the CCD will be exposed for the current image.
See page 22 for details about setting the shutter time.
F"Battery Low": appears and flashes to indicate low charge state of
the Image Bank battery when operating the Ixpress system
disconnected from the computer.
G"ISO high": appears and flashes to indicate that current ISO setting
is higher than 50 and thereby increasing the risk of noise in the
captured image.
HExposure Info: shows a histogram curve indicating the overall
brightness and contrast of the current shot - see “Taking Pictures” on
page 43 for details.
From the Setup menu you can select whether or not to display the
histogram - see "Setup" on page 27 for details.
JStatus Indicator: indicates that power is supplied to the camera back
and the color indicates the current status of the camera back:
Red = Error, Yellow = Busy, and Green = Ready.
KOK button: use to enter "Browse" function and to change/confirm
settings - see "Using the Control Panel" on page 16 for details.
LBrowse/Scroll button: use to browse through images in the Image
Bank and to scroll through menu items - see "Using the Control
Panel" on page 16 for details.
Use the button to enter the zoom function and to move the zoom box
around - see "Zooming" on page 17 for details.
The button also can be set to function as an exposure button - see
"Device Settings Menu" on page 22 for details.
MMENU button: displays the "Menu" from where you can make the
various device settings - see "Using the Control Panel" on page 16 for
details.
User's Guide - Imacon Ixpress
English
The Ixpress Camera Back 15
The Ixpress Control Panel

Using the Control Panel
Displaying Images
When power is supplied to the camera back it starts up showing the
main window:
The picture displayed in the main window is
the latest shot.
To change the display to show the image info
and histogram press MENU button.
In the pop-up menu use Browse/Scroll button
to highlight the Setup item, then press OK
button to enter.
Now highlight the Display... item and press OK
to enter.
Highlight Show Histogram and press OK.
The histogram for the current image will be
displayed at the display bottom on top of the
preview.
User's Guide - Imacon Ixpress
English
The Ixpress Camera Back
16 Using the Control Panel

Repeat the procedure to select Show Info.
The info for the current image will be displayed
at the display top on top of the preview.
Press the OK button to enter "Browse" mode.
Use Browse/Scroll button to browse through
the images currently stored in the Image Bank.
Press OK button to select the picture you want
to display.
The display returns to the main display showing
the latest shot.
Zooming
When previewing an image, either in the main window or in "Browse"
mode you are able to zoom into the image to view details. To do so press
any direction on the Browse/scroll button except for the center which
could be assigned to function as exposure button. Generally it is
recommended to use Up or Down as the Left and Right keys will still
function as browse keys when in "Browse" mode.
Press Up or Down on the Browse/Scroll button
to display the Zoom Box.
Now use the Browse/Scroll button to move the
Zoom Box to the area in the image you want to
zoom into, then press the OK button.
User's Guide - Imacon Ixpress
English
The Ixpress Camera Back 17
Using the Control Panel

If necessary repeat procedure until max. zoom
level (3 times) has been reached.
You can exit the zoom function anytime by
pressing the MENU button.
(Zoom level 1)
(Zoom level 2)
(Zoom level 3)
Browse Options
When in "Browse" mode you are able to specify the images you want to
browse through and how to display them:
From the main window press OK button to
enter "Browse" mode.
Press Menu button to display the "Browse"
menu, then use Browse/Scroll button to
highlight the Batches... item and press OK
button.
From the appearing list select a batch number
to browse through the pictures from this batch
only or select All to browse through all pictures.
User's Guide - Imacon Ixpress
English
The Ixpress Camera Back
18 Using the Control Panel

The number to the right in the "Browse" bar
indicates the number of images (57) in the
selected batch.
Press MENU button. From the menu you have
the option of selecting between 3 different ways
of displaying the images: Image (current), Info,
and Histogram. Select Info and press OK button.
The Info window shows the name, capture date
and time, and the various device settings used
for the current image.
… and if you select Histogram the histogram
for the current image is displayed.
Deleting Images or Batches
Deleting images is possible from both the main display and in "Browse"
mode while deleting batches is only possible in "Browse" mode.
From the main display you can delete the
currently previewed image by pressing the
MENU button and in the pop-up menu
highlight Delete... and press OK button.
Press Yes (OK button) to delete image or No
(MENU button) to cancel.
User's Guide - Imacon Ixpress
English
The Ixpress Camera Back 19
Using the Control Panel

Alternatively press OK button to enter "Browse"
mode, use Browse/Scroll button to find the
image you want to delete and press MENU
button.
In the menu highlight Delete... and press OK
button.
Press Yes (OK button) to delete image or No
(MENU button) to cancel.
If you want to delete a whole batch of images
select Delete Batch... from the menu and press
OK button.
In the appearing batches list highlight the batch
you wish to delete and press OK button.
Press Yes (OK button) to delete batch or No
(MENU button) to cancel.
User's Guide - Imacon Ixpress
English
The Ixpress Camera Back
20 Using the Control Panel
Table of contents