manuals.online logo
Brands
  1. Home
  2. •
  3. Brands
  4. •
  5. Impact Pumps
  6. •
  7. Water Pump
  8. •
  9. Impact Pumps SLX-40 User manual

Impact Pumps SLX-40 User manual

SLX-40
User Guide
Quick Start Operating Guide Page 2
Operating Instructions Page 4
Care and Maintenance Guide Page 8
Troubleshooting Guide Page 10
To access further support, including in other languages such as:
- Français,
- Español,
- Português,
Visit www.impactpumps.com/support or scan this code:
This guide explains how to operate the SLX-40. The SLX-40 is designed to give many years of trouble-free service
and peace of mind. Impact Pumps will contact you to conrm your 5 year warranty has been activated and to check
that you are fully satised with the installation, we will do this within 48 hours of your certied installer submitting
your ‘Site Installation Report’.
32 SLX-40 User GuideSLX-40 User Guide
SLX-40 Quick Start Operating Guide
For after installation. More detailed instructions are on page 4
1) Connect both hoses
3) Twist to release air
4) Run pump
2) Open all three valves in the
surface-pump circuit
Water pumped down into the SLX-40 is returned with extra water lifted from the well.
5) Wait 5 minutes to release air
54SLX-40 User GuideSLX-40 User Guide
SLX-40 Operating instructions
The SLX-40 has been designed to allow the user to remove the surface-pump easily for safe storage or use in other
applications such as surface distribution. These instructions are intended for rst time users or use after the surface-
pump has been removed and replaced. They cover priming, switch on and operation.
Ensure that the surface-pump
and hoses are full of water
and that the water level in
the tank is above where the
hoses connect to the tank.
3
Check that the hoses to the surface-pump
are connected and locked as shown.
1
Surface-Pump
Surface-Pump
TIP: Any air in the surface-pump and hoses can
be vented by twisting the red cap, as shown in
this image:
TIP: Any air present in the surface-pump
can be vented by temporarily part-
opening the connection between
the surface-pump and the well. This
process will be more eective if
this connection is raised.
If electrically powered, connect the electrical
power cable to the surface-pump. The surface-
pump manual should be followed carefully.
4
Ensure all electrical
supplies are isolated
before connecting
Surface-Pump
Open all three valves in the
surface-pump circuit.
2
Surface-Pump
76 SLX-40 User GuideSLX-40 User Guide
TIP: The SLX-40 may run irregularly and not add water to the tank if there is air in the system. Ensure that all
the hoses are full of water and that the tank ports are always covered by water and no air is sucked in when
the pump is switched on.
TIP: If the lengths of hose on the surface-pump are suciently long, they can optionally be joined together
to keep the surface-pump primed. This will make it heavier to transport, but introduce less air for removal
the next time it is used.
Surface-pump
Run the surface-pump. Please refer to your specic surface-
pump manual before switching on. The surface-pump
shown is an example only.
Allow any air remaining in the system to
circulate and settle out in the tank and for
the SLX-40 to produce a steady beating
sound. This may take up to 5 minutes.
5
6When pumping is no longer required, the surface-pump can easily be removed for safe
storage or use elsewhere. To do this, ensure that it is switched o, shut the valves either
side of the surface-pump and open the quick release (camlock) hose connectors. The
surface-pump can then be removed while the tank and hoses remain full of water.
The SLX-40 should now start lifting
more water to the surface tank than
is pumped down the well.
Thank you for choosing the Impact
Pump SLX-40. The SLX-40 is designed
to give many years of trouble-free
service and peace of mind. In the
rare event that you may need any
further support, there is a quick
troubleshooting guide on page 10
and you can contact Impact Pumps
by visiting www.impactpumps.com/
support or by scanning this code:
8
7
Wait 5 minutes
to release air
SLX-40 Operating instructions
TIP: While the surface-pump is running, any air
in the surface-pump and hoses can be vented by
twisting the red cap, as shown here:
Surface-
pump
98SLX-40 User GuideSLX-40 User Guide
SLX-40 Care and Maintenance Guide
Maintenance of the Hoses, Tank, Surface-Pump and Solar-Panels
The only regular care required for the SLX-40 system is maintenance of the hoses, tank, surface-pump and, if solar
powered, the solar panels.
The maintenance instructions of the
surface-pump should be followed
carefully.
Depending on the quality of the
hoses purchased by the user, the
hoses may degrade, split and leak
in strong sunshine. This may only
cause a very slow leak and there is
no risk of damage to the SLX-40.
However, all damaged hoses should
be repaired or replaced.
Depending on the well water quality,
the tank and inlet lter may need
cleaning occasionally.
If solar powered, to obtain the maximum power,
the panels should be kept clean, unshaded and
pointing towards the sun.
To prevent anything falling in the tank and fouling
the water or blocking the pump, please ensure
the tank is covered with a lid or other cover.
Surface-
pump
1
2 3
4
5
1110 SLX-40 User GuideSLX-40 User Guide
Go to page 12
Go to page 16 Go to page 16
If the water level in the tank
is not going up or down:
If the tank is empty or
losing water:
If the pressure relief valve
sprays water without being
touched:
Go to page 20
Go to page 23
If the hoses are
shaking or the
pump sounds
unsteady:
If the pipes in the well are
making a clapping noise:
SLX-40 Troubleshooting Guide
1312 SLX-40 User GuideSLX-40 User Guide
Surface-
pump
If the water level in the tank is not going up or down
TIP: The water level can be monitored easily using a weighted bottle oating on the tank water level which is
connected via a string to a weight on the outside of the tank wall. The weight on the outside of the tank then
provides a quick visual guide to the water level on the inside of the tank. Ensure that the tank remains covered
with a lid or other cover at all times
TIP: If a whirlpool is seen inside the tank then
the water level in the tank is too low for the
ow rate being pumped. Allow the tank to ll
to a higher level. If this occurs regularly, you will
need to rotate the elbow on the inside of the
tank so that it points more downwards.
Repeat steps 1-6 of the Operating Instructions above.
1
3Look into the tank to verify that the
connection-ports aren’t covered by
sediment and that the surface-pump inlet
does not suck in any air whilst pumping.
Conrm the surface-pump is working
and you have followed the surface-pump
manual carefully. If required, disconnect
the surface-pump outlet hose to check
that it is pumping a good ow rate.
2
Run the surface-pump and wait for any air
remaining in the system to circulate and settle out
in the tank and for the SLX-40 to produce a steady
beating sound. This may take up to 5 minutes.
4
SLX-40 Troubleshooting Guide
Surface-pump
Wait 5 minutes
to release air
1514 SLX-40 User GuideSLX-40 User Guide
Surface-
pump
5
If the above steps have been followed and the problem persists, please continue to page 18 for the
guide to removal of the SLX-40 from the well
Check the water level in the well is covering all of the SLX-40 well inlet lter.
If the level has dropped too low:
• The SLX-40 is designed to tolerate periods of dry-running, and will automatically re-start
pumping once water levels recover. However, it should not be left to run dry deliberately as
this could place undue stress on its components and might eventually reduce their lifetime.
• Stop the surface-pump and allow the well to re-ll.
• Re-start the surface-pump at a reduced ow rate if possible, else, stop it before the well
empties again.
If the water level in the tank is not going up or down (continued)
SLX-40 Troubleshooting Guide
1716 SLX-40 User GuideSLX-40 User Guide
Look for any water leaks from the hoses and ttings at the surface and repair if found.
2
If the pressure relief valve sprays water without being touched
If the tank is empty or losing water
If water is blown out of the
pressure relief valve, reduce
the power to the surface-
pump until the valve closes.
Add water to the tank
and replace the lid.
1
If the head and ow specications of
the SLX-40 are exceeded, the Pressure
Relief Valve may open, as shown here.
WARNING! Exceeding the product
specications may damage the SLX-40
and void the warranty.
Close the valve at the tank then unscrew
the upper pressure-tank and look to see
if the water inside the pipe is dropping.
If the water is dropping there is a leak
somewhere in the well that must be xed.
To do this remove the SLX-40 from the
well using the guide on page 18.
Conrm the steps on pages 12, 13
and 14 have been checked. 43
Pressure-Tank
SLX-40 Troubleshooting Guide
1918 SLX-40 User GuideSLX-40 User Guide
Removal of the SLX-40 from the well
Contact the installer for assistance. Prepare a clean area (e.g. a plastic sheet) to lay the SLX-40 on.
Remove the hoses and lift the SLX-40 out of the well. Up to 4 people may be needed to lift the
SLX-40 which can weigh up to 100kg if it is 25m (82 feet) long and full of water.
1
TIP: If it is too heavy to lift, the SLX-40 can be made much lighter by blowing air down the 2 HDPE riser-pipes
and allowing water to come back up the HDPE down-pipe. To do this, close ALL the valves and disconnect
the surface-pump and 1½” hose from the larger hosetail on the well-head (D). Now open only the SLX-40
inlet valve C that is normally connected to the surface-pump outlet, and arrange to blow air into the large 1½”
hosetail with an air compressor, or tyre pump. It may take more than 10 minutes of air-pumping for pressure
to build up suciently to push the water out.
Check that the HDPE pipe joints are not leaking.
Unscrew and unclip the plastic lter and check
that the inlet valves are not blocked open.
2
3
If the above steps have been followed
and the problem persists please
request further support by visiting
www.impactpumps.com/support or
by scanning this code:
TIP: With a nger, gently check that
each valve plunger moves up and down
without getting stuck. If it is blocked by
any grit or debris, remove this with a cloth
or clean water and re-install the pump.
SLX-40 Troubleshooting Guide
2120 SLX-40 User GuideSLX-40 User Guide
If the hoses are shaking or the pump sounds unsteady
Ensure that the SLX-40 is
adequately secured down.
1
Surface-
pump
2
SLX-40 Troubleshooting Guide
Check the water level in the well is covering all of the SLX-40 well inlet lter.
If the level has dropped too low:
• The SLX-40 is designed to tolerate periods of dry-running, and will automatically re-start
pumping once water levels recover. However, it should not be left to run dry deliberately as
this could place undue stress on its components and might eventually reduce their lifetime.
• Stop the surface-pump and allow the well to re-ll.
• Re-start the surface-pump at a reduced ow rate if possible, else, stop it before the well
empties again.
2322 SLX-40 User GuideSLX-40 User Guide
Air may have been lost from one of the blue pressure tanks. Check the lower pressure tank
connected to the surface-pump by pushing down the pin in the centre of the air-valve as shown.
3
If air comes out, or if nothing comes out: Connect
a standard tyre pump to this valve and pump in a
small amount of air slowly until the shaking stops.
DO NOT PUMP IN TOO MUCH AIR AS THIS MAY
CAUSE THE SHAKING TO START AGAIN.
If water comes out of this valve, please
request further support by visiting
www.impactpumps.com/support
or by scanning this code:
If steps 3.1 or 3.2 have been
completed but the shaking has not
stopped, add a few pumps of air to the
other pressure tank.
3.1 3.2
3.3
Pressure-Tank
Air Valve
If the hoses are shaking or the pump sounds unsteady
SLX-40 Troubleshooting Guide
If the cable ties are not tightly closed, the pipes may become loose and knock against each other
causing a clapping noise. Over time this may get worse. If a clapping noise is heard, please ask the
installer to remove the SLX-40 from the well and replace the cable ties. Up to 4 people may be
needed to lift the SLX-40 which can weigh up to 100kg if it is 25m (82 feet) long and full of water.
1
TIP: If it is too heavy to lift, the SLX-40 can be made much lighter by blowing air down the 2 HDPE riser-pipes
and allowing water to come back up the HDPE down-pipe. To do this, close ALL the valves and disconnect
the surface-pump and 1½” hose from the larger hosetail on the well-head (D). Now open only the SLX-40
inlet valve C that is normally connected to the surface-pump outlet, and arrange to blow air into the large 1½”
hosetail with an air compressor, or tyre pump. It may take more than 10 minutes of air-pumping for pressure to
build up suciently to push the water out.
If there is a clapping noise coming from the well
SLX-40 Troubleshooting Guide
24 SLX-40 User Guidewww.impactpumps.com

Other manuals for SLX-40

1

Other Impact Pumps Water Pump manuals

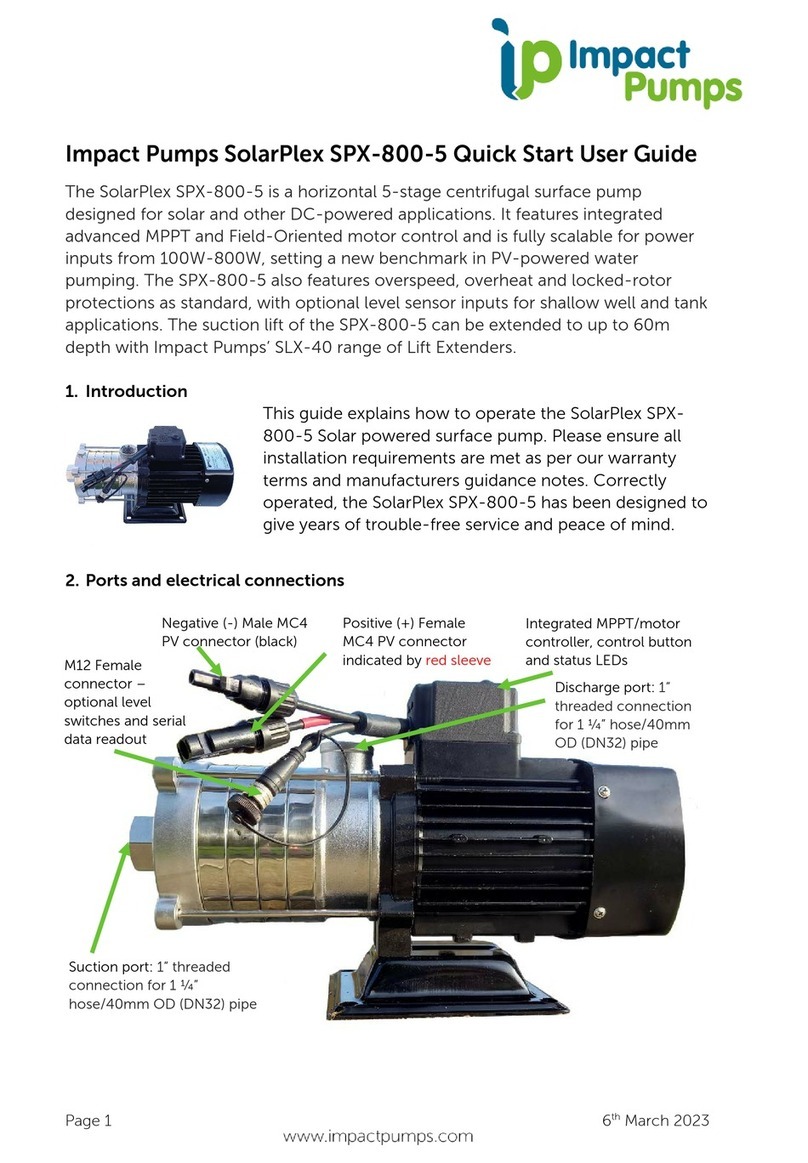
Impact Pumps SolarPlex SPX-800-5 Setup guide

Impact Pumps

Impact Pumps SolarPlex SPX-800-5 Setup guide

Popular Water Pump manuals by other brands

Samson KL Series Directions for use

Samson

Samson KL Series Directions for use

Danfoss BFP 11 L3 instructions

Danfoss

Danfoss BFP 11 L3 instructions

Heritage 1022 Service manual

Heritage

Heritage 1022 Service manual

Pentair Flotec HYDROBLASTER 2.5 V Original instructions

Pentair Flotec

Pentair Flotec HYDROBLASTER 2.5 V Original instructions

BUSCH MINK MM 0084 A instruction manual

BUSCH

BUSCH MINK MM 0084 A instruction manual

ATURIA AP instruction manual

ATURIA

ATURIA AP instruction manual

BUSCH RA 0165 D instruction manual

BUSCH

BUSCH RA 0165 D instruction manual

Denison Hydraulics P11S Series Service information

Denison Hydraulics

Denison Hydraulics P11S Series Service information

Defort DSP-401N user manual

Defort

Defort DSP-401N user manual

Ribimex Ribiland PRPVC752AS User and maintenance manual

Ribimex

Ribimex Ribiland PRPVC752AS User and maintenance manual

Orion 220VAC user manual

Orion

Orion 220VAC user manual

Wright flow Cocept SQ Installation, operation and maintanance manual

Wright flow

Wright flow Cocept SQ Installation, operation and maintanance manual

Armstrong Design Envelope 4392 Quick installation guide

Armstrong

Armstrong Design Envelope 4392 Quick installation guide

Hydro systems Taurus CP-300 manual

Hydro systems

Hydro systems Taurus CP-300 manual

Aquagarden 2250-4500 manual

Aquagarden

Aquagarden 2250-4500 manual

Grundfos SCALA1 Safety instructions and other important information

Grundfos

Grundfos SCALA1 Safety instructions and other important information

Becker VT 4.10 operating instructions

Becker

Becker VT 4.10 operating instructions

REED ROCK MASTER A30HP manual

REED

REED ROCK MASTER A30HP manual

manuals.online logo
manuals.online logoBrands
  • About & Mission
  • Contact us
  • Privacy Policy
  • Terms and Conditions

Copyright 2025 Manuals.Online. All Rights Reserved.