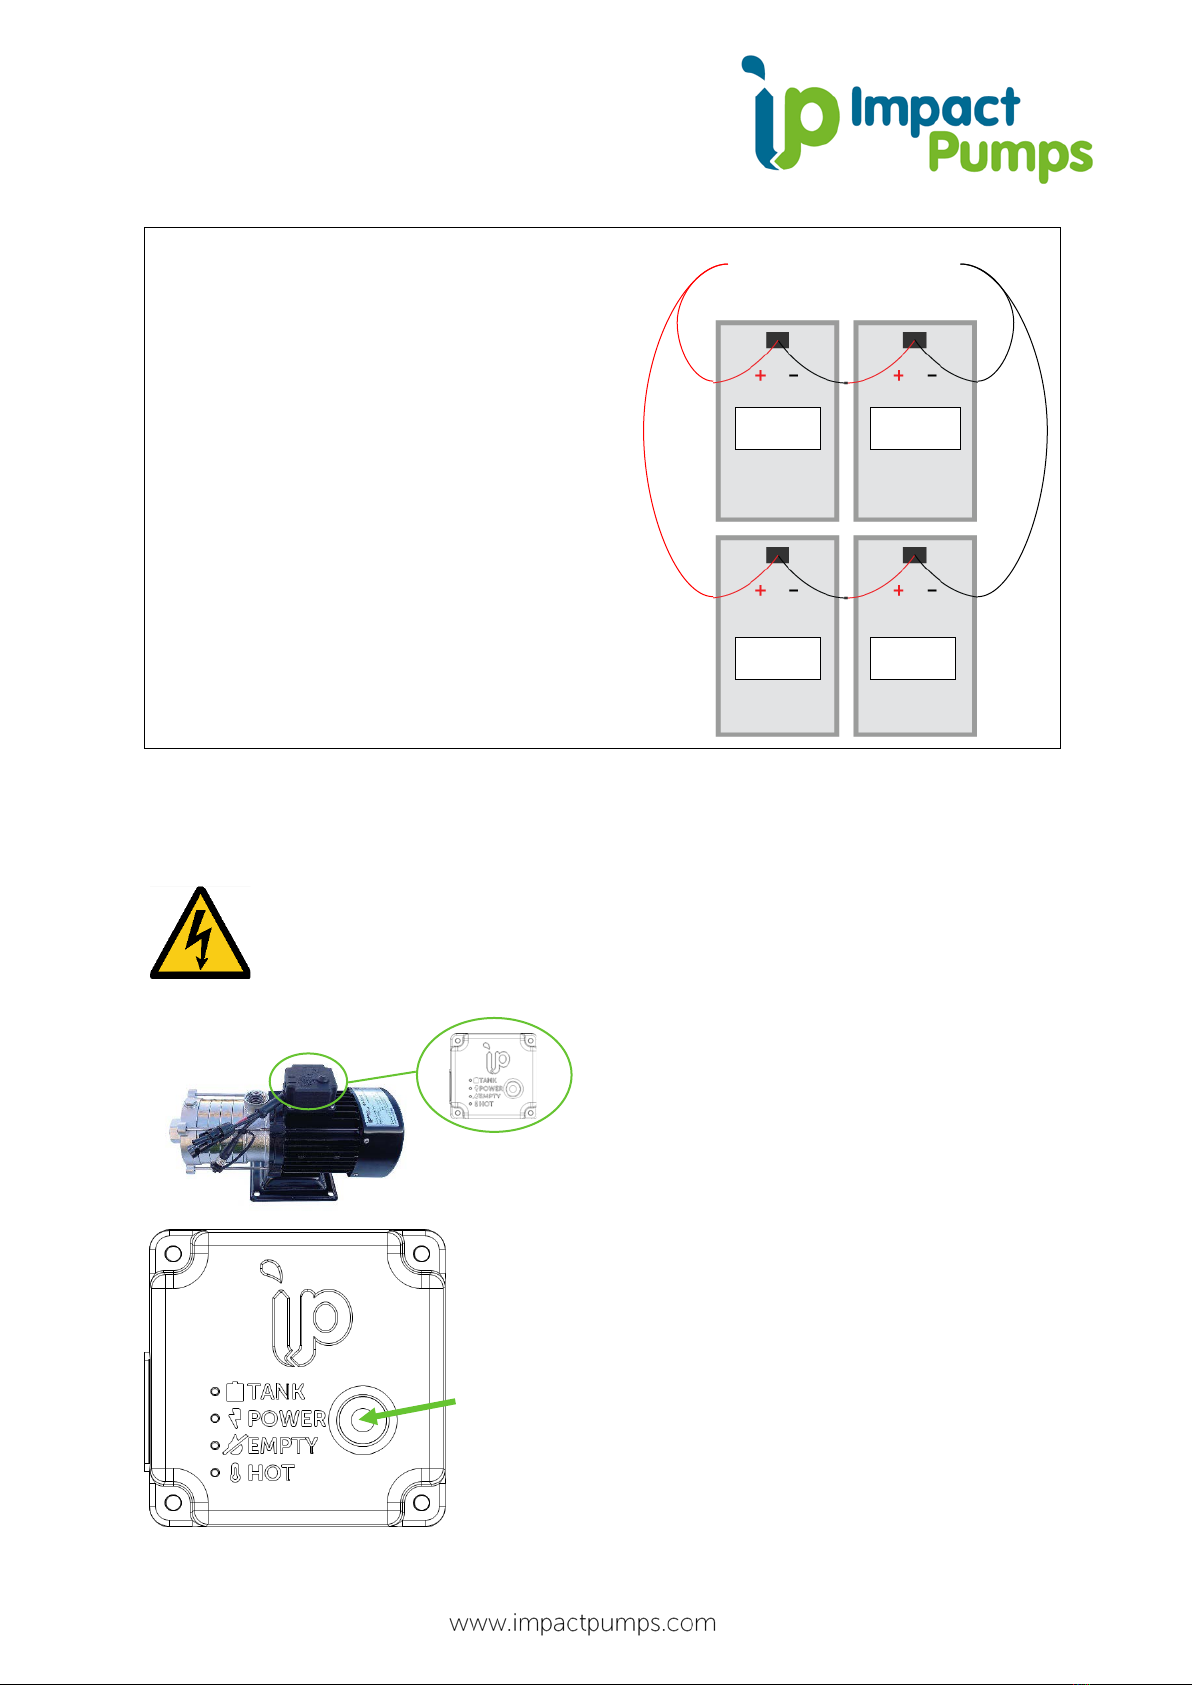
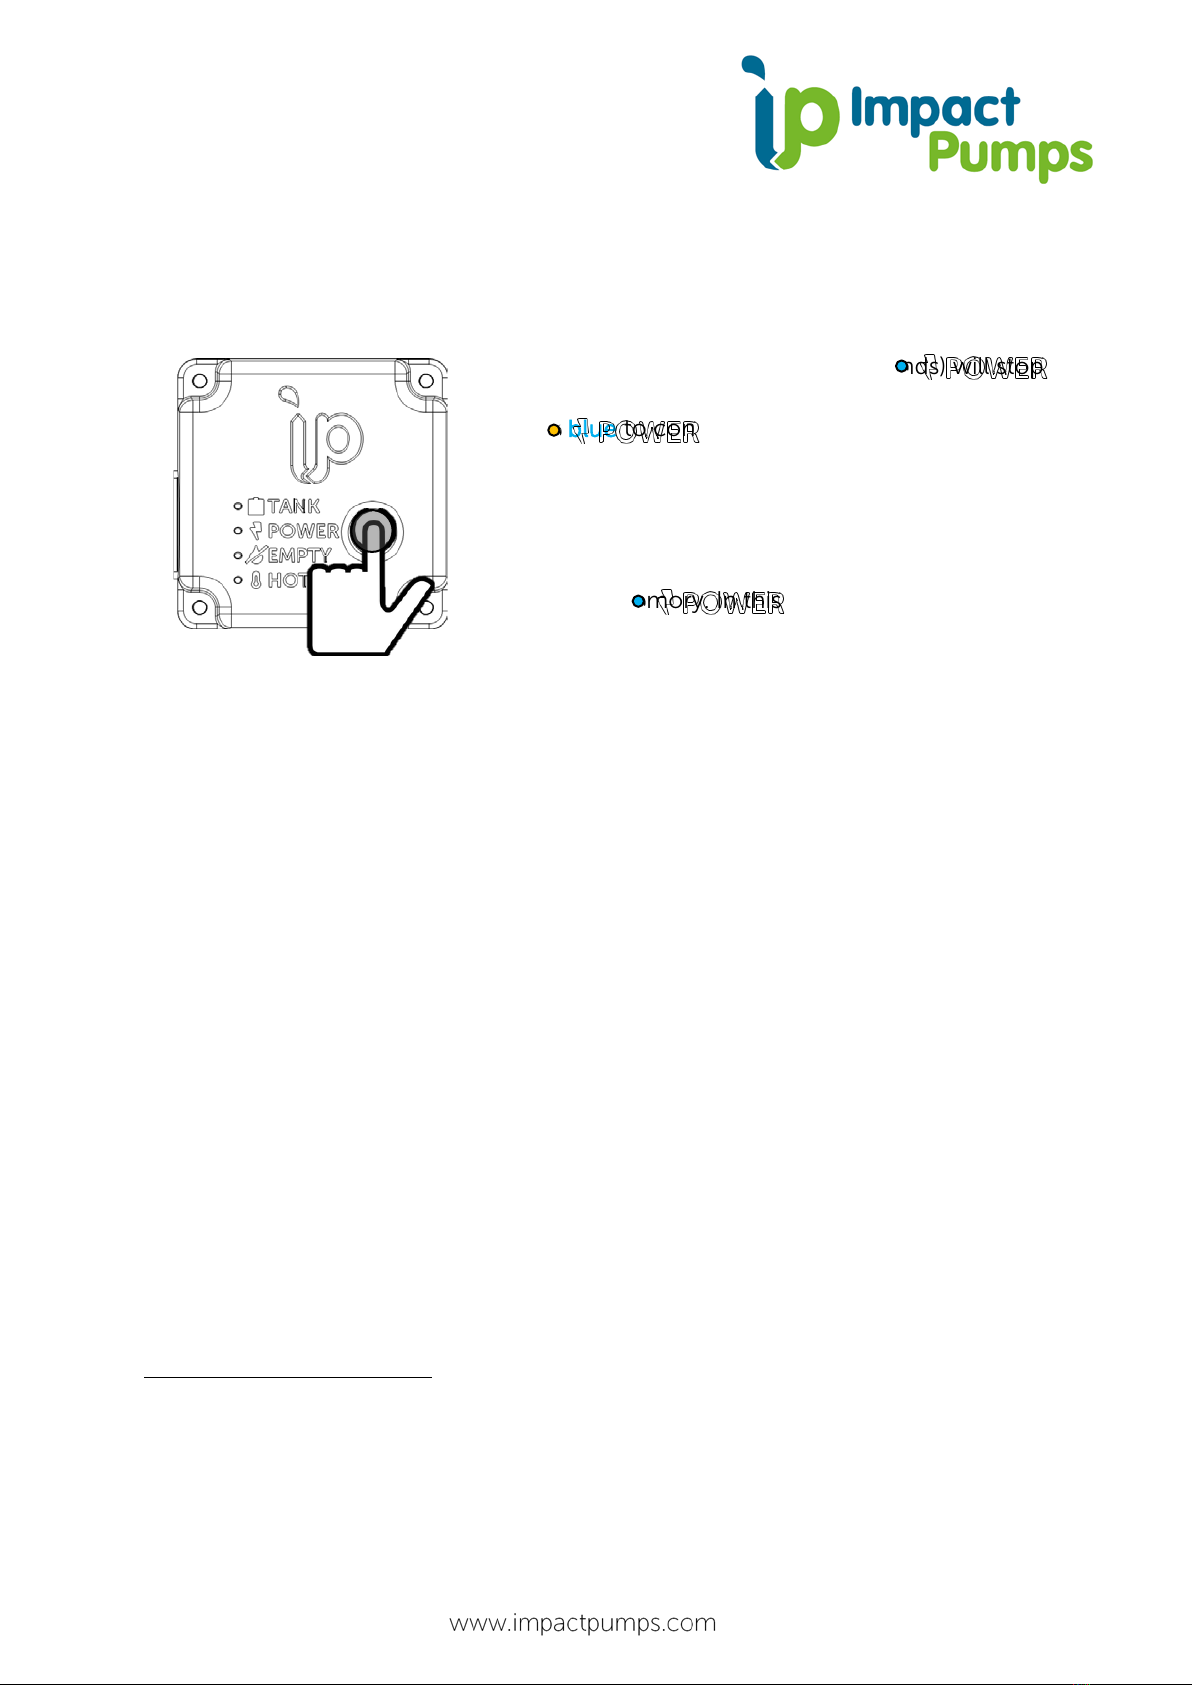
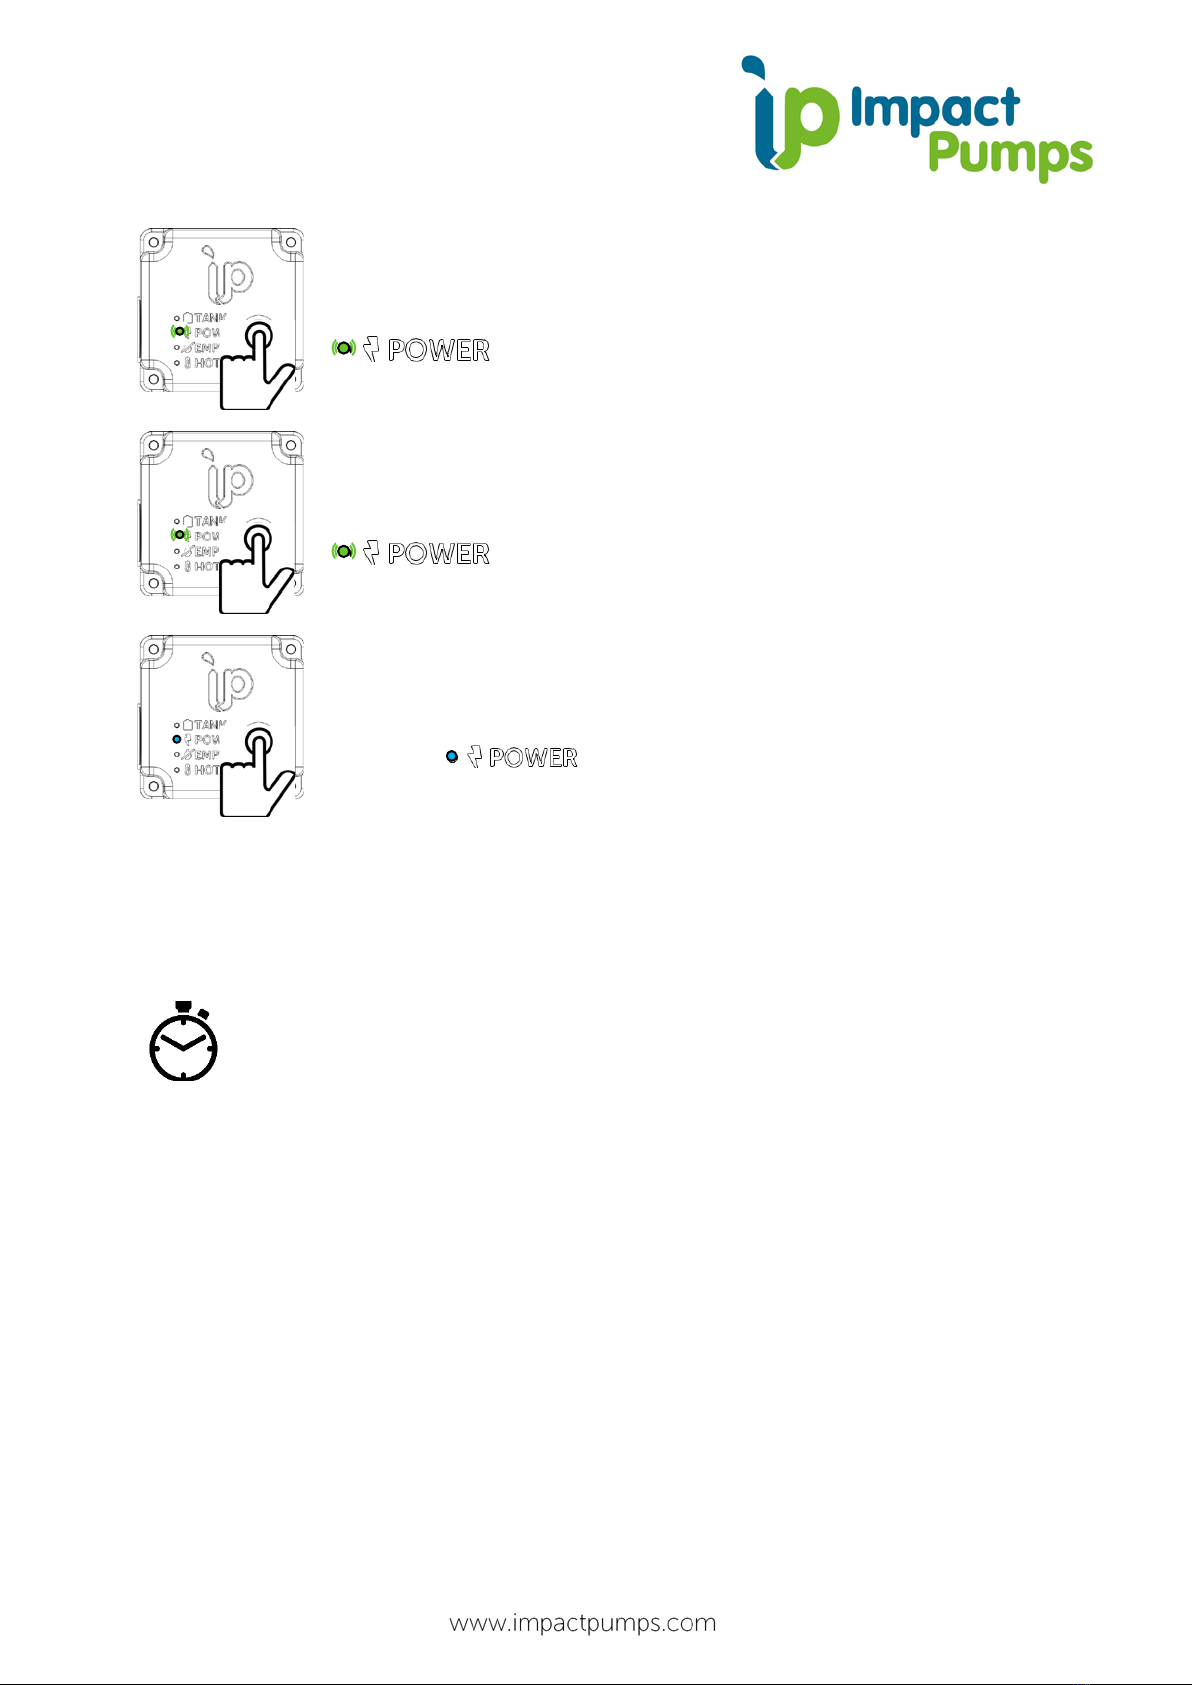
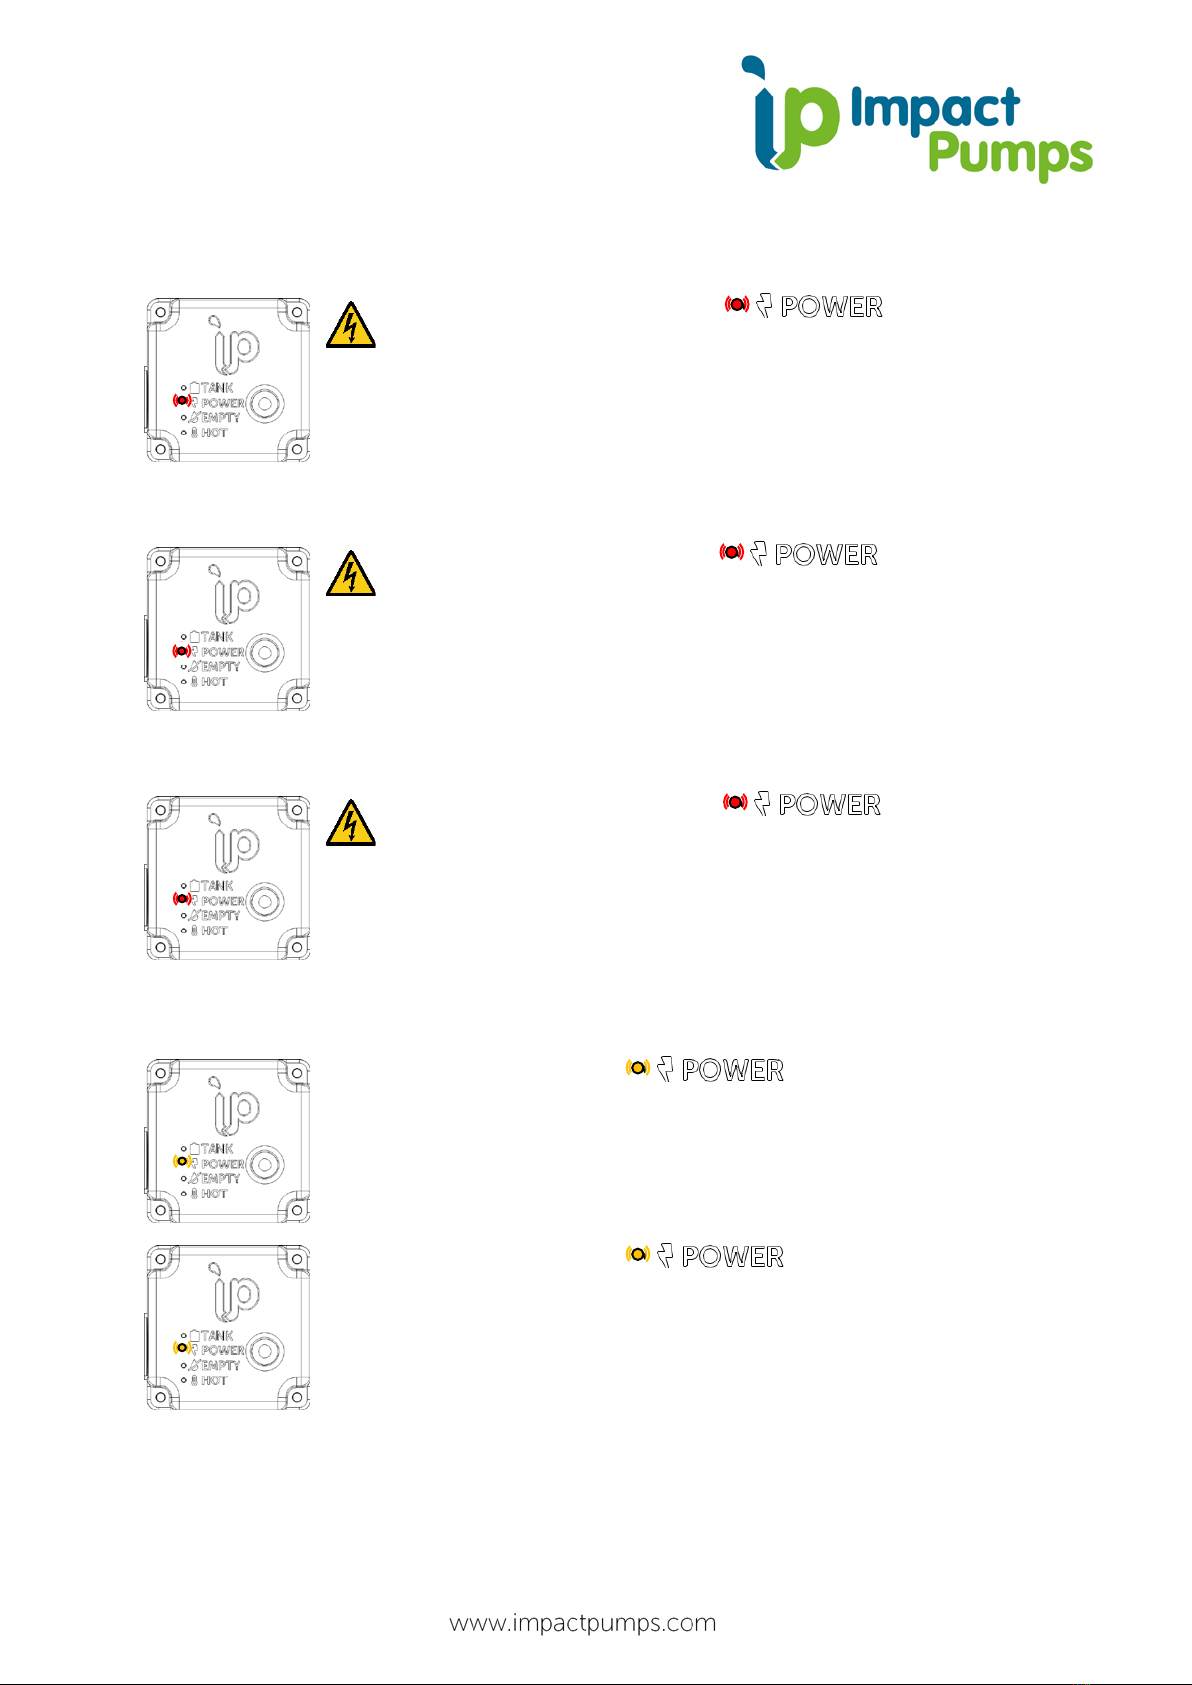
Impact Pumps SolarPlex SPX-800-5 Setup guide

Page 1 6th March 2023
Impact Pumps SolarPlex SPX-800-5 Quick Start User Guide
The SolarPlex SPX-800-5 is a horizontal 5-stage centrifugal surface pump
designed for solar and other DC-powered applications. It features integrated
advanced MPPT and Field-Oriented motor control and is fully scalable for power
inputs from 100W-800W, setting a new benchmark in PV-powered water
pumping. The SPX-800-5 also features overspeed, overheat and locked-rotor
protections as standard, with optional level sensor inputs for shallow well and tank
applications. The suction lift of the SPX-800-5 can be extended to up to 60m
depth with Impact Pumps’ SLX-40 range of Lift Extenders.
1. Introduction
This guide explains how to operate the SolarPlex SPX-
800-5 Solar powered surface pump. Please ensure all
installation requirements are met as per our warranty
terms and manufacturers guidance notes. Correctly
operated, the SolarPlex SPX-800-5 has been designed to
give years of trouble-free service and peace of mind.
2. Ports and electrical connections
M12 Female
connector –
optional level
switches and serial
data readout
Discharge port: 1”
threaded connection
for 1 ¼” hose/40mm
OD (DN32) pipe
Suction port: 1” threaded
connection for 1 ¼”
hose/40mm OD (DN32) pipe
Negative (-) Male MC4
PV connector (black)
Positive (+) Female
MC4 PV connector
indicated by red sleeve
Integrated MPPT/motor
controller, control button
and status LEDs

Page 2 6th March 2023
WARNING! ISOLATE ALL ELECTRICAL POWER CONNECTIONS
BEFORE PRIMING. DO NOT OPERATE THE PUMP WITHOUT WATER
INSIDE THE PUMP HEAD CHAMBER.
3. Closed system pumping applications1
(e.g. domestic water supply)
•Ensure inlet pipe/hose is free from leaks and
filled with water at all times;
•Ensure the outlet pipe/hose is raised above the
SolarPlex where possible;
•Protect the SolarPlex from rain and particularly
direct sunlight where possible.
The SolarPlex SPX-800-5 can be used to lift water from up to 60m below in
combination with Impact Pumps’ SLX-40 range of Lift Extenders. For further
information, please consult our website at www.impactpumps.com.
4. Open system pumping applications2
(e.g. pumping from open water sources/ shallow wells)
•Locate the SolarPlex as close to the water
level as possible in a dry location with no
risk of flooding/partial immersion;
•Connect the suction port to a foot valve
and inlet filter (sold separately);
•Ensure the suction hose/connections are
free from leaks;
•Locate the inlet end below the waterline;
•Protect the SolarPlex from rain and particularly direct sunlight where possible.
1In this context, “Closed” refers to applications where the water source is located above the pump
e.g. in a tank, as shown. Note: This section also applies to deep-water lifting in combination with
Impact Pumps’ SLX-40 range of Lift Extenders.
2In this context, “Open” refers to applications where the water source is located below the pump
e.g. in a shallow well, as shown. Note: In open-system pumping applications with Impact Pumps’
SLX-40 Lift Extenders, refer to the SLX-40 datasheets available to download from
https://www.impactpumps.com/support/

Page 3 6th March 2023
5. Setup and priming
The pump should be primed full of water before use.
The priming port on the pump should be used to prime
the pump to prevent air locks in the pump. In closed
system applications with positive pressure on the
suction port, the pump may be primed through the
suction port. Trapped air should be released by opening
the priming port as shown. In open system applications
with negative pressure at the inlet (drawing water from
below), the pump should be primed by filling with water
through the priming port as shown.
THE SUCTION HOSE/PIPE MUST ALSO BE FULL AND
FREE OF AIR. Any air locks in the suction hose must be
removed prior to start up. In open system applications
with negative inlet pressure, fitting a non-return valve to
the suction hose (directly to an inlet filter as shown
below), will help to avoid further air locks after priming
provided the inlet is submerged below the water line.
If you are pumping
from an open water
source like a river or
pond you will need
to install the
following 2 parts at
the inlet of the
suction hose:
1. A non-return valve (NRV). In
open system applications,
you will not be able to prime
the pump with water
without a Non-Return Valve
(NRV or check valve).
2.
An inlet filter should also be
attached to the NRV/check
valve
to prevent the pump
becoming blocked with
debris. A filter may be fitted
directly onto the NRV as
shown in the image to the
right here.
The SolarPlex SPX-800-5 is supplied with 1” BSP (G1”)
Female
threaded suction (inlet) and discharge (outlet)
ports. These should be connected to your application
with
1¼” (DN32) hoses or pipework
using standard
full-bore pipe fittings. For information on Impact
Pumps’ latest range of accessories, please visit
www.impactpumps.com.

Page 4 6th March 2023
6. Electrical power input connections
Once the SolarPlex SPX-800-5 suction and discharge connections have been
made and the pump has been primed, it may be connected to the PV array or
another suitable DC power supply.
WARNING! ENSURE THAT ALL CONNECTORS ARE CLEAN AND DRY.
THE POWER SUPPLY VOLTAGE SHOULD NOT EXCEED 100V.
Note: Red sleeved lead connections are ‘positive’
Connect PV panels to the NEG (negative) and POS (positive) terminals. The SPX-800-5 is
provided with standard MC4 solar connectors as shown on page 1. The open-circuit panel
voltage should always be in the range 30-100V and the short-circuit current should not
exceed 20A. For further information on input voltages, please consult the IMPACT PUMPS
SPX-800-5 datasheet.
When the PV panels are connected, the LED on the pump controller box
will show constant amber and then will auto-start after 5 seconds. The pump will initially
start in default 800W maximum power mode, and the LED will show
constant blue.
Minimum Vmp Voltage
To deliver the full 800W of power to the
SolarPlex, the PV panels must have a
combined maximum power voltage (Vmp) of
more than 66V. This is likely to require at least
2 panels, connected in series as shown.
For further information on minimum input
voltages, please consult the IMPACT PUMPS
SPX-800-5 datasheet.
Maximum Voc Voltage
The total
sum
open circuit voltage (Voc)
of
any PV panels wired in series should be
less
than 100V. If the Voc is higher than 100V the
overvoltage protection will stop the pump
from running, The two panels shown in this
diagram are wired in series.
(1
st
Vmp+2
nd
Vmp)>66V
2ndVmp
1stVmp
(1stV
oc
+2ndV
oc
)<100V
2ndVoc
1stV
oc

Page 5 6th March 2023
Tip: Parallel Wiring
There is no limit to the number of PV panels
that can be wired in parallel to the SolarPlex.
Parallel wiring increases available current and
not voltage. The SolarPlex SPX-800-5
automatically limits the maximum current
drawn from the PV panels to within the safe
limit of 12A or 800W.
For example, if all the voltages of the 4 panels
shown in this diagram are the same then the
voltage of 3rd and 4th PV panels would not add
any extra voltage to the total sum open circuit
voltage off the 1st and 2nd Panels. Instead, the
3rd and 4th panels will add to the available
current and power up to the safe automatic
limit set by the pump.
7. Connecting, stopping and starting the pump
WARNING! ISOLATE OR COVER PV PANELS WHEN CONNECTING
THE PUMP. ENSURE ALL MECHANCIAL AND ELECTRICAL
CONNECTIONS HAVE BEEN FITTED SECURELY BEFORE
UNCOVERING PANELS OR SWITCHING ON POWER SUPPLY.
The control button and status LEDs can
be found on the motor controller box as
shown.
Once a power connection is made, the SolarPlex
SPX-800-5 will automatically start in its default
MPPT mode, operating at the maximum power
available from the connected PV array or power
supply up to a maximum rated power of 800W. To
stop and start the pump, short-press the control
button indicated (for a maximum of 2 seconds). For
further information on alternative operating modes
and LED display information, please see section 10.
(1stVoc+2ndVoc)<100V
2
nd
Voc
1
st
Voc
3
rd
Voc
4
th
Voc

Page 6 6th March 2023
8. Level switches and data communications
The SPX-800-5 is fitted with a standard 5-pin Female M12 connector which
allows for optional connection to up to two level switches using a mating 4 Pin
M12 connector cable which is available separately from Impact Pumps for those
customers wishing to install level sensing. If left disconnected (open circuit), the
SPX-800-5 will default to running in 800W Maximum Power output mode unless
stopped with the control button (see section 9). The dust cap provided should be
used to prevent short circuits if level sensing and data readout are not required..
Pins 1 to 4 are for level sensing, the 5th pin on the M12 connector provides a serial
data readout, this can be accessed using the SPX Data Logger.
Example level switch connections and LED status display when using the optional
add-on M12 connector cable
Tank full level sensor
If the brown wire (pin 1) of the M12 connector cable is connected
to the blue wire (pin 3) by a Normally Open (NO) level switch or
otherwise, the pump will stop and the LED will show
constant red. This channel may be used (for example), to stop the
pump if it is delivering to a full tank.
Tank or well low level sensor
If the white wire (pin 2) of the M12 connector cable is connected
to the black wire (pin 4) by a Normally Open (NO) level switch or
otherwise, the pump will stop and the LED will
flash red. This channel may be used to stop the pump if it is
drawing water from a tank or well if the level descends too low.
M12 pinout is shown in the diagram to the right
Connections
1. Brown – pump stops when switch connects Brown to COM (Common Ground)
2. White – pump stops when switch connects White to COM (Common Ground)
3. Blue – COM (Common Ground)
4. Black – COM (Common Ground)
5. Grey – Serial RX - contact Impact Pumps for information

Page 7 6th March 2023
9. Control button actions
The SolarPlex SPX-800-5 may be stopped, started or operated in “power limited
modes” using the control button on the integrated MPPT/motor control box.
1 short-press (for a maximum of 2 seconds) will stop
the pump. The LED will change from
constant blue to constant amber .
When stopped, 1 short-press (for a maximum of 2
seconds) will start the pump. The pump will start in
its default 800W Maximum Power mode unless a
power limited mode has previously been selected
and saved to memory. In this mode, the
LED will show constant blue.
Power limited modes
In some applications3, it may be useful to limit the power of the SolarPlex SPX-800-
5. For example, if a large solar array is used to benefit from good performance at
the ends of the day or in cloud and;
•your water source is routinely running dry and/or unable to yield the daily
volumes that the SolarPlex SPX-800-5 can pump in the middle day;
•the SolarPlex SPX-800-5 is delivering to a system that may be damaged by
its high (75m) maximum output head at 800W input power;
•the SolarPlex SPX-800-5 is delivering to a system that may be damaged by
its high (4.5 m3/h) maximum output flow rate at 800W input power;
•you don’t need the high daily volumes that the SolarPlex SPX-800-5 can
deliver and wish to prioritise maximising the service life of your system;
you may consider limiting its power output4to a lower maximum level than 800W.
3When operating in combination with Impact Pumps’ SLX-40-S, the SolarPlex SPX-800-5 should be
operated in 600W maximum power mode or lower to avoid unnecessary safety valve actuations.
The SolarPlex SPX-800-5 can be operated at any power level in combination with the SLX-40-HF.
4Note that the SolarPlex will automatically switch into MPPT mode and continue to extract the
maximum power available from your PV solar array or DC power source when that maximum drops
below its set power limit in power limited modes.

Page 8 6th March 2023
Default 800W maximum power mode
In the default setting, the LED shows constant blue,
to indicate that the pump is running at full power.
100W maximum power mode
Push and hold the control button once for at least 4 seconds to
enter 100W power limited mode. In this mode, the
LED will intermittently show one green flash.
200W maximum power mode
Push and hold the control button once for at least 4 seconds
again to enter 200W power limited mode. In this mode, the
LED will intermittently show two green flashes.
300W maximum power mode
Push and hold the control button once for at least 4 seconds
again to enter 300W power limited mode. In this mode, the
LED will intermittently show three green flashes.
400W maximum power mode
Push and hold the control button once for at least 4 seconds
again to enter 400W power limited mode. In this mode, the
LED will intermittently show four green flashes.
500W maximum power mode
Push and hold the control button once for at least 4 seconds
again to enter 500W power limited mode. In this mode, the
LED will intermittently show five green flashes.
>4s
>4s
>4s
>4s
>4s

Page 9 6th March 2023
600W maximum power mode
Push and hold the control button once for at least 4 seconds
again to enter 600W power limited mode. In this mode, the
LED will intermittently show six green flashes.
700W maximum power mode
Push and hold the control button once for at least 4 seconds
again to enter 700W power limited mode. In this mode, the
LED will intermittently show seven green flashes.
Return to default 800W maximum power mode
Push and hold the control button once more for at least 4
seconds to return to default 800W maximum power mode. In this
mode, the LED will once again show constant blue.
Tip: If you wish to remove a reduced power limit from the pump, you can just hold
the button down until the LED turns from green to blue, i.e. you do not have to
release the button to move between power limits.
WARNING: POWER LIMITED MODES ARE ONLY SAVED TO MEMORY
AFTER 4 MINUTES OF OPERATION. IF POWERED DOWN SOONER, THE
PUMP WILL RESTART IN DEFAULT 800W MAXIMUM POWER MODE OR
THE PREVIOUSLY SAVED MODE IF THERE WAS ONE.
>4s
>4s
>4s

Page 10 6th March 2023
10. Pump reset and protection features
The SolarPlex comes with an innovative controller board with reset and protection
features. The board will respond to various circumstances that could be dangerous
or cause damage. LED signal lamps denote different pump protection modes.
If the pump stops but NO ERROR CODE IS DISPLAYED BY THE LEDS, this indicates
power supply interruption or overspeed due to trapped air or dry-running. If this
occurs, isolate the pump and bleed air or re-prime it through the priming port (see
section 5). Check all electrical connections before attempting to re-start.
Coded error warnings
Most error states are accompanied by a warning indicated by the LEDs on the motor
controller box. Please consult the table below to diagnose your problem before
attempting to solve it yourself or contact your dealer.
Overheat warnings!
The SolarPlex SPX-800-5 is actively fan cooled and will turn itself off to prevent
damage if the power electronics temperature exceeds 70°C or the internal motor
windings exceed 100°C. These high temperatures will only occur if the pump is
left in direct sunlight, without shading, in a hot climate and while running at high
power. We strongly recommend that the SolarPlex SPX-800-5 is shaded from full
sunlight, wherever possible, in operation.
Pump TOO HOT The LED will fast-flash red, on and off
for equal durations, two times every second. The pump will
attempt to auto-restart after 60s. This may occur if the pump is
operated for long periods in direct sunlight, without shading, in a
hot climate and while running at high power. Consider providing
shading or moving pump to a cooler location or selecting a power
limited mode (see section 9). If the problem persists, disconnect power, wait several
minutes and reconnect.
Pump TOO COLD The LED will slow-flash red, on and
off for equal durations, two times every four seconds. The pump
will attempt to auto-restart after 60s. This will only occur in
extreme cold weather in which there is a danger of ice formation
in the pump head. If the problem persists, disconnect power, wait
several minutes and reconnect.

Page 11 6th March 2023
Input Power Warnings!
Input voltage TOO HIGH The LED will fast-
flash red, on and off for equal durations, two times every
second. This may indicate that the open-circuit voltage (Voc) of
the PV array or power supply is too high. Immediately isolate or
disconnect to avoid damage to equipment and refer to section 6
of this guide.
Input curent TOO HIGH The LED will
intermitantly show 2 red flashes . This may indicate a short
circuit or locked pump rotor. Immediately isolate or disconnect to
avoid damage to equipment. Remove the pump and inspect the
pump ports, wiring and pump head for blockage, rotor seizure or
damage to electrical wiring.
Motor curent TOO HIGH The LED will
intermitantly show 3 red flashes.This may indicate a a short
in the motor electronics. Immediately isolate or disconnect to
avoid damage to equipment. Remove the pump and inspect the
pump for any damage.
Low power warnings
Input voltage too low The LED will flash amber
every two seconds. This may indicate that the maximum-power
voltage (Vmp) of the PV array or power supply is too low or that
sunlight levels are too low for your pump to operate. The pump
will attempt to auto-restart every 60 seconds.
Input current too low The LED will flash amber
every two seconds. This may indicate that the maximum-power
current (Imp) of the PV array or power supply is too low or that
sunlight levels are too low for your pump to operate. The pump
will attempt to auto-restart every 60 seconds.

Page 12 6th March 2023
Non-user serviceable error codes
Error codes shown by intermittent green and purple flashes of
the LED are not user serviceable. Nonetheless,
they may indicate faults with level sensors or serial data
communications, if relevant.
If any LED colour or flashing codes appear which are not listed here, please make a
careful note of:
1. Which LED is showing an error warning;
2. The colours and flashing sequence of the warning including the duration of
any flashes.
Most problems can be resolved simply by:
1. Disconnecting or isolating power supply;
2. Disconnecting level sensors if any;
3. Allowing the pump to cool down;
4. Restarting without level sensors connected;
5. Reinstating broken or damaged level sensors later.
If the problem persists, please visit our website for troubleshooting information or
contact your dealer.
Other Impact Pumps Water Pump manuals
Popular Water Pump manuals by other brands

SK Medical
SK Medical SK-600i Operator's manual

Almatec
Almatec A Series Operating and installation instructions

Champion Power Equipment
Champion Power Equipment 66520 Operator's manual

AMT
AMT 4430-95 Information manual

GEA
GEA Hilge HYGIA K Operating instruction

Action
Action 3003 Operating instructions & parts manual