inergy KODIAK User manual

10

10
Dear Valued Customer,
We would like to express our sincere appreciation for your pur-
chase and support. The Kodiak represents four years of research,
countless prototypes, and numerous revisions. We couldn’t be
more excited to deliver this product to you. While we know you
are as excited to dive in with the Kodiak as we are to provide it to
you, there are a few things we need to cover rst:
• TheKodiakwillarrivepartiallychargedinaccordancewith
lithium ion shipping regulations. Fully charge prior to use using
the AC charger, solar panels, or car charger (not included).
• TheprovidedACchargerwillgetHOTduringcharging.Be
sure to keep it in a well-ventilated area.
• ThefollowingpagescomprisetheUser’sManualforthe
Kodiak. Inside you will nd product specications, basic infor-
mation relating to using and expanding your new system, and
much more.
• Allofourproductsincludeaoneyear(fromdateofdelivery)
warranty. As with any new product, there may be kinks along the
way. If you experience anything peculiar at all, we would greatly
appreciate your feedback! Feel free to contact us with any ques-
tions or problems that may arise by either calling us toll free at
(877) 969-2432, our local number at (208) 717-3147, or via email
at info@inergysolar.com.
We’re also always looking for photos of our products in use, so
feel free to send some along by emailing us at the above listed
email address, or connect with us on Facebook, Instagram, or
Twitter!
BestRegards,
The Inergy Solar Team
1

10
TABLE OF CONTENTS
1. Cover Letter
2. Table of Contents (You are here)
3. Charging Your Kodiak
4. UsingYourKodiak(1of2)
5. UsingYourKodiak(2of2)
6. LCD Display Infographic
7. LCD Display Infographic Key (1 of 2)
8. LCD Display Infographic Key (2 of 2)
9. Kodiak Infographic
10. Kodiak Infographic Key & Specications (1 of 2)
11. Kodiak Infographic Key & Specications (2 of 2)
12. Solar Energy General Guidelines (1 of 2)
13. Solar Energy General Guidelines (2 of 2)
14. MC4AdapterInstructions(1of2)
15. MC4AdapterInstructions(2of2)
16. ExternalBatteryGuidelines(1of2)
17. ExternalBatteryGuidelines(2of2)
18. ConnectinganExternalBattery
19. Frequently Asked Questions
20 Manufacturer’sCerticationStatement
21. Limited Warranty (1 of 2)
22. Limited Warranty (2 of 2)
23. ImportantNoticeRegardingLithiumBatteries
24. ImportantNoticeRegardingLithiumBatteries
25. Notes
26. Notes
2

3
CHARGING YOUR KODIAK
TheKodiakhastwoportsforcharging.Onlyconnectonecharge
source at a time, connecting two simultaneously will damage
your Kodiak and may be dangerous. When a charge source is
connected, both the LCD Display and Charge Light will turn on
automatically.Iftheydon’t,yourKodiakmaybeinSafetyMode.
See“SafetyMode”sectiononpage5formoreinformation.
PORT 1: Low current charge input for use with the included In-
ergy Standard Wall Charger, or up to (3) Predator 50 Solar Panels.
MAXIMUMINPUT:UPTO150WATTS,NOTTOEXCEED26VOLTS
DC(OPENCIRCUIT,ABBREVIATEDASVOC).
PORT 2: HighcurrentchargeinputforusewiththeInergyQuick
Wall charger, Solar Storm Solar Panels, and Predator Solar Panels.
When connecting to Port 2, the connector must be inserted fully,
thenrotatedaquarterturnclockwisetolockinplace.MAXIMUM
INPUT:UPTO600WATTS,NOTTOEXCEED26VOLTSDC(OPEN
CIRCUIT,ABBREVIATEDASVOC).
• ChargingwithSolarPanel(s)
- Charge times vary depending on solar panels used, sun
conditions, and angle of panel(s) relative to the sun. If
using third party panels not supplied by Inergy, always
connectpanelsinaPARALLELwiringconguration-not
aSERIESwiringconguration.Seesectionentitled“Solar
EnergyGeneralGuidelines”onpage12formore
information.
• ChargingwithStandardWallChargerorQuickWallCharger
- The provided Standard Wall Charger is a 100 Watt charge
source, taking approximately 11 hours to fully recharge.
Connect to Port 1.
- The Quick Wall Charger is a 189 Watt charge source,
taking approximately 6 hours to fully recharge the
Kodiak. Connect to Port 2.
• ChargingwithCarCharger
- Usingavehicle’s12VDCsocketchargestheKodiakatup
to 240 Watts, taking approximately 5 hours to fully re-
charge. Connect car charger to Port 2.

10
USING YOUR KODIAK
The12VDCsockets&BasecampLEDLightportsarealwayslive
- just plug in your gear, power is readily available. The 110V AC
outlets&USBPortsarebothactivatedbypressinginthepower
button. The Kodiak can be charged and power your gear at the
same time.
POWERING YOUR GEAR
• Poweringdevicesthatconsumeverylargeamountsof
electricity (1,000 Watts or greater, like a refrigerator) can
deplete your battery capacity quickly and you may not get
all of the 1,100 Watt hours of energy stored in the Kodiak
when fully charged.
• WhenusinglargeamountsofACpoweratlowerbattery
levels, the inverter may turn o earlier than normal with
useable battery capacity still available. Try reducing the
amount of power being used via AC. DC power may still be
available, but more battery capacity is needed to power the
inverter(ACoutlets).Oftenthelast10-20%ofthebatteryis
only available via DC.
READING THE LCD DISPLAY & BATTERY LEVEL INDICATOR
• LCDDisplay
- The LCD Display is turned on and o with the power
button, as well as turning on when a charge source is
connected to the Kodiak. The LCD Display is the most
accurate method for determining battery capacity, as
well as determining how much power is being used by
the Kodiak. There are 4 data sections total on the LCD
Display, but the 2 data sections on the right side are
the most commonly used. The top right data indicates
the Voltage of the battery in real time. A fully charged
Kodiak will be between 12.3 - 12.6 Volts. A completely
discharged Kodiak will be between 9.3 - 9.6 Volts. The
bottom right data indicates how much power is being
used by the Kodiak in real time, measured in Watts.
The LCD Display does not indicate how much power is
4

10
coming into the Kodiak from a charge source. See pages
6-8 for more information on LCD Display.
• BatteryLevelIndicator(locateddirectlybelowtheLCD
Display)
- TheBatteryLevelIndicatoristurnedonandowith
the power button only. When turned on, up to 10 multi-
colored LEDs will illuminate. Each LED light represents
roughly10%ofthebatterycapacity.Note:Asillustrated
aboveinthe“PoweringYourGear”section,sometimes
10-20%oftheremainingbatterycapacityintheKodiak
may only be available via DC, not through the AC outlets.
SAFETY MODE
• Sometimesfollowingtransport,heavyuse,orextended
storage,theKodiakwillgointoSafetyMode.DuringSafety
ModetheKodiakwon’tturnonwhenthepowerbuttonis
pressed,anditwon’tcharge.SafetyModeisalsoindicated
when plugging in a charge source and the LCD Display
doesn’tcomeon.TotakethesystemoutofSafetyMode,
plugtheStandardWallChargerintotheBasecampLEDLight
PortonthefrontoftheKodiak(seeKodiakReferenceGuide)
for about 10 seconds, then remove it. The system should now
poweronandacceptachargeasnormal.DONOTLEAVEA
CHARGESOURCECONNECTEDTOTHEBASECAMPLEDLIGHT
PORT.
STORING THE KODIAK
• TheKodiakwillretainachargeforuptoafullyear,butit
is recommended that the battery level is checked every
3monthstoensureitisnotbelow10%.Neverleavein
environments exceeding 140˚F (like a hot vehicle), or
indampenvironments.PROTIP:StoringtheKodiakat
half charge ensures the longest battery life. See page 23
(ImportantNoticeRegardingLithiumBatteries)formore
information about storing the Kodiak.
5
6

7
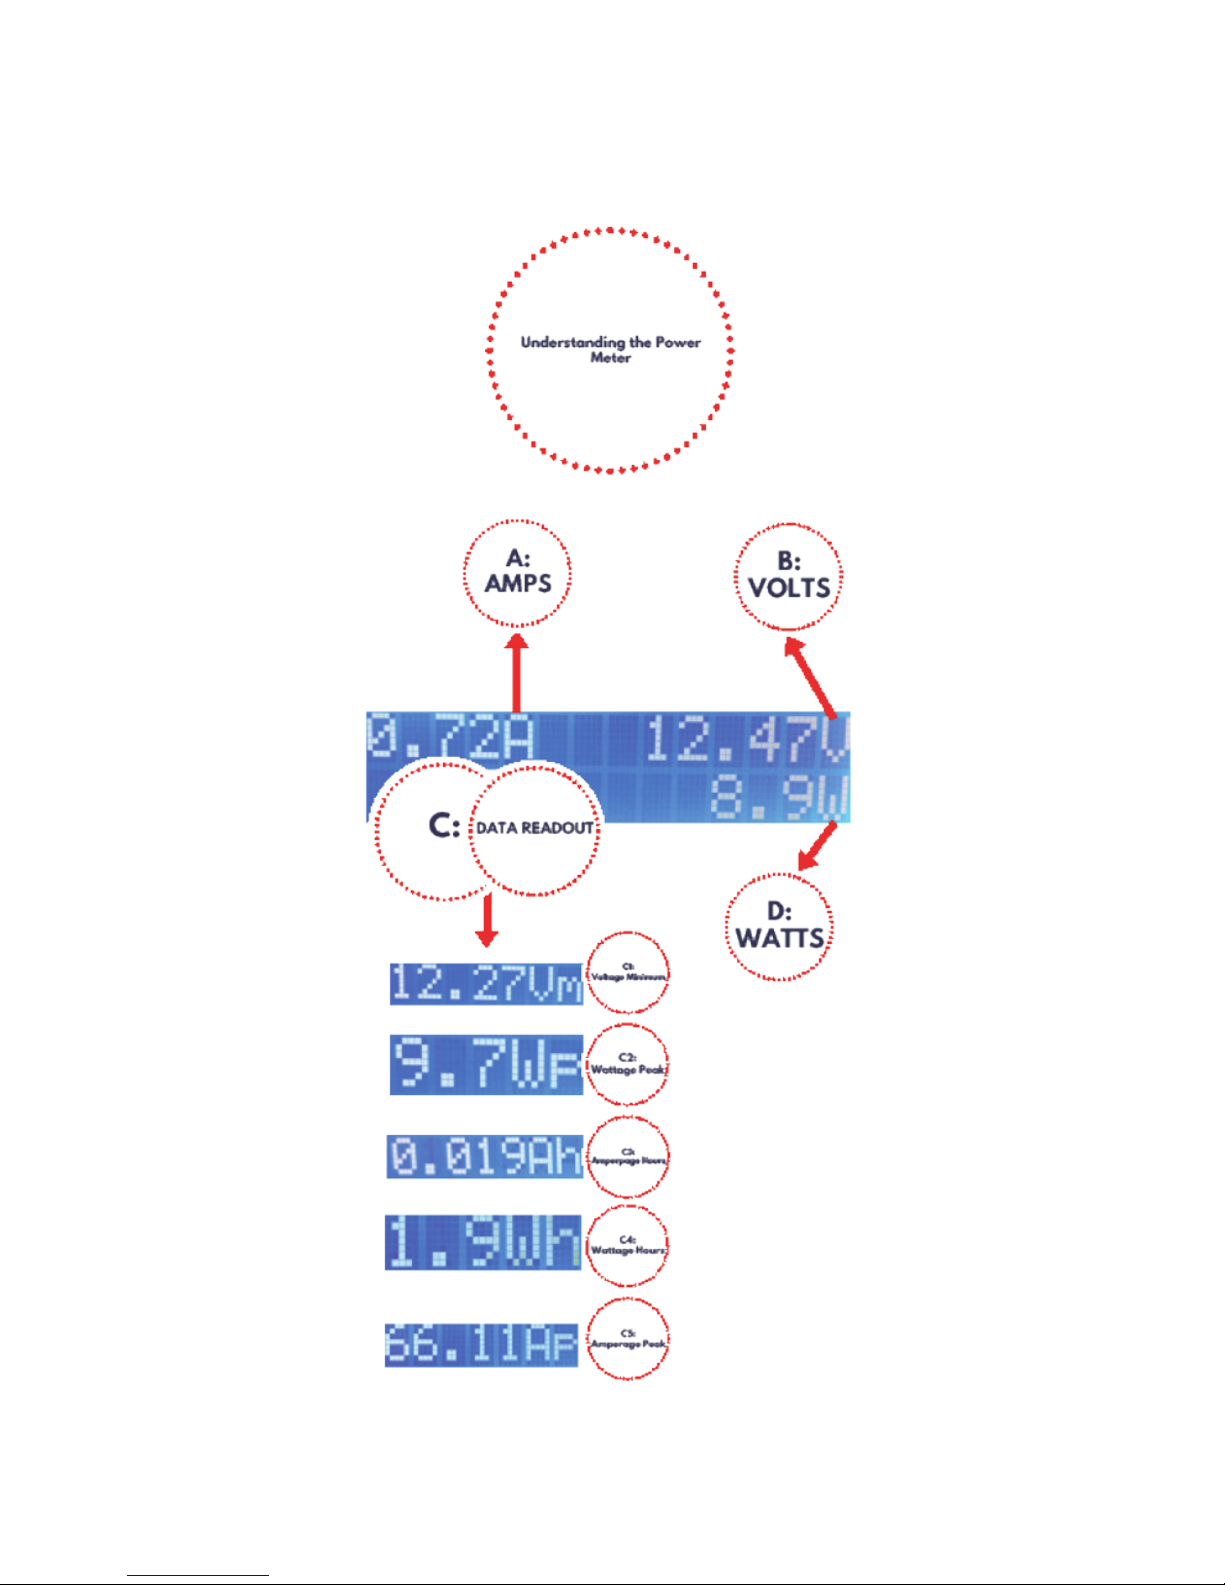
LCD DISPLAY INFOGRAPHIC KEY
The LCD Display contains three dierent real-time measurements
(Volts, Amps, and Watts), and one reading that will cycle
between ve dierent measurements to help you better
understand the performance of your Kodiak: Voltage minimum
(Vm), Wattage peak (Wp), Amp hours (Ah), Watt hours (Wh), and
Amperage peak (Ap).
A: Power Consumption in Amps
Displays the total amount of power being used by the Kodiak
in real time, measured in Amps. This is a DC measurement.
B: Battery Voltage
Displays the Voltage of the battery in real time. A fully
charged Kodiak will be between 12.3 - 12.6 Volts. A
completely discharged Kodiak will be between 9.3 - 9.6 Volts.
C: Current Session Measurements (for Advanced Users)
Each of the following ve readings represent measurements
taken since the LCD Display was last activated by either
connecting a charge source to the Kodiak, or turning the
KodiakON.EachtimetheLCDDisplayisturnedon,itis
referredtoasa“session”.Thesereadingsareonlyforthe
current session, and the data is lost once the LCD Display is
turned o.
• C1:(Vm)VoltageMinimum
- Displays the lowest measured battery Voltage at any one
time during the current session. This helps illustrate
anoccurrenceknownas“VoltageDrop.”Voltagedrop
occurs when power is drawn from a battery (known
asaload).BatteryVoltagedropssignicantlyunder
larger loads, then rebounds when the load is reduced.
Sometimes this drop in Voltage can result in the AC
inverter turning o while there is still useable battery
capacity remaining (as illustrated on page 4 under the
section“UsingYourKodiak”).

8
• C2:(Wp)WattagePeak
- Displays the highest power output at any one time
during the current session, measured in Watts. This is
useful in illustrating large peaks in power demand that
can occur intermittently, like refrigerators, water pumps,
or small air conditioners.
• C3:(Ah)AmpereHours
- Displays the total amount of power drawn from the
battery during the current session, measured in Ampere
hours. This is useful when comparing your power
consumptiontotherated90AmpereHourcapacityof
the internal battery.
• C4:(Wh)Watthours
- Displays the total amount of power drawn from the
battery during the current session, measured in Watt
hours. This is useful when comparing your power
consumption to the rated 1,100 Watt hour capacity of
the internal battery.
• C5:(Ap)AmperagePeak
- Displays the highest measured power output at any one
time during the current session, measured in Amps. This
is useful in illustrating large peaks in power demand that
can occur intermittently, like refrigerators, water pumps,
or small air conditioners.
D: Power Consumption in Watts
Displays the total amount of power being used by the Kodiak
in real time, measured in Watts.

9
THE KODIAK SOLAR GENERATOR

10
KODIAK INFOGRAPHIC KEY
(A) Charge Port 1: Low current charge input for use with the included
Inergy Standard Wall Charger, or up to (3) Predator 50 Solar Panels.
MAXIMUMINPUT:UPTO150WATTS,NOTTOEXCEED26VOLTSDC
(OPENCIRCUIT,ABBREVIATEDASVOC).ConnectorType:5.5x2.5mm
barrel connector.
(B) Charge Port 2: HighcurrentchargeinputforusewiththeInergy
Quick Wall charger, Solar Storm Solar Panels, and Predator Solar
Panels.MAXIMUMINPUT:UPTO600WATTS,NOTTOEXCEED26
VOLTSDC(OPENCIRCUIT,ABBREVIATEDASVOC).ConnectorType:
Neutrik Speakon connector.
(C) External Battery Bank Connection: Batterypostsforusewith
connectingexternalbatteries.ForusewithLeadAcid,AGM,orGel
Cell12VoltBatteriesONLY,NOTLITHIUM.NEVERCONNECTACHARGE
SOURCETOANYCONNECTEDEXTERNALBATTERIES.Seepage16
(ExternalBatteryGuidelines)formoreinformation.ConnectorType:
RingTerminals.
(D) 110V AC Outlets: 1,000 Watts (10 Amps) maximum continuous
output per outlet. 1,500 Watts combined total output from all outlets,
3,000 Watt starting surge maximum.
(E) RV Plug: OutletforconnectingtoRVshorepowercord.1,500
Watt maximum continuous output, 3,000 Watt starting surge
maximum.ConnectorType:NemaTT-30R.
(F) 12V DC Sockets: 180 Watts (15 Amps) maximum continuous output
per socket.
(G) USB Ports: 5V DC output, 3.1 Amps maximum output per pair.
(H) Basecamp LED Light Ports: 12V DC output. Connect up to 10
BasecampLEDLightschainedtogetherperport.ConnectorType:5.5
x 2.5 mm barrel connector.
(I) Battery Level Indicator: 10Multi-coloredLEDs,eachone
representingroughly10%batterycapacity.Note:ThecoloroftheLEDs
does not represent anything other battery capacity, and the colors do not
change. The dierent colors are only intended to provide contrast.
(J) Carrying Handle & Shoulder Strap
(K) LCD Display: Turns on with power button, or when a charge source
is connected.
(L) Charge Indicator Light: Illuminates any time a charge source is
connected.

10
KODIAK SPECIFICATIONS
GENERAL SPECIFICATIONS
• Weight:20lbs(9kg)
• Dimensions:7”tall,14”wide,8”deep
(17.78 x 35.56 x 20.32 cm)
• OperatingTemperatures(Ambient)
- Charging Temperatures: 32°F - 104°F (0°C - 40°C)
- Discharging Temperatures: 20°F - 115°F (-6°C - 46°C)
• ChargeControllerType:PWM
• Inverter:PureSineWave-1500WattsMaximumOutput,
3000 Watt Starting Surge
• Warranty:12Months
BATTERY SPECIFICATIONS
• Chemistry:LithiumNMC
• Capacity:1,100Wh(12.6V,90Ah),550Wattsdischarge
continuous for 2 hours
• LifeExpectancy:Upto2,000Cyclesto80%Capacity
• ShelfLife:Upto10years-chargeevery6months,storedat
68°F (20°C).
• Management:Over-chargeprotection,over-discharge
protection, short circuit protection, thermal protection,
battery balancing.
11

12
SOLAR ENERGY: GENERAL GUIDELINES
Solar energy IS as simple as pointing panels at the sun.
However,therearemanyvariablesthatCANaectthepanel’s
performance, and as such there are few hard and fast rules
involved.OurpanelsareratedatmaximumoutputinIDEAL
CONDITIONS.Belowareafewofthemostcommonvariables
that aect performance, and some safety tips.
Ideal Time of Day
As a general rule of thumb, the brighter the sun is shining and
the clearer the day, the better solar panels will work. Panels
operate at peak eciency when the sun is most direct – typically
around midday.
Solar panels run o of light, not heat. In fact, solar panels
produce the most during cold, clear days rather than in
extremely hot conditions. Even during windy or rainy
conditions, they are able to function. While cloud cover will
reduce the eciency of the panels, they will still generate
electricity.
Time of Year
The amount of daylight changes with the seasons. The summer
months, from June to August, oer the most day light hours.
Becauseofthis,overallsolarproductionisgenerallyhigher
during those months.
While the winter months have fewer daylight hours, it is
important to note that cold temperatures do not negatively
aect the panel’s performance. Again, they run on light, not
heat.
Panel Angle
As a general rule of thumb, pointing your panel directly at the
sun will yield the best results. The angle will vary from month to
month and season to season. A panel angle of 30-60 degrees
from at is generally considered the optimal angle, but as long
as you position your panels facing the sun, you will see results.
Tracking the sun throughout the day maximizes these results.

13
Unobstructed Sunlight
Solar panels function through the interaction of many individual
cells. Keeping this in mind, solar results can be greatly aected
with even the slightest obstruction to a single cell of the panel.
When selecting a location for panel placement, keep this in
mind.Makesurethepanelisfreeofanydebris,oranyshadows
created by things like tree branches, overhead structures, or any
other objects in the environment.
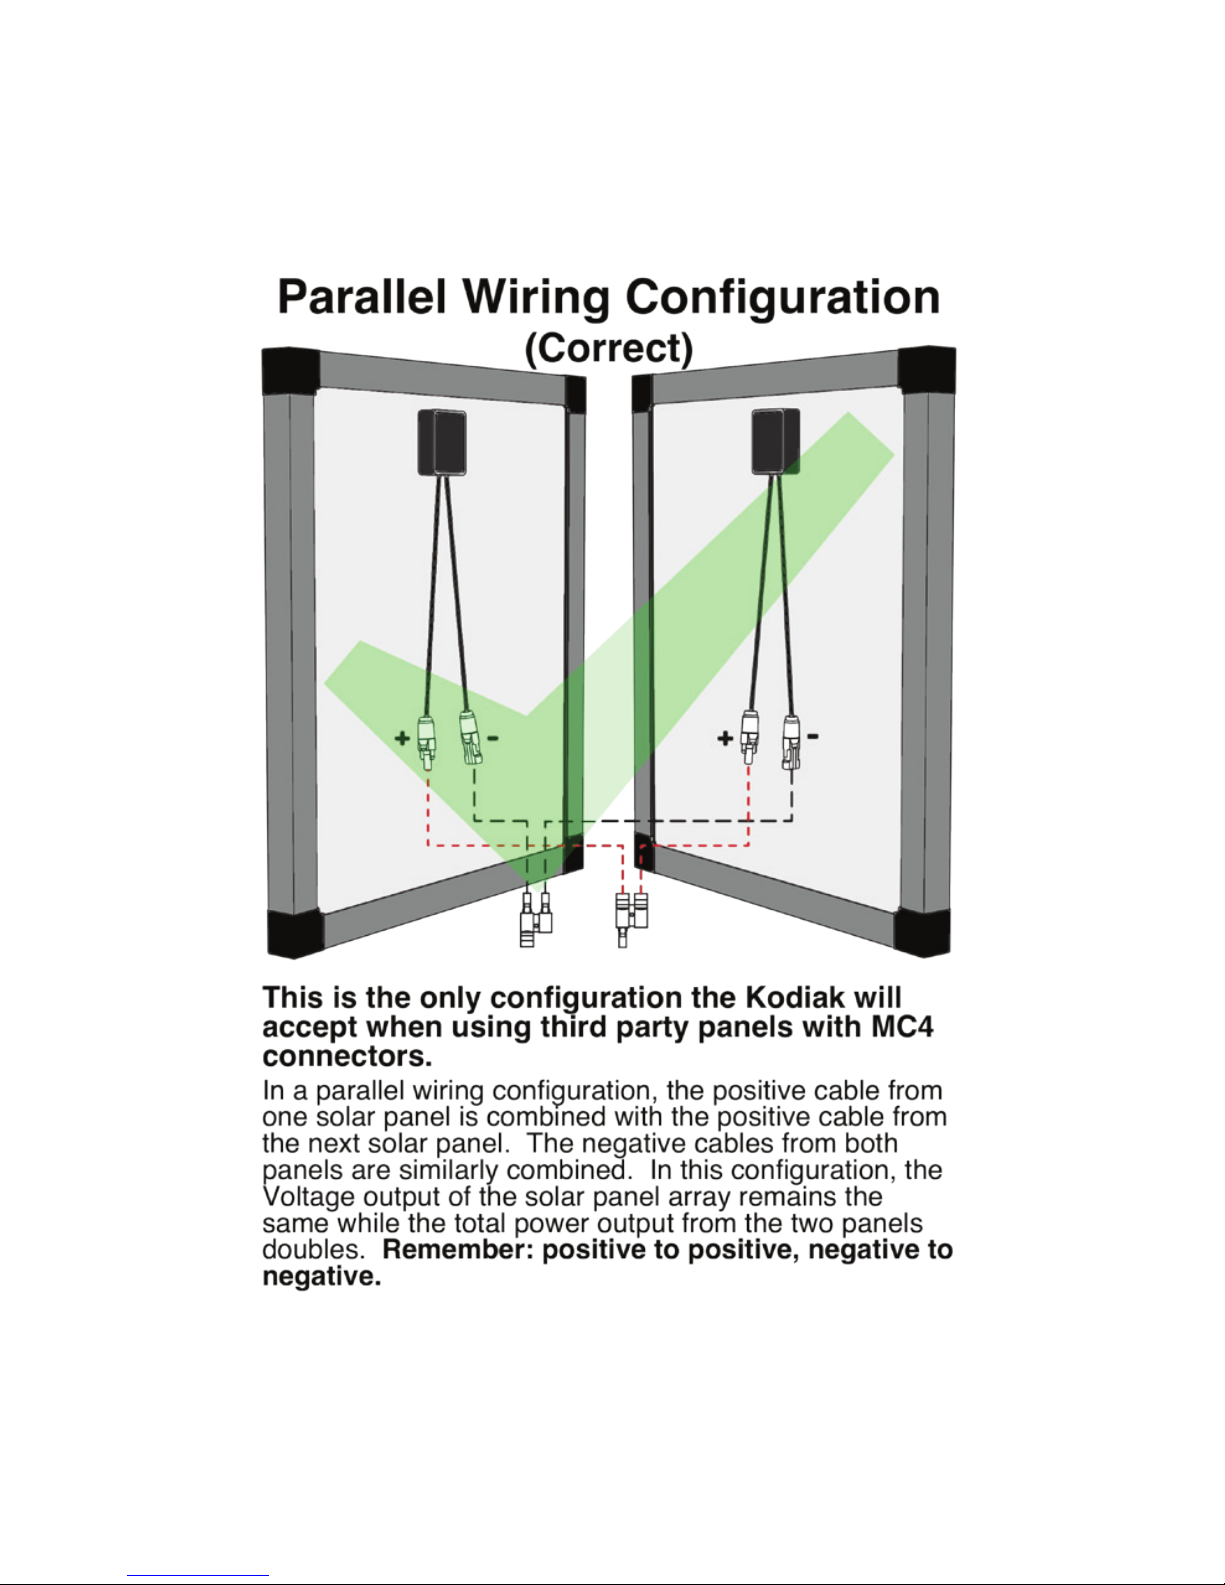
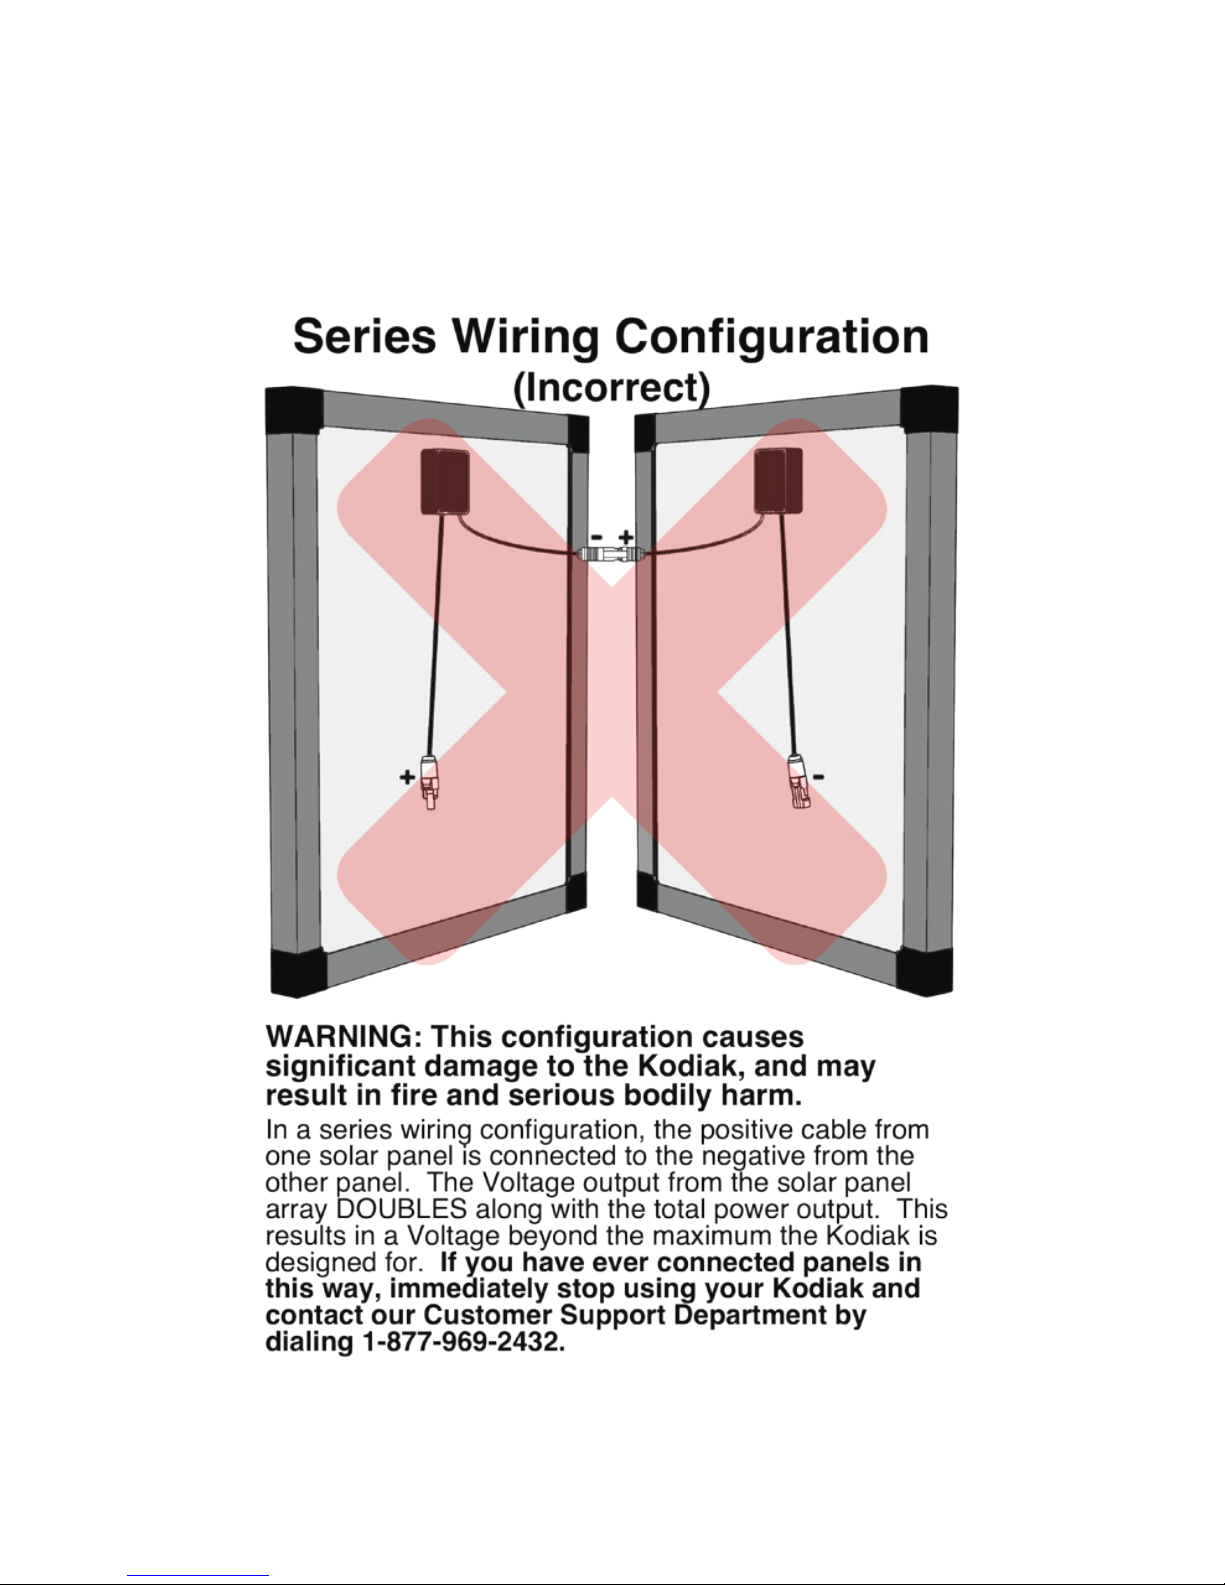
Safety Tips
The Kodiak is designed for use with all Inergy branded solar
panels. These solar panels will provide the best experience
possible. We do oer an adapter for third party solar panels, but
it is important to familiarize yourself with the wiring associated
with them and how to make them work with the Kodiak. As a
hard rule - all solar panels must be connected to the Kodiak (and
toeachother)inaPARALLELwiringconguration.Themost
commonsolarpanelconnectoronthemarkettodayistheMC4
connector.AlthoughthisconnectorcanbewiredinaPARALLEL
conguration (given the right components), it is easily wired in
aSERIEScongurationthatwillcausepermanentdamagetothe
Kodiak, as well as a risk of bodily harm or a re. Pages 14 & 15 in
this manual illustrate the correct method for using this type of
connector.
14
INSTRUCTIONS FOR CONNECTING
THIRD PARTY SOLAR PANELS WITH
INERGY MC4 ADAPTER
15
INSTRUCTIONS FOR CONNECTING
THIRD PARTY SOLAR PANELS WITH
INERGY MC4 ADAPTER

16
EXTERNAL BATTERY GUIDELINES
The Kodiak was designed with end user customization in mind,
in an eort to expand the number of applications and versatility
of the system. External batteries are one of the main ways we
havedonethis.Belowaresomeguidelinesforexpandingthe
power of the Kodiak through the use of additional batteries, as
well as some very important safety tips.
Number of Batteries
“HowmanybatteriescanIconnecttotheKodiak?”Theansweris
simple, with a small qualier: There is no limit to the number of
batteries you can connect to the Kodiak; however, the maximum
charge input of the Kodiak remains steady at 600 Watts. The
more batteries you connect, the longer they all take to charge.
Simply stated, you could connect 10 additional external
batteries, but the extremely long charging time associated with
that many batteries would make it impractical for most users.
Types of Batteries
“WhattypesofbatteriescanIconnecttotheKodiak?”Any
12VoltdeepcycleLeadAcid,AGM,orGelCellbatterycanbe
connectedtotheKodiak.DONOTconnectexternallithium
batteries not supplied by Inergy. Irreparable damage or re
could result and voids the warranty.
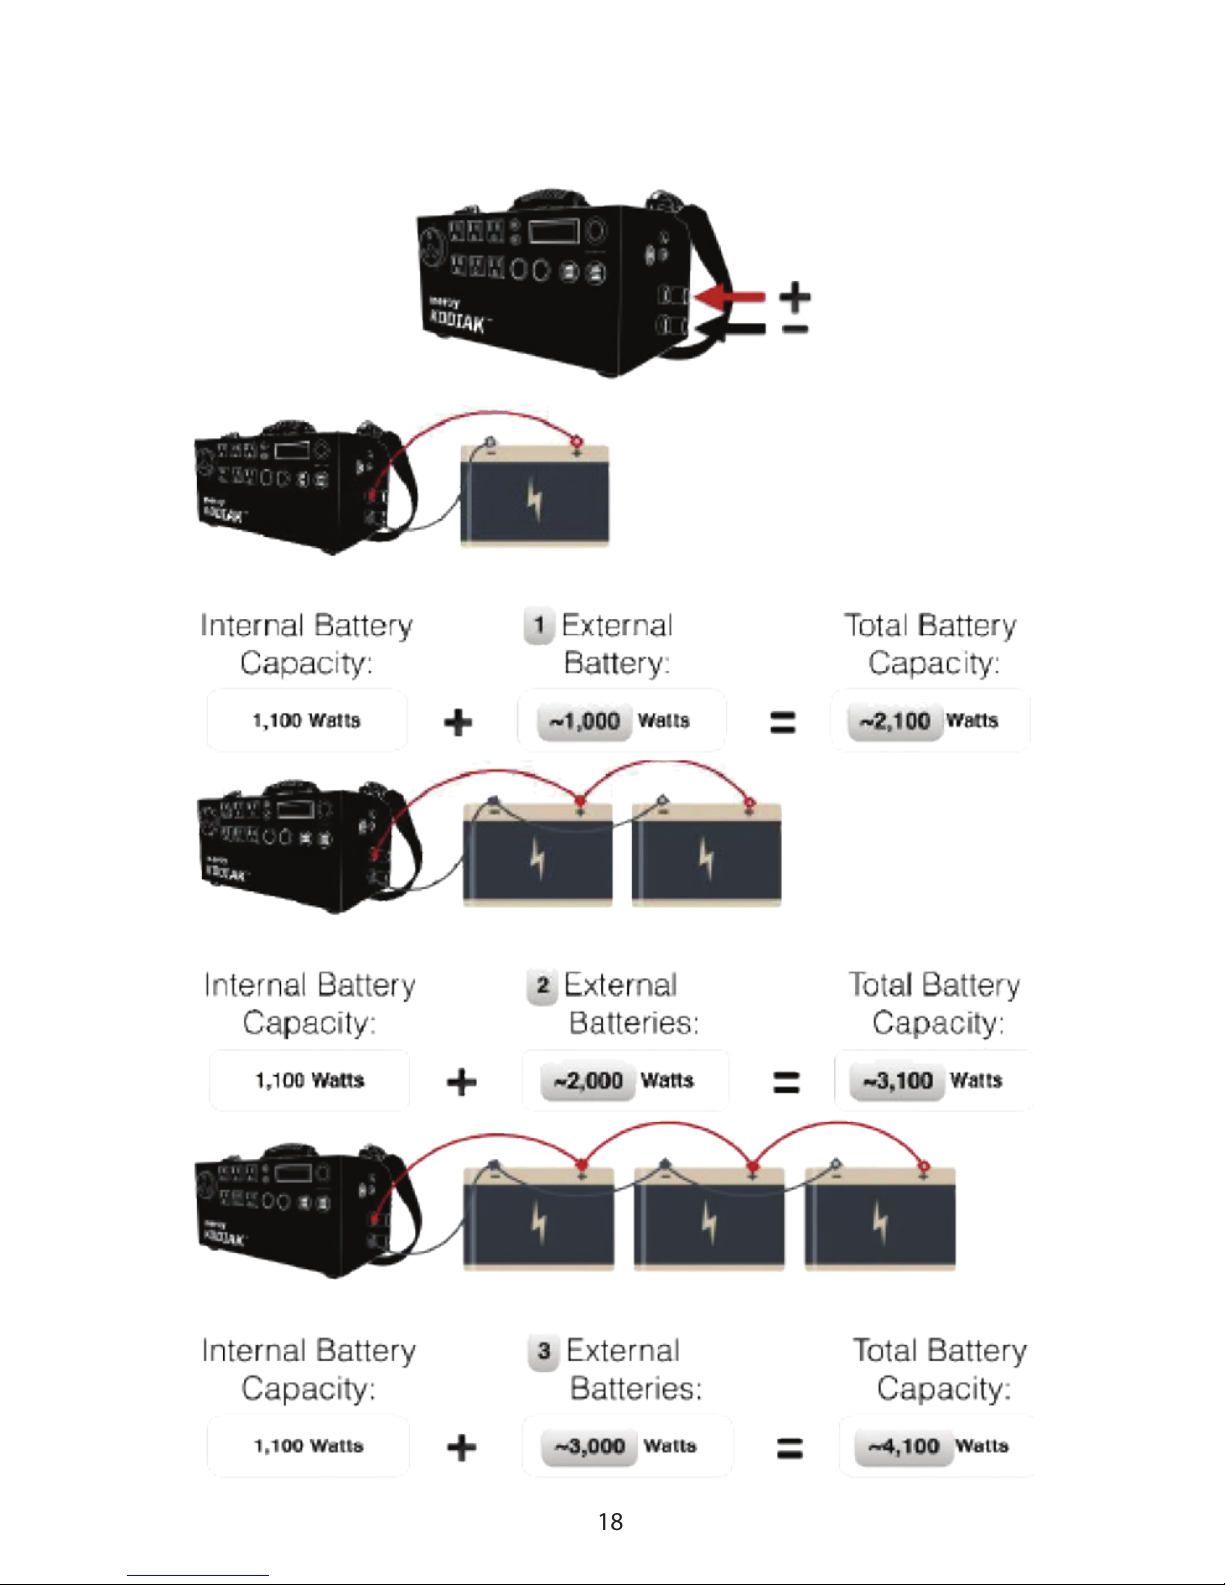
Connecting Batteries
ExternalbatteriesshouldbeconnectedinaPARALLELwiring
conguration to expand the battery capacity of the Kodiak
(see page 18 for more information). This is done by connecting
positivetopositive,andnegativetonegative.Regardlessofthe
number of additional batteries you wish to incorporate, this will
not change.
Batterywires&connectors:Whenconnectingexternalbatteries
to the Kodiak, we recommend using 2/0 Gauge battery cables
(madeofpurecopper,NOTcopperplated)with3/8”ring
terminals for up to a 5 foot long cable. Call our technical support
for questions about longer lengths at 877-969-2432.

***IMPORTANT SAFETY INFORMATION***
• NEVER connect an external battery charger to any external
batteries that are connected to the Kodiak. If connecting
theKodiakto“housebatteries”onanRVorVan,ensurethose
house batteries are disconnected from any charge source
in the vehicle. Similarly, never attempt to charge external
batteries that are still connected to the Kodiak with a solar
charge controller and solar panels. ANY CONNECTED
EXTERNAL BATTERIES MUST BE MANAGED SOLELY BY
THE KODIAK!
•NEVER connect any external battery to the Kodiak that is
charged higher than 12.6 Volts.
• NEVER connect an external battery that is more
than 0.1 Volts dierent than the Kodiak at the time they are
connected. To illustrate, if your Kodiak is charged to 12.3
Volts at the time you wish to connect an external battery,
any external battery must measure between 12.2 - 12.4
Volts before they are connected. A simple Voltage meter
commonly available at local department stores can be used
to measure your external batteries.
• NEVER connect external lithium batteries not supplied
by Inergy.
FAILURE TO FOLLOW THE ABOVE SAFETY TIPS MAY
RESULT IN PERMANENT DAMAGE TO YOUR KODIAK,
RISK OF FIRE, OR BODILY HARM. CALL OUR TECHNICAL
SUPPORT TEAM IF YOU HAVE ANY QUESTIONS AT 877-
969-2432.
17
18
CONNECTING AN EXTERNAL BATTERY

19
FAQ
Q:HowmuchdotheKodiakweigh?
A: The Kodiak weighs 20 pounds total.
Q:WhattypeofACInverterisbuiltintotheKodiak?
A:1,500WattPureSineWave.Maxoutputof3,000Watts.
Q:WhatistheexpectedlifespanoftheKodiakbattery?
A:Upto2,000cyclesor10yearsifthebatteryiswellmaintained.
Q:WhatisthewarrantyfortheKodiak?
A: The warranty is one year limited.
Q:Istheinternallithiumbatteryuserreplaceable?
A: No. Any battery service must be rendered by Inergy.
Q:Howlongwillthebatteryholditscharge?
A:Uptoafullyear,however;werecommendcheckingthebattery
levelevery3monthstoensureitisover10%charged.Storinga
battery that is completely depleted can cause irreparable damage.
Q:CanIusetheKodiakwhileitischarging?
A: Yes. It’s capable of outputting power while charging.
Q:CanIyonanairplanewiththeKodiak?
A: No. The Kodiak needs to be either ground shipped to your
destination, or air shipped via a shipping carrier, not a passenger
airplane.
Q:CantheKodiakpowermyentirehome?
A: No. The Kodiak system is designed to power individual
appliances and devices rather than plugging into the home›s
breaker panel directly. For instance, electric dryers, ovens, stoves,
andwaterheatersallexceedtheKodiak›sability.However,gas
ovens, stoves, dryers, and water heaters can be powered using the
Kodiak by plugging in directly - provided they have a standard 110
VAC wall plug.
Q:MyKodiakwon’tturnonorcharge.
A:It’slikelythatyourKodiakisinSafetyMode.Seepage5formore
information.
Q:CanIconnectlithiumionbatteriestotheKodiak?
A:No.Onlyleadacid,AGM,orGelCell12Voltbatteriesare
supported. See page 16 & 17 for more information.
Other manuals for KODIAK
2
Table of contents
Other inergy Portable Generator manuals

Popular Portable Generator manuals by other brands


Powermate
Powermate PM0103002 Generator user manual

Anritsu
Anritsu Rubidium MG36271A Operation manual

Westerbeke
Westerbeke WMD 12.5 Service manual

MozeGear
MozeGear TIG Q28-BNC operating instructions

GE
GE AF-650 GP Series operating instructions

Briggs & Stratton
Briggs & Stratton PowerBoss 30220 Operator's manual


