Infineon MERUS MA12070P User manual

User Manual Please read the Important Notice and Warnings at the end of this document V 1.6
www.infineon.com/kit-40w-amp-hat-zw page 1 of 24 2021-11-09
UM_1911_PL88_1912_152704
MERUS™ audio amp HAT ZW
User manual - KIT_40W_AMP_HAT_ZW
About this document
Scope and purpose
This document describes the MERUSTM audio amp HAT for Raspberry Pi Zero W equipped with the Infineon
MA12070P proprietary multilevel class D amplifier. Detailed information is provided on the board’s content,
layout and use. A Raspberry Pi Zero W is mandatory for operation.
Intended audience
This document is intended for anyone working with the MERUSTM audio amp HAT, such as makers and audio
engineers.
Attention: Read through this user manual before operating the board.
Attention: Observe proper volume and limiter settings handling procedures. Failure to do so may result
in damage to components on the board.
Table of contents
About this document....................................................................................................................... 1
Table of contents............................................................................................................................ 1
1MERUS™audio amp HAT overview ........................................................................................... 3
1.1 Key features.............................................................................................................................................3
1.2 Application and block diagram...............................................................................................................4
2MERUS™ audio amp HAT description ........................................................................................ 5
2.1 Features and specifications ....................................................................................................................5
2.2Audio performance..................................................................................................................................5
2.3 Hardware description .............................................................................................................................5
2.3.1 Board description and pin functions.................................................................................................5
2.3.2 Schematics .........................................................................................................................................7
2.3.3 Required input power ......................................................................................................................10
2.3.4 I2S digital audio interface configuration .........................................................................................10
2.3.5 GPIO controls ...................................................................................................................................10
2.3.6 Short-circuit protection...................................................................................................................10
3Hardware setup ....................................................................................................................11
4Software setup .....................................................................................................................12
4.1 Raspberry Pi OS (previously called Raspbian) .....................................................................................12
4.1.1 Official Raspberry Pi OS method .....................................................................................................12
4.1.2 MERUSTM custom kernel building (optional for advanced users)...................................................14
4.2 moOde audio player..............................................................................................................................14
4.2.1 Official moOde audio player method..............................................................................................14
4.3 Volumio..................................................................................................................................................16
4.3.1 Official Volumio method..................................................................................................................16

User Manual 2 of 24 V 1.6
2021-11-09
MERUS™ audio amp HAT ZW
User manual - KIT_40W_AMP_HAT_ZW
MERUS™ audio amp HAT overview
4.4 AirPlay (shairport-sync).........................................................................................................................17
4.5 alsamixer and maximum volume/limiter settings...............................................................................18
4.5.1 alsamixer controls............................................................................................................................18
4.5.2 Volume and limiter settings.............................................................................................................20
4.6 Settng the amplifier in parallel bridge-tied load (PBTL) mode ...........................................................21
5References ...........................................................................................................................22
6Revision history ....................................................................................................................23

User Manual 3 of 24 V 1.6
2021-11-09
MERUS™ audio amp HAT ZW
User manual - KIT_40W_AMP_HAT_ZW
MERUS™ audio amp HAT overview
1MERUS™ audio amp HAT overview
The MERUSTM audio amp is a hardware at the top (HAT) audio power amplifier board that brings the Infineon
proprietary multilevel technology to Raspberry Pi users and makers. It is intended for loudspeaker building and
wireless music streaming with minimum size and consumption, state-of-the-art power efficiency and HD audio
quality. The MERUSTM audio amp is equipped with the MA12070P class D multilevel amplifier, which can
provide up to 40 W instantaneous peak power from the official Raspberry Pi supply, and up to 48 kHz/24 bit
music playback. Furthermore, there is no need for extra power supplies, as the MERUSTM audio amp is powered
directly from the same supply as the Raspberry Pi Zero W. It is compatible with the most popular audio
streaming applications for Raspberry Pi, such as Volumio, Max2Play and JustBoom, and it can be also used in
Raspbian as an AirPlay client or Bluetooth audio receiver.
1.1 Key features
The MERUSTM audio amp HAT for Raspberry Pi Zero W has the following features:
•Equipped with MERUSTM MA12070P proprietary multilevel amplifier
•Compatible with both Raspberry Pi Zero and Raspberry Pi Zero W
•Compatible with major streaming applications for Raspberry Pi (Volumio, JustBoom, Max2Play)
•Power input: 5 V/2.5 A (sourced from the same single supply as the Raspberry Pi)
•No need for external or extra power supplies
•Up to 40 W instantaneous peak output power with the Raspberry Pi official 5 V/2.5 A supply
•Up to 48 kHz of sample rate and 24 bits of music playback
•THD + N: 0.077 percent at 7 W/4 Ω/1 kHz
•Full hardware control, customization and error monitoring through Linux alsamixer
User Manual 4 of 24 V 1.6
2021-11-09
MERUS™ audio amp HAT ZW
User manual - KIT_40W_AMP_HAT_ZW
MERUS™ audio amp HAT overview
1.2 Application and block diagram
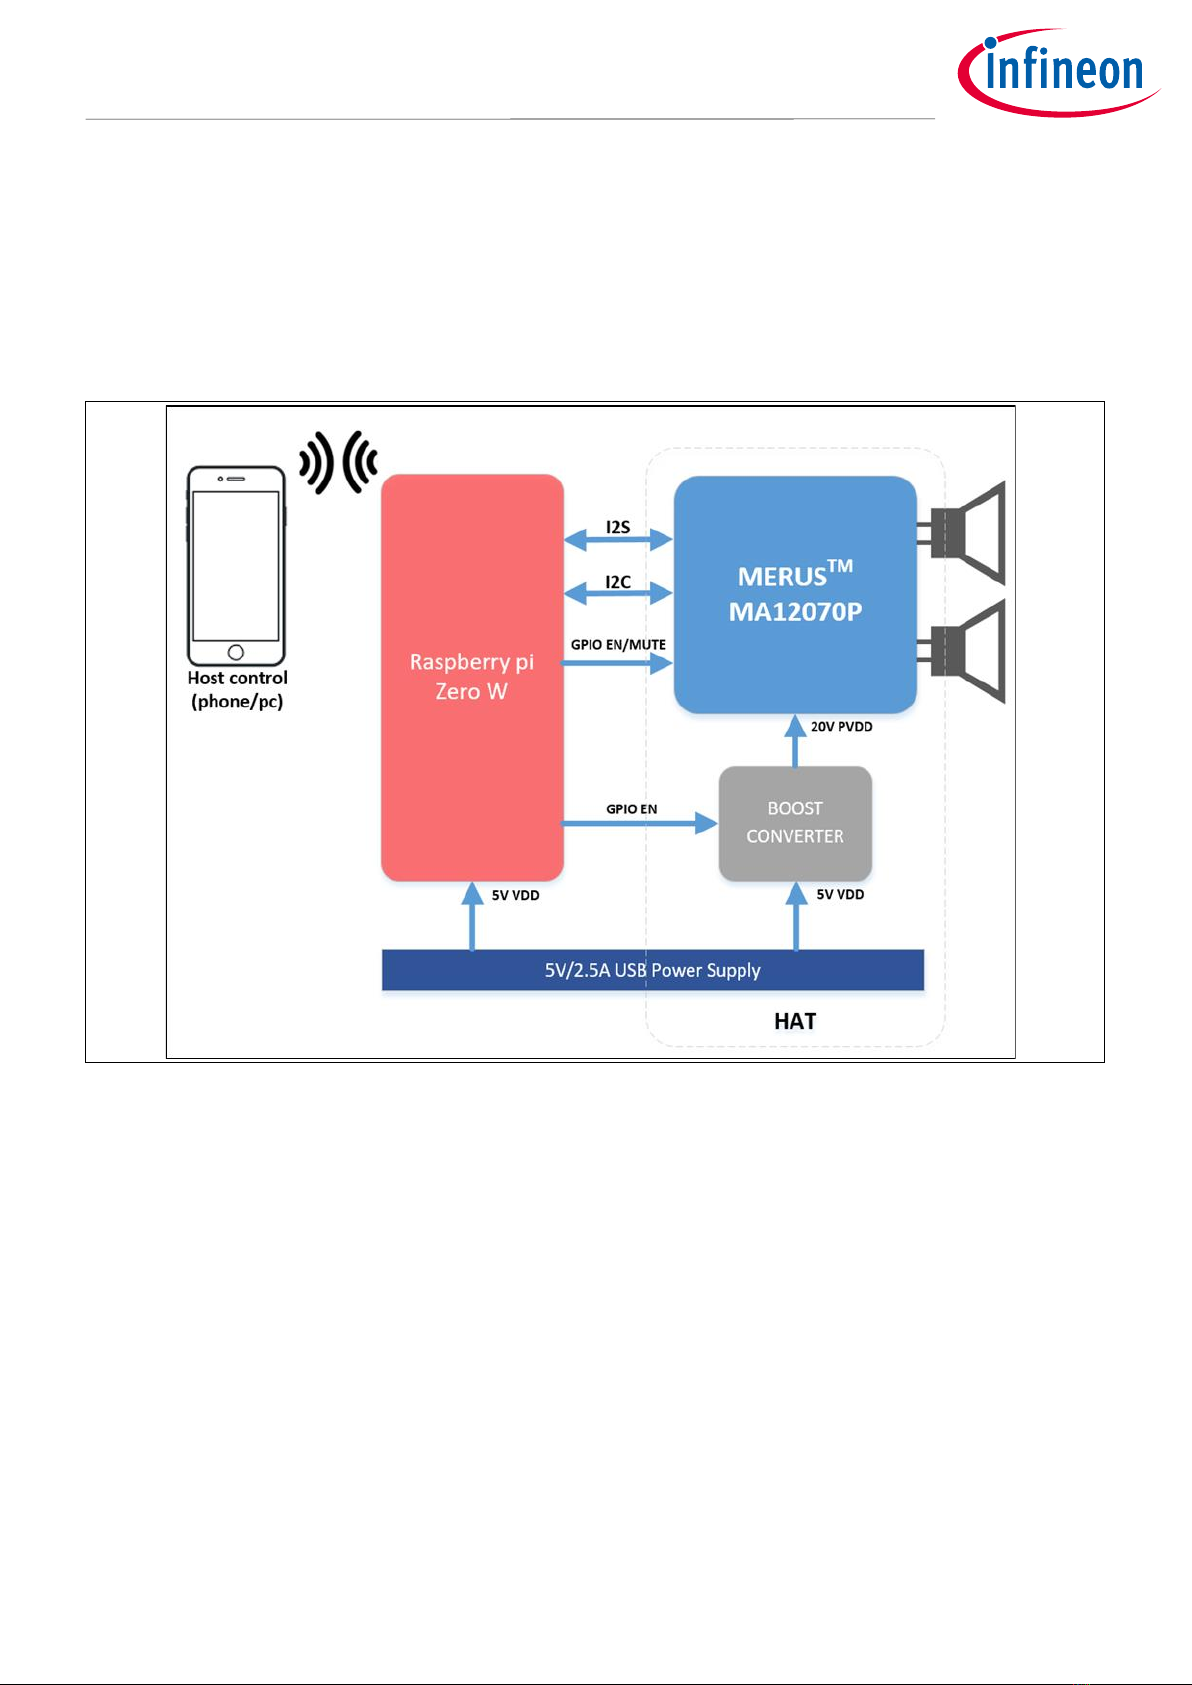
The MERUSTM audio amp HAT is meant to be used and controlled with a Raspberry Pi Zero or Raspberry Pi Zero
W. The application diagram in Figure 1 shows the simplified connection scheme. The HAT has a boost
converter built-in, which supplies 20 V to the MA12070P amplifier. It runs in slave mode so all the control and
communication is handled by the Raspberry Pi, which is implemented in the software drivers. As shown, most
applications will require a host controller such as a phone or computer over a wireless network.
Figure 1 MERUSTM audio amp HAT application diagram

User Manual 5 of 24 V 1.6
2021-11-09
MERUS™ audio amp HAT ZW
User manual - KIT_40W_AMP_HAT_ZW
MERUS™ audio amp HAT description
2MERUS™ audio amp HAT description
2.1 Features and specifications
The MERUSTM audio amp board provides the following features and specifications:
•MERUSTM MA12070P multilevel class D amplifier
•Built-in boost converter from 5 V to 20 V to supply the MA12070P device
•Minimum power supply requirements:
−micro USB power supply: 5 V to 2.5 A micro USB (no need for extra high voltage power supplies)
−Battery/power bank: 5 V to 2.1 A 3000 mAh (may vary according to the protection mechanisms of the
battery)
•I2S digital audio input
•I2C communication for full register map control
•Automatic enable control for booster and amplifier for secure boot-up and shut-down sequences
•Digital limiter for loudspeaker protection
•2 x bridge tied loaded (BTL) channel default configuration
•Optional 1 x parallel bridge tied loaded (PBTL) configuration for high-power true wireless stereo
applications
2.2 Audio performance
•Output power P-channel (max. instantaneous peak –measured with music): 20 W, RL = 4 Ω
•Output power P-channel (max. average –measured with sine waves): 7 W –THD + N = 0.077 percent, RL = 4
Ω, f = 1 kHz
•THD + N: 0.014 percent –1 kHz, POUT = 1 W, RL = 4 Ω
•Idle power consumption (HAT only): 390 mW
•Idle power consumption (HAT + Raspberry Pi): 970 mW
•Overall efficiency (1 W/ch at 4 Ω): 66 percent
2.3 Hardware description
2.3.1 Board description and pin functions
Figure 2 shows the board, pin distribution and functions of the MERUSTM audio amp HAT. It is shown that the
design is centered on the MA12070P multilevel amplifier, which is supplied from both the TPS61178 built-in
boost converter and the Raspberry Pi 5 V USB power supply. The MA12070P counts with a digital audio
processor with master and independent volume controls per channel and with limiters implemented for device
protection. For detailed information on MA12070P refer to the product datasheet.

User Manual 6 of 24 V 1.6
2021-11-09
MERUS™ audio amp HAT ZW
User manual - KIT_40W_AMP_HAT_ZW
MERUS™ audio amp HAT description
Figure 2 MERUSTM audio amp HAT board overview
Table 1 shows the pin function and description of the MERUSTM audio amp HAT.
Table 1 MERUSTM audio amp HAT pin description
Pin
Name
Type
Description
1
VDD
P
5 V power supply for internal digital circuitry and boost converter
2
VDD_3V3
P
3V3 power supply from Raspberry Pi (not used)
3
VDD
P
5 V power supply for internal digital circuitry and boost converter
4
SDA
I/O
I2C bus serial data
5
GND
P
–
6
SCL
I/O
I2C bus serial clock
7
/EN
I
MA12070P enable pin
8
NC
–
–
9
/MU
I
MA12070P mute pin
10
GND
P
–
11
PI_BCLK
I
MA12070P I2S digital audio serial clock
12
BST_EN
I
Boost converter enable signal input
13
GND
P
–
14
NC
–
–
15
/ERROR
O
MA12070P error output pin
16
NC
–
–
17
/CLIP
O
MA12070P error output pin (not used)
18
NC
–
–
19
GND
P
–
20
NC
–
–
21
NC
–
–

User Manual 7 of 24 V 1.6
2021-11-09
MERUS™ audio amp HAT ZW
User manual - KIT_40W_AMP_HAT_ZW
MERUS™ audio amp HAT description
22
NC
–
–
23
MSEL0
I
MA12070P MSEL0 pin
24
NC
–
–
25
NC
–
–
26
GND
P
–
27
NC
–
–
28
NC
–
–
29
GND
P
–
30
NC
–
–
31
NC
–
–
32
NC
–
–
33
GND
P
–
34
NC
–
–
35
NC
–
–
36
PI_LRCK
I
MA12070P I2S digital audio word clock
37
NC
–
–
38
NC
–
–
39
PI_DOUT
I
MA12070P I2S digital audio serial clock
40
GND
P
–
2.3.2 Schematics
Figure 3 and Figure 4 on the following pages show the MERUSTM audio amp HAT schematics.

User Manual 8 of 24 V 1.6
2021-11-09
MERUS™ audio amp HAT ZW
User manual - KIT_40W_AMP_HAT_ZW
MERUS™ audio amp HAT description
Figure 3 MERUSTM audio amp HAT main schematic

User Manual 9 of 24 V 1.6
2021-11-09
MERUS™ audio amp HAT ZW
User manual - KIT_40W_AMP_HAT_ZW
MERUS™ audio amp HAT description
Figure 4 MERUSTM audio amp HAT main schematic

User Manual 10 of 24 V 1.6
2021-11-09
MERUS™ audio amp HAT ZW
User manual - KIT_40W_AMP_HAT_ZW
MERUS™ audio amp HAT description
2.3.3 Required input power
The MERUSTM audio amp HAT requires a 5 V USB power supply with a minimum of 2.5 A DC current output. It is
designed to be used with the official Raspberry Pi power adapter. MA12070P limiter and volume default
settings have been determined for different nominal loudspeaker impedances while used with the Raspberry Pi
power supply. Details of these settings are covered in section 4.3.
2.3.4 I2S digital audio interface configuration
The I2S interface is implemented as a slave three-wire communication in the MERUSTM audio amp board. As
shown in the schematics, the serial clock line PI_BCLK is also wired to the MA12070P master clock. This
method is used as the Raspberry Pi Zero doesn’t count with a master clock output for this purpose. Supported
sample rates range from 44.1 kHz to 48 kHz and the word length is fixed to 32 bits per channel. The major
applications for wireless audio streaming with the Raspberry Pi are able to decode and/or convert several
audio formats including MP3, AAC, WAV and FLAC to 32 bits, and therefore this should be set in the required
host application, e.g., MPlayer running on Raspbian.
2.3.5 GPIO controls
The MERUSTM audio amp board makes use of some of the available GPIOs from the Raspberry Pi for safe boot-
up and shut-down sequences. These are automatically handled by the software drivers. During boot-up, at first
the boost converter and MA12070P are disabled. Next, the boost converter will be enabled until the 20 V
bypass capacitors are fully loaded. Finally, the MA12070P will be enabled. With regard to the mute control pin,
the amplifier will be always muted until PCM streaming is present. This will avoid pop-noises during non-
playback time and also during boot-up and shut-down sequences.
2.3.6 Short-circuit protection
The MA12070P amplifier has built-in protection mechanisms such as undervoltage lockout (UVLO),
overtemperature warning/error, short-circuit/over-load protection, power stage pin-to-pin short-circuit, and
DC protection. Additionally, the MERUSTM audio amp board counts with external protection diodes D1 to D4 at
the output-in Figure 4 to avoid inrush currents under any circumstances.

User Manual 11 of 24 V 1.6
2021-11-09
MERUS™ audio amp HAT ZW
User manual - KIT_40W_AMP_HAT_ZW
Hardware setup
3Hardware setup
The MERUSTM audio amp HAT is is designed to be mounted directly on top of a Raspberry Pi Zero, just like other
HATs. A female header is used on the board for this purpose. In order to safely separate the HAT from the
Raspberry Pi board, 4 mm 2.5 M hex spacers are recommended. Normally 2.5 M screws will be used to attach
both boards from bottom (Raspberry Pi) to top (HAT). The length of the screws depends on the attachment
below the Raspberry Pi. For this purpose, a minimum space of 4 mm between the Raspberry Pi and the surface
below is suggested to provide good air flow without overheating of the Raspberry Pi Zero. Passive loudspeakers
should be directly connected to the terminal blocks of each channel. With regard to cable length, the MERUSTM
audio amp HAT supports up to 60 cm length where radiated emission tests are necessary. However, in most of
its applications this condition won’t be needed and cables up to 5 m can be used.
Figure 5 and Figure 6 show an assembly example with this hardware setup.
Figure 5 Assembly procedure of the Raspberry Pi + HAT using 2.5 M hex spacers between boards
Figure 6 Completed assembly of the Raspberry Pi + HAT using 2.5 M hex spacers between boards

User Manual 12 of 24 V 1.6
2021-11-09
MERUS™ audio amp HAT ZW
User manual - KIT_40W_AMP_HAT_ZW
Software setup
4Software setup
This section describes how to install and setup the MERUSTM audio amp drivers and necessary software
packages with different Linux distributions and applications. Each distribution may have more than one
possible method. First, basic installation processes are covered for the main distributions, and finally alsamixer
controls and volume settings for different loudspeaker loads are covered. It is strongly recommended to read
the last section before using the MERUSTM audio amp HAT.
4.1 Raspberry Pi OS (previously called Raspbian)
4.1.1 Official Raspberry Pi OS method
In order to install Raspberry Pi OS on a Raspberry pi with the MERUSTM Raspberry Pi drivers, the following
procedure should be applied on a Windows, macOS or Linux computer:
1. Download the Raspbian image file from this link.
2. Download balenaEtcher (or any other SD card image burner) from this link and open it.
3. Insert your SD card into the host machine and burn the Raspberry Pi OS image file to the card.
4. Before unmounting the SD card:
oOpen the file called “config.txt” located at the card’s boot partition.
oReplace the line
dtparam=audio=on
with
dtparam=audio=off
–this will turn off the built-in sound card of the Raspberry Pi.
oNext, add the following line below the previous modification in order to load the MERUSTM amp
driver during boot-up, and save the file.
dtoverlay=merus-amp
oConfiguring the wireless network and SSH:
▪Linux:
In order to stream audio via a wireless network it is necessary to configure the file called “wpa_supplicant.conf”
located in the rootfs partition in the etc/wpa_supplicant directory. Open the file with a text editor and add the
following content after the last line:
GROUP=netdev
network={
ssid=”YOUR_NETWORK_NAME”

User Manual 13 of 24 V 1.6
2021-11-09
MERUS™ audio amp HAT ZW
User manual - KIT_40W_AMP_HAT_ZW
Software setup
psk=”YOUR_PASSWORD”
}
▪Windows:
In order to stream audio via a wireless network it is necessary to create a file called “wpa_supplicant.conf”
located in the boot partition. You can do this by creating a file with a text editor with the following content
(make sure the file doesn’t have any other extensions than .conf):
ctrl_interface=DIR=/var/run/wpa_supplicant GROUP=netdev
update_config=1
network={
ssid=”YOUR_NETWORK_NAME”
psk=”YOUR_PASSWORD”
}
oTo enable SSH access through your host computer create a file called “ssh” inside the boot
partition. The file doesn’t need any content and must not have any other extension, such as .txt.
5. Once this file has been saved, the SD card can be unmounted and then inserted into the Raspberry Pi.
6. Insert the SD card into the Raspberry Pi with the piHAT attached, and turn it on.
7. Next, in order to log in remotely to the Raspberry Pi from a Linux or macOS machine, type the following
(usually the password is “raspberry” if you are logging in for the first time):
ssh pi@raspberrypi.local
8. If you are on a Windows machine use “pi” as the user and the Raspberry Pi IP address in the host
address/name of any terminal window application such as Putty (usually the password is “raspberrypi”
if you are logging in for the first time).
9. Finally, once you have accessed the Raspberry Pi through SSH, type:
aplay -l
to check that the driver’s sound card and codec were loaded. If the process has been successful the
terminal should show the following output prompt:

User Manual 14 of 24 V 1.6
2021-11-09
MERUS™ audio amp HAT ZW
User manual - KIT_40W_AMP_HAT_ZW
Software setup
Figure 7 Sound card and codec verification with aplay -l command output
It shows that the default soundcard is “snd_rpi_merus_amp” with “ma120x0-amp-0” codec referring to the
Infineon MA120x0P class D amplifier series.
12. Always make sure you have the latest update on your Raspberry Pi by typing the command line:
sudo apt update
and then:
sudo apt full-upgrade
When the process is finished, reboot the system.
4.1.2 MERUSTM custom kernel building (optional for advanced users)
A custom kernel building of the Raspbian kernel source is possible with the the MERUSTM audio amp HAT drivers.
This method allows the user to make modifications not only to the drivers but also to the kernel source while
maintaining compatibility with the last kernel version. This procedure is covered in [2].
4.2 moOde audio player
4.2.1 Official moOde audio player method
In order to install moOde audio player with the MERUSTM Raspberry Pi drivers for, the following procedure
should be applied on a Windows, macOS or Linux computer:
1. Download the moOde audio image file from this link.
2. Download balenaEtcher (or any other SD card image burner) from this link and open it.
3. Insert your SD card in the host machine and flash the downloaded moOde audio image file to the card.
User Manual 15 of 24 V 1.6
2021-11-09
MERUS™ audio amp HAT ZW
User manual - KIT_40W_AMP_HAT_ZW
Software setup
4. After the flash process insert the SD card into the Raspberry Pi and turn it on.
5. To configure the wireless network settings of moOde audio, connect your host machine or mobile
phone to the “Moode” network and then type http://moode.local into your browser (password is
moodeaudio).
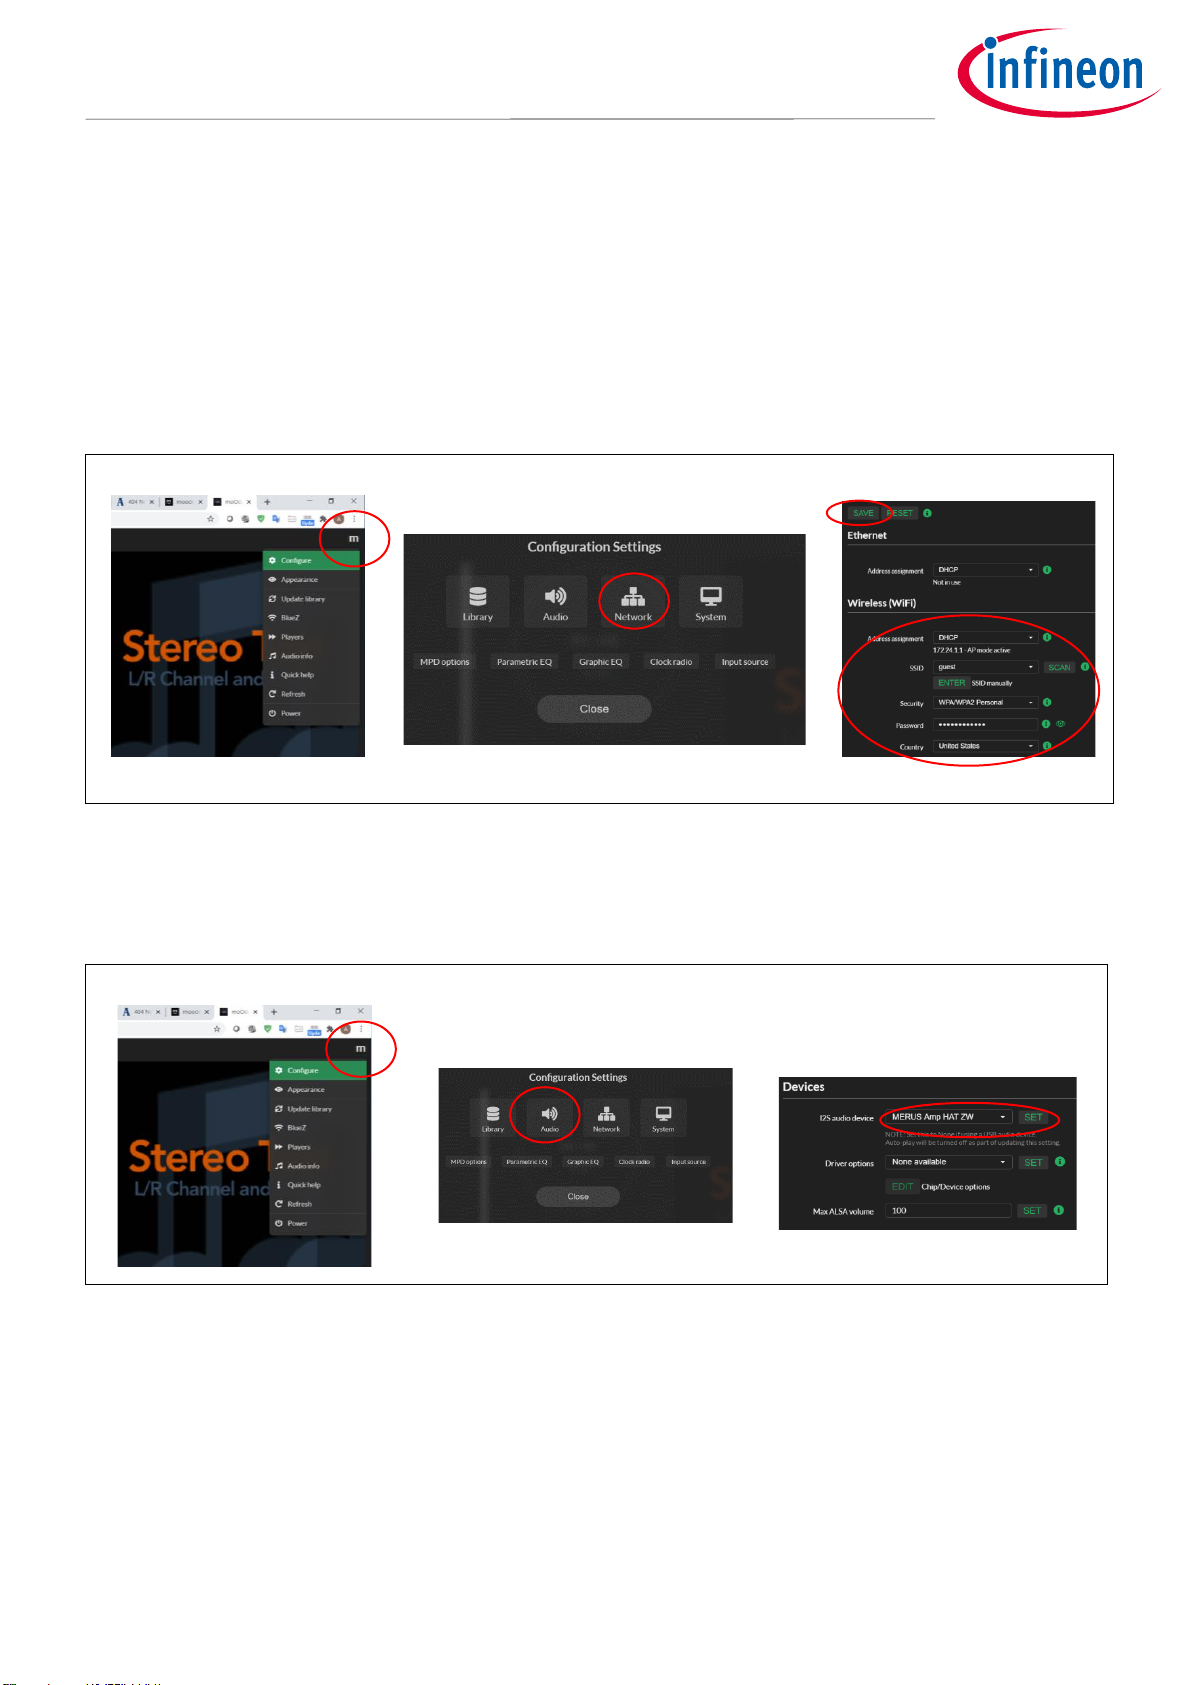
6. Go to the configure section(under the “m” menu) at the top right corner and select “Network”. Press
scan and select your netwowrk name in the SSID slot. Finally, insert your country and password. Press
save but don’t reboot the system yet.
Figure 8 moOde audio player GUI. Network configuration
7. Next, go to the configure section again and select audio. In “I2S audio device” sleect MERUSTM audio
amp piHAT as the system’s sound card and press “SET”.
Figure 9 moOde audio player GUI. I2S configuration
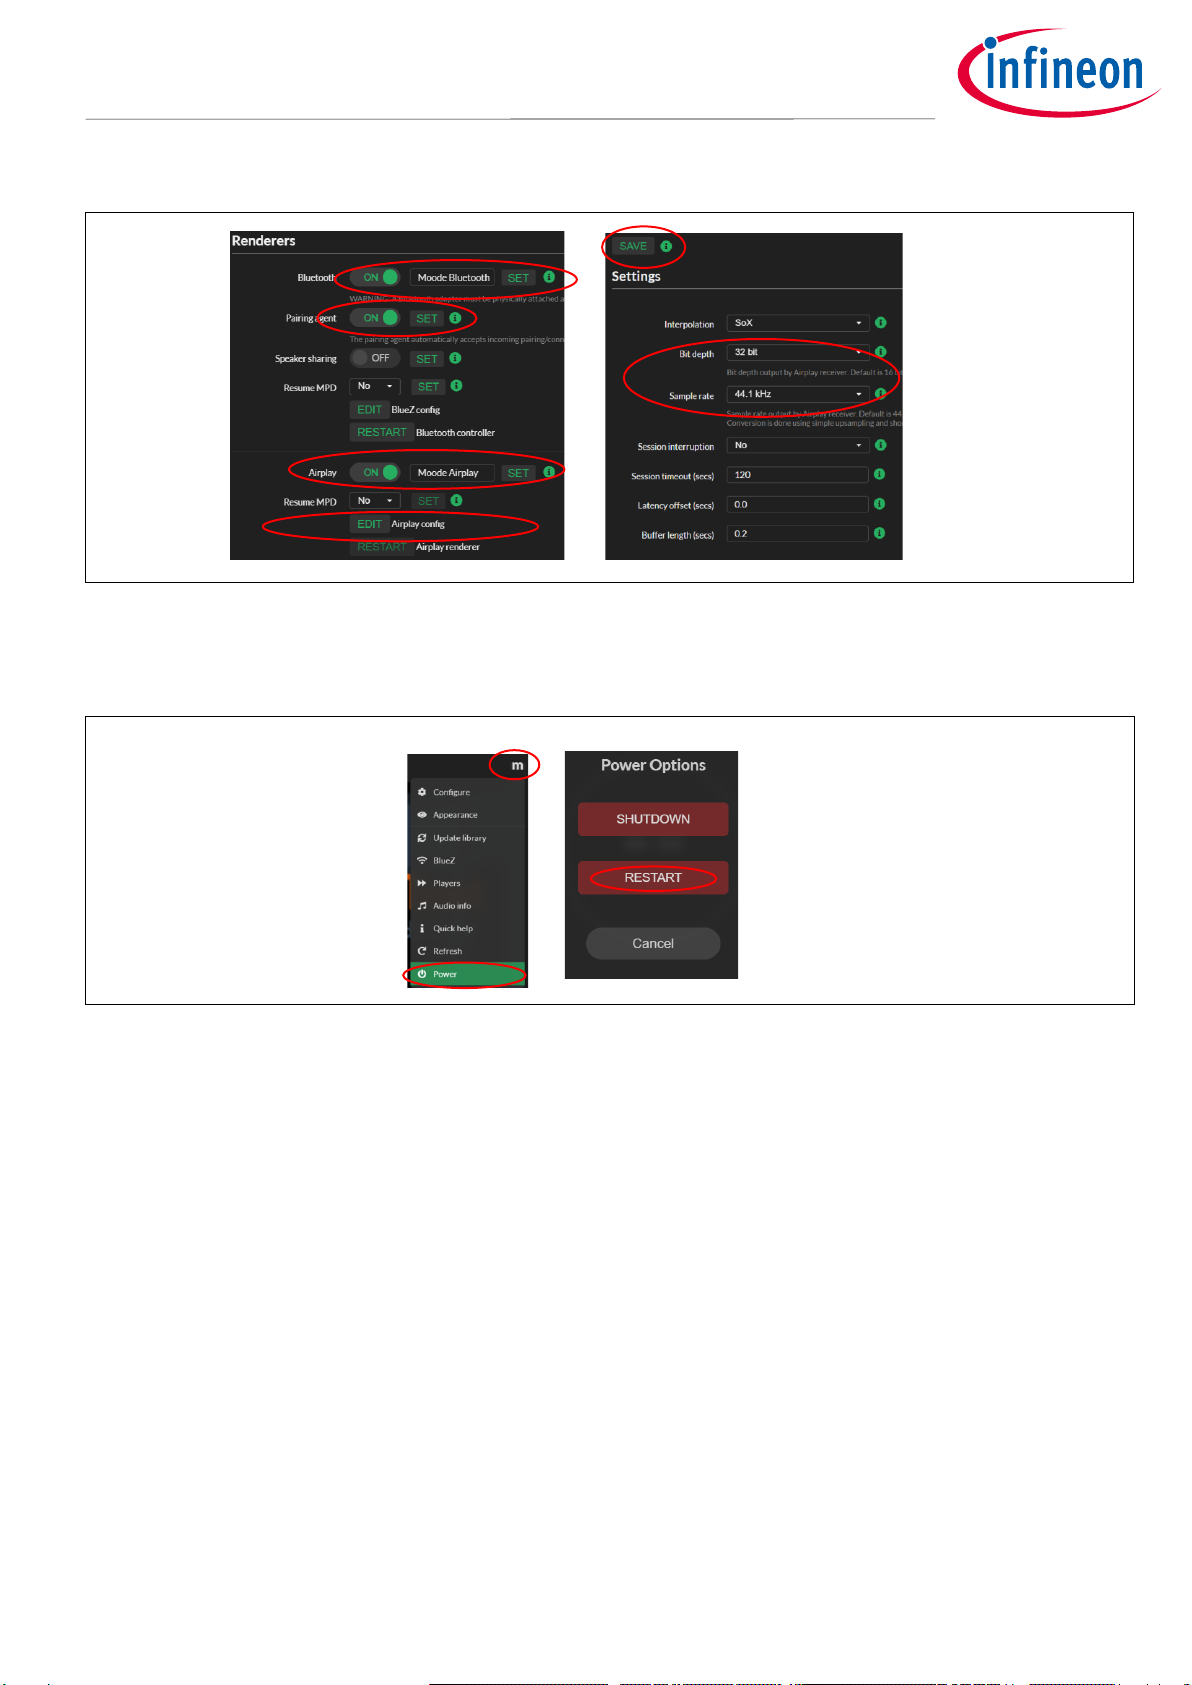
8. Scroll down and under “Renderers” turn the Bluetooth and pairing agent options “on” and press “SET”
in both. Then turn on the “Airplay” option and also press “SET”. Finally, press “EDIT” under Airplay and
configure it for 44.1 KHz and 32-bit playback. Don’t forget to press save!
User Manual 16 of 24 V 1.6
2021-11-09
MERUS™ audio amp HAT ZW
User manual - KIT_40W_AMP_HAT_ZW
Software setup
Figure 10 moOde audio player GUI. Bluetooth and Airplay configuration.
9. Select “Shutdown” from the menu and then turn on the Raspberry Pi again so the system is rebooted.
Figure 11 moOde audio player GUI. Power menu, restart.
10. Proceed to section 4.4 to configure the MA12070P amplifier settings
4.3 Volumio
4.3.1 Official Volumio method
The MERUSTM audio amp HAT software drivers already have support on the official Volumio distribution. To
install the MERUSTM Raspberry Pi drivers for Volumio the following procedure should be applied on a Windows,
macOS or Linux computer:
11. Download the Volumio image file from this link.
12. Download balenaEtcher (or any other SD card image burner) from this link and open it.
13. Insert your SD card in the host machine and flash the downloaded Volumio image file to the card.
14. After the burning process, insert the SD card into the Raspberry Pi and turn it on.
v

User Manual 17 of 24 V 1.6
2021-11-09
MERUS™ audio amp HAT ZW
User manual - KIT_40W_AMP_HAT_ZW
Software setup
15. To configure the wireless network settings of Volumio, connect your host machine or mobile phone to
the “Volumio” network and then type http://volumio.local into your browser.
16. Go to the settings section and follow the instructions in the Volumio GUI to finish your wireless
configuration. The next time the Raspberry Pi is booted it will connect to the configured network
automatically.
17. Finally, go to the settings section and select “Playback options” to configure the MERUSTM audio amp
HAT as the system’s sound card. Turn the I2S option on and choose MERUSTM audio amp as the output
device and DAC model.
18. Select “Shutdown” from the menu and then turn on the Raspberry Pi again so the system is rebooted.
19. For more information visit the Volumio documentation site.
20. Turn on the Raspberry Pi (pre-configuration should have been applied according to the steps above).
21. Type “<your Raspberry Pi IP address>/DEV” or “volumio.local/DEV” on your host machine’s web
browser and press “ENABLE” under the SSH section. There is no output warning or message after
enabling the SSH option, so once the button has been pressed do not expect any messages. For details
visit https://volumio.github.io/docs/User_Manual/SSH.html.
22. Next, in order to log in remotely to the Raspberry Pi from a Linux or macOS machine, type the following
(including your IP address) in the terminal window:
ssh volumio@<ipadress>
23. If you are on a Windows machine use “volumio” as the user and the Raspberry Pi IP address in the host
address/name of any terminal window application such as Putty. The password is “volumio”.
24. Finally, once you have accessed the Raspberry Pi through SSH, type:
aplay -lL
to check the driver’s sound card and codec were loaded. If the process was successful the terminal should show
the same output prompt as in Figure 4.
It shows that the default sound card is “snd_rpi_merus_amp” with “ma120x0-amp-0” codec referring to the
Infineon MA120x0P class D amplifier series.
4.4 AirPlay (shairport-sync)
Wireless audio streaming in Raspbian is also possible with shairport-sync, which brings AirPlay support to the
Raspberry Pi. In order to install shairport-sync type the following command in the Raspberry Pi terminal
window:
sudo apt-get install shairport-sync
Finally, open any AirPlay-compatible streaming application and find your Raspberry Pi host name as an AirPlay
device.

User Manual 18 of 24 V 1.6
2021-11-09
MERUS™ audio amp HAT ZW
User manual - KIT_40W_AMP_HAT_ZW
Software setup
4.5 alsamixer and maximum volume/limiter settings
4.5.1 alsamixer controls
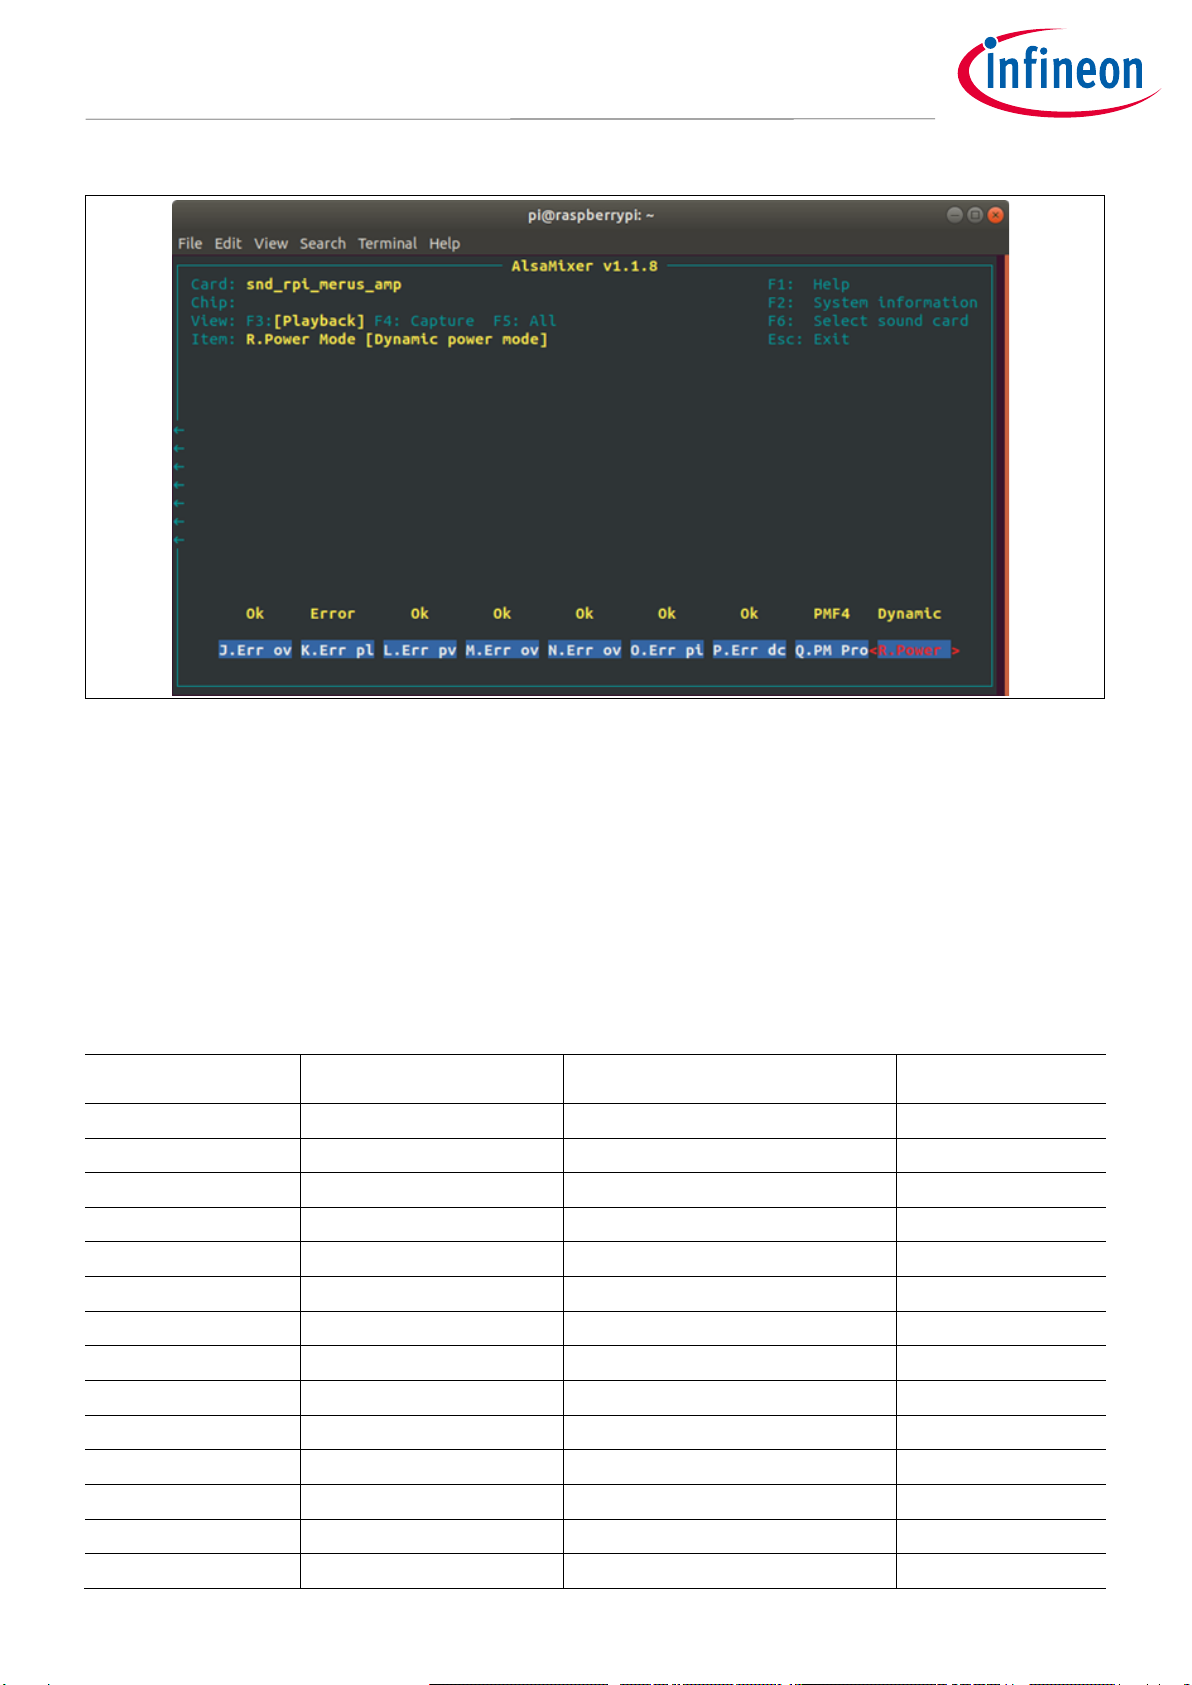
The MERUSTM audio amp sound card driver comes with its own set of controls implemented in the alsamixer,
which provide direct access to the MA12070P multilevel amplifier registers and digital audio processor. It is
strongly recommended to read section 4.3.2 in order to not exceed the maximum power ratings.
By typing the following command (for any Linux distribution distribution) in the Raspberry Pi terminal:
alsamixer
the following mixer will be shown:
Figure 12 MERUSTM audio amp sound card driver mixer (first page)
By scrolling to the right, the last controls will be shown as the following picture:
User Manual 19 of 24 V 1.6
2021-11-09
MERUS™ audio amp HAT ZW
User manual - KIT_40W_AMP_HAT_ZW
Software setup
Figure 13 MERUSTM audio amp sound card driver mixer (second page)
It should be noted that all the mixer controls are ordered from left to right and from “A” to “R”. It is
recommended to use the item description located at the top-left corner to have a more detailed description of
each control and its current status. Increasing master volume and limiter thresholds controls from their default
values should be done carefully. Exceeding the recommended settings may damage the devices permanently.
For detailed information about volume and limiter settings please refer to section 4.3.2.
Table 2 lists the available alsamixer controls of the MA12070P in the MERUSTM audio HAT. The register and
access type is also specified.
Table 2 alsamixer controls and their registers
Item/Control
alsamixer name
MA12070P register
Access type
A
Mstr Volume
0x40
Read/Write
B
L Vol
0x42
Read/Write
C
R Vol
0x43
Read/Write
D
Lim thresh Volume
0x47 and 0x48
Read/Write
E
N/A
N/A
N/A
F
Limiter Enable
0x36
Read/Write
G
Limiter Attck
0x35
Read/Write
H
Limiter Rls
0x35
Read/Write
I
Err flycap
0x6D
Read only
J
Err overcurr
0x6D
Read only
K
Err pllerr
0x6D
Read only
L
Err pvddunder
0x6D
Read only
M
Err overtempw
0x6D
Read only
N
Err overtempe
0x6D
Read only

User Manual 20 of 24 V 1.6
2021-11-09
MERUS™ audio amp HAT ZW
User manual - KIT_40W_AMP_HAT_ZW
Software setup
O
Err pinlowimp
0x6D
Read only
P
Err dcprot
0x6D
Read only
Q
PM Prof
0x1D
Read/Write
R
Power Mode
0x00
Read/Write
Controls I to P show the error status of the MA12070P. If there are no errors an “OK” string should appear in
each control. It should be noted that “Err pllerr” will show an error when the Raspberry Pi is booted. After any
audio signal has been played the control should show no errors.
4.5.2 Volume and limiter settings
In order to not reach maximum output current limits of the booster and its inductor it is necessary to set the
limiter values properly. In relation to this point, a protection mechanism has been implemented in the HAT,
which will mute and disable the MA12070P amplifier when the maximum output current is reached. In order to
set the correct limiter settings for a specific loudspeaker impedance, the following procedure should be
applied:
1. Enter the alsamixer in Raspbian or Volumio.
2. Turn the limiter control “Lim thresh Volume” down to -40 dB.
3. Set the volume control “Mstr Volume” to 0 dB.
4. Turn up the volume of your audio source (phone, computer, etc.) to maximum.
5. Start playing music.
6. Start carefully increasing the limiter control in 1 dB steps while looking at the current limiter level. Here
there are two possible results:
a. When the maximumoutput current has been reached, the device will mute and it will be disabled.
b. The Raspberry Pi has been rebooted automatically because of the voltage drop of the power
supply being used.
7. Take note of the last limiter threshold value that was reached.
8. Reboot the Raspberry Pi and set the limiter value to 1 or 2 dB less than the last value reached before the
reboot.
9. If no limiting at all is desired on the audio signal at full scale, set the volume to the same level as the
limiter value found in step 8. However, this will reduce the loudness of the system. If maximum loudness
is desired, maintain the volume at 0 dB.
10. If it is necessary or if the device is muted and disabled again, reboot the Raspberry Pi one more time and
reduce the limiter threshold by 1 dB more.
Table of contents
Other Infineon Amplifier manuals


