Infinite Play TI222.036 User manual

Quick Installation Guide
HD IR Dome Network Camera (Indoor)
TI222.036

INFINITE PLAY
Introduction
The TI222.036 network camera is capable of serving real-time
streaming and makes image quality more smoothly. In addition, this
camera develops H.264 codec to apply for high resolution digital
broadcast. Attributing to the network camera's flexible platform, the
camera can be applied in various installation locations including shops,
stores, banks, parking lots, factories and building surveillance.
This Quick Installation Guide will help you through the steps of setting
up your network camera. For further details, please refer to the User's
Manual stored in the installation CD that comes in the product package.
Package Contents
Check the following items that are included in the package. Contact the
authorized dealer of your locale immediatelyif any item contained is
damaged or missing.
• Network camera x 1
• Installation CD x 1
• Quick Installation Guide x 1
• Screw pack x 1
Camera Features
• Real time video under megapixel resolution
• H.264compression supported
• Built-in IR LEDs, up to 15~20m
• Built-in fixed lens- 3.6mm/ F1.2
• Support 1 set of audio
• Motion detection supported
• Firmware upgradeable
System Requirements
Minimum system requirement:
• CPU: Pentium 4 class, 2.0GHz
• Memory: 512MB RAM
• Hard disk drive: 500MB of available space
• GPU: AGP card, 128MB RAM; resolution @ 800x600 or above
• Operating system: Microsoft Windows XP, Vista, and Win 7
• Browser: Microsoft Internet Explorer 7.0 and above
Note: When you connect multiple cameras to monitor different places
within your surveillance application, it is recommended to use high-
performance computer and networking to approach better effect while
transmitting the image.
2
EN
Introduction
The TI222.036 network camera is capable of serving real-time
streaming and makes image quality more smoothly. In addition, this
camera develops H.264 codec to apply for high resolution digital
broadcast. Attributing to the network camera's flexible platform, the
camera can be applied in various installation locations including shops,
stores, banks, parking lots, factories and building surveillance.
This Quick Installation Guide will help you through the steps of setting
up your network camera. For further details, please refer to the User's
Manual stored in the installation CD that comes in the product package.
Package Contents
Check the following items that are included in the package. Contact the
authorized dealer of your locale immediatelyif any item contained is
damaged or missing.
• Network camera x 1
• Installation CD x 1
• Quick Installation Guide x 1
• Screw pack x 1
Camera Features
• Real time video under megapixel resolution
• H.264compression supported
• Built-in IR LEDs, up to 15~20m
• Built-in fixed lens- 3.6mm/ F1.2
• Support 1 set of audio
• Motion detection supported
• Firmware upgradeable
System Requirements
Minimum system requirement:
• CPU: Pentium 4 class, 2.0GHz
• Memory: 512MB RAM
• Hard disk drive: 500MB of available space
• GPU: AGP card, 128MB RAM; resolution @ 800x600 or above
• Operating system: Microsoft Windows XP, Vista, and Win 7
• Browser: Microsoft Internet Explorer 7.0 and above
Note: When you connect multiple cameras to monitor different places
within your surveillance application, it is recommended to use high-
performance computer and networking to approach better effect while
transmitting the image.
INFINITE PLAY
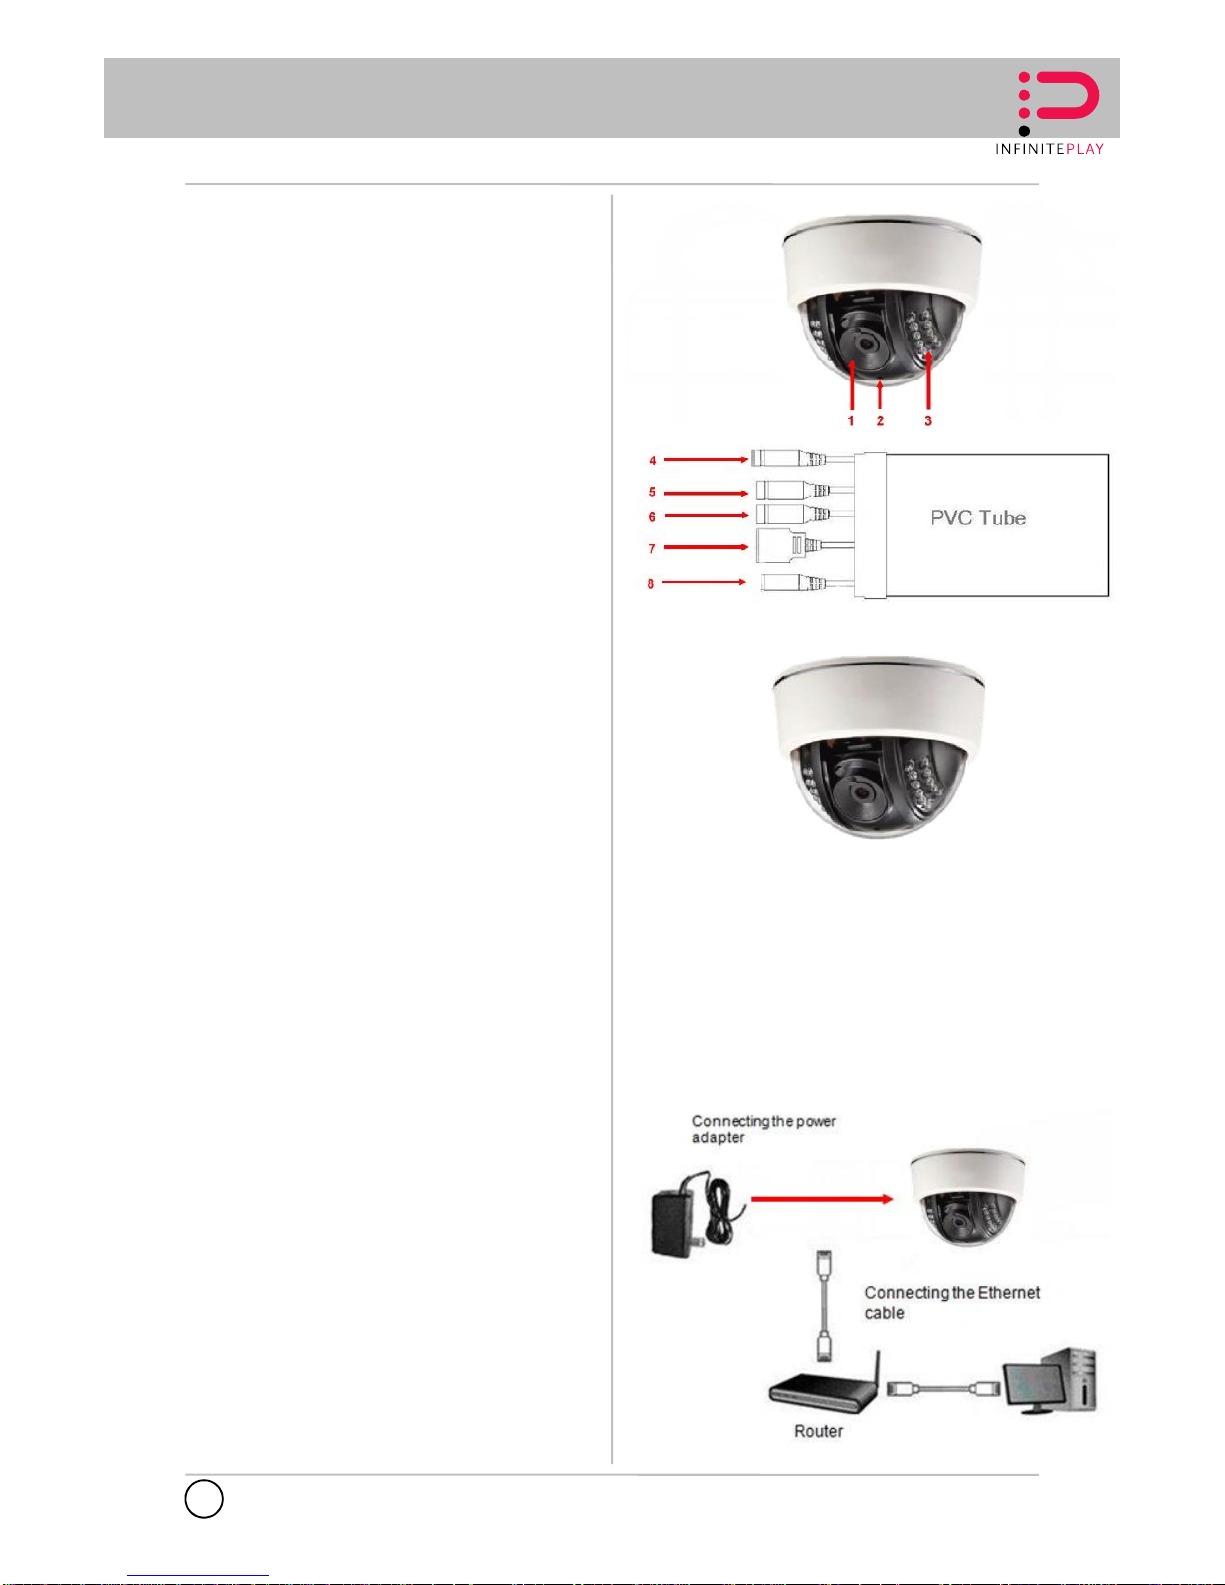
Camera components and functions
1. Lens:Fixed3.6mm lens.
2. Light sensor
3. Infrared LED
4. DC 12V power input
The power input connects the DC power adapter to supply power
to the camera.
5. Audio In (Red and White RCA connectors)
6. Audio In (Red and White RCA connectors)
7. Ethernet port
The port is used to connect the camera to your network via the
Ethernet cable (RJ-45 type). The port supports the NWayprotocol
so that the system will be able to detect the network speed
automatically.
The port is compliant with IEEE802.3afPoE (Power over Ethernet)
standard. The camera can be powered on by the Ethernet cable
so that you can install the camera anywhere without a power outlet
supported.
8. Reset Button
Hardware Installation
Installing the camera
Mount the camera dome base on the ceiling, and then you can adjust
the camera lens to any target place of object
Connecting the cables
To connect the Ethernet cable:
Use the RJ-45 type Ethernet cable to connect the camera to your local
area network (LAN). Plug one end of the Ethernet cable to the Ethernet
port of the camera and the other end to an active port on the
switch/router of the network.
To connect the DC power adapter:
Plug the 12V DC power adapter to the DC power input of the camera.
(required only if the PoE function is not used)
3
EN
Camera components and functions
1. Lens:Fixed3.6mm lens.
2. Light sensor
3. Infrared LED
4. DC 12V power input
The power input connects the DC power adapter to supply power
to the camera.
5. Audio In (Red and White RCA connectors)
6. Audio In (Red and White RCA connectors)
7. Ethernet port
The port is used to connect the camera to your network via the
Ethernet cable (RJ-45 type). The port supports the NWayprotocol
so that the system will be able to detect the network speed
automatically.
The port is compliant with IEEE802.3afPoE (Power over Ethernet)
standard. The camera can be powered on by the Ethernet cable
so that you can install the camera anywhere without a power outlet
supported.
8. Reset Button
Hardware Installation
Installing the camera
Mount the camera dome base on the ceiling, and then you can adjust
the camera lens to any target place of object
Connecting the cables
To connect the Ethernet cable:
Use the RJ-45 type Ethernet cable to connect the camera to your local
area network (LAN). Plug one end of the Ethernet cable to the Ethernet
port of the camera and the other end to an active port on the
switch/router of the network.
To connect the DC power adapter:
Plug the 12V DC power adapter to the DC power input of the camera.
(required only if the PoE function is not used)
INFINITE PLAY
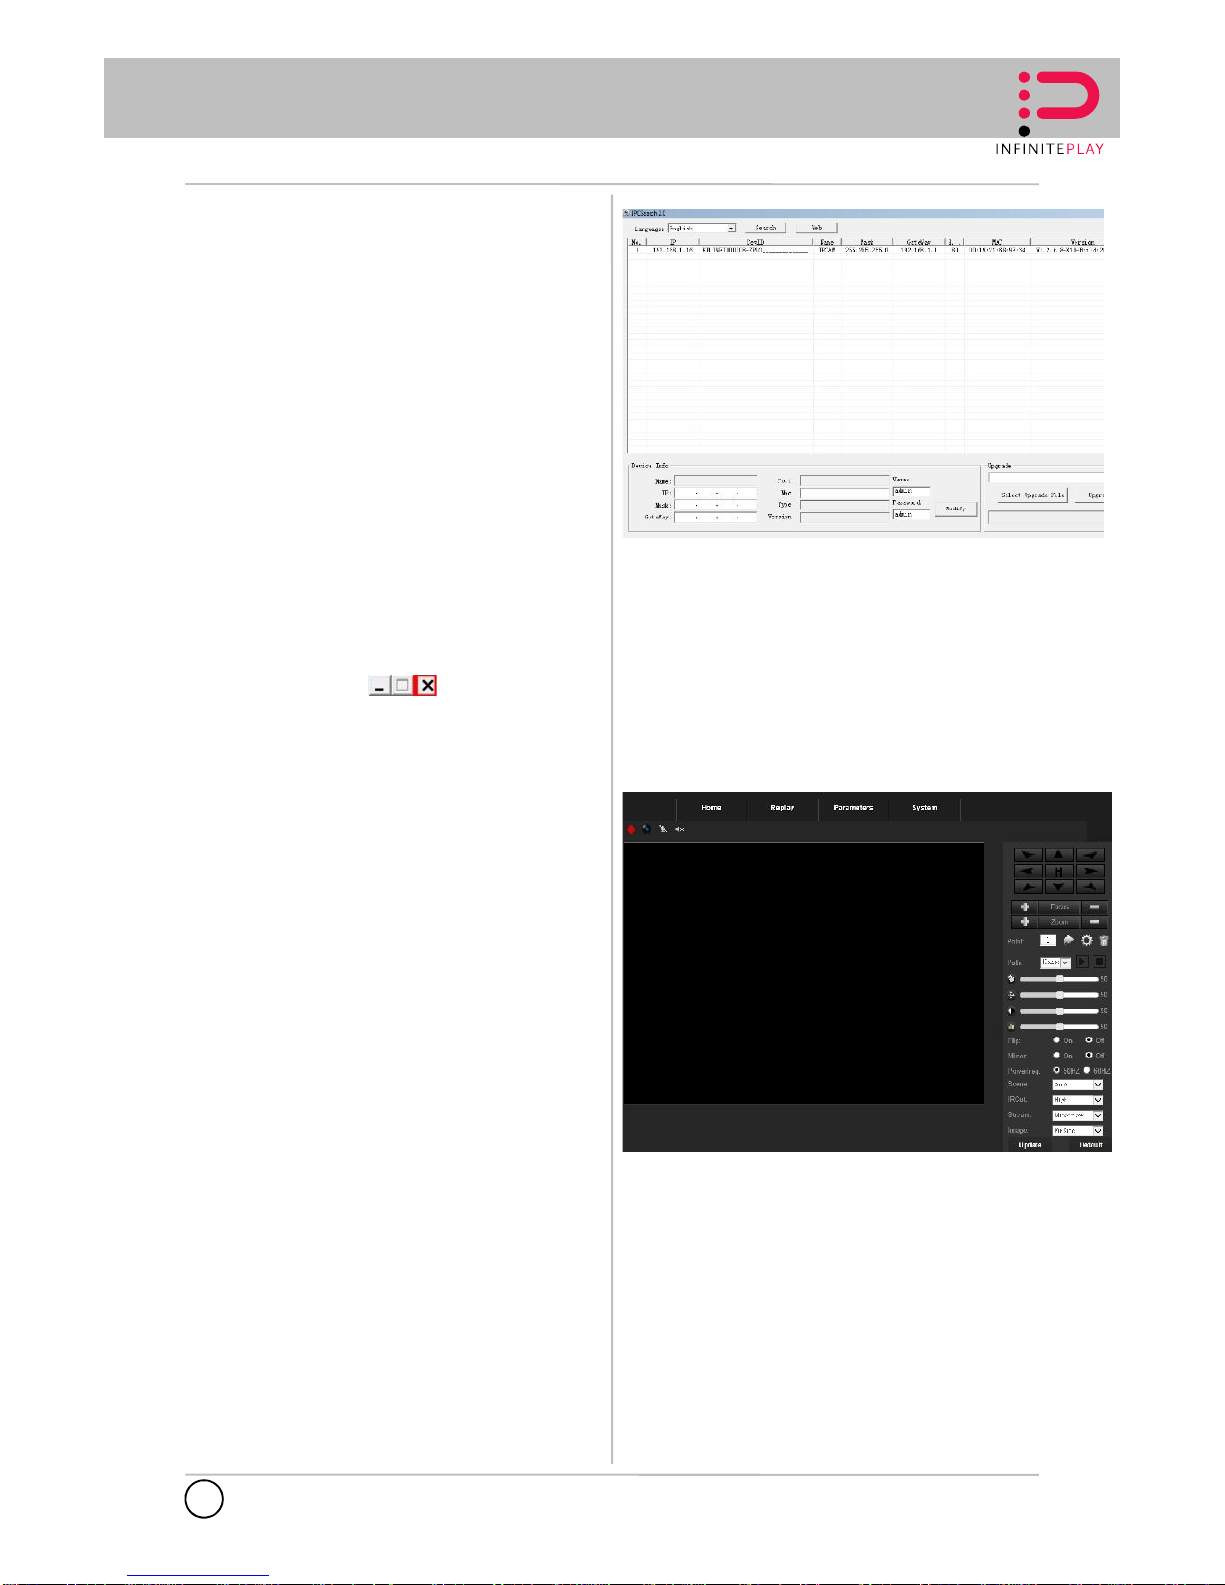
Software Installation
The “IPCSearch” comes with your camera is a conveniently utility to
search the connected camera within the network from your computer.
To install the utility on your computer:
1. Insert the Installation CD into the computer’s CD-ROM/DVD-ROM
drive.
2. Go to folder – search Tool. Execute and install utility tool of
IPCSearch2.1.exe. Follow the prompts to complete the installation.
3. When done, theIPCSearch icon will display on the desktop.
Double-click on the icon to launch the utility.
From the Control Panel, you can:
• Check the connected camera(s) from the Camera List, such as
the IP Address, Camera Name, Mac Address, and more.
• Select the connected camera(s) and click the button “Modify” to
change the IP address of the selected camera from the “Device
Info” in the bottom column.
• Click Scan to search the camera within the network.
• Click Web to access the camera using Internet Explorer.
• Click exit icon to end the utility
Managing the Camera
The camera comes with a browser-based Configuration Utility that
allows you to integrate it into your network easily. You can access the
camera via Internet Explorer:
1. Launch Internet Explorer, and then enter the camera’s IP address
in the URL bar of the browser and then press ENTER.
Use searching IP tool –“IPC Search” to scan the IP address of
the installed camera.
2. Enter the User name and password in the Login window.
The default User name is “admin” and the default password is
“admin”.
If you are the first time to access the camera, it may be required to
install a plug-in for the camera. Permission request depends on
the Internet security settings of your computer. Follow the prompts
to complete the plug-in installation.
3. When you access the camera’s Configuration Utility, the main
screen will appear as side
4
EN
Software Installation
The “IPCSearch” comes with your camera is a conveniently utility to
search the connected camera within the network from your computer.
To install the utility on your computer:
1. Insert the Installation CD into the computer’s CD-ROM/DVD-ROM
drive.
2. Go to folder – search Tool. Execute and install utility tool of
IPCSearch2.1.exe. Follow the prompts to complete the installation.
3. When done, theIPCSearch icon will display on the desktop.
Double-click on the icon to launch the utility.
From the Control Panel, you can:
• Check the connected camera(s) from the Camera List, such as
the IP Address, Camera Name, Mac Address, and more.
• Select the connected camera(s) and click the button “Modify” to
change the IP address of the selected camera from the “Device
Info” in the bottom column.
• Click Scan to search the camera within the network.
• Click Web to access the camera using Internet Explorer.
• Click exit icon to end the utility
Managing the Camera
The camera comes with a browser-based Configuration Utility that
allows you to integrate it into your network easily. You can access the
camera via Internet Explorer:
1. Launch Internet Explorer, and then enter the camera’s IP address
in the URL bar of the browser and then press ENTER.
Use searching IP tool –“IPC Search” to scan the IP address of
the installed camera.
2. Enter the User name and password in the Login window.
The default User name is “admin” and the default password is
“admin”.
If you are the first time to access the camera, it may be required to
install a plug-in for the camera. Permission request depends on
the Internet security settings of your computer. Follow the prompts
to complete the plug-in installation.
3. When you access the camera’s Configuration Utility, the main
screen will appear as side

INFINITE PLAY
WARNING:
This equipment must be fixed to the wall according to the
installation instructions.
This leaflet must always be attached to the system
documentation.
Product is according to EC Directive 2004/108/EC, 2006/95/EC
and following norms.
Directive 2012/19/UE (WEEE)
The crossed-out wheelie bin symbol marked on the product
indicates that the product must be assigned to a differentiated
collection centre for electrical and electronic equipment or
returned to the dealer to purchase a new product.
For further details regarding the collection systems available,
contact your local waste disposal service.
The user is responsible for assigning the equipment purchased,
to the appropriate collection facilities.
Risks connected to substances considered as dangerous (WEEE).
According to the WEEE Directive, these electrical and
electronic products contain harmful substances for people and
the environment.
It is obligatory treat the recycling of the materials in such
way to avoid negative impacts on the environment and people’s
health.
Adaptation to current regulations allows a correct recycling of
which the product is made..
5
EN

INFINITE PLAY
INSTALLATION NOTE:
6
EN

INFINITE PLAY
INSTALLATION NOTE:
7
EN

Via Monte Grappa, 25
31020 Villorba (TV) ITALY
Tel. 0422 350680
Fax. 0422 446958
www.infiniteplay.com
ENG
ZEALABS - ITALY
Table of contents
Other Infinite Play Security Camera manuals


