Innotech POINT-12 User manual

© INNOTECH Arbeitsschutz GmbH. Irrtümer, Druckfehler, technische Änderungen vorbehalten!
© INNOTECH Arbeitsschutz GmbH. Errors and misprints accepted. We reserve the right to make technical changes.
Page 1 of 10 Version 27/07/2016 INNOTECH POINT-12
INNOTECHPOINT-12
INSTALLATION AND
OPERATING MANUAL
ENGLISH
ACHTUNG: DEUTSCH
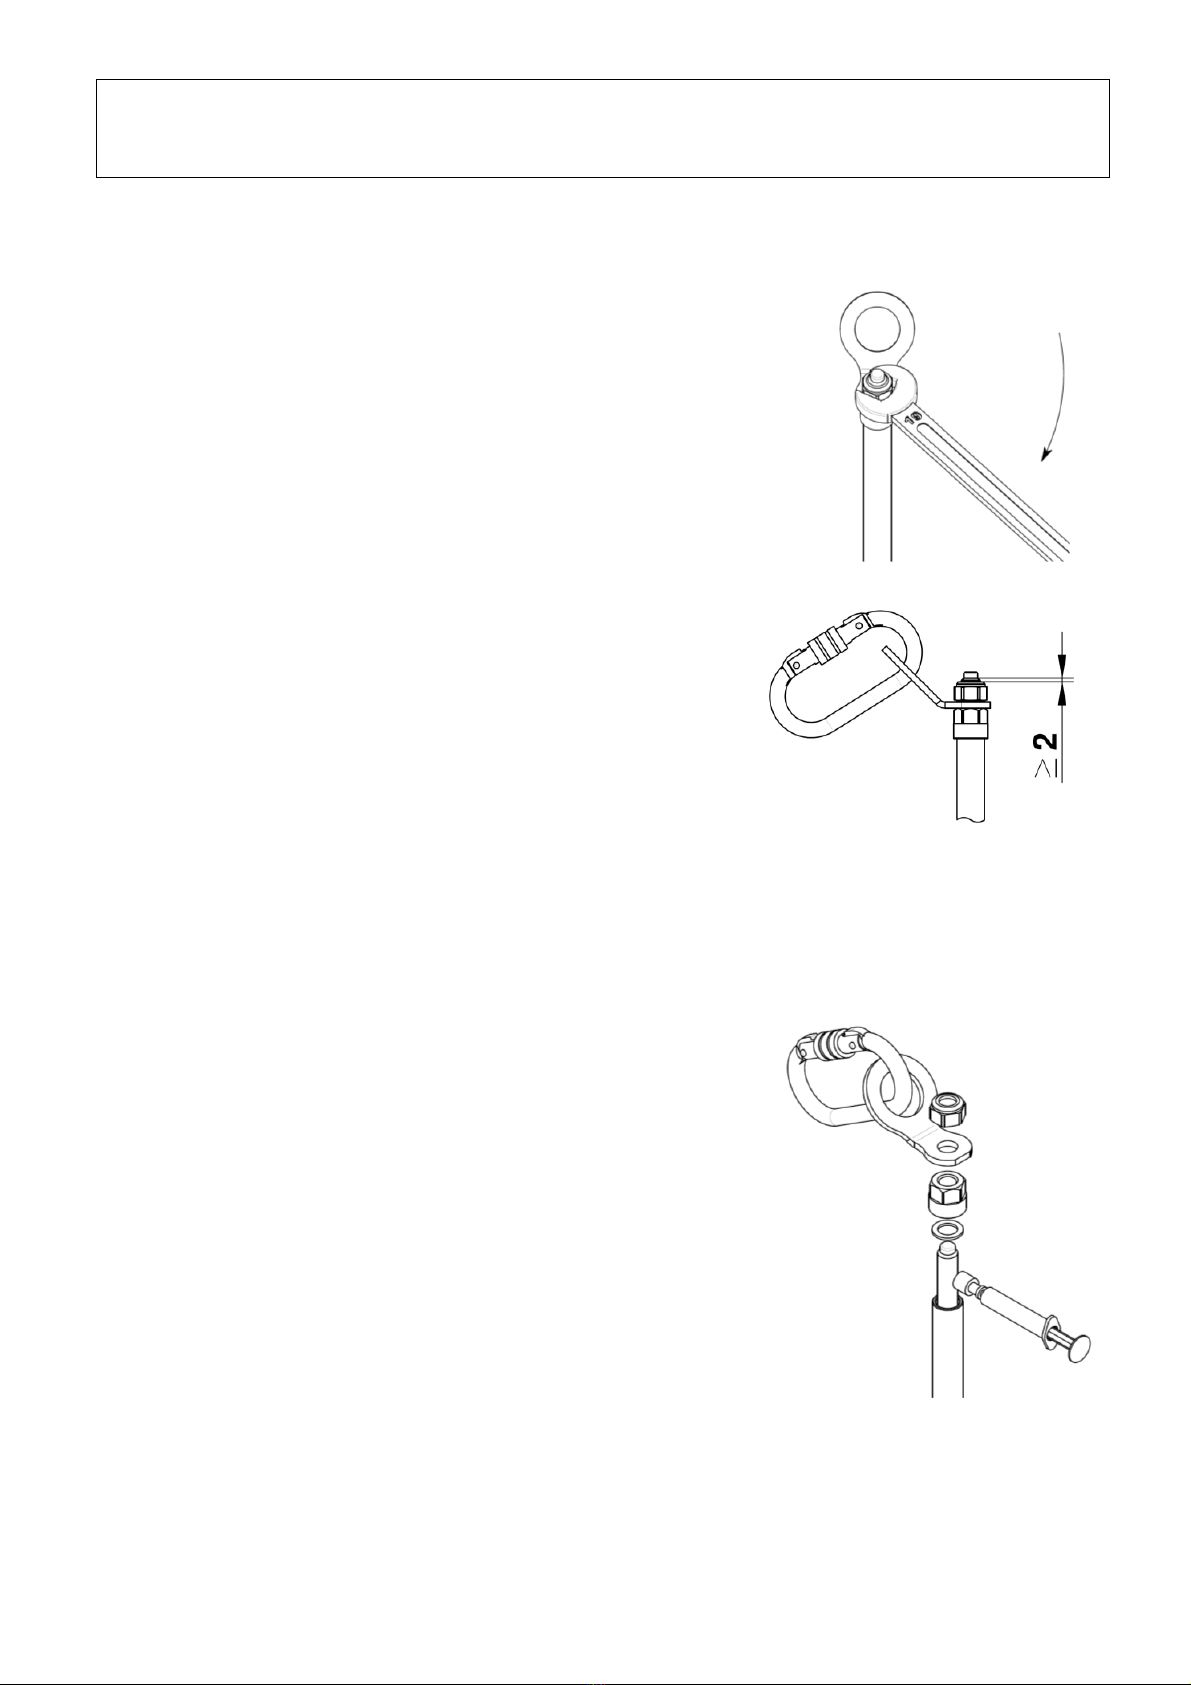
Die Montage und die Verwendung der Sicherungseinrichtung ist erst zulässig, nachdem der Monteur und der
Anwender die Original Aufbau– und Verwendungsanleitung in der jeweiligen Landessprache gelesen haben.
ATTENTION: ENGLISH
Assembling and using of the safety product is only allowed after the assembler and user read the original
installation and application instruction in his national language.
Attention!: FRANÇAIS
Le montage et l’utilisation du dispositif de sécurité ne sont autorisés qu’après lecture par le monteur et par
l’utilisateur de la notice d'origine de montage et d'utilisation dans la langue du pays concerné.
Attenzione: ITALIANO
Il montaggio e l’uso del dispositivo di sicurezza è ammesso soltanto dopo che il montatore e l’utente hanno
letto le istruzioni per l'installazione e l'uso nella rispettiva lingua nazionale.
ATENCIÓN: ESPAÑOL
No está permitido montar ni usar el dispositivo de protección antes de que el montador y el usuario hayan
leído las instrucciones de montaje y uso originales en la lengua del respectivo país.
Atenção: PORTUGUES
A montagem e o emprego do mecanismo de proteção somente serão permitidos, após o montador e o
usuário terem lido as instruções de uso originais, no respectivo idioma do país, sobre a montagem e o
emprego do mesmo.
Attentie: NEDERLANDS
De montage en het gebruik van de veiligheidsinrichting is pas toegestaan, nadat de monteur en de
gebruiker de originele montage- en gebruikershandleiding in de desbetreffende taal gelezen hebben.
Figyelem: MAGYAR
A biztonsági berendezés felszerelése és használata csak az után megengedett, miután a szerelést végzőés a
használó személyek a nemzeti nyelvükre lefordított, eredeti használati utasítást elolvasták és megértették.
Pozor! SLOVENSKY
Montaža in uporaba varnostnih naprav je dovoljena šele takrat, ko sta monter in uporabnik prebrala
originalna navodila za montažo in uporabo v konkretnem jeziku.
POZOR: ČESKY
Montáž a používání zabezpečovacího zařízení jsou povoleny až poté, co si pracovníci provádějící montáž a
uživatelé přečetli v příslušném jazyce originální návod k montáži a používání.
DİKKAT!:TÜRKÇE
Güvenlik tertibatının montajına ve kullanımına, ancak montaj teknisyeni ve kullanıcı, orijinal kurulum ve
kullanma talimatınıkendi ülke dilinde okuduktan sonra, izin verilir.
Obs!: NORSK
Monteringen og anvendelsen av sikkerhetsinnretningene er gyldige først etter at montøren og brukeren har
lest den originale oppbygnings- og bruksanvisningen i det tilsvarende landets språk.
OBS: SVENSKA
Säkerhetsanordningen får inte monteras och användas förrän montören och användaren har läst igenom
konstruktionsbeskrivningen och bruksanvisningen i original på resp lands språk.
Huomio: SUOMI
Turvalaitteiden asennus ja käyttö on sallittu vasta, kun asentaja ja käyttäjä ovat lukeneet alkuperäisen
asennus- ja käyttöohjeen omalla kielellään.
GIVAGT: DANSK
Montagen og brugen af sikkerhedsudstyret er først tilladt, efter at montøren og brugeren har læst den
originale vejledning i samling og brug på det pågældende lands sprog.
UWAGA: POLSKI
Montażi użytkowanie urządzenia zabezpieczającego dozwolone jest wtedy, gdy monter i użytkownik
przeczytająoryginalnąinstrukcjęmontażu i użytkowania w swoim języku.

Page 2 of 10 Version 27/07/2016 INNOTECH POINT-12
INNOTECHPOINT-12
INSTALLATION AND
OPERATING MANUAL
SAFETY INSTRUCTIONS
INNOTECH-POINT should only be installed by competent experts who are familiar with the
roof safety system.
You must be familiar with these instructions, as well as with the local safety regulations as
a prerequisite for installing and using the system. You must also be physically and
mentally fit and trained in the use of PSE (Personal Safety Equipment) .
Medical conditions (cardiovascular problems, intake of medicines, alcohol) can affect the
safety of the user when working in high places.
Adhere to the respective accident prevention regulations (e.g. working on roofs) when
installing/using the INNOTECH-POINT anchorage device.
A plan must be available that specifies rescue procedures for all possible emergencies.
Before starting work, ensure that no objects can fall to the ground from the work site. The
area below the work site (sidewalk, etc.) must be kept clear.
The fitters must ensure that the substrate is suitable for fastening the anchorage device.
If in doubt consult a structural engineer.
The anchorage device on the roof is designed for stress in all directions parallel to the
installation surface or at right angles to the anchor.
If uncertainties arise during installation it is imperative that you contact the manufacturer.
The roof covering must be properly sealed in accordance with applicable guidelines.
Document the professional fastening of the fall arrest system to the building with photos
of each fitting situation.
Ensure that stainless steel does not come into any contact with swarf or steel tools, as this
may lead to corrosion.
All stainless steel bolts must be greased with a suitable lubricant before installation.
Plan, install, and use the anchorage point in such a manner that no one can fall over the
edge if the personal safety equipment is used properly (see planning documents at
www.innotech.at).
At the access to the roof safety system you must document the positions of the anchorage
devices by means of diagrams (e.g. view of the roof from above).
The minimum free space necessary between the edge and the ground is calculated as
follows:
Manufacturer's specification of the personal safety equipment used including deflection of
the rope + body height + 1 m safety margin

Page 3 of 10 Version 27/07/2016 INNOTECH POINT-12
INNOTECH
POINT-12
INSTALLATION AND
OPERATING MANUAL
SAFETY INSTRUCTIONS
Fastening to the INNOTECH-POINT system is executed through the eyebolt and always
requires a carabiner. It must be used with a personal protective equipment in accordance
with EN 361 (full body harness) and EN 363 (fall arrest system).
Attention: For horizontal implementation, only use rope that is suited for this purpose and
that has been tested for the respective edges (sharp edges, corrugated sheeting, steel
girders, concrete, etc.).
There is a hazard when combining individual elements of the specified units, since the safe
function of one of the elements can be impaired through the combination. (Follow the
specific instructions provided with each element!)
Before use, you must visually inspect the entire restraint system for obvious defects (e.g.
loose screws, deformation, abrasion, corrosion, defective roof covering, etc.).
If there are any doubts concerning the safe function of the restraint system, it must be
inspected by an expert (written documentation).
At least once a year an expert must inspect the complete safety device. The inspection by
the expert must be documented on the provided control card.
After a fall and the resulting strain, you must stop using the restraint system and have it
checked by an expert (component parts, fastening to the substrate, etc.).
The INNOTECH-POINT system has been developed for personal safety and should not be
used for other purposes. Never attach undefined loads to the restraint system.
At wind forces of more than the usual strength safety systems are not allowed to be used.
Do not make any changes to the enabled anchorage device.
If used on sloping roofs, roof avalanches (ice, snow) must be avoided by means of
suitable devices to intercept snow.
If you provide the restraint system to external contractors, the instruction manuals must
be handed over in writing.
Only suitable for singular installation! Do not use again after disassembly!
If the equipment is sold in other countries, the instructions for installation and use must
be provided in the respective national language!
Do not continue to use INNOTECH-POINT if the product identification is illegible.
+INNOTECH-POINT has been tested in accordance with EN 795:2012 TYP A and should only
be used as anchorage point on a flat roof or low-pitched roof.
ATTENTION: INNOTECH-POINT should not be installed in horizontal position (e.g. in
facades) or on the underside of ceilings (overhead).

Page 4 of 10 Version 27/07/2016 INNOTECH POINT-12
INNOTECH
POINT-12
APPLICATION
As anchorage point on a flat roof or slightly inclined roof for 3 people (1 person incl. for first-aid
purposes) with personal protective equipment according to EN 361 (full body harness) and EN
363 (fall arrest system).
LOAD DIRECTIONS
When installing / using the fall prevention system,
pay attention to the approved load directions!
Loads in "X" direction are not permitted!
STANDARDS
INNOTECH POINT has been tested and certified in accordance with EN 795:2012 TYP A &
CEN/TS 16415:2013.
FUNCTION
The INNOTECH POINT single anchorage point is easily installed.
In concrete: DRIVE HOME and TIGHTEN:
DRILL – CLEAN the bore - DRIVE HOME at least to the marking – TIGHTEN with TORQUE 40 Nm–
INSPECT – COMPLETE
MATERIAL
INNOTECH POINT is made of stainless steel, quality 1.4301 IIA
SIGNS AND MARKINGS
A PSE warning must be affixed that contains the following information:
-Type designation: INNOTECH POINT-12
-Number(s) of the applicable standard(s): EN 795:2012 TYP A &
CEN/TS 16415:2013
-Name or logo of the manufacturer/reseller: INNOTECH
-Manufacturer's serial number and year of manufacture: xxxx / 20xx
-Signs stating that the instructions in the manual must
be followed:
DIMENSIONS
INNOTECH - POINT 18mm
Standard lengths 300 – 400 – 500mm, special lengths on request!
SALES AND DEVELOPMENT
INNOTECH Arbeitsschutz GmbH A-4656 Kirchham, Laizing 10
w w w . i n n o t e c h . a t
The notified authority participating in the type test:
DEKRA EXAM GmbH, Dinnendahlstr. 9, D-44809 Bochum
The type test was performed in accordance with EN 795:2012.

Page 5 of 10 Version 27/07/2016 INNOTECH POINT-12
INNOTECH
POINT-12
INSTALLATION
INNOTECH-POINT has been tested in accordance with EN 795:2012 TYP A and should only be
used as anchorage point on a flat roof or slightly inclined roof.
The basic prerequisites are a static bearing substructure and compliance with the installation
instructions. If in doubt consult a structural engineer.
FASTENING IN CONCRETE
Drill a hole Ø 18 mm in structural concrete with
a tungsten carbide drill bit at least
130 mm in depth.
Concrete quality at least C16/20.
Clean the bore by blowing out and brushing.
Prior to driving in the INNOTECH POINT in
the cleaned hole you have to heed that the
locknut is not tightened and the fastening
key puts no pressure on the slotted pipe.
Drive home INNOTECH POINT-12 125 mm deep into
the substrate, to the marking mandatory.
Tighten the Point with
a torque of 40 Nm
(Caution: Heed the
installation manual of the
dynamometric key!)
Check for firm seat.

Page 6 of 10 Version 27/07/2016 INNOTECH POINT-12
INNOTECH
POINT-12
INSTALLING THE EYEBOLT (ANCHORING POINT)
Seal in the POINT.
Use the M12 lock nut to fasten the eye bolt
(anchorage point).
After fastening loosen the lock nut a
¼ (quarter) turn; the anchorage point
will now rotate 360° around its own axis.
Check: The lock nut should free approximately
min. 2 thread turns of the stud bolt. (See detail)
Attention:
The single anchorage point can be plastically deformed!

ACCEPTANCE LOG
PROJECT:
ORDERNUMBER:
CLIENT: Specialist: H
Company address:
CONTRACTOR: Specialist: H
Company address:
INSTALLATION OF EAP / ANCHORAGE POINTS: (Single anchorage points (EAP) or
anchorage points of a horizontal lifeline system in accordance with EN 795:2012 TYP C)
Specialist: H
Company address:
FASTENER / PHOTO DOCUMENTATION
PRODUCT: units Year of manufacture / serial number:
(Type designation EAP / anchorage point)
INSTALLATION SUBSTRATE:
(e.g.: solid concrete quality: C16/20; timber rafter dimensions; for tin roofs: roof manufacturer, profile, material, sheet metal thickness, etc.)
Date: Location: Dowel type:
BEF / adhesive? /
designation
Setting
depth:
[mm]
Drill bit Ø:
[mm] Tightening
torque:
Photos:
(storage
location)
Nm
Nm
The undersigned installation company warrants that the dowels have been properly processed in accordance with the dowel manufacturer's
guidelines. (Proper cleaning of bores, compliance with curing times and processing temperature, edge spacing of the dowels, inspection of
the substrate, etc.)
OPTIONAL: when setting up a horizontal lifeline system in accordance with EN 795:2012 TYP C
INSTALLATION - HORIZONTAL LIFELINE SYSTEM:
Specialist: H
Company address:
DESIGNATION - HORIZONTAL LIFELINE SYSTEM: cable system no.:
Client accepts the performances of the contractor. The instructions for installation and use, fastener / photo
documentations and test sheets have been transferred to the client (building owner) and have been made available to the
user. When accessing the roof securing system, you must document the positions of the anchorage devices by means of
diagrams (e.g. top view of the roof).
The expert fitter familiar with the safety system confirms that the installation work has been executed
properly, in accordance with the state of the art, and in accordance with the manufacturer's instructions for
installation and use. The safety specifications for reliability are confirmed by the installation company.
Transfer of: (e.g: travelling eyebolts, personal protective equipment PPE, fall arrest devices HSG, storage cabinet, etc.)
units units units units
Comments:
Name:
Client Fitter - EAP/ anchorage points Fitter - horizontal lifeline system
Date,
Signature

INSTRUCTIONS FOR
THE EXISTING SAFETY SYSTEM
The building owner must affix this notice in a conspicuous location near the access to the system!
This system must be used in accordance with the state of the art and in accordance with the
instructions for installation and use.
The storage location for the instructions for installation and use, test logs, etc. is:
Overview diagram showing the position of the anchorage devices:
Draw in the areas where there is a break-through hazard (e.g. light domes or / and roof lights)!
The maximum limit values of the anchorage devices are provided in the respective instructions for
installation and use or the rating plate of your system.
If there is strain caused by fall, or if in doubt, the anchorage device must be taken out of service immediately and sent to
the manufacturer, or to a specialised workshop for inspection and repair.
The same applies if there is damage to the anchorage equipment.

TEST LOG I
SINGLE ANCHORAGE POINT (EAP)
PROJECT:
ORDERNUMBER:
PRODUCT: units Year of manufacture / serial number:
(Type designation EAP)
ANNUAL SYSTEM INSPECTION EXECUTED ON:
CLIENT: Specialist: H
Company address:
CONTRACTOR: Specialist: H
Company address:
INSPECTION POINTS:
checked and in order!
DEFECTS DETECTED:
(Description of defects/ measures)
DOCUMENTATION:
Instructions for installation and use
Inspection log / fastener
/ photo documentation
PPE (personal protection equipment against falling):
Inspection in accordance with manufacturer's specifications
Expiration date
Annual inspection performed
Not checked (no authorisation)
ROOF SEALING:
No damage
No corrosion
VISIBLE PARTS OF THE ANCHORAGE DEVICE
No deformation
The attachment eye can rotate
No corrosion
Threaded joints secured
Tightening torque of the fastening bolts
Firm seat
Attention: Strictly ensure that test log II is filled out for horizontal lifeline systems in accordance with
EN 795:2012 TYP C!
Acceptance result: The lifeline system corresponds to the specifications in the manufacturer's instructions for installation
and use and the state of the art. Technical safety reliability is confirmed.
Comments:
Name:
Client Inspection: Contractor:
(Expert who is familiar with the safety system)
Date,
Signature

INNOTECH
POINT-12
SALES AND DEVELOPMENT
INNOTECH Arbeitsschutz GmbH A-4656 Kirchham, Laizing 10
w w w . i n n o t e c h . a t
Table of contents
Popular Home Safety Product manuals by other brands

DSC
DSC PG9949 installation instructions

Polar Electro
Polar Electro Polar Cadence Sensor None user manual

Heath Zenith
Heath Zenith Secure Home SH-4192-BK-A manual

Heath Zenith
Heath Zenith Motion Sensor Light 7101 Installation

SOMFY
SOMFY 1782100 instruction manual

Cooper Lighting
Cooper Lighting Sure-Lites CU1 specification