Innovative Mobility Products SmartScooter Operator's manual

U
S
E
R
S
I
N
S
T
R
U
C
T
I
O
N
M
A
N
U
A
L
Version 1.7
INNOVATIVE MOBILITY PRODUCTS LLC
WWW.SMARTSCOOT.COM

2
WARNING-THE RISK OF INJURY
SmartScootTM was designed to make every day mobility easy. However, there are certain
risks that
users
should
be
aware
of
when
operating a SmartScoot™
such
as
injury
from
loss
of
control, tipping over, collisions or falls. It is your responsibility to learn how to safely ride the
SmartScootTM to help reduce these risks.
Our
website
and
support
materials
outline
the
potential
hazards
of
driving
the
SmartScoot
TM. Prior
to
riding
the
SmartScootTM,
take
time to thoroughly read and
D
I
S
C
L
A
I
M
E
R:
E
N
S
U
R
E
T
H
AT
T
H
E
P
R
O
D
U
C
T
I
S
RI
G
HT F
O
R
Y
O
U
A mobility scooter is not a toy. It is an electrically powered scooter and failure to follow
safe
operating
procedures
and
safety
warnings
at
all
times
could
result
in
serious
personal injury or
death in addition to the injury or death of others. Driving a mobility scooter requires a
combination
of
healthy
traits
and
abilities, including but not limited to:
good
vision;
strength;
coordination;
balance
and concentration. If you have these traits and abilities you are on the right track.
Additionally, to safely operate the SmartScootTM, you must be able to:
understand all
of these materials including this Users Instruction Manual which sets forth
safety instructions.
Any questions regarding information contained in this Manual, on our
website, in support materials, about the SmartScoot™ and related equipment, and all other
representatives at (855) 726-6866 (855) SCOOT66.
•
Read
and
understand
all
SmartScoot
TM
reference
materials,
including
this
Users Instruction Manual and all SmartScoot™safety instructions contained in
this Manual.
•
Stand and walk independently or with limited assistance.
• Havesufcienthandstrengthtooperatethethrottleandbrake.
•
Maintain and shift balance to accommodate inclines, declines and turns as described in the
Users Instruction Manual and all SmartScoot™safety instructions.
•
Steer and control the mobility scooter.
•
See pedestrians and vehicles.
•
Judge speeds, distances and slopes.
• Recognize hazards and obstacles in your path.
• Be patient enough to slow down, stop and wait whenever necessary.
• Mount or dismount the mobility scooter without assistance or risk of falling.
• Easily get the mobility scooter in and out of its storage place.
Use both
hands on the handle bars.
•

3
TA
B
L
E
O
F
C
O
N
T
E
N
T
S
Congratulations on the purchase of your SmartScootTM. Please read this Users Instruction
Manual carefully
before
attempting
to
operate
your
SmartScootTM.
This Manual
contains important information regarding the safe operation of your scooter including
safety and training information, battery use and charging and maintenance of your
scooter. Read, understand and pay careful attention to our safety and training sections
and follow
them diligently. Any questions regarding any information contained in this
Manual or other questions in general should be sent in writing to info@smartscoot.com or
called in to our customer service representatives at (855) 726-6866 (855-SCOOT66)
CONTENTS
Page 2
Page 3
Page 4
Page 6
Page 7
Page 8
Page 10
Page 13
Page 15
Page 17
Page 19
Page 22
Page 23
Page 24
Page 26
Page 27
Page 28
Warnings and Disclaimers
Table of Contents
Safety Instructions
SmartScoot™Features
Unpacking Your SmartScoot ™
Assembling Your SmartScoot™
Adjusting Your SmartScoot™
Folding and Lifting Your SmartScoot™
Operating Your SmartScoot™
Getting Started – Learning to Drive Your SmartScoot™
Getting About with Your SmartScoot™
Air Travel
SmartScoot™Storage Luggage Rack, Basket and Cane Holder
Battery and
Battery Charging
ProductSpecifications
Limited Warranty
Trouble Shooting and Maintenance

4
S
A
F
E
T
Y
I
N
S
T
R
U
C
T
I
O
N
S
The
below
instructions
and
tips
will
help
you
to
operate
the
SmartScootTM
safely.
PLEASE NOTE -
the
SmartScootTM scooter is designed to be used by one person
at a time and is not recommended for any person younger than 16 years old.
•
Read this Manual and all safety and training instructions and all warning labels before
operating the SmartScootTM
•
Do not carry passengers or exceed the maximum weight capacity.
•
Do
not
mount
or
dismount
the
SmartScootTM
unless
it
is
resting
at
a
complete
stop
and
is turned off.
•
Comply with all local laws and regulations while operating the SmartScootTM.
•
Check that all folding levers and clamps are securely locked before use.
•
Always slow down before changing directions and turning.
•
Always keep your feet on the foot rests when driving the SmartScootTM.
•
Always approach small obstacles straight on and at slow speeds. Do not attempt to drive
over curbs, potholes, puddles or any other road hazards. Use common sense when operating
the SmartScootTM. Reckless driving can result in an accident!

5
Reduce speeds through turns or while changing directions.
The
SmartScootTM
is
designed
to
go
over
flat,
paved
or carpeted
surfaces
only.
Do
not
attempt
to
go
over
curbs, through
potholes,
puddles
or
any
other
road
hazard.
You should
not
maneuver
around
these
hazards,
stop
the scooter, dismount it and walk the
scooter around the hazard. Attempting to go over hazards
will cause the unit to tip over.
The
SmartScootTM
is
not
designed
to
go
up
steep
inclines. Attempting
to
drive
up
steep
inclines
can
cause
the
unit to lose momentum.
The
SmartScootTM
was
designed
for
flat,
paved
or
carpeted surfaces. Do not drive the unit on grass, gravel, or
any other textured or bumpy surfaces.
Use caution when driving the scooter over wet surfaces.
Avoid puddles or potential icy conditions. If rain cannot be
avoided, reduce your speed and allow for more stopping
distance.
SAFETY WARNINGS

6
S
M
A
R
T
S
C
O
O
TTM
F
E
AT
U
R
E
S
FOLDABLE
Can
e
Holder
(Please note - Light now
located on the handlebar)
(Please note - light now
located on the handlebar)

7
U
N
PA
C
K
I
N
G
Y
O
U
R SMARTSCOOT™
The
SmartScootTM
arrives
is
a
strong
dual
walled
carton.
Carefully
cut
the
packaging
straps from the carton using a scissors and then cut the packing tape to allow access. The
scooter arrives fully folded. The package also includes the adjustable seat, battery charger,
removable basket, basket hardware, luggage rack and Allen wrenches. The battery may be
shipped separately. Accordingly, you will find packaged:
•
The
Folded scooter
•
The
Adjustable Seat and Seat back
•
The
Battery (in some cases, the battery may be shipped separately)
•
The
Battery Charger
•
The
Basket and Hardware
•
The
Luggage Rack
Allen Wrenches
•
R
E
M
O
V
I
N
G
T
H
E
P
R
O
D
U
C
T
Our product is carefully packaged to ensure that the SmartScootTM arrives in perfect condition.
1. Using a scissors, carefully cut the white wire ties from the product. CAUTION – Do
not cut the black wire ties.
These
are
used
to
route
the
wiring
throughout
the
Scooter.
2. Remove and discard all inner corrugated and other packing materials.
3. If needed, unpack and install the two adjustable rear wheel and axles into the scooter frame
as detailed on page 12.
4. Liftthescooterfrom the center bar outoftheboxandplaceitonalevelatsurface.
Removetherestoftheitems from the box making sure that the above items are present.
Inspect all items before using and take full responsibility for assuring that the equipment is in
good working order and is safe to use.
5. Your battery arrives half charged. Make sure it is fully charged before use.
PLEASE NOTE - Any and all returns must be authorized in advance. The original receipt is
required for any and all returns. The scooter must be returned in its original box.
8
A
S
S
E
M
B
L
I
N
G
T
H
E
S
M
A
R
T
S
C
O
O
TTM
S
E
T
T
I
N
G
U
P
T
H
E
S
T
E
E
R
I
N
G
C
O
L
U
M
N
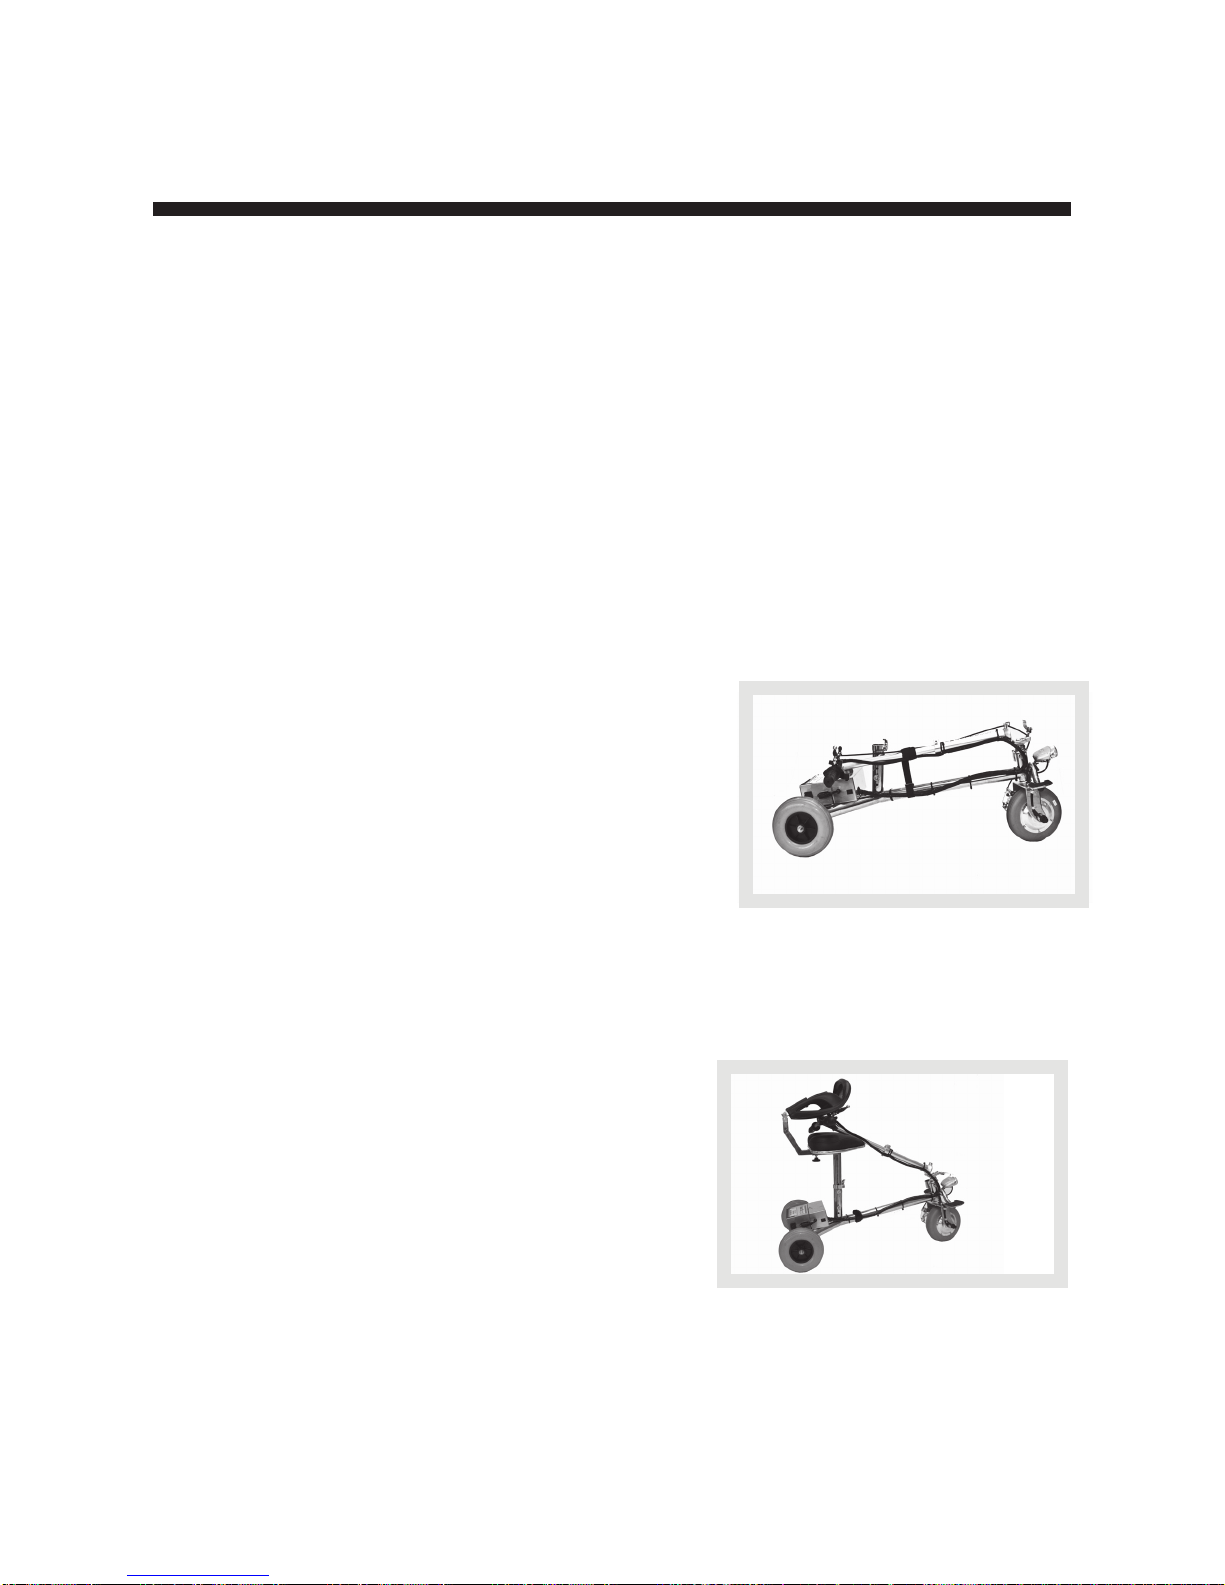
1.
Lift
the
steering
column
to
its
upright
position
until it locks in place.
2.
Pull the latch upwards
threading
the
bolt
through
the
center of the locking system.
3.
Turning the lever to the right or left, press down
on the lever to secure the steering column.
4. The steering locking system may loosen with use. Check
frequently and make sure it is tight.
C
O
N
N
E
C
T
I
N
G
T
H
E
S
E
AT
1.
Take
the
seat back
and
slide
it
into
the
slot
underneath
the
seat.
Tighten
the
black
knob
to
secure
the
seat back
to
the
seat. Lift
the seat
back to its upright position. See Figure 1.
2.
Find the seat post and remove the top locking
pin from the post .To remove the pin, continually
press
down
the
small
knob
on
the
end
of
the
pin until the pin is removed completely from the
system. See Figure 2.
3.
Insert the seat into the attached
seat
post.
Turn the lever on the left while holding the screw
on the right. This tightens the
locking system.
Grab hold of the lever and
pull
it
forward
until
it
tightens.
PLEASE NOTE – Over tightening the
screw will make it difficult for you to tighten the
handle. You might
have
to
loosen
the
screw to
adjust the tension.
The system requires that
you use some force to tighten the latch.
4.
Replace the locking pin into the top hole. Again,
press down the small knob on the pin until the
pin is through both holes in the post.
Instructions for the seat level and seat back can
be found in this Manual in the
Adjusting
Your
SmartScootTM section.
Lever
Latch
Figure 1
Figure 2

9
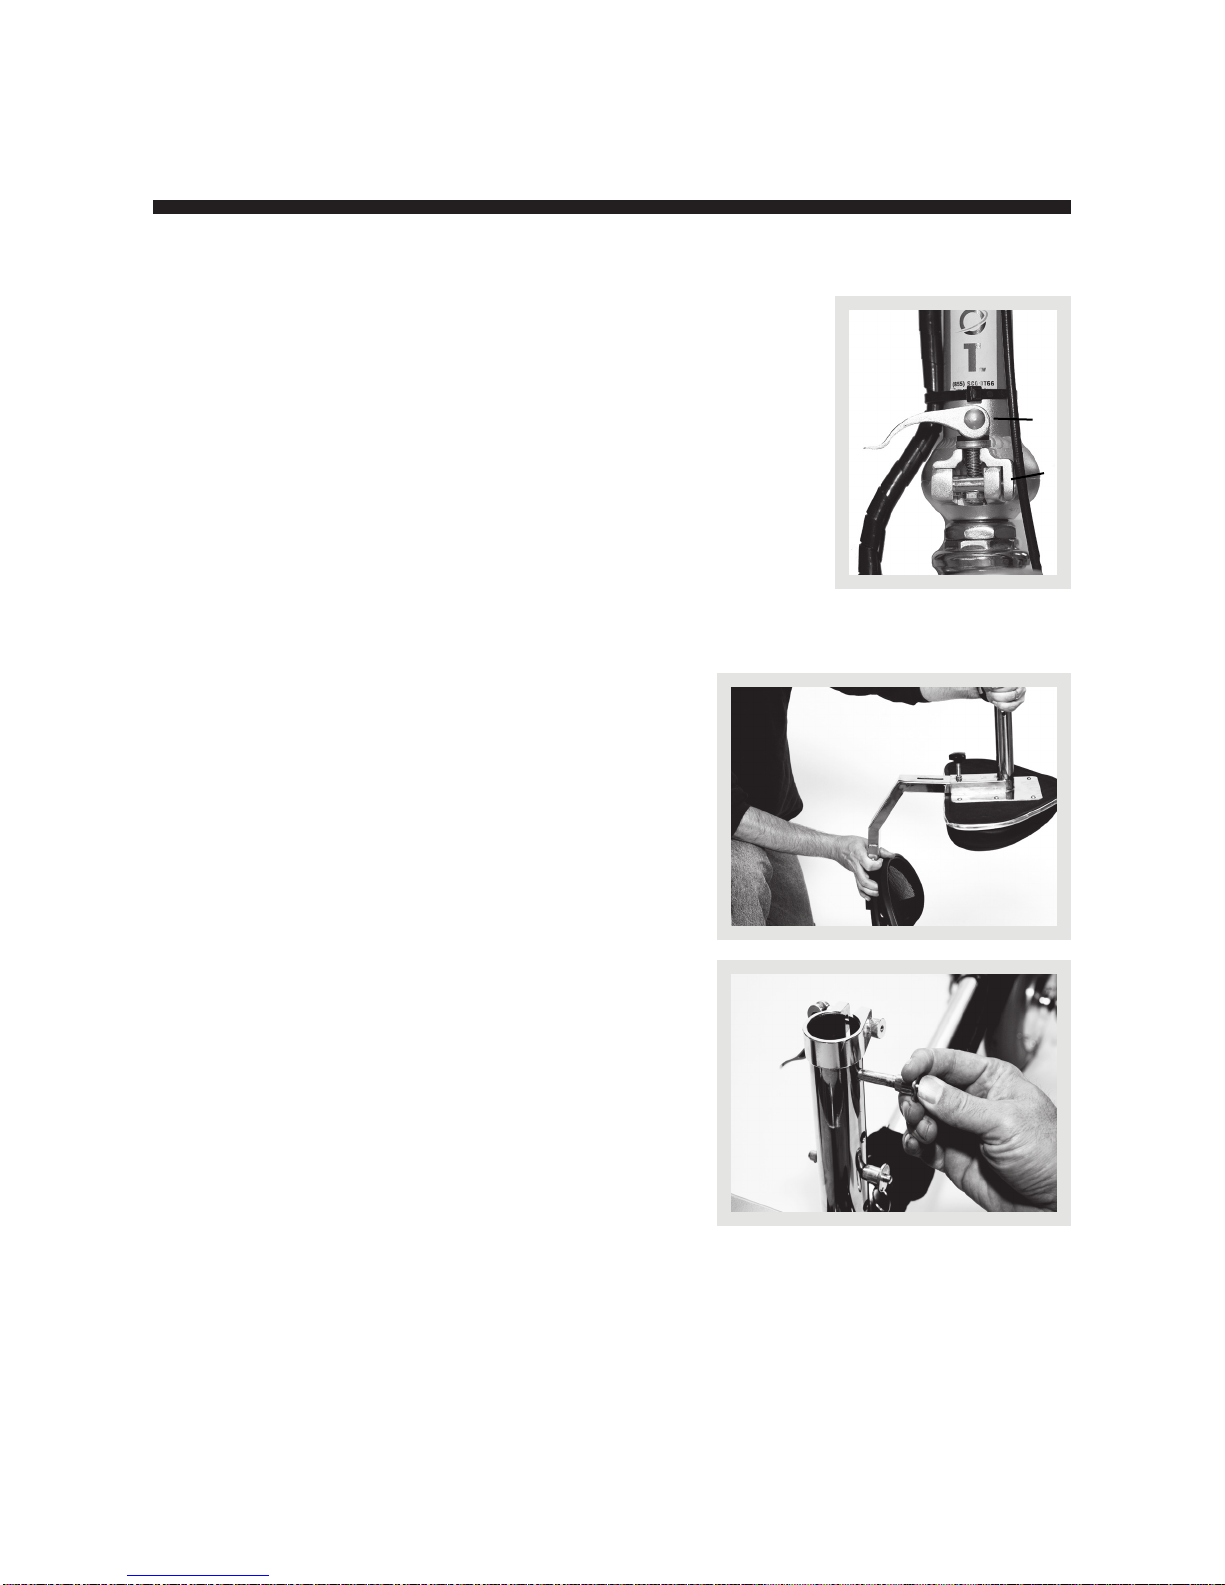
CONNECTING THE BATTERY
With the SmartScootTM label facing on top and
the battery
label
facing
on
the
left
side,
carefully align
and
slide
the
battery
pack
downward making sure that it slides into place
1.
Twist the top latch to secure the battery.
2.
Insert the
battery cord from the control panel box
into the battery socket.
3.
Turn the switch on the control panel box to the on
position.
P
O
S
I
T
I
O
N
I
N
G
A
N
D
T
I
G
H
T
E
N
I
N
G THE B
R
A
K
E
H
A
ND
LE
1.
This process requires you to use the enclosed
Allen wrench.
2.
Sitting on the scooter, place your right hand on
the throttle.
3.
Next, lift the hand brake to a comfortable position
on the handlebars. The recommended position
is just below level from the throttle
4.
Slide the Allen wrench into the bolt and tighten
to secure.
F
O
O
T RESTS
1.
Pull down foot rests.
Battery Socket
LED HEADLIGHT
1. The headlight is to be mounted on the handlebar and is operated independent of
the throttle controls. The headlight should be used in dark conditions.

10
A
D
J
U
S
T
I
N
G
Y
O
U
R
S
M
A
R
T
S
C
O
O
T
TM
With
a
handful
of
adjustable
features,
SmartScootTM
can
accommodate
almost
any
body
type without compromising comfort or safety. The seat post and front steering column adjust
vertically tottheuser’sheight,whileameshseatbackingshiftsforwardorbackwardtoprovide
theright amountofsupport.Eventherearwheelsofferflexibility.Threedifferentsettingsare
available–a bonus for users requiring additional stability while they drive.
A
D
J
U
S
T
I
N
G
T
H
E
H
A
N
D
L
E
B
A
R
S
SmartScootTM
allows
to
the
of
the
you
adjust
height
handle
bars.
Simply
open
the
clamp by releasing the
lever. Lift or lower the handlebars to a comfortable
height. When at the desired height, push in the lever to
tighten the clamp.
A
D
J
U
S
T
I
N
G
T
H
E
S
E
AT
The SmartScootTM seat can be adjusted in two ways
for maximum comfort.
Seat Backrest
Slide
the
slotted
bar
on
the
bottom
of
the
seat
backrest
into
the
slot
on
the
bottom
of
the
seat.
Tighten
the
black
knob
once the
desired
seat
back position is obtained.
Seat Height
The
SmartScootTM
seat
can
be
adjusted
to
three different
heights
located
on
the
seat
post.
Please
note
that there are 4 holes on the seat
post. The bottom 3 holes determine the seat
height. The top hole is for seat security which is
further discussed below.

11
TM
1.
Remove
the
seat
from
the
SmartScoot
by
removing
both
pins
from
the
seat post,
releasing the lever
which loosens the clamp.
2.
Once the optimal
seat
height
is
determined,
insert
one
of
the
adjusting
pins
into
the
hole
by
pressing
on
the
small
knob
and
pushing
it
through
both
holes
of
the
attached
seat
post.
Replace the seat onto the scooter.
3.
Push in the lever which will tighten the clamp. If the
clamp does not tighten, turn the lever on the left
while
holding the screw on the right. This
tightens
the
locking system.
Grab
hold of the lever and pull
it forward until it tightens. PLEASE NOTE –
Over tightening the screw will
make
it
difcult
for
you
to
tighten
the handle. You
might have to loosen the screw to adjust
tension. The system requires that you use
some force to tighten the latch.
4. Replace the locking pin into the top hole. Press
down the small knob on the pin until the pin is
through both holes in the post.
S
E
AT
S
E
C
U
R
I
T
Y
To ensure seat security while driving or lifting the SmartScootTM the seat must be securely
attached to the unit. There are two steps required to ensuring seat security.
1.
Tightening the clamp by pushing in the lever.
2.
Inserting the security pin into the top hole of the scooter.
12
A
D
J
U
S
T
I
N
G
T
H
E
R
E
A
R
W
H
E
E
L
S
The rear wheels adjust to three different positions offering the user additional stability when
using the SmartScootTM. The wider the wheel base, the more stable the scooter will be during
use.
PLEASE NOTE – Even though the wider wheel base offers more stability, it also makes it
more difficult to go through doorways.
1.
Remove the two adjusting pins from the rear axle by pressing and holding the button on the
pin and sliding it toward you.
2.
Lift up the lever which loosens the clamps on the rear axle next to the wheels.
3.
Remove both wheels from the scooter, as pictured below.
4.
There are three holes on each side of the axle. The holes closest to the middle of the axle
represent the narrowest position of the wheels. The wheelbase gets longer as you move
towards the outer two holes. PLEASE NOTE – Once you have determined the position
of the wheels,it must be the same position on both sides. For example, the middle
position on left means you have to be in the middle position on the right.
5.
Determine your desired position (narrow, middle, widest).
6.
Slide the wheel and tubing back into the rear axle aligning the appropriate hole for the
desired position, as pictured below.
7. Holding the button on the adjusting pin, slide the pin through the appropriate holes. Make
sure you hold the button until the pin goes through both holes (front and back).
8. Tighten the clamp by pushing down on the lever.
9. Repeat
on the other side
WARNING – Prior to driving make sure that each side is in the same position, that the
alignment pins are through both holes and that the clamps are tightened and secured.
13
FOLDING AND LIFTING YOUR SCOOTER
SmartScootTM was innovatively designed to be lightweight, foldable and easy to transport.
The SmartScootTMwilltinmost
carsandallSUV’s,trucksandvans.Thescootercan
befolded and unfolded quickly without the use of any tools.
F
O
L
D
I
T
SmartScootTM offers two folding option positions to accommodate various types of spaces.
•
Position
1
allows
the
SmartScootTM
to
fold
down
to
its
smallest
size by
removing the seat first. This size fits into most car trunks, SUV's, trucks and vans.
•
Position 2 allows the SmartScoot™to remain in one piece. This size fits into most SUV’s,
trucks and vans.
P
o
s
i
t
i
o
n
1
D
i
r
e
c
t
i
o
n
s
WARNING – IN THIS POSITION DO NOT LIFT THE SCOOTER BY THE STEERING COLUMN.
USE TWO HANDS TO LIFT THE SCOOTER BY THE SEAT POST AND THE CENTER BAR.
1.
Remove the seat by pulling the top security pin from the seat post and by opening the seat
clamp lever. Lift the seat out of the seat post and replace the top security pin in its original
position.
2. Using our Fold n Lock Technology™, fold down the front
steering column by lifting the front lever, pulling the latch
down through the notch and clamp. With one hand on the
steering column use one finger from your opposite hand
to slide the latch sideways until the steering column
releases.
3. Do NOT attempt to lift the scooter by the steering column
only. Use two hands and lift the scooter by the center bar.
There is an enclosed Velcro strap that may be used to
secure the center bar to the steering column.
4. To remove additional weight, you can also remove the battery from the scooter.
Instructions for removing the battery from the scooter can be found in this Manual in the
Battery and Battery Charging section.
5. Once your scooter is placed in your vehicle, engage the parking brake.
P
o
s
i
t
i
o
n
2
D
i
r
e
c
t
i
o
n
s
1. Using our Fold n Lock Technology™, fold down the front
steering column by lifting the front lever, pulling the latch
down through the notch and clamp. With one hand on
the steering column use one finger from your opposite
hand to slide the latch sideways until the steering
column releases.
2. Lower the steering column until the handle bars rest
on the seat.
3. Lower the back rest of the seat onto the top of the handle bars, as
pictured.
4. Once your scooter is placed in your vehicle, engage the parking brake.
WARNING – IN THIS POSITION DO NOT LIFT THE SCOOTER BY THE STEERING COLUMN.
USE TWO HANDS TO LIFT THE SCOOTER BY THE SEAT POST AND THE CENTER BAR.

14
L
I
F
T
I
T
SmartScoot
TM
only weighs just under 40 pounds when fully assembled, making it lightweight
and easy to lift. However, for users who still require an even lighter load, SmartScootTM can break
down quickly and easily into as many as three lighter pieces. The heaviest piece weighs
only 27 pounds, and even better, no tools are required to disassemble the scooter. Users can
choose to remove just the seat or both the seat and the battery. It’s entirely up to you. With
three different options for lifting the SmartScoot
TM
, transporting a mobility scooter has never
been easier.
WARNING - Always lift the scooter by the center bar.

15
O
P
E
R
AT
I
N
G
Y
O
U
R
S
M
A
R
T
S
C
O
O
T
TM
SmartScootTM
was
designed
to
make every day
mobility easy. However, there are still certain risks that
users should be aware of when operating a SmartScoot™
such as injury from loss of control, tipping over, collisions
or falls. It is your responsibility to learn how to safely ride
the SmartScoot™to potentially reduce these risks. Our
website and support materials outline the potential
hazards of driving the SmartScoot™. Prior to riding the
SmartScoot™take time to read and understand all
support materials including this Users Instruction
Manual which contains safety instructions. Any
questions regarding any information contained in
this Manual, our website, any support materials or
any other general questions should be sent in
customer service representatives at (855) 726-6866
(855-SCOOT66).
C
O
N
T
R
O
L
PA
N
E
L
O
P
E
R
AT
I
O
N
F
E
AT
U
R
E
S
1.
On/Off Button
Located on the upper left side of the control panel, push in the on/off button to turn on the
SmartScoot™and push the button in again to turn off the SmartScoot™. Turn off your
SmartScoot™when it is not being operated to help preserve the battery life.
2.
Speed Control
The green mode button located below the on/off button is the speed control. You can choose:
low, with a maximum speed of 3 mph; med, with a maximum speed of 5 mph; and high with a
maximum speed of 7 mph. Operate your SmartScoot™at a reasonable speed for both your
personal safety and others. CAUTION - Do not make turns at high speeds.
3.
Battery Charge Indicator
The upper right side of the control panel is the battery charge indicator. The battery indicator has
four levels. When your battery is fully charged, three or four red bar levels will display in red. Over
time and usage, these lights will begin to disappear. Once the indicator reaches two red lights
consistently, avoid driving and charge the battery as soon as possible.
4. Drive/Reverse Button
The red button with the letter D should be pushed to the left to be in the forward function and to the
right with the letter Rfor the reverse function. When in the reverse function, an audible beeping will
alert you and others that the scooter is in reverse.

16
6. Throttle
The throttle is operated by carefully and slowly twisting the grip towards you, similar to a
motorcycle. Always
gently
turn
the
throttle
when
moving
from a
stopped
position
to
avoid front wheel spin.
7. Disc Brake
The SmartScootTM is equipped with a disc brake operated with the right hand. To slow or
come to a complete stop, release the throttle and squeeze the brake inward.
8. Parking brake
The parking brake is a small black lever located above the far left hand side of the brake. To
engage the brake, pull the brake back halfway and at the same time pull back the black
lever until you hear a click.
Once the parking brake is engaged, the front wheel will not
move. To disengage the brake, pull the brake inward and the black lever will snap to the
neutral position and the wheel will move freely.
5.
Horn Button
The green button below the red drive/reverse button is the horn. This button when
pushed will emit an audible alert sound.

G
E
T
TI
N
G
S
TA
R
T
E
D
-
L
E
A
R
N
I
N
G
T
O
D
R
I
V
E
YOUR SMARTSCOOT™
Just like learning to drive a car or ride a bicycle, operating any personal transportation device
inherently
includes
risk
and
takes
practice.
Therefore,
use
caution
as
you
practice operat-
ing
the scooter
in
various
situations.
Keep
the
speed
at
a
reduced
level
until
you’re
comfortable controlling the scooter. The below instructions and practice steps will teach you
to maneuver through doorways, on and off lifts, and up and down ramps.
B
E
F
O
R
E
Y
O
U
T
R
Y
D
R
I
V
I
N
G
S
M
A
R
T
S
C
O
O
TTM
Whenpreparingforyourrstride,selectanareathatisat,spacious,andawayfromtrafc
and other obstacles. Bring a friend along to help you follow the instructions while you practice.
Start
driving
with
the
lowest
speed. Please
refer to the Operating Your SmartScoot™section
of this Manual for instructions on the SmartScoots™three speeds.
P
R
A
C
T
I
C
E
S
T
E
P
S
Practice the following steps to help you become comfortable with SmartScoot™.
1.
Adjust your SmartScoo
tTMas instructed in thisManual to fit your body comfortably.
2.
Sit on the SmartScoot™placing your hands on the handlebars and feet on the foot rests.
3. Turn on the SmartScoot
™
by
pushing
the
on/off
button
one
time.
This
will
place
it
in the
lowest speed.
4. Learn
to
use
the
throttle
and
brake.
With
your
right
hand,
apply
pressure
to
the
hand
brake. Releasing the hand brake, slowly turn the handle
(throttle)
and
move
the
scooter
forwardvefeet.Whilereleasingthethrottle,applythehandbrakeandcometoacomplete
stop. Repeat this process several times, each time allowing the scooter to venture farther
before applying the hand brake to come to a complete stop.
PLEASE NOTE – SmartScootTM
is a front-wheel-drive scooter. As a result, fast starts can cause its front wheel to spin,
which can be dangerous for drivers. Slowly turning the handle each time you start will
help to avoid or reduce this condition.
5. Learnto
turn.
Slowly
turn
SmartScootTM
by
using
wide
movements.
Feel
how
the scooter
reacts to your body weight. Shifting your body weight through the turn will help add stability. As
you feel more comfortable, you will be able to make the turns tighter. Always remember
to slow down before turning or changing directions. Going too fast through a turn will cause the
SmartScoot™to tip over. If the SmartScoot™begins to tip, slow the unit down and place your
feet on the ground.
6. Learn to reverse. Prior to putting SmartScootTM in reverse, turn your head to make sure
there are not people or hazards such as curbs, parked cars or walls behind you. While
applying the
brake,
turn
on
the
reverse
function. You
will
hear
a
distinct
repetitive warning
sound.
17

18
Turning your head again to ensure that nothing is behind you, release the brake and
slowly turn the throttle. Only use the reverse function to move away from an obstacle or
back out of an elevator. While in reverse, limit turns or changes in directions.
7.
Avoidsteep inclinesandhills.
SmartScootTM is not designed to be driven up steep inclines
or hills. However, the SmartScoot™should be able to drive up all wheelchair ramps which
comply with government standards. Leaning your body forward, which places more weight
on the front wheel, will aid the scooter up the
ramp.

19
TM
GETTING ABOUT WITH YOUR SMARTSCOOT
While riding your SmartScoot
TM
you will encounter many situations which will require that you
understandtheabilitiesofyourscooter.TheSmartScootTMprovidesreasonablesafetyonatand
level surfaces but is not entirely fool proof on uneven, slanted or inclined surfaces. Additionally
certain
outdoor
and
indoor
conditions
can
create
situations
where
caution
is
advised.
The
following guidelines will help you when encountering certain situations.
T
U
R
N
S
Unlike
a
two
wheeled
vehicle,
the
SmartScootTM
CANNOT be “leaned” into a curve. Therefore, it is
essential to slow down to a reasonably slow speed
before turning. Use extreme caution when turning
on slanted or uneven surfaces. Occasionally you
may nd
yourselfnegotiatingacurveorcornertoo
fastand the inner rear wheel starts to lift off the
ground. If this happens, immediately reduce your
speed,lessen the steering angle and shift your
upper body toward the wheel that is lifting off the
ground.
I
N
C
L
I
N
E
S
A
N
D
D
E
C
L
I
N
E
S
Incline conditions require special attention to avoid
mishaps. The SmartScootTM is not designed to go
up steep or long inclines. Be aware that not all
ramps are constructed according to government
standards. The government standard for wheelchair
ramps is 1 inch (2.5cm) rise per foot (30cm) or 5º.
WARNING
–
An incline that is too steep or
long can create a dangerous situation. The
scooter can lose momentum causing it to slide
backwards down the incline or tip over
backwards. It is not recommended to drive the
scooter on any ramp, incline or hill that doesn't
meet government wheelchair ramp standards.

20
T
i
p
s
f
o
r
d
r
i
v
i
n
g
t
h
e
S
m
a
r
t
S
c
o
o
tTM
o
n
i
n
c
l
i
n
e
s
a
n
d
d
e
c
l
i
n
e
s
•
Never
travel
up
or
down
on
an
incline
that
is
potentially
hazardous such as one that
is wet, icy, slippery, has loose gravel, etc.
•
Always start an incline at the base of the incline.
•
Shift your upper body towards the handlebars to shift weight to the front wheel.
•
Slowly twist the throttle to move the scooter forward.
•
Never stop the scooter on an incline. Do not zigzag, but travel in a straight line to the top.
•
If the scooter loses momentum, quickly apply the hand brake and put both feet on the
ground. Get off the SmartScootTM and walk the product either up or down the incline.
•
Go very slowly while driving down a ramp. In fact, you can drive down the ramp in neutral
without using the throttle.
•
Keep your hand on the disc brake handle and slowly apply pressure if the scooter picks up
too much speed.
C
U
R
B
S
SmartScoot
TM
should
not
be
driven
over
any
curb. Apply the brake, turn off the scooter and get
off the scooter.
Lift
or
walk
the
scooter
around
the
curb prior to getting back on.
WARNING
– Attempting to drive over a curb
can cause the product to tip over backwards
resulting in possible injury and will cause
damage to the scooter. Also use caution when
driving on sidewalks near curbs to avoid one
wheel falling off the curb. This will cause the
scooter to tip over resulting in possible injury.
Table of contents
Popular Mobility Aid manuals by other brands

Cefndy
Cefndy Zenith Bariatric Commode X148 User instruction

lopital
lopital Flexo Instructions for use

liftup
liftup RAIZER quick guide

NRS Healthcare
NRS Healthcare Mowbray M11089 User instructions

Harbor Freight Tools
Harbor Freight Tools 62547 Owner's manual & safety instructions

Invacare
Invacare Dolomite Step Up user manual


