Innovi PZ0462 User manual
Thank you for your purchasing this product. Before attempting to connect or operate this
product, please read these instructions carefully and save this manual for future use.
D E S C R I P T I O N
CAUTION
RISK OF ELECTRIC
SHOCK DO NOT OPEN
CAU TIO N: TO R EDU CE TH E RIS K OF EL ECT RIC
SHO CK, D O NOT R EMO VE CO VER
(OR B ACK ).
NO US ER- SER VIC EAB LE PA RTS I NSI DE. R EFE R
SER VIC ING T O QUA LIF IED S ERV ICE P ERS ONN EL
PRECAUTIONS
1.
YR-600U1 is DC12V/AC24V.
2.
3.
4. Do not expose the camera to rain or moisture, or try to operate it in wet areas.
Do not place the camera in the following locations:
①Locations where temperature is lower than -10C or higher than 50C;
②Locations where humidity is higher than 95%;
③Locations where there are large amounts of water vapor and steam.
Use the Appropriate Power Supply
The input power for Be sure to connect it to the appropriate
power. Wrong connection may cause malfunction and/or damage to the video camera.
Do not attempt to disassemble the camera.
To prevent electric shock, do not remove screws or covers. There are no user serviceable
parts inside. Ask a qualified service person for servicing.
Handle the camera with care.
Do not abuse the camera. Avoid striking, shaking, etc. The camera could be damaged by
improper handling or storage.
FEATURES
5. Do note use strong or abrasive detergents when cleaning the camera body.
Use a dry cloth to clean the camera when dirty. In case the dirt is hard to remove. Use a mild
detergent and wipe gently.
Clean the CCD faceplate with care.
When cleaning the CCD panel, do not use strong or abrasive detergents. Use a piece of lens
tissue or cotton tipped applicator and ethanol.
Do not attempt to aim the camera at the sun
Do not attempt to aim the camera at the sun or other extremely bright objects that cause
smear to appear irrespective of whether the camera is operating or not. This can damage
the CCD (Charge Coupled Device).
Do not put the camera in a place with interference.
When this camera is installed near the equipment like wireless communication device which
emits strong electromagnetic field, some irregularity such as noise on monitor screen may happen.
6.
7.
8.
Color High Resolution Camera
Operating Instruction
Use special algorithm, reduce video and color noises, which increases its resolution
and cleanliness and creates clearer and sharper images.
3D-DNR
SPE CI FICATI ON S
420 TV Line
Adv anc ed Im age P roc ess ing T ech nol ogy ; 650 TVL H igh R eso lut ion ; Cle ar Br igh t Pic tur es
650 TV Line
Model No
Sensor
Video Format
Sync Mode
Resolution
S/N Ratio
Mini Illumination
AGC
White Bal
BLC
Mirror
Iris Control
Shutter Speed
Voltage
Current
Operating Temp
Storage Temp
Dimension
Weight
Mode
Range
1/3″High Sensitivity CCD
PAL/NTSC
INTERNAL
650TVL
0.01Lux
LOW; MIDDLE; HIGH; OFF
ON; OFF; HS BLC
ON/OFF
Electronic Iris/Auto Iris Lens (DC Drive)
1/60(1/50)-1/100000 Second
DC12V/AC24V
<100mA
>50dB (AGC OFF)
MANUAL; AUTO TRACING; AUTOMATICAL
(AUTOMATICAL) 2200~10000°K
YR-600U1
-10℃ ~50℃
-20℃ ~50℃
Day/Night
AUTO; COLOR; B&W
Motion Detection
ON/OFF
Sensor
Privacy ON/OFF
Adjustment BRIGHTNESS; SHARPNESS
Title ON/OFF
Menu Oper Power
3D-DNR
D-WDR
ON/OFF
ON/OFF
*Spec ifications s ubject to ch ange without n otice.
Lens Mount CS Mount
130(L) * 60(H) * 50(W)
400g
D-W DR
Advanced D-WDR technology largely improves its image effect even under an
environment with little light.
HS BL C
Camera can automatically detect highlight spots and cover the high light spots on
the image to improve the resolution of the whole picture and carry out an effective
monitoring more clearly.
YR-600U1 employs new generation image processing technology. It has high horizontal
resolution up to 650TVL as well as advanced 3D-DNR, D-WDR, HS BLC and other functions.
Powerful OSD menu includes Brightness, Contrast, Saturation adjusting functions; Multi-area
BLC, White Balance, AGC and other functions ensure clear bright pictures. Besides, Mirror,
Motion Detection, Privacy and other aided functions make it suitable for various special
environments and help to carry out an easy 24-hour day&night monitoring.
650TVL horizontal resolution
高清晰度
High Resolution
Powerful OSD menu can set all functions on the camera.
OSD M en u
COLOR mode in daytime when there is enough light; at night when there is little light,
sensitivity and image quality need to be higher, it will switch to B/W mode automatically.
Aut o D/ N Switho ve r Op erat in g Mo de
Compatible with DC12V and AC24V. Camera can automatically switch to the
appropriate mode according to the input power.
DC1 2V /AC24V D ua l Po wer Su pp ly
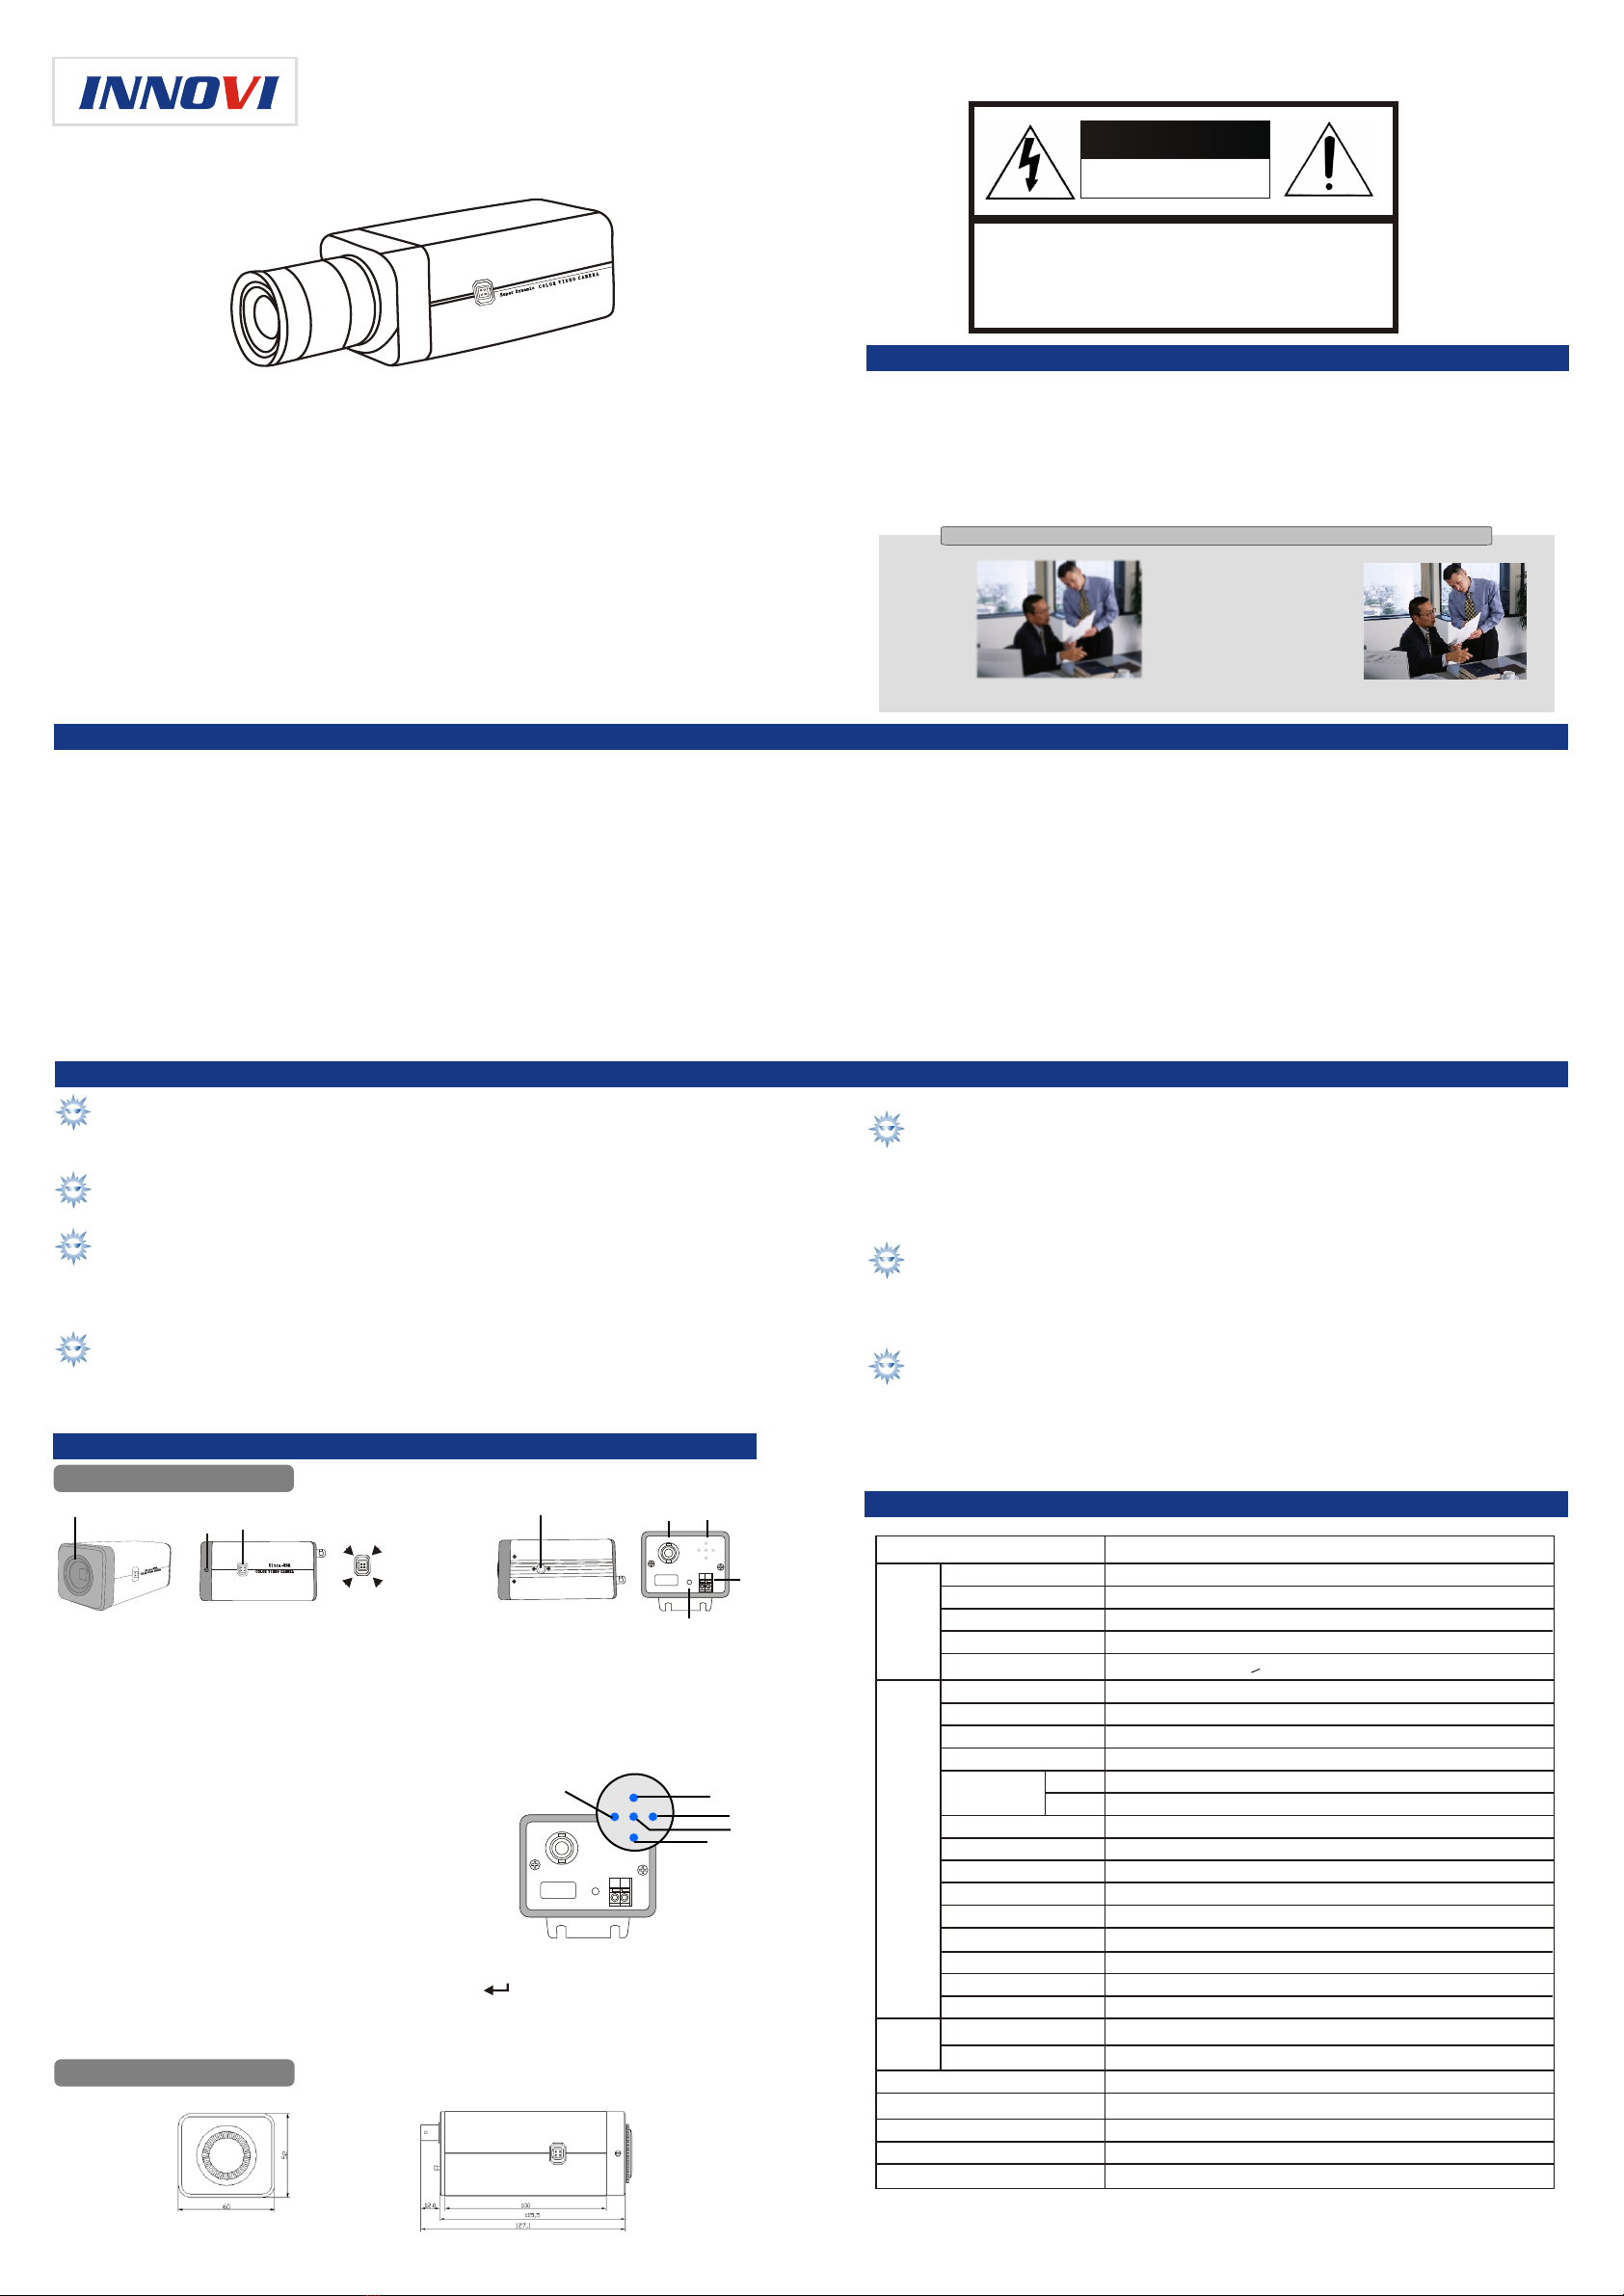
NO. DC D r ive
1 Cont r ol -
2 Cont r ol +
3 Driv e +
4 Driv e -
11
22
33
44
部件及功能说明说明
①④
②③
VIDEO
PWR
DC12V/AC24V
SEE
INSTRUCTION
MANUAL
Menu Right
Left
Up
Down
⑤⑥
⑦
⑧
① CS-Mount Lens Adapter,
used to connect to CS-Mount lens.
② Back Focus Fixing Screw,
used to readjust camera focus. Use
screw driver to unscrew the screw
and turn CS-Mount before adjusting
focal length to get clear picture.
③ Auto Iris Lens Interface,
used to connect to auto Iris lens plug.
⑤ Compound Video Signal Output
⑥
⑦ Power Input
⑧
VIDEO:
Menu/up/down/left/right
:AC24V/DC12V
PWR:Power LED
④ Bracket Fixing Hole,
used to install camera to the bracket
用摄像机后 面的5个菜单按钮来设置摄 像机
OSD Function Setting:
Menu: Menu Button, Choose Menu Item or Exit Menu
Up/down:
Left/right:
,
This button is used to move the cursor upward or downward.
This left or right button is used to move the cursor horizontally or change
parameter. Its back with symbol means there are still subordinate submenu
setups. Press Left/Right to enter setting and press RETURN button to go back to
the previous menu.
VIDEO
PWR
SE E
INSTRUCTION
MA N U AL
Men u R i g ht
Lef t
Up
Dow n
左键 上键
右键
下键
菜单
DC 1 2V / AC 24 V
功 能 说 明
PAR TS I NSTRUC TI ON
FUNC T I ON INSTRUCT I O N
D I M E N S I O N S ( U n i t : m m )
Use t he f ive butt on s on t he bac k to s et c amera.
PZ0462
EN-U1-600-110923
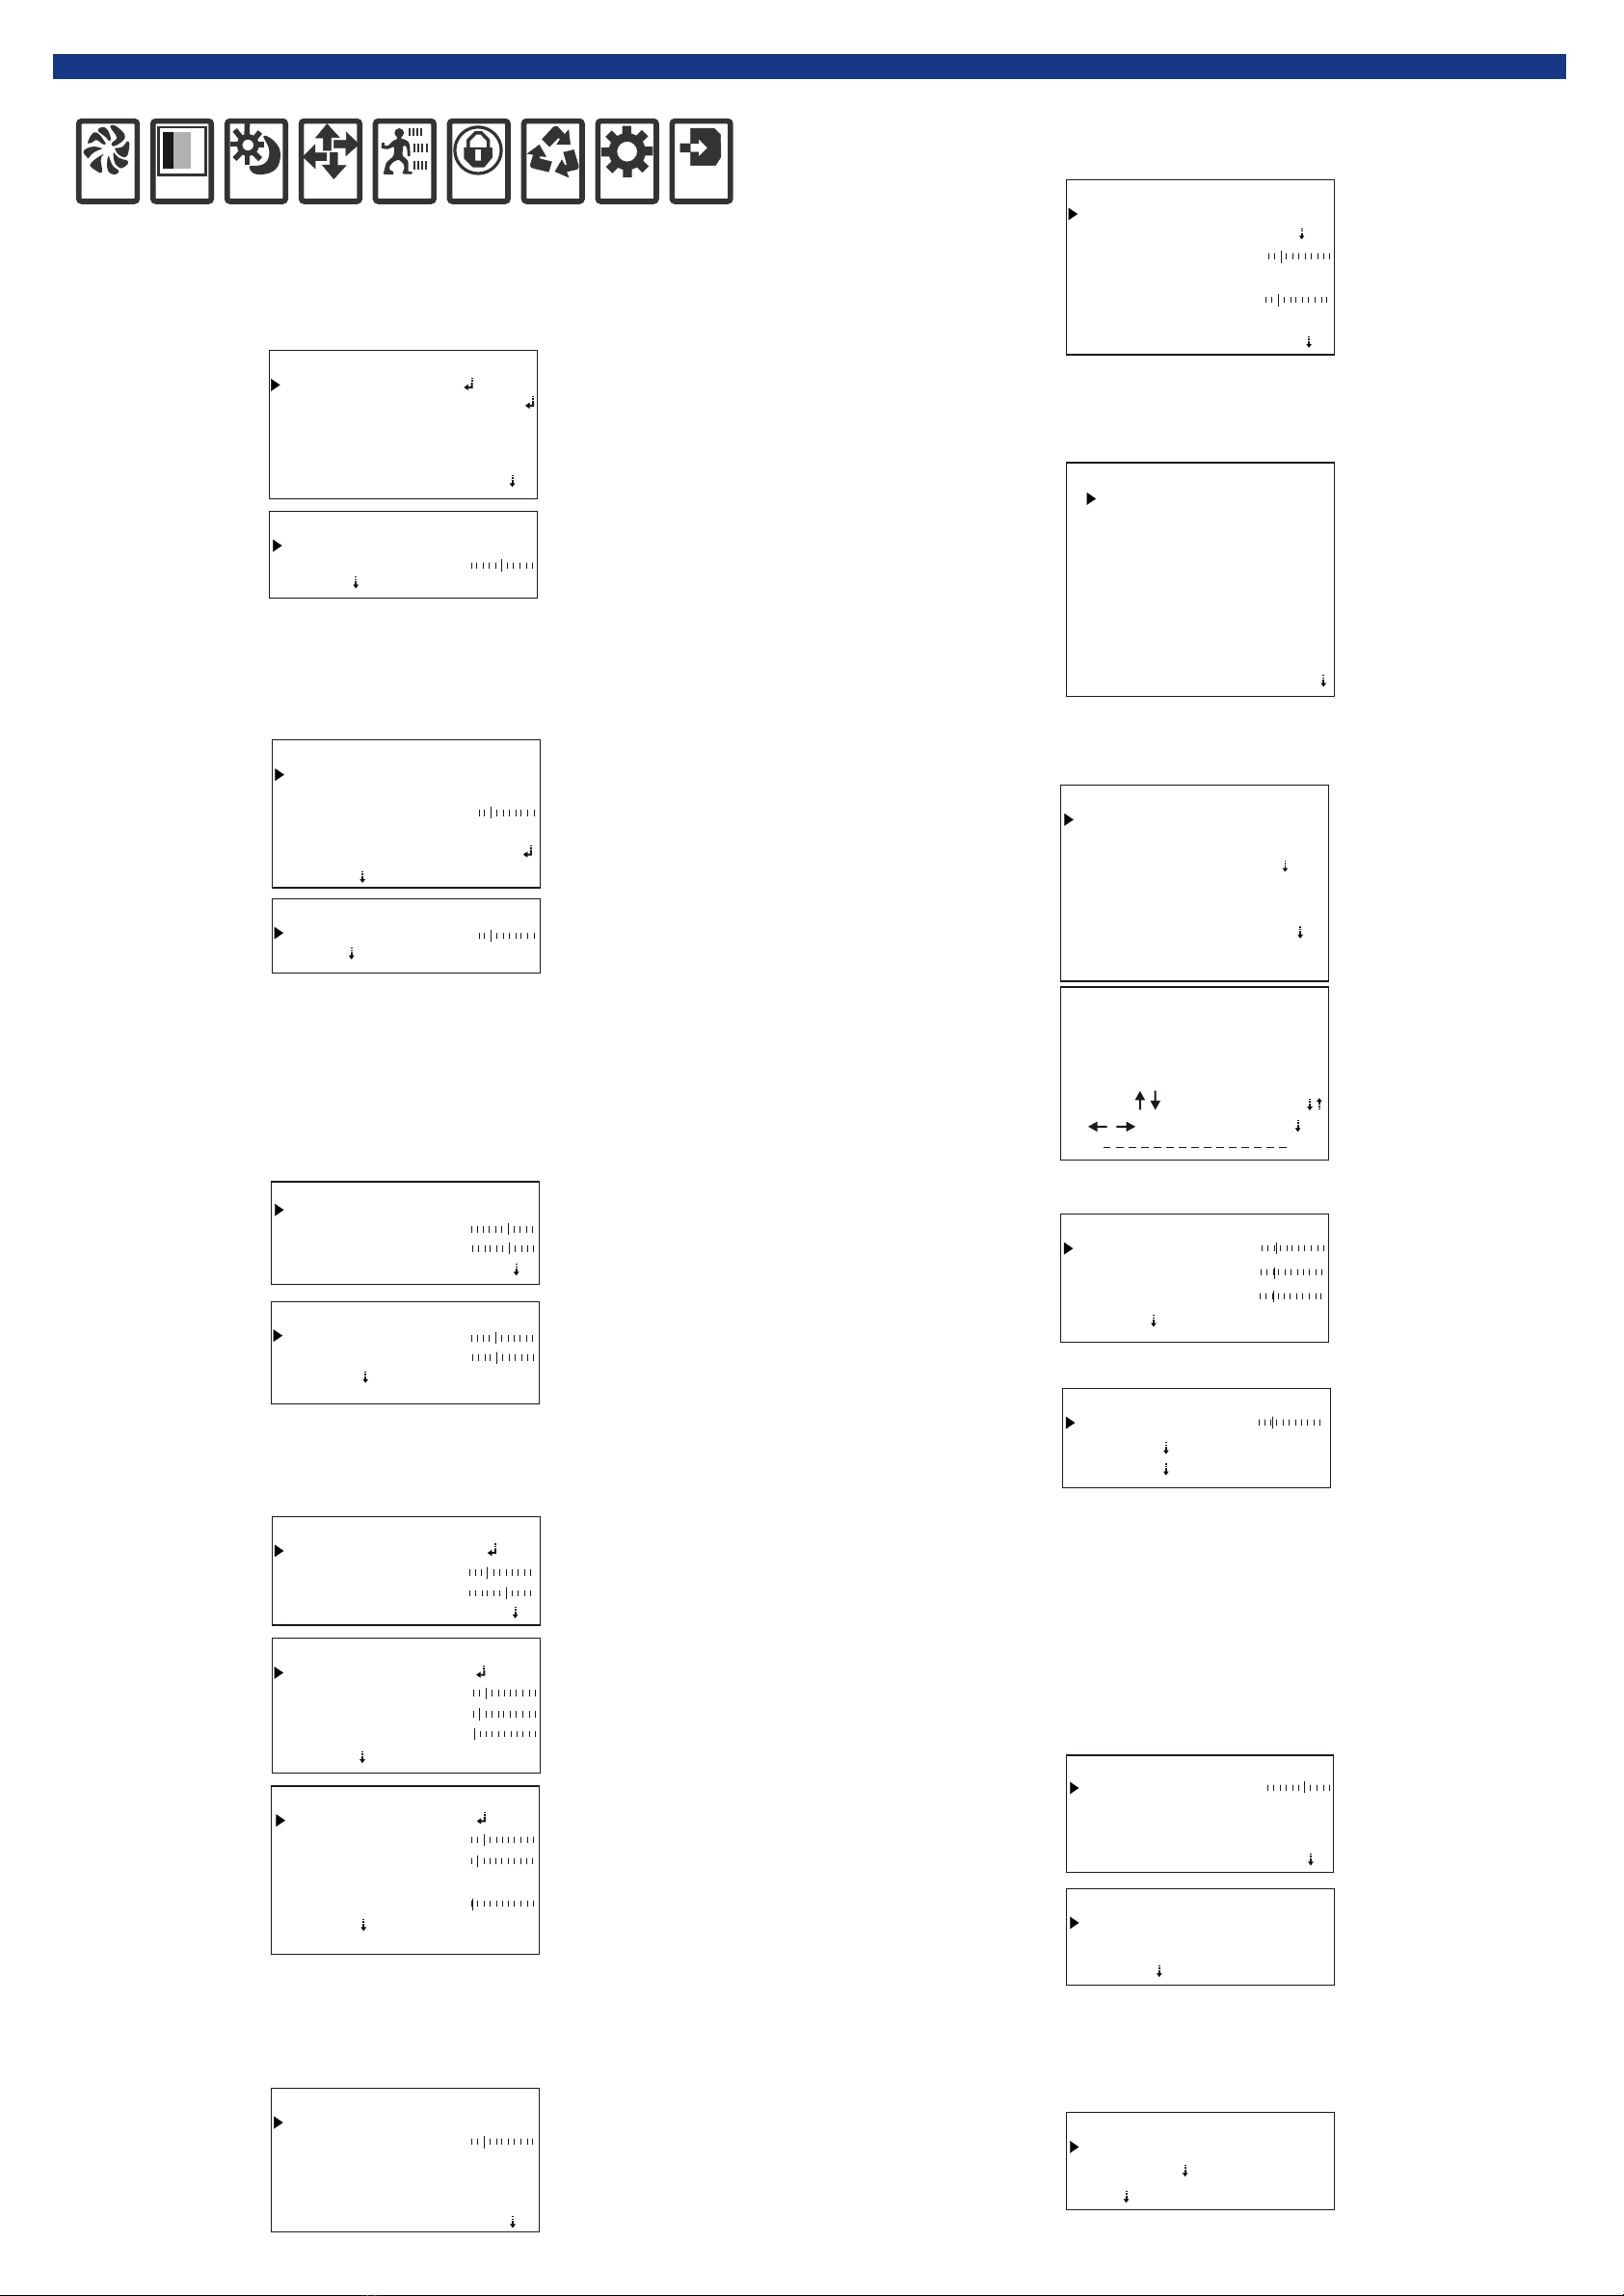
MEN U OP ERATIO N IN ST RUCTIO N
SETUP:
1. Press MENU button to display SETUP. Move the cursor to EXPOSURE. And move the
cursor to LENS by UP and DOWN buttons and set lens by left and right buttons: manual
iris lens; DC drive iris lens. E.SHUTTER and BRIGHT can be set.
EXP OS URE:
1. Move the cursor to COLOR, and set WB MODE by left and right buttons: MANUAL; ATW;
AWB; ATW LOCK. When MANUAL is selected, you can set color temperature.
COLOR:
DAY &N IGHT:
1. Move the cursor to DAY&NIGHT, and set DAY&NIGHT by left and right buttons: AUTO;
COLOR; WHITE; EXT.
FUNCTION:
1. Move the cursor to FUNCTION. Move the cursor to MIRROR by up and down buttons, and
set MIRROR by left and right buttons: ON; OFF. Move the cursor to SHARPNESS, and set
SHARPNESS range. Move the cursor to MONITOR, and set MODE type. Move to cursor
GAMMA, and set GAMMA range. Move the cursor to LSC, and set it: ON; OFF.
EXP WB D&N FUNC MOT PVM SET SYS EXIT
EXPOSURE
HB LC/ D-W DR
AG C
3D-DNR
SE NSE -UP
EX IT
LE NS
LOW
HIGH
ELC
OFF
X4
RETURN
LENS-ELC
BR IGH T
E. S HUT TER
RE TUR N
AU TO
03 5
HLI
MO DE
SE T LEV EL
GR AY MO DE
MA SK SE L
HB LC
BLACK
010
AL L DAY
RE TURN
MA SK 1
2. Move the cursor to HBLC/D-WDR and set HBLC/D-WDR by left and right buttons: BLC;
set BLC by left and right buttons: MANUAL; AUTO. Set AGC: OFF; LOW; MIDDLE; HIGH.
Set HBLC by left and right buttons: ALL DAY; ON. When HBLC is ON, you can set SET LEVEL,
GRAY MODE and MASK SEL. Set D-WDR by left and right buttons.
D- WDR
D- WDR L EVE L
010
RE TUR N
COLOR
R- Y GAI N
B- Y GAI N
WB M ODE
120
120
EX IT
ATW
WB-MANUAL
M. W B B
RE TUR N
M. W B R
064
064
DAY&NIGHT
C_ SUP
EX IT
D& N MOD E
060
050
A_ SUP
AU TO
D&N-AUTO
DA Y>N IGH T
DW ELL T IME
BU RST
013
01 9
NI GHT >DA Y
OF F
RE TUR N
003
EX-CDS
DA Y>N IGH T
DW ELL T IME
BU RST
10 0
21 0
NI GHT >DA Y
OF F
RE TUR N
00 3
SM ART I R
AU TO
FUNCTION
SH ARP NES S
MI RRO R
OF F
01 8
LS C
OF F
EX IT
RE TUR N
MOTION:
1. Move the cursor to MOTION, and set MOTION by left and right buttons: ON; OFF. When
MOTION is on, you can set 1~4 AREA; SENSITI.; DISPLAY ICON; ALARM.
MOTION
AR EA SE L
MO TIO N
AR EA 1
025
SE NSI TI.
OF F
DI SPL AY
RE TUR N
HO LD TI ME
AL ARM
EX IT
IC ON
ON
008
PRI VA CY:
PR IVA CY
MA SK 2
MA SK 1
MA SK 3
OF F
MA SK 4
RE TUR N
MA SK 5
MA SK 6
MA SK 7
MA SK 8
EX IT
OF F
OF F
OF F
OF F
OF F
OF F
OF F
SETUP:
1. Move the cursor to SETUP. Move the cursor to TITLE by up and down buttons, and set TITLE
by left and right buttons: ON; OFF. When TITLE is on, select different user titles.
SETUP
MA NUA L DPC
TI TLE
OFF
AU TO AU TO DP C
OF F
OL PF
RE TUR N
OS D COL OR
EX IT
85 0
BL UE
US ER TI TLE
CLR POS RET
A B C D E F G H IJK L M N OP
QR
S
TUV W X Y Z 01 2 345
678 9 ! # $%&( ) *+
,./< > ?@[ ] ^_
=\
_
3. Move the cursor to AUTO DPC, and set AUTO DPC by left and right buttons: ON; OFF.
AU TO DP C-A UTO
DP C RUN
DP C LEV EL
RE TUR N
02 9
MA NUA L DPC -MA NUA L
BL ACK T HR
WH ITE T HR
DP C LEV EL
16 8
RE TUR N
06 5
05 0
SYS TE M:
1. Move the cursor to SYSTEM. Move the cursor to CAMERA ID by up and down buttons and
set CAMERA ID by left and right buttons. Move the cursor to COMMUNI., And set
COMMUNI.: ON; OFF. When COMMUNI is on, you can select PROTOCOL and
BAUDRATE. Move the cursor to LANGUAGE, and set it: CHINESE; ENGLISH.
SY STE M
CO MMU NI.
CA MER A ID
LA NGU AGE
00 1
EX IT
OF F
EN GLI SH
RE TUR N
CO MMU NIC ATI ON
BA UDR ATE
PR OTO COL
RE TUR N
PE LCO -D
96 00
EXIT:
1.Move the cursor to EXIT. Move the cursor to FACTORY SET by up and down buttons and
set it: YES; NO. Moving the cursor SAVE&EXIT is to save the changes you have made and
exit. Move the cursor to EXIT and exit the menu directly.
EX IT
SA VE& EXI T
FA CTO RY SE T
EX IT
NO
1. Move the cursor to PRIVACY, and set MASK1~8 by left and right buttons: OFF; ON. When
MASK 1~8 is on, you can set the privacy masks and color.
2.Move the cursor to MANUAL DPC, and set MANUAL DPC by left and right buttons: ON; OFF.
3. Move the cursor to AGC, and set AGC by left and right buttons: OFF; LOW; MIDDLE; HIGH.
4. Set 3D-DNR by left and right buttons: OFF; LOW; MIDDLE; HIGH.
4.Move the cursor to OLPF, and set OLPF by left and right buttons: 650; 850.
5.Move the cursor to MONITOR, and set MONITOR by left and right buttons: CRT; LCD.
6.Move the cursor to GAMMA, and set GAMMA by left and right buttons:
0.45;0.6;1;other.
RE TUR N
MODE2
MO NIT OR
GA MMA
0. 45
RE TUR N
Other Innovi Digital Camera manuals


