Inoi DW567 User manual

USB 2.0 Dual Drives Enclosure
(Card Reader optional)
User’s Manual


1
♦Notebook or Desktop PC with USB2.0 or USB1.1 port
♦Windows 98SE/Me/2000, or Windows XP.
♦Mac OS 9.x or above (Mac OS 10.x is recommended for Card Reader)
NOTE:
♦USB2.0 host supports 480Mbps (maximum) data transfer rate, USB1.1 host only supports 12Mbps (maximum) data
transfer rate. Check your PC system to make sure you have the right hardware to gain the maximum performance.
♦Mac OS 9.x users can only use Hard Disk Drive without Card Reader feature. Therefore, use Mac OS 10.x or above is
recommended.
System Requirements

2
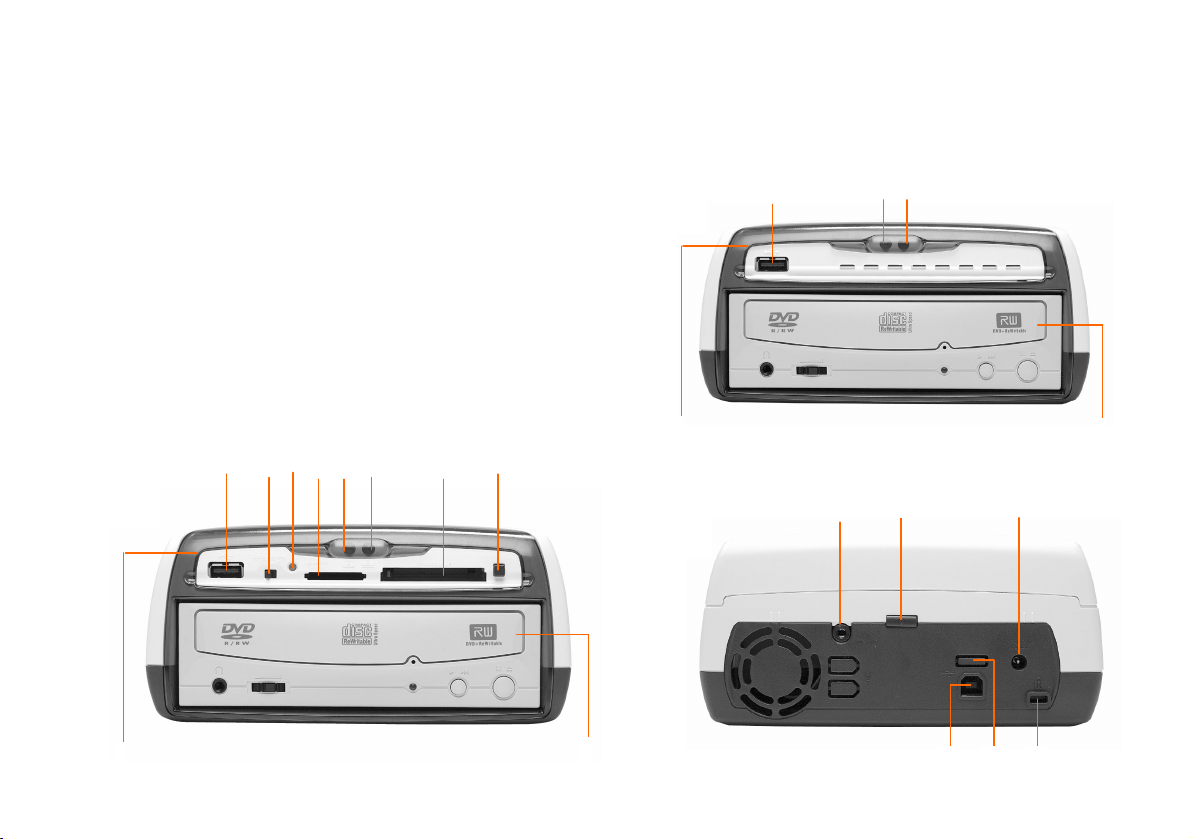
1. 3.5” Hard Disk Drive (Top drive or B drive): Supports 3.5” IDE/ATA hard disk drive.
2. 5.25” Optical Drive or 3.5” Hard Disk Drive (Bottom drive or A drive): Supports either 5.25” IDE/ATAPI optical drive such
as DVD±RW, DVD-ROM, CD-RW, CD-ROM drive or 3.5” Hard Disk Drive.
3. USB 2.0 Hub: Your PC can connect to more USB devices through this hub.
4. Card Reader Switch: Activates Card Reader.
5. LED (Green): Indicates the data-access of memory cards.
6. 5-in-1 Card Slot: Card slot for SD, MMC, MS, MS Pro and xD-Picture memory cards.
7. LED (Yellow): Indicates the power of the bottom drive (A drive) is on and the data-access of the drive.
8. LED (Green): Indicates the power of the top drive (B drive) is on and the data-access of the drive.
9. CF Card Slot: Card slot for Compact Flash (type I & II) memory card and Micro Drive.
10. CF Card Ejector: Push to eject the memory card from CF Card Slot.
11. Line Out Jack: Use this jack to output audio signal of optical drive to an audio amplifier.
12. Power Switch: Power-on to activate the top and bottom drives, and to provide extra power from AC adapter to USB 2.0 Hub.
13. External Power Jack: Connects to the AC adapter.
Part Names and Functions
3
14. USB 2.0 uplink port: Through the attached USB 2.0 cable, this port links this enclosure to PC.
15. 2nd USB 2.0 Hub: Your PC can connect to other USB devices through this hub.
16. Kensington Lock Connector.
nFront Panel for the Enclosure model with Card Reader
oFront Panel for the Enclosure model without Card Reader
pRear Panel for both Enclosure models
12
3
7 8
11
12
13
14 15 16
1
2
3456
7
8910
n
o
p
4
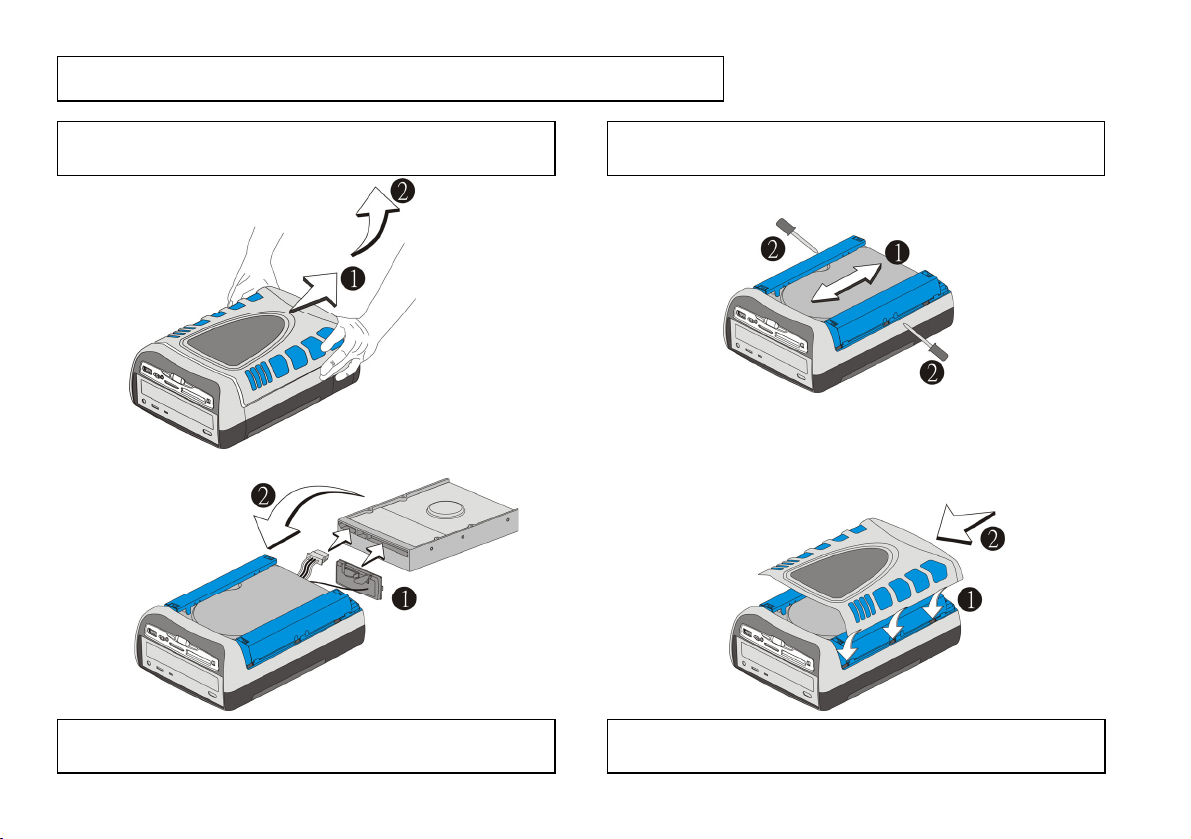
How to Assemble Top Drive (3.5” H.D. Drive)
Gently pull the top cover backward with both hands, and then
lift up the cover to separate it from the enclosure.
1 Move the drive backward and forward until it is latched. Fasten
the screws on both sides to fix the hard disk drive.
3
Attach the IDE and power cables to hard disk drive, and then
put it into the enclosure.
2 Align latches of top cover and enclosure; then put the cover
onto enclosure. Hold top cover and then push forward to fix it.
4
5
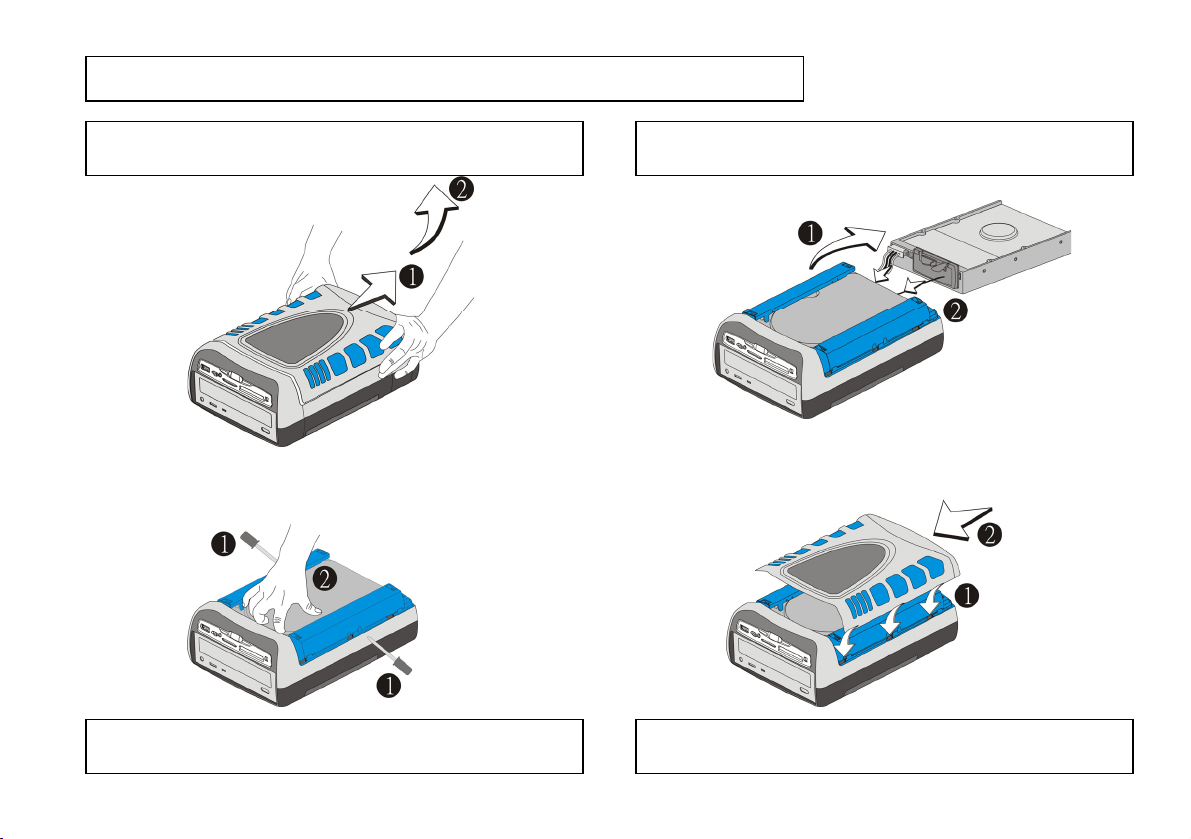
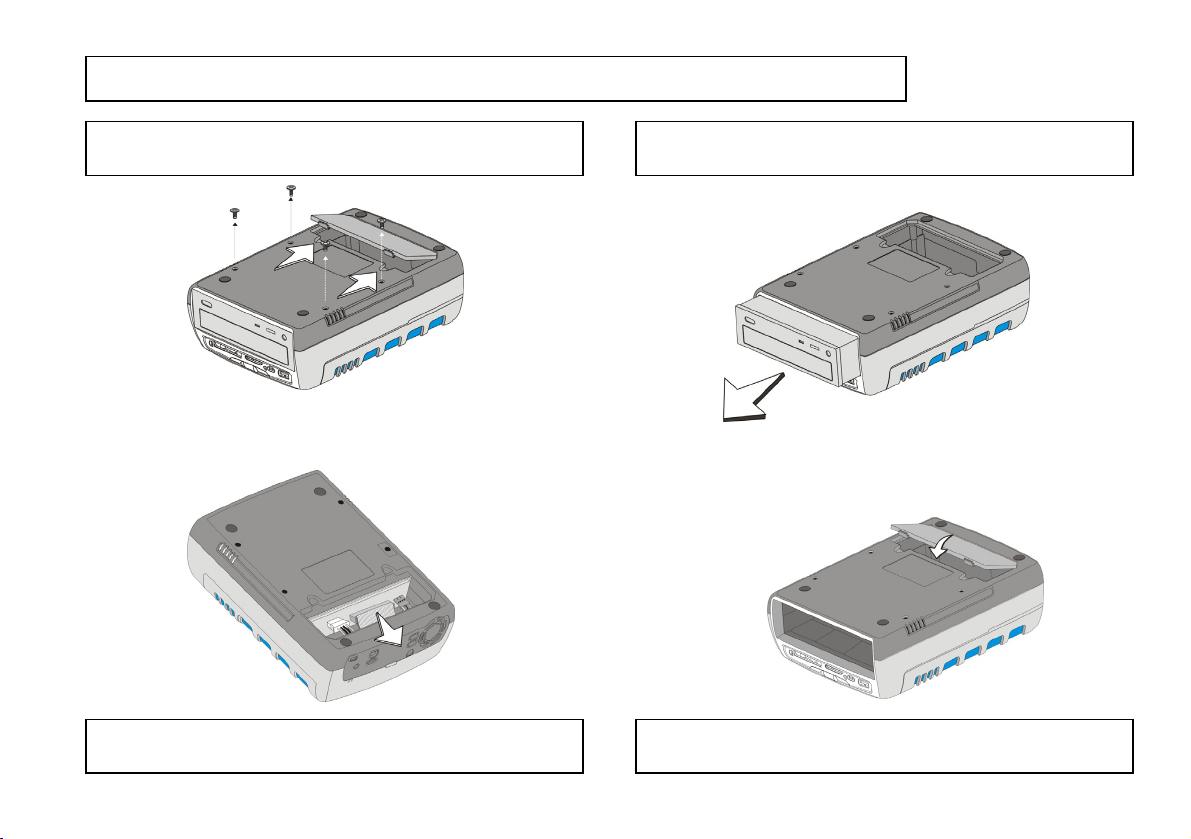
How to Disassemble Top Drive (3.5” H.D. Drive)
Gently pull the top cover backward with both hands, and then
lift up the cover to separate it from the enclosure.
1 Take out the drive from the enclosure, and then pull out the IDE
and power cables from the drive.
3
Align latches of top cover and enclosure; put the cover onto the
enclosure. Hold the top cover and then push forward to fix it.
4
Loosen the screws on both sides, use fingers to lift up the front
side of the hard drive to release the latches.
2
6
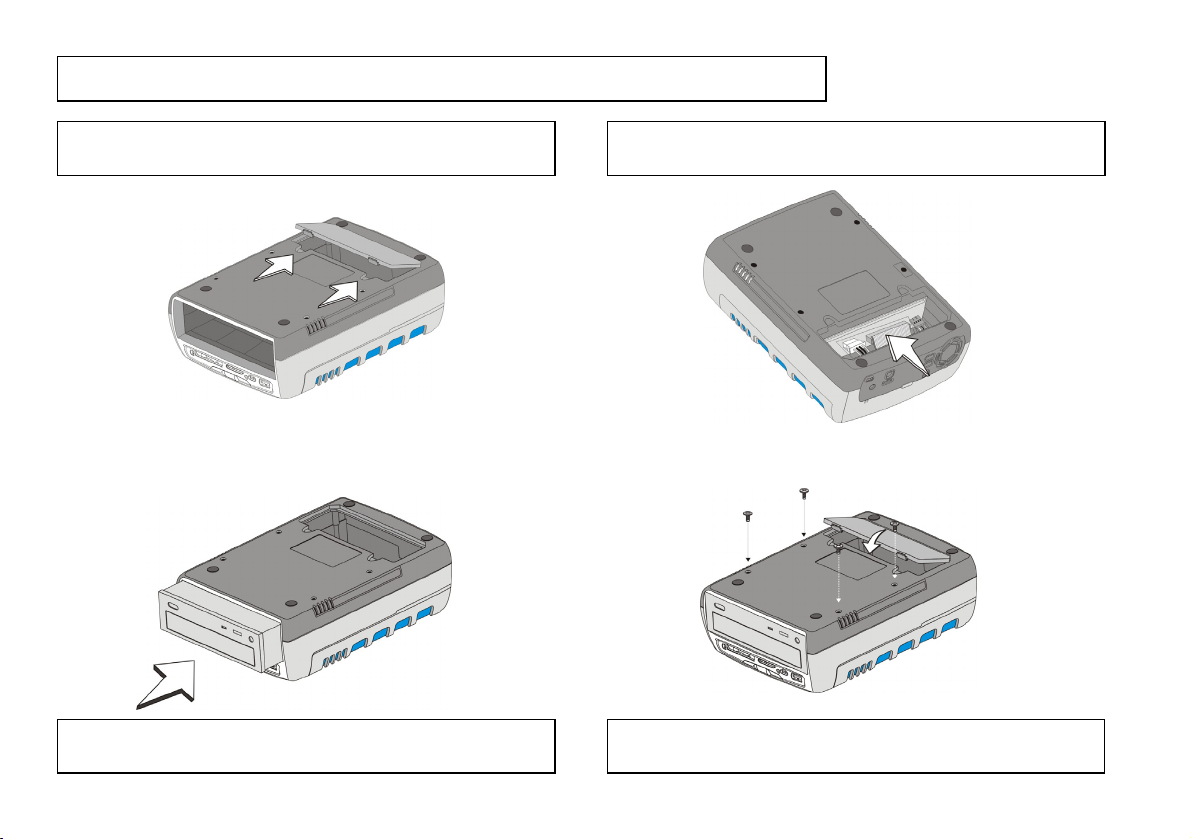
How to Assemble Bottom Drive if it is an Optical Drive
Fix the optical drive with screws. Insert the rear of the small
cover into enclosure, and then push cover downward to fix it.
4
Turn over the optical drive, and then load the optical drive into
the enclosure.
2
Turn over enclosure, use thumbs to push latches of the small
cover, and then separate the small cover from the enclosure.
1 Attach the IDE, power and audio cables to the optical drive,
and then load the drive into the enclosure completely.
3
7
How to Disassemble Bottom Drive if it is an Optical Drive
Insert the rear side of the small cover into the enclosure; push
the cover downward to fix it.
4
Pull out the IDE, power and audio cables from the optical drive.
2
Turn over the enclosure; loosen screws. Use thumbs to push
latches of small cover; separate small cover from enclosure.
1 Push the rear side of the optical drive and then pull from its
front side to separate it from the enclosure.
3

8
Install Device Driver from the Driver CD
1. Boot-up computer into Windows. Do not connect the enclosure to computer until the Device Driver is successfully
installed.
2. Insert the “Driver CD” into the CD-ROM drive, the welcome screen will pop-up automatically. If the welcome screen does not
pop-up, double click “My Computer”, double click the CD-ROM contains the “Driver CD”, and then double click “autorun.exe” to
open the welcome screen.
3. Click “Install Device Driver”, follow the instruction on screen to install the following drivers:
♦If you are using Windows 98SE, please install “Win98SE Driver for Storage Device” first, and then (only for the enclosure
model w/card reader) install “Driver for Card Reader”.
♦If you are using Windows XP/2000/Me, please install only the “Driver for Card Reader”. The driver for hard disk and
optical drive is already built-in in the Windows systems.
4. After installing the device driver, now you can connect the enclosure to computer for the system to recognize the device.
Software Installation

9
Connect the Enclosure to Computer for the very First Time
1. Make sure both the “Power Switch” and “Card Reader Switch” are switched to “OFF”.
2. Plug the AC adapter into the “External Power Jack” at the rear of the enclosure.
3. Attach the AC adapter to the AC power outlet.
4. Plug one end of the USB cable into the “USB 2.0 uplink port” at the rear of the enclosure.
5. Plug the other end of USB cable into computer. (Make sure the AC adapter is properly connected before connecting the
enclosure to PC.)
6. The driver for USB 2.0 Hub will be installed immediately and automatically.
7. Shift the “Card Reader Switch” to “ON”, the driver for Card Reader will be installed automatically. Two new drive icons are now
present in “My Computer”; they are the Card Readers; you can access data with these two drives (card readers) after inserting
the memory card.
8. Push the “Power Switch” to “ON”, and the driver for the drive (hard disk and optical drive) will be installed automatically. The
new drive letters are now present in “My Computer” for the connected drives.
9. All drivers are installed successfully, and you can now use the enclosure.
CF Card Slot
drive icon
5-in-1 Card Slot
drive icon

10
There are several features integrated into the enclosure, please follow the table to activate the features:
Feature Power Source Power Switch Card Reader Switch AC Adapter
Bus-Power*1 OFF Can Ignore*3 Not connected
USB 2.0 Hub
Self-Power*2 ON Can Ignore*3 Connected
Card Reader
Any of the above ON/OFF ON Any of the above
Hard Disk Drive
and
Optical Drive
Self-Power ON Can Ignore*3 Connected
*1 Bus-Power: get power from the USB port of computer. (Not recommending using Bus-Power; Self-Power is better.)
*2 Self-Power: get the power from the AC adapter. (And the Power Switch must be turned on)
*3 Switch on the “Card Reader Switch” will reduce the performance of the external drives and USB 2.0 Hub.
Suggestions:
1. Always use Self-Power, although the Card Reader can almost always and the USB 2.0 Hub can often get enough power using
Bus-Power.
2. Turn off the Card Reader Switch when Card Readers are not in use.
Use the Enclosure

11
Use the USB 2.0 Hub
♦When using Bus-Power, each port of the USB 2.0 Hub provides 100mA current, please connect with low power
consumption devices such as USB mouse or keyboard.
♦When using Self-Power, each port of the USB 2.0 Hub provides 2A current in total.
1. By attaching the USB cable, you can use the hub with Bus-Power.
2. If you want to use Self-Power, attach the AC adapter and then push the “Power Switch” to “ON”.
3. The USB 2.0 Hub is ready to use, you can connect your USB device to the port.
4. To stop the connection of your USB device, click or on system tray to “Safely Remove” the related device, and then
un-plug the device from the port.

12
Activate the Card Reader will reduce the performance of the external hard disk drive; please turn off the Card
Readers when they are not in use.
Use the Card Reader
1. Attach the USB cable and then push the “Card Reader Switch” to “ON”.
2. Insert the memory card into the related slot (take notice in the direction of the card), and then access the data from “My
Computer.
3. To take out the memory card, first, ensure the memory card is not accessing data, and then push the ejector (CF memory card),
or pull out the card (SD memory card) directly.
4. To stop the Card reader feature, click or on system tray (or under Win98) to “Safely Remove” the related drive
letter, and then push the “Card Reader Switch” to “OFF”.
13
Some hard disk drives may require AC adapter with higher power rating. Please contact your dealer for details.
Use the External Hard Disk and Optical Drive
1. Attach the USB cable and AC adapter, and then push the “Power Switch” to “ON”, the hard disk and optical drive will be
recognized immediately for use.
2. To stop using the hard disk or optical drive, click , or on system tray to “Safely Remove” the related drive
letter, and then push the “Power Switch” to “OFF”.
Note: Please look up the partitioning procedure (especially the cautions) in the attached Driver CD.
How to Partition the Hard Disk Drive


7450799-00
Table of contents


