Insignia IS-TV040925 User manual

OWNER'S MANUAL
MANUAL DEL USUARIO
MANUEL D'INSTRUCTIONS
32” MTS STEREO COLOR TELEVISION
TELEVISOR A COLOR DE 32” CON SONIDO ESTÉREO MTS
TÉLÉVISEUR COULEUR 32 po STÉRÉO AVEC DÉCODEUR MULTIVOIE
IS-TV040925
TV/CATV MODE SELECTION
SELECCIÓN DEL MODO DE TV/CATV
SÉLECTION DU MODE TV/CATV
When shipped from the factory, the TV/CATV menu option is set to the "CATV" (Cable Television) mode. If not
using CATV (Cable TV), set this menu option to the "TV" mode.
Cuando se envía de la fábrica, la opción del menú de TV/CATV se ajusta al mode de "CATV" (Televisión por
cable). Si no utiliza CATV, ajuste esta opción de menú al modo de "TV".
Lorsque l'appareil sort de l'usine, l'option du menu TV/CATV est en mode « CATV » (câblodistribution). Si vous
n'utilisez pas la câblodistribution, choisissez l'option « TV ».
IF CONTACT WITH CUSTOMER SERVICE IS REQUIRED
PLEASE HAVE THE MODEL NUMBER READY PRIOR TO THE CALL
CUSTOMER SERVICE – 1-877-467-4289
SI NECESITA PONERSE EN CONTACTO CON EL SERVICIO DE ATENCIÓN AL CLIENTE, TENGA A MANO
EL NÚMERO DE MODELO ANTES DE LLAMAR AL
TELÉFONO 1-877-467-4289
S’IL FAUT CONTACTER LE SERVICE CLIENTÈLE, PRENEZ SOIN D’ÊTRE MUNI DU NUMÉRO DE
MODÈLE AVANT D’APPELER.
SERVICE CLIENTÈLE – 1-877-467-4289
ATTENTION
ATENCIÓN
ATTENTION
If you purchase a universal remote control from your local retailer, please contact the remote manufacturer for
the required programming code.
Si usted ha comprado un control de remoto universal, por favor comuníquese con el fabricante para el código
de programación requerido.
Si vous utilisez avec cet appareil une télécommande universelle (autre que celle vendue avec ce téléviseur),
consultez la documentation accompagnant la télécommande universelle afin de connaître le code numérique
correspondant au téléviseur.
FRANÇAIS ESPAÑOL ENGLISH
INSIGNIA WEBSITE
FOR INFORMATION ON OUR OTHER PRODUCTS,
PLEASE VISIT OUR WEBSITE AT
www.insignia-products.com
SITIO WEB DE INSIGNIA
PARA INFORMACIÓN SOBRE NUESTROS OTROS PRODUCTOS,
VISITE NUESTRO PORTAL DE INTERNET EN
www.insignia-products.com
SITE WEB INSIGNIA
POUR DES INFORMATIONS SUR NOS AUTRES PRODUITS,
VEUILLEZ VISITER NOTRE SITE WEB
www.insignia-products.com
Before operating the unit, please read this manual thoroughly.
Antes de utilizar su aparato favor de leer las siguientes instrucciones.
Avant de mettre cet appareil en marche, veuillez lire attentivement ce manuel.
3T30631A [COVER] 2/21/05, 19:161

2
The lightning flash with arrowhead symbol, within an equilateral triangle
is intended to alert the user to the presence of uninsulated dangerous
voltage within the product's enclosure that may be of sufficient
magnitude to constitute a risk of electric shock.
The exclamation point within an equilateral triangle is intended to alert
the user to the presence of important operating and maintenance
(servicing) instructions in the literature accompanying the appliance.
CAUTION: Changes or modifications not expressly approved by the party responsible for compliance with the FCC
Rules could void the user's authority to operate this equipment.
1. READ INSTRUCTIONS
All the safety and operating instructions should be read before the unit is operated.
2. RETAIN INSTRUCTIONS
The safety and operating instructions should be retained for future reference.
3. HEED WARNINGS
All warnings on the unit and in the operating instructions should be adhered to.
4. FOLLOW INSTRUCTIONS
All operating and use instructions should be followed.
5. CLEANING
Unplug this unit from the wall outlet before cleaning. Do not use liquid cleaners or aerosol cleaners. Use a damp cloth for cleaning
the exterior cabinet only.
6. ATTACHMENTS
The manufacturer of this unit does not make any recommendations for attachments, as they may cause hazards.
7. WATER AND MOISTURE
Do not use this unit near water. For example, near a bathtub, washbowl, kitchen sink, laundry tub, in a wet basement, or near a
swimming pool.
8. ACCESSORIES
Do not place this unit on an unstable cart, stand, tripod, bracket, or table.
The unit may fall, causing serious injury, and serious damage to the unit.
8A. An appliance and cart combination should be moved with care. Quick stops, excessive
force, and uneven surfaces may cause the appliance and cart combination to overturn.
9. VENTILATION
Slots and openings in the cabinet back or bottom are provided for ventilation, to ensure reliable operation of the unit and to
protect it from overheating. These openings must not be blocked or covered. The openings should never be blocked by placing
the unit on a bed, sofa, rug, or other similar surface. This unit should never be placed near or over a radiator or heat source.
This unit should not be placed in a built-in installation, such as a bookcase, or rack unless proper ventilation is provided or the
manufacturer's instructions have been adhered to.
10. POWER SOURCE
This unit should be operated only from the type of power source indicated on the rating plate. If you are not sure of the type of
power supply to your home, consult your appliance dealer or local power company. For units intended to operate from battery
power, or other sources, refer to the operating instructions.
11. GROUNDING OR POLARIZATION
This unit is equipped with a polarized alternating current line plug (a plug having one blade wider than the other). This plug will
fit into the power outlet only one way. This is a safety feature. If you are unable to insert the plug fully into the outlet, try
reversing the plug. If the plug should still fail to fit, contact your electrician to replace your obsolete outlet. Do not defeat the
safety purpose of the polarized plug. If your unit is equipped with a 3-wire grounding-type plug, a plug having a third (ground-
ing) pin, this plug will only fit into a grounding-type power outlet. This too, is a safety feature. If you are unable to insert the plug
into the outlet, contact your electrician to replace your obsolete outlet. Do not defeat the safety purpose of the grounding-type plug.
12. POWER-CORD PROTECTION
Power-supply cords should be routed so that they are not likely to be walked on or pinched by items placed upon or against
them, paying particular attention to cords at plugs, convenience receptacles, and the point where they exit from the appliance.
S3126A
PORTABLE CART WARNING
(symbol provided by RETAC)
IMPORTANT SAFEGUARDS
WARNING: TO PREVENT FIRE OR SHOCK HAZARD, DO NOT EXPOSE THIS APPLIANCE TO RAIN OR
MOISTURE.
CAUTION: TO PREVENT ELECTRIC SHOCK DO NOT USE THIS POLARIZED PLUG WITH AN EXTENSION
CORD, RECEPTACLE OR OTHER OUTLET UNLESS THE BLADES CAN BE FULLY INSERTED TO
PREVENT BLADE EXPOSURE.
CAUTION:
TO REDUCE THE RISK OF ELECTRIC
SHOCK, DO NOT REMOVE COVER
(OR BACK).NO USER-SERVICEABLE
PARTS INSIDE. REFER SERVICING
TO QUALIFIED SERVICE PERSONNEL.
ENGLISH
3T30631A [E] P02-07 2/21/05, 19:162

3
ENGLISH
13. LIGHTNING
To protect your unit during a lightning storm, or when it is left unattended and unused for long periods of time, unplug it from the
wall outlet and disconnect the antenna or cable system. This will prevent damage to the unit due to lightning and power line
surges.
14. POWER LINES
An outside antenna system should not be located in the vicinity of overhead power lines, other electric light or power circuits, or
where it can fall into such power lines or circuits. When installing an outside antenna system, extreme care should be taken to
keep from touching such power lines or circuits as contact with them might be fatal.
15. OVERLOADING
Do not overload wall outlets and extension cords as this can result in a risk of fire or electric shock.
16. OBJECT AND LIQUID ENTRY
Do not push objects through any openings in this unit as they may touch dangerous voltage points or short out parts that could
result in fire or electric shock. Never spill or spray any type of liquid into the unit.
17. OUTDOOR ANTENNA GROUNDING
If an outside antenna or cable system is connected to the unit, be sure the antenna or cable system is grounded to provide
some protection against voltage surges and built-up static charges. Section 810 of the National Electrical Code, ANSI/NFPA
70, provides information with respect to proper grounding of the mast and supporting structure, grounding of the lead-in wire to
an antenna discharge unit, size of grounding conductors, location of antenna discharge unit, connection to grounding elec-
trodes, and requirements for the grounding electrode.
18. SERVICING
Do not attempt to service this unit yourself as opening or removing covers may expose you to dangerous voltage or other
hazards. Refer all servicing to qualified service personnel.
19. DAMAGE REQUIRING SERVICE
Unplug this unit from the wall outlet and refer servicing to qualified service personnel under the following conditions:
a. When the power-supply cord or plug is damaged.
b. If liquid has been spilled, or objects have fallen into the unit.
c. If the unit has been exposed to rain or water.
d. If the unit does not operate normally by following the operating instructions. Adjust only those controls that are covered
by the operating instructions, as an improper adjustment of other controls may result in damage and will often require
extensive work by a qualified technician to restore the unit to its normal operation.
e. If the unit has been dropped or the cabinet has been damaged.
f. When the unit exhibits a distinct change in performance, this indicates a need for service.
20. REPLACEMENT PARTS
When replacement parts are required, be sure the service technician uses replacement parts specified by the manufacturer or
those that have the same characteristics as the original part.
Unauthorized substitutions may result in fire, electric shock or other hazards.
21. SAFETY CHECK
Upon completion of any service or repairs to this unit, ask the service technician to perform safety checks to determine that the
unit is in proper operating condition.
22. HEAT
The product should be situated away from heat sources such as radiators, heat registers, stoves, or other products (including
amplifiers) that produce heat.
23. NOTE TO CATV SYSTEM INSTALLER
This reminder is provided to call the CATV system installer's attention to Article 820-40 of the NEC that provides guidelines for
proper grounding and, in particular, specifies that the cable ground shall be connected to the grounding system of the building,
as close to the point of cable entry as practical.
EXAMPLE OF ANTENNA GROUNDING AS PER NATIONAL ELECTRICAL CODE
GROUND CLAMP
ELECTRIC
SERVICE
EQUIPMENT
ANTENNA LEAD IN WIRE
ANTENNA DISCHARGE UNIT
(NEC SECTION 810-20)
GROUNDING CONDUCTORS
(NEC SECTION 810-21)
POWER SERVICE GROUNDING ELECTRODE SYSTEM
(NEC ART 250, PART H)
NEC-NATIONAL ELECTRICAL CODE
GROUND CLAMPS
S2898A
3T30631A [E] P02-07 2/21/05, 19:163

4
FEATURES
LOCATION OF CONTROLS
• 181 Channel Tuner - The tuning system is capable of receiving all 68 VHF/UHF standard broadcast channels that
are available in your area. When operating on a cable system, it can tune to the standard VHF channel frequencies
plus up to 113 cable channel frequencies. The actual number of channels received depends upon channel
reception in your area or your cable system.
• On-Screen 3 Language Display - This TV can display the on screen language in English, Spanish or French.
•Sleep Timer - Operable from the remote control, this TV can be programmed up to 120 minutes to turn off automatically.
• Memory Back Up - This system prevents loss of memorized channel selections in case a power interruption to the
TV should occur.
•V-Chip - The V-Chip function can read the rating of a TV program or movie content if the program is encoded with
this information. V-Chip will allow you to set a restriction level.
•
Picture Control Adjustments - The On-Screen display allows precise remote control adjustment of BRIGHTNESS,
COLOR, CONTRAST, SHARPNESS and TINT.
•Closed Captioned Decoder - Displays text captions or 1/2 of full screen text on the screen for hearing impaired viewers.
•Stereo/SAP Reception - This TV is designed to receive stereo and second audio program (SAP) broadcasts
where available.
5. FRONT AUDIO (L / R) / VIDEO IN Jacks (AUX2) -
Audio and video signal cables from an external
source can be connected here.
6. VHF/UHF IN (ANT) Jack - Connect a VHF/UHF
antenna or CATV cable to this jack.
7. S-VIDEO IN Jack - S-Video signal cable from an
external source can be connected here.
8. REAR AUDIO (L / R) / VIDEO IN Jacks (AUX1) -
Audio and video signal cables from an external source
can be connected here.
9. AC Power Cord - Plug into an outlet having 120V,
60 Hz AC power only.
FRONT BACK
1. POWER Button - Press to turn the TV on or off.
2. Remote Sensor - Signals from the Remote Control
unit are received here.
3. CHANNEL ▼ /▲ Buttons - Press to select a higher
or lower numbered channel set into memory.
(ENTER Button) - Press to enter or select informa-
tion for On-Screen operations.
(RESET Button) - Press, while in the On-Screen
menu mode, to reset the On-Screen picture adjust-
ments to their factory preset positions.
4. VOLUME ▼ /▲ Buttons - Press to raise or lower the
level of the sound.
(MENU Buttons) - Press both VOLUME ▼ /▲ buttons
at the same time to display the On-Screen menu function.
(SET – / + Buttons) - Press to select the desired
setting during On-Screen operations.
POWER ▼ CHANNEL ▲
ENTER RESET
▼ VOLUME ▲
MENU
– SET +
VIDEO IN (MONO)
L – AUDIO IN – R
12 35
4
6789
3T30631A [E] P02-07 2/21/05, 19:164

5
ENGLISH
4. SLEEP Button - To set the TV to turn off after a preset
amount of time, press the SLEEP button. The clock will
count down 10 minutes each time the button is pressed in
the order of 120, 110, 100, ······ 20, 10, 0. After the sleep
time is programmed, the display will disappear then
reappear momentarily every ten minutes to remind you the
sleep timer function is operating. To confirm the sleep time
setting, press the SLEEP button once and the remaining
time will be momentarily displayed. To cancel sleep time,
press the SLEEP button repeatedly until the display turns
to 0.
5. VOL (VOLUME) /Buttons - Press the button to
increase, or the button to decrease the volume level.
6. MENU Button - Press to display the On-Screen menu
function.
7. SET – / + Buttons - Press to select the desired setting
during On-Screen operations.
8. RESET Button - Press to reset the On-Screen picture
adjustments to their factory preset positions.
9. TV/AV Button - Switches between TV and external inputs.
10. CALL Button - When you press this button, the channel
number will appear in the upper right corner of the screen.
Press the button again to remove display from the screen.
11. MUTE Button - To turn off the sound, press this button
once. The TV will be silenced and the symbol “MUTE” will
appear on the screen. The muting feature can be released
by pressing the MUTE button again or one of the VOL
or button.
12. CH (CHANNEL) /Buttons - Press the button to
change to a higher numbered channel set into memory.
Press the button to change to a lower numbered channel
set into memory.
13. ENTER Button - Press to enter or select information for
On- Screen operations.
14. AUDIO SELECT Button - Switches sound between mono
and stereo when receiving broadcasts in stereo.
15.
CH.1/2 Button - Switches between Channel 1 and Channel 2
in the Closed Caption mode.
16.
TV/CAP/TEXT Button - Press this button to switch between
normal TV and the two Closed Caption modes (captions
and 1/2 of full screen text). Closed Captioning will display
text on screen for hearing impaired viewers.
1. POWER Button - Press to turn the TV on. Press again to
turn the TV off.
2. Direct Channel Selection Buttons (0-9) - Allows direct
access to any channel.
3. QUICK VIEW Button - This button allows you to go back
to the previous channel selected by just pressing the
QUICK VIEW button. Press this button again to return to
the channel you were watching.
1. Open the battery compartment cover.
2. Install two “AAA” batteries (not supplied).
HOW TO INSTALL BATTERIES
Before using the remote control, batteries must first be installed.
3. Replace the battery compartment cover.
BATTERY PRECAUTIONS
These precautions should be followed when using batteries
in this device:
•Use only the size and type of batteries specified.
•Be sure to follow the correct polarity when installing the
batteries as indicated in the battery compartment.
Reversed batteries may cause damage to the device.
•Do not mix different types of batteries together (e.g.
Alkaline and Carbon-zinc) or old batteries with fresh ones.
•If the device is not to be used for a long period of time,
remove the batteries to prevent damage or injury from
possible battery leakage.
•Do not try to recharge batteries not intended to be
recharged; they can overheat and rupture (follow battery
manufacturer's directions).
Use two “AAA” size batteries. The batteries may last
approximately one year depending on how much the remote
control is used. For best performance, it is recommended
that batteries should be replaced on a yearly basis, or when
the remote operation becomes erratic. Do not mix old and
new batteries or different types.
REMOTE CONTROL
MENU
VOL
SLEEP
MUTE
QUICK VIEW CALL
VOL
ENTER
CH
CH
123
456
7
0
89
–
SET
+
CH.1/2
TV
CAP/TEXT
RESET
AUDIO
SELECT
TV/AV
POWER
1
2
3
5
6
7
16
14
13
12
8
9
10
411
15
3T30631A [E] P02-07 2/21/05, 19:165

6
Converter/
Descrambler
AB
Converter/
Descrambler
A
/
B SwitchSplitter
This television has an extended
tuning range and can tune most
cable channels without using a
cable company supplied
converter box. Some cable
companies offer “premium pay
channels” in which the signal is
scrambled. Descrambling these
signals for normal viewing
requires the use of a descrambler
device which is generally
provided by the cable company.
ANTENNA/CATV CONNECTIONS
Separate VHF/UHF Antennas
Connect the 75 ohm Cable from the VHF antenna and the UHF
antenna Twin-lead to a combiner (not supplied). Attach the Combiner
to the Antenna Jack.
NOTE: If your VHF antenna has a Twin-lead Wire, use the 300-75
ohm Matching Transformer (not supplied), then connect the
Transformer to the Combiner.
For Subscribers to Basic Cable TV Service
For basic cable service not requiring a Converter/Descrambler box,
connect the CATV 75 ohm Coaxial Cable directly to the Antenna
Jack on the back of the television.
For Subscribers to Scrambled Cable TV Service
If you subscribe to a cable service which requires the use of a
Converter/Descrambler box, connect the incoming cable to the
Converter/Descrambler box and connect the output of the box to the
Antenna Jack on the back of the television. Follow the connections
shown left. Set the television to the output of the Converter/
Descrambler box (usually channel 3 or 4) and use the Converter/
Descrambler box to select channels.
For Subscribers to Unscrambled Basic Cable with
Scrambled Premium Channels
If you subscribe to a cable service in which basic cable channels
are unscrambled and premium channels require the use of a
Converter/Descrambler box, you may wish to use a two-set signal
splitter (sometimes called a “two-set coupler”) and an A/B Switch
box from the cable installer or an electronics supply store. Follow
the connections shown left. With the switch in the “B” position, you
can directly tune any nonscrambled channels on your TV. With the
switch in the “A” position, tune your TV to the output of the Converter/
Descrambler box (usually channel 3 or 4) and use the box to tune
scrambled channels.
If you connect the TV to a VCR, camcorder, or TV game, through
the audio/video in jacks, use the TV/AV button to make your
selection.
Press the TV/AV button repeatedly to select the desired mode.
“AUX1” or “AUX2” will display on the screen for 4 seconds.
AUDIO/VIDEO JACK CONNECTIONS
The exact arrangement you use to interconnect various video and audio components to the TV is dependent on the model and features
of each component. Check the Owner's Manual provided with each component for the location of video and audio inputs and outputs.
The connection diagrams below are offered as suggestions. You may need to modify them to accommodate your particular assortment
of components. The diagrams are intended to show component video and audio interconnections only.
Press the TV/AV selector button to select the AV mode to use the TV as a monitor.
To playback from the camcorder, connect the camcorder to the TV as
shown.
3. To connect the TV to the camcorder
Set the TV/AV selection for this connection, to AUX2.
The TV can also be used as a display device for many video games.
However, due to the wide variety of different types of signal generated by
these devices and subsequent hook-up variations required, they have not
all been included in the suggested connection diagrams. You'll need to
consult each component's Owner's Manual for additional information.
2. To connect the TV to a TV Game
Set the TV/AV selection for this connection, to AUX2.
1. To connect the TV to a VCR
Set the TV/AV selection for this connection, to AUX1.
300-75 ohm
Matching Transformer
(not supplied)
Combiner
(not supplied)
300-75 ohm
Matching Transformer
(not supplied)
VHF Antenna
Incoming CATV
Single 75 ohm Cable
Combination VHF/UHF Antenna
300 ohm Twin-lead Wire
Splitter Take off the Splitter
Single 75 ohm Cable
300 ohm Twin-lead Wire
UHF Antenna
TV/AV SELECTION
Combination VHF/UHF Antenna (Single 75 ohm Cable or
300 ohm Twin-lead Wire)
Connect the 75 ohm cable from a combination VHF/UHF antenna to
the Antenna Jack. If your combination antenna has a 300 ohm Twin-
lead Wire, use the 300-75 ohm Matching Transformer (not supplied).
Combination VHF/UHF Antenna (Separate VHF and UHF
300 ohm Twin-leads)
Connect the UHF Twin-lead Wire to a Combiner (not supplied).
Connect the VHF Twin-lead to the 300-75 ohm Matching
Transformer (not supplied).
Attach the Transformer to the Combiner.
Attach the Combiner to the Antenna Jack.
TV AUX 1 AUX 2 Front of TV
(not supplied)
To Audio/Video OUT
Front of TV
To AV OUT jack
(not supplied)
Rear of TV
VCR
To Audio/
Video OUT
VIDEO
AUDIO (L)
AUDIO (R)
AUX1
(not supplied)
TV GAME
VIDEO IN (MONO)
L – AUDIO IN – R
3T30631A [E] P02-07 2/21/05, 19:166

7
ENGLISH
Direct Channel Selection buttons (0-9)
Press these buttons to select a channel. The channel
number will appear on the upper right corner of the TV
screen. If an invalid channel number is selected, the display
will revert to the original channel.
TV Mode Direct Channel Selection
When the TV/CATV menu option is in the TV position, all
channels can be instantly selected by using two buttons.
(For example, to select channel 2, press “0”, then “2”. If you
press only “2”, channel selection will be delayed for a few
seconds). For channels 10 and above, press the 2 digits in
order.
TV - VHF/UHF channels
CATV - CABLE TV channels
To turn on the TV, press the POWER button.
The VOLUME can be adjusted to a desired level by
pressing the VOL (VOLUME) or button.
The sound level will be indicated on the TV screen by
green bars and a number. As the sound level in-
creases, so do the number of bars and the number on
the screen. The same is true for decreasing the level.
Set the TV/CATV menu option to the appropriate
position. When shipped from the factory, this menu
option is in the CABLE TV setting. See “TO MEMO-
RIZE CHANNELS”.
TV OPERATION
CATV Mode Direct Channel Selection
When the TV/CATV menu option is in the CATV position,
channels can be selected as follows:
CH. 1-9
CH. 10-12
CH. 13-99
CH. 100-125
Press “0” twice, then 1-9 as needed.
Example, to select channel 2, press
“002”.
Press “0”, then remaining 2 digits.
Example, to select channel 12, press
“012”.
Press the 2 digits in order.
Example, to select channel 36, press
“36”.
Press the 3 digits in order.
Example, to select channel 120, press
“120”.
1
2
3
4CH (CHANNEL) and buttons
Press and release the CH (CHANNEL) or
button. The channel automatically stops at the next
channel set into memory. Press and hold the button
down to change channels more quickly.
SETTING LANGUAGE
This TV can display the on-screen language in English, Spanish or French.
On-screen language selection (step 3) will automatically appear on the screen when you press the MENU button initially.
Select the language you prefer first, then proceed with the other menu options.
NOTE:
If Spanish or French is chosen, the Closed Caption indicators will be in the selected language, but the Closed Caption text
will not be affected by the language selection.
Press the SET + or – button to
select the desired language:
English (ENGLISH), Spanish
(ESPAÑOL) or French
(FRANCAIS), then press the
ENTER button.
1
2
3
4
Press the MENU button.
Press the SET + or – button to
select the “LANGUAGE” mode,
then press the ENTER button.
Press the MENU button until the menu screen is
cleared.
NOTE: If the station being viewed stops broadcasting, the
TV will automatically shut off after 15 minutes.
For proper operation, before selecting channels,
they should be set into the TV's memory.
See “TO MEMORIZE CHANNELS”.
AUDIO/VIDEO JACK CONNECTIONS (CONTINUED)
If you connect a VCR with a S-VIDEO cable to the S-VIDEO IN jack on the rear of the TV, you must also connect the audio
cables to the AUDIO IN jacks on the rear of the TV. The S-VIDEO cable only carries the video signal. The audio signal is
separate.
4. To connect the TV to a VCR with an S-VIDEO Cable
Set the TV/AV selection for this connection, to AUX1.
NOTE: When the S-video cable and the video cable
are connected to each jack at the same time,
the S-video cable takes precedence over the
video cable.
Rear of TV
VCR AUDIO (R)
AUDIO (L)
(not supplied)
LANGUAGE
CH SETUP
PICTURE
MENU
STABLE SOUND ON OFF
V-CHIP SET
(not supplied)
3T30631A [E] P02-07 2/21/05, 19:167

8
Press the MENU button.
Press the SET + or – button until
the indicator next to “CH SETUP”
begins to flash, then press the
ENTER button.
Press the SET + or – button until
the indicator next to “ADD/DELETE”
begins to flash, then press the
ENTER button.
Select the desired channels to be added or deleted
using the Direct Channel Selection buttons (10 keys,
0-9), the CH or button or the SET + or – button.
TO MEMORIZE CHANNELS
This TV is equipped with a channel memory feature which
allows channels to skip up or down to the next channel set
into memory, skipping over unwanted channels.
Before selecting channels, they must be programmed into
the TV's memory. In addition to normal VHF and UHF
channels, this TV can receive up to 113 Cable TV channels.
To use this TV with an antenna, set the TV/CATV menu
option to the TV setting. When shipped from the factory,
this menu option is in the CATV setting.
CATV CHART
TV/CATV SELECTION
Press the MENU button.
Press the SET + or – button until
the indicator next to “CH SETUP”
begins to flash, then press the
ENTER button.
Press the SET + or – button until
the indicator next to “TV/CATV”
begins to flash.
Press the ENTER button to select the TV or CATV
mode. The arrow indicates the selected mode.
Press the MENU button twice to return to normal TV
viewing.
The chart below is typical of many cable system channel
allocations.
14
A15
B16
C17
D18
E19
F20
G21
H22
I
32
S33
T34
U35
V36
W37
AA 38
BB 39
CC 40
DD
23
J24
K25
L26
M27
N28
O29
P30
Q31
R
50
NN 51
OO 52
PP 53
QQ 54
RR 55
SS 56
TT 57
UU 58
VV
41
EE 42
FF 43
GG 44
HH 45
II 46
JJ 47
KK 48
LL 49
MM
68
III 69
JJJ 70
KKK 71
LLL 72
MMM 73
NNN 74
OOO 75
PPP 76
QQQ
59
WW 60
AAA 61
BBB 62
CCC 63
DDD 64
EEE 65
FFF 66
GGG 67
HHH
86
86 87
87 88
88 89
89 90
90 91
91 92
92 93
93 94
94
77
RRR 78
SSS 79
TTT 80
UUU 81
VVV 82
WWW 83
XXX 84
YYY 85
ZZZ
104
104 105
105 106
106 107
107 108
108 109
109 110
110 111
111 112
112
95
A-5 96
A-4 97
A-3 98
A-2 99
A-1 100
100 101
101 102
102 103
103
122
122 123
123 124
124 125
125 01
5A
113
113 114
114 115
115 116
116 117
117 118
118 119
119 120
120 121
121
Number on this TV
Corresponding CATV channel
NOTE: Contact your cable company to determine the
type of cable system used in your area.
AUTOMATIC CHANNEL MEMORY
Press the MENU button.
Press the SET + or – button until
the indicator next to “CH SETUP”
begins to flash, then press the
ENTER button.
Press the SET + or – button until
the indicator next to “AUTO CH
MEMORY” begins to flash, then
press the ENTER button. The TV
will begin memorizing all the
TO ADD/DELETE CHANNELS
1
2
3
4
5
1
2
3
4
1
2
3
4
5Press the ENTER button to select ADD or DELETE.
If an unmemorized channel was selected (step 4), the
channel indication will be red. Press the ENTER button
if you wish to ADD the unmemorized channel. The
channel indicator will change from red to green when a
channel is added and the channel will be memorized.
If a memorized channel was selected (step 4), the
channel indication will be green.
Press the MENU button three times after adding or
deleting all of the desired channels, to return to normal
TV viewing.
6
Press the ENTER button if you wish
to DELETE the channel from memory.
The channel indicator will change
from green to red when a channel is
deleted.
Repeat steps 4 and 5 for each channel to be added or
deleted.
LANGUAGE
CH SETUP
PICTURE
MENU
V-CHIP SET
STABLE SOUND ON OFF
ADD / DELETE
AUTO CH MEMORY
TV CATV
channels available in your area. Channel numbers will
remain red until auto memorizing is complete.
Press the MENU button twice to return to normal TV
viewing.
LANGUAGE
CH SETUP
PICTURE
MENU
V-CHIP SET
STABLE SOUND ON OFF
ADD / DELETE
AUTO CH MEMORY
TV CATV
LANGUAGE
CH SETUP
PICTURE
MENU
V-CHIP SET
STABLE SOUND ON OFF
ADD / DELETE
AUTO CH MEMORY
TV CATV
ADD CH 012
3T30631A [E] P08-11 2/21/05, 19:168

9
ENGLISH
:all ages
:parental guidance
:parental guidance
less than 13 years old
G
PG
PG-13
R
NC-17
X
:under 17 years old
parental guidance
suggested
:17 years old and above
:adult only
When you select TV-Y7, TV-PG, TV-14 or TV-MA, press the CALL
button to explain the rating.
Press the SET + or – button to select the desired rating you want.
Press the ENTER button to select the setting ON or OFF.
NOTES:
•
If you want to change password, follow steps 1-3 and select “CHANGE PASSWORD” option then enter your new password.
• The V-Chip function is activated only on programs and tapes that have the rating signal.
•Once you block a program using the V-Chip function, the blocked program cannot be watched based on the content of the
show. When the program starts, the “INPUT PASSWORD” will appear on the screen. When you want to release the
V-Chip temporarily, enter the password.
If you change the channel or turn off the TV while the V-Chip function was temporarily released, the original setting will be
resumed. If you return to the channel you were watching you must re-enter your password to temporarily release your
V-Chip function again.
•If you are changing channels using a VCR or a cable box, while the TV remains on channel 3 or 4, the V-Chip operates
differently. When you enter your password to temporarily release the block on any channel, you have completely disabled
the V-Chip function for all stations. To reset the V-Chip turn your TV off and back on.
• Some cable boxes are built with a delay feature, in some cases it can take up to 10 seconds for a program to appear after
the password has been input.
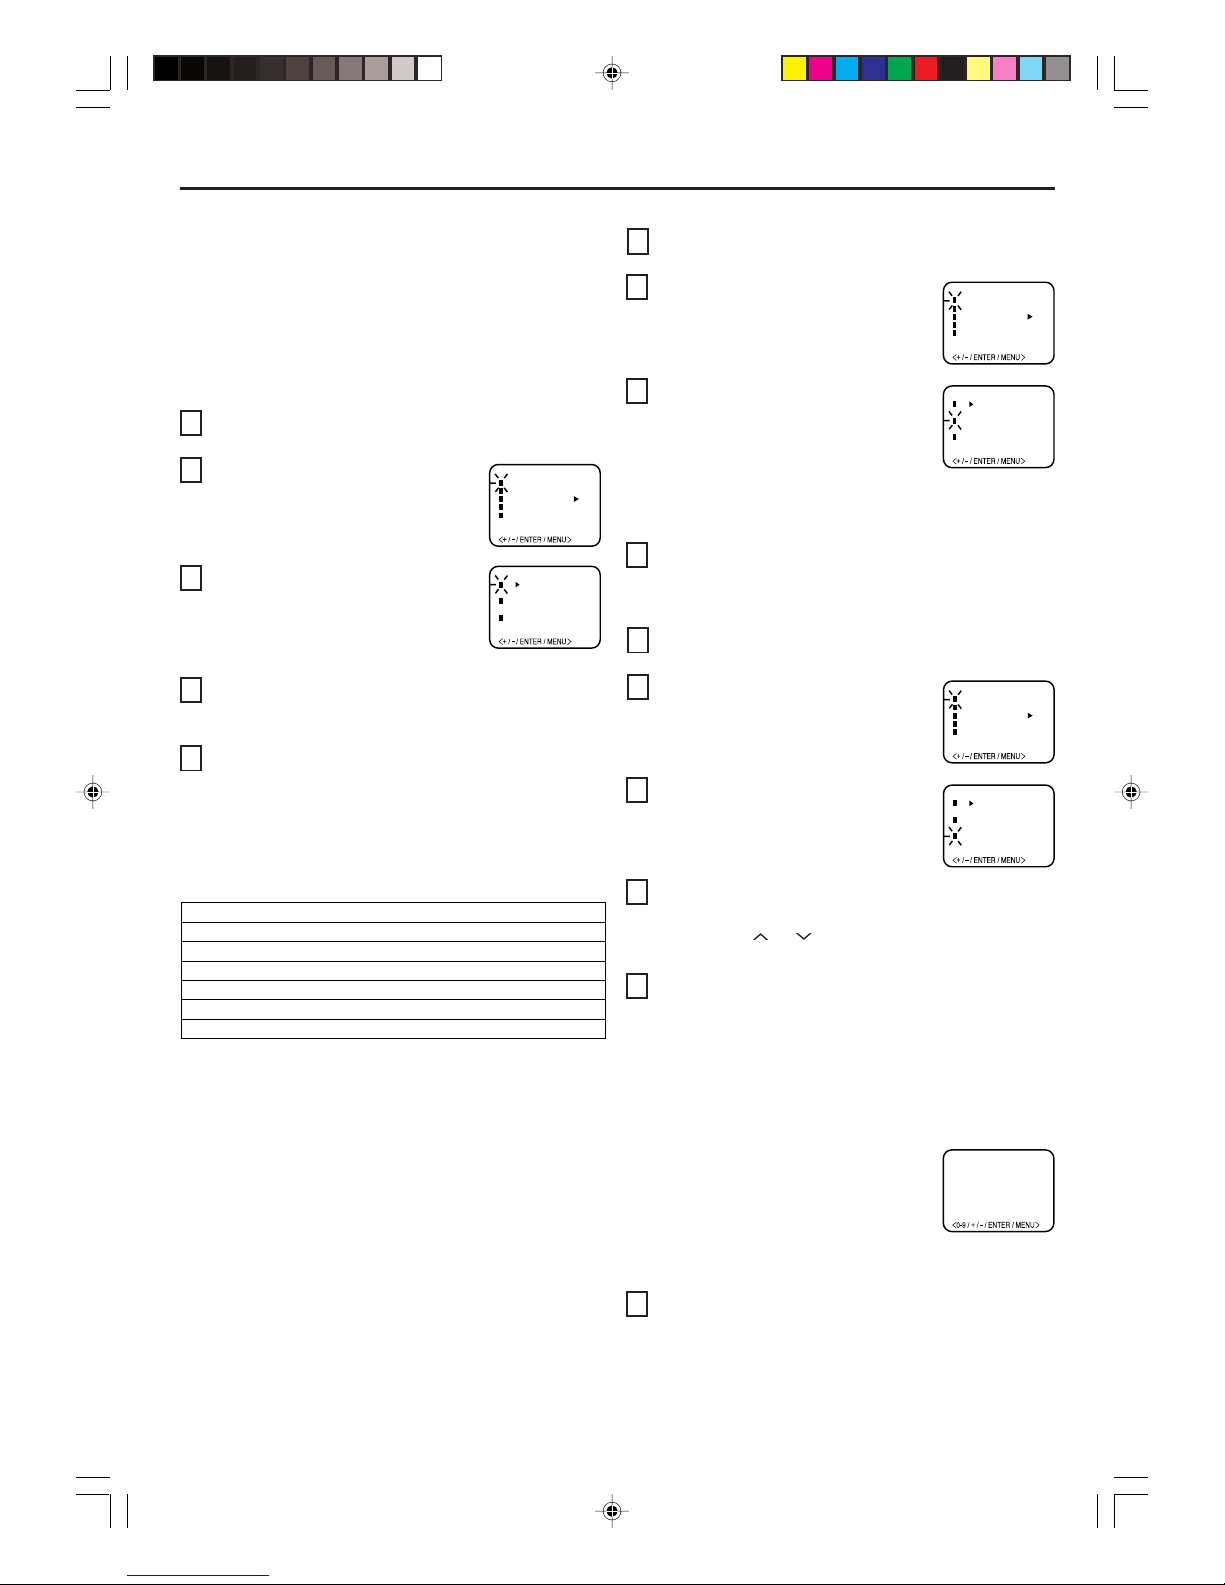
SETTING V-CHIP
This TV is fitted with a V-CHIP controller which provides you with channel viewing access controls and restrictions. This function
is to prevent your children from watching violence or sexual scenes that you may choose to exclude.
Press the MENU button and press the SET + or – button
to select the V-CHIP SET option, then press the ENTER
button.
Enter your password (4 digits) using the Direct channel
selection buttons (0-9).
In the event of entering incorrect password press the
RESET button and re-enter the correct password. Then
press the ENTER button.
Enter the same password for confirmation, then press
the ENTER button.
Press the SET + or – button to select the V-CHIP option.
Press the ENTER button to select the ON.
Press the SET + or – button to select the TV RATING or
MOVIE RATING option. Press the ENTER button.
Press the SET + or – button to select the desired rating
for the applicable video or TV channel. Press the
ENTER button.
Press the MENU button until the MENU screen is
cleared.
CLOSED CAPTION
The Captions will appear in places on the screen where they will
least interfere with the picture, usually on the bottom of the screen.
News programs will usually show three-line Closed Captions which
scroll onto the screen. Most other shows provide two or three lined
Captions placed near the character who is speaking so the viewer
can follow the dialogue. Words in italics or underlined describe
titles, words in foreign languages or words requiring emphasis.
Words that are sung usually appear enclosed by musical notes.
Text: The Text Closed Caption Mode will usually fill 1/2 of full
screen with a programming schedule or other information. After
selecting a Closed Caption Mode, it will stay in effect until it is
changed, even if the channel is changed. If the Captions signal is
lost due to a commercial or a break in the signal, the Captions will
reappear when the signal is received again. If the channels are
changed, the Captions will be delayed approximately 10 seconds.
For television programs broadcasting with Closed Captions, look in
your TV guide for the Closed Captions symbol (CC).
WHAT IS CLOSED CAPTIONING?
This television has the capability to decode and display Closed
Captioned television programs. Closed Captioning will display text
on the screen for hearing impaired viewers or it will translate and
display text in another language.
TO VIEW CLOSED CAPTIONS
Press the TV/CAP/TEXT button on the remote control to switch
between normal TV and the two Closed Caption Modes (Captions
and 1/2 of Full Screen Text).
Captions: This Closed Caption Mode will display text on the
screen in English or another language (depending on the setting
of the Closed Captions CH.1/2 button). Generally, Closed
Captions in English are transmitted on Captions Channel 1 and
Closed Captions in other languages are transmitted on Captions
Channel 2.
7
•When activating the Closed Captioned Decoder, there will be a short delay before the Closed Captioned text appears on the screen.
•Closed Captioned text is only displayed in locations where it is available.
• If no caption signal is received, no captions will appear, but the television will remain in the Caption Mode.
•Misspellings or unusual characters may occasionally appear during Closed Captioning. This is normal with Closed Captioning,
especially with live programs. This is because during live programs, captions are also entered live. These transmissions do not allow
time for editing.
•When Captions are being displayed, on-screen displays, such as volume and mute may not be seen or may interfere with Closed
Captions.
• Some cable systems and copy protection systems may interfere with the Closed Captioned signal.
•If using an indoor antenna or if TV reception is very poor, the Closed Caption Decoder may not appear or may appear with strange
characters or misspelled words. In this case, adjust the antenna for better reception or use an outdoor antenna.
OFF TV-Y7 TV-G TV-14 TV-MA
SET – SET +
TV–Y TV-PG
TV RATING
TV-Y
TV-Y7
TV-G
: all children
: 7 years old and above
: childrens program
TV-PG
TV-14
TV-MA
: parental guidance
: 14 years old and above
: 17 years old and above
MOVIE RATING
OFF PG PG-13 R NC-17
SET – SET +
XG
1
2
3
4
5
6
3T30631A [E] P08-11 2/21/05, 19:169

10
Press the ENTER button to select ON or OFF.
ADJUSTING PICTURE
Press the MENU button.
Press the SET + or – button until the indicator next to
“PICTURE” begins to flash, then press the ENTER
button.
Press the ENTER button repeatedly to select the item
you want to adjust.
You can adjust the settings for color, sharpness, contrast, brightness and tint.
CONTRAST COLORBRIGHTNESS TINT SHARPNESS TO RETURN TO INITIAL SETTING
Press the RESET button while the picture adjusting mode
appears on-screen.
1
2
3
4Press the SET + or – button to adjust the setting.
The TV is equipped with a feature known as Multi-channel TV
Sound or MTS. MTS broadcasts greatly enhance TV viewing
by bringing you programs with high fidelity stereo sound.
MTS also provides an extra channel called the Second
Audio Program or SAP which broadcasters can use to
transmit a second language for bilingual transmission or for
other purposes.
LISTENING TO STEREO SOUND
When the TV is turned on or a channel selection is made,
make certain that the word “STEREO” appears on the
screen. This means that “Stereo” broadcasting is available.
You can enjoy stereo sound from the left and right speakers.
•When the “MONO” broadcasting is received, no indication
is displayed.
•If the broadcast signal is not strong enough or clear stereo
sound is not available, press the AUDIO SELECT button
to change to mono sound. The noise should be eliminated.
Press it again to return to the stereo sound.
LISTENING TO SAP (SECOND AUDIO PROGRAM)
When the TV is turned on or a channel selection is made,
make certain that the letters “SAP” appear on the screen. This
means that the “Second Audio Program” broadcasting is
available.
TO SELECT DESIRED SOUND
Press the AUDIO SELECT button to select the desired
sound.
STEREO AND SECOND AUDIO PROGRAM (SAP)
When a loud sound is broadcast the stable sound feature assists in balancing the volume to a more comfortable listening
level.
Press the MENU button.
Press the SET + or – button until
the indicator next to “STABLE
SOUND” begins to flash.
1
2
3
STABLE SOUND
LANGUAGE
CH SETUP
PICTURE
MENU
V-CHIP SET
STABLE SOUND ON OFF
BRIGHTNESS
CONTRAST
COLOR
TINT
SHARPNESS
+
increase brightness
increase contrast
brilliant color
greenish color
decrease brightness
decrease contrast
pale color
reddish color
makes picture softer
makes picture clearer
–
MONO+SAP BROADCASTING
STEREO+SAP BROADCASTING
MAIN SOUND
(MONO) SAP SOUND
MAIN SOUND
(STEREO) SAP SOUND
MAIN SOUND
(MONO) MAIN + SAP SOUND
(MONO)
MAIN + SAP SOUND
(MONO)
3T30631A [E] P08-11 2/21/05, 19:1610

11
ENGLISH
TROUBLESHOOTING GUIDE
Before requesting service, please refer to the following chart for the symptom and possible solution.
SYMPTOMS POSSIBLE SOLUTIONS
•Make sure the power cord is plugged in.
•Try another AC outlet.
• Power is off, check fuse or circuit breaker.
•Unplug unit for an hour, then plug it back in.
•Station or CATV experiencing problems,
tune to another station.
•Check sound adjustments (Volume and Mute).
•Check for sources of possible interference.
•Station or CATV experiencing problems,
tune to another station.
•Make sure channels are set into memory.
•Check antenna or CATV connections, adjust
antenna.
•Check for sources of possible interference.
•Check picture control adjustments.
•Station or CATV experiencing problems,
tune to another station.
•Make sure channels are set into memory.
•Station is weak, adjust antenna to receive
desired station.
• Check for sources of possible interference.
•Station or CATV experiencing problems,
tune to another station.
•Make sure channels are set into memory.
•Check picture control adjustments.
•Check antenna or CATV connections, adjust
antenna.
•Check for sources of possible interference.
•Station or CATV experiencing problems,
tune to another station.
•Make sure channels are set into memory.
•CATV company is scrambling signal.
•Adjust antenna.
•Check all CATV connections.
•Set TV/CATV menu option to the CATV mode.
•Station or CATV system problems, try
another station.
•Check antenna connections, adjust or
re-direct antenna.
•Check for sources of possible interference.
Poor sound
or no sound.
Poor picture
or no picture.
Horizontal or
diagonal bars
on screen.
No Remote
operation.
•Select proper language in the menu options.
Display is not
shown in your
language.
No reception
above
channel 13.
No CATV
reception.
•Batteries are weak, dead or inserted incorrectly.
•Remote is out of range, move closer to TV
(within 15 feet).
•Make sure Remote is aimed at sensor.
•Confirm there are no obstructions between
the Remote and the TV.
•Make sure the power cord is plugged in.
• Make sure TV/CATV menu option is in the
appropriate mode.
•If using antenna, check UHF antenna
connections.
•No broadcast on station tuned.
•Sleep Timer is set.
•Power interrupted.
TV shuts off.
•TV station experiencing problems or program
tuned is not closed captioned. Try another
channel.
•Check CATV connection or VHF/UHF
antenna, reposition or rotate antenna.
•Press TV/CAP/TEXT button to turn on the
closed caption decoder.
Closed -
Caption is
not activated.
SYMPTOMS POSSIBLE SOLUTIONS
TV does not
operate.
Picture
wobbles or
drifts.
Poor color or
no color.
Poor
reception on
some
channels.
Remote Control
ACCESSORY
SPECIFICATIONS
AC Power Input:
AC Power Consumption:
Chassis Construction:
Picture Tube:
Audio Power Output Rating:
Speakers:
Tuner Type:
Remote Control:
120V, 60Hz
130 Watts
IC Solid state
32 inches (measured diagonally)
2.5+2.5 Watts
1-13/16 inches x 3-7/8 inches Full Range,
8 ohm x 2
181 Channel, Quartz PLL Frequency
Synthesized
Infrared, Direct Access, 2 x AAA batteries
(not supplied)
Receiving Channels:
Antenna Input Impedance:
Inputs: S-Video: Y-Input:
C-Input:
Video:
Audio:
Dimensions:
Weight:
VHF 2-13
UHF 14-69
CATV 01-97 (5A)-(A-3)
98-99 (A-2)-(A-1)
14-22 (A)-(I)
23-36 (J)-(W)
37-65 (AA)-(FFF)
66-125 (GGG)-(125)
75 Ohm (VHF/UHF/CATV)
Coaxial Input
1.0 Vp-p/75 ohms
0.3 Vp-p/75 ohms
1.0 Vp-p/75 ohms
-8 dBm/50K ohms
29-9/16” (W) x 21-13/16” (D) x 25-15/16” (H)
114.7 Ibs
Design and specifications are subject to change without notice.
3T30631A [E] P08-11 2/21/05, 19:1611

2
El símbolo del rayo dentro de un triángulo equilátero tiene por
finalidad alertar al usuario acerca de la presencia de tensión
peligrosa (sin aislamiento) en el interior del producto, que puede
tener una intensidad suficiente como para constituir un riesgo de
descarga eléctrica.
El signo de exclamación dentro de un triángulo equilátero tiene por
finalidad alertar al usuario de importantes instrucciones de
operación y mantenimiento (servicio) en la literatura que acompaña
a este aparato.
PARA REDUCIR EL RIESGO DE DESCARGA
ELÉCTRICA, NO RETIRE LA CUBIERTA (O PANEL
POS TERIOR). EN EL INTERIOR DEL APARATO NO
HAY COMPONENTES QUE REQUIERAN SERVICIO
DE MANTENIMIENTO POR EL USUARIO. SOLICITE
CUALQUIER OPERACIÓN DE MANTENIMIENTO A
PERSONAL DE SERVICIO CALIFICADO.
PRECAUCIÓN: El usuario corre el riesgo de perder la autorización para hacer funcionar este equipo en caso de que
ejecute un cambio o modificación no aprobado por la parte responsable de la conformidad con las
Reglas FCC.
AVISO:
ADVERTENCIA: Para reducir el riesgo de incendio o descarga eléctrica, no exponga esta unidad a la lluvia ni a la
humedad.
PRECAUCIÓN: PARA EVITAR QUE SE PRODUZCA UNA DESCARGA ELÉCTRICA, NO UTILICE ESTE
ENCHUFE POLARIZADO CON UN CABLE DE EXTENSIÓN, RECEPTÁCULO U OTRA
TOMACORRIENTE, A MENOS QUE LAS CLAVIJAS SE PUEDAN INTRODUCIR
COMPLETAMENTE, PARA EVITAR LA EXPOSICIÓN DE LAS LÁMINAS.
1. LEA LAS INSTRUCCIONES - Antes de usar la unidad, lea detenidamente todas las instrucciones de seguridad y operación.
2. CONSERVE ESTE MANUAL DE INSTRUCCIONES - Conserve las instrucciones de seguridad y operación para consultas
futuras.
3. RESPETE LAS ADVERTENCIAS - Observe estrictamente todas las advertencias impresas en la unidad y las incluidas en el
manual de instrucciones.
4. SIGA LAS INSTRUCCIONES - Siga todas las instrucciones de operación y uso.
5. LIMPIEZA - Antes de limpiar esta unidad, desconéctela del tomacorriente. No use limpiadores líquidos ni aerosol.
Limpie la unidad con un paño húmedo.
6. ACCESORIOS - El fabricante de esta unidad no hace ninguna recomendación de accesorios ya que pueden ser peligrosos.
7. AGUA Y HUMEDAD - No use esta unidad cerca del agua -- por ejemplo, cerca de una bañera o lavamanos, cerca del
fregadero de la cocina o lavandería, en un piso mojado, o cerca de una piscina.
8. ACCESORIOS - No instale esta unidad en un carro, soporte, trípode o mesa inestable.
La unidad podría caerse, causando daños serios daños a la unidad.
8A. La combinación de aparato y carro deberá ser movida con cuidado.
Las paradas bruscas, la fuerza excesiva y las superficies disparejas podrán hacer
que el aparato y el carro se den vuelta.
9. VENTILACIÓN - Las ranuras y aberturas en la parte posterior o inferior del gabinete son
para ventilación y permiten un funcionamiento fiable de la unidad, protegiendo contra calentamiento excesivo. Estas aberturas
no deberán ser bloqueadas ni cubiertas. Para evitar bloquear las aberturas, nunca sitúe la unidad encima de una cama, sofá,
alfombra u otra superficie similar. Tampoco instale la unidad cerca o encima de un radiador o calefactor. La unidad no deberá
ser instalada en un mueble empotrado, como ser una repisa para libros o bastidor, a menos que se pueda garantizar una
ventilación adecuada, o cuando las instrucciones del fabricante así lo especifiquen.
10. FUENTES DE ALIMENTACIÓN - Esta unidad sólo deberá ser operada mediante el tipo de fuente de alimentación
especificado en la etiqueta indicadora. Si no está seguro del tipo de fuente de alimentación que tiene en su casa, consulte a
su distribuidor o a la compañía de energía local. En el caso de unidades diseñadas para funcionar a con pilas o con otras
fuentes de alimentación, consulte el manual de instrucciones respectivo.
11. CONEXIÓN A TIERRA O POLARIZACIÓN - Esta unidad está equipada con una clavija polarizada de corriente alterna (una
clavija que tiene una espiga más ancha que la otra). Esta clavija solamente puede ser insertada en el tomacorriente en una
sola dirección. Esta es una medida de seguridad. Si no pudiera insertar completamente la clavija en el tomacorriente, vuelva a
intentarlo invirtiendo la clavija. Si aún no fuera posible insertar la clavija, póngase en contacto con un electricista para que
reemplace su tomacorriente obsoleto. Si su unidad está equipada con una clavija de conexión a tierra de 3 alambres (una
clavija con una tercera espiga de conexión a tierra), no modifique las características de seguridad de la clavija polarizada.
Este tipo de clavija sólo puede ser insertado en un tomacorriente con contacto a tierra. Esto también es una medida de
seguridad. Si no pudiera insertar la clavija en el tomacorriente, tome contacto con un electricista para que reemplace su
tomacorriente obsoleto. No modifique las características de seguridad de la clavija de conexión a tierra.
12. PROTECCIÓN DEL CABLE DE ALIMENTACIÓN - Los cables de alimentación deberán ser tendidos de manera tal
que la probabilidad de que sean pisados o aplastados por otros objetos sea mínima. Preste atención especial a las clavijas de
los cables, a los receptáculos, y al punto por donde salen del aparato.
S3126A
AVISO PARA CARRO PORTATIL
(símbolo provisto por RETAC)
MEDIDAS DE SEGURIDAD
ESPAÑOL
3T30631A [S] P02-07 2/21/05, 19:172

3
ESPAÑOL
13. TORMENTAS ELÉCTRICAS - Como medida de protección durante tormentas eléctricas, o cuando la unidad permanezca sin
uso durante períodos prolongados de tiempo, desconéctela del tomacorriente de pared y desconecte la antena o sistema de
cable. Esto evitará que la unidad resulte dañada por tormentas eléctricas o sobretensiones en la línea de alimentación.
14. LINEAS DE ALIMENTACIÓN - Una antena exterior no deberá ser instalada en la cercanía de líneas de alimentación aéreas ni
de otros circuitos de iluminación eléctrica o potencia, o donde pueda caerse y hacer contacto con tales líneas o circuitos.
Al instalar un sistema de antena exterior, tenga mucho cuidado de no tocar tales líneas o circuitos de alimentación, ya que el
contacto con ellos podría ser fatal.
15. SOBRECARGA - No sobrecargue los tomacorrientes de pared ni los cables de extensión, ya que esto podría causar incendios
o descargas eléctricas.
16. ENTRADA DE OBJETOS Y LÍQUIDOS - Nunca introduzca objetos de ningún tipo por las aberturas de la unidad, ya que
podría tocar puntos peligrosos de alta tensión o piezas de cortocircuito, provocando incendios o descargas eléctricas. Nunca
derrame ni rocíe ningún tipo de líquido sobre la unidad.
17. CONEXIÓN A TIERRA DE LA ANTENA EXTERNA - Si se conecta una antena externa o sistema de cable a la unidad,
cerciórese de que el sistema de antena o cable está conectado a tierra para darle protección contra sobretensión y la
acumulación de carga estática. La Sección 810 del Código Nacional de Electricidad, ANSI/NFPA 70, provee información
acerca de la manera correcta de conectar a tierra el mástil y la estructura de soporte, puesta a tierra del alambre de entrada a
una unidad de descarga de antena, tamaño de los conductores de puesta a tierra, ubicación de la unidad de descarga de la
antena, conexión a los electrodos de tierra, y requisitos para el electrodo de tierra.
18. REPARACIÓN - No intente reparar la unidad usted mismo; al abrir o retirar las cubiertas usted se expondrá a alta tensión y a
otros peligros. Solicite toda reparación a personal calificado.
19. DAÑOS QUE REQUIERAN REPARACIÓN - En los siguientes casos, desconecte la unidad del tomacorriente de pared y
llame a un técnico de servicio calificado:
a. Cuando el cable de alimentación o la clavija estén dañados.
b. Si se ha derramado líquido sobre la unidad, o si algún objeto ha caído dentro de la unidad.
c. Si la unidad ha sido expuesta a la lluvia o al agua.
d. Cuando a pesar de haber seguido las instrucciones de operación, la unidad no funciona normalmente. Ajuste solamente
los controles indicados en el manual de instrucciones; el ajuste incorrecto de otros controles podrá causar daños a la
unidad, la que por lo general requerirá de un trabajo de reparación extensivo (por un técnico calificado) para que sus
condiciones normales de operación puedan ser restablecidas.
e. Si la unidad se ha caído o si el gabinete se ha dañado.
f. Cuando la unidad muestre un cambio notorio en su rendimiento.
20. PIEZAS DE REPUESTO - Cuando sea necesario reemplazar piezas, asegúrese de que el técnico de servicio emplee las
piezas de repuesto especificadas por el fabricante, o piezas que tengan las mismas características que las piezas originales.
Los cambios no autorizados podrán causar incendios, descargas eléctricas y otros problemas.
21. VERIFICACIÓN DE SEGURIDAD - Al finalizar cualquier servicio de mantenimiento o reparación de esta unidad, solicítele al
técnico que efectúe verificaciones de seguridad para determinar si la unidad se encuentra en condiciones óptimas de
operación.
22. CALOR - El producto debe ser situado lejos de fuentes de calor como radiadores, reguladores de calefacción, estufas u otros
productos (incluyendo amplificadores) que producen calor.
23. NOTA PARA LA PERSONA QUE INSTALE EL SISTEMA TV POR CABLE - Se ha incluido esta nota para llamar la atención
de quien instale el sistema de CATV, con respecto al Artículo 820-40 de la NEC, que provee directivas de guía para realizar
una conexión adecuada a tierra y, en particular, especifica que el cable de puesta a tierra debe ser conectado al sistema de
conexión a tierra del edificio, lo más cerca del punto de entrada del cable como sea posible.
EJEMPLO DE CONEXIÓN A TIERRA DE LA ANTENA SEGÚN
EL CÓDIGO NACIONAL DE ELECTRICIDAD
ALAMBRE DE ENTRADA DE
LA ANTENA
UNIDAD DE DESCARGA
DE LA ANTENA
(NEC, SECCIÓN 810-20)
ABRAZADERAS DE TIERRA
SISTEMA DE ELECTRODO DE PUESTA
A TIERRA (NEC ART 250, PARTE H)
NEC - CÓDIGO NACIONAL DE
ELECTRICIDAD
S2898A
CONDUCTORES DE PUESTA A
TIERRA (NEC, CONEXIÓN 810-21)
EQUIPO DE
SERVICIO
ELÉCTRICO
ABRAZADERA DE
TIERRA
3T30631A [S] P02-07 2/21/05, 19:173

CARACTERÍSTICAS
UBICACIÓN DE LOS CONTROLES
• Sintonizador de 181 canales - El sistema de sintonización es capaz de recibir los 68 canales de VHF/UHF de emisión estándar
disponibles en su área. Al ser usado con un sistema de TV por cable, este sistema puede sintonizar las frecuencias de VHF
estándar y 113 frecuencias de canales de TV por cable. El número real de canales recibidos dependerá de la recepción de
canales en su área y del servicio de TV por cable al que usted esté suscrito.
•Visualización de pantalla en 3 idiomas - Este TV puede mostrar la visualización de pantalla en inglés, español o francés.
•Temporizador de apagado automático - Controlando esta función desde la unidad de control remoto, usted podrá programar el
televisor para que se apague automáticamente después de un período de hasta 120 minutos.
•Respaldo de la memoria - En caso de interrupciones en el suministro de energía al televisor, este sistema evita la pérdida de
los canales memorizados.
•Chip V - La función de con Chip V puede leer la clasificación de un programa de TV o película, si el programa tiene codificada esta
información. El Chip V permite seleccionar el nivel de prohibición.
•Ajustes de control de la imagen - La visualización de pantalla permite realizar ajustes precisos de BRILLO, COLOR,
CONTRASTE, DEFINICIÓN y TINTE desde la unidad de control remoto.
•Descodificador de subtítulos - Muestra subtítulos de texto en la mitado de pantalla completa de TV para personas con
problemas de audición.
• Recepción estéreo/SAP - Este TV fue diseñado para recibir programas de estéreo y de programa de audio secundario (SAP).
5. Conectores frontales de AUDIO (L/R) VIDEO IN
(AUX2) - Aquí se pueden conectar los cables de señale
de audio y vídeo de una fuente externa.
6. Conector de entrada de ANTENA VHF/UHF - Conecte
una antena VHF/UHF o un cable de CATV a este
conector.
7. Conector de S-VIDEO IN - Aquí puede conectar el
cable de señal S-Vídeo desde una fuente externa.
8. Conectores de REAR AUDIO (L/R) VIDEO IN (AUX1) -
Aquí se pueden conectar el cables de señale S-vídeo
de una fuente externa.
9. Cable de alimentación de CA- Conéctelo a un
tomacorriente de 120 V, 60 Hz únicamente.
VISTA FRONTAL
1. Interruptor de alimentación (POWER) - Presione para
encender y apagar el televisor.
2. Sensor del control remoto - Recibe las señales
provenientes del control remoto.
3. Botones selectores de canal (CHANNEL ▲ /▼
) - Utilice
estos botones para seleccionar los canales almacenados
en la memoria.
(Botón ENTER) - Presione para ingresar o seleccionar
información para las operaciones en la pantalla.
(Botón RESET) - Presione para volver los ajustes de
imagen en la pantalla a sus posiciones iniciales de fábrica.
4. Botones de volumen (VOLUME ▲ /▼
) - Utilice estos
botones para aumentar o reducir el nivel de volumen.
(Botones MENU) - Presione ambos botones para que
aparezca la función de menú en la pantalla.
(Botones SET+ / –) - Presione para seleccionar el ajuste
deseado durante las operaciones en la pantalla.
VISTA POSTERIOR
POWER ▼ CHANNEL ▲
ENTER RESET
▼ VOLUME ▲
MENU
– SET +
VIDEO IN (MONO)
L – AUDIO IN – R
12 35
4
6789
4
3T30631A [S] P02-07 2/21/05, 19:174

CONTROL REMOTO
1. Interruptor de alimentación - Para encender y apagar el
televisor.
2. Botones de selección directa de canal (0-9) - Permiten el
acceso directo a cualquier canal de TV.
3. Botón de visión rápida - Esta función le permite retornar
al canal previamente seleccionado; simplemente presione
el botón QUICK VIEW. Para retornar al canal que estaba
viendo, vuelva a presionar este botón.
4. Botón de apagado automático - Para hacer que el
televisor se apague después de un período de tiempo
predefinido, presione el botón SLEEP. La indicación
disminuirá en intervalos de 10 minutos cada vez que el
botón sea presionado (en el orden de 120, 110, 100, ... 20,
10, 0.). Una vez programado el tiempo de apagado
automático, la indicación desaparecerá de la pantalla,
después de lo cual volverá a aparecer momentáneamente
cada diez minutos para recordarle que la función de
apagado automático está activada. Para confirmar el
tiempo de apagado automático, presione el botón SLEEP
una vez; el tiempo restante será momentáneamente
mostrado. Para cancelar la función de apagado automático,
presione repetidamente el botón SLEEP hasta que la
indicación sea 0.
5. Botones de volumen /- Presione el botón para
aumentar el nivel de volumen, y el botón para
disminuirlo.
6. Botón MENU - Presione este botón para mostrar el menú
de función en la pantalla.
7. Botones de SET + / – - Presione los botones para
seleccionar los ajustes deseados durante las operaciones
en pantalla.
8. Botón de reinicialización (RESET) - Presione para
reinicializar los ajustes de la imagen en pantalla.
9. Botón TV/AV - Cambia entre las entradas de TV y externa.
10. Botón de llamada - Cuando este botón sea presionado, el
canal sintonizado aparecerá en la esquina superior derecha
de la pantalla de TV. Presione nuevamente el botón para
borrar la indicación de la pantalla.
11. Botón de silenciamiento - Para apagar el sonido,
presione este botón una vez. El televisor será silenciado y
la indicación “MUTE” aparecerá en la pantalla. Para
desactivar la función de silenciamiento, vuelva a presionar
el botón de silenciamiento (MUTE) o presione el botón de
aumento o disminución de volumen (VOL o ).
12. Botones selectores de canal /- Presione el botón
direccional arriba para cambiar a un canal más alto
almacenado en la memoria. Presione el botón direccional
abajo para cambiar a un canal más bajo.
13. Botón ENTER - Presiónelo para ingresar o seleccionar la
información de las operaciones en pantalla.
14. Botón de AUDIO SELECT - Cambia el sonido entre
monoaural, estéreo y SAP cuando se reciben transmisiones
en estéreo.
15. Botón CH.1/2 - Para cambiar entre el canal 1 y el canal 2
en el modo de subtítulos.
16. Botón de TV/CAP/TEXT - Presione este botón para
cambiar entre TV normal y los dos modos de subtítulos
(subtítulo y texto en una tercera parte de pantalla
completa). La función de subtítulos indicará el texto en
pantalla para los usuarios con problemas de audición.
COMO INSTALAR LAS PILAS
Antes de usar el control remoto deben ser instaladas las pilas.
1. Abra la cubierta del compartimiento de pilas.
2. Instale dos pilas “AAA” (no proveidas).
3. Recoloque la tapa del compartimiento.
Utilice pilas de tamaño “AAA”. Las pilas duran
aproximadamente un año, dependiendo de se utilice el control
remoto. Para su mejor funcionamiento se recomienda que las
pilas se reemplacen en forma anual, o cuando el
funcionamiento del control remoto sea errático. No mezcle pilas
nuevas y viejas.
PRECAUCIONES PARA LAS PILAS
Se deben tomar las siguientes precauciones cuando se usan las
pilas para el control remoto.
•Utilice solo el tipo y tamaño de pila especificado.
• Asegurese de colocar correctamente la polaridad como está
señalado en el compartimiento para pilas. Las pilas invertidas
pueden causar daño al control.
• No mezcle diferentes tipos de pilas (por ejemplo: alcalinas,
zinc-carbón), o pilas viejas con pilas nuevas.
•Si Vd. no utiliza el control por un largo período de tiempo,
saque las pilas para prevenir daños por posible derrame de
electrolito.
•No trate de recargar las pilas que no son recargables; pueden
sobrecalentarse y reventar (Siga las instrucciones del
fabricante de pilas).
1
2
3
5
6
7
16
14
13
12
8
9
10
411
15
MENU
VOL
SLEEP
MUTE
QUICK VIEW CALL
VOL
ENTER
CH
CH
123
456
7
0
89
–
SET
+
CH.1/2
TV
CAP/TEXT
RESET
AUDIO
SELECT
TV/AV
POWER
5
3T30631A [S] P02-07 2/21/05, 19:175

6
TV GAME
VIDEO IN (MONO)
L – AUDIO IN – R
Este televisor, puede sintonizar
la mayoría de los canales por
cable sin necesidad la caja
convertidora proveída por la
compañía de cable. Algunas
compañías de cable ofrecen
“canales pagados premiados”
en los cuales la señal esta
codificada. La decodificación de
esas señales para la obtención
de una señal normal, requiere
el uso de un decodificador que
es generalmente provisto por
la compañía de cable.
CONEXIONES DE ANTENA
Antenas de Separadas de VHF/UHF
Conecte el cable de 75 ohmios desde la antena de VHF y UHF de
conductores gemelos al combinador (no proveído). Fije el
combinador al soporte de la antena.
NOTA: Si su antena de VHF tiene un cable doble, use un
transformador de adaptación de 300-75 ohmios (no proveído), luego
conecte el transformador al combinador.
PARA LOS ASOCIADOS A UN SERVICIO DE TV POR CABLE
BÁSICO
Para un servicio de cable básico que no requiera convertidor/
descodificador, conecte el cable coaxial de CATV de 75 ohmios
directamente a la entrada de la antena en la parte posterior del televisor.
PARA LOS ASOCIADOS A UN SERVICIO DE TV POR CABLE
“CODIFICADO”
Si Ud. está asociado a un servicio de cable que requiere el uso de un
convertidor/descodificador conecte el cable de bajada de la antena al
convertidor/descodificador y conecte la salida de ésta a la entrada de
antena en la parte posterior del televisor. Siga las conexiones como
se muestra en la figura. Sintonice el televisor en el canal de salida del
convertidor/descodificador (usualmente canal 3 o 4) y utilice el
convertidor/descodificador para la selección de canales.
PARA ASOCIADOS A UN SERVICIO DE CABLE BÁSICO CON
CANALES ESPECIALES CODIFICADOS
Si Ud. está asociado a un servicio de cable en el cual los canales
básicos son comunes y los canales especiales necesitan un
convertidor/descodificador, puede utilizar un divisor de señal (a
veces llamado “acoplador”) y una caja de interruptor de cambio A/B.
Siga las conexiones como se muestra en la figura. Con el
interruptor en la posición “B”, Ud. puede sintonizar directamente
cualquier canal común en su televisor. Con el interruptor en la
posición “A”, puede seleccionar los canales codificados desde el
convertidor/decodificador sintonizando el televisor en el canal de
salida del convertidor/decodificador (canal 3 o 4).
Si conecta el TV en la videograbadora, videocámara o juego de TV,
puede seleccionarlo presionando el botón TV/AV.
Presione repetidamente el botón TV/AV para seleccionar el modo
deseado.
La palabra “AUX1” o “AUX2” aparecerá en la pantalla durante 4
segundos.
CONEXIONES DE AUDIO/VIDEO
La instalación exacta a utilizar para hacer las conexiones de los distintos componentes de vídeo y audio en el TV depende del modelo y
funciones de cada componente. Confirme en el manual de instrucciones de cada componente para encontrar la posición de las entradas y
salidas de vídeo y de audio.
Los diagramas de conexión a continuación son sugerencias. Puede que se necesite modificarlos según los equipos que posee. Los
diagramas muestran sólo las conexiones de componentes de vídeo y audio.
Presione el botón selector TV/AV para seleccionar el modo AV para utilizar el TV como monitor.
3. Para conectar el TV a la videocámara
Ajuste la selección de TV/AV a AUX2 para esta conexión.
El TV puede utilizarse también como pantalla para muchos juegos
de vídeo. Sin embargo, debido a que existe una gran variedad de
tipos diferentes de señales generadas por estos aparatos y
diferentes requisitos de conexión correspondientes, no se han
incluido todas las posibilidades posibles en los diagramas de
conexión sugeridos. Para más detalles, deberá consultar el
manual de instrucciones de cada componente.
2.Para conectar el TV a un juego de TV
Ajuste la selección de TV/AV a AUX2 para esta conexión.
SELECCIÓN DE TV/AV
Antena combinada de VHF/UHF (Cable individual de 75 ohmios
o doble de 300 ohmios)
Conecte el cable de 75 ohmios desde la antena combinada de
VHF/UHF al soporte de la antena. Si su antena combinada tiene un
cable doble de 300 ohmios, use un transformador de adaptación de
300-75 ohmios (no proveído).
Antena combinada de VHF/UHF (Cable dobles de 300 ohmios
separados para VHF y UHF)
Conecte el cable doble de UHF al combinador (no proveído).
Conecte el cable doble de VHF al transformador de adaptación de
300-75 ohmios (no proveído). Fije el combinador al soporte de
antena.
Frente del TV
(no proveído)
Para reproducir desde la videocámara, conecte la videocámara
en el TV tal como se indica.
AUX 1
1.Para conectar el TV a una videograbadora
Ajuste la selección de TV/AV a AUX 1 para esta conexión.
A la salida de Audio/Vídeo
JUEGO DE TV
Converter/
Descrambler
AB
Converter/
Descrambler
A
/
B SwitchSplitter
Transformador de adaptación de
300-75 ohmios (no proveído)
Combinador
(no proveído)
Antena de VHF
Cable entrante de CATV
Cable individual de 75 ohmios
Antena combinada de VHF/UHF
Cable doble de 300 ohmios
Divisor Desmonte el divisor
Cable individual de 75 ohmios
Cable doble de 300 ohmios
Antena de UHF
Transformador de adaptación de
300-75 ohmios (no proveído)
Divisor Conmutador A/B
Convertidor/Decodificador
TV AUX 1 AUX 2
Atrás del TV
VÍDEOGRABADORA
A la salida de
Audio/Vídeo
VIDEO
AUDIO
(Izquierdo) AUDIO
(derecho)
(no proveído)
Frente del TV
A la salida de AV
(no proveído)
3T30631A [S] P02-07 2/21/05, 19:176

7
ESPAÑOL
FRANCAIS
ENGLISH
ESPAÑOL
LANGUAGE / IDIOMA / LANGUE
〈
+/ –/ ENTER / MENU
〉
Selección directa de canal en modo CATV
Cuando la opción de menú de TV/CATV está en el modo de
CATV, los canales pueden seleccionarse como sigue:
Para encender el televisor, presione el interruptor de
alimentación (POWER).
Ajuste el volumen al nivel deseado usando los botones
de aumento/disminución de volumen (VOL / ).
El nivel de sonido se indicará en la pantalla de TV
mediante barras verdes y un número. Cuando el nivel de
sonido aumente, también aumentará el número de barras
y el número en la pantalla. De igual forma, el número de
barras disminuirá cuando disminuya el nivel.
Ajuste la opción de menú de TV/CATV al modo deseado.
Al despacharse de fábrica, esta opción de menú está en el
modo de CATV. Vea “PARA MEMORIZAR CANALES”.
OPERACIÓN DEL TELEVISOR
NOTA: Si el canal sintonizado deja de transmitir programas, el
televisor se apagará automáticamente al cabo de 15 minutos.
CANAL 1-9
CANAL 10-12
CANAL 13-99
CANAL 100-125
Presione “0” dos veces, y luego 1-9
según sea necesario.
Por ejemplo, para seleccionar el canal
2, presione “002”.
Primero presione “0”, y luego los 2
dígitos restantes.
Por ejemplo, para seleccionar el canal
12, presione “012”.
Presione los 2 dígitos en orden.
Por ejemplo, para seleccionar el canal
36, presione “36”.
Presione los 3 dígitos en orden.
Por ejemplo, para seleccionar el canal
120, presione “120”.
Botones selectores de canal (CH /)
Presione y libere el botón selector de canal en o. La
unidad se detendrá automáticamente en el siguiente canal
almacenado en la memoria. Presione y mantenga presionado
el botón para hacer que los canales cambien más rápido.
AJUSTE DE IDIOMA
Este TV puede mostrar las indicaciones en la pantalla en inglés, español o francés.
La selección de idioma en la pantalla (paso 3) aparecerá automáticamente en la pantalla cuando presione el botón MENU al
principio. Seleccione primero el idioma preferido y vaya a las otras opciones de menú.
NOTA:
Si español o francés se ha escogido, los subtítulos se mostrarán en la idioma seleccionado, pero el texto de los subtítulos no será
por la selección de idioma.
Presione el botón SET + o – para
seleccionar el idioma deseado:
inglés (ENGLISH), español
(ESPAÑOL) o francés
(FRANCAIS), y después presione
el botón ENTER.
1
2
3
4
Presione el botón MENU.
Presione el botón SET + o –
para seleccionar el modo
LANGUAGE, y después presione
el botón ENTER.
Presione el botón MENU otra vez
para volver a la imagen normal de TV.
2
1
3
4
Botones de selección directa de canal (0-9)
Utilice estos botones para seleccionar canales. El número del
canal será indicado en la esquina superior derecha de la
pantalla de TV. Si se selecciona un número de canal inválido, la
pantalla volverá al canal anterior.
Selección directa de canal en modo de TV
Cuando la opción de menú de TV/CATV está en el modo de
TV, todos los canales pueden seleccionarse intantáneamente
usando dos botones. (Por ejemplo, para seleccionar el canal 2,
presione “0” y “2”. Si usted sólo presiona “2”, la selección del
canal se retardará unos segundos.) Para los canales de 10 en
adelante, presione los dos dígitos en orden.
Antes de seleccionar canales, éstos deberán ser
almacenados en la memoria del televisor. Consulte la
sección “PARA MEMORIZAR CANALES”.
TV - Canales de VHF/UHF
CATV - Canales de CABLE TV
CONEXIONES DE LA TOMA DE AUDIO/VIDEO (CONTINUACIÓN)
Ajuste a la selección de TV/AV a AUX1 para esta conexión.
Si conecta un VCR con una toma S-vídeo a la toma S-VIDEO de la parte posterior del TV, también debe conectar los cables de audio
a las tomas AUDIO IN de la parte posterior del TV.El cable S-vídeo sólo transporta la señal de vídeo.La señal de audio es independiente.
4. Para conectar el TV a un VCR con una toma S-VIDEO
NOTA: Cuando el cable S-vídeo y el cable de vídeo
estándar se conectan al mismo tiempo, el
cable S-vídeo toma preferencia.
Parte posterior del TV
AUDIO (R)
AUDIO (L)
(no proveída)
(no proveída) S-VIDEO
LANGUAGE
CH SETUP
PICTURE
MENU
V-CHIP SET
〈
+/ —/ ENTER / MENU
〉
STABLE SOUND ON OFF
VÍDEOGRABADORA
3T30631A [S] P02-07 2/21/05, 19:177

8
PICTURE
CH SETUP
MENU
LANGUAGE
V-CHIP SET
〈
+/ —/ ENTER / MENU
〉
STABLE SOUND ON OFF
AUTO CH MEMORY
TV
ADD / DELETE
CATV
〈
+/ —/ ENTER / MENU
〉
PICTURE
CH SETUP
MENU
LANGUAGE
V-CHIP SET
〈
+/ —/ ENTER / MENU
〉
STABLE SOUND ON OFF
AUTO CH MEMORY
TV
ADD / DELETE
CATV
〈
+/ —/ ENTER / MENU
〉
PARA MEMORIZAR CANALES
Este televisor está equipado con una función de
memorización de canales que permite avanzar o retroceder
al siguiente canal almacenado en la memoria, pasando por
alto los canales no deseados.
Antes de seleccionar canales, éstos deberán estar
programados en la memoria del televisor. Además de los
canales normales de VHF y UHF, este televisor puede recibir
hasta 113 canales de TV cable. Para usar el televisor con
una antena, coloque la opción de menú de TV/CATV al modo
de TV. Cuando sale de fábrica, la opción de menú TV/CATV
está en el modo CATV.
CANALES CATV
SELECCIÓN DE TV/CATV
Presione el botón MENU.
Presione el botón SET + o – hasta
que el indicador “CH SETUP”
empiece a parpadear seguidamente,
y a continuación presione el botón
ENTER.
Presione el botón SET + o – hasta que
el indicador “TV/CATV” empiece a
parpadear seguidamente.
La tabla a continuación muestra el sistema típico de la
localización de los canales por cable.
14
A15
B16
C17
D18
E19
F20
G21
H22
I
32
S33
T34
U35
V36
W37
AA 38
BB 39
CC 40
DD
23
J24
K25
L26
M27
N28
O29
P30
Q31
R
50
NN 51
OO 52
PP 53
QQ 54
RR 55
SS 56
TT 57
UU 58
VV
41
EE 42
FF 43
GG 44
HH 45
II 46
JJ 47
KK 48
LL 49
MM
68
III 69
JJJ 70
KKK 71
LLL 72
MMM 73
NNN 74
OOO 75
PPP 76
QQQ
59
WW 60
AAA 61
BBB 62
CCC 63
DDD 64
EEE 65
FFF 66
GGG 67
HHH
86
86 87
87 88
88 89
89 90
90 91
91 92
92 93
93 94
94
77
RRR 78
SSS 79
TTT 80
UUU 81
VVV 82
WWW 83
XXX 84
YYY 85
ZZZ
104
104 105
105 106
106 107
107 108
108 109
109 110
110 111
111 112
112
95
A-5 96
A-4 97
A-3 98
A-2 99
A-1 100
100 101
101 102
102 103
103
122
122 123
123 124
124 125
125 01
5A
113
113 114
114 115
115 116
116 117
117 118
118 119
119 120
120 121
121
Números en este TV
Canal de CATV correspondientes
NOTA: Póngase en contacto con la compañía de cable
para determinar el tipo de sistema de cable
usado en su área.
MEMORIA AUTOMÁTICA DE CANAL
Presione el botón MENU.
Presione el botón SET + o – hasta que
el indicador “CH SETUP” empiece a
parpadear seguidamente, y a
continuaciónpresioneel botón ENTER.
Presione el botón SET + o – hasta que
el indicador “AUTO CH MEMORY”
empiece a parpadear seguidamente, y
a continuación presione el botón EN-
TER. El TV comenzará a memorizar
todos los canales disponibles en su área.
Presione el botón MENU dos veces para volver a la
imagen normal de TV.
PARA AÑADIR/BORRAR CANALES
Presione el botón MENU.
Presione el botón SET + o – hasta
que el indicador “CH SETUP”
empiece a parpadear seguidamente,
y a continuación presione el botón
ENTER.
Presione el botón SET + o – hasta que
el indicador “ADD/DELETE” empiece a
parpadear seguidamente, y a
continuación presione el botón
ENTER.
1
2
3
4
5
1
2
3
4
5Presione el botón ENTER para seleccionar ADD o
DELETE. Si un canal no memorizado se ha
seleccionado (paso 4), el indicador de canal será de
color rojo. Presione el botón ENTER si usted desea
añadir el canal no memorizado. Cuando un canal se ha
añadido, el indicador de canal cambiará de rojo a
verde y el canal será memorizado.
Si un canal memorizado se ha seleccionado (paso 4), el
indicador de canal será de color verde.
Presione el botón ENTER si usted
desea borrar el canal de la memoria.
Cuando el canal se borrado, el
indicador de canal cambiará de
verde a rojo.
Repita los pasos 4 y 5 para ser añadido o borrado
cada canal.
Presione el botón MENU tres veces después de añadir
o borrar todos los canales deseados, para volver a la
imagen normal de TV.
6
ADD CH 012
〈
0-9 / + / –/ ENTER / MENU
〉
1
2
3
4
Presione el botón ENTER para seleccionar el modo TV o
CATV. La flecha indica el modo seleccionado.
Presione el botón MENU dos veces para volver a la
imagen normal de TV.
Seleccione los canales deseados a agregar o borrado
mediante los botones de Selección Directa de
Canal (10 teclas, 0-9), el botón CH Subir/Bajar o el
botón SET + o –.
PICTURE
CH SETUP
MENU
LANGUAGE
V-CHIP SET
〈
+/ —/ ENTER / MENU
〉
STABLE SOUND ON OFF
AUTO CH MEMORY
TV
ADD / DELETE
CATV
〈
+/ —/ ENTER / MENU
〉
3T30631A [S] P08-11 2/21/05, 19:178

9
ESPAÑOL
PROHIBICIÓN DE PELICULAS
OFF PG PG-13 R NC-17
SET – SET +
XG
G
PG
PG-13
R
NC-17
X
:menores de 17 años se
recomienda autorización
de los padres
:17 años o mayor
:sólo para adultos
TV-Y : todos los niños
TV-Y7 :7años o mayor
TV-G : programa para niños
TV-PG : con autorización de los
padres
TV-14 : 14 años o más
TV-MA: 17 años o más
Cuando seleccione TV-Y7, TV-PG, TV-14 o TV-MA, presione el
botón CALL para mostrar el nivel de prohibición.
Presione el botón SET + o – para seleccionar la clasificación deseada.
Presione el botón ENTER para seleccionar el ajuste ON u OFF.
OFF TV-Y7 TV-G TV-14 TV-MA
SET – SET +
TV–Y TV-PG
PROHIBICIÓN DE TV
NOTAS:
•
Si desea cambiar la contraseña, siga los pasos 1 y 3 y seleccione la opción “CHANGE PASSWORD” para entrar su nueva contraseña.
• La función de chip V se activa sólo en los programas y cintas que tienen la señal de nivel de prohibición.
•Cuando se prohibe un programa con la función del Chip V, el programa prohibido no puede verse según su contenido. Cuando el
programa empieza, aparecerá “INPUT PASSWORD” en la pantalla. Para cancelar el Chip V temporalmente, entre la contraseña.
Si cambia de canal o desconecta el TV cuando el Chip V está cancelado temporalmente, volverá a activarse el Chip V seleccionado.
•
Si está cambiando los canales utilizando una videograbadora o una caja de cable mientras que el TV está sintonizando en el canal 3 o
4, el Chip V funciona de forma diferente. Cuando entre su contraseña para cancelar temporalmente el bloqueo en cualquier canal, se
desactivará enteramente la función del Chip V para todas las emisoras. Para reponer el Chip V, desconecte el TV y vuelva a conectar.
•Algunas cajas de cable fueron diseñadas con una función de retardo, en algunos casos puede demorar unos 10 segundos para
que un programa aparezca después de entrar una contraseña.
SELECCIÓN DE CHIP V
Este televisor tiene un control CHIP V para fijar una prohibición y controlar el acceso para ver determinados canales.
Presione el botón SET + o – para seleccionar la opción
V-CHIP SET y presione el botón ENTER.
Entre su contraseña (4 cifras) utilizando los botones de
selección de canal directo (0-9).
En el caso de haber entrado una contraseña equivocada,
presione el botón RESET y vuelva a entrar la misma
contraseña. A continuación, presione el botón ENTER.
Entre la misma contraseña para confirmarla, y presione el
botón ENTER.
Presione el botón SET + o – para seleccionar la opción
V-CHIP. Presione el botón ENTER para activar a ON.
Presione el botón SET + o – para seleccionar la opción TV
RATING o MOVIE RATING. Presione el botón ENTER.
Presione el botón SET + o – para seleccionar la prohibición
deseada para el video o canal de TV aplicable. Presione el
botón ENTER.
Presione el botón MENU hasta que se borre la pantalla
MENU.
• Cuando está activando el decodificador de subtítulos, habrá una demora corta antes de aparecer texto de subtítulos en la
pantalla.
•El texto del programa aparecerá en pantalla solo en aquellas áreas donde exista este tipo de servicio.
•
Si no se recibe la señal de emisión de texto, no aparecerán leyendas, pero el televisor permanecerá en el modo de recepción de texto.
•Ocasionalmente podrán aparecer errores de ortografía o caracteres extraños durante la recepción de texto. Esto es normal en
este modo, especialmente con los programas en vivo. Esto se debe a que durante los programas en vivo, los textos son
ingresados sin edición, ya que no hay tiempo para la misma.
•Cuando las leyendas estén en pantalla, puede ser que las indicaciones de funciones como volumen y silenciamiento no
aparezcan ya que interferirían con las leyendas.
• Algunos sistemas de cable y sistemas de protección contra copias pueden interferir con la señal de emisión de texto.
• Si utiliza una antena interior o si la recepción del TV es muy insuficiente, el texto de las emisiones puede no aparecer o mostrar
caracteres extraños y errores de ortografía. En tal caso, ajuste la antena para mejorar la recepción o utilice una antena externa.
SUBTÍTULOS
Las leyendas aparecerán en los lugares de la pantalla que
interfieran mínimamente con la imagen, generalmente en la parte
inferior de la misma. Los programas de noticias mostrarán
generalmente tres líneas de leyendas que cambiarán en la pantalla
La mayoría de los otros programas ofrecen dos o tres líneas de
leyendas colocadas cerca del personaje que está hablando de
tal manera que el usuario pueda seguir el diálogo. Las letras
itálicas o subrayadas indican títulos, palabras en idiomas extranjeros
o palabras que requieren énfasis. Las letras de canciones
aparecen encerradas entre notas musicales.
Texto: El modo de recepción de texto llenará usualmente una
tercera parte de pantalla completa con la programación de
programas y otras informaciones. Después de seleccionar uno
de los modos de recepción de texto, éste continuará activado
hasta que se lo cambie, independientemente de que se sintonice
otro canal. Si se pierde la señal de la emisión de texto debido a
un aviso comercial o al corte de la señal, las leyendas
reaparecerán cuando la señal sea recibida nuevamente. Si se
cambia de canal, las leyendas se retardarán en 10 segundos
aproximadamente.
Para recibir emisiones de programas de televisión con emisión de
texto, refiérase a su guía de TV en la que estarán indicadas con
el símbolo (CC).
¿QUE ES LA RECEPCIÓN DE TEXTO?
Este televisor tiene capacidad para descodificar y mostrar los
programas de televisión con emisión de texto. Esta función
mostrará el texto en pantalla para los usuarios con problemas
de audición o traducirá y mostrará el texto que se encuentre en
otra lengua.
PARA VER LOS SUBTÍTULOS
Presione el botón TV/CAP/TEXT en el mando a distancia para
cambiar entre el TV normal y los dos modos de subtítulos
(subtítulos y texto en toda la pantalla).
Leyendas: Este modo de recepción de texto mostrará el texto
en pantalla en inglés u otro idioma (dependiendo de la
programación del botón CH.1/2 de recepción de texto).
Generalmente las emisiones de textos en inglés son recibidas
en el canal 1 de recepción de texto y los textos en otros
idiomas son recibidos en el canal 2 de recepción de texto.
1
3
4
5
6
7
2
:para todas las edades
:con autorización de los
padres
:con autorización de los
padres menos de 13
años
3T30631A [S] P08-11 2/21/05, 19:179

10
AJUSTE DE IMAGEN
Presione el botón MENU.
Presione el botón SET + o – hasta que el indicador al
lado de “PICTURE” empiece a parpadear y presione el
botón ENTER.
Presione el botón ENTER repetidamente para
seleccionar el punto que desea ajustar.
Se pueden hacer los ajustes de brillo, contraste, color, tinte y definición.
BRILLO
CONTRASTE
COLOR
TINTE
DEFINICIÓN
+
aumenta el brillo
aumenta el contraste
color brillante
color hacia el verde
disminuye el brillo
disminuye el contraste
tiene un color pálido
color rojizo
le imagen es más suave
le imagen es más nítida
–
PARA VOLVER AL AJUSTE INICIAL
Presione el botón RESET cuando aparece en la pantalla el
modo de ajuste de imagen.
1
2
3
4Presione el botón SET + o – dos veces para hacer el
ajuste.
El aparato de TV está equipado con una función conocida
como sonido de TV multicanal o MTS. Las transmisiones
MTS permiten disfrutar mejor de la TV ya que sus programas
tienen un sonido en estéreo de alta fidelidad. MTS también
tiene un canal adicional llamado programa de audio
secundario o SAP que los canales de TV pueden utilizar
para transmitir un segundo idioma en las transmisiones
bilingües o para otros propósitos.
PARA ESCUCHAR SONIDOS EN ESTÉREO
Cuando el aparato de TV está encendido o se hace una
selección de canal, asegúrese de que aparece “STEREO”
en la pantalla. Esto significa que se pueden recibir
transmisiones en “Estéreo”. Puede disfrutar de los sonidos
en estéreo utilizando las altavoces izquierdo y derecho.
•Cuando se reciben transmisiones “MONO” no aparece
ninguna indicación.
•Si la señal transmisora no es lo suficientemente fuerte o
no puede escuchar nítidamente los sonidos en estéreo,
presione el botón AUDIO SELECT para cambiar a un
sonido monoaural. Con este deberán eliminarse los ruidos.
Presione nuevamente para escuchar los sonidos en estéreo.
PARA ESCUCHAR EN SAP (PROGRAMA DE
AUDIO SECUNDARIO)
Cuando el aparato de TV está encendido o se hace una
selección de canal, asegúrese de que aparece SAP en la
pantalla. Esto significa que se puede recibir transmisiones en
“Programa de audio Secundario”.
PARA SELECCIONAR EL SONIDO DESEADO
Presione el botón AUDIO SELECT para seleccionar el
sonido deseado.
PROGRAMA DE AUDIO SECUNDARIO (SAP) Y ESTÉREO
COLOR
(COLOR)
BRIGHTNESS
(BRILLO) TINT
(TINTE)
SHARPNESS
(DIFINICION)
CONTRAST
(CONTRASTE)
FUNCIÓN SONIDO ESTABLE
Cuando se emite un sonido de alto volumen, la función de sonido estable contribuye a equilibrar el volumen hasta un nivel
de escucha más confortable.
Presione el botón MENU.
Presione el botón SET + o –
hasta que el indicador al lado
de “STABLE SOUND” empiece
a parpadear.
1
2
PICTURE
CH SETUP
MENU
LANGUAGE
V-CHIP SET
〈
+/ —/ ENTER / MENU
〉
STABLE SOUND ON OFF
Presione el botón ENTER para seleccionar ON o OFF.
3
TRANSMISIÓN MONOAURAL+SAP
TRANSMISIÓN ESTEREO+SAP
SONIDO PRINCIPAL
(MONOAURAL) SONIDO
SEPARADO
SONIDO PRINCIPAL
(ESTEREO) SONIDO
SEPARADO
SONIDO PRINCIPAL
+ SEPARADO
(MONOAURAL)
SONIDO PRINCIPAL
+ SEPARADO
(MONOAURAL)
SONIDO PRINCIPAL
(MONOAURAL)
3T30631A [S] P08-11 2/21/05, 19:1710
Table of contents
Languages:
Other Insignia CRT TV manuals