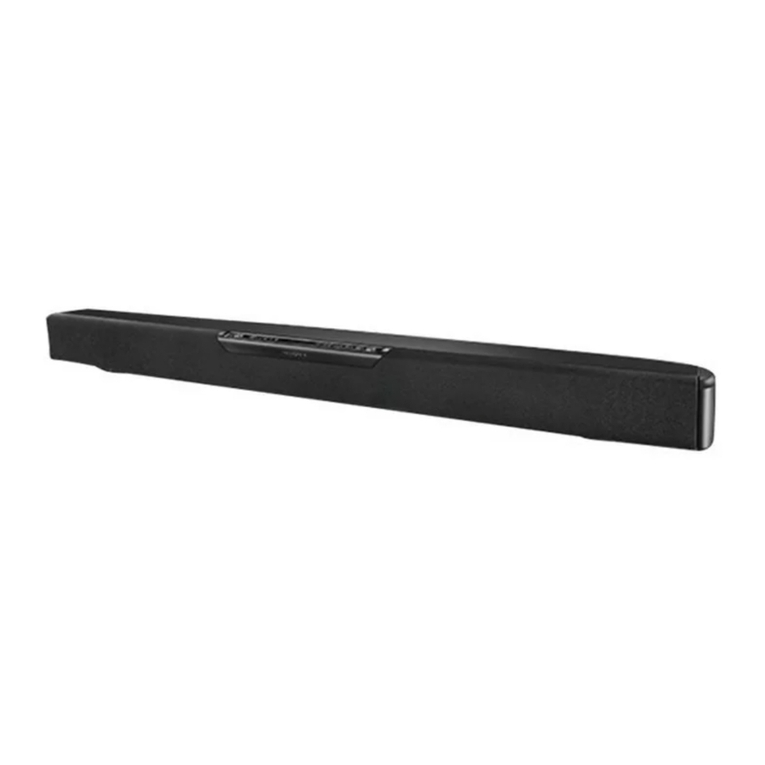
Insignia NS-SB212 User manual

NS-SB212
User Guide
Soundbar Home Theater Speaker
NS-SB212_12-0388_MAN_EN_V2.book Page 0 Tuesday, April 17, 2012 1:07 PM
ii www.insigniaproducts.com
Contents
Important safety instructions . . . . . . . . . . . . . . . . . . . . . . . . . . . . . . . . . . . . .1
Placement . . . . . . . . . . . . . . . . . . . . . . . . . . . . . . . . . . . . . . . . . . . . . . . . . . . . . . . 1
Using close to a TV or computer . . . . . . . . . . . . . . . . . . . . . . . . . . . . . . . . . . 1
Introduction . . . . . . . . . . . . . . . . . . . . . . . . . . . . . . . . . . . . . . . . . . . . . . . . . . . . .2
Package contents . . . . . . . . . . . . . . . . . . . . . . . . . . . . . . . . . . . . . . . . . . . . . . . .2
Soundbar features . . . . . . . . . . . . . . . . . . . . . . . . . . . . . . . . . . . . . . . . . . . . . . .2
Top View . . . . . . . . . . . . . . . . . . . . . . . . . . . . . . . . . . . . . . . . . . . . . . . . . . . . . . . . 2
Back View . . . . . . . . . . . . . . . . . . . . . . . . . . . . . . . . . . . . . . . . . . . . . . . . . . . . . . . 3
Remote Control . . . . . . . . . . . . . . . . . . . . . . . . . . . . . . . . . . . . . . . . . . . . . . . . . . 3
Installing or replacing the remote control battery . . . . . . . . . . . . . . . . . 4
Using the remote control . . . . . . . . . . . . . . . . . . . . . . . . . . . . . . . . . . . . . . . . 4
Setting up your soundbar . . . . . . . . . . . . . . . . . . . . . . . . . . . . . . . . . . . . . . . .4
Mounting the soundbar . . . . . . . . . . . . . . . . . . . . . . . . . . . . . . . . . . . . . . . . . . 4
Connections . . . . . . . . . . . . . . . . . . . . . . . . . . . . . . . . . . . . . . . . . . . . . . . . . . . . . 5
Using your soundbar . . . . . . . . . . . . . . . . . . . . . . . . . . . . . . . . . . . . . . . . . . . . .6
Troubleshooting . . . . . . . . . . . . . . . . . . . . . . . . . . . . . . . . . . . . . . . . . . . . . . . . .6
Specifications . . . . . . . . . . . . . . . . . . . . . . . . . . . . . . . . . . . . . . . . . . . . . . . . . . . .6
Legal notices . . . . . . . . . . . . . . . . . . . . . . . . . . . . . . . . . . . . . . . . . . . . . . . . . . . . .6
One-year limited warranty . . . . . . . . . . . . . . . . . . . . . . . . . . . . . . . . . . . . . . . .7
NS-SB212_12-0388_MAN_EN_V2.book Page ii Tuesday, April 17, 2012 1:07 PM

1
www.insigniaproducts.com
Important safety
instructions
1Read these instructions.
2Keep these instructions.
3Heed all warnings.
4Follow all instructions.
5Do not use this apparatus near water.
6Clean only with dry cloth.
7Do not block any ventilation openings. Install in
accordance with the manufacturer's
instructions.
8Do not install near any heat sources such as
radiators, heat registers, stoves, or other
apparatus (including amplifiers) that produce
heat.
9Do not defeat the safety purpose of the
polarized or grounding-type plug. A polarized
plug has two blades with one wider than the
other. A grounding type plug has two blades
and a third grounding prong. The wide blade or
the third prong are provided for your safety. If
the provided plug does not fit into your outlet,
consult an electrician for replacement of the
obsolete outlet.
10 Protect the power cord from being walked on or
pinched particularly at plugs, convenience
receptacles, and the point where they exit from
the apparatus.
11 Only use attachments/accessories specified by
the manufacturer.
12 Use only with the cart, stand,
tripod, bracket, or table specified
by the manufacturer, or sold with
the apparatus. When a cart is used,
use caution when moving the
cart/apparatus combination to
avoid injury from tip-over.
13 Unplug this apparatus during lightning storms
or when unused for long periods of time.
14 Refer all servicing to qualified service personnel.
Servicing is required when the apparatus has
been damaged in any way, such as
power-supply cord or plug is damaged, liquid
has been spilled or objects have fallen into the
apparatus, the apparatus has been exposed to
rain or moisture, does not operate normally, or
has been dropped.
15 To reduce the risk of fire or electric shock, do not
expose this device to rain, moisture, dripping, or
splashing, and no objects filled with liquids,
such as vases, shall be placed on it.
16 An apparatus with a three-prong,
grounding-type plug is a Class I apparatus,
which needs to be grounded to prevent
possible electric shock. Make sure that you
connect any Class I device to a grounding-type,
three-prong outlet.
17 The wall plug is the disconnecting device. The
plug must remain readily operable.
18 Batteries should not be exposed to excessive
heat such as sunshine, fire, or the like.
Placement
• The soundbar cabinet is made out of plastic and is
therefore sensitive to extreme temperatures and
humidity, do not put it in locations subject to
direct sunlight or in humid places, such as near an
air conditioner, humidifier, bathroom, or kitchen.
• Do not put water or other liquids close to the
soundbar. If liquid is spilled over the soundbar, it
may be damaged.
• The soundbar should be placed on a sturdy, flat
surface that is free from vibration, or mounted on
a wall. Do not put the soundbar on an uneven or
unstable surface, where it may fall and cause
damage.
Using close to a TV or computer
Some older TVs and computer monitors are
magnetically sensitive devices and as such are likely
to suffer discoloration or picture distortion when
conventional speakers are placed nearby. If
discoloration problems persist, try moving the
soundbar away from your TV or monitor.
Warning
Danger of explosion if battery is incorrectly replaced.
Replace only with the same or equivalent type.
NS-SB212_12-0388_MAN_EN_V2.book Page 1 Tuesday, April 17, 2012 1:07 PM
2
NS-SB212 Soundbar Home Theater Speaker
www.insigniaproducts.com
NS-SB212
Soundbar Home Theater Speaker
Introduction
Congratulations on your purchase of an Insignia
2-Channel Digital Home Theater Soundbar System.
The soundbar is designed to be suitable for use
with today’s LCD and plasma flat panel displays and
it can either be mounted on the wall or placed on a
TV stand.
This user manual explains how to correctly install,
operate, and get the best performance from your
Soundbar Home Theater Speaker. Read this user
manual carefully before installing your system, and
then keep it handy for quick reference.
Package contents
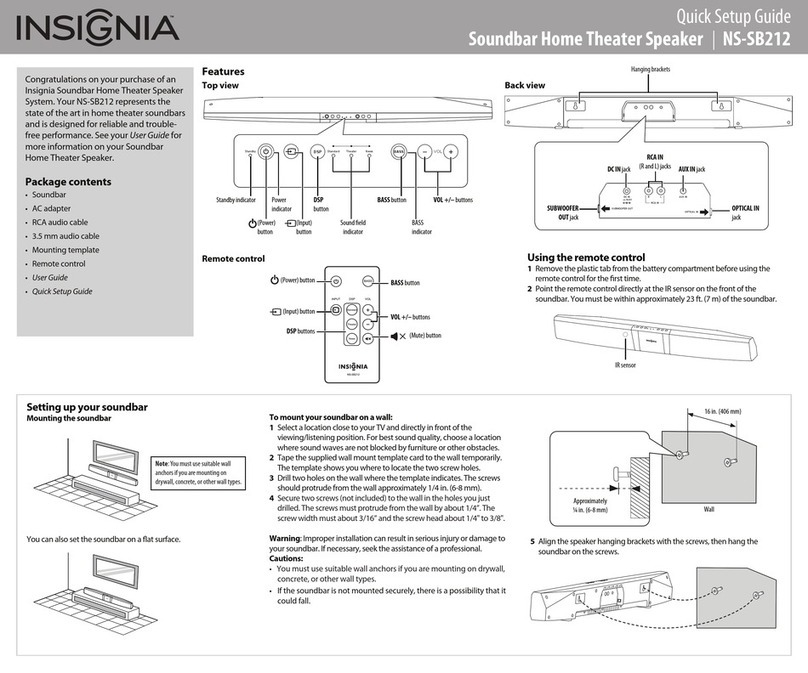
Soundbar features
Top View
Congratulationsonyourpurchase of an
Insignia2-ChannelDigitalHome Theater
SoundbarSystem.YourNS-SB212
representsthestateof the art in digital
hometheatersoundbarsand is designed
forreliableandtrouble-free performance.
Packagecontents
•Soundbar
•Remote control
•AC adapter
•RCA cable
•Audio cable
•Mounting screws (2)
•User Guide
•Quick Setup Guide
Usingtheremote control
1Removetheplasticinsulation sheet from the
batterycompartmentbeforeusing the remote
2Pointtheremotecontrol directly at the IR sensor
onthefrontof the soundbar. You must be within
approximately23ft.(7 m) of the soundbar.
Settingupyour soundbar
Mountingthesoundbar
Youcanusethe two screws supplied to hang
soundbaronthewall opposite your listening
location.
QuickSetup Guide
2-ChannelDigital Home Theater Soundbar I NS-SB212
Features
Topview
Backview
Remotecontrol
# Component
1 Standbyindicator
2 (Power)button
3 Powerindicator
4 (Input)button
5 DSPbutton
7 BASSbutton
8 BASSindicator
9 VOL+/–buttons
10 Hanger brackets
11 SUBWOOFEROUTjack
12 DCINjack
13 RCAIN(RandL) jacks
14 AUXINjack
15 OPTICALINjack
16 (Power) button
17 Powerindicator
18 DSPbuttons
19 BASSbutton
20 VOL+/–buttons
21 (Mute)button
Description
Lightswhenthesoundbaris in standby mode.
Presstoturnonthe soundbar. Press again to return the soundbar to
standbymode.
Lightswhenthesoundbaris turned on.
Pressrepeatedlytocyclethrough the available sound sources (RCA>AUX
IN>OPTICALIN).
(Standard>Theater>News).Thecorrespondingindicatorlights to
•Standard-Lets you enjoy normal sound.
•Theater-Best for enjoying movies. Bass frequencies are enhanced.
•News-Select for clear voice reproduction.
Presstoactivatethebass frequency enhancement.
LightswhentheBASSfrequency enhancement is activated.
Presstoincreaseordecrease the volume of the soundbar.
Usetohangthesoundbar on a wall.
Connectthisjacktoa powered subwoofer.
ConnecttheACadapterto this jack to power the subwoofer.
Connectthesoundoutputfrom your TV or DVD player to these jacks.
Connectthesoundoutputfrom your external audio device to this jack.
Connectthedigitalsoundoutput from a digital optical device, such as a
TVorDVDplayer,to this jack.
Presstoturnonthe soundbar. Press again to return the soundbar to
standbymode.
Pressrepeatedlytocyclethrough the available sound sources (RCA>AUX
IN>OPTICALIN).
•Standard-Lets you enjoy normal sound.
•Theater-Best for enjoying movies. Bass frequencies are enhanced.
•News-Select for clear voice reproduction.
Presstoactivatethebass frequency enhancement.
Presstoincreaseordecrease the volume of the soundbar.
Presstomutethesound from the soundbar. Press again to restore the
sound.
SUBWOOFEROUT
OPTICALIN
DCIN AUXIN
RL
RCAIN
15.5V
VOL
sweNretaehTdradnatSybdnatS
DSP
BASS
IRsensor
Soundbar Remote Control
AC Adapter RCA Audio Cable 3.5 mm Audio Cable
Mounting Template
User Guide Quick Start Guide
VOL
Standby Standard Theater News
DSP
BASS
12 4 5 6 789
3
#Component Description
1 Standby indicator Lights when the soundbar is in standby mode.
2(Power) button Press to turn on the soundbar. Press again to return the soundbar to standby mode.
3 Power indicator Lights when the soundbar is turned on.
4(Input) button Press repeatedly to cycle through the available sound sources (RCA>AUX IN>OPTICAL IN).
5DSP button Press repeatedly to cycle through the available Digital Signal Processor (DSP) sound modes
(Standard>Theater>News). The corresponding indicator lights to indicate the sound mode
selected.
6Sound mode indicator Lights to indicate the DSP sound mode selected.
• Standard - Lets you enjoy normal sound.
• Theater - Best for enjoying movies. Bass frequencies are enhanced.
• News - Select for clear voice reproduction.
7BASS button Press to activate the bass frequency enhancement.
8BASS indicator Lights when the BASS frequency enhancement is activated.
9VOL +/– buttons Press to increase or decrease the volume of the soundbar.
NS-SB212_12-0388_MAN_EN_V2.book Page 2 Tuesday, April 17, 2012 1:07 PM
3
NS-SB212 Soundbar Home Theater Speaker
www.insigniaproducts.com
Back View
Remote Control
11
5
SUBWOOFER OUT
OPTICAL IN
DC IN AUX IN
RL
RCA IN
6
4
2
3
18V
#Component Description
1 Hanging brackets Use to hang the soundbar on a wall.
2SUBWOOFER OUT jack Connect this jack to a powered subwoofer.
3DC IN jack Connect the AC adapter to this jack to power the soundbar.
4RCA IN (R and L) jacks Connect the sound output from your TV or DVD player to these jacks. If your TV only
has a 3.5 mm jack, use the AUX IN jack on the soundbar.
5AUX IN jack Connect the sound output from your external audio device to this jack.
6OPTICAL IN jack Connect the digital sound output from a digital optical device, such as a TV or DVD
player, to this jack.
41
5
6
2
3
#Component Description
1 (Power) button Press to turn on the soundbar. Press again to return the soundbar to standby mode.
2 INPUT button Press repeatedly to cycle through the available sound sources (RCA>AUX IN>OPTICAL IN).
3DSP buttons Press repeatedly to cycle through the available Digital Signal Processor (DSP) sound
modes (Standard>Theater >News ). The corresponding indicator on the soundbar top
panel lights to indicate the sound mode selected.
4BASS button Press to activate the bass frequency enhancement.
5VOL +/– buttons Press to increase or decrease the volume of the soundbar.
6(Mute) button Press to mute the sound from the soundbar. Press again to restore the sound.
NS-SB212_12-0388_MAN_EN_V2.book Page 3 Tuesday, April 17, 2012 1:07 PM
Other manuals for NS-SB212
4
Table of contents
Other Insignia Home Cinema Speakers manuals

Insignia
Insignia NS-HSB318 User manual

Insignia
Insignia NS-HT51 - 5.1-CH Home Theater Speaker Sys User manual

Insignia
Insignia NS-SB212 User manual

Insignia
Insignia NS-HSB318 User manual

Insignia
Insignia NS-SB314 User manual

Insignia
Insignia NS-SB316 User manual

Insignia
Insignia NSSP511 User manual

Insignia
Insignia NS-SB316 User manual

Insignia
Insignia NS-SB212 User manual