InstaBox i50 User manual
i50
USER’S MANUAL

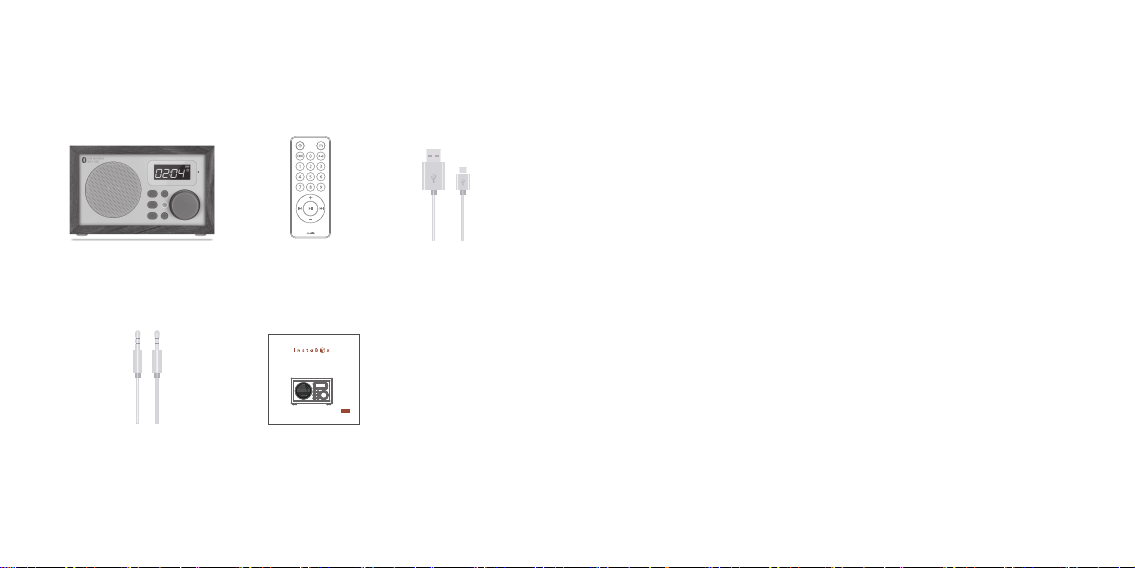
② Remote x1 ③ USB Cable x1
④ Audio Cable x1 ⑤ User’s Manual x1
① i50 x 1
• Output power: RMS 4W (THD + N = 10%, f0 = 1KHZ)
• Signal to noise ratio: ≥ 70dBA
• Distortion (%): ≤1%
• Frequency response: 100Hz ~ 18KHz
• Audio input mode: Bluetooth, AUX, USB, TF card, FM
• Volume adjustment form: 360 degree knob adjustment
• Speaker: Φ57mm, 4 , 5W
• Power supply: lithium polymer rechargeable battery 1800mAh 3.7V
• Charging power: DC5V ≥ 600mA
• AUX maximum input sensitivity: 800mV
• Working environment temperature: 0ºC ~ +50 ºC
• Product specifications: 155mm / 73mm / 101mm
• Net weight: 0.6kg
Package Includes Specification
RF50
User’s Manual
01 0201 02

01
01
07
04
05
06
03
02
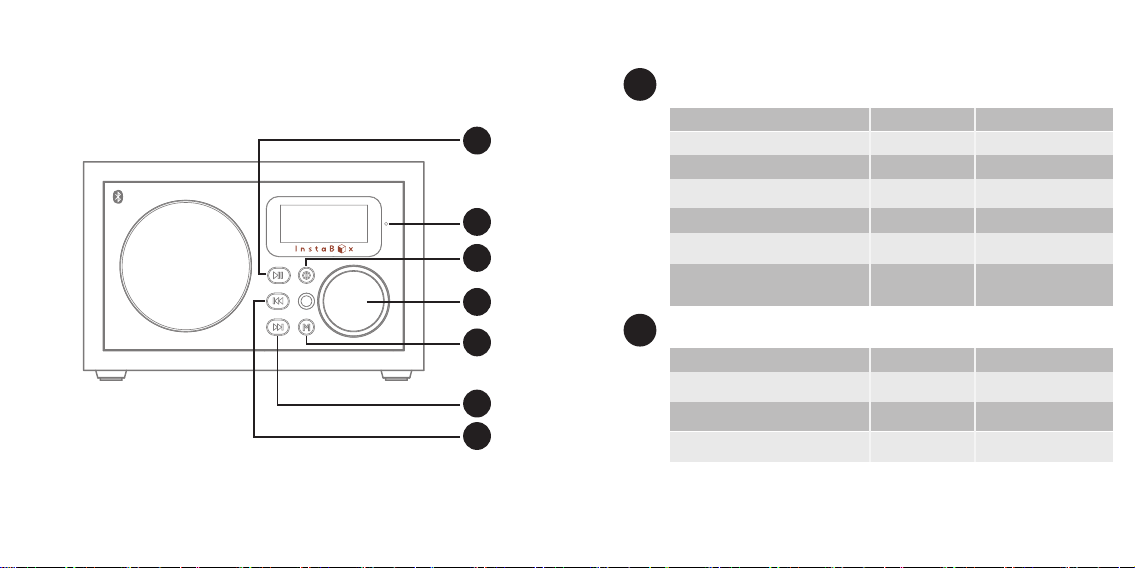
i50 Front View Play / Pause Button
03 04
Radio Mode
Bluetooh Mode
Bluetooh Mode(Call received)
Time Mode
When Playing External Audio
When Playing U disk/TF Card Music
Short Press
mute / play
play / pause
answer / hand up
-
mute
play / pause
auto search
pairing
-
alarm set
-
-
Long Press
02 Back Button
Music Mode (U Disk/SD/TF card)
Bluetooh Music Mode
Radio Mode
Short Press
previous track
previous track
previous channel
rewind
-
reverse search
Long Press

03
04
06
08
09
10
13
11
12
Forward Button
Long press—
for 3 seconds for ON/OFF;
for 8 seconds to clear all settings
Short press to select: CLOCK/USB/SD/FM/AUX /BLUETOOTH
Note: any input not present will be skipped.
Time Mode: Long press —clock setting mode (see below).
Bluetooth Mode: Long press—refuse incoming phone call
On / Off Button 05
Works in any Playing Status
Turn clockwise —-increase the volume
Turn counterclockwise —-reduce the volume
Volume Control
Mode Button
07 Microphone
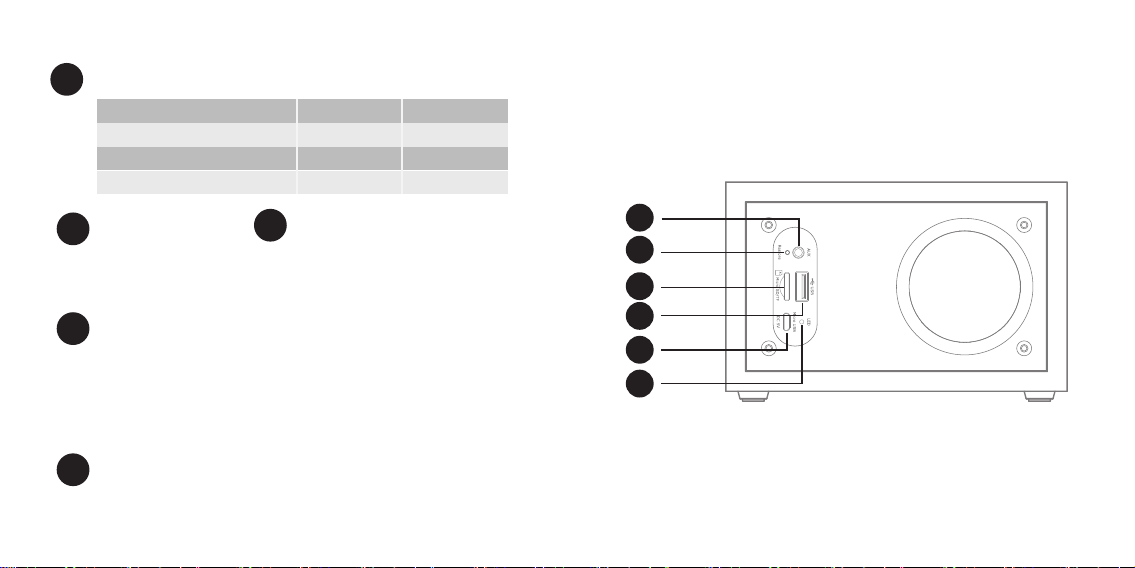
i50 Rear View
05 06
Music Mode (U Disk/SD/TF card)
Bluetooh Music Mode
Radio Mode
Short Press
next track
next track
next channel
fast forward
-
forward search
Long Press
11
09
08
12
10
13
Insert micro USB cable for charging internal battery or for USB
audio cable input
Reset Hole
Audio cable connection for computer, phone, or other source for audio input.
Insert paper clip or other pointed device and hold button for 3 seconds to reset
i50 to factory defaults settings.
When charging, the indicator will illuminate red, when fully charged, green.
Charging time may be increased if i50 unit is in use during charging cycle.
TF card input for MP3 audio files.
USB port for audio input
AUX Audio Input Port
Charging Indicator
TF or micro SD Card Input Port
USB Type A Input Port
USB Micro B Input/Charging Port
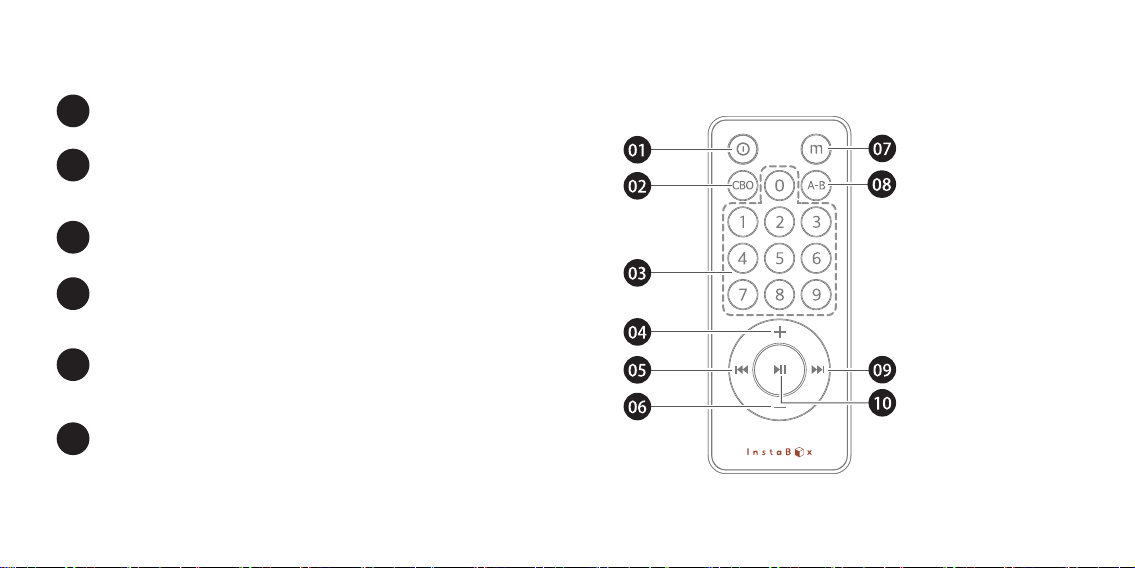
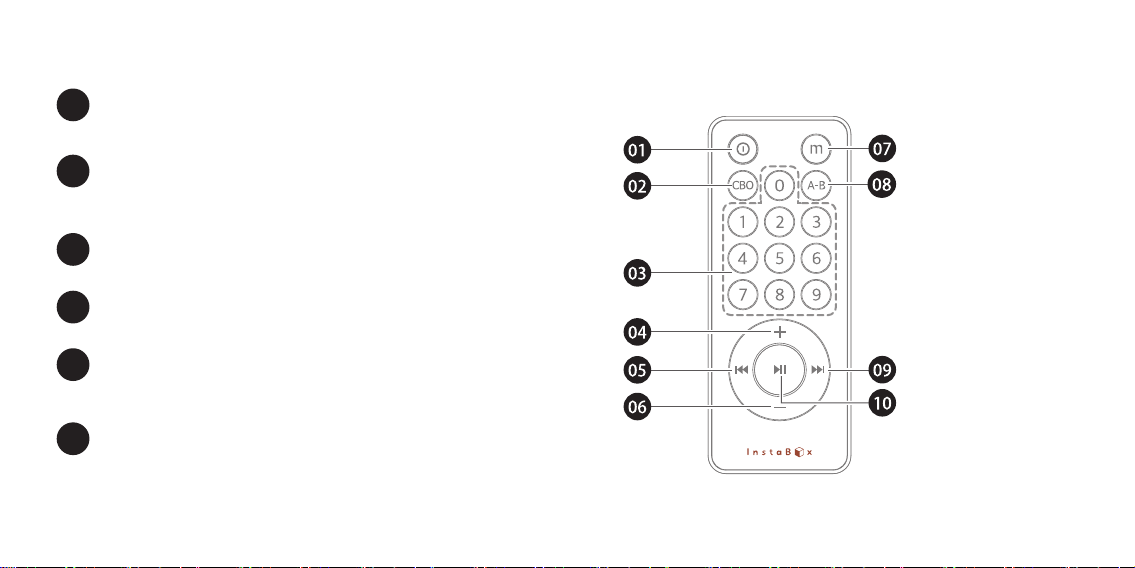
i50 Remote Control
07 08
① On / Off Button
Long press— place radio in
standby mode
Note: the remote is only available
when the radio is on or in standby.
② Music Function Button
Loop, Single Play, Random
③ 0-9 Number Buttons
Music mode: Long press ‘0’
selects equalizers
Normal, Rock, Pop, Class, Jazz,
Bass
④ Volume Increase
⑤ Back Button
Music mode:
Short press - previous track
Long press - rewind
Bluetooth Music Mode:
Short press - previous track
Radio Mode:
Short press - previous channel
Long press - reverse search
⑥ Volume Decrease

Installing the battery in the remote
You must install the battery with the positive (+) side up.
Note: The i50 comes with a CR2025, 3-volt Li cell. If you want longer life for your
remote, use a CR2032. The only difference is that the CR2032 is a tiny bit thicker but it
still fits nicely in the remote control.
When installing the battery ensure that the positive contact pin is located next to the
rim of the battery and not forced below the disc.
09 10
⑩ Play / Pause Button
Radio Mode: Short press—mute/play
Long press—auto-search
Bluetooth Mode: Short press — play/pause
Long press— pairing
Bluetooth Mode (Call received): Short press—answer/hang up
Time Mode:
Long press—alarm set
When Playing External Audio: Short press—mute
When Playing U disk / TF Card Music::Short press—play/pause
⑦ Mode Button
Short press to select:
CLOCK/USB/SD/FM/AUX /BLUETOOTH
Note: any input not present will be skipped.
Time Mode:
Long press —clock setting mode (see below).
Bluetooth Mode: Long press—refuse incoming phone call
⑧ A to B Replay
⑨ Forward Button
Music Mode: (U Disk / SD Card):
Short press—next track
Long press—fast forward
Bluetooth Music Mode:
Short press—next track
Radio Mode:
Short press—next channel
Long press—forward search

1. Short press the Mode and make sure the radio in clock display
2. Press and hold the Mode button for 3 seconds then release.
3. Use the Volume knob to adjust settings, then press and release Mode button to
select settings
4. Set the hour
5. Set the minutes
6. Press the Mode to finish settings
7. The clock will only display in 24-hour (military time) format.
8. After setting the clock choose the desired Sleep time for the i50. Choices available
are: OFF, 30, 60, 90, 120 minutes.
The Instabox i50 has 2 convenient alarms that can be set independently. Once set, the
alarms will repeat twice daily.
1.Press Mode to get to the time function then press and hold Play for 3 seconds.
2.Press Mode to set the hour. Use the volume control to select the desired hour.
3.Press Mode and repeat the same steps to set the minutes.
4.Press Mode to confirm setting. The alarm sign will be flashing.
5.Press Play to turn the alarm ON or OFF. When ON is selected the alarm sign will
remain on the screen.
6.Once the alarm is set, long press Mode or Play to exit the settings or wait for 10
seconds.
7.To set additional alarms follow the steps above. After step 1, use the Volume
Control to choose which of the two alarms to set – then follow the remaining steps.
Setting the clock
Setting the alarm
11 12
There are three choices for the alarm ring:
1.The beep sound of the radio is automatically set for the alarm. This is the default.
2.Your favorite FM station can be selected as the alarm ring. Follow these steps using
the remote:
a)Select your favorite FM station, long press “1”. The screen shows “ON”
when complete.
b)To change your selection, long press “1”, when the screen shows “OFF”,
alarm clock ring is set to the default “Beep” sound.
Note: once the ring is set to an FM station, it will last for 30 minutes.
3.You can use the TF/SD Card/USB music as your alarm clock ring
a)Select a favorite song (MP3 format) from the TF/SD card or USB input. Using the
remote control, long press “1”. The screen shows “ON” when complete.
b)To change your selection, long press “1”, when the screen shows “OFF”,
alarm clock ring is set to the default “Beep” sound.
Note: You must have the TF/SD card/U disk in inserted when the alarm is ON.
Setting the alarm clock ring

Using the FM Radio
1.You can scan the FM band and save desired stations.
a) Click Mode and select the FM function
b)Long press Play on the radio or the remote control. The radio will automatically
scan the FM band from 87.5-108.5MHz and save stations found as P01-P50.
The Instabox i50 can store 50 preset radio stations.
2.You can step through saved stations using the forward and back buttons on the
front panel or on the remote. Select any previously stored channel by pressing the
numbers (1-50) on the remote, then press Play. If no station has been saved in a
selected channel Err will display.
3.You can semi-automatically scan and save FM stations:
a)Hold the forward or back button to scan through available radio stations. To save
a selected station, long press ‘2’. Your selection is saved in the next available
preset position.
4.You may select any FM station directly by entering the station frequency then press
Play.
(e.g.: for 105.1MHz = Press 1051 + Play).
5.To momentarily mute the radio press the Play button on the remote or on the front
panel.
Note: The i50 is equipped with only an internal antenna. Reception may be improved
by relocating the radio or placing it near a window. Signal reception may be better
outdoors.
Playing music from a micro-SD card or a Flash
Ports are provided on the rear panel of the i50 for a Micro-SD card and for a USB
Flash drive. When either type of device is plugged into the i50, TF or USB will appear
on the screen and MP3 format music will begin to play. The i50 supports memory
sources up to 32GB at a maximum bit rate of 320kbps. All music selections must be in
MP3 format.
13 14
• Press the forward or back button to play the next or previous selection.
• Press and hold the forward or back button to fast-forward or rewind a selection
• Press the play button to pause/play the music.
• You can use the remote to numerically select a track. (Press 30 + Play= Play song
30)
• Press and hold ‘0’ to select one of six different sound profiles:
NORMAL / ROCK / POP / CLASS / JAZZ / BASS
• You can record segments of a selection for a playback repeat. Press A-B. “P—A”
will show on the display as the segment is saved. End the segment by again
pressing A-B, “P—B” will display. The segment will now play repeatedly until A-B
is pressed again. The segment will stop and “P—E” will display.

Using the external audio cable provided, you can play audio from any external source
using the rear panel Aux audio input port. “AUX” will display on the front panel
when the cable is used. Use the play button to mute the input. Note: this is an input
only port.
1.The InstaBox i50 supports Bluetooth version V4.0+EDR
2.Press the Mode button or ‘m’ on the remote to turn on Bluetooth. ‘BLUE’
appears on the screen. When you hear ‘DO-DI’ the Bluetooth is on and ready to
pair.
3.Turn on the Bluetooth on your device and search for D50.
4.The i50 will connect in about 20 seconds and the external device content will begin
to play.
5.Press the play button to play/pause the device playback
6.If the device content has tracks use the forward or back controls to play next or
previous tracks.
7.The i50 will receive phone call audio and display ‘HP’ during a call. Press and
hold the Play button to disconnect or auto-connect a call.
Using the External Auxiliary Input
Bluetooth and InstaBox i50
Battery Charging Management
Friendly Reminder
• The battery indicator on the upper right of the screen displays the amount of
battery charge
• The i50 is charge from a micro USB connector on the rear panel. It requires DC 5v
600MA for charging. The battery reaches full charge in 4 to 6 hours. The charge
light on the rear panel changes from red to green when the battery is fully charged.
• The battery has a capacity of 1800 mAH. You can also use this battery as an
emergency backup for charging a cell phone. Plug your USB phone charging cable
into the USB audio input on the back of the i50 and your phone will commence
charging.
• It is normal that the radio may get hot when charging or using.
• Please turn off the power and disconnect all the outside devices of your radio
before cleaning.
• Please do not expose to fire or cigarettes and prevent contact with water or
moisture.
• Please make sure your radio and the accessories stay dry and do not drop, throw or
use your radio violently.
• Please use any antistatic soft cloth to clean your radio. Do not use any detergent
which contains any chemical material such as alcohol, benzene etc.
• Avoid using your radio and the accessories in extreme heat or cold temperatures.
• Do not attempt to take apart or repair your radio, or free warranty is void.
15 16
② Fernbedienung x1 ③ USB Kable x1
④ Audio Kable x1 ⑤ Bedienungsanleitungl x1
① i50 x 1
• Ausgangsleistung: RMS 4W (THD + N = 10%, f0 = 1KHZ)
• Vorgeschriebener Störabstand: ≥ 70dBA
• Verzerruung (%): ≤1%
• Frequenzgang: 100Hz ~ 18KHz
• Audio Eingangsschnittstelle: Bluetooth, AUX, USB, TF card, FM
• Typ der Lautstärke-Steuerung: 360°Knopf Steuerung
• Lautsprecher: Φ57mm, 4 , 5W
• Stromversorgung: Lithium polymer aufladbare Batterie 1800mAh 3.7V
• Ladestrom: DC5V ≥ 600mA
• AUX max. Eingangsempfindlichkeit: 800mV
• Arbeitstemperatur: 0ºC ~ +50 ºC
• Abmessungs: 156mm / 116mm / 101mm
• Netto Gewicht: 0.7kg
Lieferumfang Technische Daten
RF50
User’s Manual
01 0201 02

01
01
07
04
05
06
03
02
i50 Vorderseite Play / Pause Button
03 04
Radio Modus
Bluetooth Modus
Bluetooth Modus (beim Anruf)
Time Modus
Bei Abspielen des externen
Bei Abspielen der Musick von U-Disk
/ TF Karte
Kurz gedrückt
stumm/abspielen
abspielen/anhalten
annehmen/auflegen
-
stumm
abspielen/anhalten
automatisch
Stationen suchen
koppeln
-
Werker einstellen
-
-
Lang gedrückt
02 Zurück Taste
Music Modus: (U Disk / SD Karte)
Bluetooth Musik Modus
Radio Modus
Kurz gedrückt
vorheriger Track
vorheriger Track
vorheriges Station
zurückspulen
-
rückgängig suchen
Lang gedrückt
03
04
06
08
09
10
13
11
12
Vorwärts Taste
Lang gedrückt—
für 3s um ein/auszuschalten;
für 8s, Zurücksetzen
Drücken Sie diese Taste um Arbeitsmodus umzuschalten:
CLOCK/USB/SD/FM/AUX /BLUETOOTH
Hinweis: Jede nicht vorhandene Eingabe wird übersprungen.
Time Modus: lang Drücken —Wecker Einstellung (wie folgend gezeigt).
Bluetooth Modus: lang Drücken —alle Anrufe ablehnen
On / Off Taste 05
verfügbar in allen Arbeitsmodi
rechtsdrehend —- Lautstärke erhöhen
linksdrehend—-Lautstärke absenken
Lautstärke Steuerung
Modus Taste
07 Microphone
i50 Rückseite
05 06
Music Modus: (U Disk / SD Karte)
Bluetooth Musik Modus
Radio Modus
Kurz gedrückt
vorheriger Track
vorheriger Track
vorheriges Station
zurückspulen
-
rückgängig suchen
Lang gedrückt
11
09
08
12
10
13
Setzen Sie mikro USB Kabel ein um aufzuladen oder USB Audio Eingabe.
Zurücksezten Löchen
Verbindung mit Computer, Handy, order andere Audio-Eingaben durch ein
Audio-Kabel.
Setzen Sie die Büroklammer oder ein anderes spitzes Gerät ein und halten
Sie die Taste 3 Sekunden lang gedrückt, um das i50 auf die Werkseinstellungen
zurückzusetzen.
Der Indikator wird von rot zu grün wechseln wenn vollaufgeladen ist. Ladezeit
mag verlängert werden wenn dieser Teil bei der Aufladung noch arbeitet.
TF Karte Eingabe für MP3 Audio
USB Anschluss fär Audio-Eingabe
Aux Audio Anschluss
Aufladungsindikator
TF order mikro SD Karte Anschluss
USB Type A Eingang
Anschluss für USB Mikro B Eingabe/Aufladung
i50 Fernbedienung
07 08
① On / Off Taste
Lang gedrückt— in Standby
Modus eintreten
Hinweis: Die Fernbedienung ist nur
verfügbar wenn das Radio
eingeschaltet oder standby ist.
② Musik Funktionen
Loop, Single Play, Random
③ 0-9 Ziffer-Taste
Music modus: lang ‘0’ Taste
gedrückt halten um Equalizer
auszuwählen
Normal, Rock, Pop, Class, Jazz,
Bass.
④ Lautstärke erhöhen
⑤ Zurück Taste
Music Modus:
kurz gedrückt- vorheriger Track
Lang gedrückt—rewind
Bluetooth Music Mode:
Kurz gedrückt—vorheriger Track
Radio Mode:
Kurz gedrückt—vorheriges Station
Lang gedrückt—rückgängig
suchen

Einsatz der Batterie in Fernbedienung
Die positive Seite(+) der Batterie muss nach oben gesetzt.
Hinweis: Ein 3V CR2025 Li Batterie wird geliefert. Sie können sie auch mit eine CR2032
Li Batterie ersetzen, um eine lange arbeitszeit zu erhalten, denn die CR2032 ist ein
bisschen größer als CR2025 aber kann noch in die Fernbedienung setzen.
Bei Batterie-Einstellung müssen Sie es sichern, dass das positive Pin in der nähe vom
Batterierand liegt und nicht unter der Disc gezwungen gelegt wird.
09 10
⑩ Play / Pause Taste
Radio Modus:
Kurz gedrückt—stumm/abspielen
Lang gedrückt— automatisch Stationen suchen
Bluetooth Modus:
Kurz gedrückt — abspielen/anhalten
Lang gedrückt — koppeln
Bluetooth Modus (beim Anruf):
Kurz gedrückt —annehmen/auflegen
Time Modus:
Lang gedrückt—Werker einstellen
Bei Abspielen des externen:
Kurz gedrückt —stumm
Bei Abspielen der Musick von U-Disk / TF Karte:
Kurz gedrückt — abspielen/anhalten
⑥ Lautstärke absinken
⑦ Modus Taste
Drücken Sie diese Taste um Arbeitsmodus umzuschalten:
CLOCK/USB/SD/FM/AUX /BLUETOOTH
Hinweis: Jede nicht vorhandene Eingabe wird übersprungen.
Time Modus: lang Drücken —Wecker Einstellung (wie folgend gezeigt).
Bluetooth Modus: lang Drücken —alle Anrufe ablehnen
⑧ A to B Replay
⑨ Vorwärts Taste
Music Mode: (U Disk / SD Card):
Kurz gedrückt—nächster Track
Lang gedrückt—schnell vorwärts
Bluetooth Music Modus:
Kurz gedrückt—nächster Track
Radio Modus:
Kurz gedrückt—nächster Station
Lang gedrückt—suchen vorwärts

1. Kurz die Modus-Taste Drücken und stellen es sicher dass das Radio in Clock
zeigt.the Mode and make sure the radio in clock display
2. Halten die Modus-Taste gedrückt für 3s und lassen sie los
3. Benutzen Sie die Lautstärke-Taste um Einstellungen auzupassen. Drücken und
lassen die Taste los um Einstellung auszuwählen
4. Uhr einzustellen
5. Minute einzustellen
6. Drücken die Modus-Taste um die Einstellung zu beenden
7. Dieses Radio zeigt nur 24-Stunden Format.
Nach Einstellung der Uhrzeit können Sie die gewünschte Schlafzeit für i50 auswählen
unter anderem OFF, 30, 60, 90, 120 Minuten.
Dieses InstaBox i50 stellt zwei bequeme unabhängige Werker zur verfügung. Dieser
Werker werden sich zweimal jedes Tag wiederholen nachdem er eingestellt wird.
1.Drücken Sie die Modus-Taste um ins Zeitmodus einzutreten und dann halten die
Play-Taste für 3s gedrückt.
2.Drücken Sie die Modus-Taste um die Stunde einzustellen. Benutzen Sie
Lautstärke-Taste um die richtige Stunde auszuwählen.
3.Drücken Sie die Modus-Taste und wiederholen die gleiche Maßnahme wie bei der
Stundeneinstellung.
4. Drücken die Modus-Taste um die Einstellung zu bestätigen. Das Zeichen des
Werkers wird dann blinken.
5.Drücken Sie die “Play” Taste um der Werken ein/auszuschalten. Das
Werker-Zeichen wird auf dem Bildschirm bleiben, wenn der Werker eingeschaltet
ist.
6.Halten die Modus- oder Play-Taste lang gedrückt oder warten für 10s und die
Einstellung wird beenden.
7.Wiederholen Sie diese obenen Maßnahmen um zusätzliche Werker einzustellen .
Benutzen die Lautärke-Taste um den einzustellenden Werken auszuwählen.
Uhrzeit und Kalender Einstellung
Werker Einstellung
11 12
Es gibt drei Wähle von Klingelton:
1.Standarder Klingeltong : “beep”
2.Ihre beliebte FM Stationen können auch als Klingelton ausgewählt. Benutzen die
Fernbedienung wie folgt um es einzustellen:
a)Wählen Ihe beliebte Stationen aus und dann halten lang gedrückt die „1“ Taste.
Wenn es erfolgt, ein „ON“ wird auf dem Bildschirm angezeigt.
b)Lang gedrückt die „1“ Taste zu halten um standarden „beep“ Klingelton
auszuwählen, wenn es erfolgt, ein „OFF“ wird auf dem Bildschirm angezeigt.
Hinweis: Der Klingelton wird für 30 Minuten dauern wenn eine FM Station eingestellt
ist.
3.Musik aus TF/SD Karte als Klingelton
a)Benutzen die Fernbedienung. Wählen Ihe beliebte Musik von TF/SD Karte aus
und dann halten lang gedrückt die „1“ Taste. Wenn es erfolgt, „ON“ wird auf
dem Bildschirm angezeigt.
b)Lang gedrückt die „1“ Taste zu halten um standarden „beep“ Klingelton
auszuwählen, wenn es erfolgt, ein „OFF“ wird auf dem Bildschirm angezeigt.
Hinweis: Die TF/SD Karte/U Disk muss eingesteckt werden wenn der Werker
arbeitet.
Klingelton-Einstellung des Werkers

FM Radio
1.Sie Können FM Bänder scannen und gewünschte Stationen speichern.
a) Klicken die Modus-Taste und wählen die FM Funktion aus.
b) Lang gedrückt die Play-Taste von das Radio oder Fernbedienung halten. Dann
es wird automatisch Bänder von 87.5 zu 108.5MHz scannenund die Stationen als
P01-P50 speichern.
Maximal 50 Stationen können gespeichert werden.
2.Sie können die gespeicherten Stationen durch die Pfeiltasten auf der Vorderseite
des Radios oder auf der Fernbedienung auswählen. Drücken Nummer (1-50) auf
der Fernbedienungen um entsprechende Station auszuwählen. Wenn es keine
entsprechende Station gibt, ein “Err” wird auf dem Bildschirm gezeigt.
3.Sie können halbautomatische die Stationen scannen und speichern.:
a)Halten die vorwärts oder rückwärts Taste gedrückt um verfügbare Stationen
auszuwählen. Um eine gewählte Station zu speichern, halt „2“ Taste lang
gedrückt.
4.Sie können alle FM Stationen dadurch auswählen, ein verfügbare Frequenz
einzugeben und danach “Play” drücken. (zB.: für 105.1MHz = Drücken 1051 +
Play).
5.Um das Radio vorübergehend stumm zu machen drücken Sie die Play Taste von
Radio oder Fernbedienung.
Hinweis: Mit Hilfe der externn Antenne von hoher Verstärkung gewährleistet i50
einen hochwertigen UKW-Empfang. Erweitern Sie die Antenne und positionieren
Sie sie für den besten Empfang.
Musik von Mikro-SD Karte oder USBdrive
Auf der Rückseite des i50 befinden sich Anschlüsse für eine Micro-SD-Karte und ein
USB-Flash-Laufwerk. Wenn ein Gerätetyp an den i50 angeschlossen wird, erscheint TF
oder USB auf dem Bildschirm und MP3-Musik wird abgespielt. Der i50 unterstützt
Speicherquellen bis zu 32 GB bei einer maximalen Bitrate von 320 kbps. Alle Musik
müssen im MP3-Format vorliegen.
13 14
• Drücken Sie die Vorwärts- oder Zurück-Taste, um die nächste oder vorherige Musik
zu spielen.
• Halten Sie die Vorwärts- oder Zurück-Taste gedrückt, um eine Auswahl vor- oder
zurückzuspulen
• Drücken Sie die Wiedergabetaste, um die Musik anzuhalten / abzuspielen.
• Sie können mit der Fernbedienung einen Track numerisch auswählen. (Drücken Sie
30 + Play = Song 30 abspielen)
• Halten Sie '0' gedrückt, um eines von sechs verschiedenen Soundprofilen
auszuwählen:
NORMAL / ROCK / POP / CLASS / JAZZ / BASS
• Sie können Segmente von einer Wiedergabewiederholung einstellen. Drücken Sie
A-B. "P-A" wird auf dem Display angezeigt, wenn das Segment gespeichert wird.
Beenden Sie das Segment, indem Sie erneut A-B drücken, "P-B" wird angezeigt. Das
Segment wird jetzt wiederholt abgespielt, bis A-B erneut gedrückt wird. Das
Segment stoppt und "P-E" wird angezeigt.

Mit dem mitgelieferten externen Audiokabel können Sie Audio von einer beliebigen
externen Quelle über den Aux-Audioeingang auf der Rückseite wiedergeben. "AUX"
wird an der Vorderseite angezeigt, wenn das Kabel eingesteckt wird. Verwenden Sie
die Wiedergabetaste, um den Eingang stummzuschalten. Hinweis: Dies ist ein Port
nur für die Eingabe.
1. Die InstaBox i50 unterstützt Bluetooth Version V4.0 + EDR
2. Drücken Sie die Mode-Taste oder "m" auf der Fernbedienung, um Bluetooth
einzuschalten. "BLAU" erscheint auf dem Bildschirm. Wenn Sie "DO-DI" hören, ist
Bluetooth aktiviert und kann gekoppelt werden.
3. Schalten Sie Bluetooth auf Ihrem Gerät ein und suchen Sie nach i50.
4. Der i50 verbindet sich mit Ihrem Bluetooth-Gerät in etwa 20 Sekunden und der
Inhalt des externen Geräts beginnt zu spielen.
5. Drücken Sie die Playtaste, um die Gerätewiedergabe zu starten / zu unterbrechen
6. Wenn der Geräte-Inhalt Titel enthält, verwenden Sie die Vorwärts- oder
Zurück-Taste, um die nächsten oder vorherigen Titel abzuspielen.
7. Der i50 empfängt Telefonanrufe und zeigt während eines Anrufs "HP" an. Halten
Sie die Play-Taste gedrückt, um das Radio mit Ihrem Hany zu trennen oder
automatisch den Anruf anzunehmen
Verwenden des externen Zusatzeingangs
Bluetooth und InstaBox i50
Battery Charging Management
Freundliche Erinnerung
• The battery indicator on the upper right of the screen displays the amount of
battery charge
• The i50 is charge from a micro USB connector on the rear panel. It requires DC 5v
600MA for charging. The battery reaches full charge in 4 to 6 hours. The charge
light on the rear panel changes from red to green when the battery is fully charged.
• The battery has a capacity of 1800 mAH. You can also use this battery as an
emergency backup for charging a cell phone. Plug your USB phone charging cable
into the USB audio input on the back of the i50 and your phone will commence
charging.
• IEs ist normal, dass das Radio beim Laden oder Verwenden heiß wird.
• Schalten Sie das Gerät aus und entfernen Sie alle externen Geräte von Ihrem Radio,
bevor Sie es reinigen.
• Bitte verwenden Sie es nicht in der Nähe von Feuer oder Zigaretten vermeiden den
Kontakt mit Wasser oder Feuchtigkeit vermeiden.
• Bitte stellen Sie sicher, dass Ihr Radio und das Zubehör trocken bleiben und lassen
Ihr Radio nicht gewaltsam benutzt werden sowie fallen lassen oder werfen.
• Bitte verwenden Sie ein antistatisches, weiches Tuch, um Ihr Radio zu reinigen.
Verwenden Sie kein Reinigungsmittel, das chemische Substanzen wie Alkohol,
Benzol usw. enthält.
• Verwenden Sie Ihr Radio und das Zubehör nicht bei extremer Hitze oder Kälte.
• Versuchen Sie nicht, Ihr Radio auseinanderzunehmen oder zu reparieren, sonst wird
die kostenlose Garantie nicht mehr verfügbar.
15 16

② Telecomando x1 ③ Cavo USB x1
④ Cavo Audio x1 ⑤ Manuale Utente x1
① i50 x 1
• Potenza d’uscita: RMS 4W (THD + N = 10%, f0 = 1KHZ)
• Rapporto segnale/rumore: ≥ 70dBA
• Distorsione (%): ≤1%
• Risposta in frequenza: 100Hz ~ 18KHz
• Modi input audio: Bluetooth, AUX, USB, scheda TF, FM
• mpostazione volume: manopola ruotante 360°
• Altoparlante: Φ57mm, 4,5W
• Alimentazione: batteria ricaricabile ai polimeri di litio da 1800mAh 3.7V
• Caricabatterie: DC5V ≥ 600mA
• Massima sensibilità d’ingresso AUX: 800mV
• Temperature di lavoro: 0ºC ~ +50 ºC
• Specifiche del prodotto: 155mm / 73mm / 101mm
• Peso netto: 0.6kg
La confezione include Specifiche
RF50
User’s Manual
01 0201 02
01
01
07
04
05
06
03
02
i50 Vista Frontale Tasto Play / Pausa
03 04
Modalità Radio
Modalità Bluetooth
Modalità Bluetooth (Chiamata
telefonica in arrivo)
Modalità Orario
Mentre si riproduce una fonte
audio esterna:
Mentre si riproduce della musica da
un disco USB / Scheda TF
Pressione breve
mute/play
play/pausa
risposta/termina
chiamata
-
mute
play/pausa
ricerca automatica
accoppiamento (pairing)
-
regolazione sveglia
-
-
Pressione prolungata
02 Tasto Indietro
Modalità Musica: (Disco USB /
Scheda SD/TF)
Modalità Musica Bluetooth
Modalità Radio
Pressione breve
traccia precedente
traccia precedente
canale precedente
riproduzione del brano
dall’inizio
-
ricerca inversa
Pressione prolungata

03
04
06
08
09
10
13
11
12
Tasto Avanti
Pressione prolungata —
3 secondi per accensione/
spegnimento (ON/OFF);
8 secondi per cancellare tutti I
settaggi
Pressione breve per selezionare: OROLOGIO/USB/SD/FM/AUX /BLUETOOTH
Nota: ogni input non presente verrà saltato.
Modalità Orario: Pressione prolungata —modalità regolazione orologio
(vedere sotto).
Modalità Bluetooth: Pressione prolungata —rifiuta la chiamata telefonica
in ingresso
Tasto On / Off 05
E’attivo quando l’apparato riproduce dell’
audio Ruotato in senso orario — aumenta il
volume Ruotato in senso antiorario — riduce
il volume
Controllo Volume
Tasto Modalità
07 Microfono
i50 Vista Posteriore
05 06
Modalità Musica: (Disco USB /
Scheda SD)
Modalità Musica Bluetooth
Modalità Radio
Pressione breve
traccia successiva
traccia successiva
canale successivo
avanti veloce
-
ricerca in avanti
Pressione prolungata
Table of contents
Languages:


