InStove 20 Liter Stove User manual

FLAMMABLE SURFACES
Always avoid touching the stove
body when in operaon.
While insulated to reduce sur-
face temperatures, porons of
the stove can get hot enough to
cause burns.
Never operate the stove directly
on wood oors, grass, or other
ammable surfaces.
The base of the stove can get hot
enough to start res.
Always route the chimney to the
outdoors with an approved chim-
ney thimble if the stove is used in
an enclosed space or under a roof.
Even if the stove is not producing
visible smoke, emissions include
carbon monoxide and are toxic
to breathe.
Always place stove and chimney
at least 18 inches (0.5 meters)
from ammable structures and
materials.
Never place combusble
materials or volale liquids
near or on the stove when hot.
Never operate the stove with
ash tray removed for an
extended period of me
This reduces the strength of
the dra and can allow
smoke/ame to escape from
the fuel feed entrance.
Always dispose of ashes in a
reproof container stored
away from all combusbles.
Ash can remain hot enough
to start res for many hours
aer the stove burns out.
Never operate the stove
without liquid in the pot,
autoclave, or pressure cooker/
canner.
The re can burn at over
1800 F (1000 C). The heat
will destroy them, and can
also destroy your stove.
20-Liter Self-Feeding Stove
User’s Manual
www.instove.org │ info@instove.org │ +1-541-942-9519
1. Safety Precauons
Introducon
Please read this manual thoroughly in order to get the most out of your 20-Liter
self-feeding cookstove, as well as to maximize its lifespan and understand how to
use it safely. Your stove is designed to be exceponally convenient, user-friendly,
and safe, and can withstand 5 or more years of daily use, but there are a few im-
portant pracces, ps, and tricks you’ll want to learn before geng started.
Contact InStove at info@instove.org or +1-541-942-9519 with queson or for
replacement parts. You can also check us out online at www.instove.org.
Table of contents:
1. Safety Precauons
2. Assembly
3. Stove Placement
4. Stove Lighng and Operaon
5. Cleaning and Care
6. Removable Pot Skirt: Pot, Pressure
Cooker, and Autoclave Usage
ASH
TRAY

2. Assembly
If your stove has come parally disassembled, follow the steps below to assemble it before operaon.
CAUTION: Sheet metal edges of chimney secons and chimney elbow are SHARP. Gloves are recommended.
Step 1. Install folding fuel chute
1. Insert the 2 provided screws from the outside of the fuel chute through the
holes in the stove’s fuel feed. Use a #2 Philips head screwdriver and 3/8” hex
wrench or socket to fasten the 2 provided locknuts from the inside of the
fuel feed chute, as shown above. Make sure that the toothed locking ring on
the nut is facing inwards (touching the fuel feed wall).
2. Tighten nuts so that the chute is easy to move, but stays in an upright posi-
on for transport/storage without falling. Move the chute back and forth
through its full range of moon several mes and re-ghten the nuts.
3. The nuts may need to be re-ghtened once more aer a few days of use.
Step 2. Install chimney elbow
1. Insert the anged top edge of the chimney elbow into the opening in the
rear of the stove.
2. Bend the lower corners of the elbow upward with your thumbs and insert
them into the stove. The chimney elbow should snap into place once it has
cleared the edge of the opening in the stove.
3. Insert and ghten the 4 provided screws and ange nuts with a #2 Philips
head screwdriver and 3/8” hex wrench or socket.
Step 3. Assemble and install chimney
1. Press and join the edges of each chimney piece together, as shown above. Start at one end and work towards the other end.
2. Combine all pieces together by inserng the crimped end of one secon into the smooth end of the next.
3. Place the assembled chimney into the stove, as shown in the “overview” diagram, with the crimped end facing upwards.
4. Place the chimney cap on top of the chimney, as shown in the “overview” diagram.
Stove overview
Tools needed:
#2 Phillips head screwdriver
3/8” hex wrench or socket
Chimney Cap
Chimney
Chimney elbow is
behind stove (not
shown)
Pot
Removable
Pot Skirt
Fuel Feed
and Folding
Fuel Chute
Ash Tray
1. 2.
2.
1. 3.

4. Stove Lighng and Operaon
Before lighng the stove:
Recommended fuel: Use small, dry scks or lumber scraps for best performance. 1-1.5 in. (2.5-4 cm) diameter is ideal.
Use straight scks, when possible, and break o any twigs in order to maximize self-feeding eecveness.
Avoid burning salt water dri wood, as this will increase corrosion of the stove internals.
Never burn pressure treated lumber. Toxic fumes are emied.
Folding fuel chute posion: Make sure that the fuel chute is fully open and is resng above the lip of the stove’s fuel feed
entrance to help make sure that scks feed in smoothly.
Lighng the stove:
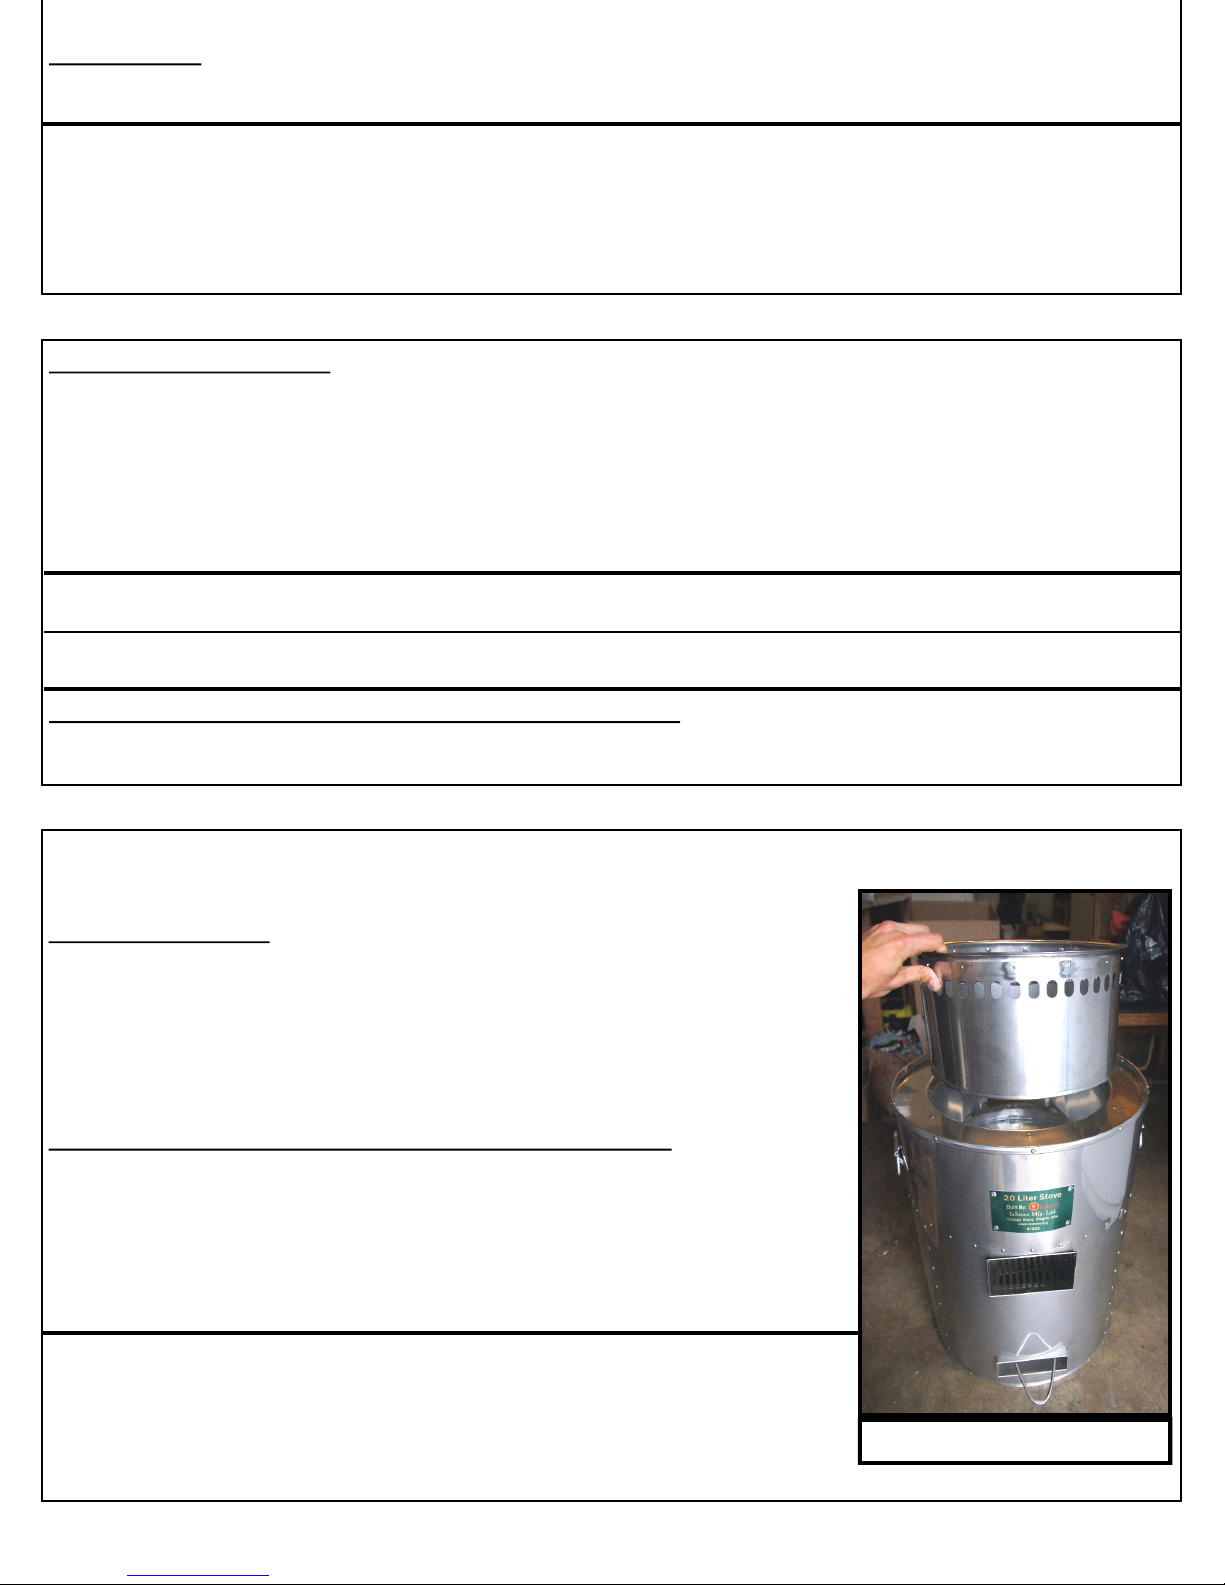
1. Remove the ash tray and arrange nder/kindling inside it.
Fire starng liquid or gel may be used.
2. Place scks into the fuel feed of the stove.
The scks should be spaced about 3/8 in. (1 cm) apart from each other for quick lighng.
3. Light the re in the ash tray and fully re-insert it into the stove (beneath the scks) once the re is burning strongly.
WARNING: Make sure that there is always water or cooking oil in your pot, pressure cooker, or autoclave when stove is lit.
Never burn them dry, or the heat from the re, which can exceed 1800°F (1000°C), can destroy them and the stove.
CAUTION: If the stove does get wet, allow it to dry completely before lighng (this may take several days).
If lit while wet, the stove will consume extra wood while drying, burn cooler, and corrode much faster than normal.
NOTE: Remove cardboard spacers holding the re grate and ash tray in place before lighng your stove for the rst me.
Tending the re:
Controlling repower: Firepower can be controlled by adding or removing scks unl the desired repower is achieved.
The stove will self-feed relavely smooth, straight scks into the re at a fairly constant rate.
Adding more fuel: To avoid a surge in the re when adding more wood, place the ps of new scks against the end of the
scks currently burning so that they help to push them into the re at a constant rate before burning, themselves.
NOTE: Make sure that scks rest on the boom surface of the stove’s fuel feed. If they are so long that they tend to p back
out of the stove, they will not self-feed correctly.
Over-feeding/over-ring: Do not stu the rebox full of wood.
This will decrease the quality of the burn and lifespan of the stove with minimal increase in repower.
If the stove produces visible smoking while burning dry wood, it is being over-fed.
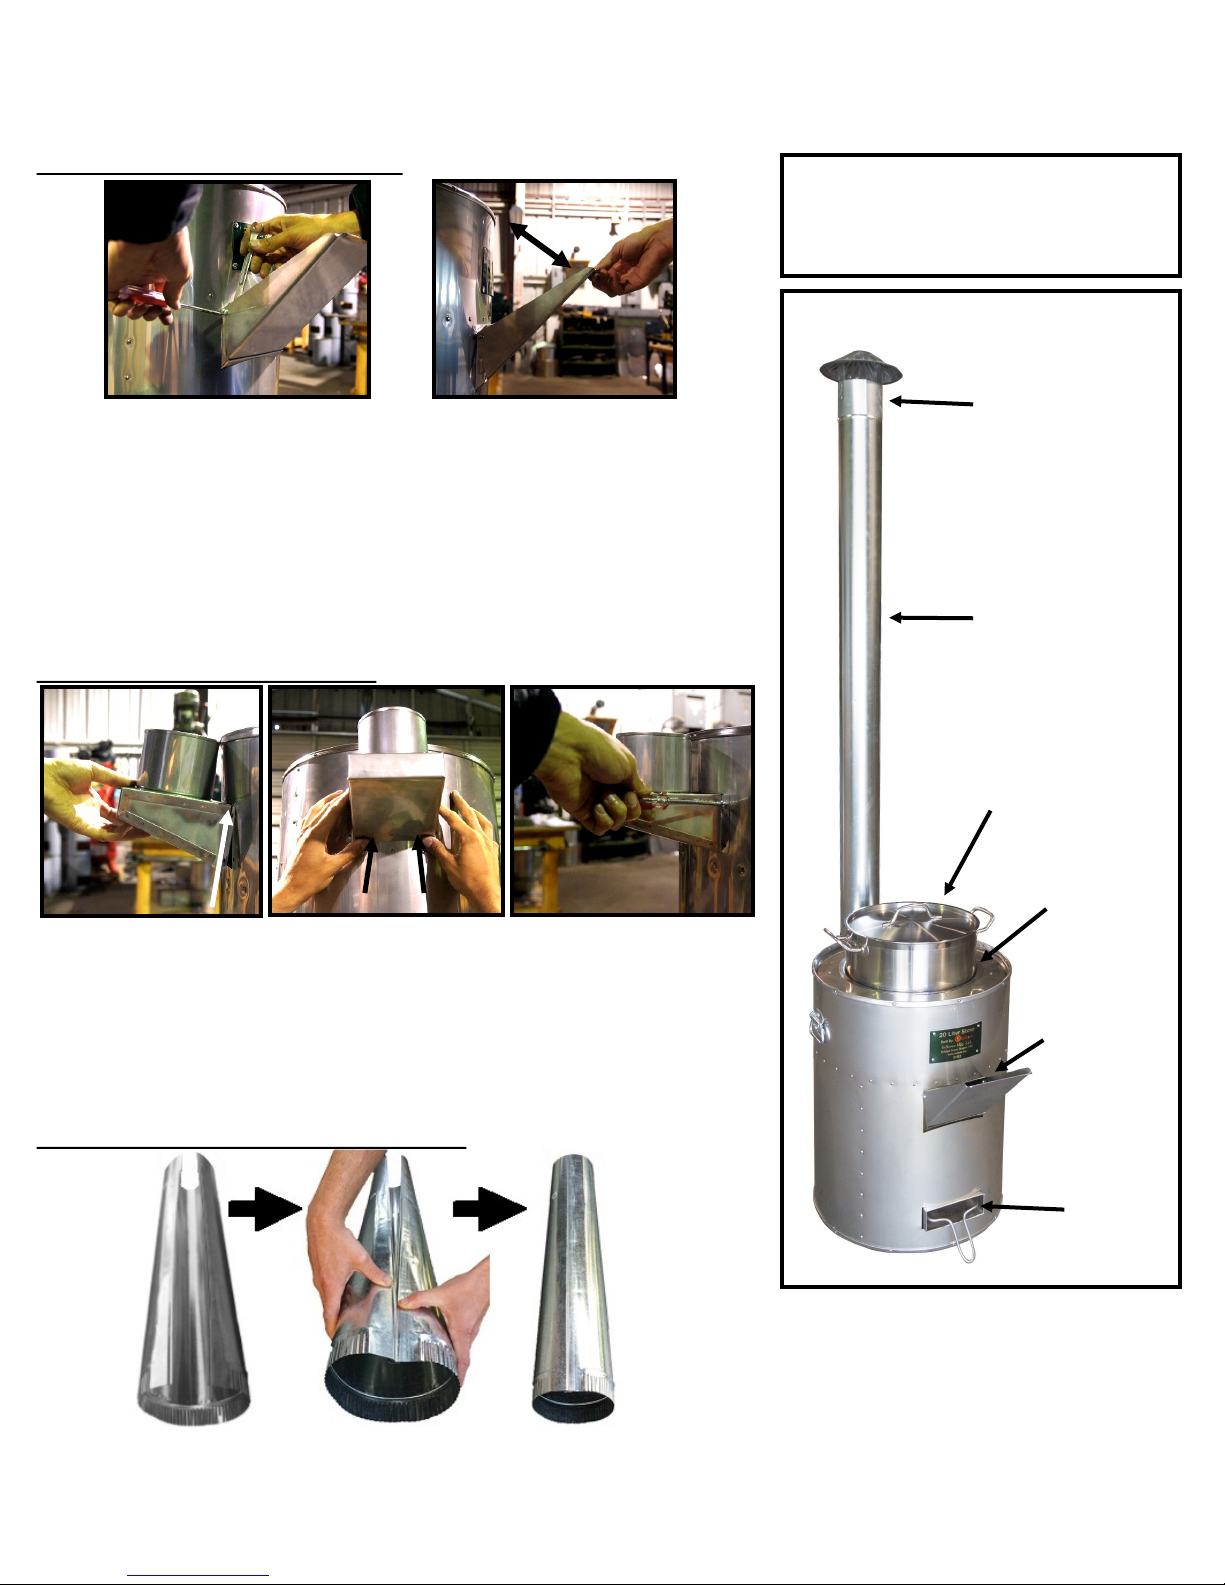
3. Stove Placement and Storage
Placement while in operaon:
To ensure safety and maximize lifespan, never operate your stove:
On ammable surfaces such as wood oors, grass or brush, etc. The boom of the stove may exceed 400°F — hot
enough to char or ignite these materials.
The stove can be safe to use over wood ooring if elevated at least 6 inches (0.2 m) above the oor. (This does not in-
clude sealed hardwood, veneers/composites, carpeted wood oors, or other products with plasc/coangs.)
Near ammable or combusble materials like re starng uid, curtains, tent walls, etc.
Make sure the sides of the stove and chimney are at least 18 in. (0.5 m) away from ammable structures and materials.
Make sure that combusble/inammable items such as gasoline, re starter uid, etc. are kept far away from the stove.
In the rain or while wet. The combinaon of water and high heat will cause the stainless steel internals to corrode.
On uneven surfaces. Hot liquid may spill out of the pot.
In enclosed spaces—unless the chimney is routed to the outdoors with an approved chimney thimble.
Even if no smoke is visible, the stove sll emits toxins including carbon monoxide.
Storage:
Always store the stove in a dry place. If you live near the ocean, make sure that it is not exposed to salt spray/dew.
Always allow the stove to cool completely before storage.
Make sure that any food residue is removed before storage to prevent corrosion.
NOTE: This stove is not cered by the US EPA or Canadian CSA as a residenal heater. You are responsible for
ensuring that installaon and usage of your stove are in compliance with all applicable codes and regulaons.

6. Removable Pot “Skirt”: Pot, Pressure Cooker, and Medical Autoclave Usage
5. Cleaning and Care
Stove cleaning and care:
Stove exterior: Can be cleaned with a damp cloth or common cleaners (that do not leave residues), such as glass cleaners.
Clean food residue aer each use to protect the appearance and lifespan of the stove.
Stove interior: Should not need regular cleaning. Soot can be removed with a dry rag or so brush (never with liquids).
Soot can be brushed into the re chamber, where it will burn up during the next re.
The pot surround/skirt is removable for access to the interior of the stove (see secon 6, below, for details).
Smoke seals: The two woven stainless steel smoke seals on your stove (one on the removable pot skirt, and one on the lip
of the stove body) are very delicate. Use only so, dry rags or brushes for cleaning.
WARNING: Be sure to let the stove cool before cleaning aer use
CAUTION: NEVER pour water/liquids into your stove for cleaning. This will quickly corrode and destroy the internals.
NOTE: Thick, aky soot build-up inside the stove is usually caused by over-ring or burning very wet wood.
NOTE: The metal on the inside of the stove and the smoke seals will discolor with heat. This is normal.
Pot, Pressure cooker, and Autoclave cleaning and care:
Soot can be removed from the outside of pots, pressure cookers, and autoclaves with warm, soapy water and a rag or bush.
Follow the instrucons provided with your pot or accessory for other preparaon, cleaning, and care details.
Ash removal:
Ash removal: Ash can be removed during or aer a re by removing, emptying, and re-inserng the ash tray.
Ash does not need to be removed aer every re, but be sure to empty ash tray when full or before storage/transport.
WARNING: Stove, ash tray, and ashes are HOT and can burn you/cause res while stove is in operaon:
Use a heat-resistant glove when holding the ash tray handle if stove is or has been lit recently.
Always dispose of ashes in a re-proof container.
Ashes can remain hot enough to start res for many hours aer being removed from the stove.
WARNING: NEVER leave the ash tray outside of the stove while lit for an extended amount of me.
This will decrease the dra through the stove and can allow smoke and ame to escape from the fuel feed.
The stove comes with a removable inner “skirt” or pot surround, which is designed to t a 12 in. (30.5 cm) diameter stock pot
when installed in the stove. When the skirt is removed, the stove is designed to t pressure cooker/canners and medical auto-
claves of various diameters.
Cooking pot usage:
When installed in the stove, the removable skirt is engineering to maximize eciency with
the following Update Internaonal brand pot models:
Aluminum: 20 and 24 qt. stock pots (models apt-20 and apt-24).
Stainless Steel: 20 qt. stock pot (model sps-20).
Other pots of similar diameter may t, as well, but InStove does not guarantee their per-
formance.
Pressure cooker/canner and medical autoclave usage:
When the pot skirt is removed from the stove, the stove opening is designed to accept the
following All-American brand pressure cooker/canner and medical autoclave models:
Pressure cooker/canners models: 915, 921, 925, and 930.
Medical autoclave models: 915X and 925X.
Similar models made by dierent manufacturers may t, as well, but InStove does not
guarantee their performance.
NOTE: The woven stainless steel smoke seals are designed to minimize smoke leakage
around cooking pots or pressure cookers/autoclaves, but may not eliminate 100%
of leakage, especially around models with smaller diameters.
www.instove.org │ info@instove.org │ +1-541-942-9519
Stove with pot skirt removed.
Table of contents
Popular Stove manuals by other brands

hergom
hergom FRAMA Series user manual

MCZ
MCZ SUITE AIR 10 M2 installation guide

Heatilator
Heatilator ECO-ADV-PS35 owner's manual

Jøtul
Jøtul MF 3 Installation and operating instructions

Elmira Stove Works
Elmira Stove Works Firewiew 2100 Installation and operating instructions

Earth Stove
Earth Stove 1003C Installation and operation manual

Aito
Aito AK-68 installation instructions

Portway
Portway Arundel MK3 Installation and operating instructions

MCZ
MCZ SUITE-CLUB-MUSA Hydromatic 18 M2 installation guide

ZF
ZF Euro Alpi Vezzana Use and maintenance manual

Stanley
Stanley Solis Inset 500 Installation and operating instructions

Country Flame
Country Flame NPS-1000 owner's manual