Integrated Controls, Inc. DMX-IT 512 User manual

Designed and manufactured by:
Integrated Controls, Inc.
2851 21st Street
San Francisco, CA 94110
Tel: 415-647-0480 Fax: 415-647-3003
email: sales@dmxit.com
website: http://www.dmxit.com
DMX-512 CONNECTIONS
Use a standard 5 pin XLR, DMX data cable to
connect the dmx-IT to your DMX receivers.
(Pins 1-3 are used, 4 & 5 are not connected to the dmx-IT)
Note: dmx-IT products comply with the DMX512
standard as defined by the USITT specification and
use a 5 pin XLR for interface connection and data
transmission to DMX receivers. The wire type for
DMX512 cable must be data cable designed for
EIA485. This cable is low capacitance, twisted pair,
shielded, and designed for high speed data. There
are many brands and types that will work reliably.
Standard pre-built cables can be purchased from
any theatrical lighting supplier. Conversion to 3 pin
XLR and use of microphone cable is known to be
problematic and not recommended.
CHANNEL SETTING RANGE
Valid starting addresses for the DMX-IT 512 are
from 001 to 512. Entering a starting address setting
of 000 or 513 to 999, will be ignored if a valid address
has previously been set, or will result in a starting
address of channel 1 if no address has previously
been set. Setting the starting address to a channel
number from 502 to 512 will result in the sliders
controlling the channels from the starting address
up to channel 512. The remaining sliders will be
ignored. For example, with the starting address set
to 512, the channel 1 slider will control channel 512
and sliders 2-12 will be ignored.
SPECIFICATIONS
Size: 7.6" L, 1.3" H(front), 1.75" H(rear), 3.75" W
(19.3cm L, 3.3cm H(front), 4.4cm H(rear), 9.5cm W)
Net Weight: 1.5 lbs. (0.68kg)
Power requirements: 4 AA alkaline batteries (not included)
and/or a 9-12V 100mA AC adapter (included), with a
standard 2.1mm x 5.5mm barrel connector.
Adapter polarity may be either center positive or center
negative.
dmx-IT data control timing accuracy meets or exceeds
USITT standards and provides highly stable outputs with
no jitter or bobble headed values.
DMX-IT 512
Palm-Top Lighting Console
USER MANUAL
Integrated Controls, Inc.
DMX-IT Service Policy Available on website Integrated Controls, Inc.
Dealer
DMX-IT 512 SETUP and OPERATION
dmx-IT models are really simple to use.
For many applications, just set it to “1” and go to work!
The manual fader section of the DMX-IT 512
consists of channel faders 1-12 with a Master
fader and individual channel Bump buttons,
used to momentarily “flash” a channel to the
level set on the Master fader. The manual
section can control any 12 consecutive channels
in the 512 channel address space of DMX512
data.
Separate from the 12 manual channels, a list of
channels can be created and controlled by the
Group fader. This list can contain any number of
individual channels and/or any group of consecutive
channels, up to all 512 addressable channels.
Grouped channels operate independently from
the channel faders 1-12, but are also controlled
by the Master fader.
The Master fader controls the maximum output
level for fader channels 1-12, the Bump buttons
and the Group fader.
CHANNEL SELECTION for MANUAL FADER
CHANNELS 1-12
To change the starting address of the sliders 1-12:
1) Select the new starting address with the
numeric pushwheel switches.
2) Press the Address Change button.
The DMX512 starting address can be set to any
channel number between 1 and 501, and will
control the 12 consecutive channels starting
from that channel number. For example, if the
starting address is set to 025 then DMX
receivers set to 25 through 36 will respond to
the channel sliders 1-12.
Note that the Address Change button applies only to the starting
address of the fader channels 1-12, and is not used in adding,
deleting or clearing group channel assignments.
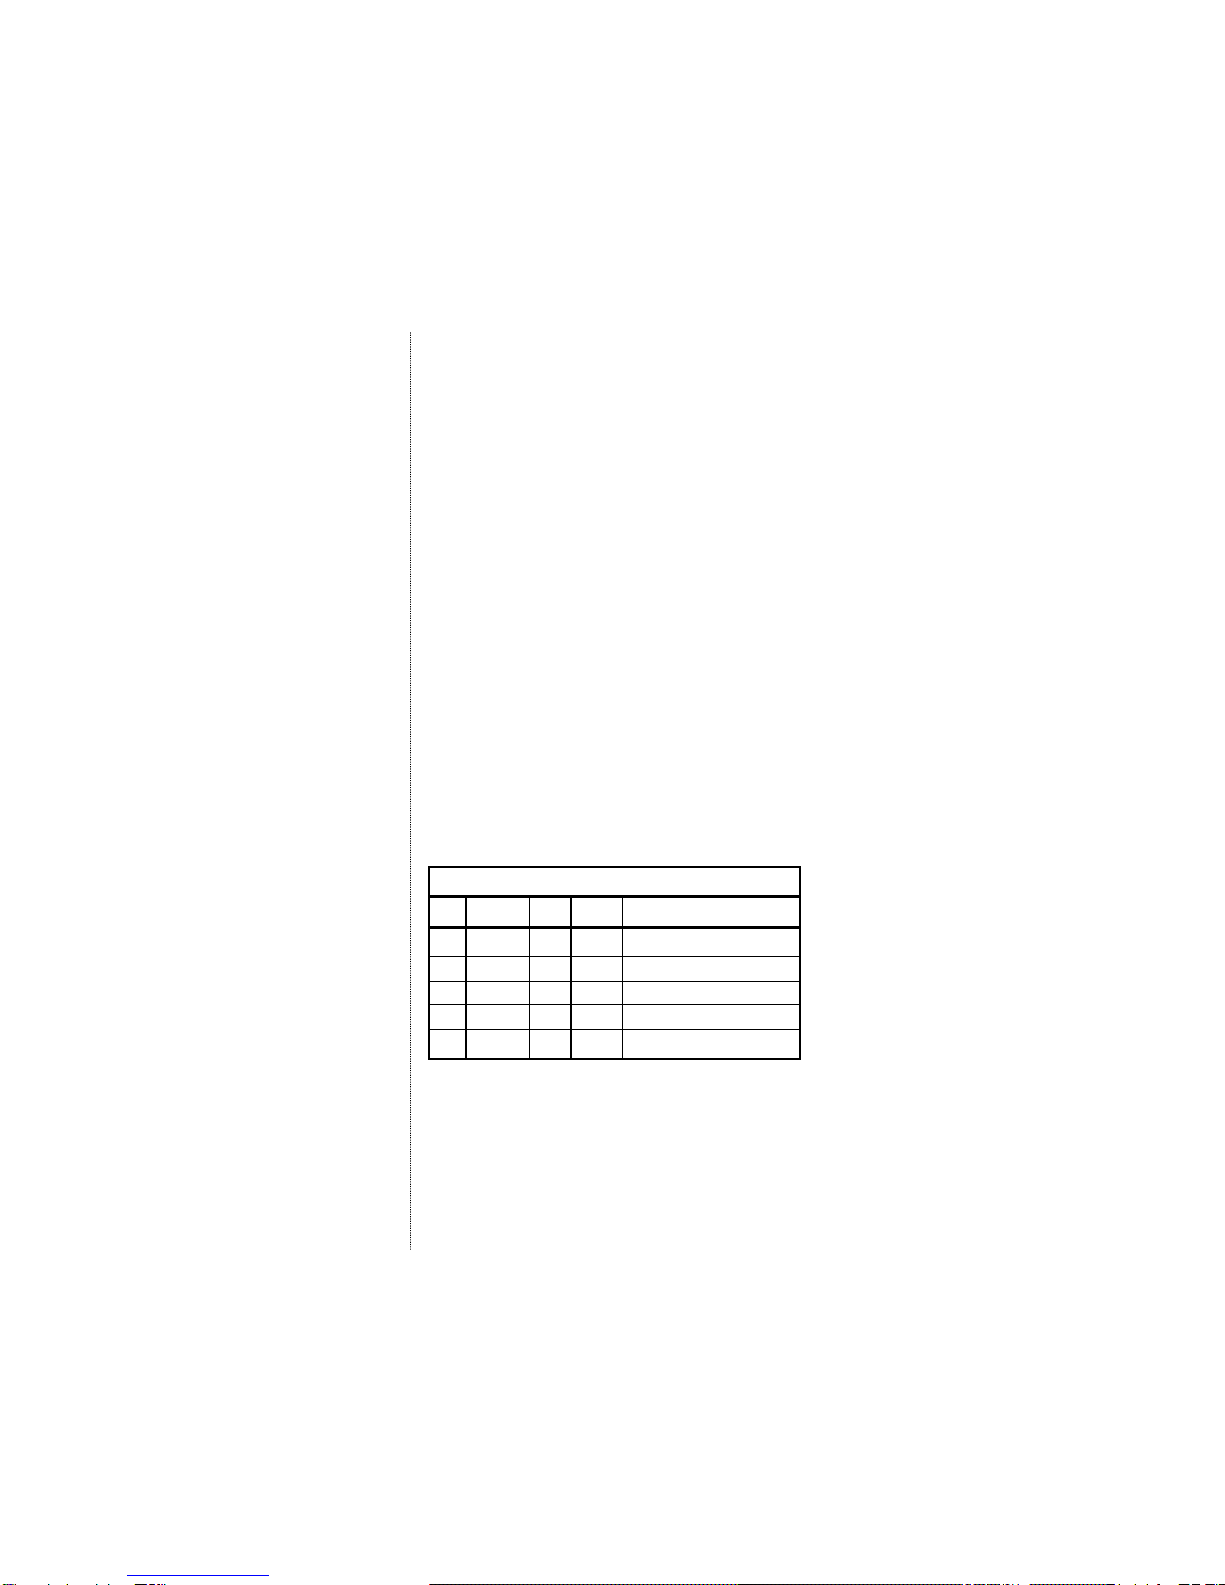
SET PRESS SET PRESS GROUP CONTROLS CHANNELS
015 ADD 15
023 ADD 15, 23
045 ADD 050 THRU* 15, 23, 45, 46, 47, 48, 49, 50
047 DELETE 15, 23, 45, 46, 48, 49, 50
048 DELETE 050 THRU* 15, 23, 45, 46
Examples of Group command sequences and resulting channel control:
*THRU must be pressed while the GROUP LED is still lit
there is a 10 second time-out period
NOTE: After assigning channels to the Group slider, the
pushwheels may not show the current starting address
for the 12 manual sliders. You may want to set the push-
wheels back to the starting address that you last set as a
reminder. This will assure that your starting address does
not inadvertently get changed. Pushing the Address
Change button again is not necessary.
GROUP CHANNEL ASSIGNMENT
Group is a list of channels controlled by the
Group slider. Any of the 512 channels may be
assigned to the Group.
Create and edit a Group using the pushwheel
settings and Add, Delete & Thru buttons. If a
channel is assigned to the group and is also
included in the manual section, the higher
level is output.
Add - Adds individual channels to the Group
list. Set an address, press Add. Repeat as
desired.
Delete - Deletes individual channels from the
Group list. Set an address, press Delete .
Repeat as desired.
Thru - Adds or deletes a range of channels in
the Group list. After Adding or Deleting a channel
from the list, and while the Group LED is still lit
(there is a 10 second time-out), set the end of
the range and press Thru.
To clear the entire Group, set the pushwheel
address to 9XX (where XX = any numbers)
and press Delete.
POWER
The dmx-IT operates on 4AA batteries or the
supplied AC adapter.
The POWER LED indicates power is present
when the power switch is turned on. If using
batteries, the LED will flash when the battery
voltage is low. If the batteries are too low to
operate, the LED will turn off and the dmx-IT
will stop transmitting.
To conserve battery power the dmx-IT stops
transmitting when the Master slider is at 0.
NiCad or NiMH batteries are not recommended
as operating life will not be acceptable due to
their lower initial cell voltage.
Expected battery life for alkaline batteries is
20-30 hours of operation.
Replace the 4 AA batteries (not included) in the
slide out tray by loosening the screw at the
bottom front of the enclosure and sliding out the
battery tray. It is not necessary to remove the
screw completely, just loosen it enough to release
the battery tray.
SLEEP MODE
If batteries are installed or the AC adapter is
plugged in and powered, when the power switch
is turned OFF the unit goes to sleep. In sleep
mode the dmx-IT will retain the last starting
address for the channel sliders and the channels
which are assigned to the Group. If batteries are
not installed or are low and the AC adapter is
not plugged in and powered, the unit does not
retain the channel starting address and Group
information. In this case, at power up the
channel sliders will be set to start with the
channel set on the pushwheels, providing it is
set to a valid starting address (001-512), or set
to begin at channel 1 if invalid. If you have
important group information which you wish to
retain, change the batteries with the AC adapter
connected and powered; the power switch may
be on or off.
Other Integrated Controls, Inc. Music Mixer manuals


