Sepura SCC User manual
User Guide
SCC colour console

Original Instructions: ENGLISH
Document Number: MOD-15-1896
Issue 1.0
Copyright
© Sepura plc. 2002–2016
All rights reserved. This document is intended for the use of Sepura plc’s customers and/or other parties only for the
purposes of the agreement or arrangement under which this document is submitted, and no part of it may be reproduced or
transmitted in any form or means without the prior written permission of Sepura plc.
Disclaimer
Sepura’s policy is to continually improve its products. The features and facilities described in this document were correct at
publication, but are subject to change without notice.
Software license agreement
NOTICE: CAREFULLY READ THE LEGAL AGREEMENT CORRESPONDING TO THE LICENSE YOU PURCHASED,
WHICH SETS FORTH THE GENERAL TERMS AND CONDITIONS FOR THE USE OF THE LICENSED SOFTWARE.
Contact Details
Sepura plc
9000 Cambridge Research Park
Beach Drive
Waterbeach
Cambridge
CB25 9TL
United Kingdom
sepura.com
ii SCC – 03/2016

CONTENTS
General information 1
Your console at a glance 3
Connection with the SRG3900 mobile radio 5
Console and Application Interface Unit 5
Mobile radio audio control 5
Getting Started 7
Power on 7
Power off 7
Locking and unlocking the keypad 8
Home screen 10
Menu 10
SmartMenus 12
Help 13
Emergency operation 14
Making an Alarm call 15
Receiving an Alarm call 16
Clearing an Alarm call 16
Sound 17
Adjusting the volume 17
Loudspeaker on/off 17
Whisper mode 19
Audible tone alerts 20
Personalising your radio 21
Adjusting the backlight 21
Day/Night mode 21
Adjusting text and icon size 22
Setting the display language 23
Menu style 24
Time and Date 25
User Guide iii

Talkgroups and folders 26
Typical folder arrangement 28
Select a talkgroup 29
Working with folders 30
Special folders 31
User Defined Scan Lists 32
Quick Groups 35
Contacts 36
Searching and filtering contacts 36
View contact details 38
Creating contacts 38
Editing contacts 39
Delete all contacts 40
Calls 41
Call types 41
Call History 42
Group calls 43
Individual calls 45
Broadcast calls 47
Missed events 48
Quick Calls 48
Smart Calls 49
Modifying your call setup 50
Text entry 52
Cursor movement 52
Character sets 53
Messages 55
Message Inbox 55
Opening messages 57
View message details 57
iv SCC – 03/2016

Reply to a message 58
Saved messages 58
Paging alerts 63
Networks 64
Authentication 64
Change Network 65
Transmit Inhibit 65
Fallback Mode 66
Operating Modes 67
DMO Mode 68
DMO gateway operation 71
Repeater Mode 74
Features 79
Privacy Screen 79
User profiles 79
Lone Worker 81
GPS 82
GPS position 82
GPS direction 83
GPS reporting options 84
Security 85
End-to-End Encryption 85
Asset management 87
Labelling 87
Customising your radio 88
GLOSSARY 89
User Guide v

vi SCC – 03/2016

General information
This user guide describes the default operation and features of the SCC
mobile radio. Your service provider or organisation may have customised
your mobile radioto optimise its performance to suit your individual needs.
There may be differences between this guide and the way your product
operates. Contact your service provider or organisation for information about
the customisation of your SCC mobile radio.
The SCC is attached to the SRG3900 mobile radio and either installed within a
vehicle or desk mounted. It is typically used with a handset-based console, or
with a fist microphone. Audio is supplied from a loudspeaker attached to the
SRG3900 mobile radio, or the loudspeaker in your handset or through the
earpiece in a headset. Some instructions within this guide assume that the
console is operated using one of these audio attachments.
The SCC emulates the user interface (UI) functionality of the attached
handset. For example, with an HBC handset attached the SCC adapts to the
UI of the HBC and does not display the Context key options. The instructions
in this guide assume that an HBC2 handset is attached. You may need to refer
to the HBC User Guide for instructions on using the console with the HBC.
Safety Information
Before using this product read the safety and regulatory information
contained in the Product Safety Guide (SPR-DOC-00170) supplied with your
radio. It is your responsibility to ensure that this product is operated safely at
all times, and that local laws governing the use of Radio Frequency (RF)
devices are observed.
Sepura products are designed for use by mobile workforces, often working
alone, and are intended for use in occupational and controlled conditions. It
is recommended that you obtain training on how to operate this product.
Your personal safety could be at risk if you do not understand how to operate
this product correctly.
User Guide 1

Sepura products have been tested to meet strict guidelines for personal safety
and operational conditions. Do not operate this product in environments that
exceed those listed on the product technical data sheet.
Waste Electrical and Electronic Equipment disposal information
This symbol on the product or its packaging indicates that this product must
not be disposed of as household or commercial waste. Some countries have
set up collection and recycling systems for waste electrical and electronic
products. By ensuring that this product is disposed of correctly, you will help
prevent potentially negative consequences for the environment and human
health, and help conserve natural resources. Please dispose of your waste
product according to your national and local regulations. Contact your
service provider or Sepura for information about disposing of this product in
your region of the world
How to use this document
Icons and other visual cues are used throughout this document to help the
reader with important information. These icons and visual cues are described
below:
Warning:
Indicates that this information is important and if
disregarded could result in an injury to yourself or
to others.
Caution:
Indicates that this information is important and if
disregarded could result in serious damage to the
product or other devices or a minor injury.
Note:
Contains additional information that could be
exceptions to the general text. They may also
contain references to additional information in this
guide or other reading material.
Tip:
Contains additional information that could help you
perform a task quicker by offering an alternative
method to that in the general text.
Bold typeface Used to highlight parts of the radio, such as keys
and buttons, key presses and menu options.
Menu >Phone >
Contacts
Indicates navigation through the menu structure to
the desired option based on the default language
strings. Note: your radio may be customised to use
different language strings.
2SCC – 03/2016
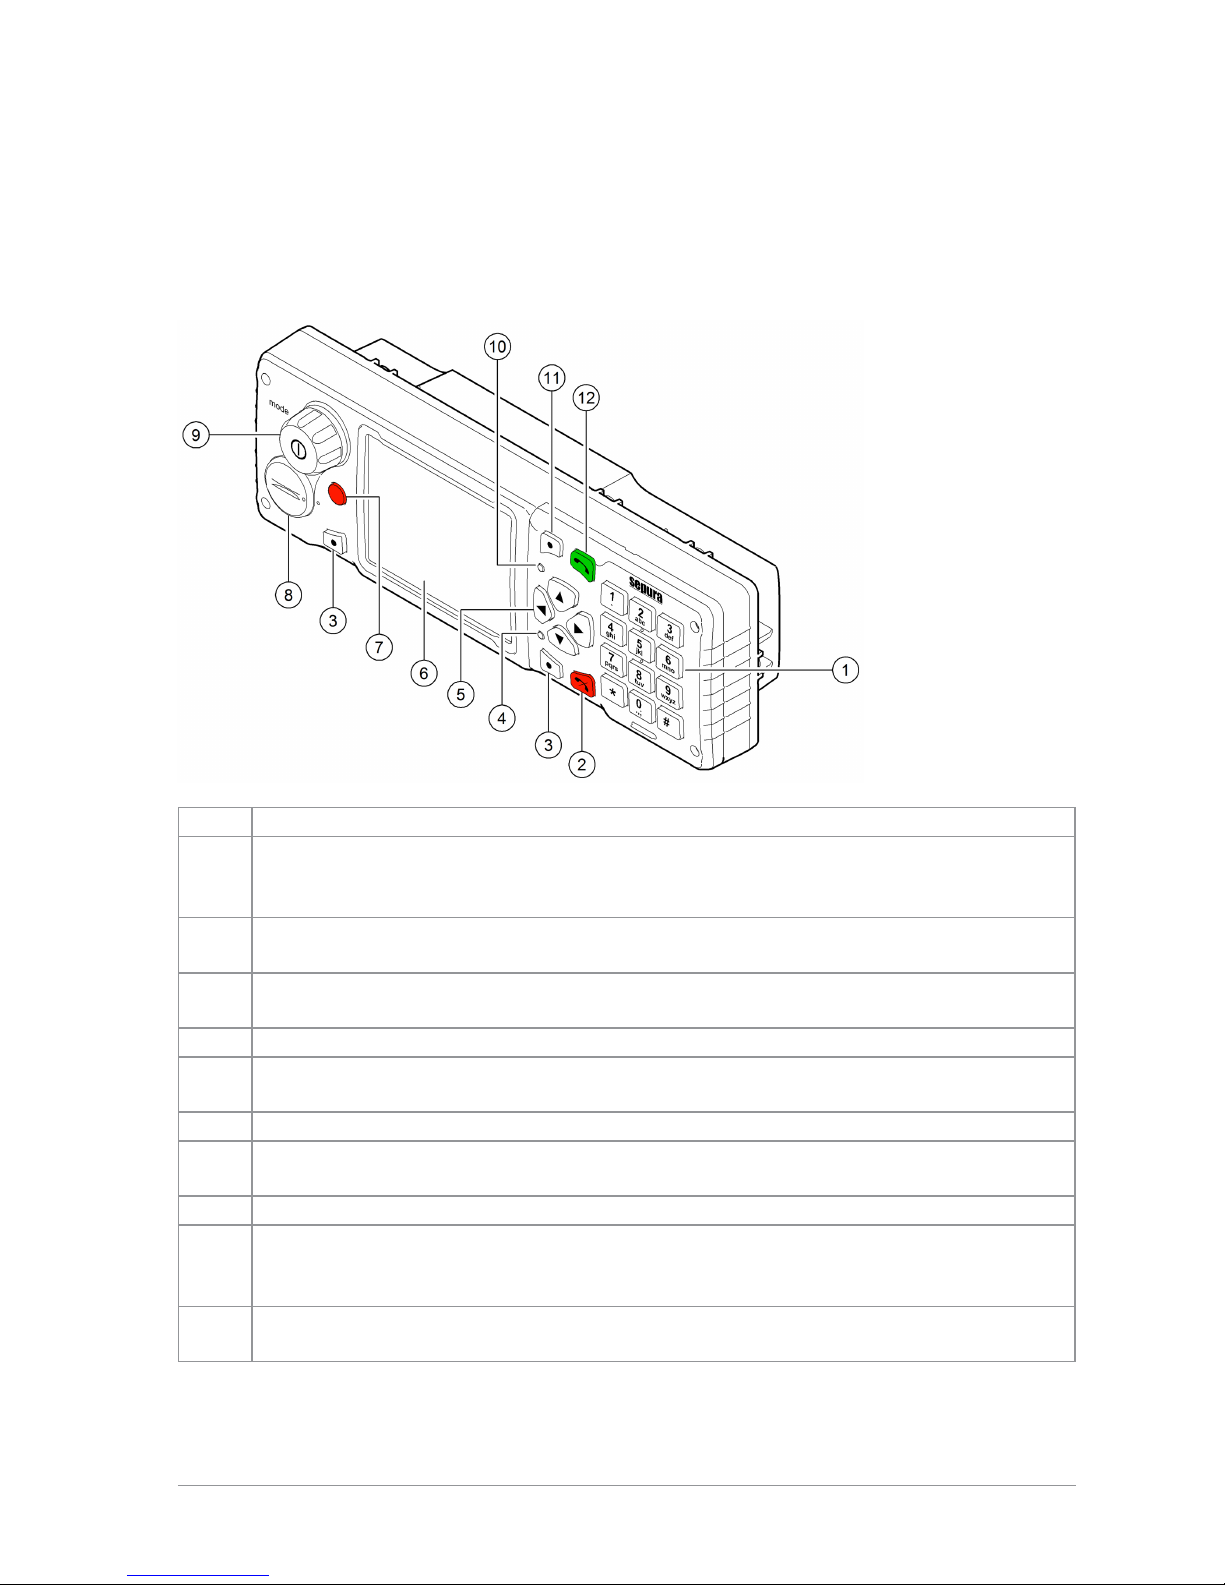
Your console at a glance
Item Description
1
Alphanumeric keypad with backlight. Use the keypad to enter alphanumeric
characters for text editing and dialling. Keys 0–9, # and * are programmable
soft keys.
2Cancel/Home key. Press to cancel a function or a call. Press and hold (2
seconds) to return to the Home screen from any other screen.
3Right and Left context keys. Press to select the option shown on either the
right or left of the display (next to the key).
4Tri-colour LED (indicator). Indicates various operational states of the radio.
5Navigation keys. Use to scroll through lists and move the cursor when writing
text.
6Colour display with backlight.
7Programmable Emergency Button. Press and hold (2 seconds) to initiate an
Alarm Call.
8VAC handset connection.
9
Navi-knob with integrated Mode/Power key. Press to power on, press and
hold (2 seconds) to power off. A continuously rotating knob used to adjust the
volume of an independent loudspeaker or through an earpiece.
10 Blue LED. (indicator). Indicates a missed event such as a call, Callout or
message.
User Guide 3

11 Missed Events key. Press to open the Missed Events menu to review missed
calls, Callouts and new messages.
12 Select/Send key. Press to initiate a phone call.
4SCC – 03/2016

Connection with the SRG3900
mobile radio
Your console works using the SRG3900 mobile radio, with the optional
provision of the Applications Interface Unit (AIU).
Console and Application Interface Unit
The SRG3900 mobile radio supports the connection of up to two consoles,
either a Standard Console, Colour Console or a Handset-Based Console (via
an Interface and Handsfree box), or an Applications Interface Unit, which is
similar to a console but does not have a keypad and display. Through the use
of a console, the SRG3900 mobile radio can support the connection of up to 6
of the following audio accessories:
up to two hands-free kits
up to four standard handsets
up to four standard fist microphones
If two consoles are fitted, they display the same information. This makes it
possible to move from one console to another without having to take any
special action. If two users are using the same mobile radio, operational
procedures are required to ensure that the actions of the two users do not
conflict.
On some configurations it is possible to have a hands-free kit attached to each
console. If this is the case, only one of the remote microphones is live during
a call. The remote microphone which is live is the one attached to the console
which accepted or made the call or switched the call to hands-free.
Mobile radio audio control
The mobile radio supports the concept of a single controlling audio accessory
for a call. The controlling audio accessory is the one in control of the call, and
User Guide 5

the only one on which the microphone becomes active.
Tip: When a fist microphone or hands-free kit is used, the received audio
is directed to the loudspeaker connected to the mobile unit. When a
handset is used, the received audio is directed to the handset earpiece.
The controlling audio accessory is normally the Remote Microphone used in
conjunction with the loudspeaker, i.e. the hands-free kit or ‘Public’ mode. To
make a different accessory become the controlling accessory, press the PTT
button on that accessory or by take it off hook. If the new controlling
accessory has an earpiece then normally this is used for received audio
instead of the Loudspeaker (‘Private’ mode).
When in ‘Private’ mode you can switch to ‘Public’ mode by pressing the
hands free soft key (if configured). Taking a handset off hook, or using its
PTT will return to ‘Private’ mode.
While the controlling accessory is not the Remote Microphone, you may
switch to another accessory by pressing the PTT button on that accessory.
Taking that accessory off-hook does not change the controlling accessory.
This allows a second user to listen to received audio on another accessory.
If the controlling accessory is placed on-hook this clears the call unless
customised differently. Other accessories can be put back on-hook without
clearing the call in progress.
All earpiece audio is left on all the time in order that multiple users may listen
to the received audio.
The audio presentation for duplex (telephone) calls depends on the capability
of the controlling accessory. With a duplex controlling accessory, duplex calls
have a duplex presentation. With a half-duplex accessory, half-duplex
(Group) calls are controlled using the PTT button.
6SCC – 03/2016

Getting Started
Power on
To power on, press and hold (2 seconds) the Mode key.
Your radio attaches to the last selected talkgroup when it was powered off (if
it is 'in service').
Depending on your radio's customisation any of the following may display:
the percentage of charge remaining, if a Sepura battery is fitted
a Sepura logo
a splash screen
a welcome screen
a PIN entry screen
Note: If your radio supports Radio User Assignment (RUA), which
authenticates your radio on the network, you may be prompted to log on
to your network. See Authentication on page 64.
Power off
Note: Do not power off the radio by removing the battery. The radio
must be powered off correctly to ensure that it performs a controlled
'powered down'.
To power off, from the Home screen press and hold (4 seconds) the Mode
key. A message may display whilst your radio disconnects from the network.
Scroll to the Shutdown option, then press the Select key to power off your
radio. Before powering down, alerts and messages may be sent.
User Guide 7

Locking and unlocking the keypad
To prevent accidental activity during operation, you can lock the keypad.
This will also prevent access to the radio's functions if the radio is stolen.
When the keypad is locked, the Key icon appears in the status line.
The keypad can be locked manually or set to lock automatically after a period
of inactivity.
Note: If customised, your radio's keypad can be locked when an accessory
is attached.
Receiving calls with locked keypad
If you receive a telephone call when the keypad is locked your radio can be
customised so that the Select/Send key can still be pressed to answer it. If the
call is accepted the whole keypad is unlocked. Your radio can also be
customised so that you can press the Cancel/Home key to reject the call and
in this case the keypad remains locked.
Navi-knob with locked keypad
Your radio may be customised so that the Navi-knob is locked when the
keypad is locked. In this case you cannot alter the volume by rotating the
Navi-knob.
Your radio can also be customised so that the Navi-knob remains unlocked
and in this case it can be used for volume control only while the keypad is
locked.
To lock/unlock the keypad:
Press the *(star) key (or a designated soft key), then press the OK context
key to lock/unlock the keypad.
Tip: To quickly lock and unlock the keypad, press and hold (2 seconds)
the *(star) key.
If you press any other key while the keypad is locked no action is taken. The
Navi-knob remains unlocked when the keypad lock is enabled. A message is
displayed to remind you that the keypad is locked.
Alternatively, you can:
8SCC – 03/2016

1. Select Menu > Options > Settings > Keypad Lock.
2. Press Lock to lock the keypad.
Setting the radio to automatically lock the keypad
You can set the radio to automatically lock the keypad after a period of
inactivity.
1. Select Menu > Options > Settings > Timed Keypad Lock.
2. Press Toggle to enable/disable auto keypad lock.
User Guide 9
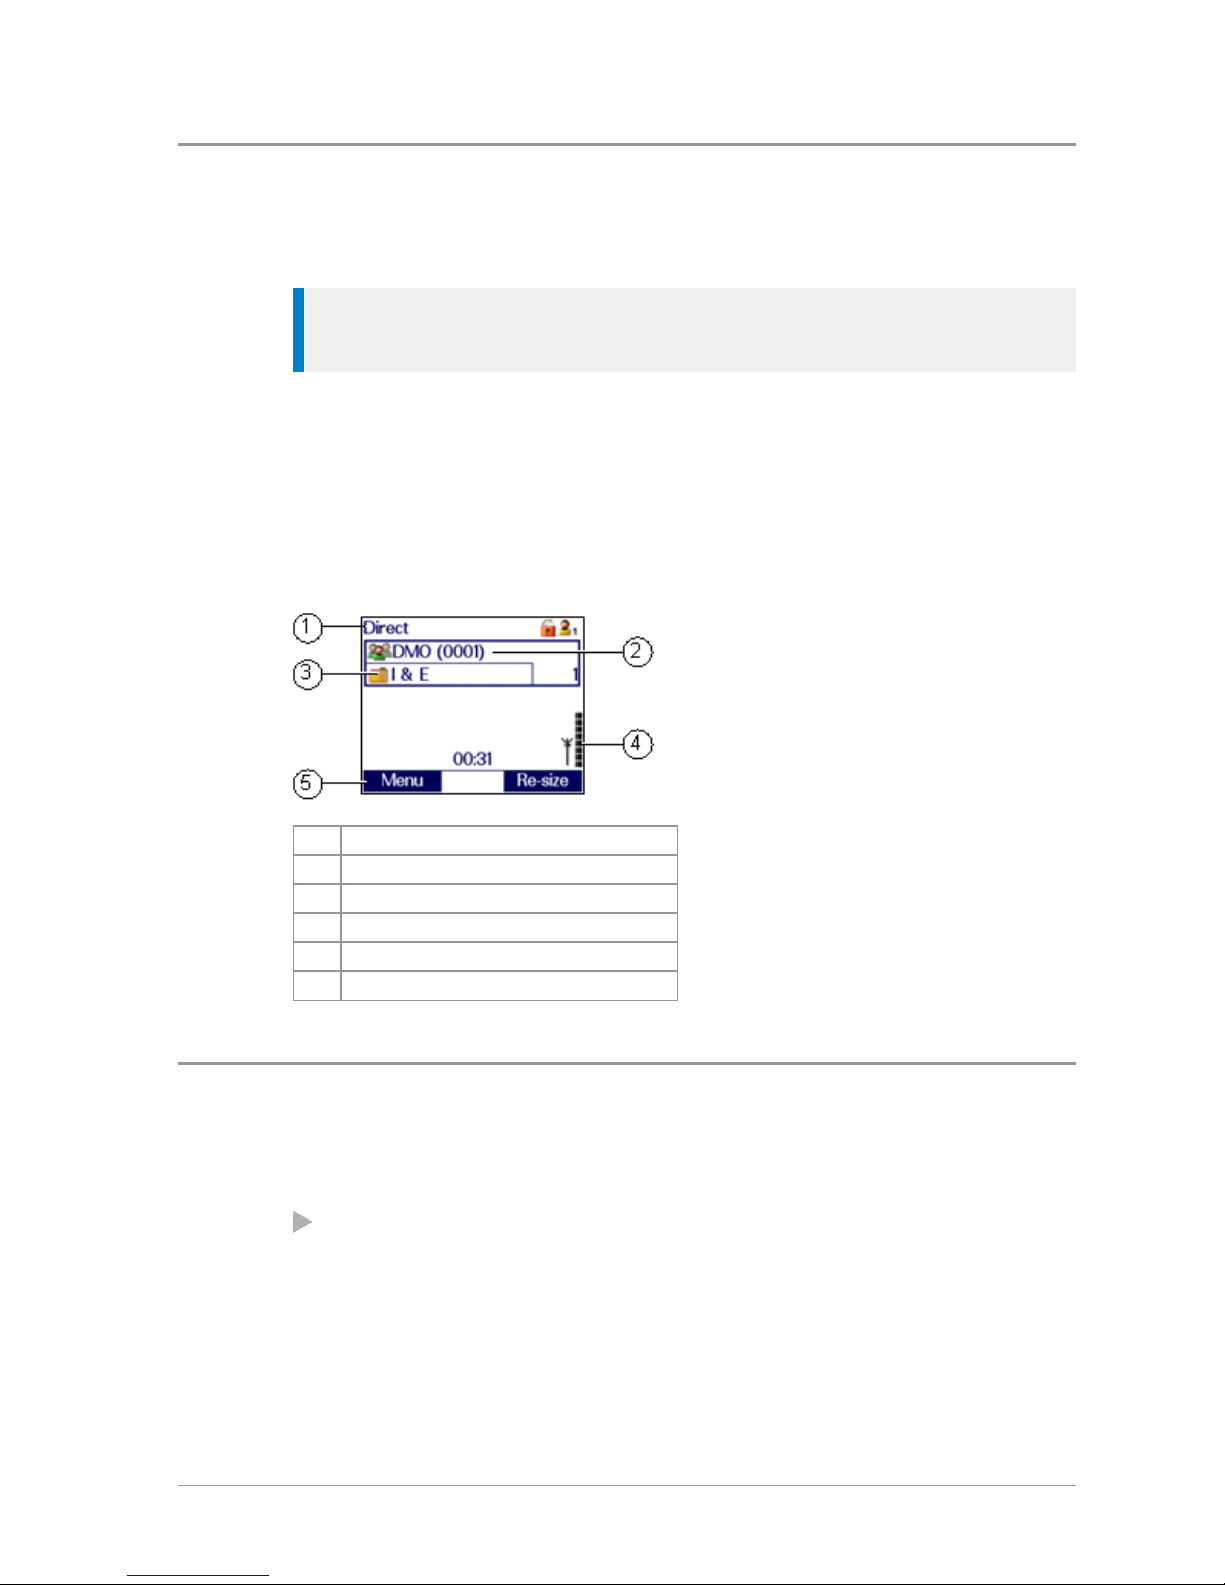
Home screen
The top level screen, known as the Home screen, appears when the radio
powers on and when it is idle.
Tip: To quickly get back to the Home Screen, press and hold (2 seconds)
the Cancel/Home key.
The status line, at the top of the screen, displays various icons to indicate the
state of operation or when certain functions like keypad lock have been
activated.
The context key labels at the bottom of the screen indicate what the context
key directly below the label is configured to do. These labels change
according to where you are in the menu hierarchy.
# Description
1 Status line
2 Talkgroup
3 Folder
4 Coverage indicator
5 Context key options
Menu
Your radio is customised by your service provider or organisation with a
number of features that are accessed from the main menu.
To open the menu, in the Home screen press Menu or press the Down
navigation key.
10 SCC – 03/2016
To open a sub-menu or menu option, scroll to the option (highlight it) and
press Select.
To return to a higher level menu, press Back.
To return to the Home screen at any time within the menu hierarchy,
press and hold (2 seconds) the Cancel/Home key.
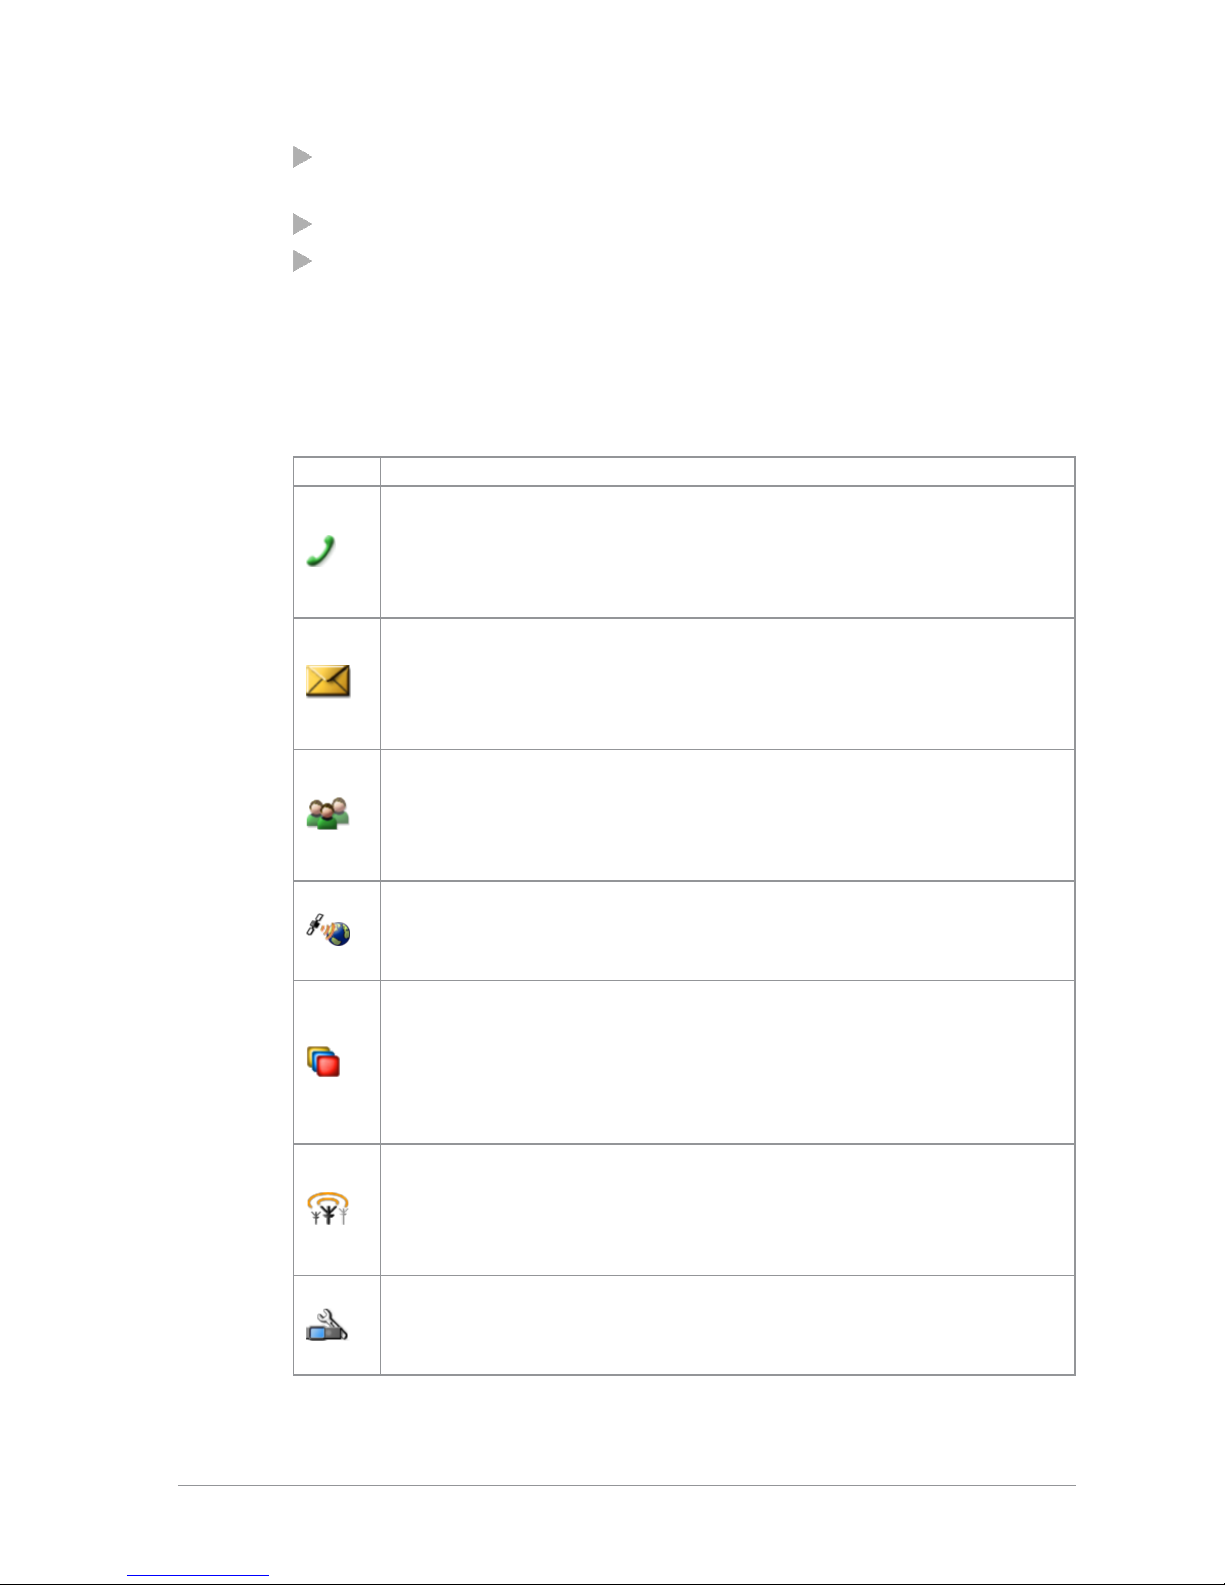
Menu options
The following icons are used to identify the sub-menus that provide access to
further options.
Icon Menu option
Phone
Add, edit and delete your personal contacts within your personal
folder. Search (or filter) your contacts to locate the contact you
want and initiate a call. Review you call history.
Messages
Read, create, save and send text (SDS) messages. View picture
messages (if customised). Select and send a status message. Clear
your mailbox of unwanted messages.
Groups
Search your talkgroup folders and select a talkgroup. Enable
scanning of your selected talkgroups. Set up your speech call
settings.
GPS
Manage your GPS location and position settings. View your
current location, direction and speed.
Applications
Your radio may be customised with a number of applications such
as Man-down and Lone Worker. Your service provider or
organisation may have installed specific applications (Short Data
Applications) to help you in your role. Access WAP sites.
Networks
Manage your network connections and DMO options. Change
your operating mode (TMO/DMO/Repeater). Enable/disable
Transmit Inhibit mode when working in RF sensitive areas.
Options
Personalise your radio settings such as backlight, text size and
language.
User Guide 11

User Profiles
Select customised profiles designed specifically for the way you
work.
Help
View help, such as a list of customised soft keys on your radio.
SmartMenus
SmartMenus are designed to provide quick access to regularly used radio
features, usually with a common theme. Your service provider or
organisation may customise your radio with a number of SmartMenus, for
example you may have a SmartMenu containing all your Quick Status
messages, another for user profiles and another for selecting operational
modes such as toggling on/off covert mode, Transmit Inhibit, loudspeaker
mute and so on.
SmartMenus are assigned to a soft key. To open a SmartMenu, press a soft
key or press and hold (1 second) a key on the keypad.
Use the navigation keys to scroll the list of options on the SmartMenu.
Options are labelled with a number, shown to the right of the option. To
select the option, press the key that corresponds to the number of the option,
for example to select option 3, press the 3 key. Note that using this method
only options numbered 1 to 12 can be selected using the keys on the keypad
(press 0 for option 10, the Star (*) key for option 11 and the Hash (#) key for
option 12). For options numbered 13 onwards, scroll to the option (highlight
it), and press Select.
12 SCC – 03/2016

Help
The Help menu displays a free text area which is usually customised to
indicate radio soft key assignments. It may also be used to record any
required help text.
To access help
Use one of the following:
Press a dedicated soft key (Sepura default is normally key ‘0’ zero).
Press Menu > Help.
User Guide 13

Emergency operation
Emergency operation is available in TMO and DMO if the radio is in service.
If your radio is customised for Gateway and Repeater modes, it will make an
Alarm call in TMO. If it cannot make the call in TMO the radio will
automatically switch to DMO to make the call.
A button on your radio, (usually the orange button under the Navi-knob) can
be programmed to initiate an Alarm call at any time when your radio is in
operation. This button is known as the Emergency button.
Your radio may be customised to perform one or more of the following:
Initiate an Alarm call set up to one or more pre-defined users (typically to
your dispatcher and other members of your talkgroup) and/or;
Send an Emergency Status message to an individual, the dispatcher or a
talkgroup and/or;
Send a position report (GPS dependent).
If you are working in RF sensitive areas and have enabled Transmit Inhibit,
prohibiting radio transmission, initiating an Alarm call will override the
Transmit Inhibit feature and the Alarm call will be transmitted.
Your service provider or organisation can provide information on how your
radio is customised for Alarm calls and how to operate your radio in
emergency situations. If you are working in a sensitive environment your
radio may be customised for Silent Alarm calls where audible and display
alerts are disabled, or your radio may be customised for Live Microphone that
allows you to call for assistance hands-free without pressing the PTT button.
Silent Alarm Call
If you are working in sensitive environments where the audible and display
alerts associated with an Alarm call are inappropriate, your radio can be
customised to make a Silent Alarm call (without acoustic or screen alerts).
Silent Alarm calls cannot be activated when operating in Lone Worker or
Man Down modes.
14 SCC – 03/2016
Table of contents
Other Sepura Music Mixer manuals


