INTELLI HEAT HALM-FL-LCD 4 User manual

Roma Classic
1
HALM-FL- LCD Serie
Please read this manual carefully before use
Thermodynamic Fluid Filled
Aluminium Electric Radiator
User Manual

2
IMPORTANT SAFEGUARDS
When using an electrical appliance, basic safety precautions should always be observed, including the
following:
READ ALL INSTRUCTIONS BEFORE USING
WARNING: To reduce the risk of fire, electrical shock, or injury to person:
1. The product is for household use only.
2. Connect the appliance to single-phase AC supply of the voltage specified on the rating plate.
3. In order to avoid overheating do not cover the heater.
4. Never leave the heater unattended while it is in use. Always turn the product to the OFF position and
unplug it from the electrical outlet when not in use.
5. Extreme caution is necessary when any heater is used by or near children, invalids or elderly person
and whenever the heater is left operating and unattended.
6. The heater must not be located immediately below an electrical Socket-outlet.
7. Do not run cord under carpeting and do not cover cord with throw rugs, runners or the like. Arrange
cord away from traffic area and where it will not be tripped over.
8. Do not operate the heater with a damaged cord or plug, or after the heater malfunctions, has been
dropped, or damaged in any manner.
9. If the supply cord is damaged, it must be replaced by the manufacturer, its service agent or a similarly
qualified person in order to avoid a hazard.
10. Avoid the use of an extension cord as this may overheat and cause a risk of fire.
11. Use the heater in a well-ventilated area. Do not insert or allow objects to enter any ventilation or
exhaust opening. To prevent a possible fire, do not block air intakes or exhaust openings in any manner.
Do not use on soft surfaces, like a bed, where openings may become blocked. Use the heater on flat, dry
surfaces only.
12. Do not place this heater near flammable materials, surfaces or substances, as there may be a risk of
fire. Keep the above flammable materials, surfaces or substances at least 1m from the front of the
product and keep them away from the sides and rear. 13. Do not use the heater in any areas where
petrol, paint or other flammable liquids are stored e.g. Garages or workshops as a hot, arcing or sparking
parts inside the heater.
14. Don’t use this heater in the immediate surroundings of a bath, a shower or a swimming pool with
floor standing mode. Never locate the heater where it may fall into bathtub or other water container.
15. Never touch the heater with wet hand. The heater should be installed so that can not be touched by a
person using a bath or shower.
16. This heater is hot when in use. To avoid burns and personal injury, do not let bare skin touch hot
surfaces.
17. Before moving the heater, please must unplugged it and let it cool down for 15 minutes. If provided,
use handles when moving the product.
18. Be sure that no other appliances are in use on the same electrical circuit as your product as an
overload can occur.
19.This appliance is not intended for use by persons (including children) with reduced physical, sensory or
mental capabilities, or lack of experience and knowledge, unless they have been given supervision or
instruction concerning use of the appliance by a person responsible for their safety.
20.Children should be supervised to ensure that they do not play with the appliance.
21. This heater is filled with a precise quantity of special oil.
22. Repair requiring opening of the oil container are only to be made by the manufacturer or his service
agent who should be contacted if there is an oil leakage.
23. Regulations concerning the disposal of oil when scrapping the appliance have to be followed.
FOR HOUSEHOLD USE ONLY - SAVE THESE INSTRUCTIONS
3
SPECIFICATIONS
MODEL NO
NET SIZE
RATED VOLTAGE
RATED POWER
HALM-FL-LCD 4 490X590X80mm ~230V/50Hz 600W
HALM
-
FL
-
LCD 5
570X590X80mm
~230V/50Hz
900W
HALM-FL-LCD 7 730X590X80mm ~230V/50Hz 1200W
HALM
-
FL
-
LCD 9
890X590X80mm
~230V/50Hz
1500W
HALM-FL-LCD 11 1050X590X80mm ~230V/50Hz 1800W
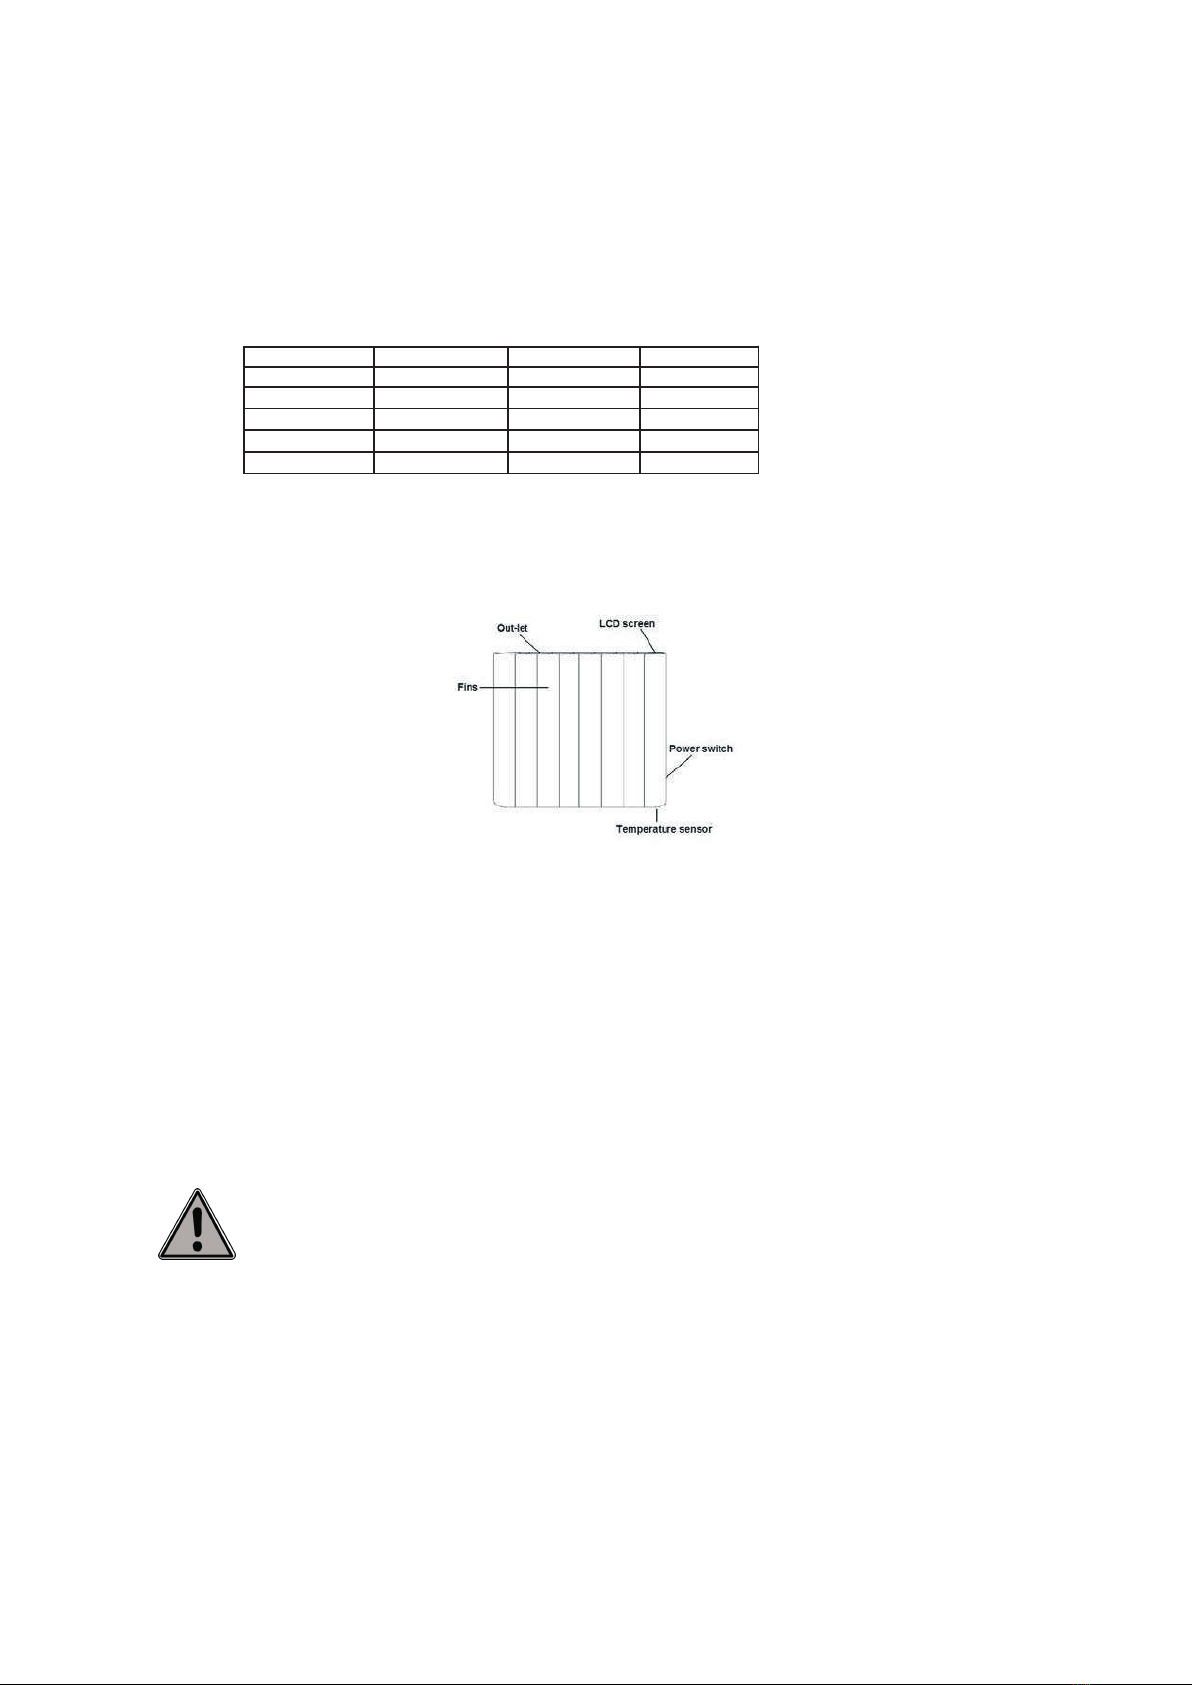
STRUCTURE AND PARTS
CHARACTERISTICS
1. 1 heat setting
2. Over heating protection
3. With digital LCD
4. Room temperature setting
5. Room temperature sensor
6. Digital clock, digital week calendar
7. Multi-running mode:
daily program mode, weekly program mode, free use mode
8. Anti-frost function
9. Wall-mount use
Being double insulated, the cable from this radiator does not carry an Earth wire, it has a Live
(brown), Neutral (grey) and a black wire, which is a pilot wire. Never connect the black Pilot Wire
to an Earth, Live or Neutral connection, if this occurs it will destroy the thermostat. The black pilot
wire is a signal wire, only to be connected to an external programmer. Please contact INTELLI
HEAT for advice on such systems. If the pilot wire is not used it must be properly insulated and
isolated to avoid accidental connection.
THIS RADIATOR IS DOUBLE INSULATED:
WARNING!
4
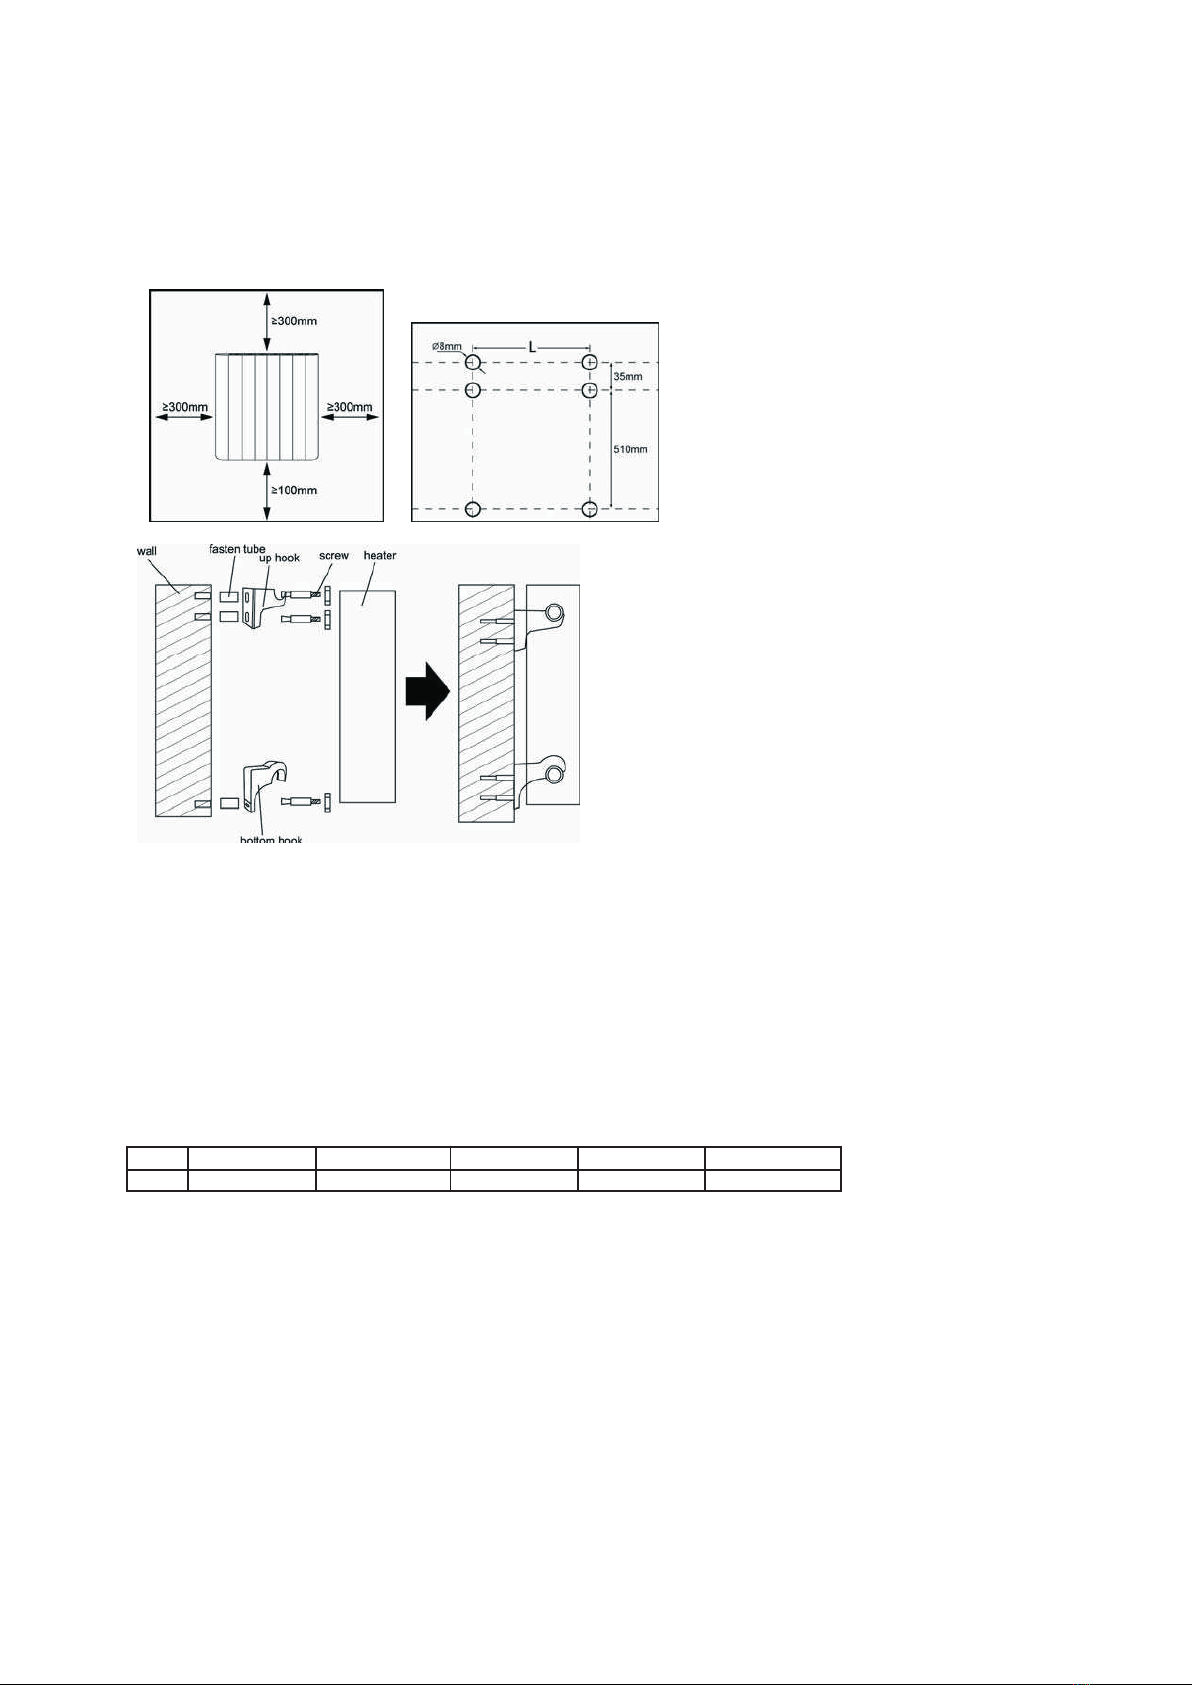
INSTALLATION
Used as wall-mounted:
(1) Drill holes on the wall according to the picture.
Warning: Be sure to keep the distance between the heater and floor, wall and so on
accordingly.
(2) Fit the fasten tube in the holes.
(3) Fit the up-hook on the wall with screws.
(4) Hang the unit on the up-hook.
(5) Fit the bottom hook between 2 fins at the bottom of unit.
(6) Fasten he bottom hook with screw.
The distance of hanging hole is as follows:
Model
HALM
-
FL
-
LCD
-
4
HALM
-
FL
-
LCD
L
-
5
HALM
-
FL
-
LCD
-
7
HALM
-
FL
-
LCD
-
9
HALM
-
FL
-
LCD
-
11
L(mm) 160 240 400 560 720

5
INSTRUCTIONS FOR USE
Warning:Before using the heater make sure that it is mounted tightly on the wall. Damage
may occur if it is placed on an incline or decline.
The control system is with following functions:
1. With digital LCD to let you know the working situation of the unit.
2. Room temperature setting to enable you to set the desired room temperature.
3. Room temperature sensor to control the heating of the unit according to your desired room
temperature.
4. Digital clock, digital week calendar.
5. Multi-running mode:
daily program mode, weekly program mode, free use mode
6. Anti-frost function
Control panel and LCD screen
Control panel:
There are total 5 buttons on the control panel as follows:
------Power stand by switch
------Date and time settings; Timer settings; Shift the working mode
------Select running mode;
Set program;
------Increasing;
------Decreasing;
Screen:
Clock, Date, Program name,
Target temperature, Comfort, Economic,
Anti-frost, Stand by, buttons lock, heating,
program setting, timer, program contents,
solid time mark

6
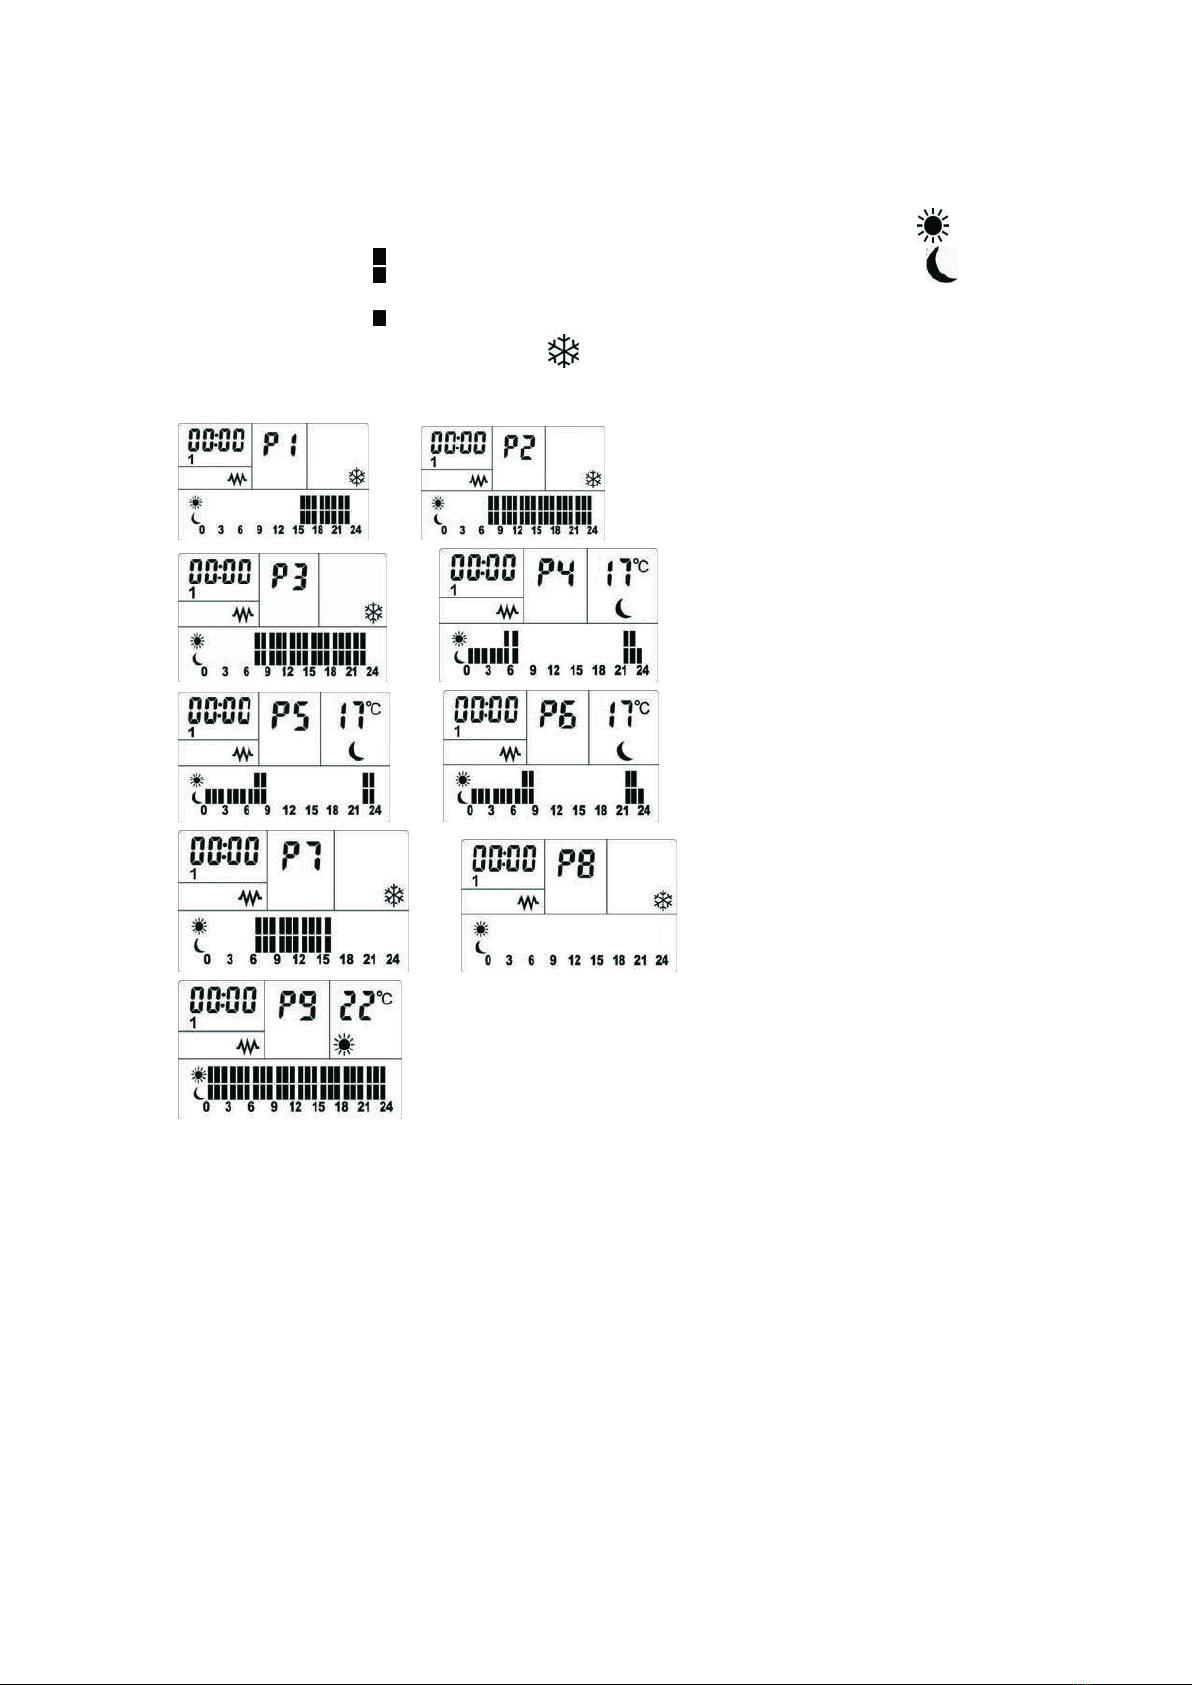
Rationale:
There are 3 running modes: free , daily ~ and weekly .
Free use mode( ): It will include normal mode and timer mode ;
Daily mode( ~ ):There are total 9 daily programs. Every program is combined with 3
working modes: comfort( and ), economic( and )and anti-frost( and empty).
every day(24hours) is divided into 24 segments evenly. Every segments will be filled in with one working
mode to combine a daily program. All the setting for daily program will be kept in memory by the unit. If
a daily program is selected, the unit will repeat this program every day.
Weekly mode:
Selecting one daily program ( from daily programs P1-P9) for every day in a week to combine a weekly
program.
How to use: 1. Plug and switch on the unit. For the first time use, the screen will showed as follows:
Press ,then disappeared and unit get into free normal mode(note: units always get into free
normal mode from stand by mode).
2-1.Free program: For the first time use, the screen will showed as follows:
2-1-1.Time setting: Press ,the hour start to twinkle, use or to select hour (0 ~ 23). Press
again, the minutes start to twinkle, use or to select minute( 0 to 59); Pressed again,
date start to twinkle, use or to select date (1-Monday, 2-Tuesday, 3-Wednesday, 4-
Thursday, 5-Friday, 6-Saturday, 7-Sunday); Finally press to confirm and finish the setting.
(Note: If press or without releasing, you can achieve rapid increasing or decreasing; If there is
no pressing, the twinkle would stop after 5 seconds and setting will be finished automatically.)

7
2-1-2. Temperature setting: Press or to set the target temperature directly and at this
moment the temperature starts to twinkle. Press or to set the target temperature.
Temperature adjustable range is from 10 ℃~ 35 ℃. (Note: If press or without releasing, you
can achieve rapid increasing or decreasing; If there is no pressing, the twinkle would stop after 5
seconds and setting will be finished automatically.)
2-1-3.Timer setting(timer mode):
Long-press (3 seconds) till the showed. Same time the clock will turn to 00:00 and start to
twinkle. This means the timer setting starts (as following):
Press or to set the timer length by every press with half an hour (30 minutes). The maximum
timer length is 24 hours.
When the timer is over, the unit would enter into standby mode .
(Note: If press or without releasing, you can achieve rapid increasing or decreasing; If there is
no pressing, the twinkle would stop after 5 seconds and setting will be finished automatically.)
You can also set time and temperature same as 2-1-1 and 2-1-2.
Quit from timer mode: long press button (3 seconds) until the disappeared. The unit
automatically return back to free normal mode.
(Note: Once the machine exit free program (enter the day, week program, or standby), and then return
to the free program, the unit always enters into the free normal mode first. The original timing model was
automatically canceled).
2-2.running mode selecting: Press to get into program selecting (Program No. start to twinkle).
Pressed or to select running mode ( -~- )and then press to confirm it .
The unit would run following the new selection program. Note: During this period, if there is no pressing,
the selection is automatically completed 5 seconds later.
8
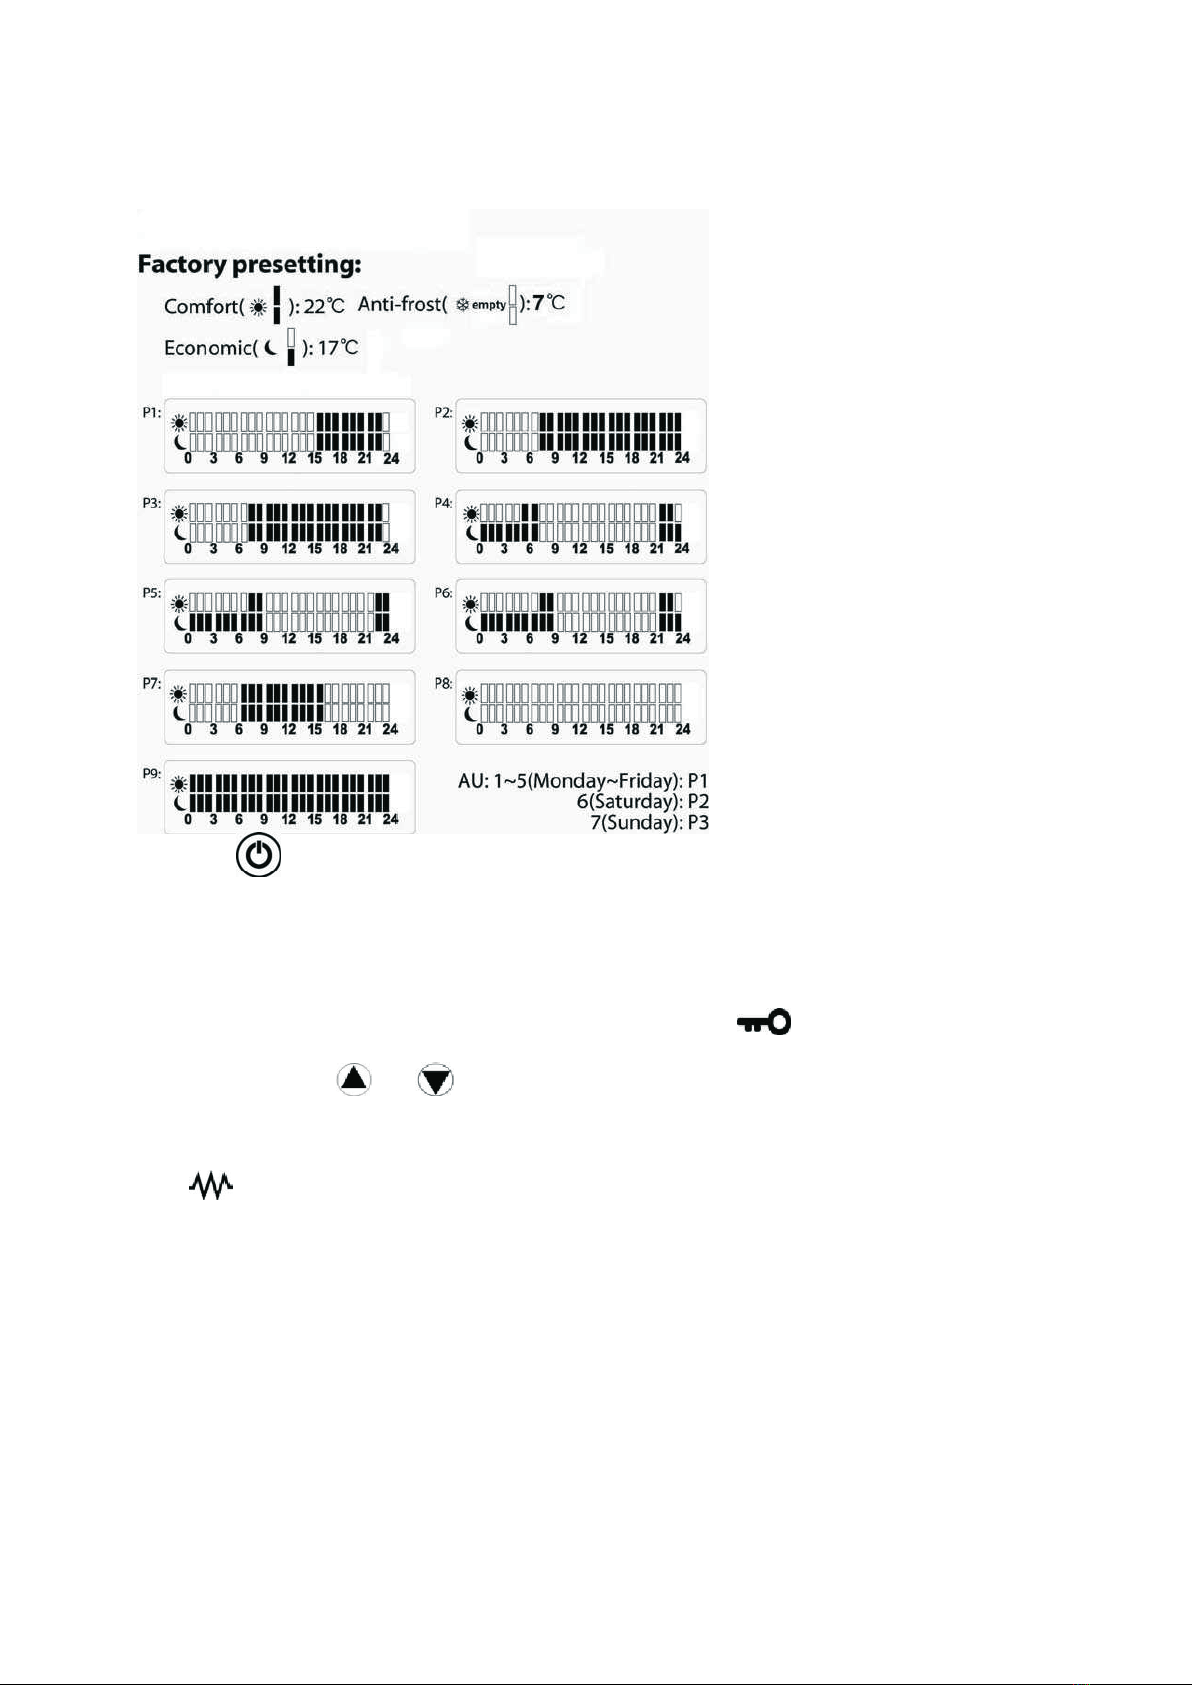
2-3. Day program Day program has three kinds of working modes: Comfort mode :( and
program content displayed ), adjustable range from 10 ℃~ 35 ℃; Economic mode: ( and
program content displayed ), adjustable range of 10 ℃~ 35 ℃; the temperature should no higher than
comfortable temperature; Anti-frost mode: ( and program content displayed empty ), 7 ℃, it’s
inherent and non-adjustable. If a daily program was chosen for the work program, the unit will repeat
the program every day. Different program used for the first time as follows:
P1 : P2 :
P3 : P4 :
P5 : P6 :
P7 : P8 :
P9 :
2-3-1. Time setting: Same as 2-1-1, then the unit will automatically adjust to the current time and
running accordingly.

9
2-3-2. Temperature settin g: Long-press (3 seconds) until twinkle, at the same time the
original comfort temperature start to twinkle. Press , to set the target comfort temperature.
Press to confirm, and start to twinkle, the original economic temperature also starts to
twinkle. Press , to set the target economic temperature. Use to confirm it temperature
setting is completed, the unit come back to run under comfort mode. The temperature will be kept into
the memory. (Note: During this period, if there is no pressing, the settng is automatically completed 5
seconds later.)
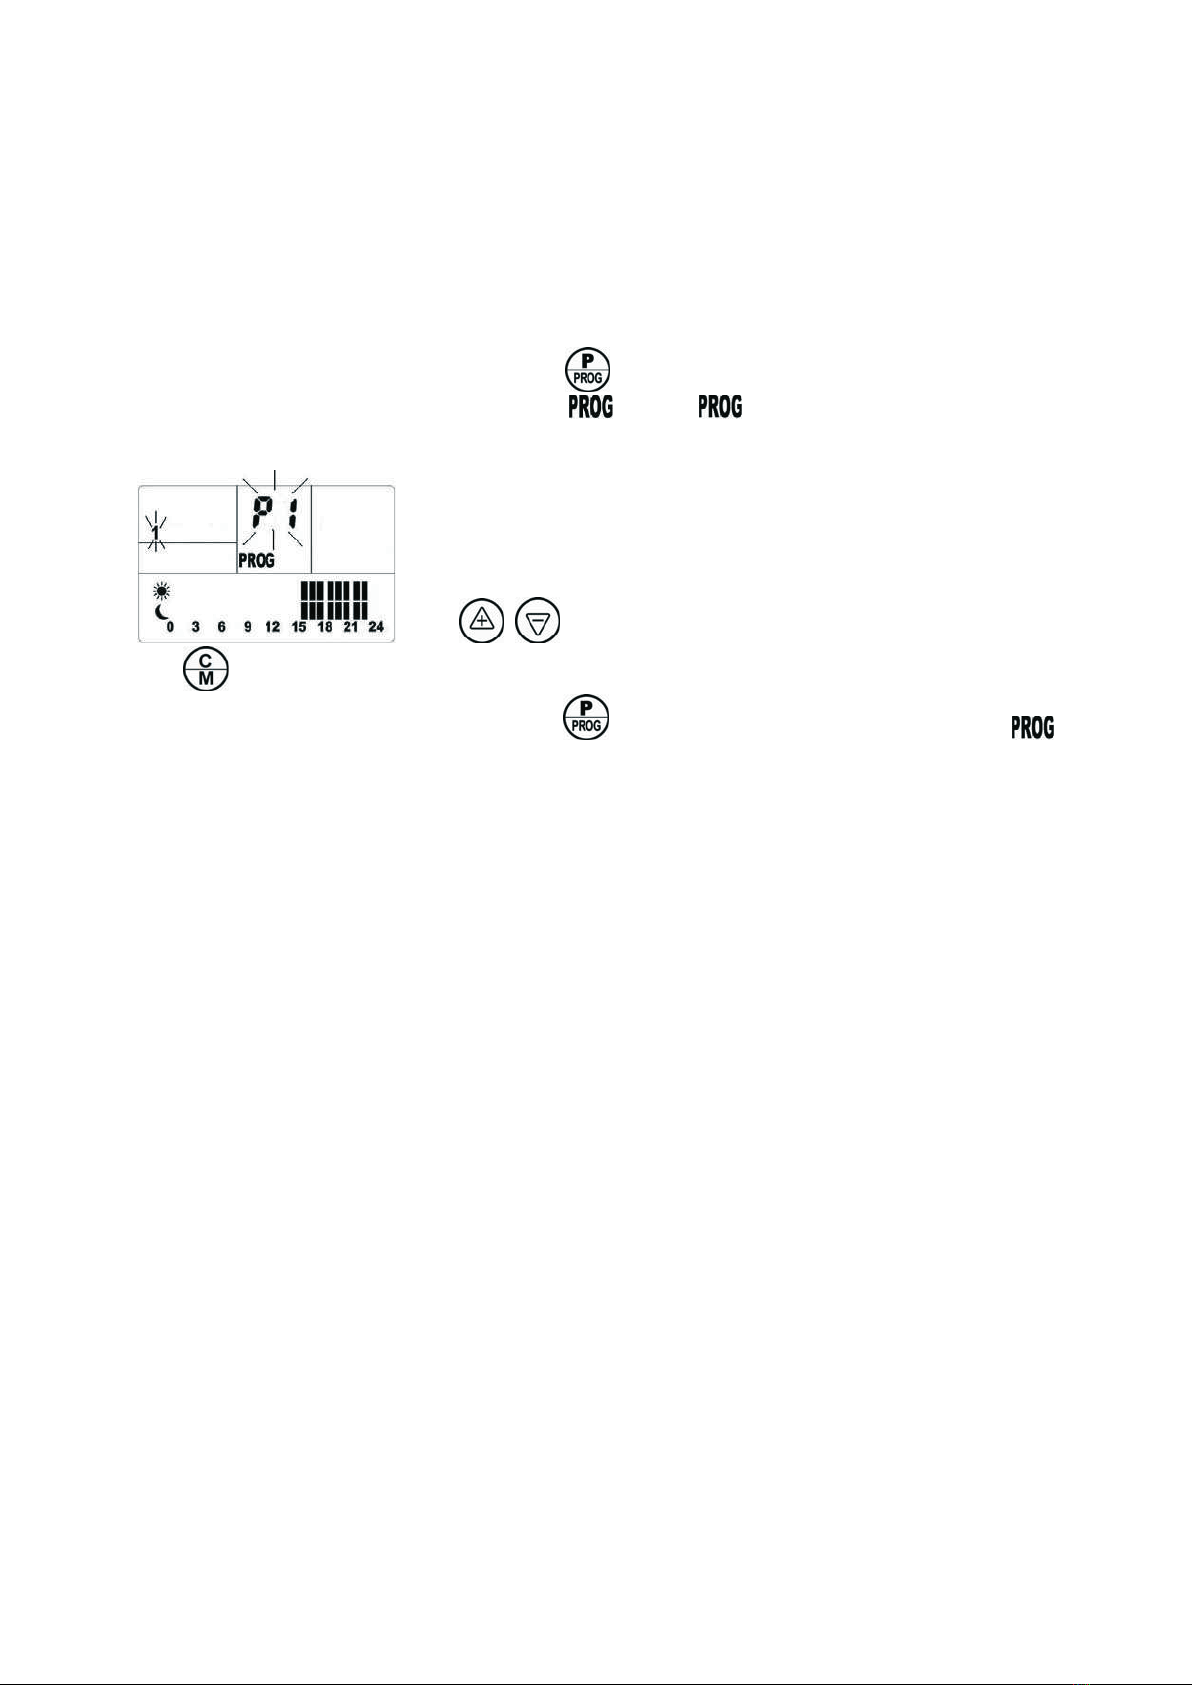
2-3-3. Setting Daily program: Press to choose the program (from ~ ) which you want
to set. Then long-press (3 seconds) to enter the program settings, at this time displayed on
the screen ( will showed until the setting is completed, the heating will stop during the setting). The
date does not show , time is 00:00. The mark starts to twinkle rapidly at the first segment of selected
program, such as following (when the selected daily program is P1): Press
to select the working mode ( ,for comfort; ,for the economic; , empty for the anti-
frost), then Press (forward), (back) to copy the mode into every segment(press without
releasing can achieve fast-forward or fast-back). Finally press to confirm the program content and
exit program setting. Disappear; the unit comes back to normal work. Note: daily program setting,
the hour will go ahead or return back according to the mark. Settings can be terminated at any time
during setting. The new content will be retained. the new program will be kept into the memory and
replace the original program.
2-4. Week program : You may select week program according 2-2. the first use as following:
10
2-4-1.Time setting
Same as 2-1-1, then the unit will automatically adjust to the current time and running accordingly.
2-4-2.Temperature setting:
Same as 2-3-2
2-4-3. Setting weekly program : Long-press (3 seconds) to enter weekly program setting, the
time and working mode are no longer displayed, showed ( displayed until the setting finished,
the unit stopped heating during the setting), Monday marking begin to twinkle, program name of Monday
also twinkl (corresponding program content also shows). The screen is as follows:
Press , to select the daily program from P1~P9 for Monday (1).
Press to confirm and automatically enter the Tuesday (2).With same method you can select a daily
program for everyday in a week . Finally press to complete week program settings. Then
Disappear and the unit will run according to new weekly program. Note: Settings can be terminated at
any time during setting. The new content will be retained.
3, Factory pre-setting:
The unit is with a factory pre-setting as follows:
Date: 1 (Monday) clock: 00:00 Anti-frost: 7 ℃Free mode temperature: 10 ℃Daily program
Temperature: Comfort: 22 economy: 17 ℃℃ Weekly program : 1 ~ 5 (Mon-Fri): P1
6 (Saturday): P2 7 (Sunday): P3
11
Note: Press to power on, the unit would come back to factory pre-setting.
4. Other notes :
(1) The screen is with back light. It will extinguish after 1 minute if you didn’t press any button. It will
light up if you press any button.
(2) Unit is with button lock function. The buttons will be locked ( ) after 1 minute if you didn’t
press any button.
Open lock: press and at same time.
(3) Time will be clean to 00:00 if you unplugged unit or cut off the power.
(4) This heater includes an overheat protection system that shuts off the heater when parts of the
heater are getting excessively hot.
(5) will showed only the unit is heating.
(6) The units will always get into free normal mode from standby mode;
The unit will return to latest running mode due to suddenly power off after power come back.

12
MAINTENANCE
1. Always remove the plug from the socket-outlet and allow the heater to cool down before clean it.
2. Wipe the exterior surface of the heater occasionally with a soft damp cloth (not dripping wet) and dry
the exterior surface before operating the heater.
WARNING:
Do not immerse the heater in water.
Do not use any cleaning chemicals such as detergents and abrasives. Do not allow the
interior to get wet as this could create a hazard.
3. Light accumulated may be removed from the heater with a soft dry cloth.
4. To store away the heater, put the heater back into its original package and store it in a clean dry place.
5. In case of malfunction or doubt, do not try to repair the heater yourself, it may result in a fire hazard
or electric shock.
CONFORMITY WITH DIRECTIVES
This product is CE marked to denote conformity with Directives 73/23/EEC (Low Voltage) and 89/336/EEC
(Electromagnetic Compatibility), as amended.
Waste electrical products should not be disposed of with household waste. Please recycle
where facilities exist. Check with your Local Authority or retailer for recycling advice.
Intelli Heat Ltd, Unit 18 Napier Place, Stephenson Way, Thetford, Norfolk IP24 3RL
www.intelligentheat.co.uk www.intellygreen.co.uk
This manual suits for next models
4
Table of contents
Other INTELLI HEAT Heater manuals


Popular Heater manuals by other brands

Kesser
Kesser PN1000G WIFI instruction manual

Webasto
Webasto Air Top 2000 Operating, and servicing instructions

Whirlpool
Whirlpool WCC installation instructions

Somogyi Elektronic
Somogyi Elektronic FK 430 WIFI instruction manual

Juliana
Juliana Maxi manual

Heat Outdoors
Heat Outdoors UMBRA Plinth Safety instructions and operation manual


