Interalia iProMOH V5-SU User manual

iProMOH V5-SU
Installation and User Manual

iProMOH V5
|
Installation and User Manual
Interalia | 58-UM-523-001-00-EN-85 iProMOH-V5 Installation and User Manual
Page 2
Copyrights
This manual and the software accompanying it are copyrighted © 2017 by Interalia Inc. ®
iProMOH V5-SU Installation and User Manual
46-UM-512-003-00-EN-85
All rights reserved. No part of this book, including interior design, cover design, and icons, may
be reproduced or transmitted in any form, by any means (electronic, photocopying, recording, or
otherwise) without the prior written permission of Interalia Inc.
Interalia Inc. Marketing Department
6815 8th Street N.E, Suite N275
Calgary, Alberta, Canada T2E 7H7
Phone: (800) 661-9406 or (403) 288-2706
Fax: (403) 288-5935
Interalia and the publisher have used their best efforts in preparing this book as accurately and
completely as possible, however we do not make any guarantees or warranties regarding its
content.
Trademarks
Interalia is a registered trademark of Interalia Inc.
iProMOH is a registered trademark of Interalia Inc.
All other product names and services identified throughout this book are used in an editorial
fashion only, and for the benefit of such companies. No such use, or the use of any trade name,
is intended to convey endorsement or other affiliation with the book.
Canada
United States
Europe
6815 - 8th Street NE.
701-24th Ave. SE.
Kerkenbos 10-123
Calgary, Alberta
Minneapolis, Minnesota
6546 BJ Nijmegen
Canada T2E 7H7
U.S.A. 55414
The Netherlands
Tel: 403 288 2706
Tel: 952 942 6088
Phone: +31 858 882046
Toll Free 800 661 9406
Toll Free 800 531 0115
Fax: 403 288 5935
Fax: 952 942 6172

iProMOH V5
|
Installation and User Manual
Interalia | 58-UM-523-001-00-EN-85 iProMOH-V5 Installation and User Manual
Page 3
1 Table of Contents
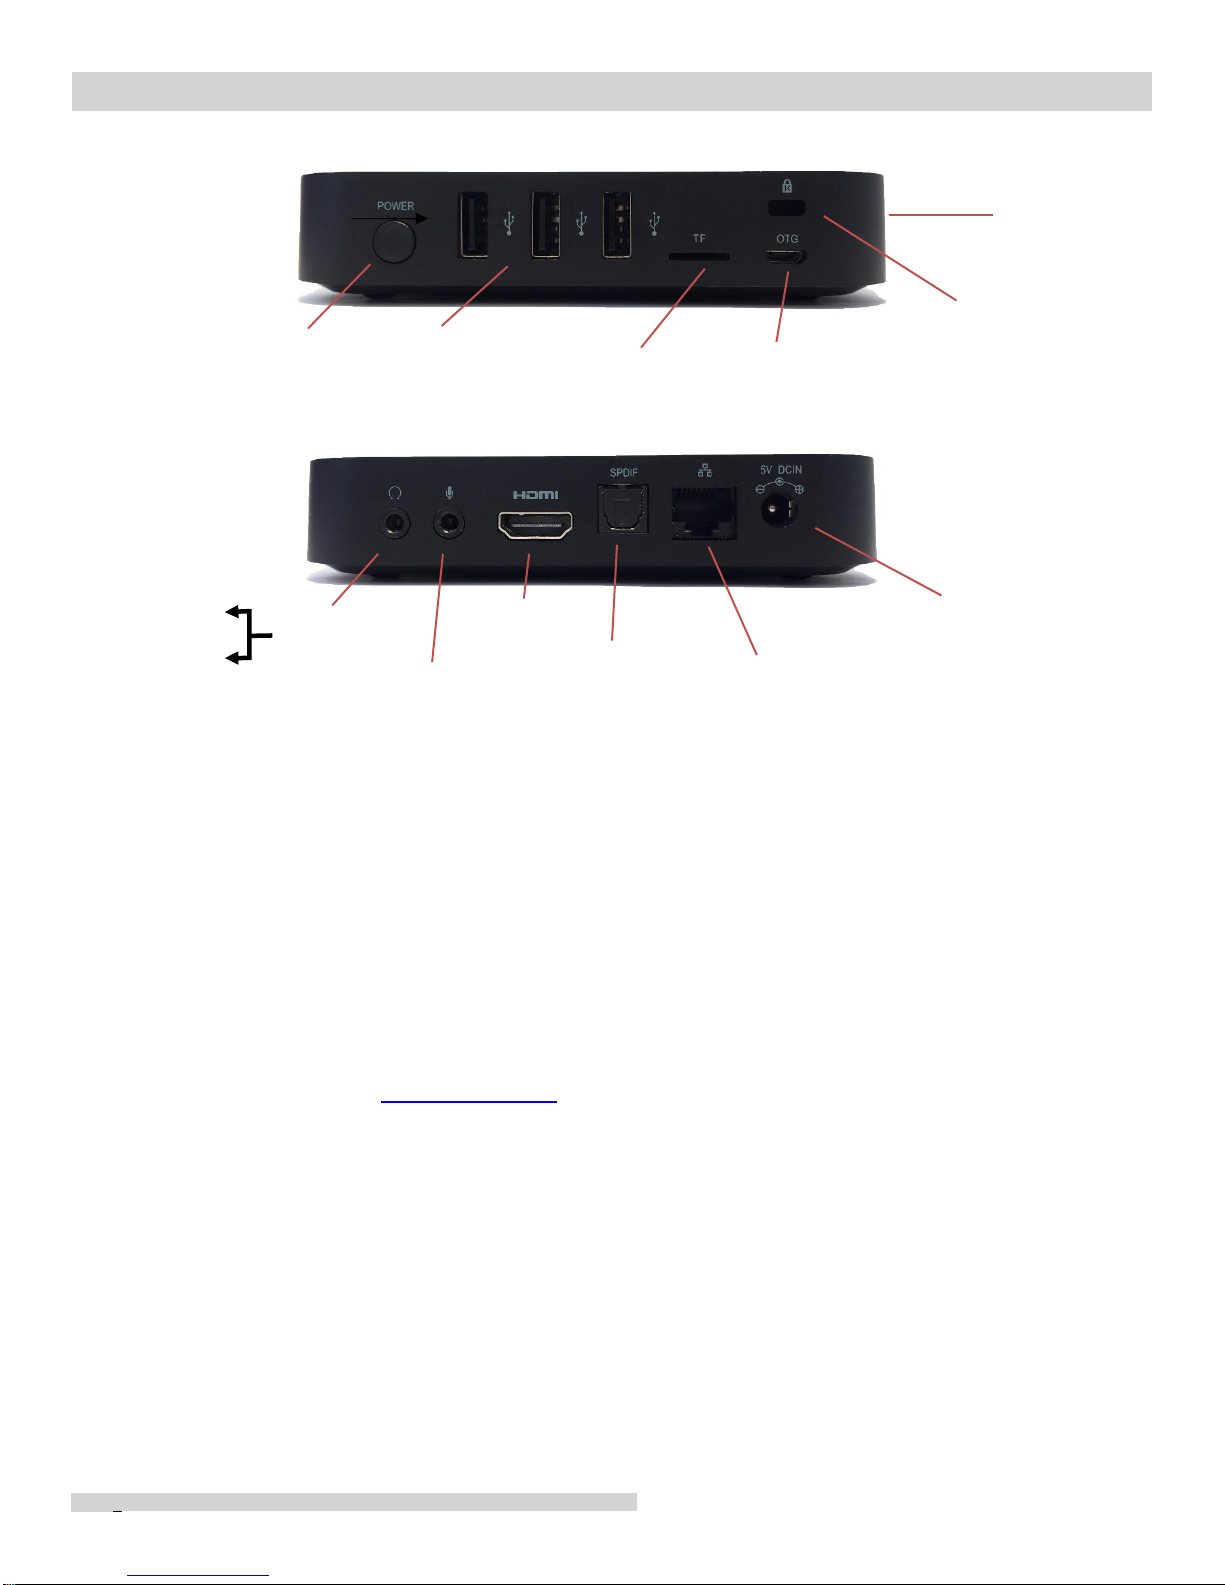
2iProMOH V5 Playback Device............................................................................4
2.1 Introduction .................................................................................................................. 4
2.2 Included in the Package............................................................................................... 4
2.3Getting started.............................................................................................................. 5
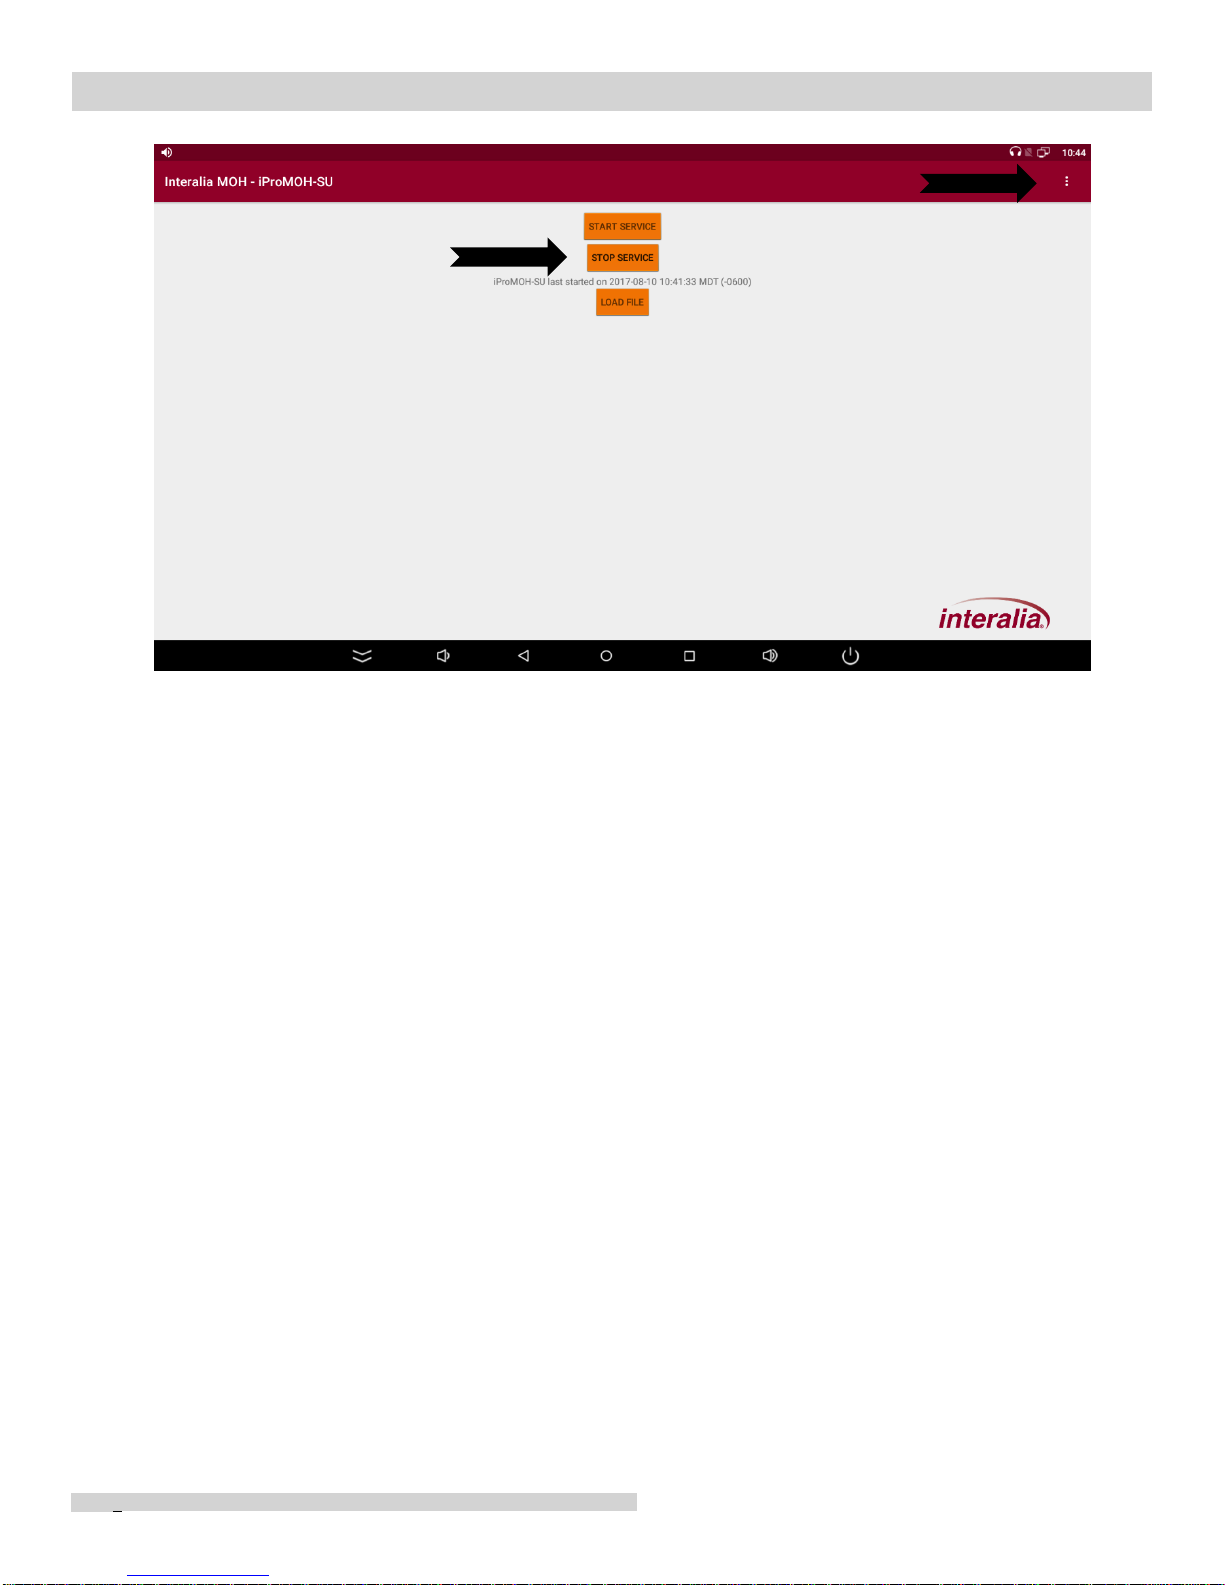
2.4 Installation in SU Mode with Simple Audio Mixer (SAM) ........................................... 5
2.4.1 Digital streams with Simple Audio Mixer...............................................................................6
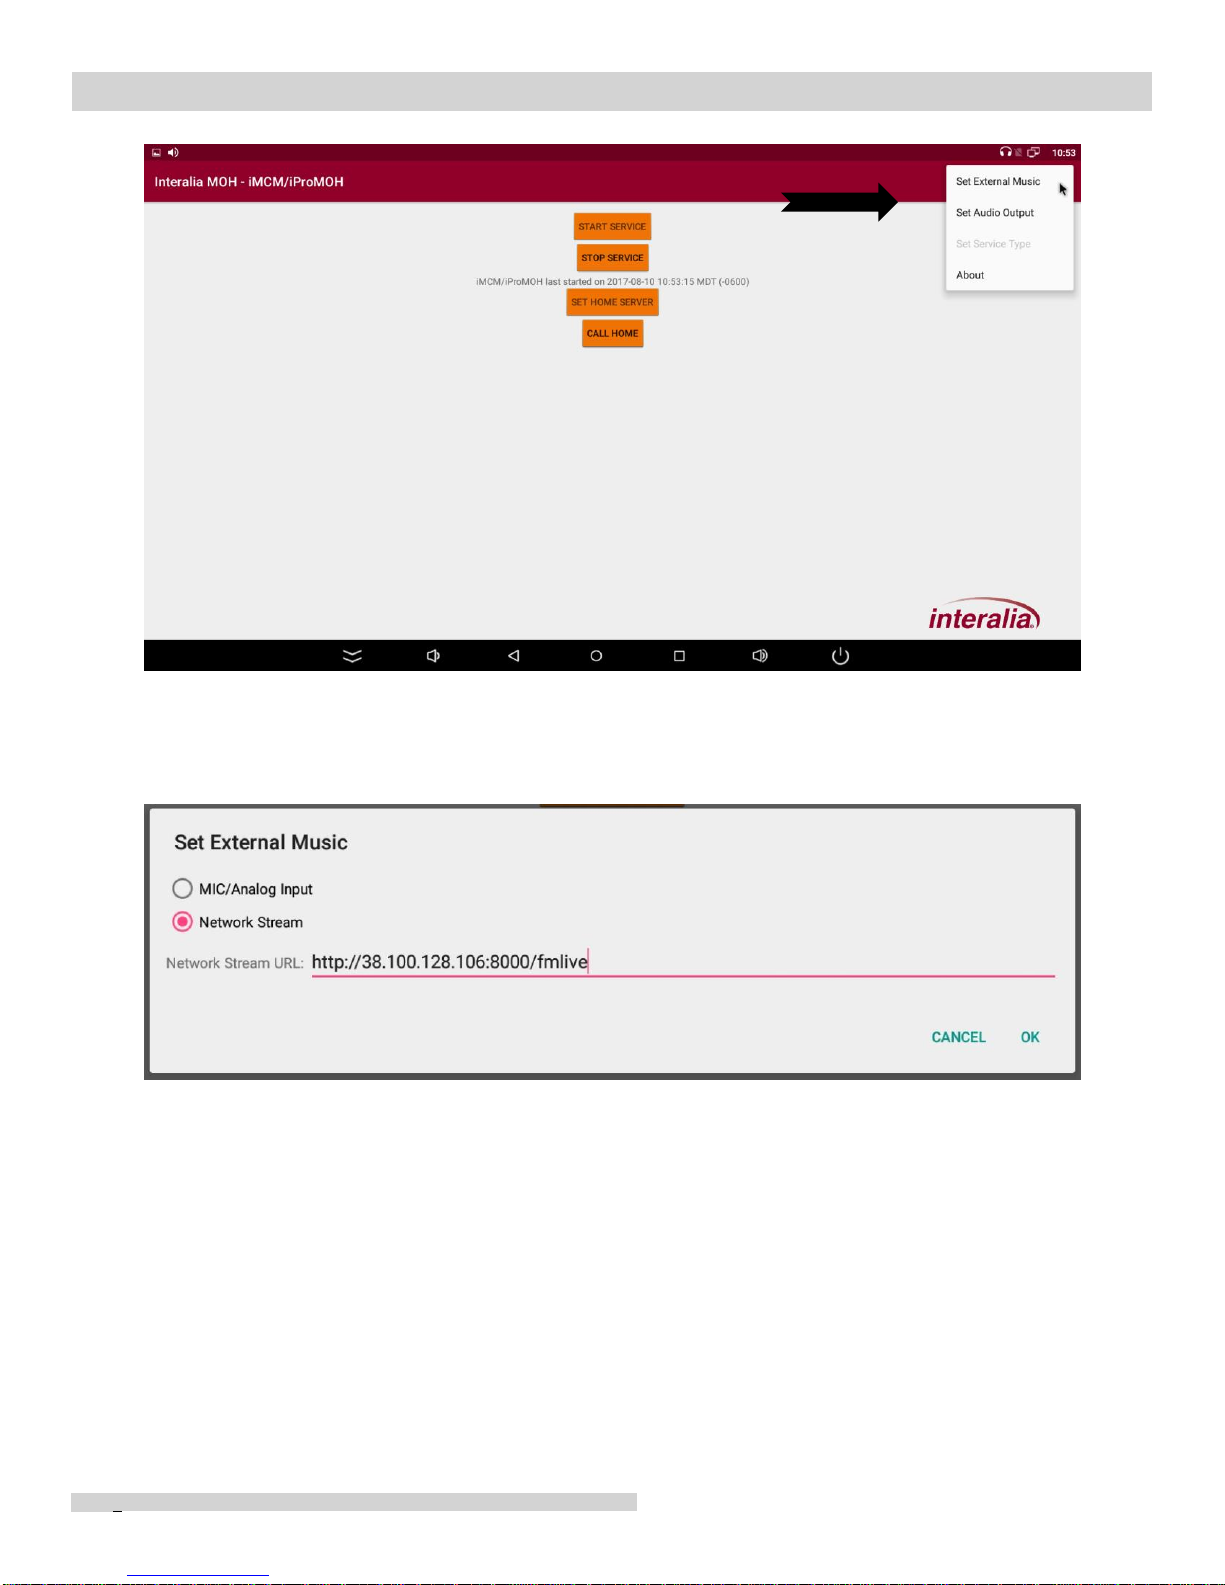
2.4.1.1 Change External Music Source from Analog to Digital.....................................................7
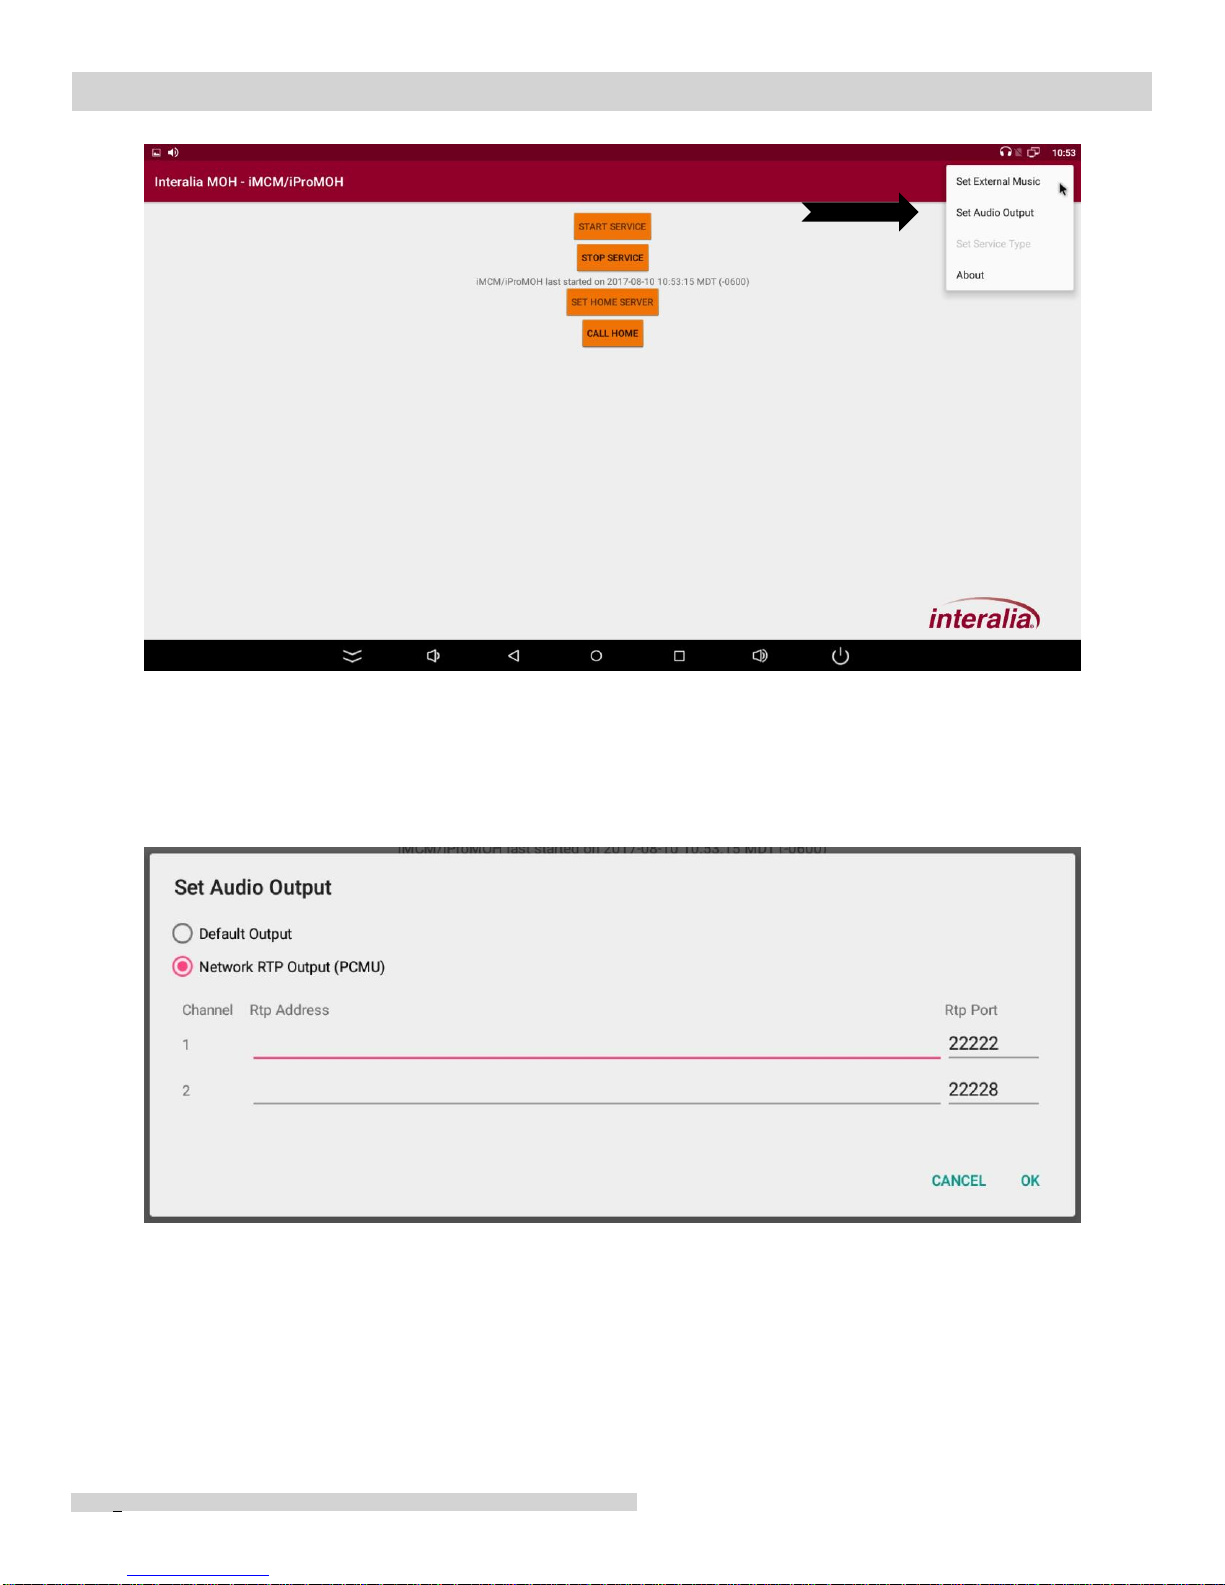
2.4.1.2 Change Audio Output from Analog to Digital....................................................................8
2.5 Setup the iProMOH V5 for iMCM operation ...............................................................10
2.5.1 Switching from SU mode to iMCM mode............................................................................11
2.5.2 Digital Audio Streams with iMCM Mode..............................................................................15
2.5.2.1 Change External Music Source from Analog to Digital...................................................15
2.5.2.2 Change Audio Output from Analog to Digital..................................................................16
2.6 Diagnostics..................................................................................................................18
3Network Settings..............................................................................................18
3.1 Default Settings...........................................................................................................18
3.2 Static IP Settings.........................................................................................................18
3.3 Enabling Wifi................................................................................................................22
4Loading Your Content onto the iProMOH V5-SU...........................................23
5Upgrading Firmware.........................................................................................24
6Setting the iProMOH V5-SU Time....................................................................25
7Technical Specifications..................................................................................25

iProMOH V5
|
Installation and User Manual
Interalia | 58-UM-523-001-00-EN-85 iProMOH-V5 Installation and User Manual
Page 4
2 iProMOH V5 Playback Device
2.1 Introduction
Congratulations on your purchase of the iProMOH V5. The iProMOH V5 is the most advanced
Music-On-Hold device ever released by Interalia. It combines in a single unit both the iProMOH-
SU and iProMOH V4 features. You decide which functionality best fits your needs. But that’s
not all, the iProMOH V5 can also receive ShoutCast and IceCast streams as music background
and it can create analog and RTP output streams compatible with the newer communication
platforms.
2.2 Included in the Package
•1x iProMOH V5
•1x 3.5mm Stereo Splitter to Male RCA cables
oChannel 1 –White
▪Note: By default, out of the box, the iProMOH V5 will play the pre-loaded
license free music on both Channel 1 and Channel 2. If you are utilizing a
one channel configuration ensure the Channel 1 cable is connected to
your system. This avoids a possible issue later when you change the
audio load for channel 1 but it does not play on your system because the
installer connected the Channel 2 cable to your system instead of
Channel 1.
oChannel 2 - Red
•1x Female RCA to 3.5mm male Stereo adapter
•HDMI cable
•USB to Micro USB cable
•1x Universal AC to DC power adapter (100 –240 V)
•1x Remote control (2 –AAA Batteries not included)
•1x Antenna
•1x Network cable
The following illustrates all the connections on the iProMOH V5 unit and their functions:

iProMOH V5
|
Installation and User Manual
Interalia | 58-UM-523-001-00-EN-85 iProMOH-V5 Installation and User Manual
Page 5
2.3 Getting started
What mode should you choose - SU or iMCM?
The new iProMOH can be set-up to work with our Simple Audio Mixer (SAM) or Interalia
Multisite Content Management (iMCM) software. The V5 comes from the factory configured in
SU mode with a USB interface which utilizes Simple Audio Mixer (SAM) software to configure
the audio to be played. If this is your first unit and you only have one unit to manage,we
strongly recommend that you use SAM which is a quick and easy tool to load your content in
the iProMOH. Go to Section 2.4 of this manual to get started with SAM. If you already have or
just purchased iMCM go to Section 2.5 to get started. To learn more about these products you
can visit our website at www.interalia.com. If you’re not sure on which software to use please
contact us, we will be happy to help.
2.4 Installation in SU Mode with Simple Audio Mixer (SAM)
If you want to set up your iProMOH V5 with analog input and outputs then you don’t have to
change any settings, because out of the box the iProMOH V5 is configured this way in SU mode.
Step 1: Connect the power adapter and power up the unit.
Channel 2
Analog
audio out
Channel 1
Gigabit Ethernet
Connection
Power
Connector
HDMI
Monitor
Micro SD
(Future)
Analog audio in
SPDIF
(Future)
OTG
(Future)
USB
Update player content
Keyboard and Mouse Connection
Power On/Off
WiFi
Connector
Side Mount
Kensington
Security Slot

iProMOH V5
|
Installation and User Manual
Interalia | 58-UM-523-001-00-EN-85 iProMOH-V5 Installation and User Manual
Page 6
Step 2: Connect the stereo cable splitter in the audio output and connect the RED end of the
cable to the “music in”of your system. Music should now play in your system. Use the BLACK
end of the cable if you need the second channel.
Step 3: If you plan on using an external analog music source as the music background for the
iProMOH V5, connect the “line out”of your music source to the “music-in”of the iProMOH V5.
Note: You must also enable the “External Music” feature in the Simple Audio Mixer (SAM)
software for this option to work correctly.
To take full control of your iProMOH V5 you will need to download Simple Audio Mixer (SAM)
software. This will enable you to:
- add your own music
- add your own messages
- add external music feed
- and much more
Simply go to www.interalia .com/SAM_DOWNLOAD to get the latest version.
-Simple Audio Mixer is only available for Microsoft Windows.
-Notes:
- You will need a USB key to transfer content from your PC to the iProMOH V5
- In SAM select iProMOH-SU as the device.
2.4.1 Digital streams with Simple Audio Mixer
If you want to set up your iProMOH V5 with IceCast or Shoutcast stream and/or RTP outputs
then follow the steps below:
Step 1: Connect the iProMOH V5 to the network. We strongly recommend using the wired
connection.
Step 2: Connect a monitor to the iProMOH V5 using the HDMI cable.
Step 3: Connect a mouse and a keyboard to the iProMOH V5 using the USB ports.
Step 4: Connect the power adapter and power up the unit.
Step 5: From the screen shown below, select “STOP SERVICE” and then select the 3 vertical
dots at the top right of the screen.

iProMOH V5
|
Installation and User Manual
Interalia | 58-UM-523-001-00-EN-85 iProMOH-V5 Installation and User Manual
Page 7
2.4.1.1 Change External Music Source from Analog to Digital
To change the External Music Source from the default analog input to a digital stream input,
select “Set External Music”

iProMOH V5
|
Installation and User Manual
Interalia | 58-UM-523-001-00-EN-85 iProMOH-V5 Installation and User Manual
Page 8
From “Set External Music”, select “Network Stream”and enter the address of the stream. Select
“OK”.
2.4.1.2 Change Audio Output from Analog to Digital
To change the Audio Output from the default analog output to a digital stream output, select
“Set Audio Output”

iProMOH V5
|
Installation and User Manual
Interalia | 58-UM-523-001-00-EN-85 iProMOH-V5 Installation and User Manual
Page 9
From “Set Audio Output”select “Network RTP Output”and enter the RTP address for the
appropriate channel. Select “OK”.
Additional options:
By selecting “About” you will obtain the MAC address of the unit as well as the version of the
firmware.

iProMOH V5
|
Installation and User Manual
Interalia | 58-UM-523-001-00-EN-85 iProMOH-V5 Installation and User Manual
Page 10
Additional information:
If you wish to use a wireless network, refer to Section 3.3 Enabling WiFi.
2.5 Setup the iProMOH V5 for iMCM operation
It is advised to use the Ethernet cable for a network connection because it is more reliable and
stable, requiring no network configuration (using DHCP). Alternatively, the iProMOH V5 allows
you to use the WiFi connection if the Ethernet connection is not available.
There are 2 methods to configure the iProMOH V5 for iMCM mode:
1- You can connect a monitor, mouse and keyboard to the iProMOH and set it up directly on the
unit.
2- An alternative method is to create a Configuration file that is loaded on a USB key. The
iProMOH-V5 will automatically load this Configuration file data when the USB key is inserted
into the iProMOH V5. This is very convenient when you must program multiple units with the
same call home information.
In this manual, we will show you the first method because it will get you started quickly, but to
learn how to create Configuration files, go to the V35 Multisite Content Manager (iMCM) User
Manual https://interalia.com/imcm.php .

iProMOH V5
|
Installation and User Manual
Interalia | 58-UM-523-001-00-EN-85 iProMOH-V5 Installation and User Manual
Page 11
2.5.1 Switching from SU mode to iMCM mode
By default, the iProMOH-V5 is setup for SAM. Therefore, to set it up for iMCM you need to
change the mode from SU to iMCM.
To switch the V5 to iMCM mode a monitor will need to be connected using HDMI. A USB mouse
will also need to be connected to the iProMOH V5.
Once the monitor, mouse and keyboard and network cables are connected power on the
iProMOH-V5.
Once the unit completes the start-up you will need to select “STOP SERVICE”, next select the 3
vertical dots in the upper right corner of the screen.

iProMOH V5
|
Installation and User Manual
Interalia | 58-UM-523-001-00-EN-85 iProMOH-V5 Installation and User Manual
Page 12
From that menu, select “Set Service Type”
Next- select on “Service Type”

iProMOH V5
|
Installation and User Manual
Interalia | 58-UM-523-001-00-EN-85 iProMOH-V5 Installation and User Manual
Page 13
Next –Select “iMCM/iProMOH”and the service will be updated.
Go back to the home screen and select “SET HOME SERVER”
In the pop up screen, enter the iMCM server address and the port number. Contact your iMCM
administrator to get the information if you don’t have it.

iProMOH V5
|
Installation and User Manual
Interalia | 58-UM-523-001-00-EN-85 iProMOH-V5 Installation and User Manual
Page 14
Once the information is entered select “OK”.

iProMOH V5
|
Installation and User Manual
Interalia | 58-UM-523-001-00-EN-85 iProMOH-V5 Installation and User Manual
Page 15
You can now select “START SERVCE” and “CALL HOME” to confirm communication.
2.5.2 Digital Audio Streams with iMCM Mode
2.5.2.1 Change External Music Source from Analog to Digital
To change the External Music Source from the default analog input to a digital stream input,
select “Set External Music”
From “Set External Music”, select “Network Stream”and enter the address of the stream. Select
“OK”.

iProMOH V5
|
Installation and User Manual
Interalia | 58-UM-523-001-00-EN-85 iProMOH-V5 Installation and User Manual
Page 16
2.5.2.2 Change Audio Output from Analog to Digital
To change the Audio Output from the default analog output to a digital stream output, select
“Set Audio Output”

iProMOH V5
|
Installation and User Manual
Interalia | 58-UM-523-001-00-EN-85 iProMOH-V5 Installation and User Manual
Page 17
From “Set Audio Output”select “Network RTP Output”and enter the RTP address for the
appropriate channel. Select “OK”.
Additional options:
By selecting “About” you will obtain the MAC address of the unit as well as the version of the
firmware.

iProMOH V5
|
Installation and User Manual
Interalia | 58-UM-523-001-00-EN-85 iProMOH-V5 Installation and User Manual
Page 18
2.6 Diagnostics
To aid in diagnostics and to keep a record of your device status, you can plug a USB drive into
an iProMOH V5 unit and the iProMOH V5 will create a diagnostics file on the root of your USB
drive. It is labelled “diagnostics.MAC.txt”, where “MAC” is the MAC address of your device. For
example, “diagnostics.000707A0B9FF.txt”. You may find there could be many diagnostics files
created on your USB drive if you have plugged the USB drive into other iProMOH-V5 devices
before.
A diagnostics file is a text file. It records various information about the device - including its MAC
address, network address, application version, memory, system running status, and current
settings of the device, etc. You can open the diagnostics file with any text editor like Notepad or
Notepad++ to check this information.
It will take about 10 seconds to create the diagnostics file on the USB drive. If your USB drive
has a LED light for indication of read/write operation, it will be flashing while reading/writing data
on your USB drive, wait till it stops flashing before you unplug it.
iProMOH V5 will overwrite its diagnostics file if the same file already exists on the USB drive.
You will find the creation time of the file is updated to the current time.
3 Network Settings
3.1 Default Settings
The iProMOH V5 default network setting is for DHCP. If you have a DHCP allocation of IP
addresses simply connect the Network cable in the Ethernet port and the unit will connect to the
network.
3.2 Static IP Settings
If you need to utilize a Static IP Address, the following steps illustrate how to change the
settings from DHCP:

iProMOH V5
|
Installation and User Manual
Interalia | 58-UM-523-001-00-EN-85 iProMOH-V5 Installation and User Manual
Page 19
Step 1 - From the start-up iProMOH application menu select “Escape”or the “O”in the bottom
tool bar.
Step 2 - Once in the home menu select the “Settings” gear icon to open the Settings window.

iProMOH V5
|
Installation and User Manual
Interalia | 58-UM-523-001-00-EN-85 iProMOH-V5 Installation and User Manual
Page 20
Step 3 - Once in the “Settings” page, in the Wireless and Network section select “More”
Step 4 - In the “More”section select “Ethernet”
Table of contents