Yealink EXP20 User manual


Copyright © 2015 YEALINK NETWORK TECHNOLOGY CO., LTD.
Copyright © 2015 Yealink Network Technology CO., LTD. All rights reserved. No parts of this
publication may be reproduced or transmitted in any form or by any means, electronic or
mechanical, photocopying, recording, or otherwise, for any purpose, without the express written
permission of Yealink Network Technology CO., LTD. Under the law, reproducing includes
translating into another language or format.
When this publication is made available on media, Yealink Network Technology CO., LTD. gives
its consent to downloading and printing copies of the content provided in this file only for private
use and not for redistribution. No parts of this publication may be subject to alteration,
modification or commercial use. Yealink Network Technology CO., LTD. will not be liable for any
damages arising from use of an illegally modified or altered publication.
THE SPECIFICATIONS AND INFORMATION REGARDING THE PRODUCTS IN THIS GUIDE ARE
SUBJECT TO CHANGE WITHOUT NOTICE. ALL STATEMENTS, INFORMATION, AND
RECOMMENDATIONS IN THIS GUIDE ARE BELIEVED TO BE ACCURATE BUT ARE PRESENTED
WITHOUT WARRANTY OF ANY KIND, EXPRESS OR IMPLIED. USERS MUST TAKE FULL
RESPONSIBILITY FOR THEIR APPLICATION OF PRODUCTS.
YEALINK NETWORK TECHNOLOGY CO., LTD. MAKES NO WARRANTY OF ANY KIND WITH
REGARD TO THIS GUIDE, INCLUDING, BUT NOT LIMITED TO, THE IMPLIED WARRANTIES OF
MERCHANTABILITY AND FITNESS FOR A PARTICULAR PURPOSE. Yealink Network Technology CO.,
LTD. shall not be liable for errors contained herein nor for incidental or consequential damages
in connection with the furnishing, performance, or use of this guide.
Hereby, Yealink Network Technology CO., LTD. declares that this device is in conformity
with the essential requirements and other relevant provisions of the CE, FCC.
This device is marked with the CE mark in compliance with EC Directives 2006/95/EC and 2004/108/EC.
This device is compliant with Part 15 of the FCC Rules. Operation is subject to the following two conditions:
1. This device may not cause harmful interference.
2. This device must accept any interference received, including interference that may cause undesired
operation.

Note: This equipment has been tested and found to comply with the limits for a Class B digital device,
pursuant to part 15 of the FCC Rules. These limits are designed to provide reasonable protection against
harmful interference in a residential installation. This equipment generates, uses and can radiate radio
frequency energy and, if not installed and used in accordance with the instructions, may cause harmful
interference to radio communications. However, there is no guarantee that interference will not occur in a
particular installation. If this equipment does cause harmful interference to radio or television reception,
which can be determined by turning the equipment off and on, the user is encouraged to try to correct the
interference by one or more of the following measures:
1. Reorient or relocate the receiving antenna.
2. Increase the separation between the equipment and receiver.
3. Connect the equipment into an outlet on a circuit different from that to which the receiver is connected.
4. Consult the dealer or an experienced radio/TV technician for help.
To avoid the potential effects on the environment and human health as a result of the
presence of hazardous substances in electrical and electronic equipment, end users of
electrical and electronic equipment should understand the meaning of the crossed-out
wheeled bin symbol. Do not dispose of WEEE as unsorted municipal waste and have to
collect such WEEE separately.
We are striving to improve our documentation quality and we appreciate your feedback. Email your


About This Guide
v
Thank you for choosing the Yealink EXP20 LCD expansion module. EXP20 is designed to
expand the functional capability of the SIP-T29G and SIP-T27P IP phones. It features a
160*320 graphic LCD screen and 20 physical keys with dual-color LEDs. You can add 20
additional keys via a page switch key, bringing the number of keys up to 40. Up to six
expansion modules can be daisy-chained to a single SIP-T29G/T27P host phone, offering
a maximum of 240 Ext keys per phone.
Yealink EXP20 is ideal for receptionists, administrative assistants, call center agents,
power-users, and executives who need to monitor and manage a large volume of calls
on a regular basis.
This guide provides everything you need to quickly set up and use the EXP20 LCD
expansion module. Be sure to read the Packing Contents in this guide before you set up
and use your EXP20 LCD expansion module. This guide takes the working together of the
Yealink SIP-T29G IP phone running firmware version 80 and the Yealink EXP20 LCD
expansion module as an example for reference.
Topics provided in this guide include:
Chapter 1 Getting Started
Chapter 2 Configuring the Yealink EXP20 LCD Expansion Module
Chapter 3 Using the Yealink EXP20 LCD Expansion Module
Chapter 4 Troubleshooting

Yealink EXP20 User Guide
vi

Table of Contents
vii
About This Guide ...................................................................... v
In This Guide ......................................................................................................................... v
Table of Contents.....................................................................vii
Getting Started......................................................................... 1
Packaging Contents............................................................................................................. 1
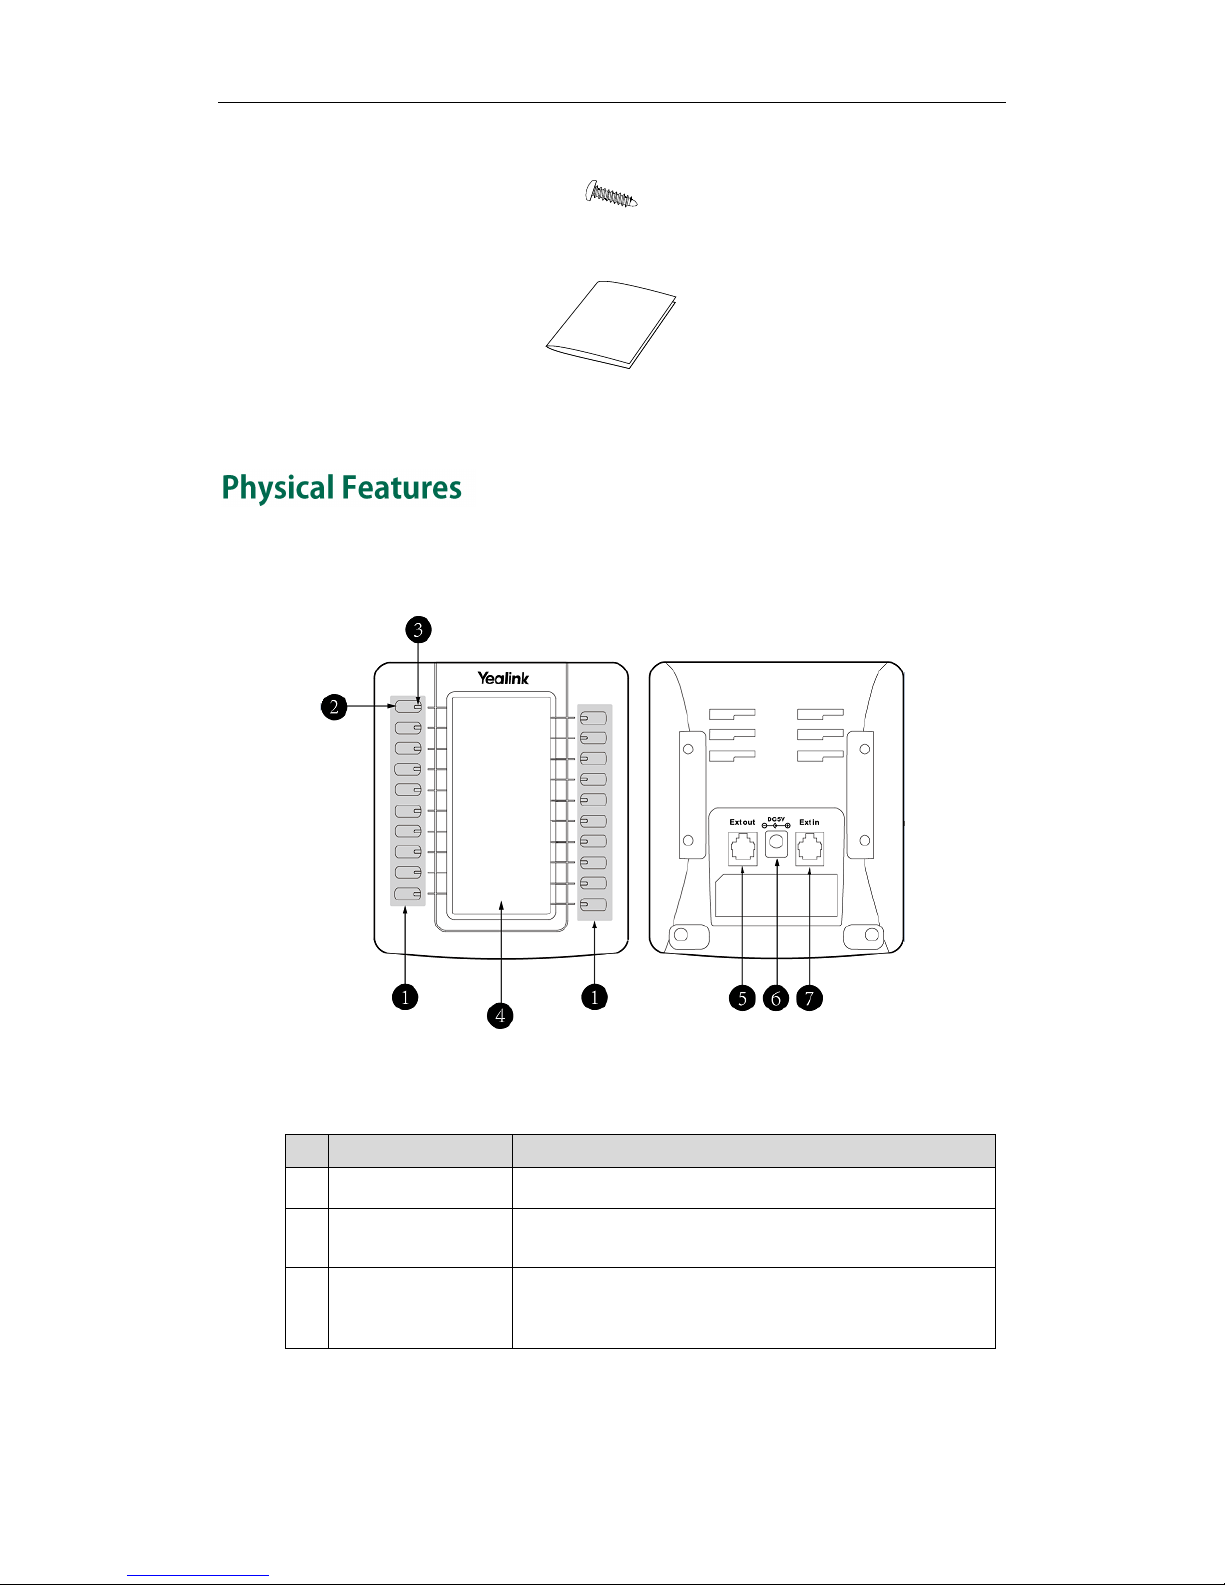
Physical Features.................................................................................................................. 2
LED Instructions..................................................................................................................... 3
Installation............................................................................................................................. 4
Startup
.................................................................................................................................... 6
Configuring the Yealink EXP20 LCD Expansion Module.......... 7
Switch .................................................................................................................................... 8
Line......................................................................................................................................... 9
Speed Dial .......................................................................................................................... 10
Busy Lamp Field (BLF) ....................................................................................................... 11
Voice Mail ........................................................................................................................... 12
Direct Pickup ....................................................................................................................... 13
Group Pickup ...................................................................................................................... 14
Call Park .............................................................................................................................. 15
Intercom .............................................................................................................................. 16
DTMF.................................................................................................................................... 17
Prefix .................................................................................................................................... 18
Local Group ........................................................................................................................ 19
XML Group.......................................................................................................................... 20
XML Browser....................................................................................................................... 21
LDAP..................................................................................................................................... 22
Conference ......................................................................................................................... 23
Forward ............................................................................................................................... 24
Transfer ................................................................................................................................ 25
Hold ..................................................................................................................................... 26
DND...................................................................................................................................... 27
ReCall .................................................................................................................................. 28
SMS...................................................................................................................................... 29
Record.................................................................................................................................. 30
URL Record.......................................................................................................................... 31
Multicast Paging................................................................................................................. 32
Group Listening .................................................................................................................. 33
Hot Desking ........................................................................................................................ 34
ACD...................................................................................................................................... 35
Zero Touch........................................................................................................................... 36
URL ....................................................................................................................................... 37
Phone Lock .......................................................................................................................... 38
Directory.............................................................................................................................. 39
Using the Yealink EXP20 LCD Expansion Module.................. 41

Yealink EXP20 User Guide
viii
Using the Line Key.............................................................................................................. 41
Adjusting the Contrast ....................................................................................................... 42
Adjusting the Backlight...................................................................................................... 43
Using the Busy Lamp Field ................................................................................................ 44
Resetting the Yealink EXP20 LCD Expansion Module .................................................... 44
Troubleshooting ...................................................................... 47

Getting Started
1
This chapter provides basic installation instructions and information for obtaining the
best performance with the EXP20 LCD expansion module. Topics include:
Packaging Contents
Physical Features
LED Instructions
Installation
Startup
The following items are included in your package:
LCD Expansion Module
Stand
Connecting Sheet
Connecting Cord

Yealink EXP20 User Guide
2
Screws x 4
Quick Start Guide
Check the list before installation. If you find anything missing, contact your reseller.
The main physical features of the EXP20 LCD expansion module are LCD screen, Ext
keys, LED indicators, Ext in jack, Ext out jack and power interface.
The main physical features of the EXP20 LCD expansion module are described as
below:
Item
Description
①
Ext Keys
Assign various features to these keys.
②
Page Key
Presses this key to navigate to a different page to view
additional keys.
③
LED Indicators
Indicate the Ext key status. For more information, refer to
LED Instructions on page 3.

Getting Started
3
Item
Description
④
LCD Screen
Shows key feature label, key feature icon and the label
of switch key (such as List 1 or List 2) indicating the
current page at the top of the LCD screen.
⑤
Ext out Jack
Connects the supplied cord to the Ext in jack on the next
expansion module.
⑥
Power Interface
Connects a power adapter to the expansion module.
When more than two expansion modules are connected
to a single host phone, you need to connect a power
adapter to any one of the expansion modules.
⑦
Ext in Jack
Connects the supplied cord to the Ext jack on the host
phone or to the Ext out jack on the prior expansion
module.
Ext key LED (configured as a line key)
LED Status
Description
Solid green
The line is in conversation.
The line is seized.
Fast flashing green
The line receives an incoming call.
Slow flashing green
The call is placed on hold.
Off
The line is inactive.
Ext key LED (configured as a BLF key)
LED Status
Description
Solid green
The monitored user is idle.
Fast flashing red
The monitored user receives an incoming call.
Solid red
The monitored user is talking.
The monitored user‟s conversation is placed on
hold (This LED status requires server support).
The monitored user is dialing.
The call is parked against the monitored user‟s
phone number.
Off
The monitored user does not exist.

Yealink EXP20 User Guide
4
The EXP20 LCD expansion module applies to Yealink SIP-T29G/T27P IP phones. To
connect the EXP20 to the phone more easily, unplug the phone stand from the IP phone
before installation.
Note
To
unplug
the stand from the IP phone:
1. Unplug the power adapter and Ethernet cable from the IP phone.
2. Unplug the handset attached to the IP phone.
3. Turn the IP phone over and lay it on a non-slip, flat surface.
4. Unplug the stand from the IP phone.
To install the
EXP20 LCD expansion module:
1. Turn the IP phone and the expansion module over and lay them on a flat, non-slip
surface.
2. Position the expansion module on the left of the IP phone.
3. Connect the EXP20 LCD expansion module and the IP phone using the supplied
connecting sheet and screws.
Up to six expansion modules can be connected to an IP phone.

Getting Started
5
Connecting an expansion module on a single host phone is shown as below:
4.
Follow the same step (1-3) to add an expansion module
.
Connecting
two expansion modules on a single host phone is shown as below
:

Yealink EXP20 User Guide
6
5. Connect the Ext jack on the host phone and the Ext in jack of the first module using
one supplied cord. If you want to connect another module, connect the Ext out jack
of the first module and the Ext in jack of the second module using one supplied cord.
Connecting two expansion modules on a single host phone is shown as below:
Note
To attach the stand of the expansion module:
After the EXP20 LCD expansion module is powered on, the LCD screen of the EXP20 LCD
expansion module will display “Loading…”. After a short time, the loading screen will
disappear, and then you can assign the desired feature to the EXP20 LCD expansion
module.
Power is automatically transferred from the host phone to the expansion module(s) upon
connection. If you want to use more than two expansion modules on a single phone, you
need to connect an additional power adapter to any one of the expansion modules.

Configuring the Yealink EXP20 LCD Expansion Module
7
The EXP20 LCD expansion module supports 40 Ext keys. You can access additional 20
keys via the page key. Each key can be assigned a feature using the configuration files,
via phone user interface or web user interface. For more information on using the
configuration files to assign a feature, refer to
Yealink Auto Provisioning Guide
.
Long press the desired key, the phone LCD screen will enter the setting screen of this key.
Then you can assign the desired feature to this key.
To log into the web user interface, you should obtain the IP address of the host phone in
advance. Press the OK key on the keypad when the host phone is idle, and the LCD
screen of the host phone will display the IP address and some other information. Enter
the IP address (e.g., http://192.168.0.10 or 192.168.0.10) in the address bar of the web
browser on your PC. The default user name and password are both “admin”
(case-sensitive).
This chapter provides you with the instructions of assigning a feature to an Ext key via
web user interface. Topics include:
Switch
Line
Speed Dial
Busy Lamp Field (BLF)
Voice Mail
Direct Pickup
Group Pickup
Call Park
Intercom
DTMF
Prefix
Local Group
XML Group
XML Browser
LDAP
Conference
Forward

Yealink EXP20 User Guide
8
Transfer
Hold
DND
ReCall
SMS
Record
URL Record
Multicast Paging
Group Listening
Hot Desking
ACD
Zero Touch
URL
Phone Lock
Directory
Note
EXP20 supports 20 physical keys and two pages, providing a total of 40 keys. The 20
additional keys are sorted from 21 to 40 and displayed on the second page. You can
configure the first Ext key (key 1) as the switch key. The key 21 will be configured as the
switch key automatically when you configure the first Ext key (key 1) as the switch key.
You can then press the first key to view the 20 additional keys or the key 21 to return to
the first page.
To configure the first Ext key as the switch key:
1. Click on DSSKey->Ext Key.
2. In the first Ext key field, select Switch from the pull-down list of Type.
3. Enter the desired value in the Label field or leave it blank.
Quick access features like intercom and voice mail should be configured on your SIP
server in advance to make sure they will work on your phone. Contact your system
administrator for more information.
If more than one expansion module is connected, select the desired expansion module
from the pull-down list of Expansion Key.
Feature codes may vary between different servers.
The available key features may vary between different phone firmware versions. This
guide introduces key features available on the SIP-T29G/T27P IP phone running firmware
version 80 or later.

Configuring the Yealink EXP20 LCD Expansion Module
9
If you leave this field blank, the LCD screen of the EXP20 LCD expansion module will
display the default label “Switch”. The default label of key 21 is “List 2”.
4. Click Confirm to accept the change.
You can configure an Ext key as the line key. You can press this key to enter the
pre-dialing screen when the phone is idle. You can also press this key to place a new
call during an active call, and then the original call is placed on hold. For more
information on using the line key, refer to Using the Line Key on page 41.
To configure an Ext key as the line key:
1. Click on DSSKey->Ext Key.
2. In the desired Ext key field, select Line from the pull-down list of Type.
3. Enter the desired value in the Label field or leave it blank.
If you leave this field blank, the LCD screen of the EXP20 LCD expansion module will
display the default label the extension number of the selected line (e.g., 1001).

Yealink EXP20 User Guide
10
4. Select the desired line to apply this key from the pull-down list of Line.
5. Click Confirm to accept the change.
You can configure an Ext key as the speed dial key. Then you can dial out the
pre-defined number using the specified line by pressing the speed dial key.
To configure an Ext key as the speed dial key:
1. Click on DSSKey->Ext Key.
2. In the desired Ext key field, select Speed Dial from the pull-down list of Type.
3. Enter the desired number you want to dial out in the Value field.
4. Enter the desired value in the Label field or leave it blank.
If you leave this field blank, the LCD screen of the EXP20 LCD expansion module will
display the number specified in the Value field.

Configuring the Yealink EXP20 LCD Expansion Module
11
5. Select the desired line to apply this key from the pull-down list of Line.
6. Click Confirm to accept the change.
Busy Lamp Field (BLF) allows you to monitor the status changes of a user. You can
configure an Ext key as the BLF key, which allows you to monitor the status (idle, ringing
or busy) of the pre-defined phone user. You can also pick up the incoming call of the
monitored user directly by pressing the BLF key. For more information on using the BLF
feature, refer to Using the Busy Lamp Field on page 44.
To configure an Ext key as the BLF key:
1. Click on DSSKey->Ext Key.
2. In the desired Ext key field, select BLF from the pull-down list of Type.
3. Enter the phone number you want to monitor in the Value field.
4. Enter the desired value in the Label field or leave it blank.
If you leave this field blank, the LCD screen of the EXP20 LCD expansion module will
display the value specified in the Value field (e.g., 1011).
5. Select the desired line to apply this key from the pull-down list of Line.

Yealink EXP20 User Guide
12
6. Enter the BLF pickup code in the Extension field.
7. Click Confirm to accept the change.
You can configure an Ext key as the voice mail key. Then you can press the voice mail
key when the phone is idle to dial out the pre-defined voice mail access code and
follow the voice prompt to listen to voice mails.
To configure an Ext key as the voice mail key:
1. Click on DSSKey->Ext Key.
2. In the desired Ext key field, select Voice Mail from the pull-down list of Type.
3. Enter the voice mail access code in the Value field.
4. Enter the desired value in the Label field or leave it blank.
If you leave this field blank, the LCD screen of the EXP20 LCD expansion module will
display the default label “Voice Mail”.
Other manuals for EXP20
1
Table of contents
Other Yealink Telephone Accessories manuals

Yealink
Yealink EXP40 User manual

Yealink
Yealink CPN10 User manual

Yealink
Yealink EXP40 User manual

Yealink
Yealink W70B DECT User manual

Yealink
Yealink EXP38 User manual

Yealink
Yealink EXP39 User manual

Yealink
Yealink W70B DECT User manual

Yealink
Yealink ED10 User manual

Yealink
Yealink EXP38 User manual

Yealink
Yealink EXP40 User manual