Interconnective H Eye User manual

USER MANUAL

Catalogue
01
Specification
02
04
Diagram
Charge
Quickstart
PC Software
FAQ
RECORDING
Video Resolution Multiple Recording Resolution 1296P(30 FPS)/
1080P(30 FPS)/ 720P(30 FPS)/ 480P(30 FPS)
Video Format .MP4 / H.264
Recording Angle Wide Angle 140 degrees
Audio High Quality Built-in Microphone.
Pre Record Support
Water Mark User ID, Time and date Stamp Embedded into Video.
Frame 4FPS, 6FPS, 8FPS, 12FPS, 16FPS, 25FPS, 30FPS
Video Duration 10 mins, 15 mins, 20 mins
Activation prompt Vibrator & Speaker & LED Indicators
PHOTOGRAPH
Camera 34M 14M 12M 8M
Camera Format JPEG
Snap Shot Capture Photos During Video Recording
Type Built-in 2400mAH Lithium (LiCoO2)
Charging Time 180 minutes
Battery Life 8 hours at 1080P@30
OTHERS
Storage Capacity 16G/32G/64G/128G
IR Light 6PCS 850nm Infrared LED with Wide Angle
Auto IR Control Support
Night Vision Up to 10 Meters
Waterproof IP66
Password Protection Requires Password to Access to Video
Dimensions 76 mm *54 mm *26.5mm
109 gram
Working Temperature -20C° ~ 65C°
Storage temperature -20C° ~ 65C°
ACCESSORIES
Standard Accessories
SOS LED Blue and Red Flash Light
White LED Support
01
Catalogue
Specifications
08
06
05
Weight

1
3
9
3
4
5
6
7
8
10
2
11
12
13
14
15
16
17
19
21
18
20
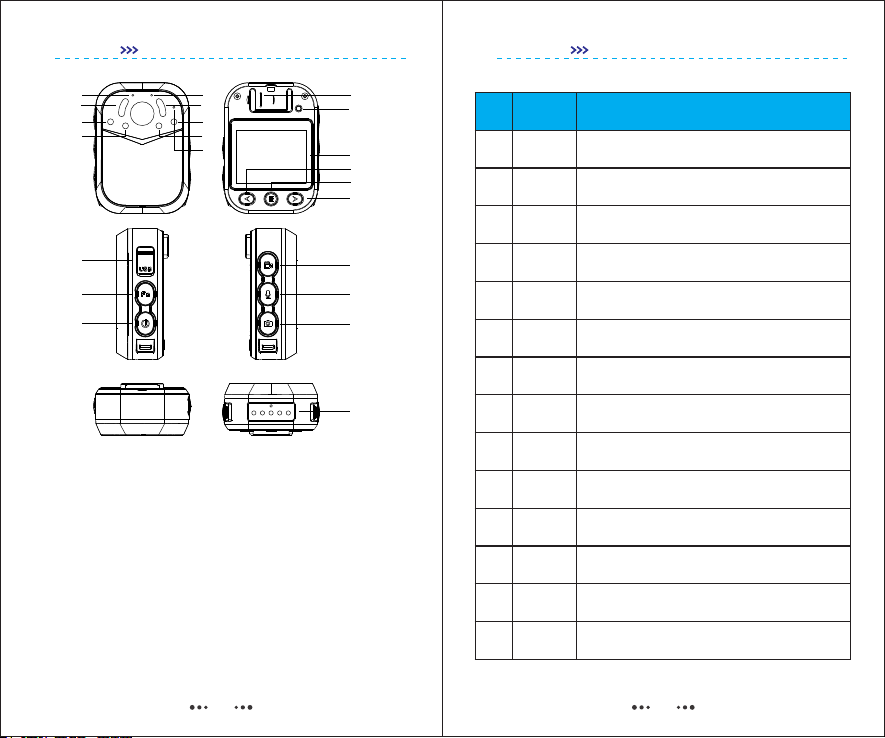
1.Charging Indicator
2.Power Indicator
3.Infrared LED x 6
4.Red SOS LED
5.White LED
6.Blue SOS LED
7.Auto IR Detector
8.Microphone
9.Speaker
10.Reset Button
11.LCD Screen
12.Left
14.Right
15.USB
16.Fn Button
17.Power Button
18.Video Button
19.Audio/ SOS Button
20.Photo/ Back Button
21.Charging/Data Pin
13.Confirm/ Menu/ Playback
Functions
Item
No.
1
2
3
4&6
5
8
*10
11
12
14
*13
16
18
*20
Charging
LED
Power
LED
IR LED
SOS LED
White LED
Microphone
Reset Button
LCD Screen
Left Button
Right Button
Confirm/Menu
Playback
Fn Button
Video Button
Photo Button
During charging, this indicator is in blue. After finish, the blue
light will be off.
Green - Standby Mode
Red Video Recording
Orange - Audio Recording
In the night vision, IR LED helps to get a clear videos without
colour. Short press Fn button to activate.
Long press Audio/SOS button to activate the SOS LED. Blue
and Red LED will flash in rotation.
Long press Fn button to activate the white LED
Microphone is waterproof, but make sure to clean the dust and
water when necessary
After press, the camera will be turn off. (It won’t clear the data
and settings)
2.0 TFT LCD Screens helps to video preview and playback.
During working status press Power button to turn if off.
During standby mode, press left to zoom in. During playback,
press left to rewind. In other situations, it is for up and left.
Under preview mode, short press to enter menu, or long press
to enter playback page. In other situations, this button is pressed
to enter.
Under preview mode or video recording, short press to turn on
IR LED, or long press to turn on white LED.
Short press to start video recording, or long press to record a
important video.
Under preview mode or video recording, press to take a photo.
In other situations, this button is pressed to return.
During standby mode, press right to zoom out. During playback,
press left to fast forward. In other situations, it is for down and
right.
Note: Please pay attention to the items with “ * ”.
02 03
Diagram
Diagram

Charging and Download
Socket
PC
Plug
Download
USB
Socket
PC
Plug
Download
USB
Before connect camera to USB, make sure the power voltage is not more
than 5.5V. Otherwise, it will do harm to battery and burn the camera.
Please use our standard charger and cord.
When charging via dock, the camera can support fast charging. (1.5A).
1920x1080P30FPS 00:00:51
2017/05/04 18:20:50 29.5G
DID:0000000 PID:000000
Start Video
Recording
Start Audio
Recording
Take a
Photo
Current Time (Watermark) and Remaining Memory Capacity
Police ID and Device ID (Watermark)
Current Resolution, Video Recording Time and Battery Life
Hold and press power button for 2 seconds to turn on camera.the unit will
emit ONE audio chirp and long vibration. A green indicator on top of the unit
will turn on and remain green while the unit is powered on.
To record a video, press the “Recording” button. The unit will emit 1 audio
chirps and 1 vibration. A red working indicator on top of the device will turn
on and remain red until recording is ended.
04 05
Charge
Quickstart

Find Cammanager.exe in the CD disc, double click to open it.
Default Password is 000000 (six zero).
After entering password, then click “Login”.
Password Setting < New Password
After login, input new password, then click “Apply” to
Change password
Device Information < Device ID
Device ID is with 7 characters. While Police ID is with 6
characters. After setting, click “Apply” to finish.
How to Login?
How to Change Password?
How to Change ID?
1) Select recording video resolution(from 480P to 1296P),
2) Select from 4FPS to 30 FPS to choose frame rate.
3) Select the length of each video(from 5 to 30 Mins),
4) Select video quality from low to high.
When login the cammanager, tick the checkbox of “Sync
PC Time”.
Other Settings
Login
Password Login
Sync PC Time
√
Connection: Connected Device Name: SC01
CamManager
CamManager
Camera Setting Device Information WiFi Setting Password Setting Other Settings
Video Resolution: 1920x1080P
Clip Time: 15 minutes
Pre-record: Off
Photo Size: 34M
Video Quality: Super Fine
Frame Rate: 30 FPS
Motion Detect: Off
Post-record: Off
Burst Capture: 1 Pic
Mute: Off
Factory Setting Open Disk
Firmware Version: Nov. 6 2019 15:11:50 Batery: 100% SD Status: 28GB - 29.71GB
1) Anti-Virus function: to prevent other files generated
in camera memory.
2) WiFi and GPS Settings are Optional. These functions
are not available if there are no hardware module.
3) Record Notification: Camera can warn the user by
vibration during recording.
06 07
PC Software
PC Software

R
o
H
S
Customer
Information
Name:
Address:
Zip Code:
Tel:
Product
Information
Model Name:
Serial No.:
Purchase Date:
Failure
Detail
Product Warranty Card
Failure Diagnose Solution
No Power
Protection Mode
Protection Mode
Charge camera for at least 3 hours.
Press Reset button, and restart camera
USB Cable Change the USB cord
Contact your seller to reset password
Can not
Power On
Connect Camera to PC via USB, and charge it
for 30 mins.
Battery Power
is not enough
① First time or did not use for a long time, please
discharge the battery, then charge it for at least
3 hours before use it.
② Don’t charge the camera when too hot/cold.
Short Working
Time
Data Transfer
is not stable
Power of USB
is not enough to
afford charging
and download
Use other USB port on your laptop.
①
Use the dock station.
②
Computer can
not recognize
the device Forget Password
08
FAQ
Table of contents
Other Interconnective Digital Camera manuals