Intersan sanispray Assembly instructions
SANISPRAY
Individual Sensor Operated
Repair Guide
INTERSAN MANUFACTURING COMPANY
1748 W. Fillmore St. - Phoenix, Arizona 85007 - Tel 602.254.3101 - Fax 602.254.1776

IMPORTANT
Sanispray - Individual Sensor Operated
Repair Guide
INTERSAN MANUFACTURING COMPANY
1748 W. Fillmore St. - Phoenix, Arizona 85007 - Tel 602.254.3101 - Fax 602.254.1776 - www.IntersanUS.com
NOTE: THIS INFORMATION IS SUBJECT TO CHANGE WITHOUT FORMAL NOTICE REV1.2
- 1 -
Always reset the microprocessor(s)
after each intervention (reset button
mounted on the lid of the
microprocessor). After 35 seconds the
unit should be operational.
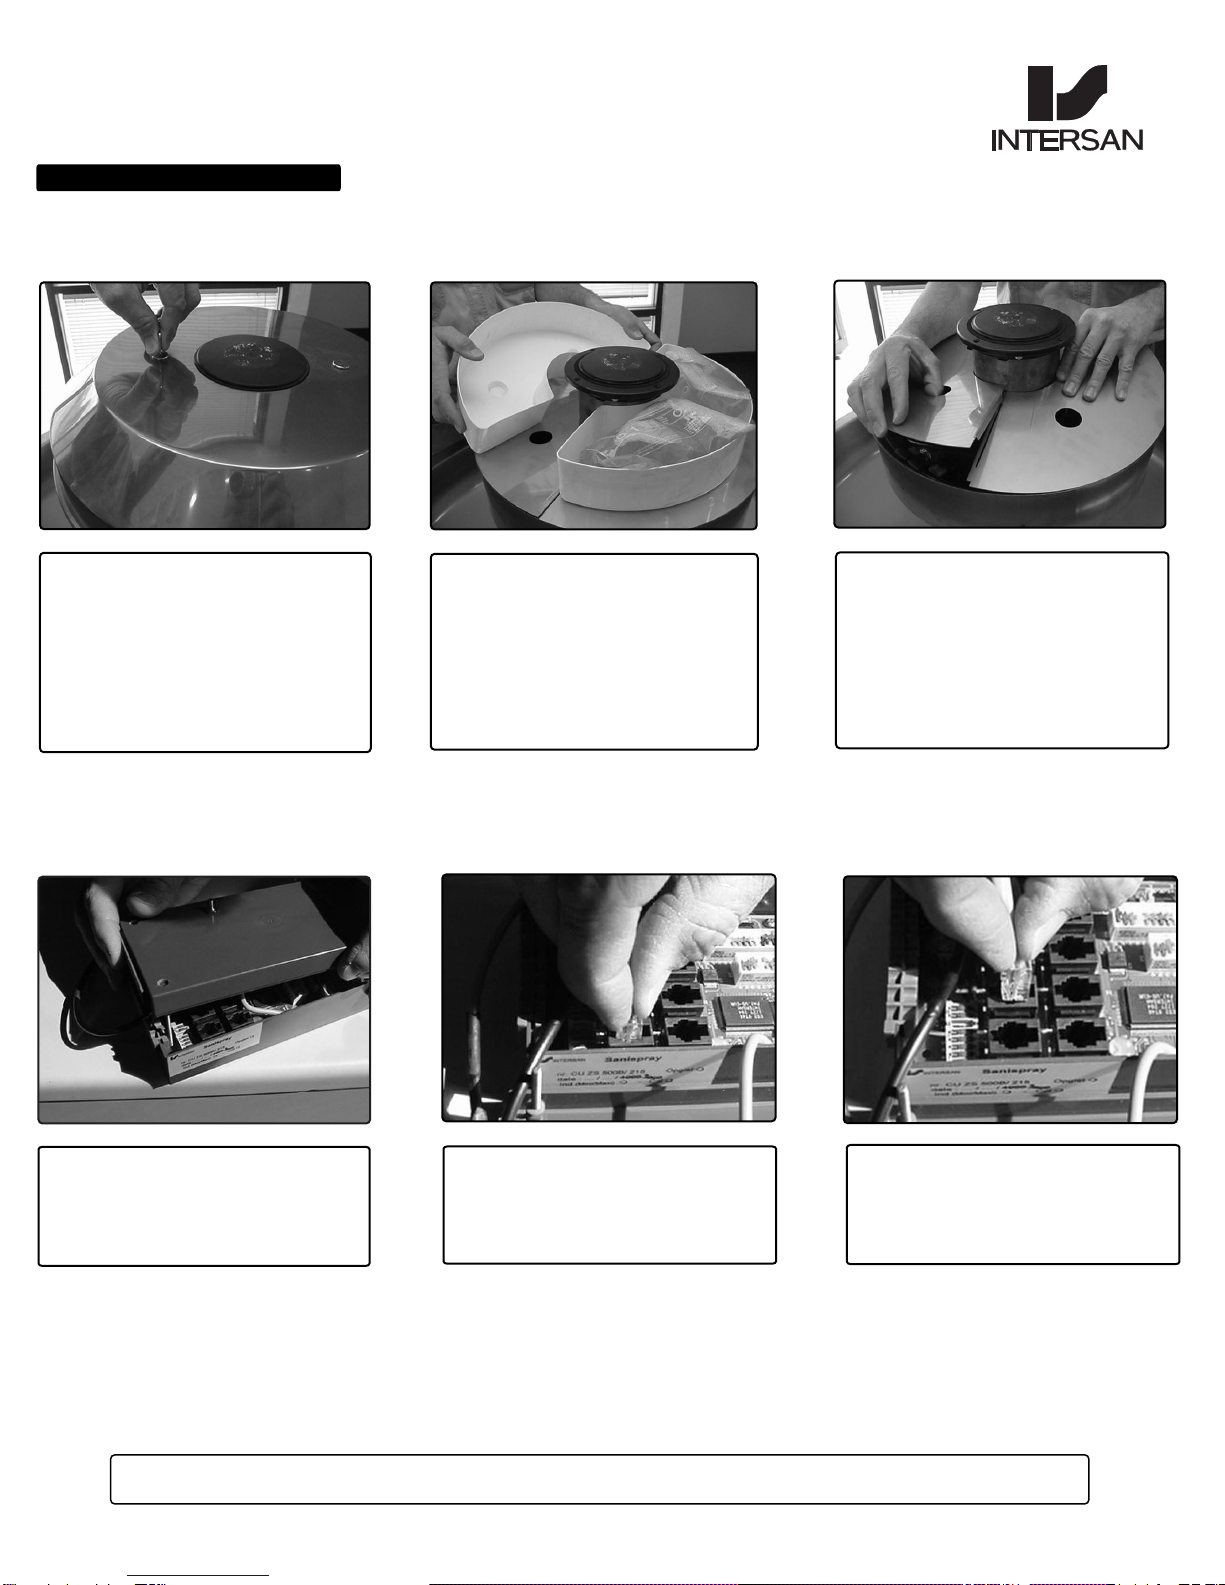
PROBLEM 1: UNIT CONTINUOUSLY BEEPS WHEN ACTIVATED
Check and Replace Battery-Pack
Step 1
Open the water-distribution head by using
the supplied key and turning the two locks
counterclockwise. Gently lift and remove the
cover
Step 2
Disconnect the battery by depressing the
battery terminal lock and gently pulling the
two halves apart.
Step 3
a. Test the battery for the proper 10.8
voltage.
b. Look for possible loose leads or
connections to cause low voltage.
c. Replace the battery. Reverse steps 1
& 2. Push the reset button and wait 35
seconds.

Check if:
INTERSAN MANUFACTURING COMPANY
1748 W. Fillmore St. - Phoenix, Arizona 85007 - Tel 602.254.3101 - Fax 602.254.1776 - www.IntersanUS.com
NOTE: THIS INFORMATION IS SUBJECT TO CHANGE WITHOUT FORMAL NOTICE REV1.2
- 2 -
PROBLEM 2: INSUFFICIENT or NO WATER FLOW WITH CLICKING SOUND
1. Check Sensor Shipping Covers
1. Ball valves and angle stops are in the open position.
2. Y-strainer screens (P3070) and strainer screens at the inlet of the solenoid valves assembly
are clean and debris free.
3. Supply lines are clean and pressure requirements are within the parameters.
4. Thermostatic mixing valve has the correct supply connected to the hot and cold inlets.
5. The check valves on the elbows (P2824) of the thermostatic mixing valve are clean.
PROBLEM 3: INSUFFICIENT or NO WATER FLOW WITHOUT CLICKING SOUND
Check if the shipping covers on the sensors are still installed. If so remove the gold opaque lens cover from the bottom of the
sensor lens.
If this doesn't help:
2. Checking the Battery
Follow steps 1,2 & 3 from the
battery pack replacement
(problem 1 - page 1)
If this doesn't help go to 3. Check Sensor
Sanispray®- Individual Sensor Operated
INTERSAN®REPAIR GUIDE
INTERSAN MANUFACTURING COMPANY
1748 W. Fillmore St. - Phoenix, Arizona 85007 - Tel 602.254.3101 - Fax 602.254.1776 - www.IntersanUS.com
NOTE: THIS INFORMATION IS SUBJECT TO CHANGE WITHOUT FORMAL NOTICE REV1.2
- 3 -
1. Check Sensor
Step 6
Install the adjacent working sensor in the
non working position.
Step 5
Remove the defective sensor by depressing
the phone jack tab and gently pulling the
wire out of the slot
Step 4
Remove the four screws from the
microprocessor and separate lid from the
base
The problem should travel with the nonworking sensor and the adjacent sensor should activate the solenoid valve. Replace the defective sensor with a new
one
If not continue with 4. Check Solenoid Valve
To reinstall, reverse the above process
Step 3
Separate soap shelf halves by raising the
opposite ends and remove them
Step 2
Remove optional soap trays and soap bags
if supplied by manufacturer.
Step 1
Open the water-distribution head by using
the supplied key and turning the two locks
counterclockwise. Gently lift and remove the
cover
3. Check Sensor
Sanispray®- Individual Sensor Operated
INTERSAN®REPAIR GUIDE

Check if:
INTERSAN MANUFACTURING COMPANY
1748 W. Fillmore St. - Phoenix, Arizona 85007 - Tel 602.254.3101 - Fax 602.254.1776 - www.IntersanUS.com
NOTE: THIS INFORMATION IS SUBJECT TO CHANGE WITHOUT FORMAL NOTICE REV1.2
- 4 -
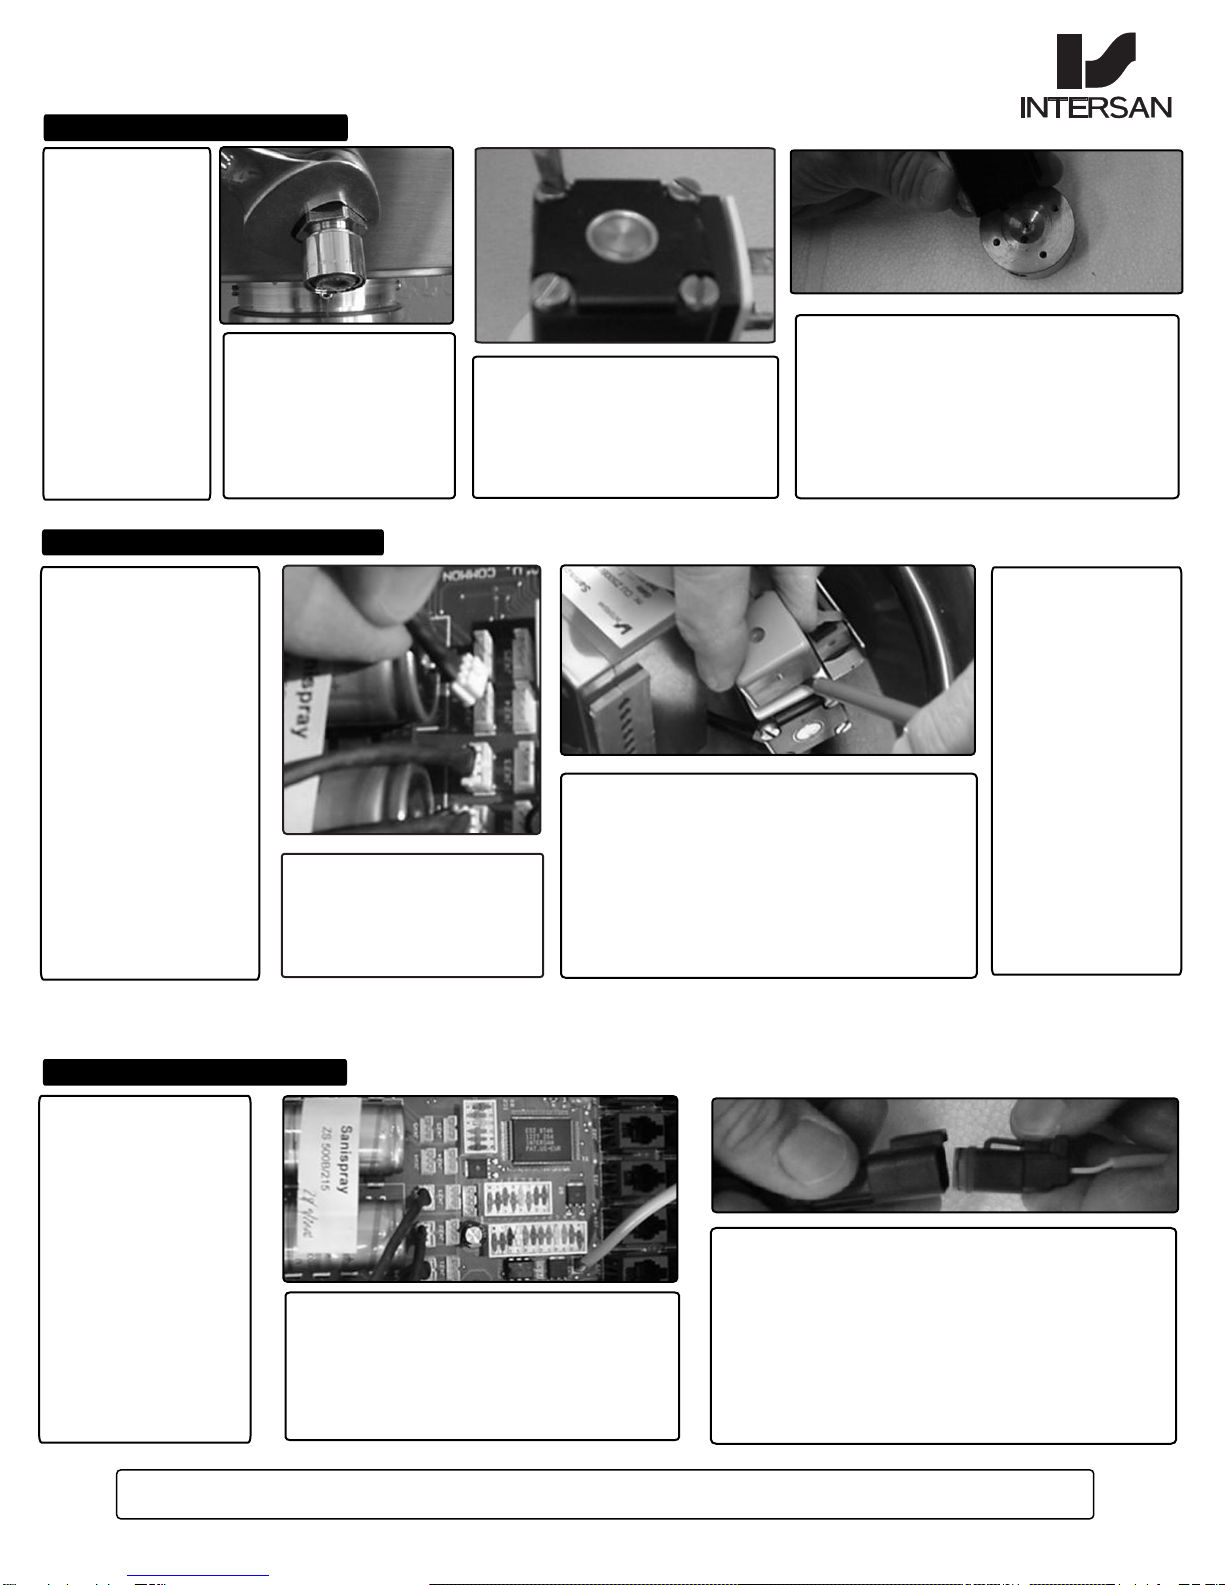
1. Check Sensor
4.1. Solenoid Valve Cleaning
1. Check Sensor
Step 1
Separate the electrical
part of the valve from
the water part.
This is described below
in the solenoid valve
replacement (steps 1,2
& 3).
Step 2
Remove the core and the core
spring from the core housing.
Clean core, core spring, core
housing and water outlet from the
solenoid valve.
Step 3
Replace core spring inside
core, and reposition both
elements inside the core
housing (core spring first).
Step 4
Place back O-ring, which joins the
electrical and the water part of the
valve, in its groove around the core
housing, and reposition the electrical
part on the water part of the valve.
Insert 4 round head solenoid screws
and tighten firmly.
4. Check Solenoid Valve
Step 3
Remove the solenoid valve leads
from the solenoid valve by gently
pulling straight up with pliers or
prying up between the solenoid
valve and the solenoid lead. Use
caution not to damage the gasket
between the valve and the wire.
Step 2
Remove the solenoid valve lead from
the suspected bad valve and an
adjacent working valve. This is done
by removing the screws from the
center of the solenoid valve leads at
the solenoid valve
Step 1
Follow steps 1, 2 & 3 from
the sensor checking
Step 4
Swap the two leads for
determining if the problem is
the valve or the wire.
Step 5
a. Activate the appropriate sensor for testing the valve status
b. If the above sequence determines the solenoid valve is inoperative then the valve must be cleaned or replaced
After the valve is cleaned reinstall in reverse order. Be sure the lead is facing the brass !
Sanispray®- Individual Sensor Operated
INTERSAN®REPAIR GUIDE
Check if:
INTERSAN MANUFACTURING COMPANY
1748 W. Fillmore St. - Phoenix, Arizona 85007 - Tel 602.254.3101 - Fax 602.254.1776 - www.IntersanUS.com
NOTE: THIS INFORMATION IS SUBJECT TO CHANGE WITHOUT FORMAL NOTICE REV1.2
- 5 -
4.3. Replace Solenoid Lead
1. Check Sensor
Step 1
Follow steps 1,2,3 & 4
from the sensor
checking.
Step 3
Remove the screws from the center of the solenoid
valve lead at the solenoid valve. Unplug the solenoid
valve leads from the solenoid valve by gently pulling
straight up with pliers or prying up between the
solenoid valve and the solenoid lead
Step 4
Use caution not to
damage the gasket
between the valve
and the lead.
After the lead is
replaced, reinstall in
reverse order
If the problem is not solved by checking the solenoid valve, check the microprocessor
5. Check the microprocessor
Step 1
Follow steps 1,2,3 & 4
from the sensor
checking.
Step 2
Check that all the connections are secure.
Step 3
Disconnect the battery by depressing the battery
terminal lock and gently pulling the two halves
apart.
Make note that when reinstalling the sensor and
solenoid wires it is imperative that each valve and
sensor is paired up correctly.
Step 2
Unplug the solenoid valve lead
from the microprocessor
4.2. Solenoid Valve Replacement
Step 4
Turn the brass water body counter clockwise
and remove any remaining thread sealant.
After the valve is replaced reinstall in the
reverse order making sure the brass water
body is properly sealed to the manifold.
Step 3
Remove the four screws that travel
thru the coil into the brass water
body.
Step 1
Follow steps 1,2
& 3 from the
solenoid valve
checking (page 3
of the ISO
trouble shooting
guide)
Step 2
Loosen and remove tie nut
that fixes the valve, at the
bottom of the spray
nozzles.
Sanispray®- Individual Sensor Operated
INTERSAN®REPAIR GUIDE

INTERSAN MANUFACTURING COMPANY
1748 W. Fillmore St. - Phoenix, Arizona 85007 - Tel 602.254.3101 - Fax 602.254.1776 - www.IntersanUS.com
NOTE: THIS INFORMATION IS SUBJECT TO CHANGE WITHOUT FORMAL NOTICE REV1.2
- 6 -
PROBLEM 3: INSUFFICIENT or NO WATER FLOW WITHOUT CLICKING SOUND
... Replace the Micro-Processor
Step 1
Disconnect the battery terminal
Unplug the solenoid valve wires from
the microprocessor by gently pulling
them straight out.
Use caution not to damage the
connection for the wire.
Step 2
Remove the sensors by depressing the
phone jack tabs and gently pulling the
wires out of the slots.
Step 3
Reverse the above order to reinstall,
making sure the sensor wires and the
solenoid wires correspond for each
station.
Push the reset button and wait 35 seconds
IF ALL OF THE ABOVE FIELD DIAGNOSTICS HAVE DETERMINED THE NECESSITY TO REPLACE THE
MICROPROCESSOR ...
PROBLEM 4: CONTINUOUS WATER FLOW
Check Solenoid Valve
In some cases the filters may not be enough to eliminate the debris from jamming the solenoid valve in the open or closed position.
In this case clean the solenoid valve (page 4 of the trouble shooting guide).
PROBLEM 5: REPETITIVE WATER FLOW
Check the Sensor
Some times when a unit has a bad sensor the water system will activate without someone present. To test this in the field it is necessary to
exchange the faulty station with one that is working correctly.
In this case follow the procedure on page 2 (check sensor) and replace the nonworking sensor with a new one.
NOTE : In the above case the two components that are NOT defective are the battery and the solenoid valve.
- The battery because it has enough power to cycle the solenoid valve.
- The solenoid valve because it opens and closes completely.
Sanispray®- Individual Sensor Operated
INTERSAN®REPAIR GUIDE

Sanispray®- Individual Sensor Operated
INTERSAN®REPAIR GUIDE
IF THIS TROUBLESHOOTING DOESN'T SOLVE YOUR PROBLEM ...
1. You should be able to solve most electronic problems with this guide.
If the troubleshooting doesn't solve your problem, then please
contact Intersan at 1-800-999-3101.
2. In order to solve your problem quickly it is necessary to provide us
with as much information as possible.
- Serial number of Microprocessor
- Color of battery connector
- Date of installation
- Environment where unit is installed
- How the unit is used
3. To order replacement parts or to receive parts prices, please contact
your local rep.
4. Use only Intersan parts. The use of repair parts that are not
manufactured by Intersan will void any warranty.
5. When your unit has an integral electronic soap dispenser: use only
Intersan soap. The use of any other soap will void any warranty.
NOTE: THIS INFORMATION IS SUBJECT TO CHANGE WITHOUT FORMAL NOTICE REV1.2
- 7 -
INTERSAN MANUFACTURING COMPANY
1748 W. Fillmore St. - Phoenix, Arizona 85007 - Tel 602.254.3101 - Fax 602.254.1776 - www.IntersanUS.com
Other Intersan Plumbing Product manuals

Popular Plumbing Product manuals by other brands

DURAVIT
DURAVIT DuraSystem WD5007 013 000 operating instructions

Swiss Madison
Swiss Madison Vivante SM-STS01 instructions

Omega Engineering
Omega Engineering DPG1100AD Series instruction sheet

Hans Grohe
Hans Grohe AXOR Carlton 17454XX1 Installation instructions / warranty

METHVEN
METHVEN FLEXISPRAY quick start guide

Hans Grohe
Hans Grohe Tango C 06040000 Specifications


 Installation instructions & user guide")


