Intertec Data Systems Barton 95146 Original instruction manual

SAVE THIS MANUAL: KEEP THIS MANUAL FOR SAFETY WARNINGS, PRECAUTIONS, ASSEMBLY,
OPERATING, INSPECTION, MAINTENANCE AND CLEANING PROCEDURES. WRITE THE PRODUCT’S
SERIAL NUMBER ON THE BACK OF THE MANUAL NEAR THE ASSEMBLY DIAGRAM (OR MONTH
AND YEAR OF PURCHASE IF PRODUCT HAS NO NUMBER)
OWNER’S MANUAL AND SAFETY INSTRUCTIONS
FOR QUESTIONS PLEASE CALL OUR CUSTOMER SUPPORT: (909) 628 0880 MON-FRI 9AM TO 3PM PST
33” ELECTRIC FIREPLACE 3D INSERT
ITEM: 95146

IMPORTANT SAFETY INFORMATION
GENERAL SAFETY WARNINGS
Read all safety warnings and instructions. Failure to follow the warnings and instructions may
result in electric shock, re and/or serious injury. Save all warnings and instructions for future
reference.
SAFETY
WARNING DO NOT use this product or any available optional equipment without rst completely reading
and understanding these instructions and any additional instructional material such as owner’s manuals,
service manuals or instruction sheets supplied with this product or optional equipment. When using an
electrical appliance, basic precautions MUST be followed to reduce the risk of re, electric shock and
personal injury.
1
DO NOT switch the appliance on until it is properly installed as described in this manual.
DO NOT leave the replace unattended during use.
DO NOT operate the replace if it has a damaged cord or if it has any other malfunction.
DO NOT run the cable under carpets or rugs.
DO NOT allow the mains cable to hang over any sharp edges or hat surfaces.
A dedicated power circuit is recommended for this unit. Additional electric appliances on the same circuit
may exceed the amperage rating for the circuit.
Periodically check the cord for damage. NEVER use the appliance if there is any damage.
DO NOT insert or allow any objects such as a screw driver or similar object into the air outlet or other
ventilation of the replace. This may cause re and/or electric shock.
Risk of burns. This replace is HOT when in operation and heating element is ON. Power to the replace
should be turned off and the replace allowed to cool before servicing. To disconnect power to the
replace, turn controls to off, then remove plug from outlet.
Young children should be carefully supervised when they are in same room with replace. Toddlers, young
children and others may be susceptible to accidental contact burns. A physical barrier is recommended
if there are at risk individuals in the house. To restrict access to the replace, install an adjustable safety
gate to keep toddlers, young children and other at risk individuals away from the replace and hot
surfaces.
Clothing and other ammable material should not be placed on or near the replace.
Due to high temperatures, the replace should be located out of trafc and away from furniture and
draperies.
It is imperative that the control compartments, circulating blower, and its passageway is the replace
is kept clean.
Under no circumstances should this replace be modied.
Any new wiring must be done in compliance with local and national codes and other applicable regulations
in order to reduce the risk of re, electric shock or other injuries. It is strongly recommended that a
licensed electrician complete this work.
DO NOT use the replace if any part has been under water.

2
IMPORTANT SAFETY INFORMATION
DO NOT operate the replace with the glass panel removed, cracked or broken.
Servicing should only be done while the replace is disconnected from the power outlet.
Unplug replace if not being used for an extended period of time.
DO NOT use outdoors.
NEVER locate replace where it may fall into a bathtub or other water container.
Ensure clearances to combustibles are maintained when building a mantel or shelves above the replace.
Elevated temperatures on the wall or in the air above the replace can cause melting, discoloration or
damage to the decorations, a TV or other electronic components.
Repairs to electrical appliance should be made by a qualied technician only.
Overheating will result if it is accidentally covered.
NEVER immerse the product in water or other liquids.
WARNING: DO NOT open the back panel of the insert unless the power has been shut off and the
insert has been unplugged.
WARNING: Discontinue use of the electric replace if it has any of the following: Water damage, if the
insert is dented or bent, if the power cord is damaged or hot to the touch or if the unit smokes or smells
like smoke.
DO NOT use this unit for drying any wet objects such as clothes, etc.
This heater has hot and arcing or sparking parts inside. DO NOT use it in areas where gasoline, paint of
ammable liquids are used or stored.
Avoid the use of an extension cord, which may overheat and possibly cause a re. However if an
extension cord must be used, the cord must be a three-wire cord N. 14AWG minimum size and rated
not less than 1875 watts with a grounded plug. This extension cord should meet the National Electric
Code, ANSI/NFPA 70.
When transporting or storing the unit, keep it in a dry location, free from dust, excessive vibration or
other factors, which may damage the unit.
SAVE THESE SAFETY PRECAUTIONS.
Under no circumstance should this appliance be modied.

3
FEATURES
This electric rebox can heat up to an impressive 400 square feet. 33” curved electric rebox features a
realistic wood burning ame effect and simulated brick refractory as well as accent lights to enhance the
ame. Enjoy all the comforts of a replace ame without the maintenance or cleanup. This replace insert
unit is a cozy lighting addition for select TV stands and entertainment center units.
33” Curved Electric Fireplace Insert Wood Fireplace Wall Mounted
Adjustable Temperature with Remote Control
SPECIFICATIONS

4
INSTALLATION
This heater is for use on 120 volts. The cord had a plug as shown. An adapter as shown is available for
connecting three-blade grounding-type plugs to two-slot receptacles. The green grounding lug extending
from the adapter must be connected to a permanent ground such as a properly grounded outlet box. The
adapter should not be used if a three-slot grounded receptacle is available. Note: A grounding adapter is
prohibited in Canada.
GROUNDING
LOCATING YOUR FIREPLACE
When choosing a location for your new replace,
ensure the general instructions are followed. Also,
for best operation, install the replace out of direct
sunlight.
DO NOT STORE OR USE GASOLINE OR OTHER
FLAMMABLES IN THE VICINITY OF THIS OR ANY
OTHER APPLIANCE.
A 15 Amp, 120 Volt, 60 Hz circuit with a properly grounded outlet is required to operate this appliance.
Preferably, the replace insert will be on a dedicated circuit as other appliances on the same circuit may
cause the circuit breaker to trip or the fuse to blow when the heater is in operation. The unit comes standard
with a 6ft long, 2-wire cord, exiting out of the replace insert. Plan the installation to avoid the use of an
extension cord. Always plug heaters directly into a wall outlet/receptacle. NEVER use with an extension
cord or relocatable power tap (outlet/power strip).
ELECTRICAL CONNECTION
WARNING: Electrical outlet wiring must comply with local building codes and other applicable regulations
to reduce the risk of re, electrical shock and/or injury to other persons.
WARNING: DO NOT use this replace if any part of it has been under water. Immediately call a qualied
technician to inspect the replace and replace any part of the electrical system which has been exposed to
water.
PLANNING INSTALLATION
To avoid scratching the nish of the replace, assemble the product on a soft, non-abrasive surface. Assembly
may take more than one person.
DIMENSION SPECIFICATIONS
A
D
B
C
FG
H

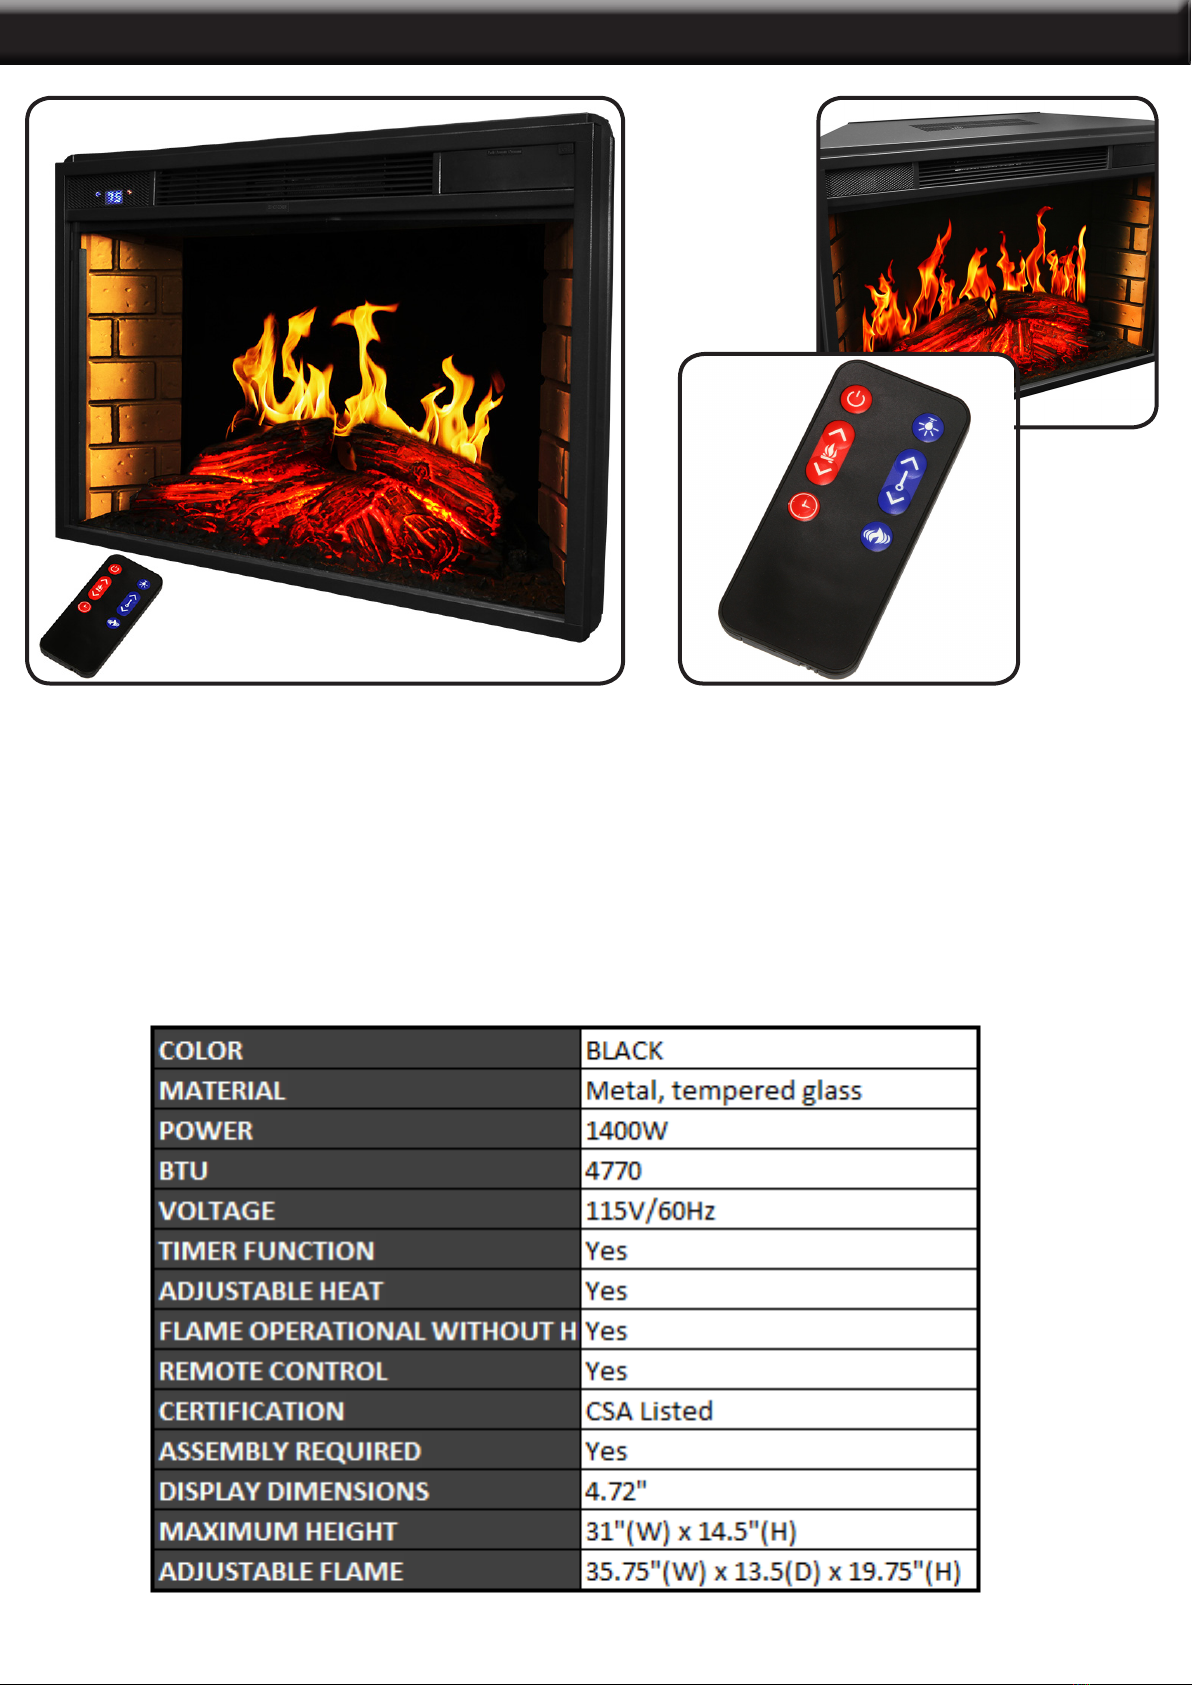
INSTALLATION and OPERATION
REMOTE CONTROL
The infrared remote control relies on a line of sight and must be pointed at the ame screen of the replace to
work. The remote control unit has the controls required to turn ON/OFF both the main power and the heater. If
you prefer to use the touchpad control on the unit, simply open the control panel cover to access the manual
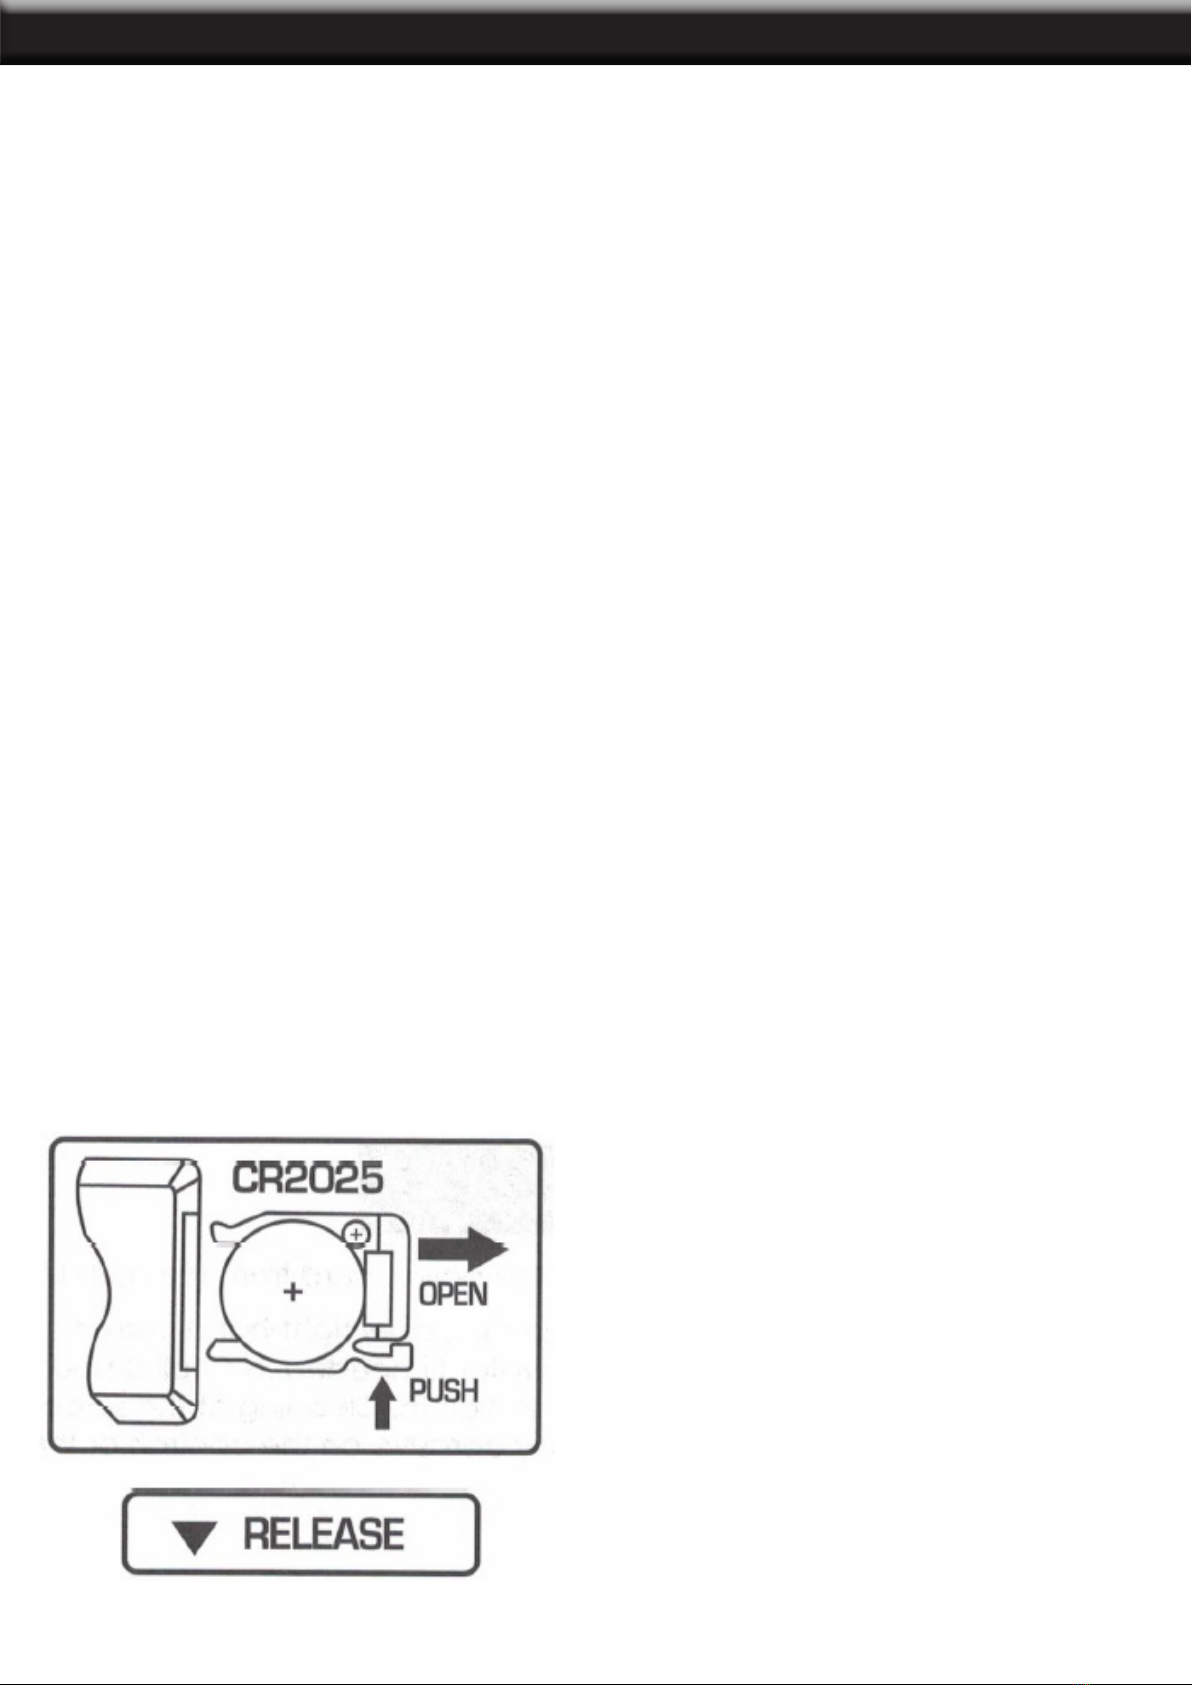
buttons. NOTE: The plastic tab inside the battery compartment must be removed before the remote control
will operate.
CONTROL PANEL
1. MAIN POWER BUTTON: This button supplies power to all the functions of the
replace. The main power button must be on for any of the functions to work.
2. DOWN LIGHT BUTTON: This button controls the interior brightness. Turning the
down light button ON illuminates the interior of the rebox.
3. HEATER CONTROL BUTTON: This button controls the heater and the 14
temperature modes from 62 °F to 86 °F. When the heater is rst turned on, it will be
at the lowest temperature setting. Each time the heater control button is pressed, the
temperature set point increases 2 °F, allowing you to adjust the ambient temperature
up to 86 °F. The replace will remember the last heat setting and will start at that
setting, unless the power to the unit has been interrupted.
4. FLAME CONTROL BUTTON: This button controls the brightness of the ame effect with settings for high,
medium and low. When the replace is rst turned on, the ame will come on at the brightest setting. The
replace will remember the last ame setting used unless the power to the unit has been interrupted. Each
time the ame button is depressed, the ame brightness will decrease.
5.TIMER BUTTON: This button controls the timer ON/OFF and 8-time settings from 1-8hours. When the
timer is rst turned on, it will come on at the shortest time setting (1 hour). Each time the timer button is
depressed, the time will increase by one hour, up to 8 hours. Once the time set expires, all replace functions
will be automatically turned off.
6. FAHRENHEIT/CELSIUS BUTTON: This button displays F (Fahrenheit) or C (Celsius) depending on
how the temperature mode is set. When the replace is rst turned on, the Fahrenheit temperature will be
displayed. To switch from “F” to “C” (Celsius), or vise-versa, when heater is on, hold the HEATER CONTROL
button for 10 seconds. The replace will remember the last temperature mode setting and in later use, the
display will start at that setting unless power to this unit has been interrupted.
7. TEMPERATURE/TIMER DISPLAY: This LED display shows the set point for the temperature and timer
functions. When either of these functions is activated, the display reects the set point for ve seconds and
then fades to black. Any change in the set point of the temperature or timer will reactivate the display, which
again fades after ve seconds.
5

MAINTENANCE
DANGER: Disconnect power before servicing the heater.
WARNING: Any electrical re-wiring of this appliance must be done by a qualied electried. This wiring must
be done in accordance with local codes and/or in Canada with the current CSA C22.1 Canadian Electrical
Code, and for US installations, the National Electrical Code ANSI/NFPA NO 70.
WARNING: If repairing or replacing any electrical component or wiring, the original wire routing, color coding
and securing locations must be followed.
GLASS INFORMATION
1. Under no circumstances should this product be operated with a broken or chipped glass panel.
2. DO NOT strike or slam the glass.
3. DO NOT use abrasive cleansers to clean the glass. Make sure the glass is cool to the touch before
cleaning.
4. This product uses tempered glass. Replacement of the glass supplied by the manufacturer should be
done by qualied personnel only.
MAINTENANCE OF THE MOTORS
1. ALWAYS disconnect the appliance from the main power supply and allow it to cool before any servicing.
2. This motors used on the fan heater and ame blower are pre-lubricated for extended bearing life and
require no further lubrication. However, periodic cleaning/vacuuming of the appliance around the air intake
and exhaust, as well as the fan heater is recommended. For heavy or continuous use, periodic cleaning
must be done more frequently. If the heater blows alternating cold and warm air, check the fan for free
movement and for debris restricting air ow. If the fan does not move freely, the unit be turned off and fan
replacement immediately in order to prevent further damage to the unit.
BATTERY REPLACEMENT
Battery replacement procedure: Size CR2025
DANGER: This product contains batteries. If swallowed, it can cause severely injury or death. Seek medical
attention immediately.
6

MAINTENANCE and TROUBLESHOOTING
CIRCUIT DIAGRAM
WARNING: Any electrical re-wiring of this appliance must be done by a qualied electrician. This wiring must
be done in accordance with local codes and or/in Canada with the current CSA C22.1 Canadian Electrical
Code, and for US installations, the National Electrical Code ANSI/NFPA NO 70. If repairing or replacing any
electrical component or wiring, the original wire routing, color coding and securing locations must be followed.
CARE AND CLEANING
1. Always turn the heater OFF and unplug the power cord from the outlet before cleaning.
2. Cleaning of the control panel, located on the upper right-hand corner of the replace is to be done only
using a soft cloth, slightly dampened with water (if needed, a small amount of dish soap can be added to the
water) and dried using a clean, dry soft cloth. Cleaning of the screen diffuser is to be done using only water
and lint free cloth. DO NOT use any abrasive on the controls or the diffusing screen.
7

8
THE MANUFACTURER AND/OR DISTRIBUTOR HAS PROVIDED THE PARTS LIST AND ASSEMBLY
DIAGRAM IN THIS MANUAL AS A REFERENCE TOOL ONLY. NEITHER THE MANUFACTURER OR
DISTRIBUTOR MAKES ANY REPRESENTATION OR WARRANTY OF ANY KIND TO THE BUYER THAT
HE OR SHE IS QUALIFIED TO MAKE ANY REPAIRS TO THE PRODUCT, OR THAT HE OR SHE IS
QUALIFIED TO REPLACE ANY PARTS OF THE PRODUCT. IN FACT, THE MANUFACTURER AND/OR
DISTRIBUTOR EXPRESSLY STATES THAT ALL REPAIRS AND PARTS REPLACEMENTS SHOULD BE
UNDERTAKEN BY CERTIFIED AND LICENSED TECHNICIANS, AND NOT BY THE BUYER. THE BUYER
ASSUMES ALL RISK AND LIABILITY ARISING OUT OF HIS OR HER REPAIRS TO THE ORIGINAL
PRODUCT OR REPLACEMENT PARTS THERETO, OR ARISING OUT OF HIS OR HER INSTALLATION
OF REPLACEMENT PARTS THERETO.
Record Product’s Serial Number Here:
Note: If product has no serial number, record month and year of purchase instead.
Note: Some parts are listed and shown for illustration purposes only and are not available individually
as replacement parts.
PLEASE READ THE FOLLOWING CAREFULLY
PRODUCT MADE IN CHINA
Table of contents
Popular Indoor Fireplace manuals by other brands

Solution FIres
Solution FIres SLE55i instruction manual

Aurora
Aurora Archer IS760 Installation & operating instructions

Desa
Desa VT32P Series OWNER'S OPERATION AND INSTALLATION MANUAL

Dimplex
Dimplex Shaftsbury SHA20 Installation and operating instructions

Bali
Bali SRGF11605 user manual

BFT
BFT Beebox instruction manual

superior fires
superior fires F500384 Installation & user's instructions

Napoleon
Napoleon VECTOR LHD45 quick start guide

Heatilator
Heatilator CONSTITUTION C-40 owner's manual

White Mountain Hearth
White Mountain Hearth DVTL27FP90N-1 Installation instructions and owner's manual

Quadra-Fire
Quadra-Fire QV36DB Installer's guide

Kemlan
Kemlan Super Nova Freestanding Series II Installation & operating instructions