Intertek Cleanica 360 JJ-SC-005B User manual
When using electrical appliances, basic safety precautions
should always be followed. Do not use the Cleanica 360™
until you have read this manual thoroughly.
Visit TristarCares.com for tutorial
videos, product details, and more.
Guarantee Information Inside
MODELS: JJ-SC-005B - EL20003
Save These Instructions – For Household Use Only
Owner’s Manual

Cleanica 360
BEFORE YOU BEGIN
Thank you for choosing the Cleanica 360. Before
you begin, it’s very important that you read this entire
manual, making certain that you are totally familiar
with this appliance’s operation and precautions.

Table of Contents
IMPORTANT SAFEGUARDS 4
Parts & Accessories 6
Choosing the Right Accessory 8
Assembly 10
Instructions For Use 12
Steam Cleaning Tips 13
Cleaning & Maintenance 14
Troubleshooting 16
Product Disposal 17
Money-Back Guarantee 18

4Cleanica 360
™
IMPORTANT SAFEGUARDS
SAFETY GUIDELINE DEFINITIONS
It is important for you to read and understand this manual.
The information it contains relates to protecting YOUR SAFETY
and PREVENTING PROBLEMS. The symbols below are used
to help you recognize this information.
DANGER: Indicates an imminently hazardous situation
that, if not avoided, will result in death or serious injury.
WARNING: Indicates a potentially hazardous situation
that, if not avoided, could result in death or serious injury.
CAUTION: Indicates a potentially hazardous situation that,
if not avoided, might result in property damage.
RESIDUAL RISKS:
Additional residual risks might arise when using the appliance
that might not be included in the enclosed safety warnings.
These risks can arise from misuse, prolonged use, etc. Even
with the application of the relevant safety regulations and the
implementation of safety devices, certain residual risks cannot
be avoided. These include:
• Injuries caused by touching any moving parts.
• Injuries caused by touching any hot parts.
• Injuries caused when changing any parts or accessories.
• Injuries caused by prolonged use of the appliance. When
using any appliance for prolonged periods, ensure that you
take regular breaks.
1. Read and follow all instructions carefully.
2. For indoor use only.
3. This appliance is not intended for use by persons with
reduced physical, sensory, or mental capabilities or lack
of experience and knowledge unless they are under the
supervision of a responsible person or have been given
proper instruction in using the appliance. This appliance is
not intended for use by children.
4. Children should be supervised to ensure that they do not
play with the appliance.
5. WARNING: This electrical appliance contains a heating
function. Surfaces, including surfaces other than the
surfaces intended to be cleaned by this appliance,
can develop high temperatures. Since temperatures
are perceived differently by different people, the this
equipment be used with
6. CAUTION: This appliance should only be touched at
its intended handles and gripping surfaces, and heat
protection, such as gloves, should be used. Surfaces other
than the intended handles/gripping surfaces should be
given sufcient time to cool down before being touched.
7. WARNING: Danger of scalding.
8. Steam is hot and can cause burns. Do not direct steam at
people or animals.
9. To avoid electrical shock, do not direct steam at electrical
appliances or electrical outlets.
10. Do not expose to rain.
11. Do not immerse the appliance in the water. Do not use in
swimming pools containing water.
12. Do not leave the appliance unattended. Keep children
away from the appliance while in use.
13. Do not leave the appliance connected to an electrical
outlet when not in use.
WARNING
When using electrical appliances, always follow
these basic safety precautions.
PREVENT INJURIES! – CAREFULLY READ
ALL INSTRUCTIONS BEFORE USE!
Cleanica 360
™
5
IMPORTANT SAFEGUARDS
14. This appliance has a polarized plug (one blade is wider
than the other). To reduce the risk of electric shock, this
plug is intended to t in a polarized outlet only one way.
If the plug does not t fully in the outlet, reverse the plug.
If the plug still does not t, contact a qualied electrician.
Do not modify the plug in any way.
15. If the power supply cord is damaged, it must be replaced
by the manufacturer, its service agent, or a similarly
qualied person in order to avoid a hazard.
16. The appliance must be unplugged after use and before
cleaning or maintenance of the appliance. Always
disconnect the appliance from the socket by pulling
the plug – never by pulling the power cord. Keep the
appliance’s cord away from heat, oil, and sharp edges.
17. Do not handle this appliance with wet hands.
18. Do not pull or carry this appliance by its cord, use the cord
as a handle, close a door on the cord, pull the cord around
sharp corners, or expose the cord to heated surfaces.
19. Not for space heating.
20. Do not use appliance in an enclosed space lled with
vapor given off by oil-based paint thinner, some
moth-proong substances, ammable dust, or other
explosive or toxic vapors.
21. Do not use on leather; waxed or polished furniture or
oors; synthetic fabrics; velvet; or other delicate, steam-
sensitive materials.
22. Do not use on any unsealed hard oor surfaces.
Additionally, on surfaces that have been treated with wax
or some no-wax oors, the sheen may be removed by
the heat and steam action. It is always recommended to
test an isolated area of the surface to be cleaned before
proceeding. Check the use and care instructions from the
oor manufacturer.
23. Liquid or steam must not be directed toward equipment
containing electrical components, such as the interior
ofovens.
24. Never put de-scaling, aromatic, alcoholic, or detergent
products into this appliance because they may damage
the appliance or make it unsafe for use.
25. If the circuit breaker trips while using the steam function,
discontinue product use immediately and contact
customer service using the information on the back of this
manual. Beware of the risk of electrical shock if the circuit
breaker trips while using this appliance.
26. The appliance emits very hot steam to sanitize the area of
use. This means that the steam head and cleaning pads
get very hot during use. Use caution when handling the
appliance during use.
27. CAUTION: Always wear suitable shoes when using this
appliance and when changing the accessories on the
appliance. Do not wear slippers or open-toed footwear
when using the appliance.
28. The lid may become hot during use.
29. Care should be taken when using this appliance. Do not
touch any parts that may become hot during use.
30. Make sure the microber cleaning pad is installed
correctly before use.
SAVE THESE INSTRUCTIONS – FOR HOUSEHOLD USE ONLY
This product can expose you to Di(2-ethylhexyl)phthalate, which is
known to the State of California to cause cancer and birth defects
or other reproductive harm. For more information go to www.
P65Warnings.ca.gov.
For California Residents
WARNING:

6Cleanica 360
™
Parts & Accessories
MAIN BODY
1. HANDLE
2. CORD HOLDER
3. HANDLE CONNECTOR
4. ON/OFF BUTTON
(LATCH LOCK)
5. WATER TANK CAP
6. WATER TANK BUTTON
7. WATER TANK
8. STEAM CONTROL KNOB
9. STEAM HEAD SPINDLE
10. POWER CORD
11. WATER INLET
12. INDICATOR LIGHT
13. MAIN BODY STEAM
BUTTON
14. HANDLE TUBE BUTTON
NOTE: Unpack all listed contents
from the packaging. Contents
vary by model. Please remove any
clear or blue protective lm on the
components before use.
CAUTION: The appliance may get hot during use. Be careful not to touch the appliance while
in use. Keep the appliance away from other objects.
IMPORTANT: Please make sure that your Cleanica 360 has been shipped with
the components that you ordered (some accessories may be sold separately). Check everything
carefully before use. If any part is missing or damaged, do not use this product. Contact the
shipper using the customer service number located on the back of this manual.
1
3
2
4
5
6
7
8
9
10
11
12
13
14

Cleanica 360
™
7
Parts & Accessories
15 16 17 18
19 20 21 22
23 24 25 26
ACCESSORIES
15. MAIN BODY
16. HANDLE TUBE
17. HANDLE
18. WINDOW SQUEEGEE
19. SMALL SCRUB BRUSH
20. MEDIUM SCRUB BRUSH
21. ACCESSORY ADAPTOR
22. ANGLED NOZZLE
23. GROUT CLEANING TOOL
24. SCRAPING TOOL
25. MEASURING CUP
26. CLEANING PAD
27. GARMENT STEAMER
CLOTH
28. STEAM HEAD
29. CARPET GILDER
27 28 29
NOTE: Some accessories
may be sold separately.

8Cleanica 360
™
Accessory
Required Accessories That Must Be
Connected to the Accessory Adaptor Suggested Use
Window Squeegee/
Garment Steaming Tool
Use the Window Squeegee for
shower glass doors, mirrors, and glass for
removing soap scum and grime.
Use the Garment Tool for removing
wrinkles from garments, steaming draperies,
tablecloths, and more.
Small and Medium
Scrub Brushes
Use the Scrub Brushes to clean ovens,
microwaves, stove tops, showers,
bathtubs, faucet xtures, tile, grout, toys,
refrigerators, and more.
Angled Nozzle
Use the Angled Nozzle to clean
stove tops, around faucet edges,
grout, microwaves, sinks, hard to reach
areas, and more.
Grout Cleaning Tool
Use the Grout Cleaning Tool
to clean grout lines
(sanded or unsanded).
Choosing the Right Accessory
Before cleaning any electrical appliance, check and follow the appliance manufacture’s cleaning guidelines.
NOTE: Some accessories may be sold separately.

Cleanica 360
™
9
Choosing the Right Accessory
Before cleaning any electrical appliance, check and follow the appliance manufacture’s cleaning guidelines.
Accessory
Required Accessories That Must Be
Connected to the Accessory Adaptor Suggested Use
Scraping Tool
Use the Scraping Tool to scrape away
baked-on food, grime, and grease and
to remove residue or other difcult
substances from surfaces such as stove
tops and ovens.
Garment Steamer Cloth
Use the Garment Steaming Cloth
when steaming garments, draperies,
tablecloths, and more. To use the
Garment Steaming Cloth, place
the Garment Steaming Cloth
over the Garment Steaming Tool.
Cleaning
Use the Cleaning Pad for general
cleaning of hard oors and for
refreshing carpets.
NOTE: Some accessories may be sold separately.
10 Cleanica 360
™
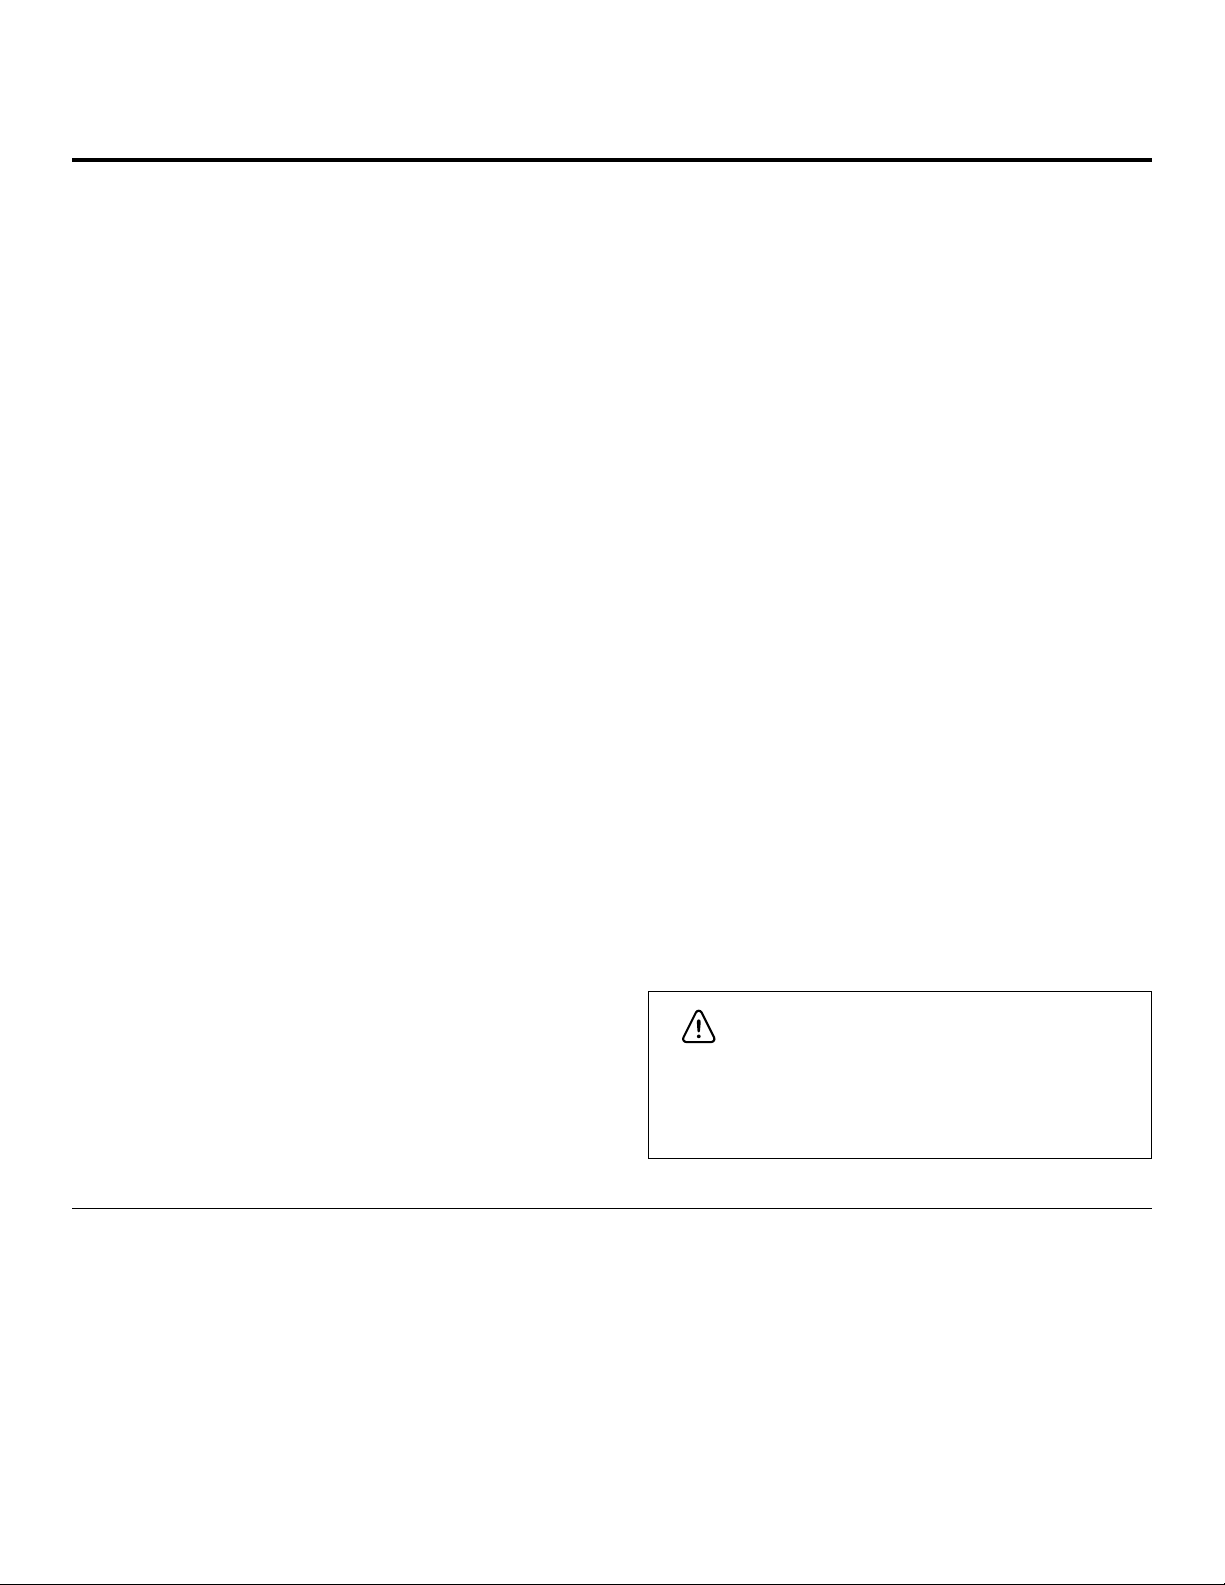
Assembly
1. Slide the Handle Connector into the Handle Tube
until it clicks into place.
2. Slide the Handle Tube into the Main Body until it
clicks into place.
3. The Handle can be removed from the Main Body for
storage by pressing the Handle Tube Button.
Attaching the Handle
1. Slide the bottom end of the Main Body onto
the Steam Head until the Steam Head Spindle clicks
into place.
2. The Steam Head can be removed from the Main
Body by pressing the release button near the Steam
Head Spindle.
Attaching the Steam Head
Cleanica 360
™
11
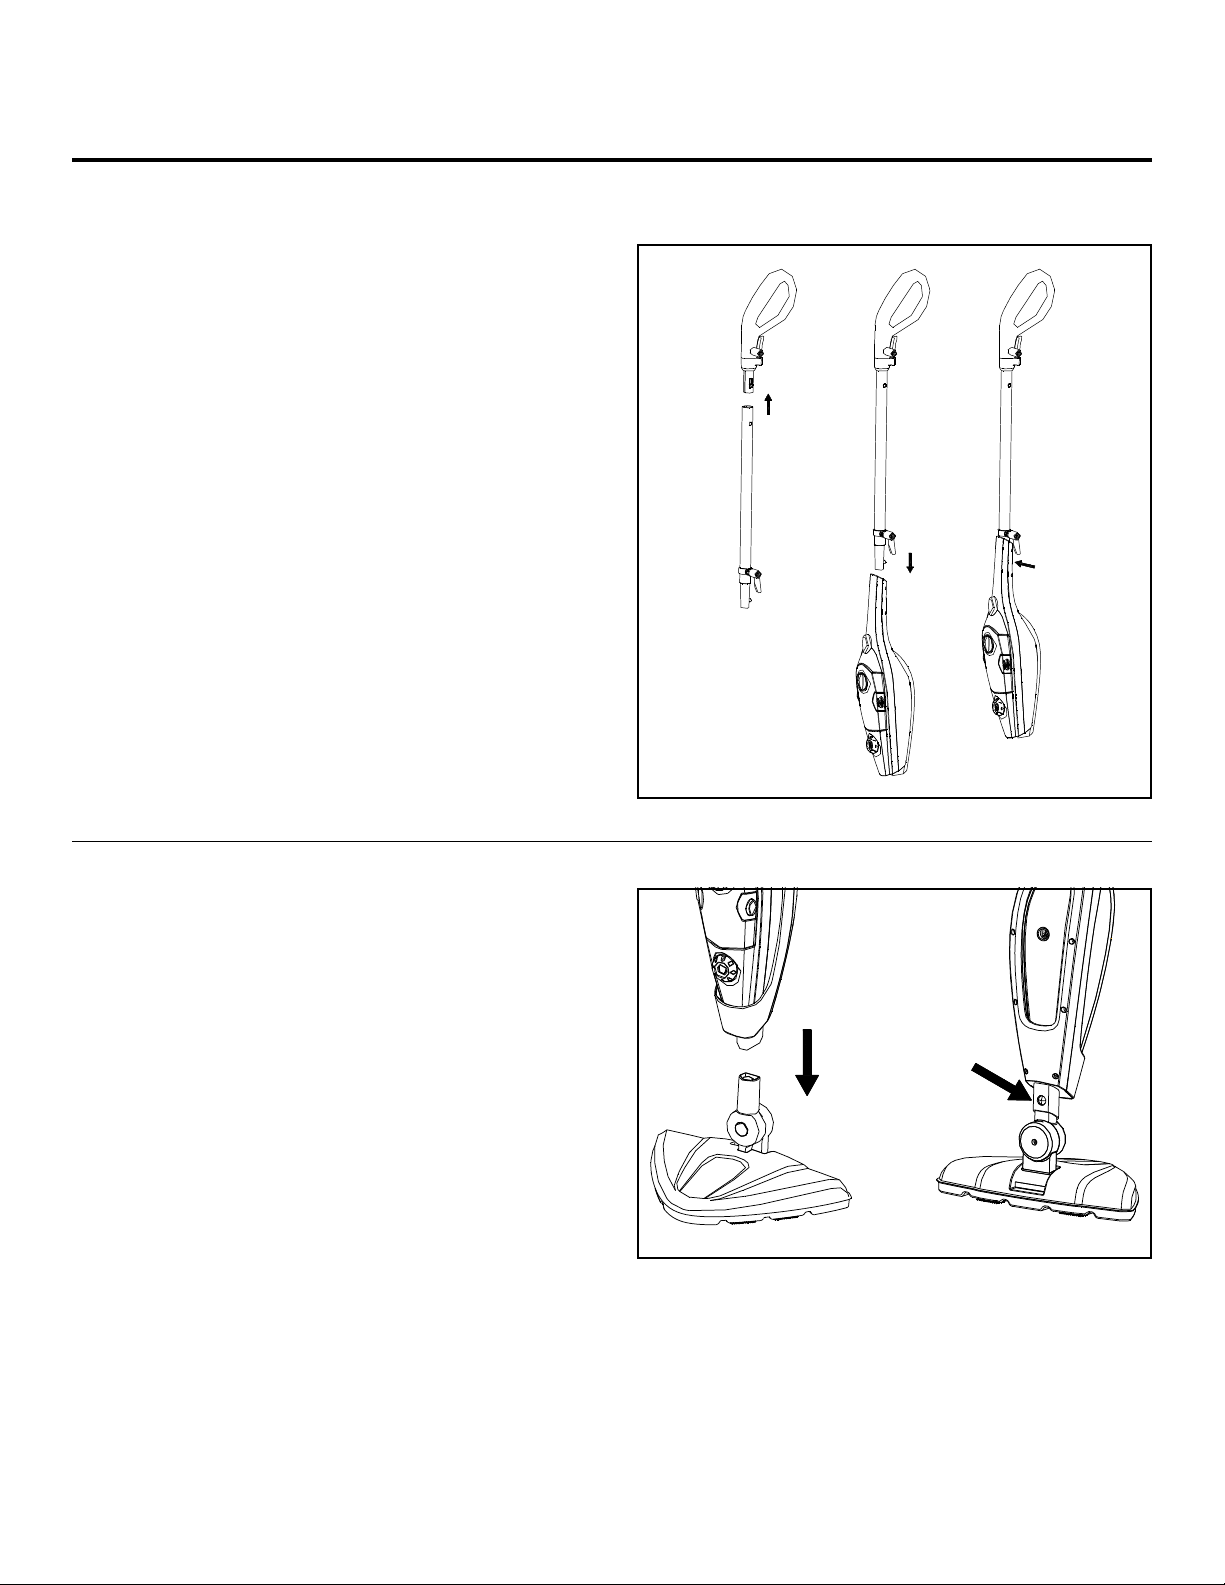
Assembly
1. To attach the Cleaning Pad, place the Cleaning Pad
on a at, level oor surface. Lower the bottom of the
Steam Head onto the Cleaning Pad and press down
rmly. The Cleaning Pad will attach to the bottom of
the Steam Head.
2. To remove, pull the Cleaning Pad off of the
Steam Head.
Attaching/Removing the
Cleaning Pad
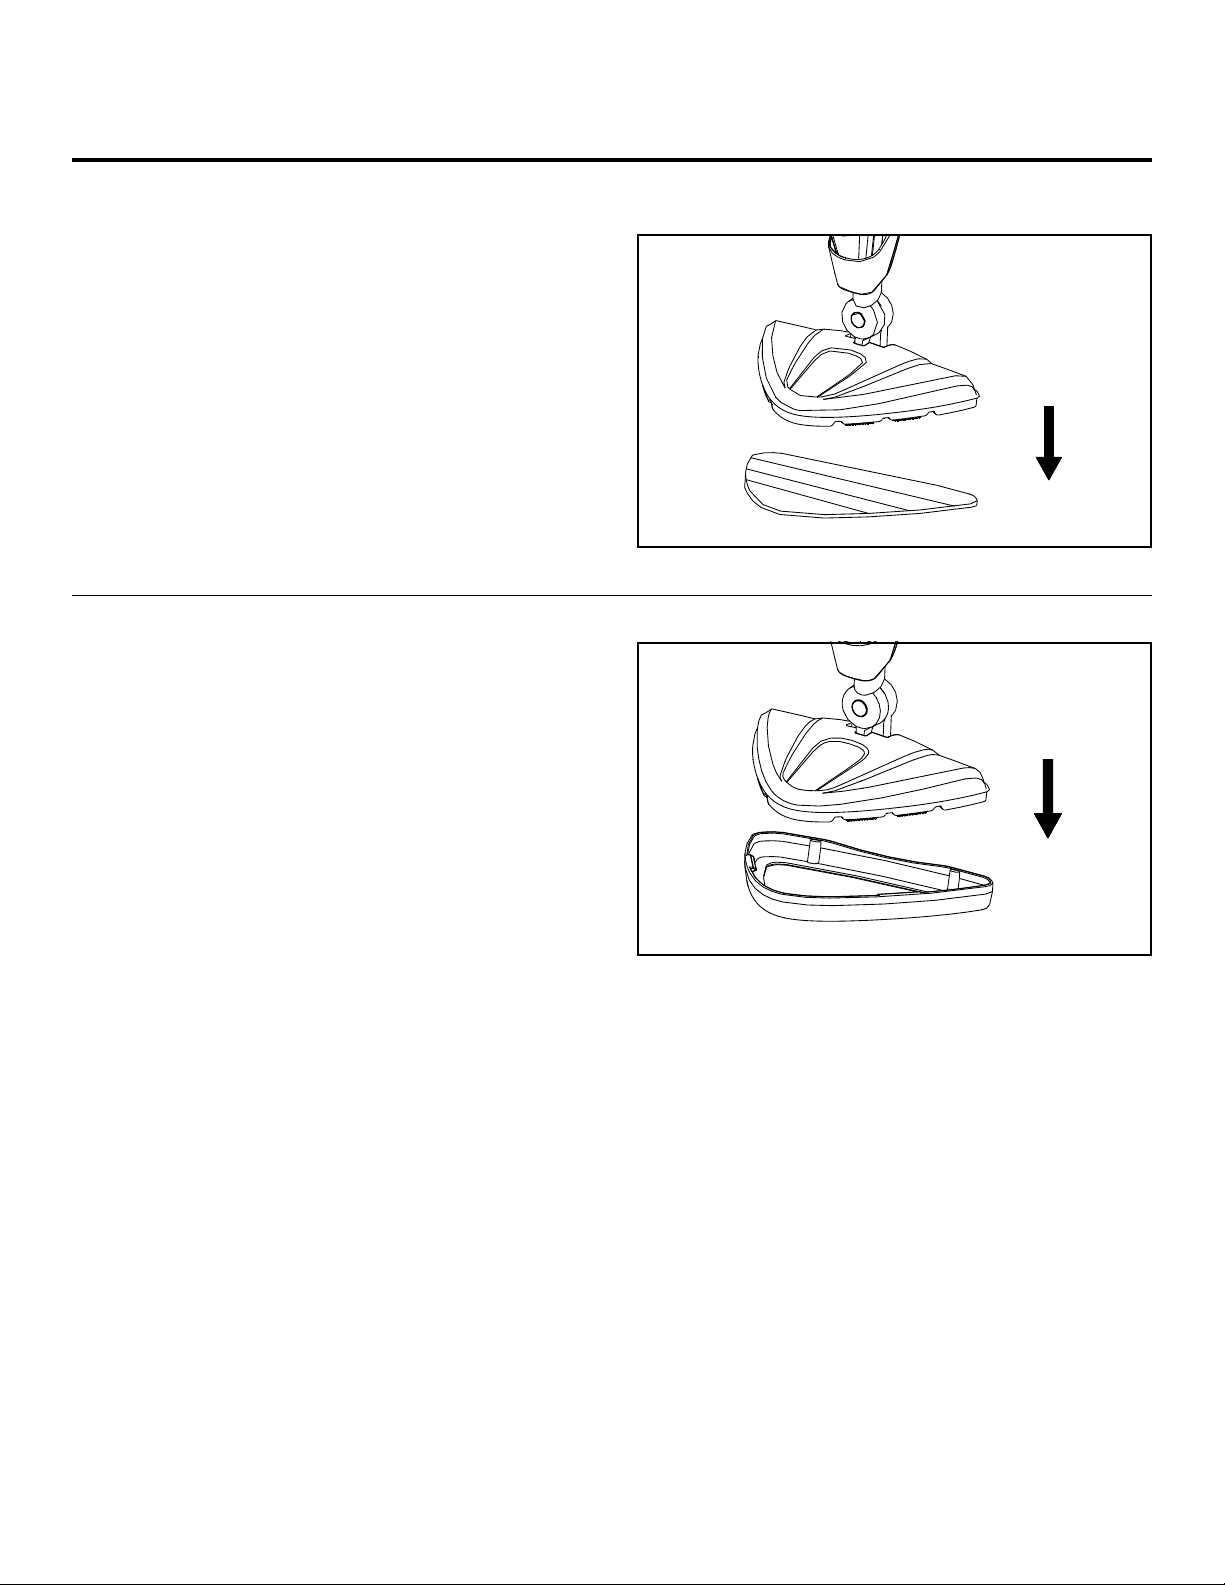
1. To attach the Carpet Glider, rst attach the Cleaning
Pad (see the “Attaching/Removing the Cleaning Pad”
section).
2. Place the Carpet Glider on a at, level oor surface.
Lower the bottom of the Steam Head onto the Carpet
Glider and press down rmly until the Carpet Glider
is attached to the Steam Head.
3. To remove, pull the Carpet Glider and then the
Cleaning Pad off of the Steam Head.
Attaching/Removing the
Carpet Glider

12 Cleanica 360
™
Instructions for Use
1. Remove all the packaging material.
2. Remove any stickers or labels from the appliance.
Before First Use
1. There are two ways to ll the appliance with
water:
a) Open the Water Tank by turning the Water
Tank Cap counterclockwise and removing the
Water Tank Cap. Use the Measuring Cup to ll
the Water Tank with up to 1 ½ cups (360 ml) of
water. Reattach the Water Tank Cap and turn it
clockwise to close it.
b) Remove the Water Tank from the Main Body.
Open the Water Tank by turning the Water
Tank Cap counterclockwise and removing the
Water Tank Cap. Hold the Water Tank under
a faucet and ll the Water Tank with water (up
to 1 ½ cups [360 ml]). Reattach the Water Tank
Cap and turn it clockwise to close it. Reattach
the Water Tank to the Main Body. The Water
Tank should click into place.
2. Plug the appliance into a power outlet.
3. Switch the appliance on. The Indicator Lights will
turn red to indicate that the appliance is heating
up (heating takes approximately 25 seconds).
Once the appliance has fully heated, the Indicator
Lights will turn blue.
4. Press the Steam Button to start releasing steam.
You can control the volume of steam released
by the appliance by turning the Steam Control
Knob clockwise (to increase the volume of steam)
or counterclockwise (to decrease the volume of
steam).
NOTE: It will take approximately 3 seconds
for the appliance to release an increased or
decreased volume of steam after adjusting the
Steam Control Knob.
5. A full Water Tank will allow you to steam for
approximately 20 minutes. When the Water Tank
is empty, the Indicator Lights will glow red and
ash, indicating the need to add more water.
Power off the appliance and rell the Water Tank.
NOTE: If the appliance is powered off at any point
during operation, such as to rell the Water Tank,
the appliance will need to heat up again before
resuming operation.
Using the Cleanica 360
1. Press the Handle Tube Button to release the
Handle from the Main Body.
2. Attach the Accessory Adaptor to the Main Body.
3. Align the arrow on your chosen accessory
with the arrow on the Accessory Adaptor
and attach the accessory. Turn the accessory
counterclockwise until it is locked into place.
4. To remove the Accessory Adaptor from the Main
Body, press the release button on the Accessory
Adaptor.
Using as a Hand-Held Steam Cleaner

Cleanica 360
™
13
Steam Cleaning Tips
For 25 years, I’ve been bringing you great innovative cleaning products. Included here are a few tips to help you
get the most out of your Cleanica 360 Steam Cleaning System! —Anthony Sullivan
• The Cleanica 360 is a lightweight, easy-to-use,
versatile steam cleaning tool that can be used to
clean almost any surface. It cleans with only water
rather than chemicals, and when you’re finished
cleaning, the water quickly evaporates, so surfaces
dry fast!
• The steam from your Cleanica 360 reaches over
200 degrees! It’s HOT, and it loosens dirt quickly.
When using it as a handheld steamer, wipe down
the surface with a dry cloth after cleaning the area
with steam. NOTE: Always keep the steam facing
away from you, anyone around you, and electrical
appliances or outlets!
• Remember to wait for the light in the tank to turn
from red to blue. Then, just hold the steam button
if you’re using the hand-held steamer and you’re
good to go. It only takes about 20–30seconds to
start steaming.
• The closer you hold the steam to the surface, the
hotter it gets, so for tough messes, hold the steam or
microfiber on the surface for longer to let the steam
loosen the dirt or mess.
• Keep the tank at least a quarter full; that way, you’ll
never run out of steam.
• To extend cleaning time, use the lowest setting.
Keep the setting low when cleaning hard floors.
You’ll have to refill less often and your floors will
dry quicker.
• Always keep the steamer moving on sealed hard-
wood and use it on the lowest volume of steam. The
microfiber will still be hot, and less steam means less
water left behind.
The Cleanica 360 is good at cleaning anywhere, but
here are a few things it’s GREAT at:
Cleaning Grout: Cleaning the grout lines between tiles
can be tough with other cleaning methods, and grout
lines can become dirtier than the tiles around them.
But the Cleanica 360 comes with a specialized grout
cleaning brush to easily clean out those grout lines.
Doorknobs and Drawer Handles: The Cleanica 360
can quickly clean these small, frequently neglected
areas.
Steaming Clothes: The Cleanica 360 both helps
deodorize fabrics and remove wrinkles.
Glass Windows/Doors: Use the window squeegee
attachment to remove soap scum and grime
from glass.
Deodorizing Garbage Disposal: Freshen up your
garbage disposal by using the Cleanica360 in the
handheld configuration, and let the steam loosen
built-up fat and oil that can cause a stink coming from
your sink!
Cleaning around Pets and Kids: Because there’s no
chemical residue from steam, it’s an effective way to
clean up around pets and kids.
Cleaning Around People with Allergies, Sensitive
Skin, or Who Are Chemically Sensitive: If anyone in
your household has allergies, the Cleanica 360 is a
perfect solution. With steam, there are no chemicals in
the air or on surfaces.
Nooks and Crannies: The jet-like stream from the
Cleanica 360 is incredible for cleaning hard-to-reach
areas.
Cleaning Food Prep Surfaces: Remember, most spray
cleaners are loaded with chemicals. They can leave a
toxic residue on a cutting board, inside a fridge, and in
a microwave and oven. Steam from the Cleanica 360
uses only water!
THINGS YOU SHOULDN’T STEAM CLEAN:
• Paper
• Cardboard
• Suede
• Delicate fabrics, such as silk
• Wallpaper
• Anything covered in water-based paint
If in doubt, clean a small area rst; if you like what you
see, keep going! Enjoy your Cleanica 360.

14 Cleanica 360
™
Cleaning & Maintenance
1. Always unplug the appliance before cleaning.
2. Drain all the water from the Water Tank and clean
the Water Tank after each use.
3. With the Water Tank removed from the appliance,
run the appliance for a short time to remove any
residual water or steam from the appliance.
4. Use detergent to clean the accessories when they
are dirty. Then, rinse the accessories with water
and air dry.
5. NOTE: The interior of this appliance contains
no serviceable parts. If any maintenance that
requires disassembly needs to be performed on
the interior of this appliance, contact customer
service using the contact information on the back
of this manual.
To clean calcium deposits that build up inside the
Water Tank:
1. Remove the Water Tank from the Main Body (see
the “Using the Cleanica 360 Cleaner” section).
2. Add one or two tablespoons of white vinegar to
the Water Tank.
3. Fill the Water Tank with water.
4. Close the Water Tank Cap.
5. Shake the Water Tank.
6. Remove any water and vinegar from the Water
Tank before using the appliance again.
7. Rinse the Water Tank.
NOTE: Vinegar should only be used to clean the
Water Tank. Do not turn the appliance on until the
vinegar has been removed from the Water Tank.
Decalcifying the Water Tank Interior
If your appliance begins to produce steam more
slowly than usual or stops producing steam, you
might need to remove limescale from the interior of
the appliance or the Water Tank. Limescale should
be removed from the appliance every 25–50 times a
full Water Tank is used and will need to be performed
more frequently in areas with hard water. To clean
limescale from the interior of the appliance:
1. Prepare a cleaning solution of ½ cup white
vinegar and 1 cup tap water. Add the cleaning
solution to the Water Tank.
2. Secure the appliance and aim the release of
steam away from the oor and surrounding
objects and surfaces.
3. Turn the appliance on (see the “Using the
Cleanica 360 Steam Cleaner” section) and let the
appliance release steam until the Water Tank is
empty.
4. Repeat this procedure as many times as
necessary until the appliance releases steam at a
normal rate.
5. Remove the Water Tank from the Main Body. Fill
the Water Tank with fresh water and rinse out the
Water Tank.
6. Fill the Water Tank with fresh water, reattach
the Water Tank to the Main Body, and let the
appliance release steam until the Water Tank is
empty.
Descaling/Cleaning Limescale

Cleanica 360
™
15
Cleaning & Maintenance
Due to the high mineral content of water in some
areas, you may notice that less steam comes out
from the accessories. This reduced steam output can
be caused by calcium buildup inside the tip of an
accessory’s nozzle. To remove calcium build-up:
1. Spray a small burst or two of spray lubricant
(which can be found in any hardware store)
inside the tip of the nozzle. Rinse and wipe away
any spray lubricant. Attach the accessory to the
appliance. Ensure that no lubricant remains
before using the appliance.
2. Fill the Water Tank with water and run the
appliance for a few minutes (see the “Using the
Cleanica 360” section). Ensure that the steam
is aimed away from any sensitive surfaces that
could be damaged by debris coming out of the
appliance.
Cleaning Blocked Steamer Accessories
1. The Cleaning Pad is machine washable. Use a
warm setting and always use a mild detergent.
2. To dry the Cleaning Pad, lay at and air dry.
IMPORTANT: Never use bleach or fabric softener
when washing the Cleaning Pad.
Cleaning the Microber Cleaning Pad
Storage
1. Turn the appliance’s power off and unplug the
power cord. Let the appliance cool fully.
2. Remove the Water Tank and empty any residual
water. Clean the external surface of the appliance
and any accessories with a dry cloth.
3. Remove and clean the Cleaning Pad (see the
“Cleaning the Microber Cleaning Pad” section).
4. Store product in a clean, dry area away from
children. Store the Water Funnel and Measuring
Cup with the appliance.

16 Cleanica 360
™
Problem Possible Reason Possible Solution
Reduced steam or no steam
Water Tank may be empty Fill the Water Tank with water
Steam nozzle may be blocked Clean the steam nozzle
There is no power to the appliance Make sure the appliance is plugged in
The Steam Button was not pressed Press the Steam Button
The Steam Control Knob is set to “MIN” Turn the Steam Control Knob clockwise
The appliance will not turn on
Blown fuse or breaker Replace the fuse or reset the breaker
Power cord not plugged in Plug the power cord into a working power outlet
Internal fuse is blown Contact customer service using the contact information
on the back of this manual
Troubleshooting
Use the troubleshooting guide as a rst step to
resolve any issues you may be experiencing. Contact
customer service using the contact information on
the back of this manual for any servicing that requires
disassembly of the appliance.
WARNING: To reduce risk of personal injury,
unplug the appliance and allow it to cool before
troubleshooting.

Product Disposal
Meaning of crossed–out wheeled dustbin:
Do not dispose of electrical appliances as unsorted
municipal waste. Use separate collection facilities.
Contact your local government for information
regarding the collection systems available.
If electrical appliances are disposed of in landlls
or dumps, hazardous substances can leak into the
groundwater and get into the food chain, damaging
your health and wellbeing.
When replacing old appliances with new ones, the
retailer is legally obligated to take back your old
appliance for disposals at least free of charge.

Header
90-Day Money-Back Guarantee
The Cleanica 360 is covered by a 90-day money-back guarantee. If you are not 100% satised with
your product, return the product and request a replacement product or refund. Proof of purchase
is required. Refunds will include the purchase price, less processing and handling. Follow the
instructions in the Return Policy below to request a replacement or refund.
Replacement Guarantee Policy
Our products, when purchased from an authorized retailer, include a 1-year replacement guarantee
if your product or component part does not perform as expected, the guarantee extends only to the
original purchaser and is not transferable. If you experience an issue with one of our products within
1 year of purchase, return the product or the component part for replacement with a functionally
equivalent new product or part. The original proof of purchase is required, and you are responsible
to pay to return the appliance to us. In the event a replacement appliance is issued, the guarantee
coverage ends six (6) months following the receipt date of the replacement appliance or the remainder
of the existing guarantee, whichever is later. Tristar reserves the right to replace the appliance with
one of equal or greater value.
Return Policy
If, for any reason, you would like to replace or return the product under the money-back guarantee,
your order number can be used as the return merchandise authorization number (RMA). If the product
was purchased in a retail store, return the product to the store or use “RETAIL” as the RMA. Return your
product to the address provided below for a replacement, which will incur no additional processing and
handling fees, or for the refund of your purchase price, less processing and handling. You are responsible
for the cost of returning the product. You can locate your order number at www.customerstatus.com.
questions. Pack the product carefully and include in the package a note with (1) your name, (2) mailing
address, (3) phone number, (4) email address, (5) reason for return, and (6) proof of purchase or order
number, and (7) specify on the note whether you are requesting a refund or replacement. Write the RMA
on the outside of the package.
Send the product to the following return address:
Cleanica 360
Tristar Products
500 Returns Road
Wallingford, CT 06495
If the replacement or refund request has not been acknowledged after two weeks, please contact
Customer Service at 973-287-5124.
Refund
Refunds requested within the money-back guarantee timeframe will be issued to the payment method
used at purchase if the item was purchased directly from Tristar. If the item was purchased from an
authorized retailer, proof of purchase is required, and a check will be issued for the item and sales tax
amount. Processing and handling fees are non-refundable.
18 Cleanica 360
™

Distributed by:
Tristar Products, Inc.
Faireld, NJ 07004
© 2021 Tristar Products, Inc.
Made in China
CL360-SM_IB_TP_ENG_V5_210611
We are very proud of the design and quality of our
Cleanica 360TM Steam Mop.
This product has been manufactured to the highest standards.
Should you have any questions, our friendly customer service staff
is here to help you.
For parts and, accessories, go to tristarcares.com or scan this QR code
with your smartphone or tablet:
To contact us, email us at
or call us at 973-287-5124
This manual suits for next models
1
Table of contents


