IntesisHome PA-RC2-WIFI-1 User manual

IntesisHome
PA-RC2-WIFI-1
INSTALLATION GUIDE
_________________
INSTALLATIONSANLEITUNG
_________________
GUIDE D’INSTALLATION
_________________
GUIDA PER L’INSTALLAZIONE
_________________
GUÍA DE INSTALACIÓN

CONTENTS
English ................................................................................ 3
Deutsch ............................................................................... 7
Français............................................................................... 11
Italiano................................................................................. 15
Español................................................................................ 19
Norsk ................................................................................... 23
Svenska............................................................................... 27
Dansk .................................................................................. 31
Nederlands .......................................................................... 35
Polski................................................................................... 39
Russian................................................................................ 43

IntesisHome®PA-RC2-WIFI-1
3
INSTALLATION GUIDE
1. Product description
The IntesisHome device is an external module capable of connecting Panasonic ECOi and PACi units
into your Wi-Fi network in order to provide global connectivity and remote control applications through a
friendly user interface.
External View
Internal View
Front view Back view
External LED
Internal LED
Button
K1 Connector
Antenna Connector
Quick Start Guide
Device External Antenna Installation Guide Warranty
100 mm
70 mm 28 mm
74,5 mm
External
LED
Antenna Connector
Button
Top Hole
Fixing Holes
EN
4
INSTALLATION GUIDE
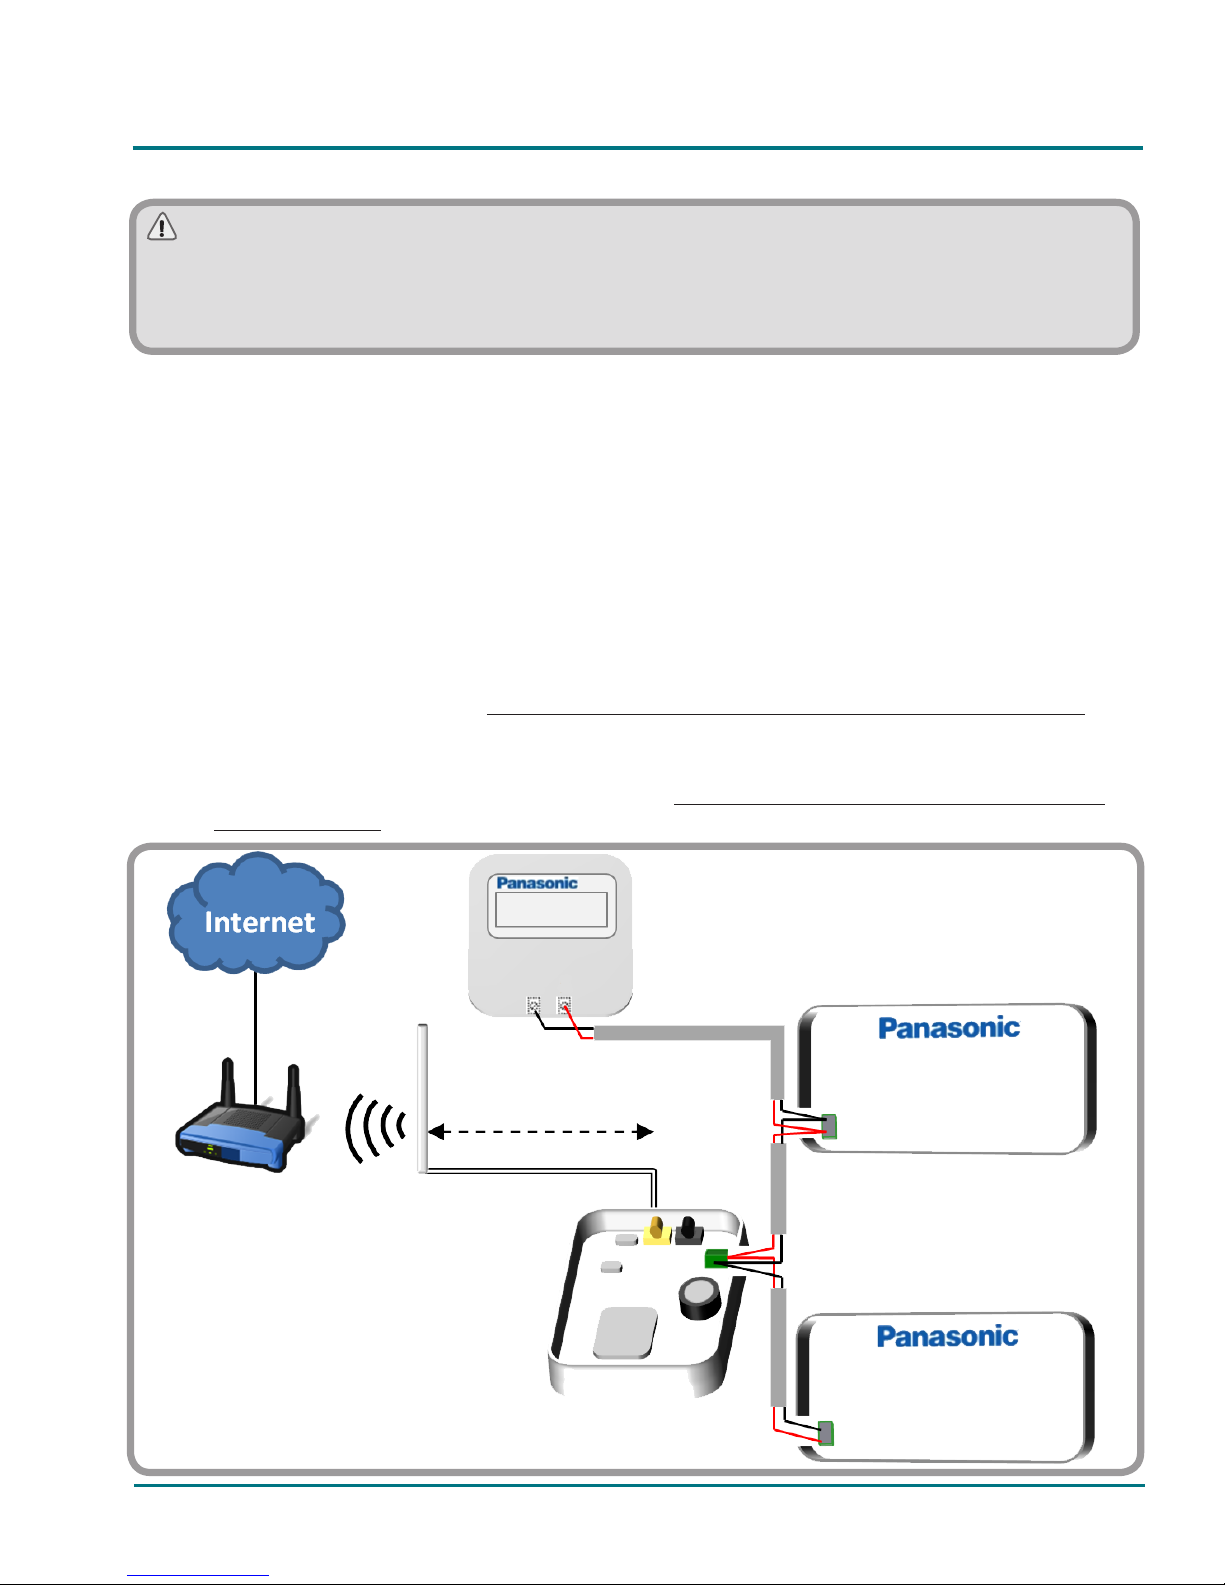
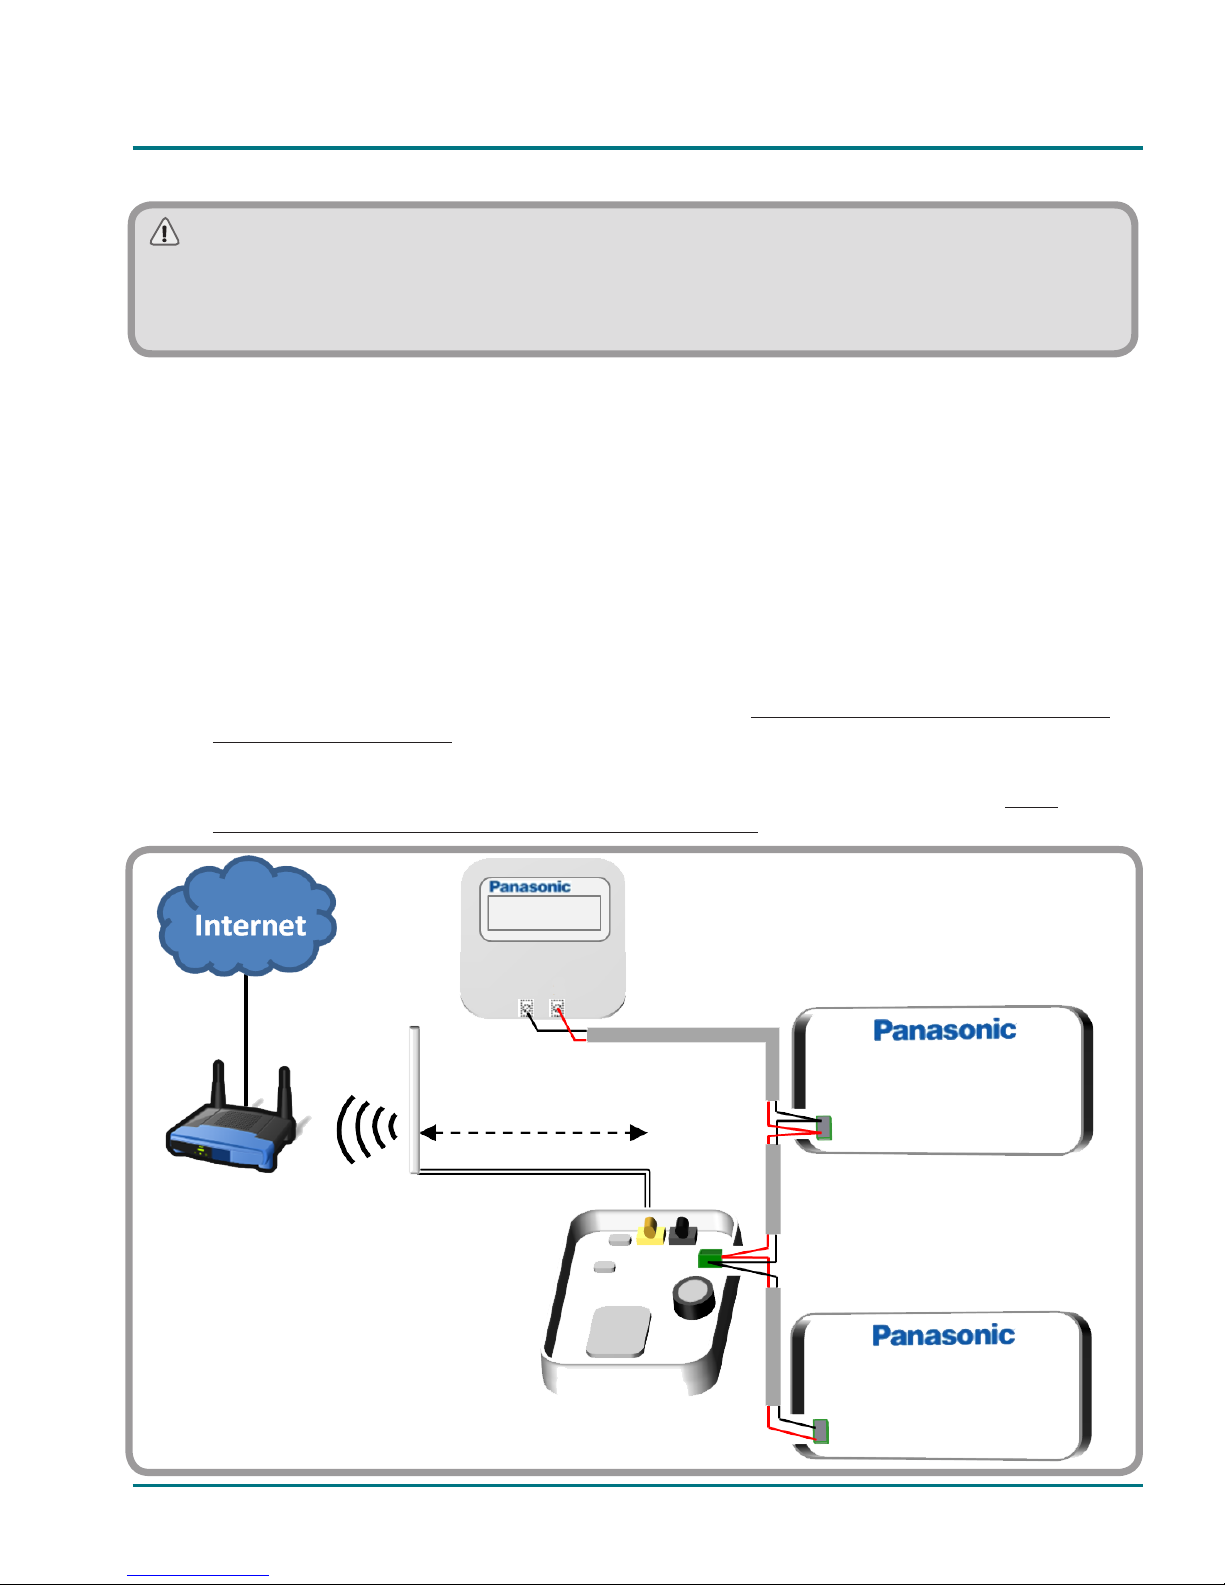
2. Installation procedure
There are two installation options available: With Control Panel and without Control Panel.
2.1 With Control Panel (Recommended)
This method assumes that you want to control the Panasonic system both with IntesisHome and the
Panasonic Control Panel.
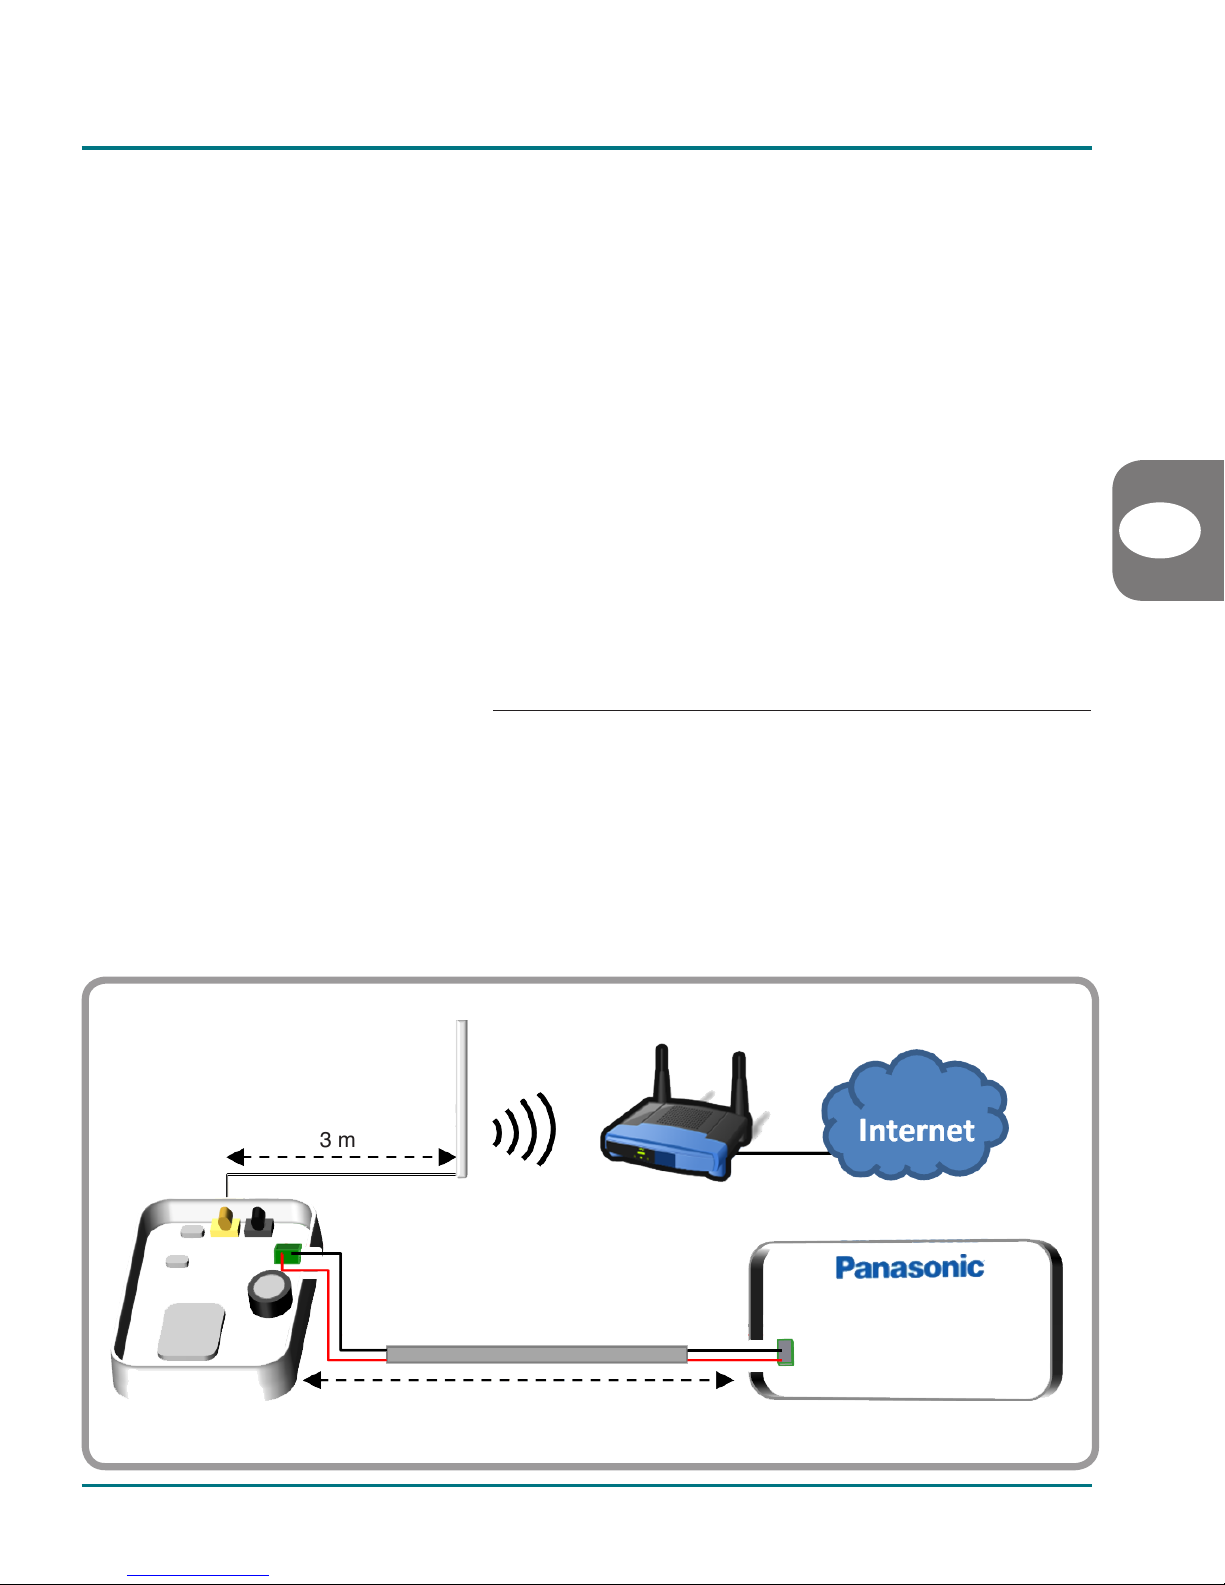
1. Unplug the Panasonic system from mains electricity.
2. Open the top lid of the IntesisHome device.
3. Remove IntesisHome’s Top Hole cover.
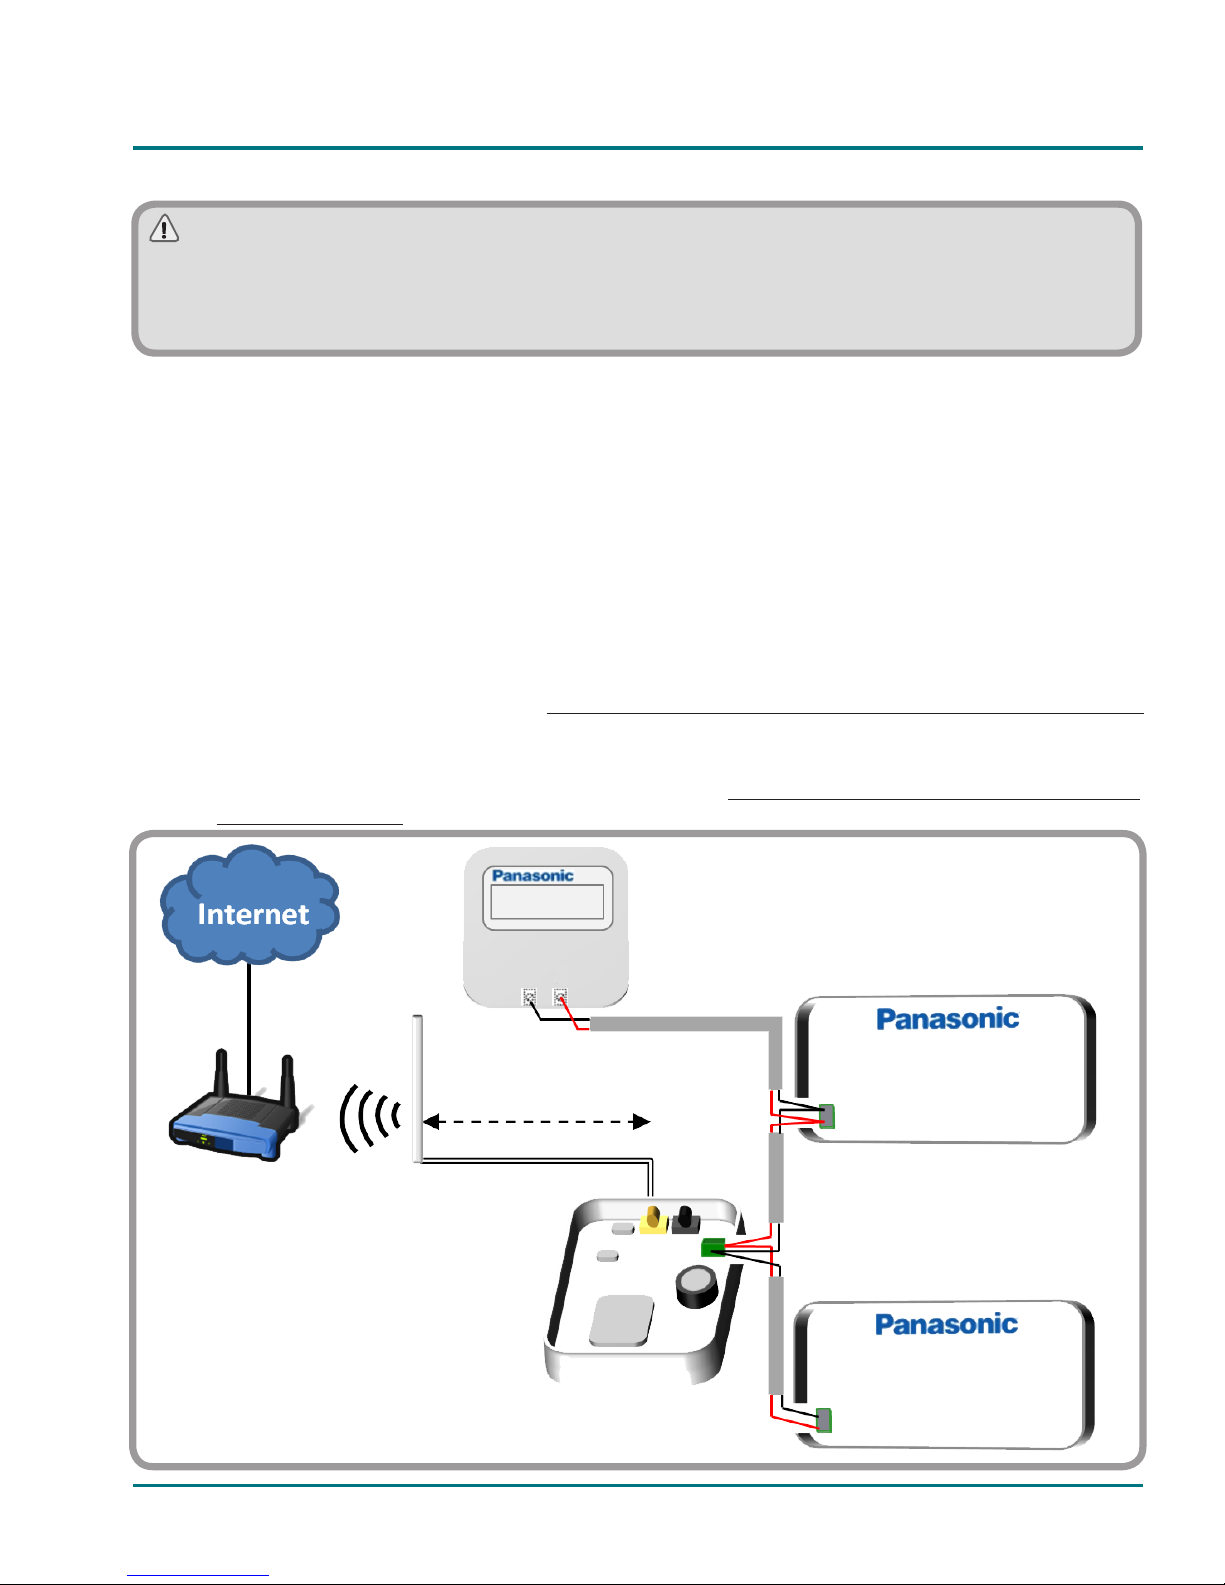
4. Connect one end of Panasonic’s bus cable into IntesisHome device K1 connector.
5. Connect the other end of Panasonic’s bus cable into Panasonic’s Indoor Unit R1R2 connector or
Remote Control Wiring (see www.intesishome.com/docs/PA-RC2-WIFI-1-Install_sketch.pdf for
more information).
6. Connect another cable from Panasonic’s Control Panel connector to Panasonic’s Indoor Unit
R1R2 connector or Remote Control Wiring (see www.intesishome.com/docs/PA-RC2-WIFI-1-
Install_sketch.pdf for more information).
Installation process should only be performed by an
authorized installer.
IntesisHome®PA-RC2-WIFI-1
3 m R1
R2
R1
R2
. . .
# 1
# n
Please follow all Safety Instructions provided by the Panasonic service manual and/or installation
manual.
Wi-Fi Router or
Access Point
K1
IntesisHome®PA-RC2-WIFI-1
5
7. Close the IntesisHome’s and Panasonic’s lid again.
8. Plug the Panasonic system to mains electricity.
If connection with the Panasonic system has been successful, IntesisHome device LED will start
blinking Green and then will change to steady Green.
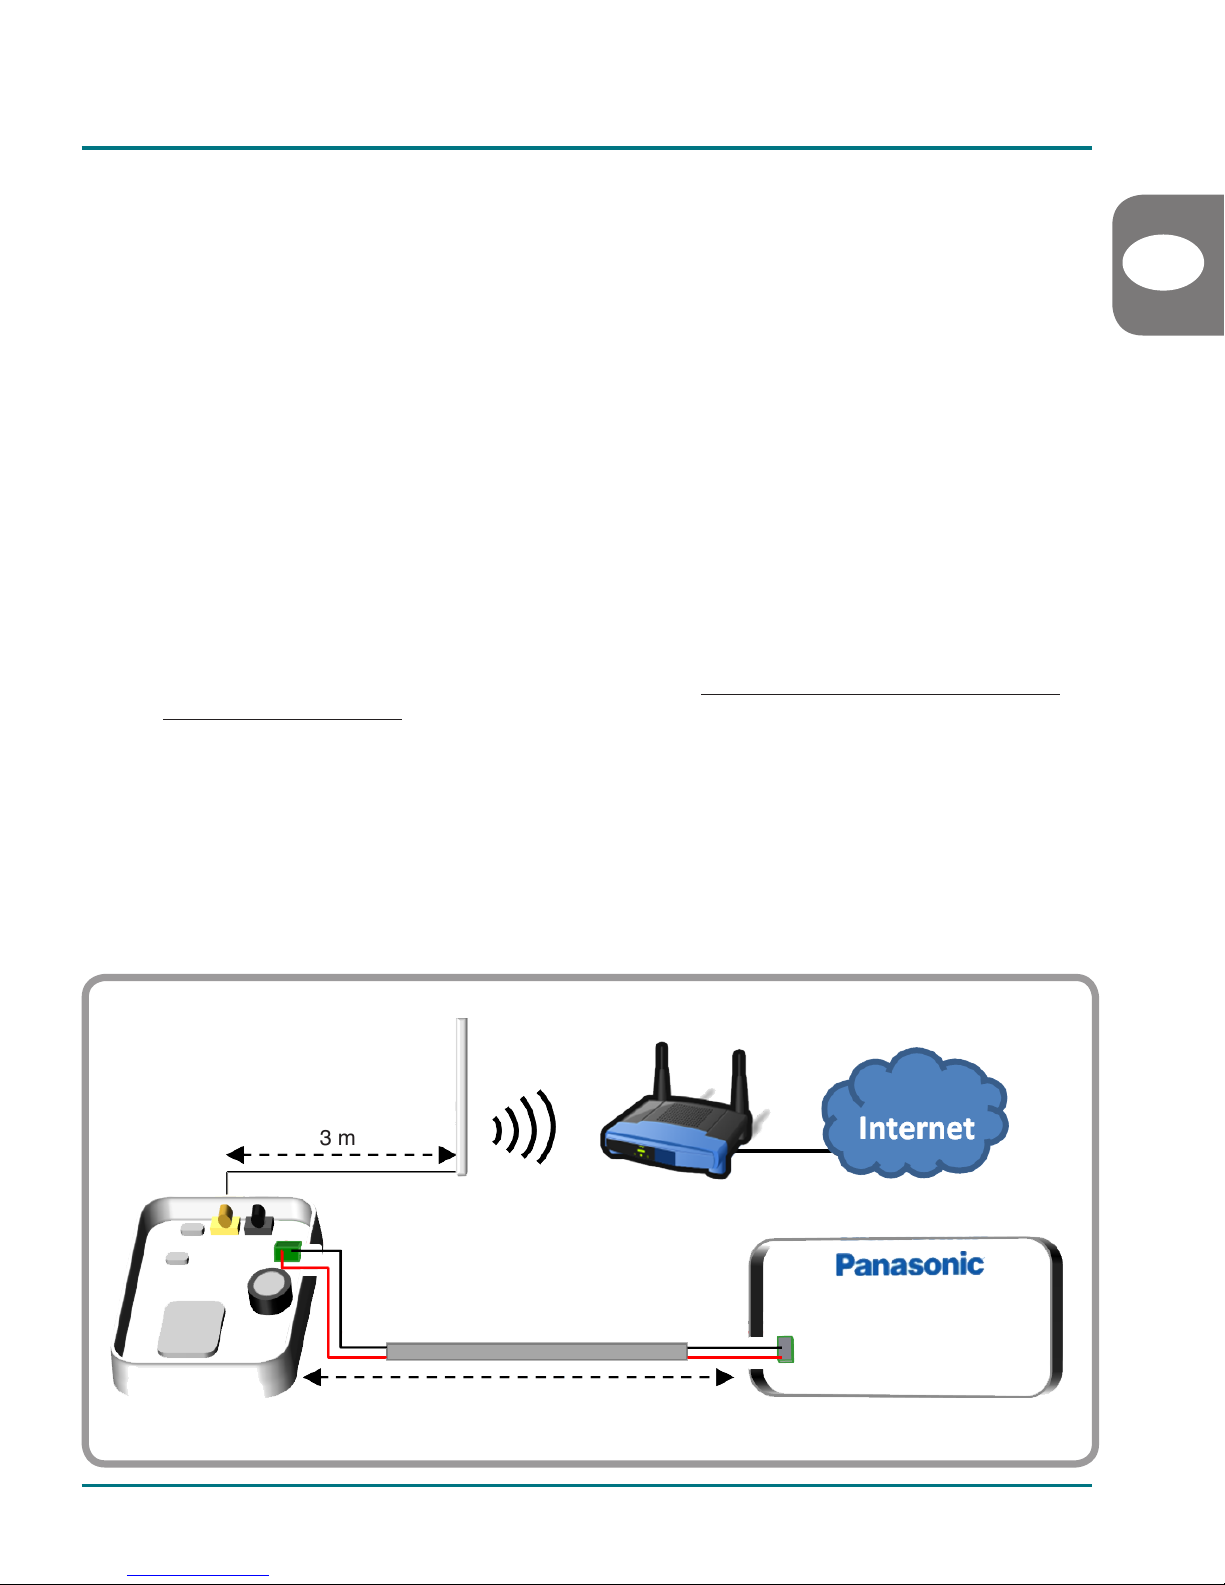
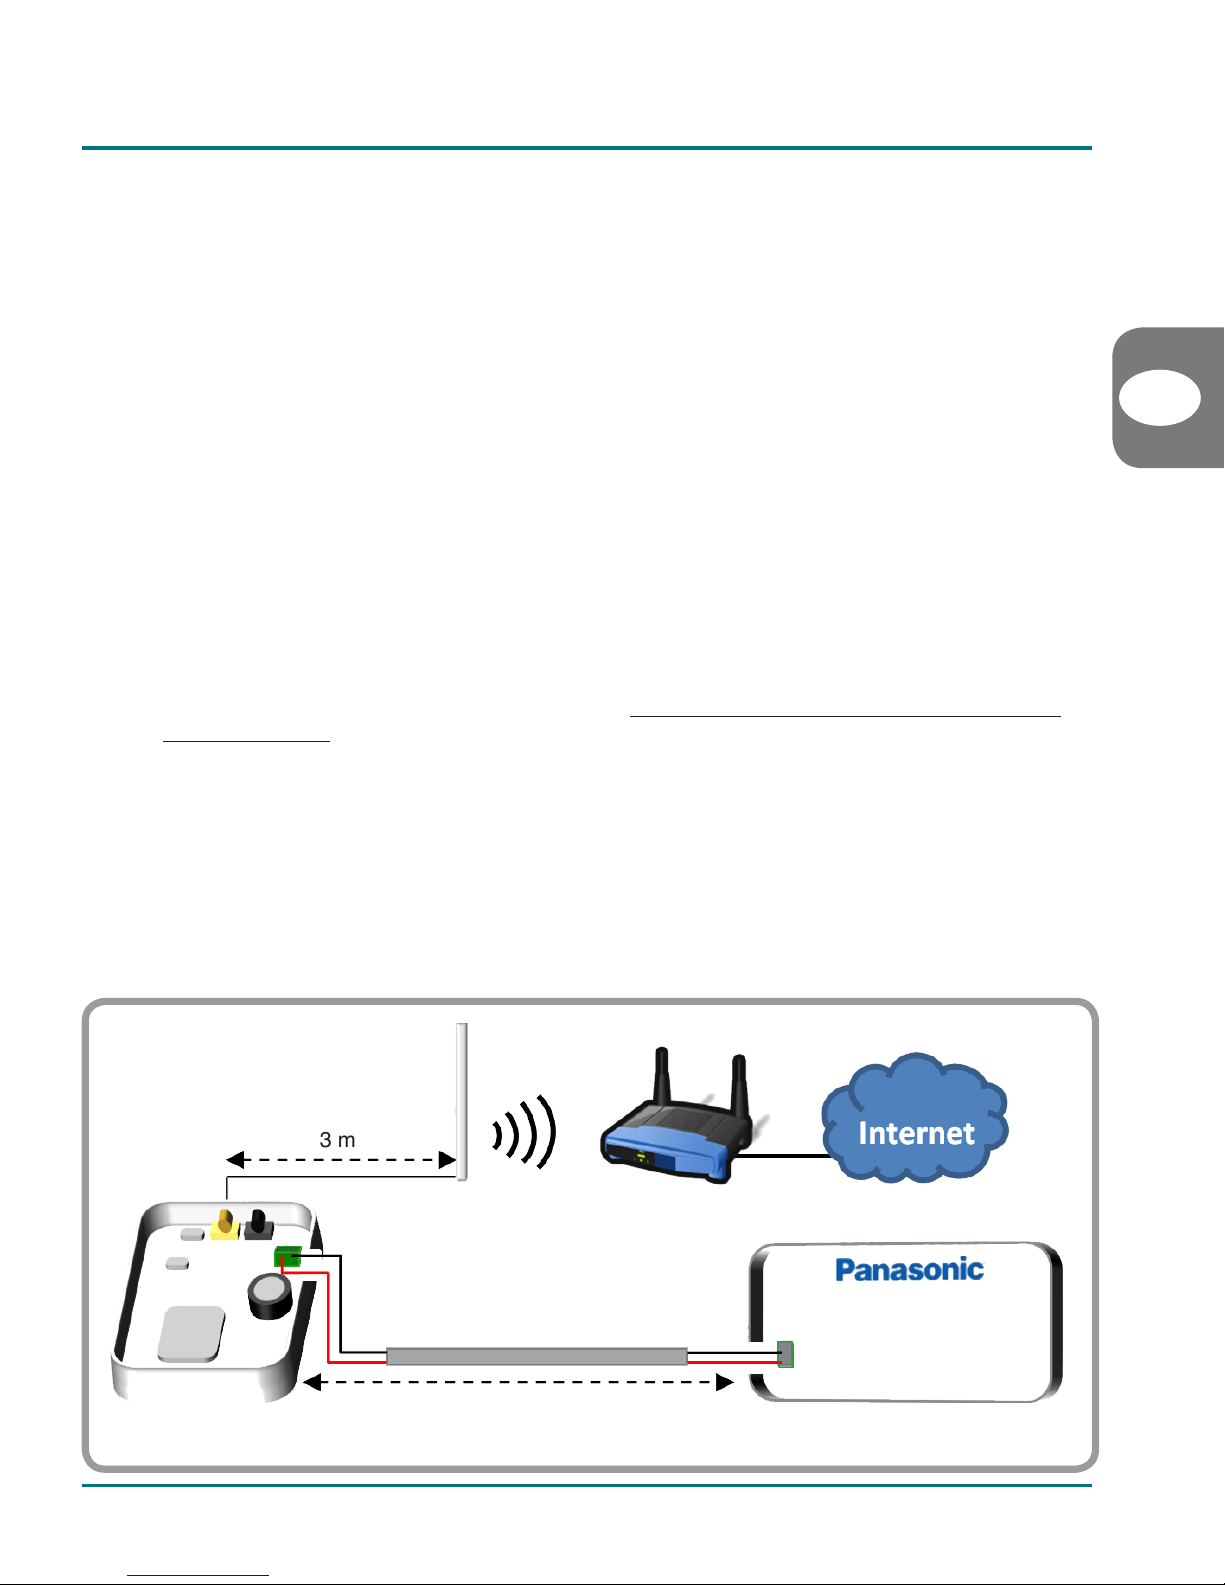
9. Connect the external antenna into the antenna connector.
10. Place the antenna preferably in a vertical position and pointing directly to the Wi-Fi Router or
Access Point (AP). See section 3.
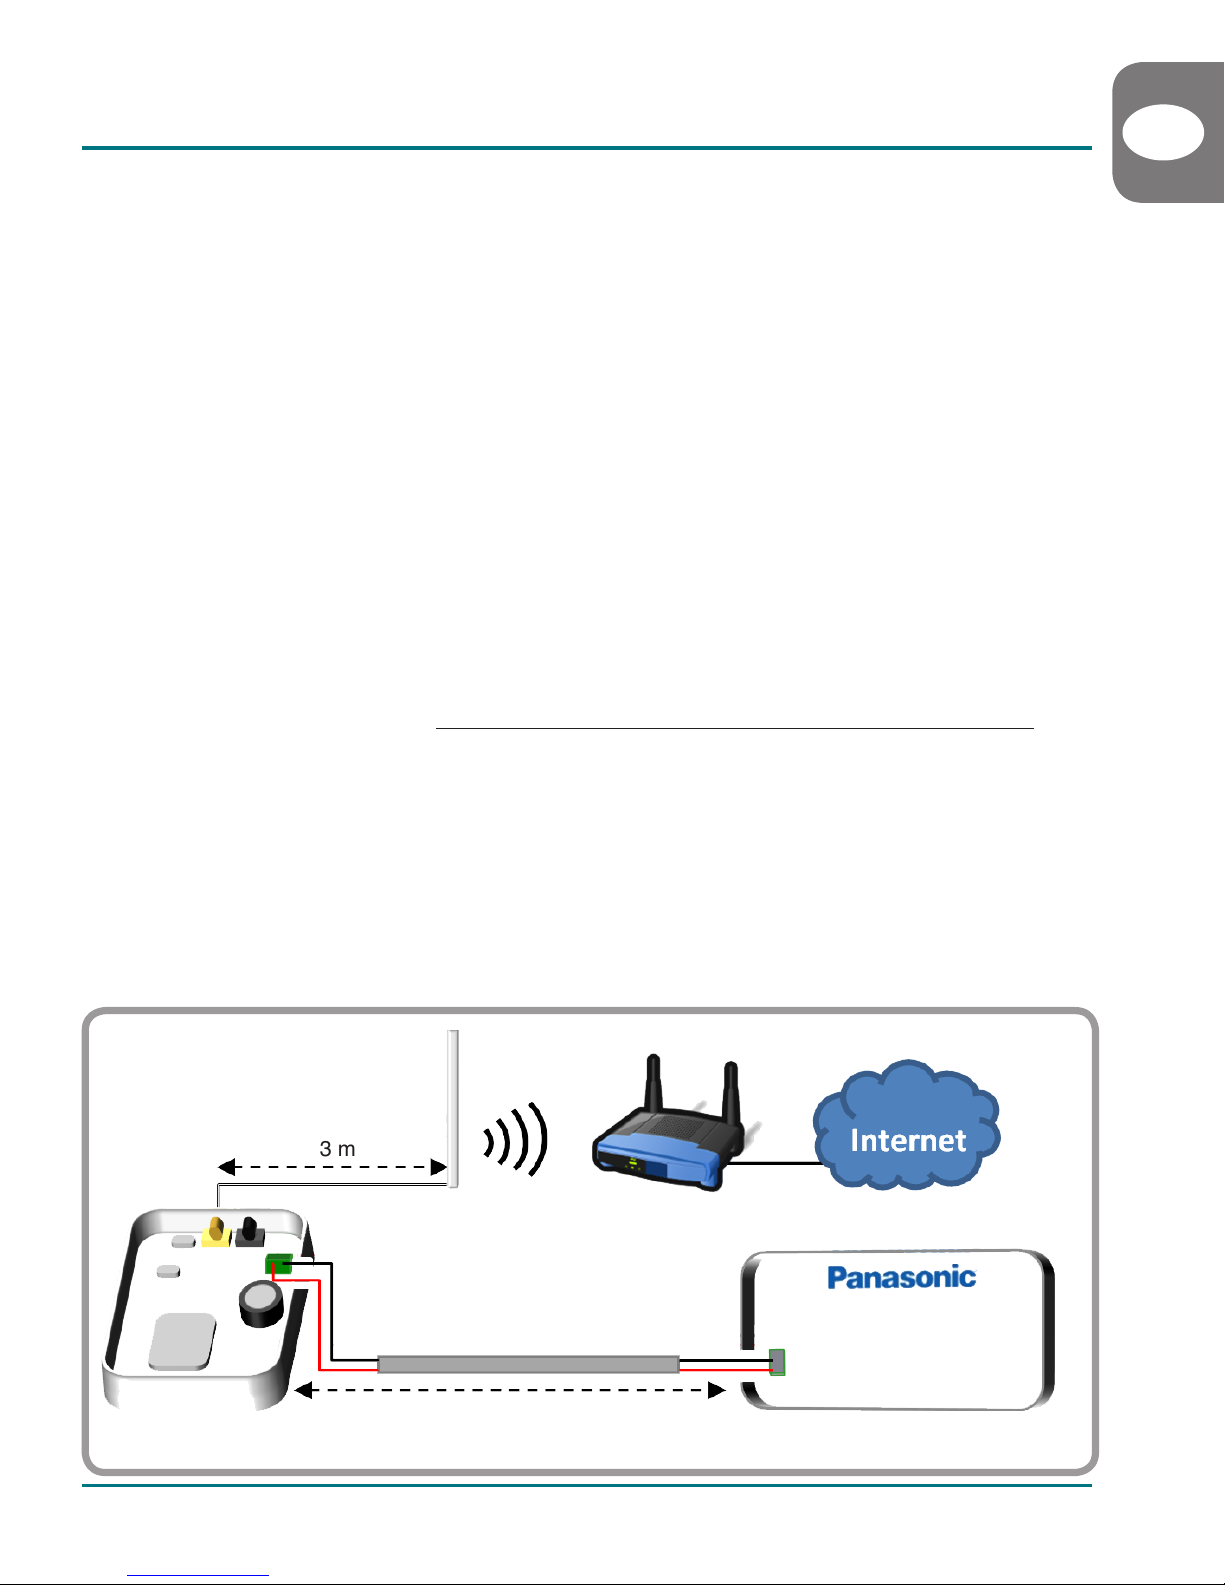
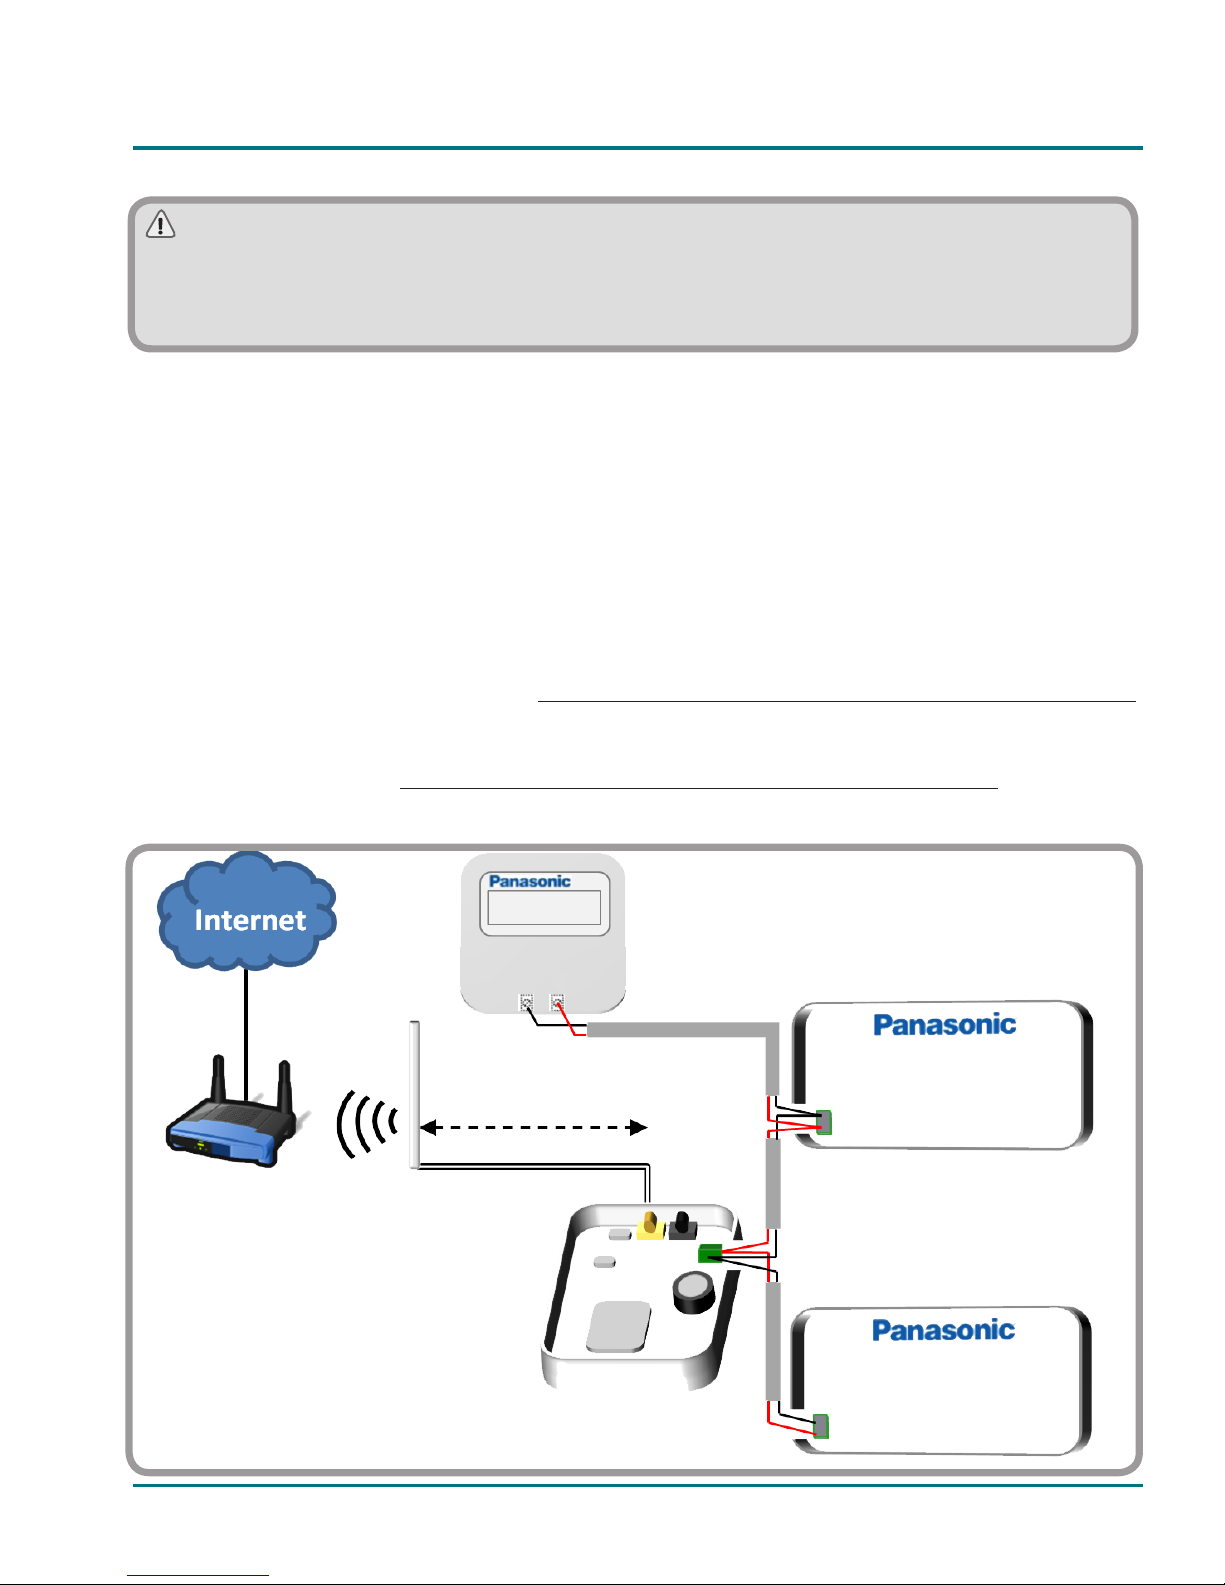
2.2 Without Control Panel
This method assumes that you want to control the Panasonic system through IntesisHome
exclusively.
1. Unplug the Panasonic system from mains electricity.
2. Open the top lid of the IntesisHome device.
3. Remove IntesisHome’s Top Hole cover.
4. Connect one end of Panasonic’s bus cable into IntesisHome device K1 connector.
5. Connect the other end of Panasonic’s bus cable into Panasonic’s Indoor Unit R1R2 connector or
Remote Control Wiring (see www.intesishome.com/docs/PA-RC2-WIFI-1-Install_sketch.pdf for
more information).
6. Close IntesisHome’s lid again.
7. Plug the Panasonic system to mains electricity.
If connection with the Panasonic system has been successful, IntesisHome device LED will start
blinking Green and then will change to steady Green.
8. Connect the external antenna into the antenna connector.
9. Place the antenna preferably in a vertical position and pointing directly to the Wi-Fi Router or
Access Point (AP). See section 3.
INSTALLATION GUIDE
3 m
Max. 500 m
EN
R1
R2
Wi-Fi Router or
Access Point
K1
IntesisHome®PA-RC2-WIFI-1
6
INSTALLATION GUIDE
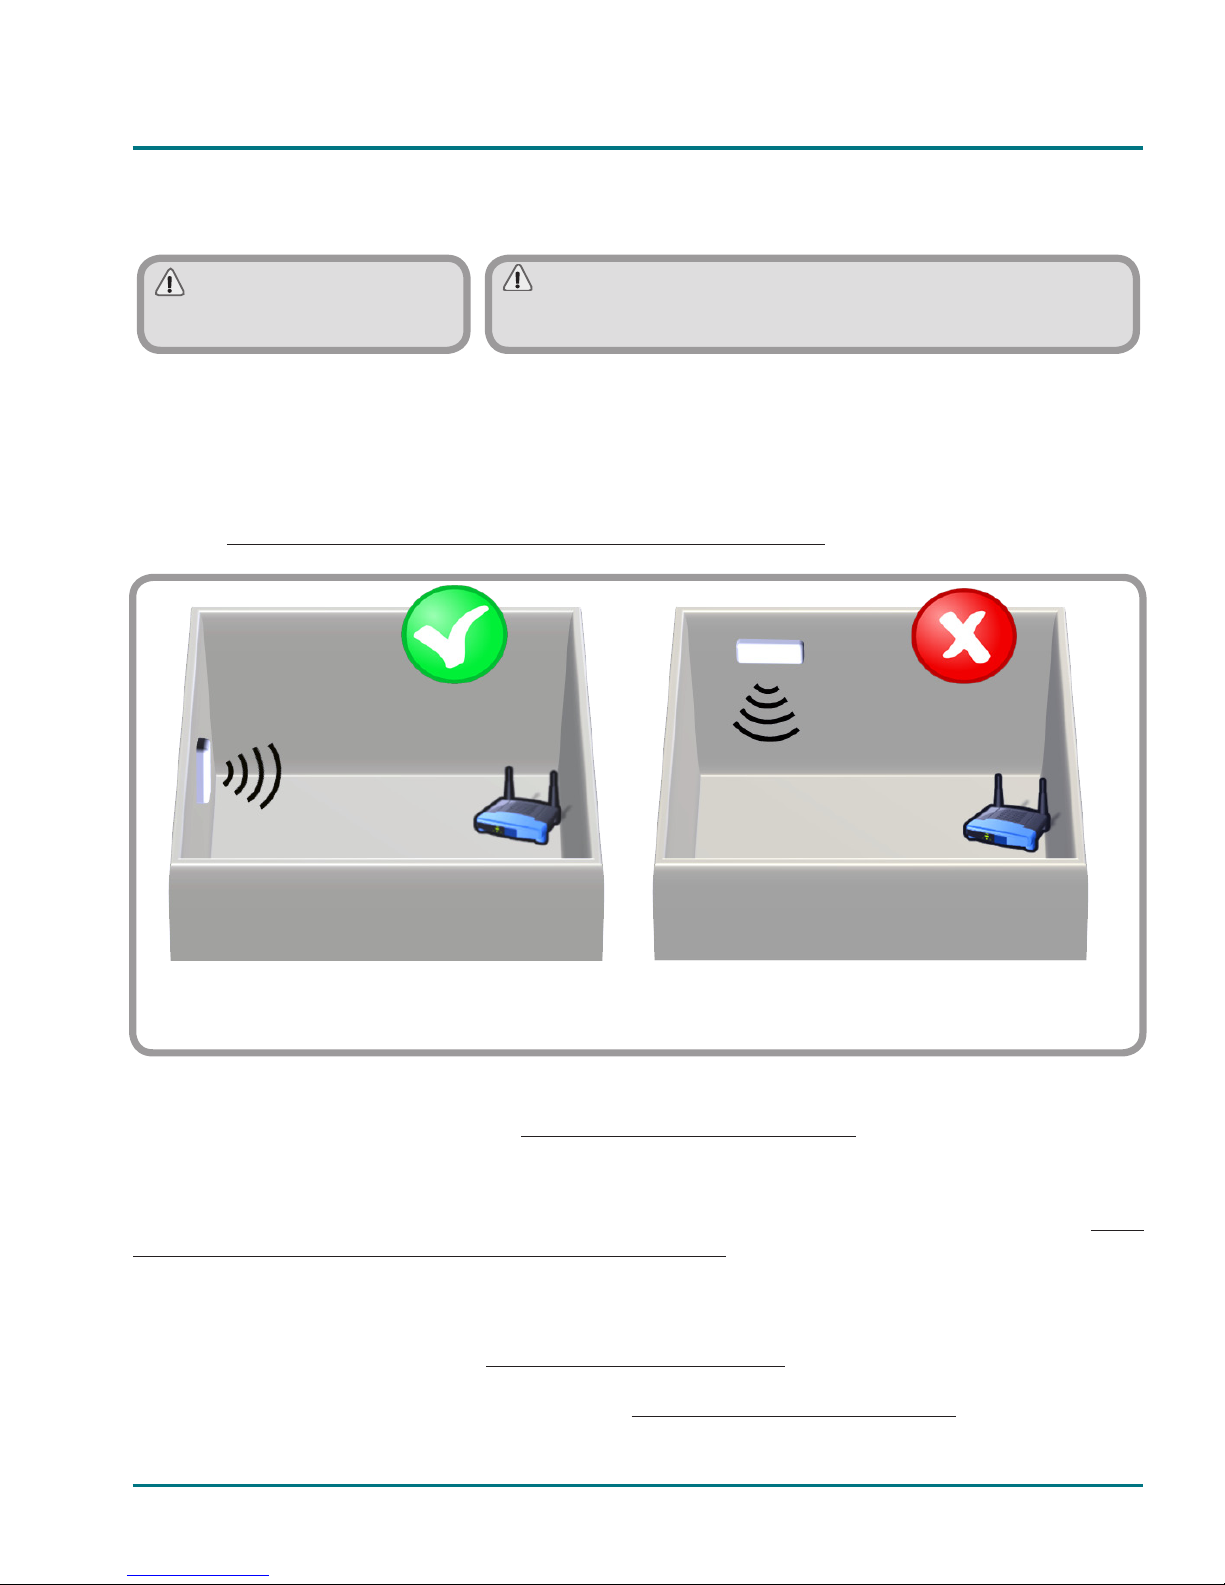
Important: Avoid placing
the antenna next to metal
surfaces.
Important: When possible, try to check Wi-Fi coverage
in the installation location. Good Wi-Fi level is strongly
recommended.
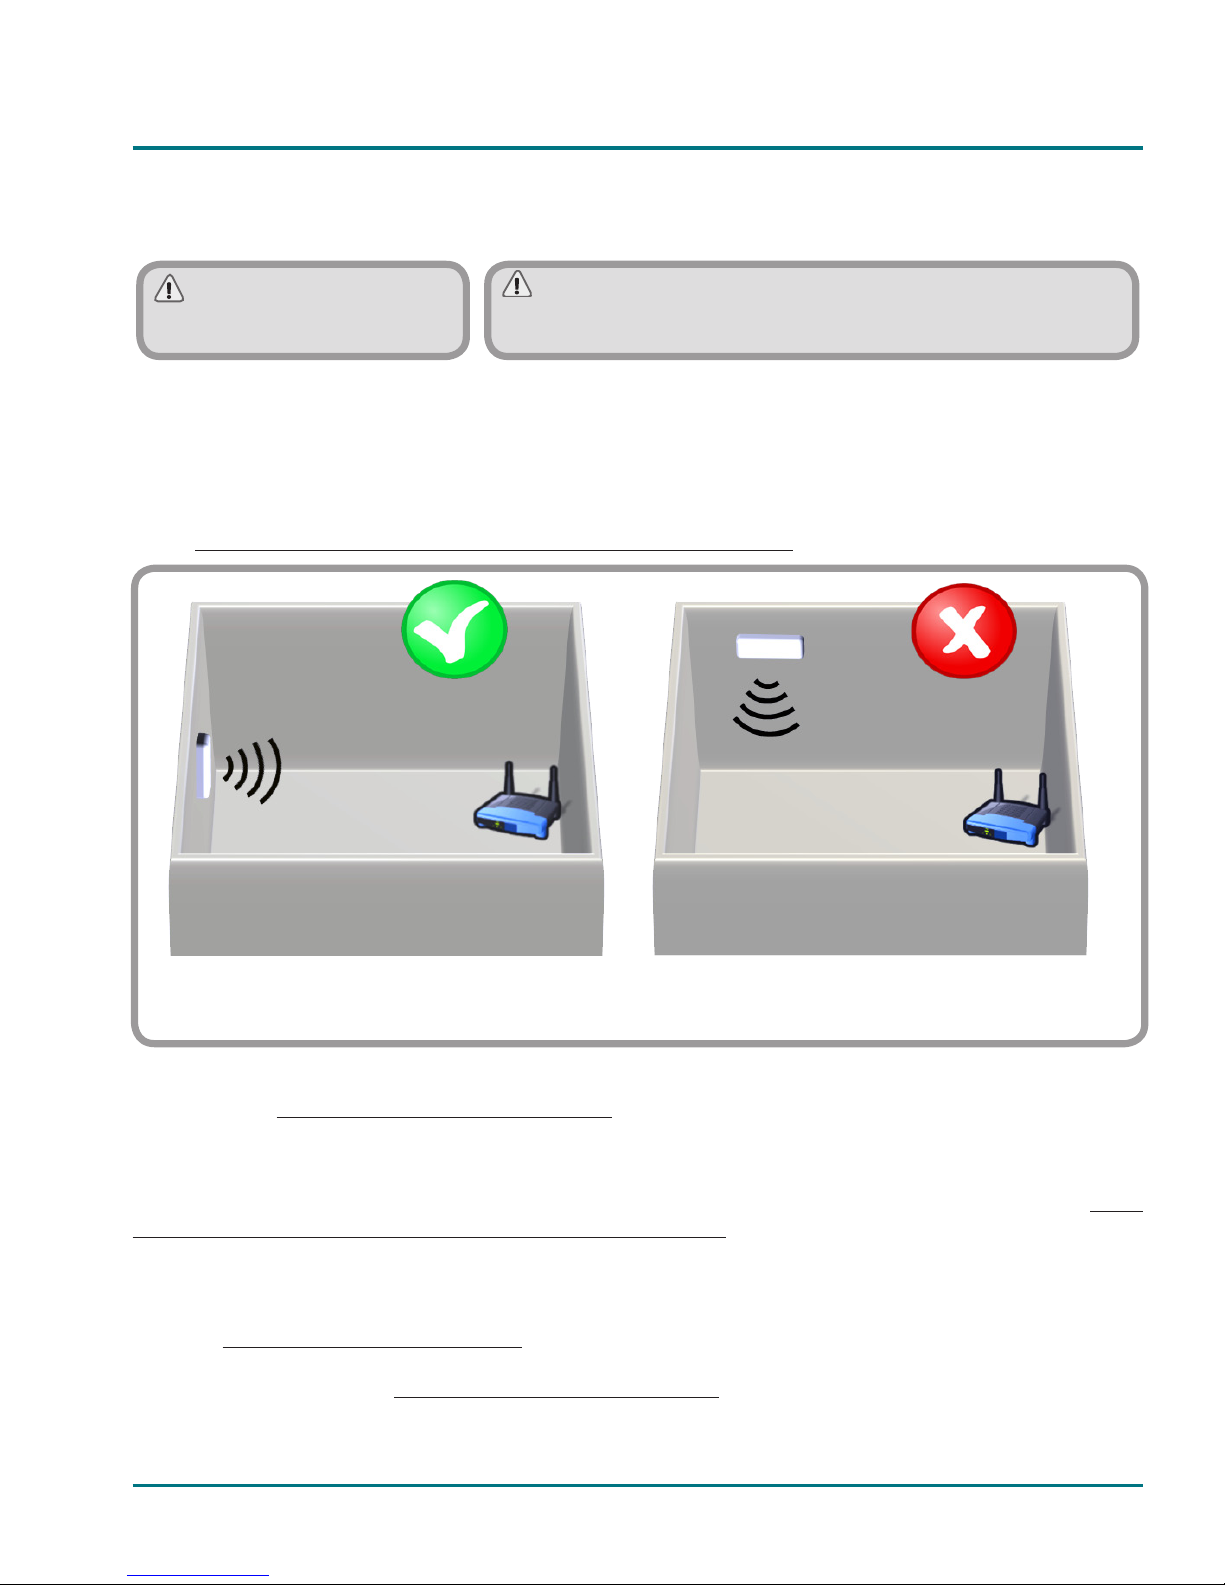
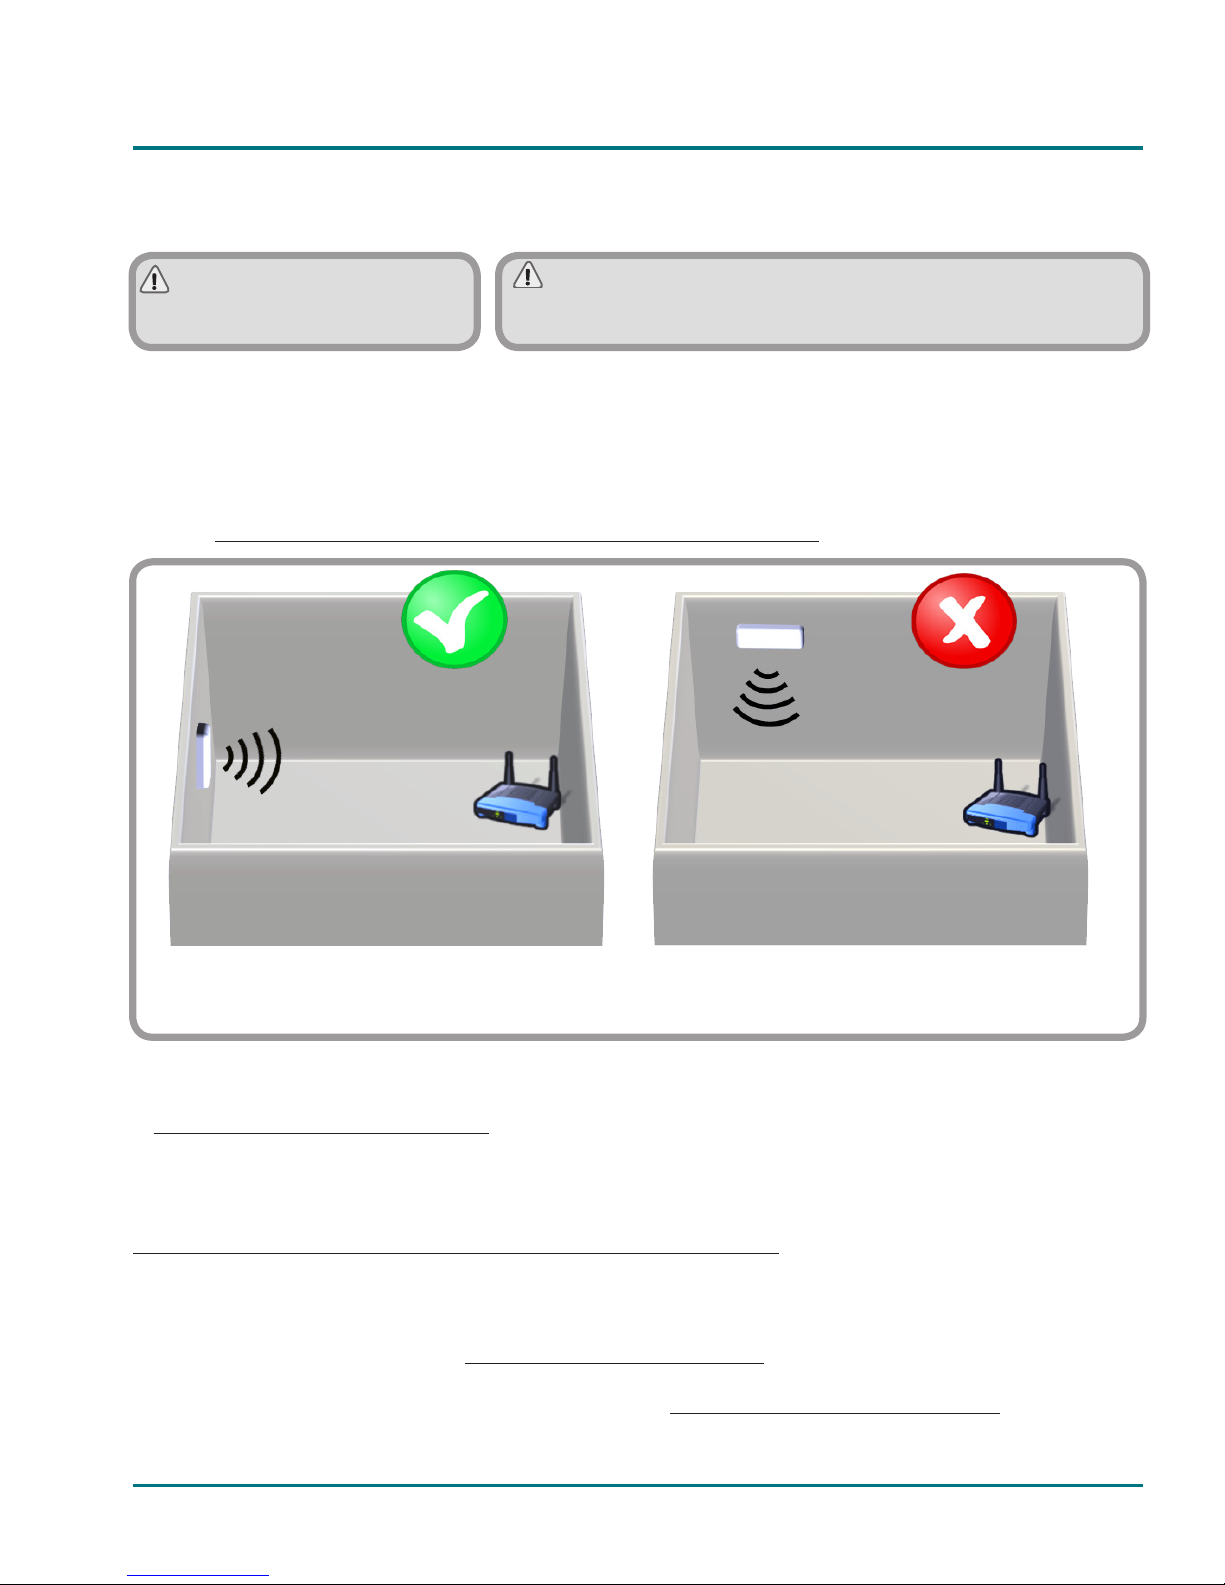
3. Antenna location
Locating the external antenna in a proper location and position will improve communication between the
IntesisHome device and your Wi-Fi Router or Access Point (AP).
Fix the external antenna preferably as close as possible from the Wi-Fi signal source (Access Point
or Router).
Please, make sure that you place the antenna in a vertical position and pointing directly to your Wi-Fi
Router or Access Point (AP).
See www.intesishome.com/docs/PA-RC2-WIFI-1-Install_sketch.pdf for more information.
If you have coverage problems after installation, please visit the connectivity support section
in our site at www.intesishome.com/support/faq/
4. Technical information
In order to obtain a complete and technical description of the device, please see the document at www.
intesishome.com/docs/PA-RC2-WIFI-1-Technical-Info-eng.pdf
5. FAQ and support
For any question or problem related with the product or the installation procedure, please visit our support
center at www.intesishome.com/support .
Please refer to the website www.intesishome.com/downloads for latest updates.
Antenna in vertical position and pointing to
the Wi-Fi Access Point or Router
Antenna in horizontal position and not
pointing to the Wi-Fi Access Point or Router
Antenna
Antenna

IntesisHome®PA-RC2-WIFI-1
7
INSTALLATIONSANLEITUNG
DE
1. Produktbeschreibung
IntesisHome ist ein externes Modul für die Verbindung von Panasonic ECOi und PACi-Geräte mit Ihrem
WLan-Netz, das mittels einer benutzerfreundlichen Schnittstelle eine weltweite Konnektivität sowie
Anwendungen für eine Fernregelung bietet.
Außenansicht
Innenansicht
Vorderansicht Rückansicht
Externe LED-Leuchte
Interne LED-Leuchte
Taste
K1 Steckverbinder
Antennenanschluss
QuickStart-Anleitung
Gerät Externe Antenne Installationsanleitung Garantieschein
100 mm
70 mm 28 mm
74,5 mm
Externe
LED-Leuchte
Antennenanschluss
Taste
Obere Öffnung
Befestigungsöffnung
IntesisHome®PA-RC2-WIFI-1
8
INSTALLATIONSANLEITUNG
2. Vorgehensweise zur Installation
Es gibt zwei verschiedene Kongurationsoptionen: Ohne Control Panel und mit Control Panel.
2.1 Mit Control Panel (empfohlen)
Diese Methode dient zur Steuerung Ihres Panasonic-Systems sowohl mit IntesisHome als auch mit dem
Panasonic-Control Panel.
1. Trennen Sie das Panasonic-System von dem Stromnetz.
2. Öffnen Sie die obere Abdeckung von IntesisHome.
3. Entfernen Sie die Abdeckung der oberen Öffnung von IntesisHome.
4. Verbinden Sie ein Ende des Panasonic-Buskabels mit dem K1-Anschluss von IntesisHome.
5. Verbinden Sie das andere Ende des Panasonic-Buskabels mit dem R1R2-Anschluss des Indoor-
Geräts oder der Verkabelung der Fernbedienung (siehe www.intesishome.com/docs/PA-RC2-
WIFI-1-Install_sketch.pdf für nähere Informationen).
6. Verbinden Sie ein anderes Kabel von dem Control Panel-Anschluss aus mit dem R1R2-
Anschluss des Indoor-Geräts oder mit der Verkabelung der Fernbedienung (siehe www.
intesishome.com/docs/PA-RC2-WIFI-1-Install_sketch.pdf für nähere Informationen).
3 m R1
R2
R1
R2
. . .
# 1
# n
Wi-Fi Router oder
Access Point
Die Installation sollte ausschließlich von einem zugelassenen
Installateur vorgenommen werden.
Bitte befolgen Sie alle Sicherheitsanweisungen, die im Servicehandbuch der Panasonic
Klimaanlage aufgeführt sind.
IntesisHome®PA-RC2-WIFI-1
9
INSTALLATIONSANLEITUNG
DE
7. Schließen Sie die Abdeckung von IntesisHome und Panasonic erneut.
8. Schließen Sie das Panasonic-System erneut an das Stromnetz an.
Wenn die Verbindung mit dem Panasonic-System erfolgreich hergestellt wurde, beginnt die LED-
Leuchte von IntesisHome zu blinken, und wechselt daraufhin auf ein durchgehendes grünes Licht.
9. Verbinden Sie die externe Antenne mit dem Antennenanschluss.
10. Geben Sie die Antenne vorzugsweise in eine vertikale Position, und stellen Sie sicher, dass diese
direkt auf den WLAN-Router oder Access Point (AP) zeigt. Siehe Abschnitt 3.
2.2 Ohne Control Panel
Bei dieser Methode wird davon ausgegangen, dass Sie das Panasonic-System ausschließlich über
IntesisHome verbinden möchten.
1. Trennen Sie das Panasonic-System von dem Stromnetz.
2. Öffnen Sie die obere Abdeckung von IntesisHome.
3. Entfernen Sie die Abdeckung der oberen Öffnung von IntesisHome.
4. Verbinden Sie ein Ende des Panasonic-Buskabels mit dem K1-Anschluss von IntesisHome.
5. Verbinden Sie das andere Ende des Panasonic-Buskabels mit dem R1R2-Anschluss des Indoor-
Geräts oder der Verkabelung der Fernbedienung (siehe www.intesishome.com/docs/PA-RC2-
WIFI-1-Install_sketch.pdf für nähere Informationen).
6. Schließen Sie die Abdeckung von IntesisHome und Panasonic erneut.
7. Schließen Sie das Panasonic-System erneut an das Stromnetz an.
Wenn die Verbindung mit dem Panasonic-System erfolgreich hergestellt wurde, beginnt die LED-
Leuchte von IntesisHome zu blinken, und wechselt daraufhin auf ein durchgehendes grünes Licht.
8. Verbinden Sie die externe Antenne mit dem Antennenanschluss.
9. Geben Sie die Antenne vorzugsweise in eine vertikale Position, und stellen Sie sicher, dass diese
direkt auf den WLAN-Router oder Access Point (AP) zeigt). Siehe Abschnitt 3.
3 m
Max. 500 m
R1
R2
Wi-Fi Router oder
Access Point
IntesisHome®PA-RC2-WIFI-1
10
INSTALLATIONSANLEITUNG
Wichtig: Vermeiden Sie eine
Positionierung des Geräts in
der Nähe von Metallächen.
Wichtig: Überprüfen Sie, sofern möglich, den WLan-
Empfang im Installationsbereich. Ein guter WLan-Empfang
wird dringend empfohlen.
3. Platzierung der Antenne
Die Positionierung der externen Antenne an dem korrekten Standort und in der bestmöglichen Position
verbessert die Kommunikation zwischen IntesisHome und Ihrem WLAN-Router oder Access Point (AP).
.
Fixieren Sie die externe Antenne vorzugsweise so nahe wie möglich an der WLAN-Signalquelle (Access
Point oder Router).
Bitte stellen Sie sicher, dass sich die Antenne in einer vertikalen Position bendet und direkt auf Ihren
WLAN-Router oder Access Point (AP) zeigt.
Siehe www.intesishome.com/docs/PA-RC2-WIFI-1-Install_ sketch.pdf für nähere Informationen.
Wenn Sie nach der Installation Probleme mit dem Empfang haben, bitte besuchen Sie den
entsprechenden Abschnitt auf unserer Internetseite für nähere Informationen
www.intesishome.com/support/faq/
4. Technische Informationen
Eine vollständige technische Beschreibung des Geräts entnehmen Sie bitte der pdf-Datei unter
www.intesishome.com/docs/PA-RC2-WIFI-1-Technical-Info-eng.pdf
5. FAQ und Support
Bitte besuchen Sie bei Fragen oder Problemen bezüglich dieses Produkts oder seiner Installation unser
Support-Center unter der Adresse www.intesishome.com/support .
Die neuesten Informationen nden Sie auf der Website www.intesishome.com/downloads
Antenne in vertikaler Position, zeigt direkt
auf WLAN-Router oder Access Point
Antenne in horizontaler Position, zeigt nicht
direkt auf WLAN-Router oder Access Point
Antenne
Antenne

IntesisHome®PA-RC2-WIFI-1
11
GUIDE D’INSTALLATION
FR
1. Description du produit
Le périphérique IntesisHome est un module externe capable de connecter les unités Panasonic ECOi et
PACi au réseau Wi-Fi de la maison, an de disposer d’une connectivité globale et d’un contrôle distant des
appareils, grâce à une interface usager intuitive.
Vue externe
Vue intérieure
Vue face avant Vue face arrière
LED externe
LED interne
Bouton
Connecteur K1
Connecteur de l’antenne
Guide de Prise en Main
Dispositif Antenne externe Guide d’Installation Garantie
100 mm
70 mm 28 mm
74,5 mm
LED
externe
Connecteur de l’antenne
Bouton
Orice supérieur
Orices de xation

IntesisHome®PA-RC2-WIFI-1
12
GUIDE D’INSTALLATION
2. Processus d’installation
Il existe deux options disponibles de conguration : sans panneau de contrôle et avec panneau de contrôle.
2.1 Avec panneau de contrôle (recommandé)
Cette méthode part du principe que vous souhaitez contrôler le système Panasonic au moyen
d’IntesisHome et du panneau de contrôle Panasonic à la fois.
1. Débranchez le système Panasonic de la ligne d’alimentation électrique.
2. Ouvrez le couvercle supérieur du dispositif IntesisHome.
3. Retirez la protection de l’orice supérieur.
4. Connectez l’une des extrémités du câble du bus Panasonic au connecteur K1 du dispositif
IntesisHome.
5. Connectez l’autre extrémité du câble du bus Panasonic au connecteur R1R2 de l’unité interne de
Panasonic ou câblage de la télécommande (voir www.intesishome.com/docs/PA-RC2-WIFI-1-
Install_sketch.pdf pour plus d’information).
6. Connectez l’autre câble du connecteur du panneau de contrôle au connecteur R1R2 de l’unité
interne Panasonic ou câblage de la télécommande (voir www.intesishome.com/docs/PA-RC2-
WIFI-1-Install_sketch.pdf pour plus d’information).
La conguration du produit doit être effectuée par un
technicien agréé.
3 m R1
R2
R1
R2
. . .
# 1
# n
Veuillez respecter les instructions de sécurité fournies par le manuel de fonctionnement
Panasonic ou par le manuel d’installation.
Wi-Fi Router ou
Point d’Accés
IntesisHome®PA-RC2-WIFI-1
13
GUIDE D’INSTALLATION
FR
7. Fermez de nouveau le couvercle d’IntesisHome et de Panasonic.
8. Branchez le système Panasonic à la ligne d’alimentation électrique.
Si la connexion au système Panasonic a été réalisée avec succès, le LED du dispositif
d’IntesisHome commencera à clignoter en vert, puis cette même couleur deviendra stable
9. Connectez l’antenne externe au connecteur de l’antenne.
10. Placez l’antenne de préférence en position verticale, pointant directement vers le routeur Wi-Fi ou
le point d’accès (AP, en anglais). Voir la section 3.
2.2 Sans panneau de contrôle
Cette méthode part du principe que vous souhaitez contrôler le système Panasonic exclusivement au
moyen d’IntesisHome.
1. Débranchez le système Panasonic de la ligne d’alimentation électrique.
2. Ouvrez le couvercle supérieur du dispositif IntesisHome.
3. Retirez la protection de l’orice supérieur.
4. Connectez l’une des extrémités du câble du bus Panasonic au connecteur K1 du dispositif
IntesisHome.
5. Connectez l’autre extrémité du câble du bus Panasonic au connecteur R1R2 de l’unité interne de
Panasonic ou câblage de la télécommande (voir www.intesishome.com/docs/PA-RC2-WIFI-1-
Install_sketch.pdf pour plus d’information)
6. Fermez de nouveau le couvercle d’IntesisHome et de Panasonic.
7. Branchez le système Panasonic à la ligne d’alimentation électrique.
Si la connexion au système Panasonic a été réalisée avec succès, le LED du dispositif
d’IntesisHome commencera à clignoter en vert, puis cette même couleur deviendra stable
8. Connectez l’antenne externe au connecteur de l’antenne.
9. Placez l’antenne de préférence en position verticale, pointant directement vers le routeur Wi-Fi ou
le point d’accès (AP, en anglais). Voir la section 3.
3 m
Max. 500 m
R1
R2
Wi-Fi Router ou
Point d’Accés

IntesisHome®PA-RC2-WIFI-1
14
GUIDE D’INSTALLATION
3. Emplacement de l’antenne
Placer l’antenne externe dans un endroit et une position adéquats améliorera la communication entre le
dispositif IntesisHome et votre routeur Wi-Fi Router ou point d’accès (AP, en anglais).
Fixez l’antenne externe de préférence aussi près que possible de la source du signal Wi-Fi (point d’accès
ou routeur).
Veuillez-vous assurer de placer l’antenne dans une position verticale, pointant directement vers votre
routeur Wi-Fi ou point d’accès (AP, en anglais).
Voir www.intesishome.com/docs/PA-RC2-WIFI-1-Install_sketch.pdf pour plus d’information.
Si vous avez des problèmes de couverture suite à l’installation, veuillez visiter notre section d’assistanceà
la connectivité sur notre site, sur www.intesishome.com/support/faq/
4. Fiche technique
La che technique complète du module peut être consultée sur www.intesishome.com/docs/PA-RC2-WIFI-
1-Technical-Info-eng.pdf
5. FAQ et assistance
Pour toute question ou problème au sujet de ce produit ou de son installation, veuillez consulter notre
centre d’assistance sur www.intesishome.com/support .
Veuillez consulter le site www.intesishome.com/downloads pour prendre connaissance de la
dernière mise à jour.
L’antenne est en position verticale et
pointant directement vers le point d’accès
Wi-Fi ou routeur
L’antenne est en position horizontale et ne
pointe pas directement vers le point d’accès
Wi-Fi ou routeur
Important: Ne placez
pas le module près d’une
surface métallique.
Important: Si possible, vériez la couverture Wi- dans le
local d’installation. Il est fortement recommandé de disposer
d’un signal Wi-Fi de bon niveau.
Antenne
Antenne

IntesisHome®PA-RC2-WIFI-1
15
IT
GUIDA PER L’INSTALLAZIONE
1. Descrizione del prodotto
Il dispositivo IntesisHome è un modulo esterno in grado di connettere unità Panasonic ECOi e PACi alla
tua rete Wi-Fi consentendo così un collegamento globale e applicazioni di controllo a distanza attraverso
un’interfaccia intuitiva e di facile utilizzo.
Visione Esterna
Interno del dispositivo
Fronte Retro
LED esterno
LED interno
Pulsante
Connettore K1
Connettore per l’Antenna
Guida Rapida
Dispositivo Antenna esterna Guida per l’Installazione Garanzia
100 mm
70 mm 28 mm
74,5 mm
LED esterno
Connettore per l’Antenna
Pulsante
Foro superiore
Fori Montaggio
IntesisHome®PA-RC2-WIFI-1
16
GUIDA PER L’INSTALLAZIONE
2. Installazione
Sono disponibili due modalità di congurazione: Senza Pannello di Controllo e Con Pannello di Controllo.
2.1 Con Pannello di controllo (scelta consigliata)
Questo metodo presuppone che si desidera controllare il sistema Panasonic sia con IntesisHome che
con il Pannello di Controllo Panasonic.
1. Scollegare il sistema Panasonic dalla linea di alimentazione.
2. Aprire il coperchio superiore del dispositivo IntesisHome.
3. Rimuovere il coperchio del Foro Superiore del dispositivo IntesisHome.
4. Collegare un estremo del cavo del bus Panasonic nel connettore K1 del dispositivo IntesisHome.
5. Collegare l’altra estremità del cavo del bus Panasonic al connettore R1R2 dell’unità interna o
collegarlo al telecomando (vedere www.intesishome.com/docs/PA-RC2-WIFI-1-Install_sketch.pdf
per ulteriori informazioni).
6. Collegare un altro cavo dal connettore del pannello di controllo Panasonic al connettore R1R2
dell’unità interna o collegarlo al telecomando (vedere www.intesishome.com/docs/PA-RC2-WIFI-
1-Install_sketch.pdf per ulteriori informazioni).
L’installazione può essere effettuata solo da tecnici
autorizzati.
3 m R1
R2
R1
R2
. . .
# 1
# n
Seguire tutte le Istruzioni di Sicurezza indicate da Panasonic nel manuale di servizio e/o nel
manuale di installazione.
Wi-Fi Router o
Access Point
IntesisHome®PA-RC2-WIFI-1
17
GUIDA PER L’INSTALLAZIONE
IT
7. Richiudere il coperchio superiore del dispositivo IntesisHome
8. Collegare il sistema Panasonic alla linea di alimentazione.
Se la connessione con il sistema Panasonic ha avuto successo, il LED del dispositivo IntesisHome
inizierà a lampeggiare verde e poi diventa verde sso.
9. Collegare l’antenna esterna nel connettore esterno.
10. Posizionare l’antenna preferibilmente in posizione verticale e che punti direttamente al Router
Wi-Fi o access point (AP). Vedere la sezione 3.
2.2 Senza Pannello di Controllo
Questa modalità implica che l’utente voglia controllare il sistema Panasonic esclusivamente attraverso
IntesisHome.
1. Scollegare il sistema Panasonic dalla linea di alimentazione.
2. Aprire il coperchio superiore del dispositivo IntesisHome.
3. Rimuovere il coperchio del Foro Superiore del dispositivo IntesisHome.
4. Collegare un estremo del cavo del bus Panasonic nel connettore K1 del dispositivo IntesisHome.
5. Collegare l’altra estremità del cavo del bus Panasonic al connettore R1R2 dell’unità interna o
collegarlo al telecomando (vedere www.intesishome.com/docs/PA-RC2-WIFI-1-Install_sketch.pdf
per ulteriori informazioni).
6. Richiudere il coperchio superiore del dispositivo IntesisHome
7. Collegare il sistema Panasonic alla linea di alimentazione.
Se la connessione con il sistema Panasonic ha avuto successo, il LED del dispositivo IntesisHome
inizierà a lampeggiare verde e poi diventa verde sso.
8. Collegare l’antenna esterna nel connettore esterno.
9. Posizionare l’antenna preferibilmente in posizione verticale e che punti direttamente al Router
Wi-Fi o access point (AP). Vedere la sezione 3.
3 m
Max. 500 m
R1
R2
Wi-Fi Router o
Access Point
IntesisHome®PA-RC2-WIFI-1
18
GUIDA PER L’INSTALLAZIONE
Importante: Non collocare
il dispositivo accanto a
superci metalliche
Importante: Quando possibile, provare a controllare la
copertura Wi-Fi del luogo di installazione. Si raccomanda
vivamente un alto livello di copertura Wi-Fi.
3. Posizionamento dell’Antenna
Posizionare l’antenna esterna in un luogo ed in una posizione corretta, migliorerà la comunicazione tra il
dispositivo IntesisHome e la rete Wi-Fi router o access point (AP).
Fissare l’antenna esterna preferibilmente il più vicino possibile dalla sorgente di segnale Wi-Fi (punto di
accesso o Router).
Assicurarsi di posizionare l’antenna in posizione verticale e che punti direttamente al vostro Router Wi-Fi
o Access Point (AP).
Vedere www.intesishome.com/docs/PA-RC2-WIFI-1-Install_sketch.pdf per ulteriori informazioni.
Se si vericano problemi di copertura dopo l’installazione, si prega di visitare la sezione di supporto di
connettività nel nostro sito all’indirizzo www.intesishome.com/support/faq/
4. Informazione tecnica
Per ottenere una descrizione tecnica completa del dispositivo, vedere il documento nel sito www.
intesishome.com/docs/PA-RC2-WIFI-1-Technical-Info-eng.pdf
5. FAQ e assistenza
Per qualsiasi domanda o problema riscontrato con questo prodotto o durante la sua installazione, visitare
il sito del nostro centro di assistenza www.intesishome.com/support .
Per l’aggiornamento più recente, visitare il sito Web www.intesishome.com/downloads.
Antenna in posizione verticale e che punti
all’ Access Point o al Router Wi-Fi
Antenna in posizione orizzontale e che non
punti all’ Access Point o al Router Wi-Fi
Antenna
Antenna

IntesisHome®PA-RC2-WIFI-1
19
GUÍA DE INSTALACIÓN
ES
1.Descripción del producto
El dispositivo IntesisHome es un módulo externo capaz de conectar unidades Panasonic ECOi y PACi
a tu red Wi-Fi para ofrecer conectividad global y aplicaciones de control remoto a través de una interfaz
amigable.
Vista Exterior
Vista interior
Vista Frontal Vista Trasera
LED externo
LED interno
Botón
Conector K1
Conector antena
Guía de Inicio Rápido
Dispositivo Antena externa Guía de Instalación Garantía
100 mm
70 mm 28 mm
74,5 mm
LED externo
Conector antena
Botón
Agujero superior
Agujero de jación
IntesisHome®PA-RC2-WIFI-1
20
GUÍA DE INSTALACIÓN
2. Procedimiento de instalación
Existen 2 modos disponibles para la instalación: Con Panel de Control y sin Panel de Control.
2.1 Con Panel de Control (Recomendado)
Este método asume que se desea controlar el sistema Panasonic a través del Panel de control de
Panasonic y a través de IntesisHome simultáneamente.
1. Desconecte el sistema Panasonic de la alimentación.
2. Abra la tapa superior del disposittivo IntesisHome.
3. Retire la cobertura del agujero superior del dispositivo IntesisHome.
4. Conecte un extremo del cable del bus de Panasonic al conector K1 del dispositivo IntesisHome.
5. Conecte el otro extremo del cable del bus Panasonic en al conector R1R2 de la unidad interior o
al cable del Panel de Control (ver www.intesishome.com/docs/PA-RC2-WIFI-1-Install_sketch.pdf
para más información).
6. Conecte otro cable del Panel de Control al conector R1R2 de la unidad interior o al cable del
control remoto (ver www.intesishome.com/docs/PA-RC2-WIFI-1-Install_sketch.pdf para más
información).
El proceso de instalación sólo deberá realizarse por
instaladores autorizados.
3 m R1
R2
R1
R2
. . .
# 1
# n
Por favor, sigue las Instrucciones de Seguridad proporcionadas por el manual de servicio o
instalación de Panasonic.
Router o Punto
de Acceso Wi-Fi
Table of contents
Languages:
Other IntesisHome Recording Equipment manuals


