epiphan video AV.io HD User manual
1
AV.io HD
Release 1.0.10
June 30, 2015
User Guide

Thank you for choosing Epiphan Video!
At Epiphan Video, product function and quality are our top priority. We make every effort to make sure that
our products exceed your expectations.
Product feedback
Your feedback is important! We regularly contact our customers to ensure our products meet your
performance and reliability requirements. We strive to continually enhance our products to accommodate your
needs. Please let us know how you think we can improve our products by emailing your suggestions to
Specifications
Go to the USB Video Grabbers page of the Epiphan website to get the most recent product specifications and
additional information about Epiphan AV.io HD.
Warranty
All Epiphan Video products are provided with a 100% return to depot warranty for one year from the date of
purchase.
Technical support
Epiphan’s products are backed by our professional support team. If you are having issues with your product,
please gather details about your system and contact our team by:
E-mailing support@epiphan.com
Live chat via the link on our support site http://www.epiphan.com/support/
Phone toll free at 1-877-599-6581 or call +1 613-599-6581
Be sure to include as much information about your problem as possible, including:
Problem description
Details of the video or audio source (type, resolution, refresh rate, etc.)
Product serial number
Your operating system and version number
Copyright © 2015 Epiphan Systems Inc. All Rights Reserved.

Table of contents
Introducing AV.io HD! ...................................................................................1
Product Features............................................................................................................................................................................1
Limitations and Known Issues ..............................................................................................................................................1
Getting started................................................................................................4
Contents of the kit......................................................................................................................................................4
System requirements.................................................................................................................................................5
Capturing live video content.........................................................................6
How AV.io HD works......................................................................................7
Resolutions and capture rates...............................................................................................................................7
Aspect ratios..................................................................................................................................................................7
Automatic image scaling & audio resampling...............................................................................................8
Third-party applications...........................................................................................................................................8
Physical features.............................................................................................9
Indicator LED details ...............................................................................................................................................10
Technical specifications.........................................................................................................................................11
Optional configuration ............................................................................... 12
Input signal resolution............................................................................................................................................................ 12
Preserve aspect ratio................................................................................................................................................................ 12
Performance mode.................................................................................................................................................................... 12
Changing the configurable settings using the AV.io Config tool .......................................................13
To change the configurable settings using the AV.io Config tool................................................................................. 13
To update the firmware using the AV.io Config tool .......................................................................................................... 14
Software and Documentation License ..........................................................i

AV.io HD User Guide –Release Notes
1
Introducing AV.io HD!
Epiphan’s AV.io HD is a new video grabber –the first of its kind in Epiphan’s family of Grab & Go video capture
hardware!
AV.io HD provides cross-platform, high-definition video capture. It is portable, flexible, and simple to use: the
perfect companion to your HD video source! Best of all, there’s no installation required! Simply connect the
required cables and you’re ready to start capturing live HD video content with your favourite third-party
application!
Product Features
Simplicity of use
AV.io HD has no driver to install and is ready to capture right out of the box! This is because AV.io HD is a UVC-
capture device, which means it works automatically with existing drivers on your operating system –just like a
webcam!
HD video capture
Looking for quality video capture? Look no further! Use AV.io HD to capture from HDMI (with HDMI audio),
DVI or VGA sources in Full HD at 60 fps!
Automated capture configuration
AV.io HD works automatically with all resolutions up to 1080p and also resizes video and resamples audio
outputs on your behalf for a worry-free and seamless video capture experience without any configuration
required!
Extensive third-party support
AV.io HD works with UVC-friendly applications including Skype, VLC media player, Wirecast, Adobe FMLE and
many more!
Limitations and Known Issues
This section includes known issues or limitations that affect functionality or usability and ways that you can
work around these limitations.
AV.io HD is not a selectable device when attempting to capture on Mac using VLC media player (this is
a VLC-specific bug).
Workaround: Upgrade to an older version of VLC media player (ex: 2.1) or use a different
capture application.

AV.io HD User Guide –Release Notes
2
On Windows 7, when AV.io HD is connected to the video source and capture computer, the AV.io
Config tool displays the device more than once in the device list.
Workaround: Press the refresh icon to refresh the device list; only one AV.io HD device will now
properly display.
When AV.io HD is connected to the video source and capture computer on Windows 7, the AV.io
Config tool sometimes does not display AV.io HD on the device list despite showing up as an installed
device on the computer’s Device Manager.
Workaround: Use AV.io Config on a different supported OS to configure AV.io HD. Firmware
updates and configuration changes will be saved to the device. (Note that the AV.io HD device
still functions with the selected capture application on the original Windows 7 workstation
despite possible issues with the AV.io Config tool.)
Plugging in AV.io HD to a USB 3.0 port on Windows 8.1 causes the Windows Device Setup window to
freeze.
Workaround: Close and ignore the frozen Device Setup window; AV.io HD is installed and
available for use.
On Windows 8.1/10, streaming is not possible when the capture computer with an ASMedia ASM1042A
USB 3.0 controller recovers from sleep mode.
In this scenario, AV.io HD is connected to both the capture computer and video source. Streaming is
initiated through the application, then stopped. The computer is then put in sleep mode, and upon
recovering from sleep, streaming cannot be resumed. This only occurs when using a capture computer
with an ASMedia ASM1042A USB 3.0 controller.
Workaround: Connect to a different USB 3.0 controller. Use the lsusb command to list all USB
devices and connect to a different USB 3.0 controller that is not ASMedia.
Using Chromebook Apps (Clipchamp) and WebRTC on Google Chrome OS
v 43.0.2357.125 (64 bit), AV.io HD is not detected as a valid audio device.
Workaround: Use Clipchamp and WebRTC for capturing video only, or use a different
Chromebook app to capture both video and audio.
In Ubuntu 14.04 LTS, the very first frame is always green in all streaming attempts (with the exception of
the first streaming attempt after device boot).
Workaround: Remove the green frame in post-production editing. If streaming, begin stream
after the initial green frame as already been captured.

AV.io HD User Guide –Release Notes
3
Disconnecting and reconnecting the USB 3.0 cable on an AV.io HD device with an HDMI splitter causes
video capture to become nonfunctional.
Workaround: Avoid using a splitter. If a splitter is necessary, disconnect then reconnect USB 3.0
cable from capture computer before reconnecting cable to AV.io HD.
AV.io HD User Guide –Getting Started
4
Getting started
Welcome and thank you for buying Epiphan’s AV.io HD!
This guide contains all the information necessary to successfully use AV.io HD to quickly and easily capture live
video content without any configuration –simply connect the cables and you’re ready to go!
We’ll start off by jumping right into it by showing you how to start capturing video, then we’ll take you through
how AV.io HD works, followed with some technical reference material, and we’ll conclude with a walkthrough
of some optional video capture configuration.
Let’s get started!
Contents of the kit
Your Epiphan AV.io HD product contains everything you need to easily capture live video content with minimal
setup. Your purchase includes the following:
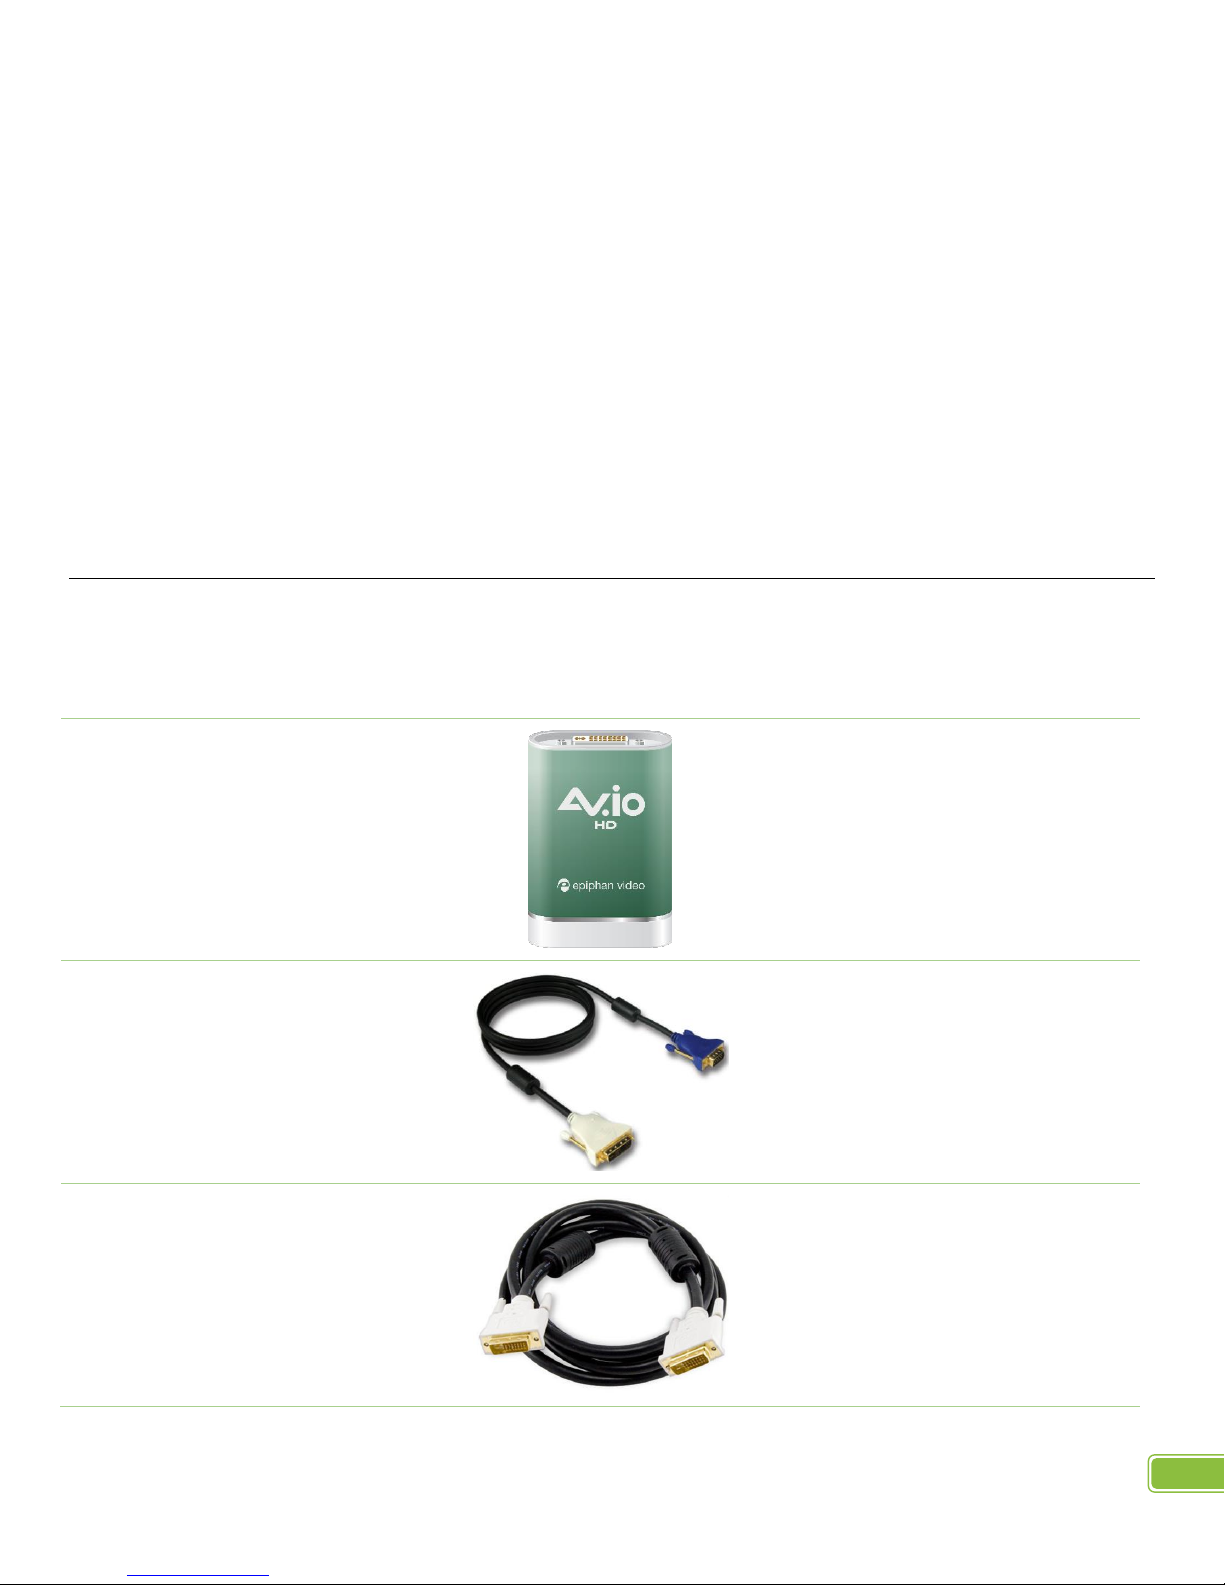
AV.io HD video grabber
Your video capture device!
DVI to VGA cable
Connects a video source with a
VGA port to your AV.io HD’s DVI
port. This cable is included with
your AV.io HD purchase.
DVI single link cable
(3 feet)
Connects a DVI source to your
AV.io HD’s DVI port.
AV.io HD User Guide –Getting Started
5
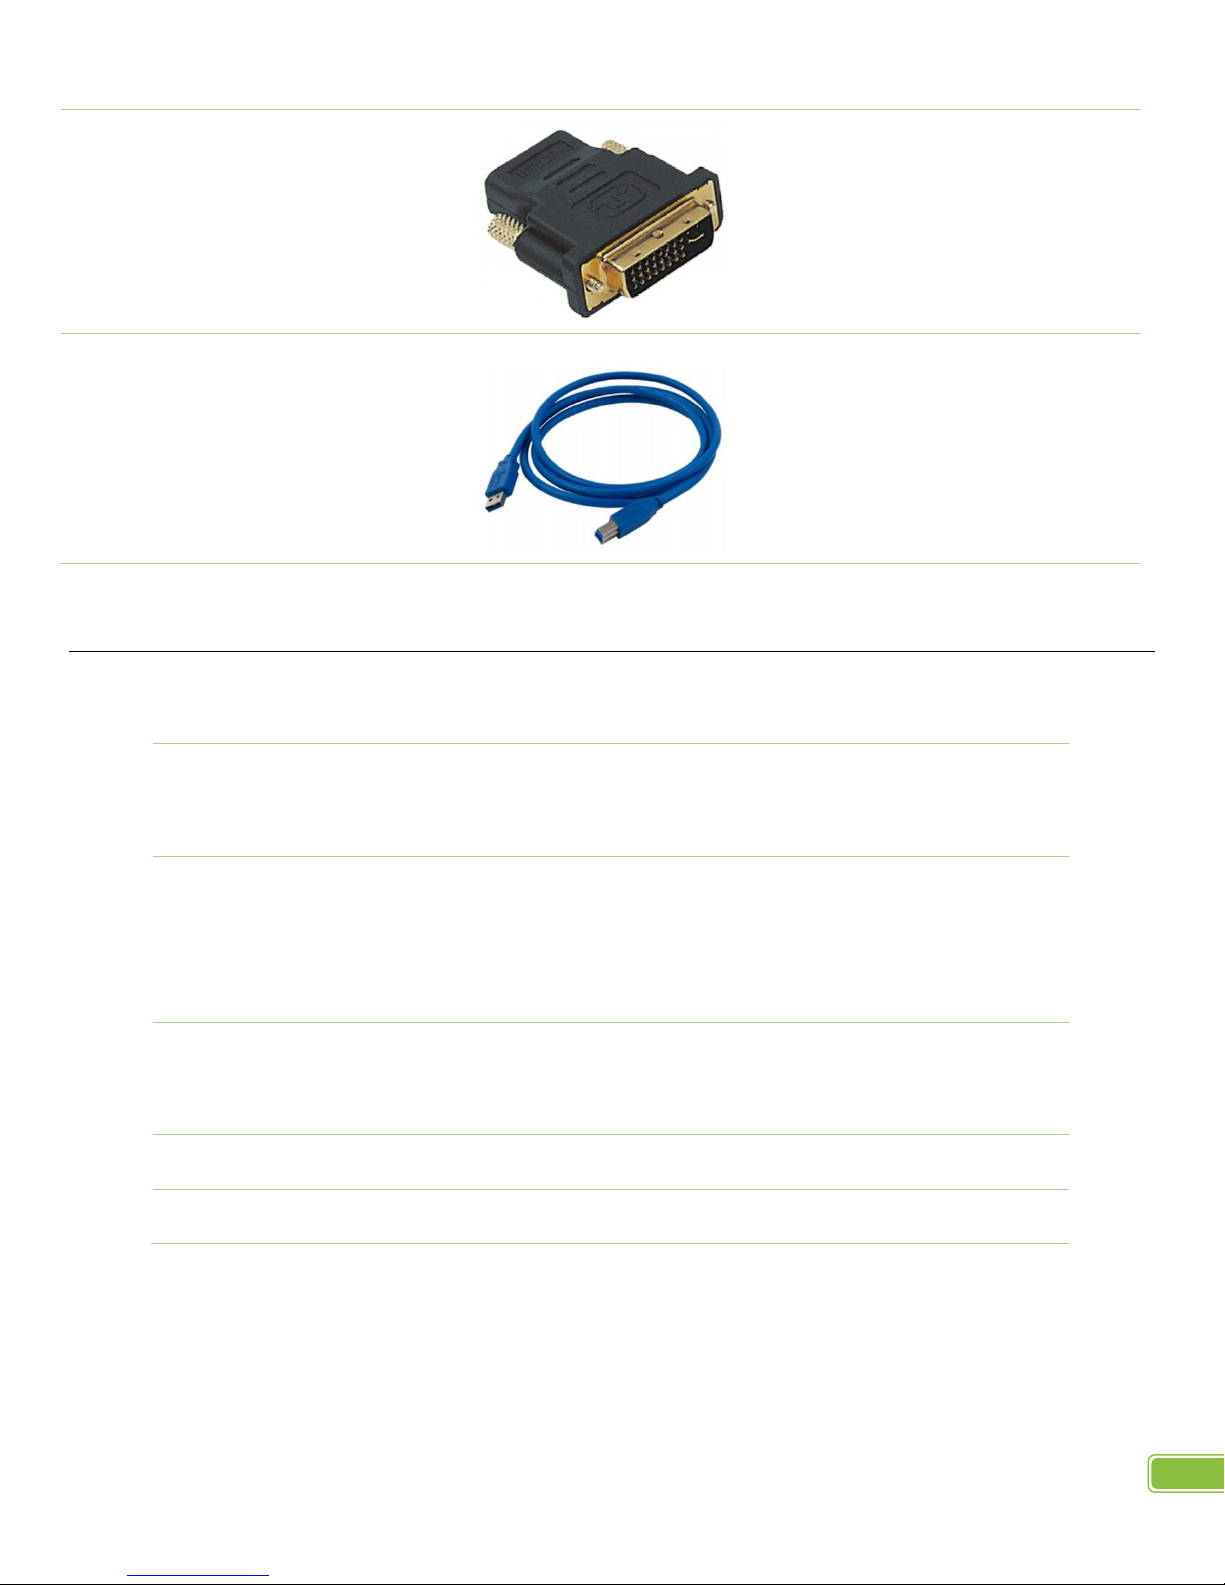
HDMI to DVI adapter
Connects an HDMI source to your
AV.io HD’s DVI port
USB 3.0 cable
(1 meter)
The USB 3.0 cable connects your
AV.io HD video grabber with your
desktop computer, laptop or
notebook’s USB 3.0 or 2.0 port.
System requirements
System requirements are the barebones technical essentials your computer needs to work with AV.io HD.
System requirements to use AV.io HD include:
Video source
Any VESA-compatible VGA, DVI or HDMI source.
(AV.io HD cannot capture from an HDCP encrypted
source)
Video capture workstation
Any computer (laptop/desktop/other format) with:
a compatible USB 3.0 host controller for
SuperSpeed operation;
or a USB 2.0 controller
Video capture workstation
operating system
Windows 7, Windows 8.1, Windows 10
Mac OS X 10.10 and up
Linux distribution with kernel 3.5.0 or higher
Processor frequency
Minimum recommended value: 2.4 GHz
RAM
Minimum recommended value: 4 GB

AV.io HD User Guide –Capturing live video content
6
Capturing live video content
Setting up your AV.io HD device to capture live video content couldn’t be easier!
1. Connect your AV.io HD device to your video source
2. Connect your AV.io HD device to your desktop computer, laptop or notebook
3. Open your favourite built-in or third-party application, select AV.io HD from the list
of available cameras and start capturing!
And that’s it! No drivers to install and no extensive set-up! Just connect the cables and you’re ready to go!

AV.io HD User Guide –How AV.io HD works
7
How AV.io HD works
Once you’re ready to start capturing, you’ll need either a built-in or third-party application to capture video
content with AV.io HD. The application will communicate with AV.io HD and negotiate a frame rate (frequency
at which frames in a video sequence are displayed) and frame size (size of a single video frame in pixels).
Resolutions and capture rates
The display resolution or display modes of a TV, computer monitor or display device is the number of distinct
pixels in each dimension that can be displayed.
AV.io HD generates a list of the following possible resolutions for your capture application to select for output
display:
640×360
848×480
1024×768
1280×1024
1920×1080
640×480
960×540
1280×720
1600×1200
1920×1200
Captured video content outputs to your application at 15, 30 or 60 frames per second.
Aspect ratios
The aspect ratio of an image describes the proportional relationship between its pixel width and height.
AV.io HD outputs resolutions in many commonly supported aspects ratios, color-coded according to table of
resolutions above and described in the table below:
4:3
16:9
16:10 (8:5)
5:4
Aspect Ratio
Common Use
4:3
Standard letterbox TV display and non-widescreen computer displays
16:9
Widescreen (HD) TV displays (1080p, 1080i, 720p etc)
16:10 (8:5)
Widescreen computer displays
5:4
Sometimes used in larger format computer monitors
AV.io HD User Guide –How AV.io HD works
8
Automatic image scaling & audio resampling
If your source content is larger or smaller than the frame size chosen by the application, AV.io HD automatically
scales your source to match the desired frame size! No user configuration required!
Av.io HD also automatically performs audio resampling, meaning that no matter the bit depth or frequency of
audio through an HDMI audio source, AV.io HD automatically resamples your audio so that your application
gets a consistent audio sample rate and bit depth, even if you change the video source!
Third-party applications
Once your AV.io HD is connected and ready to go, you can now begin capturing live video content via any
UVC-compatible third-party application. These third-party applications include, but are not limited to:
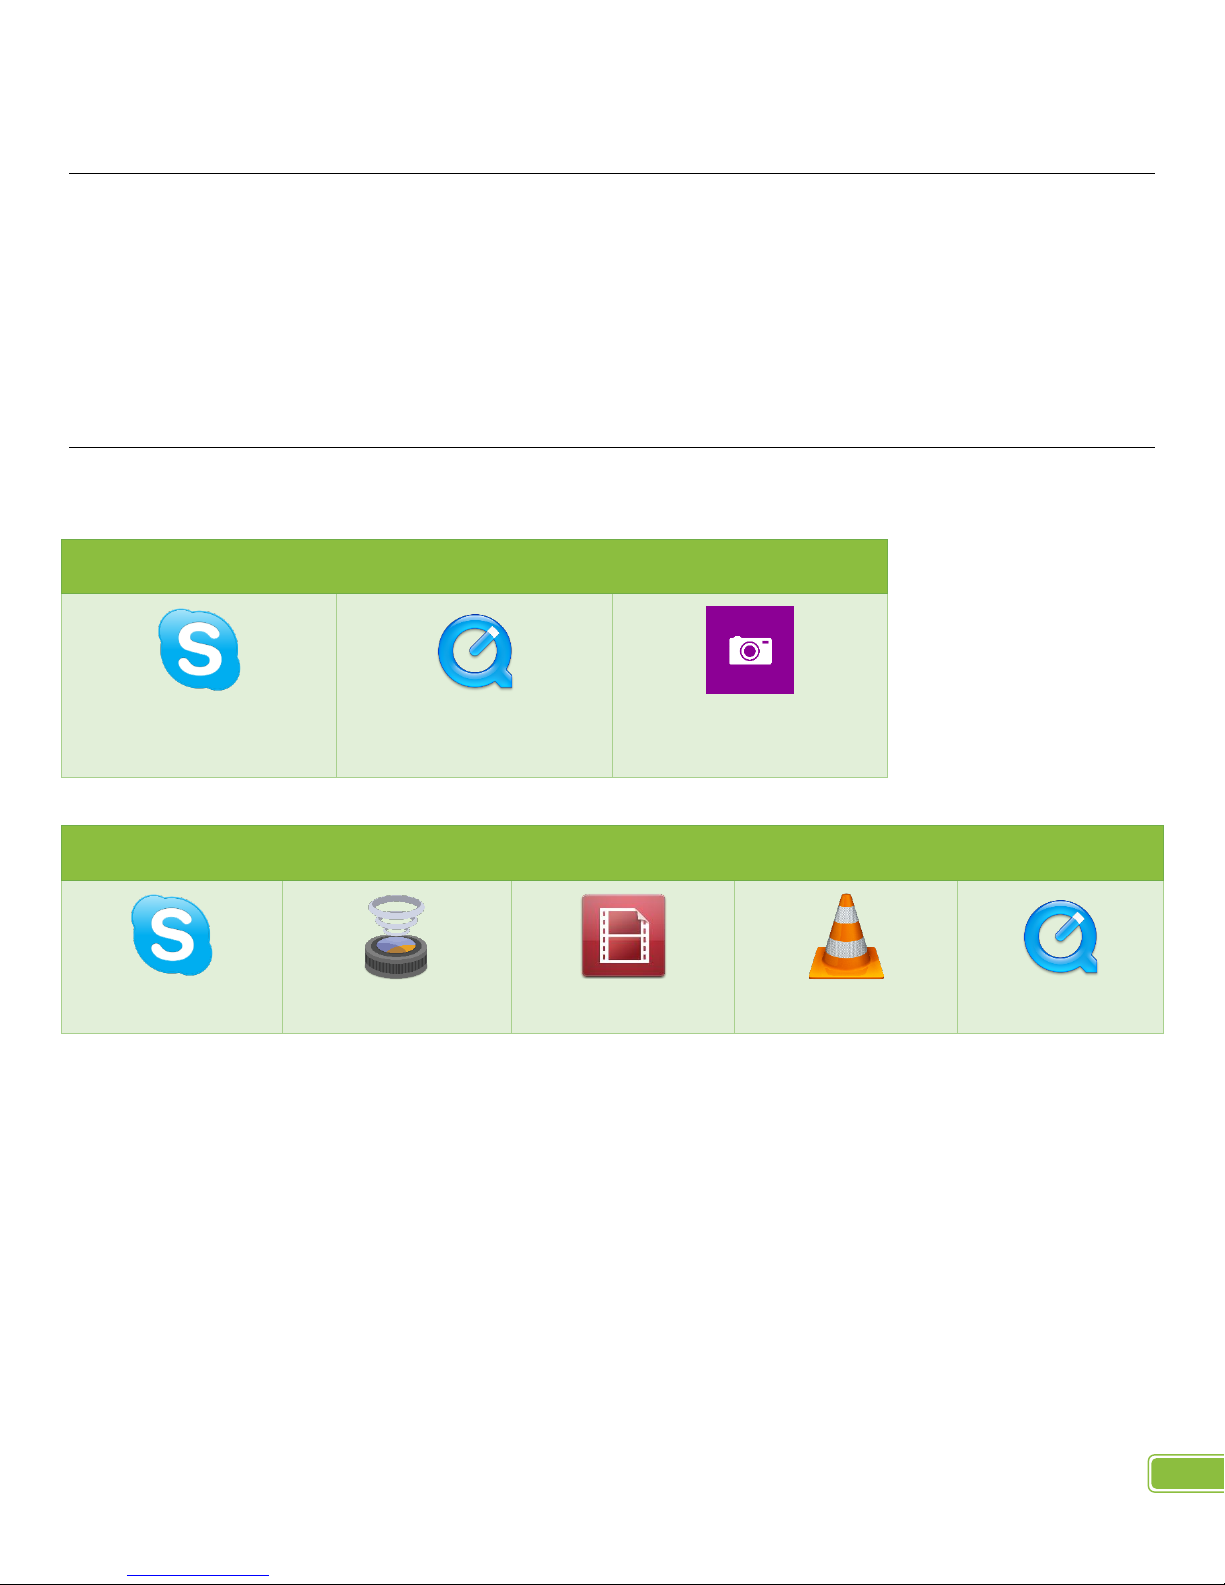
Zero install applications (included with your OS)
Skype
(with Windows 8.1)
Quicktime
(with Mac OS X)
Windows Camera App
(with Windows 8.1)
Popular applications available for download
Skype
Wirecast
Adobe FMLE
VLC media player
Quicktime

AV.io HD User Guide –Physical features
9
Physical features
Your AV.io HD device includes two inputs and an indicator light.
Inputs and indicator lights are identified in the top and bottom cap view AV.io HD images below. Inputs are
explained in the images, and the indicator light details are explained in the proceeding table.
Figure 1 –AV.io HD top cap view
Figure 2 –AV.io HD bottom cap view

AV.io HD User Guide –Physical features
10
Indicator LED details
The color and action of the indicator LED depends on whether you are connected by USB 3.0 or USB 2.0. For
maximum performance, always use a USB 3.0 port and the included USB 3.0 cable. Note that frame capture rate
will be reduced when connected via USB 2.0.
If you’re not sure if your controller is USB 3.0 or USB 2.0, plug AV.io HD into the capture computer and look at
the indicator LED:
A solid blue LED means USB 3.0 and…
a solid green LED means USB 2.0
Connection type/LED color
USB 3.0 connection
USB 2.0 connection
Solid red
Firmware update in
progress
AV.io HD initializing
Firmware update in
progress
AV.io initializing
Blinking red
Adjustment to VGA input in
progress
Adjustment to VGA input in
progress
Solid green
–
USB 2.0 connection active
USB 3.0 (solid blue) or USB 2.0
(solid green) begins blinking
only green
Audio transferring successfully
Video transferring successfully
Solid blue
USB 3.0 connection active
–
USB 3.0 (solid blue) or USB 2.0
(solid green) begins blinking
only blue
Video transferring successfully
Audio transferring successfully
USB 3.0 (solid blue), now
blinking green and blue
Video and audio transferring
successfully
–
USB 2.0 (solid green), now
blinking blue and green
–
Video and audio transferring
successfully

AV.io HD User Guide –Physical features
11
Technical specifications
Connectors
DVI-I (digital and analog)
USB standard B type
Input
HDMI (audio compatible)
VGA and DVI
Audio (HDMI) Input
16-bit and 24-bit PCM encoded
audio at 32 kHz, 44.1 kHz and 48
kHz sampling rates
Audio (UAC) output
16-bit 48 kHz stereo audio
sampling rates
Color space
YUV 4:2:2
Supported output resolutions
(at 15, 30 or 60 fps capture rate)
640×360 640×480
848×480 960×540
1024×768 1280×720
1280×1024 1600×1200
1920×1080 1920×1200
Capture delay
Near-zero latency, although
certain third-party applications
may contribute to delay
OS support
(32-bit and 64-bit)
Windows 7, Windows 8.1,
Windows 10
Mac OS X 10.10 and up
Linux distribution with kernel 3.5.0
or higher
USB support
USB 3.0 and 2.0

AV.io HD User Guide –Optional configuration
12
Optional configuration
Your AV.io HD device is ready to use right out of the box; however, there is support for additional configuration
should you need it. Changes can be made to your AV.io HD’s default settings through Epiphan’s AV.io Config
tool.
The AV.io Config tool allows you to change several settings to make changes to your video capture experience
if necessary. Most user’s won’t need to use this utility for anything other than firmware update, but advanced
users may find these tweaks help them get the most out of their AV.io HD.
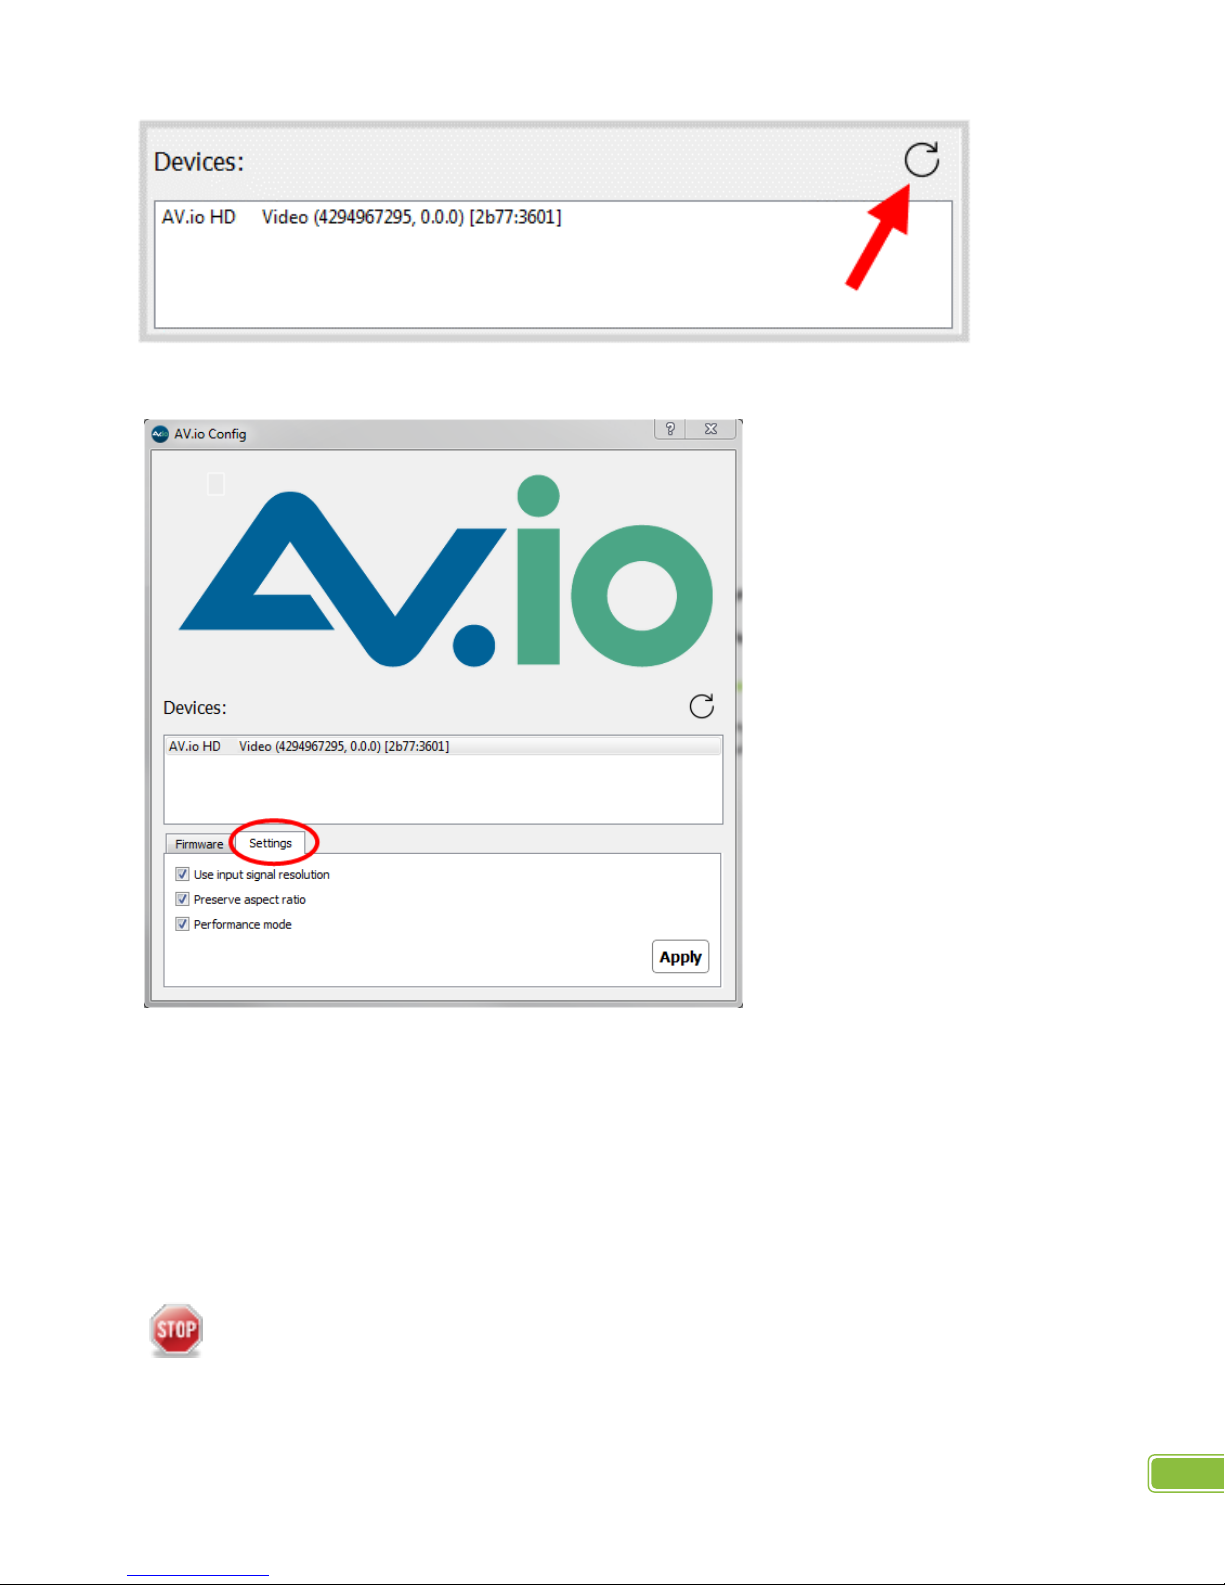
These settings include:
use input signal resolution;
aspect ratio preservation; and,
performance mode
Input signal resolution
When enabled, your AV.io HD adds the exact resolution of your input signal to the list of supported output
resolutions. This is the only way to enable 1:1 capture for special frame sizes. However it is important to note
that the capture resolution as dictated by the third-party application will override any AV.io HD custom capture
settings. Also note that in selecting this mode, any change in input signal (programmatic or by connecting a
different input) causes AV.io HD to renegotiate its resolution with the application. This can cause an
interruption in the captured stream.
Preserve aspect ratio
When enabled, your AV.io HD preserves the aspect ratio of your input signal by adding black bars to the sides
or top and bottom of the frame if the application using the signal requests a frame size with a different aspect
ratio. For example, with this option enabled, a 4:3 input signal gets black bars added to the sides of the image
when viewed in an application that requests a 16:9 aspect ratio. With this option disabled, the 4:3 image is
instead stretched to fit the full 16:9 size.
Performance mode
When enabled, your AV.io HD enters and exits system suspend mode (i.e. sleep) faster by disabling support for
the Suspend/U3 USB power state. This means AV.io starts working again faster after your computer wakes from
a system suspend state, at the cost of increased power consumption. Disabling this setting is ideal in situations
where power consumption needs to be monitored, such as battery preservation in laptops.
AV.io HD User Guide –Optional configuration
13
Changing the configurable settings using the AV.io
Config tool
Epiphan’s AV.io Config tool allows a more advanced user the ability to change several settings to their video
capture experience. The settings that can be changed include: Re-numerate input signal resolution, aspect ratio
preservation and performance mode.
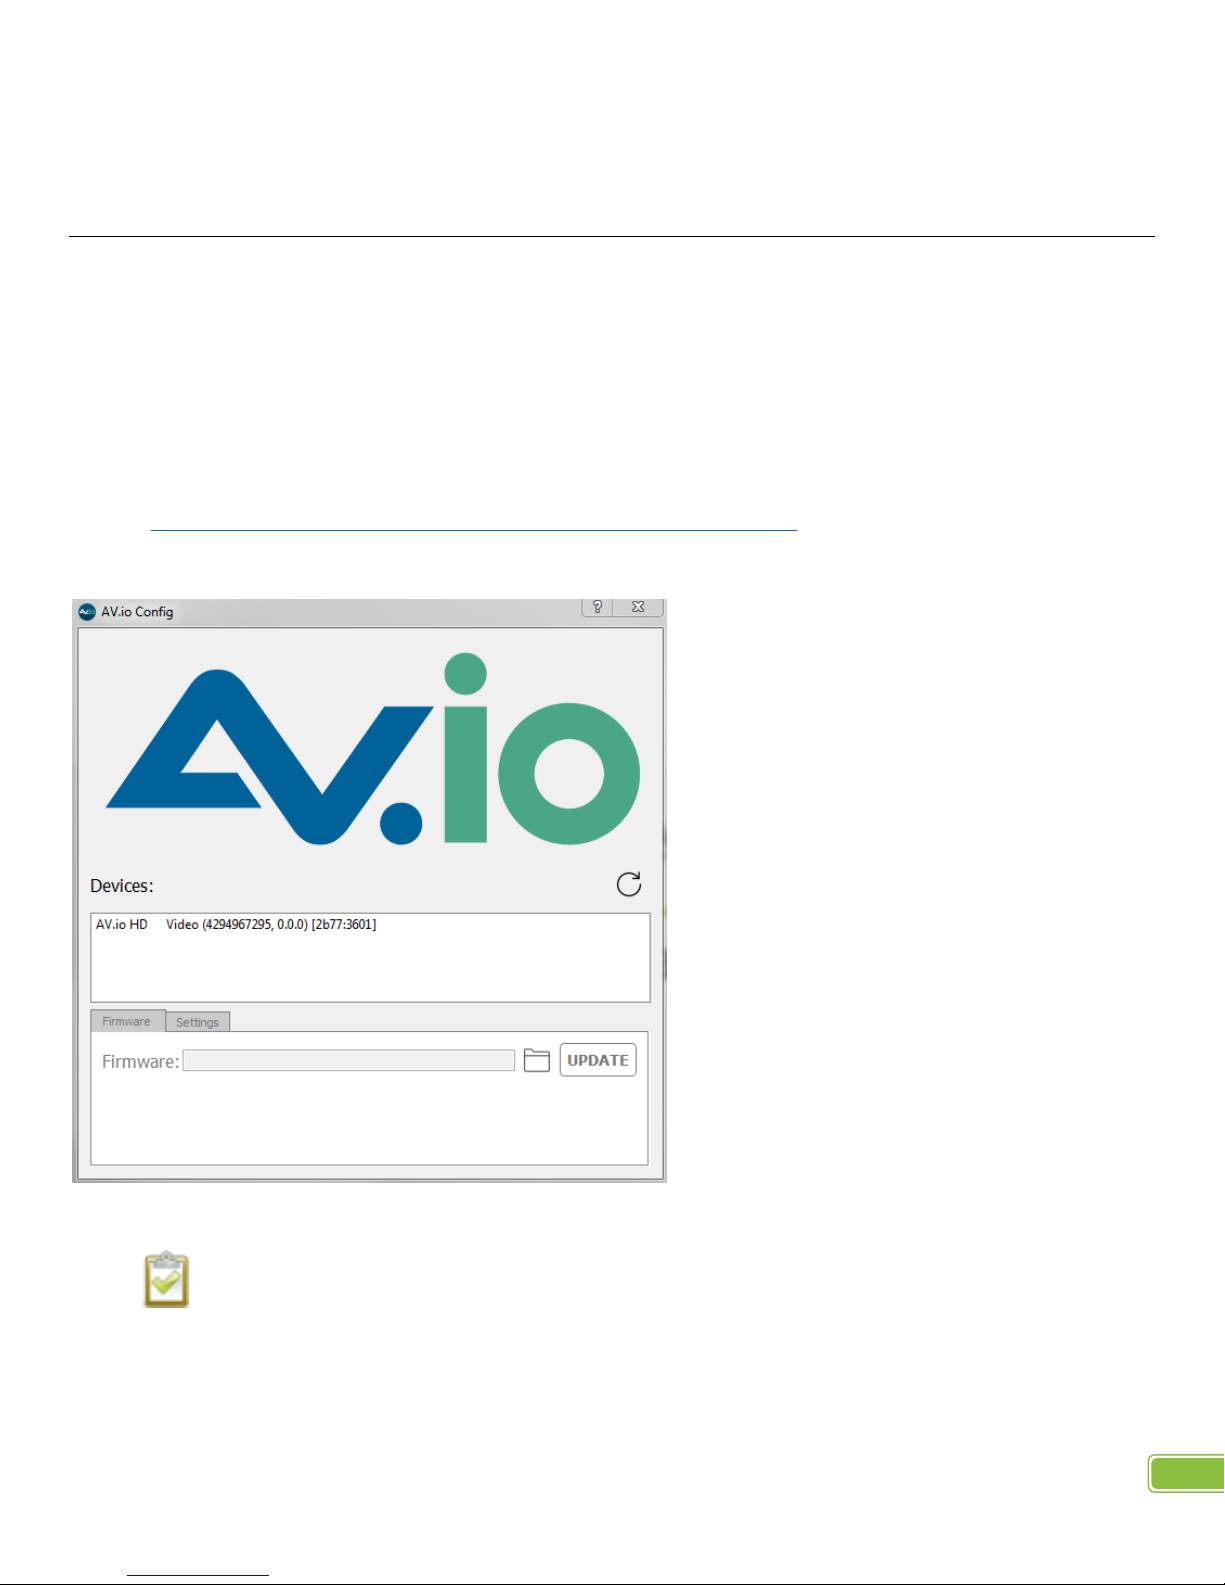
To change the configurable settings using the AV.io Config tool
1. Connect your AV.io HD device to your computer, laptop or notebook.
2. Download the AV.io Config tool from the Av.io Drivers section of Epiphan’s web site
(http://www.epiphan.com/support/avio-hd-drivers-documentation/)
3. Open the AV.io Config tool.
4. Select your AV.io HD device from the list under the Devices heading.
If your AV.io HD device is not displayed, press the Refresh icon to refresh the list of connected
devices.
AV.io HD User Guide –Optional configuration
14
5. Click the Settings tab; the setting page appears.
6. Enable or disable the settings by clicking each setting’s checkbox accordingly.
7. Click Apply.
To update the firmware using the AV.io Config tool
From time-to-time Epiphan Video releases firmware updates for our video grabbers. If you register your
product and agree to be notified of product updates, you’ll receive an email when there is an AV.io HD update
available for download.
Do not attempt to update firmware while running virtual machines –doing so will result in
firmware upgrade failure.
AV.io HD User Guide –Optional configuration
15
1. Download the firmware update file from the Epiphan website, as described in your firmware update
notification email.
2. Connect your AV.io HD device to your computer, laptop or notebook.
3. Download the AV.io Config tool from the Av.io Drivers section of Epiphan’s web site
(http://www.epiphan.com/support/avio-hd-drivers-documentation/)
4. Open the AV.io Config tool.
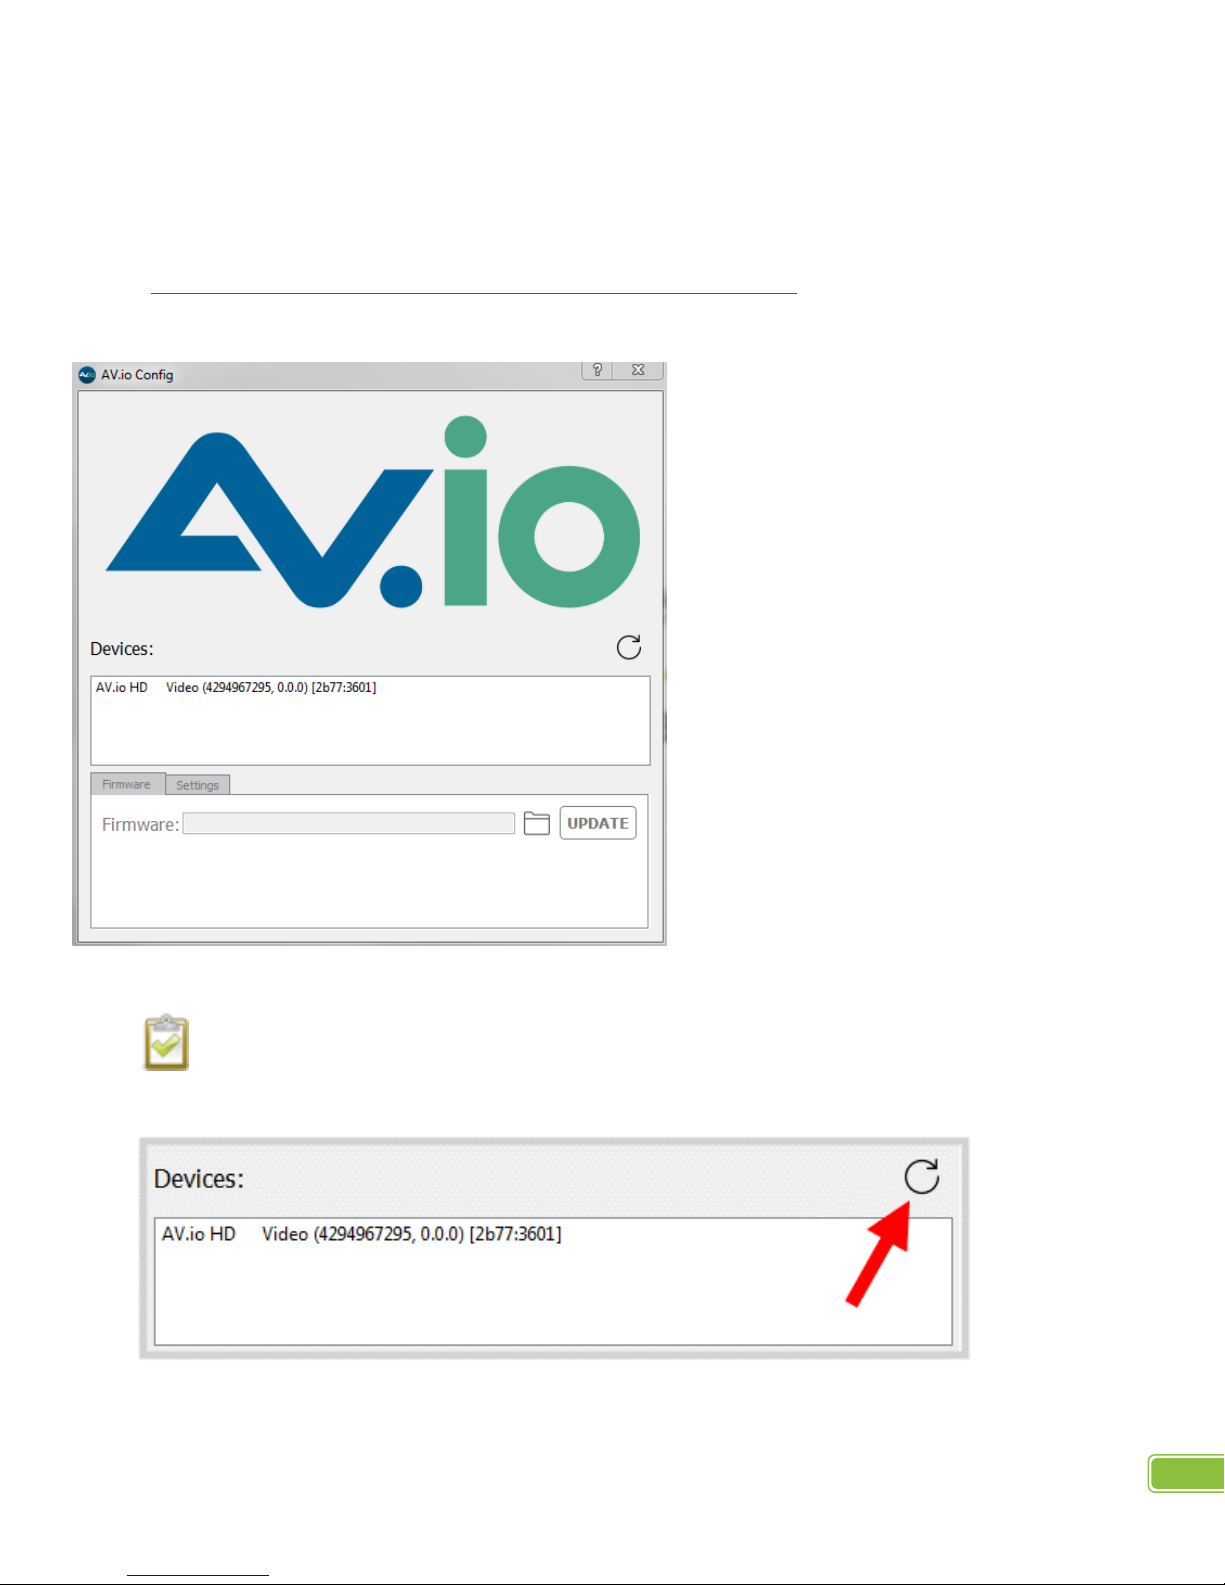
5. Select your AV.io HD device from the list under the Devices heading.
If your AV.io HD device is not displayed, press the Refresh icon to refresh the list of connected
devices.
6. Click the Firmware tab.

AV.io HD User Guide –Optional configuration
16
7. Click the Folder icon to navigate to the saved location of the firmware, and click Update to update your
AV.io HD unit to the selected firmware. An update bar will appear which will display the progress of the
update.
Do not disconnect your AV.io HD at any point during the update process! Doing so may cause
irrevocable errors and/or permanently damage the device.
8. When the update is finished the progress bar will turn green and display “Update Completed”. You may
now safely disconnect your AV.io HD if needed.

AV.io HD User Guide –Optional configuration
17
When updating firmware on a Mac, “Update Completed” text will not be displayed. The firmware
upgrade is complete when the progress bar fills the width of the AV.io Config window and the window
contents are no longer greyed out.
Table of contents


