iRobot Terra t7 User manual


TerraTM t7 Robot Mower Owner’s Guide ii
EN
Welcome to your TerraTM t7 Robot Mower
This guide will cover the basics, and then you’ll need
to download the iRobot HOME App to complete your
setup and access helpful features.
In the app, you can:
ORIGINAL INSTRUCTIONS
Before operating the robot lawn mower, you must read
this Owners Guide and accompanying Safety Guide.
• Watch video overview and instructions about your robot
• Customize mower settings and grass-cut height
• Set mowing schedules
• Enable automatic software updates
• View tips, tricks, and FAQ’s

1 For more information, email TerraSupport@irobot.com
EN
Top View
Lift Handle
Bumper
Control Panel Lid
Light Ring
About your TerraTM t7 Robot Mower
STOP Button
Navigation Antenna

TerraTM t7 Robot Mower Owner’s Guide 2
EN
Bottom View
Blade Hub
Blade
Caster Wheel
Caster Wheel
Wheel
Wheel
Blade Release Button
Cutting Deck
Battery
Charging Port

3 For more information, email TerraSupport@irobot.com
EN
START
STOP
AUTO
OFF
Control Panel
Send Home Button
Start Mow Button
Mode Key
O
Remote Control
Auto
Indicators
Wi-Fi
Bluetooth
Child Lock
Indicators
Battery
Error
Theft Alarm

TerraTM t7 Robot Mower Owner’s Guide 4
EN
Home Base Charging Station
Charging Contacts
Power Indicator
Home Base Ground Stake
Cable Storage

5 For more information, email TerraSupport@irobot.com
EN
Beacon Ground Stake
Beacon ID
Battery Chamber
Beacon

TerraTM t7 Robot Mower Owner’s Guide 6
EN
How it works
• Your robot must be installed and trained to your yard perimeter
by an iRobot approved professional installer. Do not attempt to
install or rearrange the robot, beacons, or charging station by
yourself.
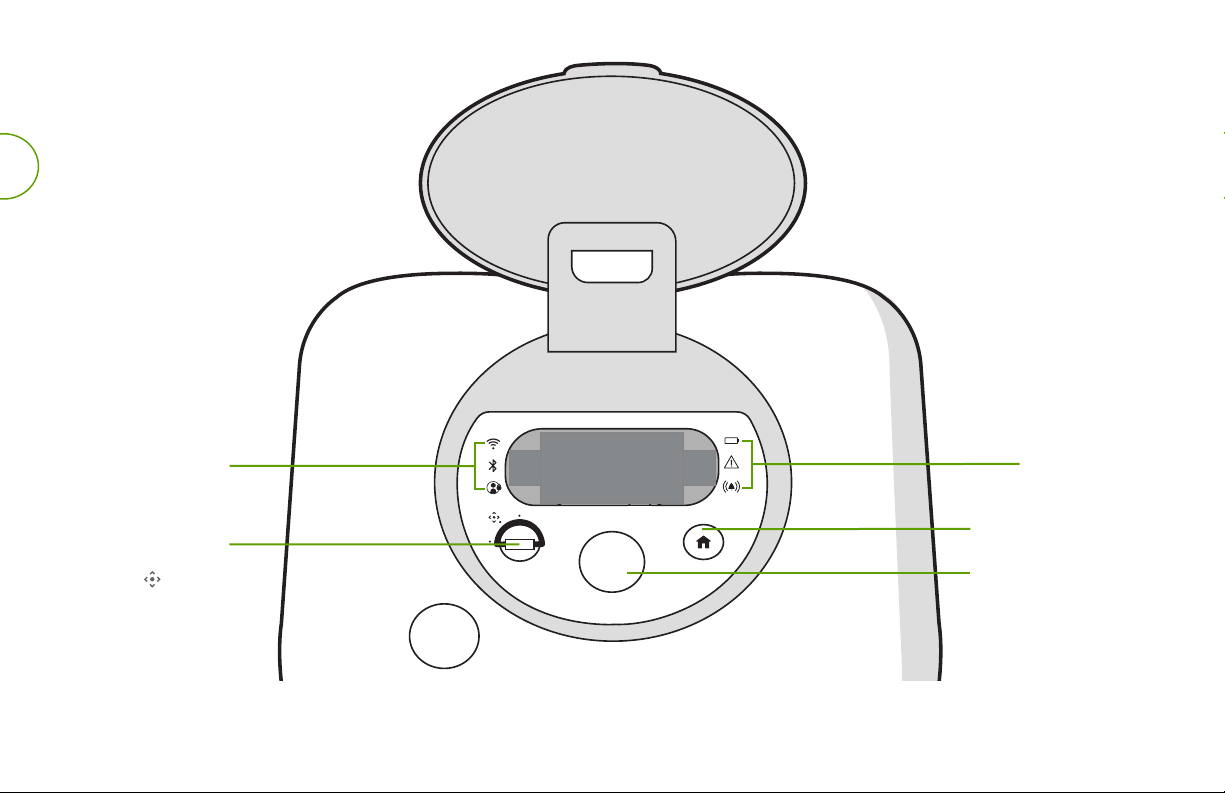
• Your robot will mow your lawn on its own once you’ve either set
it to a mowing schedule or manually started it on the mower or
iRobot HOME App.
• Your robot uses the beacons to understand its location in your
yard, and to plan its path. Ensure that your beacons do not move,
or else your robot will not know where it is and then it will not be
able to mow.
• Your robot will automatically return back to its charging station
when a mowing job is complete.
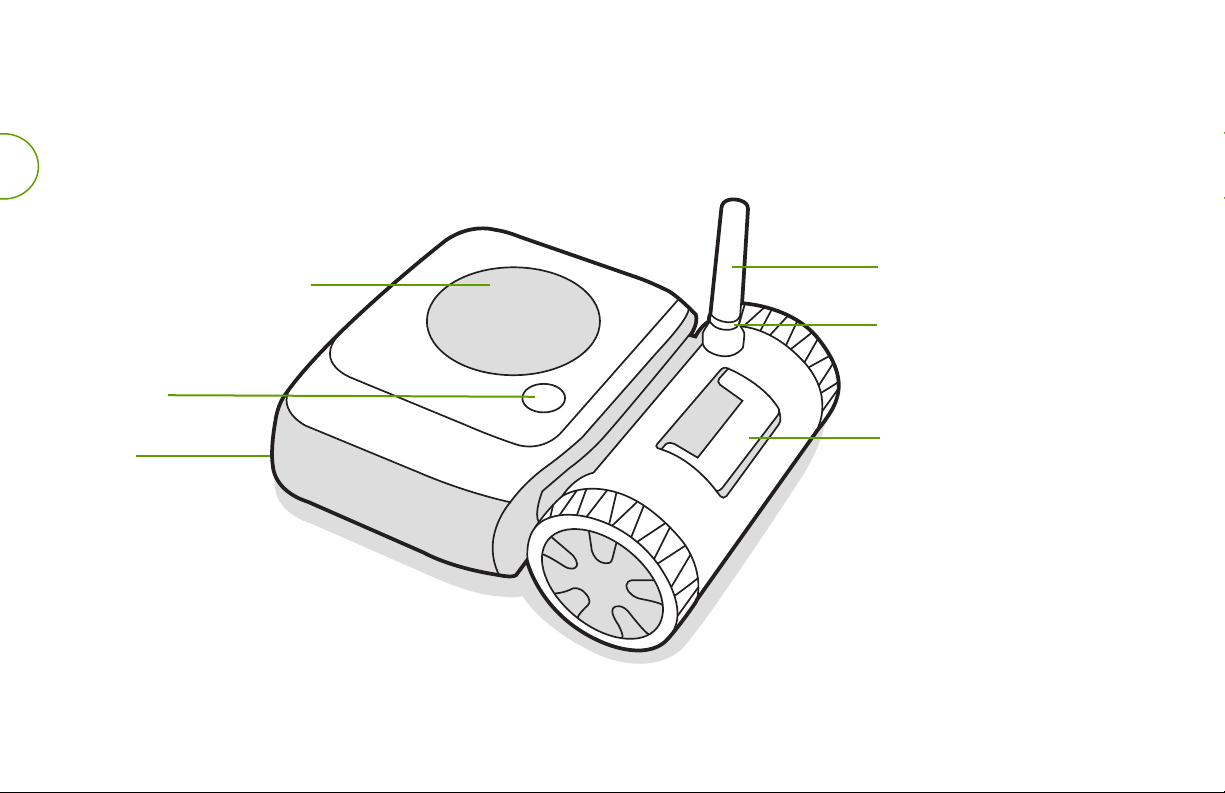
• The bumper receives a signal to re-navigate when it bumps into
larger objects like trees, large rocks, or structures.
• The bumper may not sense smaller objects, so clear your yard
of small obstacles like toys, equipment, or gardening supplies
before any scheduled or on-demand mowing jobs.
Before you mow
• Keep in mind that the operator or user is responsible for acci-
dents or hazards occurring to other people or their property.
• Your robot is equipped with numerous built-in safety features.
However, the robot is a hazardous device with sharp blades,
which could cause major injury to anyone who comes in contact
with them. Therefore, don’t ever use the robot lawn mower when
persons are in the cutting area.
• Before operation, always check the work area and remove any
branches, rocks, and other objects from the lawn.
• Note that the robot is intended for consumer use only; use must
be limited to residential areas.
Using your TerraTM t7 Robot Mower

7 For more information, email TerraSupport@irobot.com
EN
• To stop or pause a mowing job, press STOP on the robot or tap
MOW on the iRobot HOME App.
• Mowing jobs can be resumed for up to 90 minutes after pausing,
then they will be canceled.
• Resume a mowing job by pressing START on the robot or via the
iRobot HOME App.
• Send the robot back to its charging station by pressing on the
robot or via the iRobot HOME App.
Mowing
For best performance and maintenance of your lawn, send your robot
to mow at least 3 times per week.
To start mowing, first make sure that the Mode Key is in the Auto
position. You can start the mowing job in any of the following ways:
Press START on the robot, then close the lid.
Note: A white light ring will spiral around the antenna to let you know
when the blades are spinning.
Warning: Always press the STOP button before lifting or carrying the robot.
Warning: Blades are sharp. Use caution whenever touching the robot.
Note: If you ever need to pick up your mower, it is recommended that
you carry it with two hands, as show in the illustration below.
MOW
9:00
AM
WEE KDAYS
Schedule
12:00
PM
SATU RDAYS
MOW
9:00
AM
WEE KDAYS
Schedule
12:00
PM
SATU RDAYS
A. Set up a mowing schedule
in the iRobot HOME App.
B. Press MOW on the iRobot
HOME App.
1
2

TerraTM t7 Robot Mower Owner’s Guide 8
EN
Tips for Best Performance
• Set up an automatic mowing schedule using the iRobot HOME App.
For optimal performance, schedule your mower to run at least 3
times per week.
• Adjust the grass-cut height, child lock, and anti-theft alarm
preferences in the iRobot HOME App.
• Keep your charging station plugged in and the area around it clear
of obstacles.
• Keep the beacons and charging station in the locations set by the
iRobot authorized installer. If you need to change them for some
reason, please email TerraSupport@irobot.com.
• For the best possible result, it’s recommended to run your robot
lawn mower primarily in dry weather. The robot lawn mower is also
able to run in rain; however, wet grass will be more likely to stick to
the mower, which could create a greater risk of the mower slipping
on steep slopes.
Charging
• Slide your robot onto the charging station contacts to charge
the battery.
• The robot light ring will pulse to let you know it’s charging.
• The charging status can be viewed on the iRobot HOME App or on the
battery icon under the lid on your robot.
• Your robot uses a small amount of power whenever it’s on its charging
station.
• For long term storage, turn o your robot by turning the Mode Key to
the O position and then removing the robot from its charging station.
Store your robot in a cool, dry place.

9 For more information, email TerraSupport@irobot.com
Customer Care
If you have questions or comments about your TerraTM t7 robot
mower or require any customer support, please email
TerraSupport@irobot.com.
You can also view support tips and frequently asked questions
on your iRobot HOME App.
Troubleshooting
• Your robot will let you know something is wrong by playing an
audio alert and turning its light ring red. Lift the lid or see the iRobot
HOME App for details.
• If your robot is inactive o the charging station for over 90 minutes,
your mowing job will automatically be canceled.
• Please email TerraSupport@irobot.com for repairs, replacement,
breakdowns, or servicing of robot and accessories.
• If you have made changes to your lawn since TerraTM robot mower was
installed, email TerraSupport@irobot.com to have a certified iRobot
authorized installer retrain your lawn.
Care and Maintenance
To ensure your robot is in top working condition, you should inspect it
once a month and clean it as necessary. Once a year, you should change
the blades on the robot and change the batteries in the beacons.
For instructions and illustrations on how to clean your robot, safely
change its blades, or replace the beacon batteries, please refer to the
iRobot HOME App.
©2019 iRobot Corporation, 8 Crosby Drive, Bedford, MA 01730 USA. All rights reserved.
iRobot and Terra are registered trademarks of iRobot Corporation. Wi-Fi and the Wi-Fi logo are registered trademarks of the Wi-Fi Alliance.
Warning: Always remove the key before cleaning the robot or changing
the blades.
Warning: Blades are sharp. Use caution whenever touching the robot.
For reference, the part number for the blades is 4656282, the model
number for the robot battery is ABL-A, and the beacons and remote
control use AA batteries.

TerraTM t7 Robot Mower Owner’s Guide 10
EN
Regulatory Information
This device complies with part 15 of the FCC Rules. Operation is
subject to the following two conditions:
(1) This device may not cause harmful interference, and
(2) this device must accept any interference received, including
interference that may cause undesired operation.
• Changes or modifications not expressly approved by iRobot Cor-
poration could void the user’s authority to operate the equipment.
• This equipment has been tested and found to comply with the
limits for a Class B digital device, pursuant to part 15 of the FCC
Rules as well as ICES-003 Rules. These limits are designed to provide
reasonable protection against harmful interference in a residential
installation. This equipment generates, uses and can radiate radio
frequency energy and, if not installed and used in accordance with
the instructions, may cause harmful interference to radio commu-
nications. However, there is no guarantee that interference to radio
communication will not occur in a particular installation. If this
equipment does cause harmful interference to radio or television
reception, which can be determined by turning the equipment o
and on, the user is encouraged to try to correct the interference by
one or more of the following measures:
- Reorient or relocate the receiving antenna.
- Increase the separation between the equipment and receiver.
Device Regulatory Model Number FCC ID
TerraTM t7 RLA-Y1 UFERLA-Y1
also contains UFEAXD-Y1
TerraTM Home Base ADA-N1 N/A
TerraTM Confinement Beacon AXB-Y1 UFEAXB-Y1
- Connect the equipment into an outlet on a circuit dierent from that
to which the receiver is connected.
- Consult the dealer or an experienced radio/TV technician for
help.
• FCC Radiation Exposure Statement: This product complies with FCC
§2.1093(b) for portable RF exposure limits, set forth for an uncontrolled
environment and is safe for the intended operation as described in this
manual.
Terra is a registered trademark of iRobot Corporation.
(C) 2019 iRobot Corporation, 8 Crosby Dr. Bedford, MA 01730 USA
All rights reserved. U.S. Pat. http://www.irobot.com/patents | Other Pat-
ents Pending.
Designed in USA, Assembled in China
For residential use only

11 For more information, email TerraSupport@irobot.com
EN
WC#: 4696395
Instructions for Disposal of Waste Electrical &
Electronic Equipment:
This symbol on the product indicates that the appliance must
not be disposed of with unsorted common municipal waste.
As the end-user, it is your responsibility to dispose of the end-
of-life appliance in an environmentally sensitive
manner as follows:
(1) returning it to the distributor/dealer from
whom you purchased the product; or
(2) depositing it in a designated collection point.
Disposing of this product correctly will help save
valuable resources and prevent any potential negative eects
on human health and the environment, which could otherwise
arise from inappropriate waste handling. Please contact your
local authority for further details or your nearest designated
collection point. Penalties may be applicable for incorrect
disposal of this waste, in accordance with your national leg-
islation.
For battery recycling go to call2recycle.org;
or call 1-800-822-8837
Table of contents