iScope Corp 148 Series User manual

1
148 Series
User’s Manual

2
148 Series Table of Contents
Before Use............................................................................................ 3
Introduction............................................................................................................3
Safety Precautions ..................................................................................................4
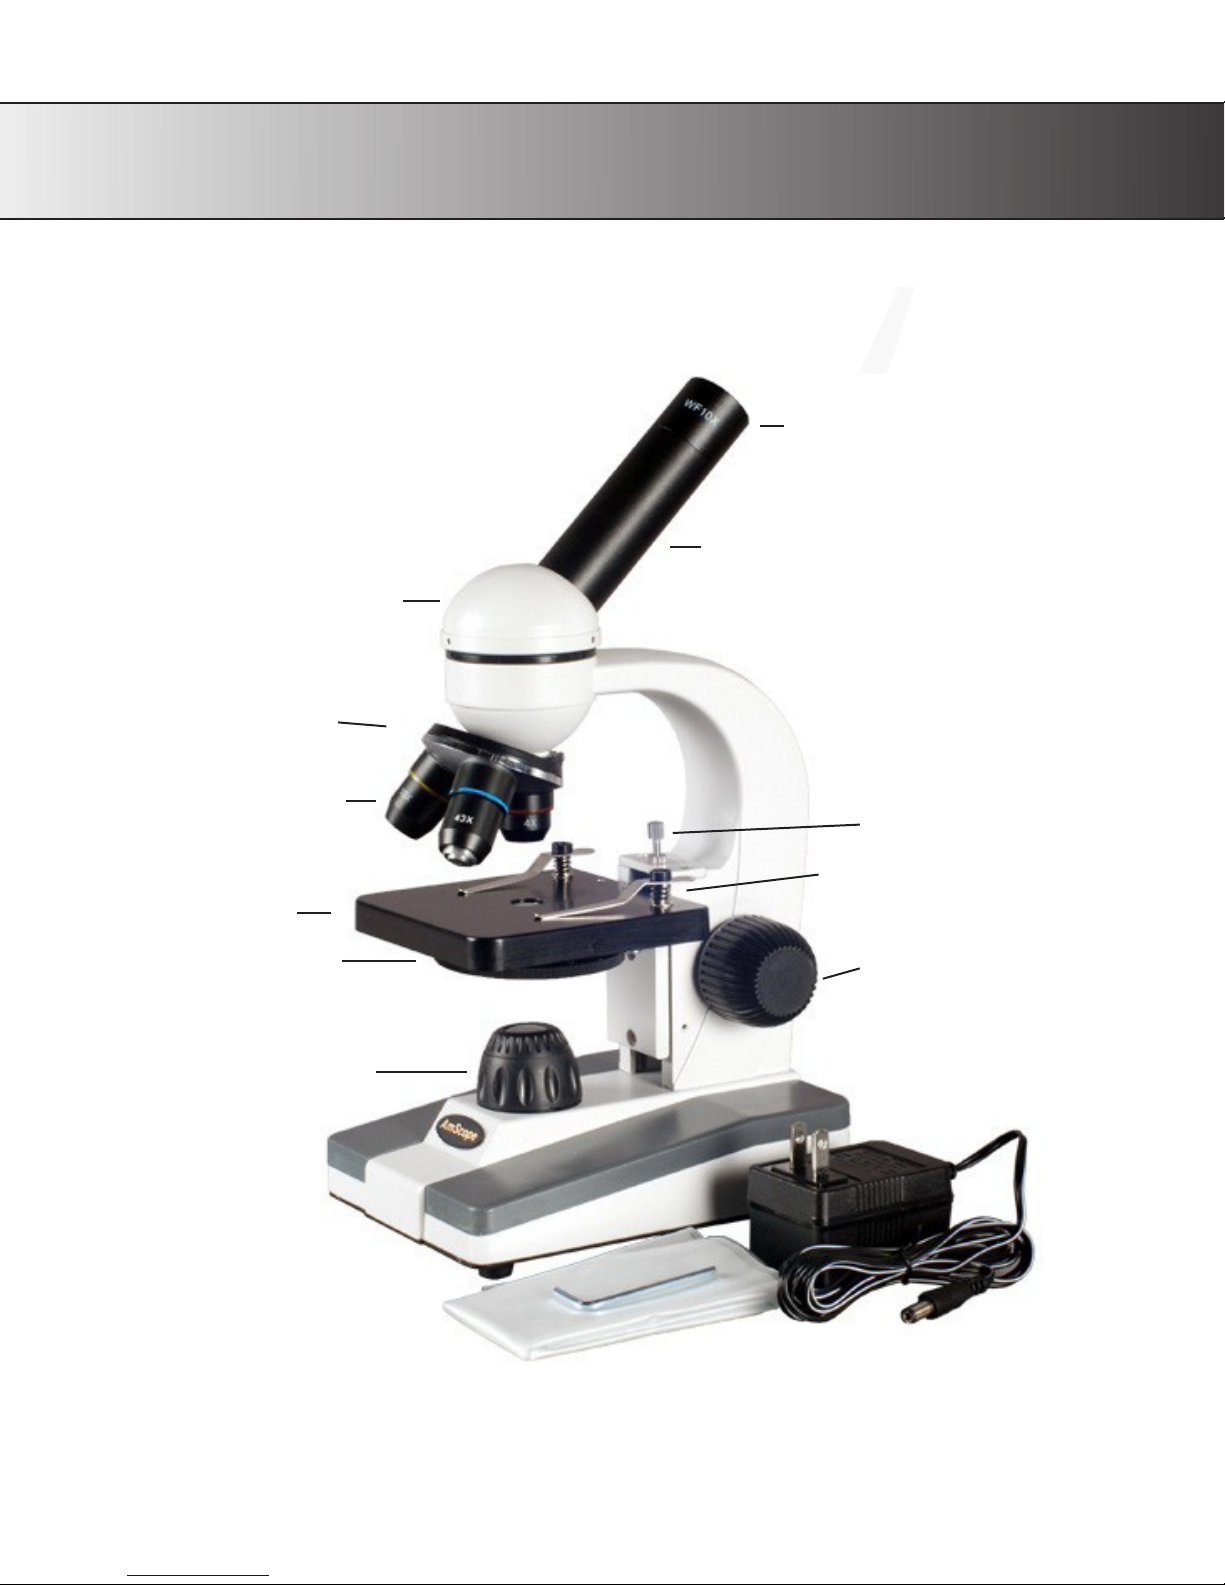
Parts...................................................................................................... 5
M148.......................................................................................................................5
Denition of Parts ..................................................................................................6
Getting Started .................................................................................... 7
Assembly .................................................................................................................7
Operation............................................................................................. 8
Setting Up ...............................................................................................................8
Focusing ..................................................................................................................8
Adjusting e Diaphragm......................................................................................8
Attaching a Camera / Changing Eyepieces............................................................8
Setting the Stage’s Stop-Limit .................................................................................9
Adjusting Focusing Tension ...................................................................................9
Maintenance/Precautions ....................................................................................10
Specications..................................................................................... 11
148 Series Specications.......................................................................................11
Optional Accessories.............................................................................................12
Objectives..............................................................................................................13
Eyepieces ...............................................................................................................13
Technical Parameters ....................................................................... 14
Electrical System...................................................................................................14
Technical Terms & Concepts................................................................................15
Common Issues.....................................................................................................16
Common Issues (Continued) ...............................................................................17

3
148 Series Before Use
Introduction
Congratulations on the purchase of your new AmScope microscope!
is manual is designed for the M148 series microscopes.
Please be sure to take a few minutes to familiarize yourself with the features and functions of your
new AmScope microscope.
If you’d like more information on microscopes, parts, or accessories, please visit our website at:
www.iScopeCorp.com
We highly recommend you study this manual thoroughly before operating the microscope, and
that yo ukeep it on ahnd for future reference.
If you have additional questions or need assistance, please send us an email at:
info@amscope.com

4
148 Series Before Use
Safety Precautions
1. As the microscope is a precision instrument, always handle it with care, avoiding impact
or abrupt movement during transporation. Do not shake the package.
2. Do not place the microscope in direct sunlight or in high heat. Keap it indoors in a dry
and clean place with temperateures between 32-100 degrees F (0-40 degrees C), and in
maximum relative humidity of 85%.
3. Avoid touching the lenses on the objectives and the eyepieces so that oil and dirt from
your ngerprints do not obstruct your view.
4. Before turning the power on, make sure that the power supply voltage is consident with
the voltage of your microscope.

5
148 Series Parts
Eyepiece
Ocular Tube
Objectives
Nosepiece Turret
Rotating Monocular Head
Stage
Illuminator Lens
Focusing KnobDisc Diaphragm (Disc Iris)
Limit Stop
Stage Clips
M148

6
148 Series Parts
Denition of Parts
Base Illuminator Lens
Directs the light source towards the slide
Focusing Knob
Used to bring the slide into the sight and focus
Disc Iris Diaphragm
Controls the amount of light that hits the slide from the base illuminator
Limit Stop Knob
Limits the upward movement of the mechanical stage in order to avoid damaging the slide and objective
Nosepiece
Houses the objective lenses
Rotating Monocular Head
Houses the eyepiece and optics of the microscope

7
148 Series Getting Started
Assembly
1. First, take the styrofoam container out of the cardboard carton and lay it on its side, paying attention to which
side is labeled up. Remove the tape and open the container carefully so as to avoid dropping and damaging the
optical items. Check carefully to ensure that all parts and accessories are intact.
2. Check the packing list to ensure that you’re received all items:
- One Monocular Microscope Body & Head
- ree Objectives (4x, 10x, 40x)
- 10x Wideeld Eyepieces
- 16x Wideeld Eyepieces (for -A models only)
- 20x Wideeld Eyepieces (for -B models only)
- 25x Wideeld Eyepieces (for -C models only)
- One Dust Cover
Note: LED models do not have a spare bulb, as the LED bulbs do not need replacing.
3. Remove the microscope body from the box and remove the plastic protective covering. e body of the micro-
scope is composed of the base, the stage, the arm, and the nosepiece.
4. Screw the objectives into the microscope nosepiece from the lowest magnication to the highest, again avoid-
ing touching the lenses.
5. Plug in the microscope and turn it on. If no light emerges from the light source, adjust the dimmer knob on
the side of the base.

8
148 Series Operation
Setting Up
1. Place the specimen to be studied on a glass slide (or use a prepared slide). Place it on the stage, holding it snugly
in place with the metal slide holders (clips) of the mechanical stage.
2. Center the specimen over the stage opening, lining it up with the light and the objective lens.
Focusing
1. Turn the nosepiece to choose an objective. It is easiest to use the lowest magnication rst (4x objective) to lo-
cate and focus on the specimen. As you move up in magnication you may need to refocus the image a little each
time.
2. Being focusing by rst looking with one eye through the eyepiece without the diopter. Close your other eye. Use
the coarse focusing knob to adjust the height of the stage until the sample comes into clear focus.
Note: You may loosen the limit-stop knob (located on the read of the stage) in order to give yourself the full range
of motion for ne tuning the focus.
3. Once the image is clear in your eld of view, you will want to use the ne focusing knob to tune it for best results.
Note: Please be careful when moving the mechanical stage if you need to recenter the sample, or if moving the
stage very close to the objectives. e limit stop is designed to prevent impact between objective and slide, so when
it is o you will be able to damage the microscope.
Adjusting The Diaphragm
1. By changing the aperture (hole size) of the iris diaphragm, you can adjust the background brightness. Adjust the
aperture of the iris diaphragm by rotating the disc underneath the stage to the desired aperture.
Attaching a Camera / Changing Eyepieces
1. To remove the 10x eyepiece included on the microscope, you will need to remove the small metal screw on the
ocular tube just under where the eyepiece connects to the tube. To do so, you will need a 1mm athead precision
screwdriver (much like what you would use to adjust eye glasses).
2. Once unscrewed, remove the eyepiece and slide in the camera or alternate eyepieces.

9
148 Series Operation
Setting the Stage’s Stop-Limit
1. To adjust the stop limit on the stage, unlock it by unscrewing the lower nut. e stop limit is located at the rear
of the stage.
2. Once tension is released on the nut by rotating it counter clockwise, you may adjust the upper thumb screw to
move the limit up or down as desired.
3. Lock the limit stop nut back into place aer the desired stage height is achieved.

10
148 Series Operation
Maintenance/Precautions
- All glass surfaces must be kept clean. Fine dust on the optical surface should be blown o using a can of com-
pressed air or gently wiped o with a so lens paper tissue/nonabraisive lint free cloth.
- Carefully wipe o oil or ngerprints on the lens surfaces using tissue moistened with a small amount of lens
cleaner (we recommend Sparkle brand optical cleaner).
- Do not use Sparkle to clean other elements of the microscope. Use a neutral detergent on any plastic or painted
surfaces.
- Do not assemble or disassemble the microscope’s electrical components yourself without advisement from one of
our technicians. Doing so will void your warranty unless by advisement of one of our technicians to do so.
- Aer use, cover the microscope with the provided dust cover.
- Keep your AmScope microscope in a dry, clean location in order to prevent rust or other damage.
- To change batteries with this unit, use the included allen wrench (hexagonal shaped L-tool) to undo the door hex
screw on the base. Use 3 AAA batteries with the unit.
- e unit can be used as a recharger for AAA batteries specied as rechargeable only. Please do not use standard
batteries in the unit with the charger plugged in to avoid damage.
Table of contents
Popular Microscope manuals by other brands

VWR
VWR VisiScope 384 Series instruction manual

Nikon
Nikon ECLIPSE E200 POL instructions

Leica
Leica DI C800 User's manual & installation instructions

ThermoFisher Scientific
ThermoFisher Scientific Continuµm manual

ThermoFisher Scientific
ThermoFisher Scientific Continuµm manual

Olympus
Olympus SZ61 instructions


