ISG Autocam Z100 HD User manual

Preliminary Manual
ISG Autocam Z100 HD
Introduction
Thanks for purchasing the ISG-Z100 HD, Identification Systems Group’s
newest entry into the high end photo-ID and isual database application
imaging.
The ISG-Z100 HD pro ides full HD resolution at 1080x1960 and includes a
synchronized photoflash for consistent high quality image acquisition in any
en ironment. Software controls are pro ided for flash intensity and color
adjustments making the acquisition of top quality images a snap. High quality
captures with perfect skin tones and exposure can be obtained effortlessly in any
en ironment, e en ery dark room!
Features Include:
Full HD+ Resolution 1080x1960
Superior low light performance e en without flash allowing for top
quality captures in e en the harshest en ironments.
25-1 Optical Zoom
USB hardware interface
Integrated high intensity photoflash with software control of flash
exposure and flesh tones. Perfect captures e en in dark rooms.
Extensi e User control of Image Size, Cropping, and Color adjustments.
Optics configured for Portrait mode captures not Landscape allowing for
the highest resolution in the format of your ID Badge layout.
Includes Twain Dri er, Standalone App, and Optional 32&64 bit SDK
Will work in all major Windows® photo ID and imaging applications.
Phone or E-mail support for the lifetime of the product.
2
Pro ided in this manual are instructions for hardware and software installation,
as well as operational guides and tips.
If technical support is needed please contact:
Identification Systems Group
13851 W. 63rd Street
Suite 372
Shawnee, Kansas 66216
Phone 888.964.6482
FAX 816.817.1749
www.identificationsystemsgroup.com
Parts List for availabl ISG products:
ISG-Z100 HD
High resolution USB Zoom camera
USB 3 10ft cable
Brick power supply for camera
w/extension
Instruction Manual
Installation Disk/USB Thumb Dri e
Software can be downloaded at
https:// al-cam.com/dri ers/
Identification Systems Group
13851 W. 63rd Street
Suite 372
Shawnee, Kansas 66216
Phone 888.964.6482
FAX 816.817.1749
www.identificationsystemsgroup.com

3
Installation for ISG-Z100 HD to Win 7,8,10, or S rv r dition
comput r.
1. Run S tup_ISG_Z100HD_v rsion numb r. x located on the
installation CD (or) USB Thumb Dri e (or) Downloaded from
https:// al-cam.com/dri ers/
2. During Installation of software your computer may prompt you asking
if you want to install software from Video Associates Labs, select Y s
*Not : Do not conn ct th cam ra to th comput r until aft r softwar
installation.
3. Connect the power adaptor to the matching connector on the back of
the camera. Plug the power adaptor to a wall socket.
4. Connect the USB cable to the back of
the camera.
Do not conn ct th USB cabl to th
comput r unl ss you hav install d
th softwar .
5. The computer will find new hardware and
install the de ice. Answer Y s or Continu if you are queried during
the installation.
6. You can confirm the installation by opening De ice Manager (type
De ice Manager in the search bar to find the application) and noting
the “ISG Z100 HD” listed under “ISG Z100 HD” entry.
NOTE: Wh n upgrading softwar ALWAYS UNPLUG THE POWER SUPPLY
CONNECTOR b for installing th n w softwar . Plug in th Pow r Supply
Conn ctor aft r th softwar upgrad is install d. Cam ra firmwar will not b
upgrad d unl ss this proc dur is follow d.
4
Basic Op ration
1. Click on START-->ISG-Z100 HD ->ISG-Z100 HD and start the application.
2. The ISG-Z100 HD capture control box will appear. If you r c iv an rror
m ssag or th captur control box do s not app ar displaying liv vid o
pl as v rify that th ISG-Z100 HD app ars in th d vic manag r und r
“ISG Z100 HD” ntry.
Cam ra Zoom controls
1. Place the mouse curser o er the “+” or “-“button located in the Zoom box of the
Main Application window and left click on it. You can hold it down to
continuously zoom or click it for smaller adjustments.

5
2. To control Zoom from the keyboard you can press the + key next to the numeric
keypad, the camera will zoom in. Release the + key and the camera will stop
zooming. To zoom out press the – key next to the numeric keypad. Release the –
key to stop the action.
3. To speed up the Zooming action hold down the Ctrl k y when acti ating Zoom.
To slow down the Zooming action hold down the Shift k y when acti ating
Zoom.
4. To adjust the default zoom speed of the camera click on the Adjust button then
click on the “Flesh Tone” tab. The “Zoom Speed” box is located at the bottom of
the tab and has 3 radio buttons for Zoom Speed settings.
Sharpn ss Control
1. Click the “Advanc d” tab on the Adjust Dialog box.
2. There will be Two different sharpness
controls “Liv Cam ra Sharpn ss”
which only affects non-flash captures,
the default is 10 and ”Flash Cam ra
Sharpn ss” which only affects flash
captures, the default setting is 7.
3. Higher or lower alues might be
warranted in different circumstances. If
the alues are too high the image will
look edgy and noisy. If the alue is too
low the image will look soft or out of
focus.
4. Clicking the “Page Defaults” button will
restore
factory defaults.
Taking a Liv (non-flash) Captur
The low light capabilities of the ISG-Z100 HD are outstanding. It is possible that you
will not e en need to use the Flash mode to acquire top quality captures.
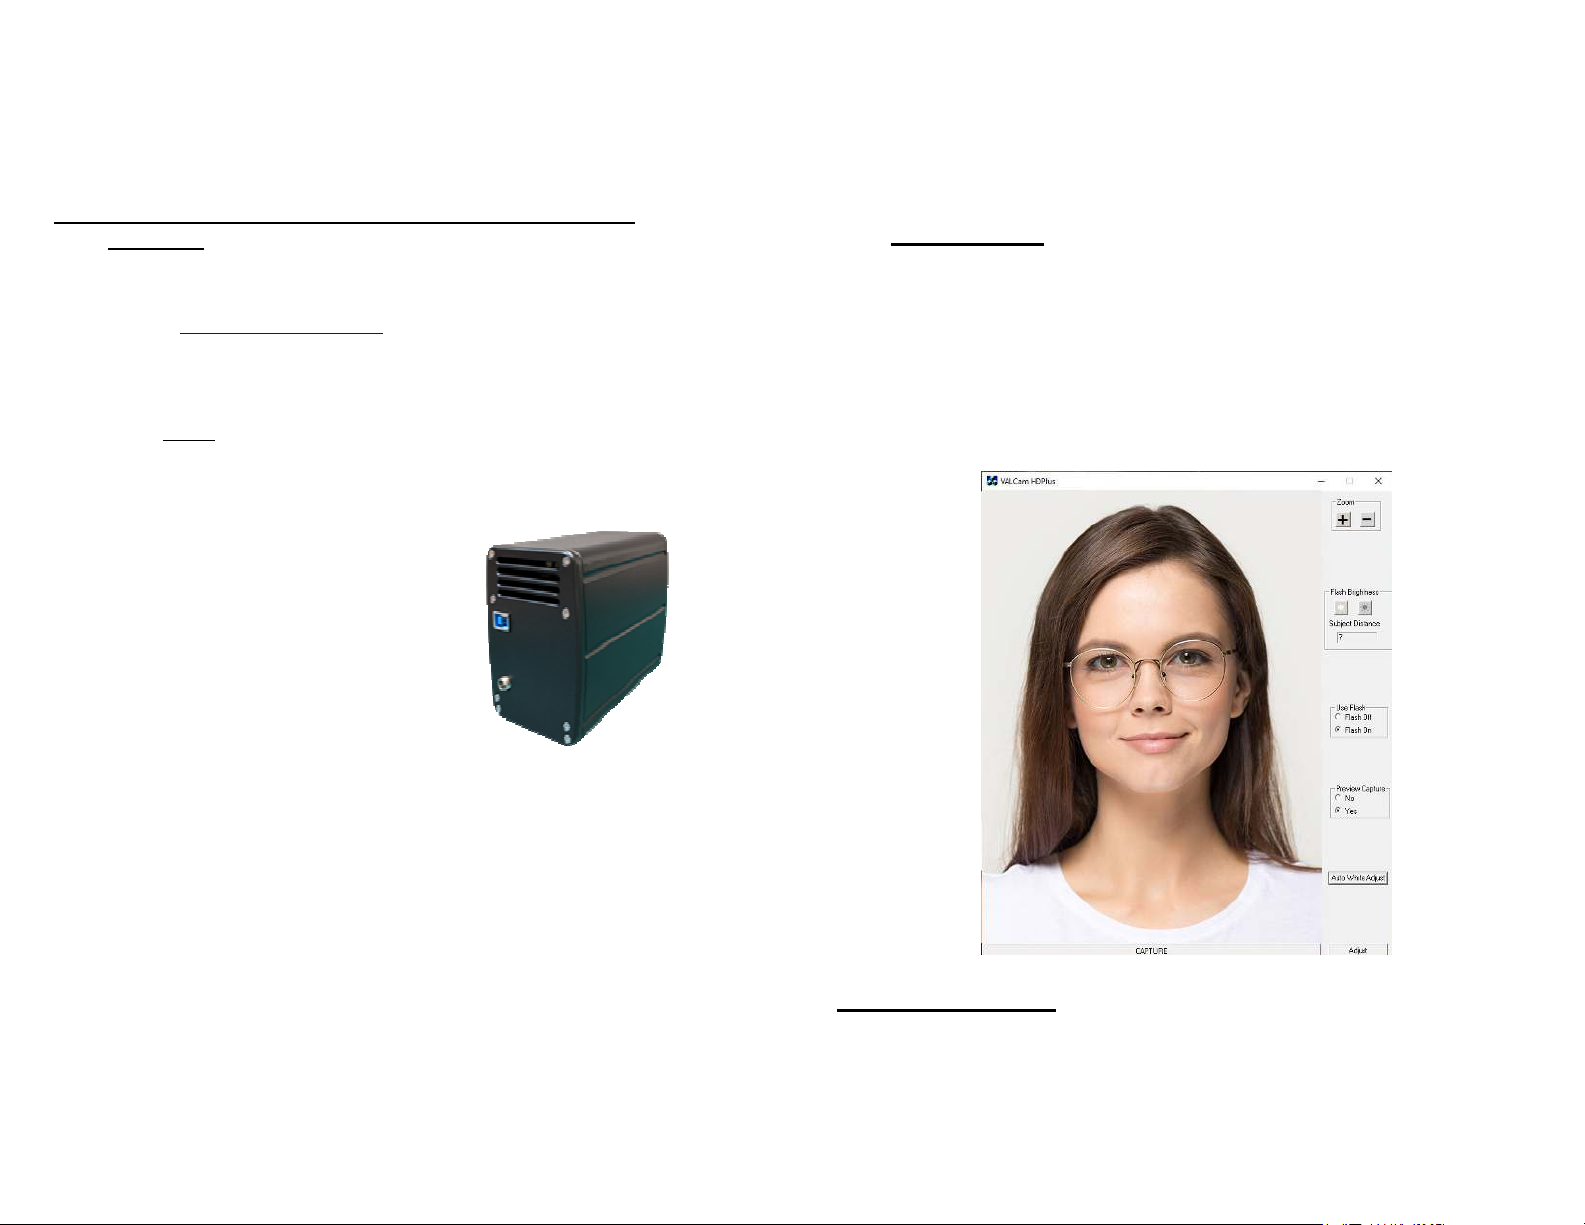
1. On main dialogue box erify that the Us Flash is set to
Flash Off and Pr vi w Captur is set to Y s.
6
2. Adjust the Brightn ss control buttons by clicking on them to incrementally
lighten or darken the pre iew until you ha e optimal image illumination. This is
the only control used to adjust image brightness.
3. The last setting of the Brightn ss control is
remembered between sessions.
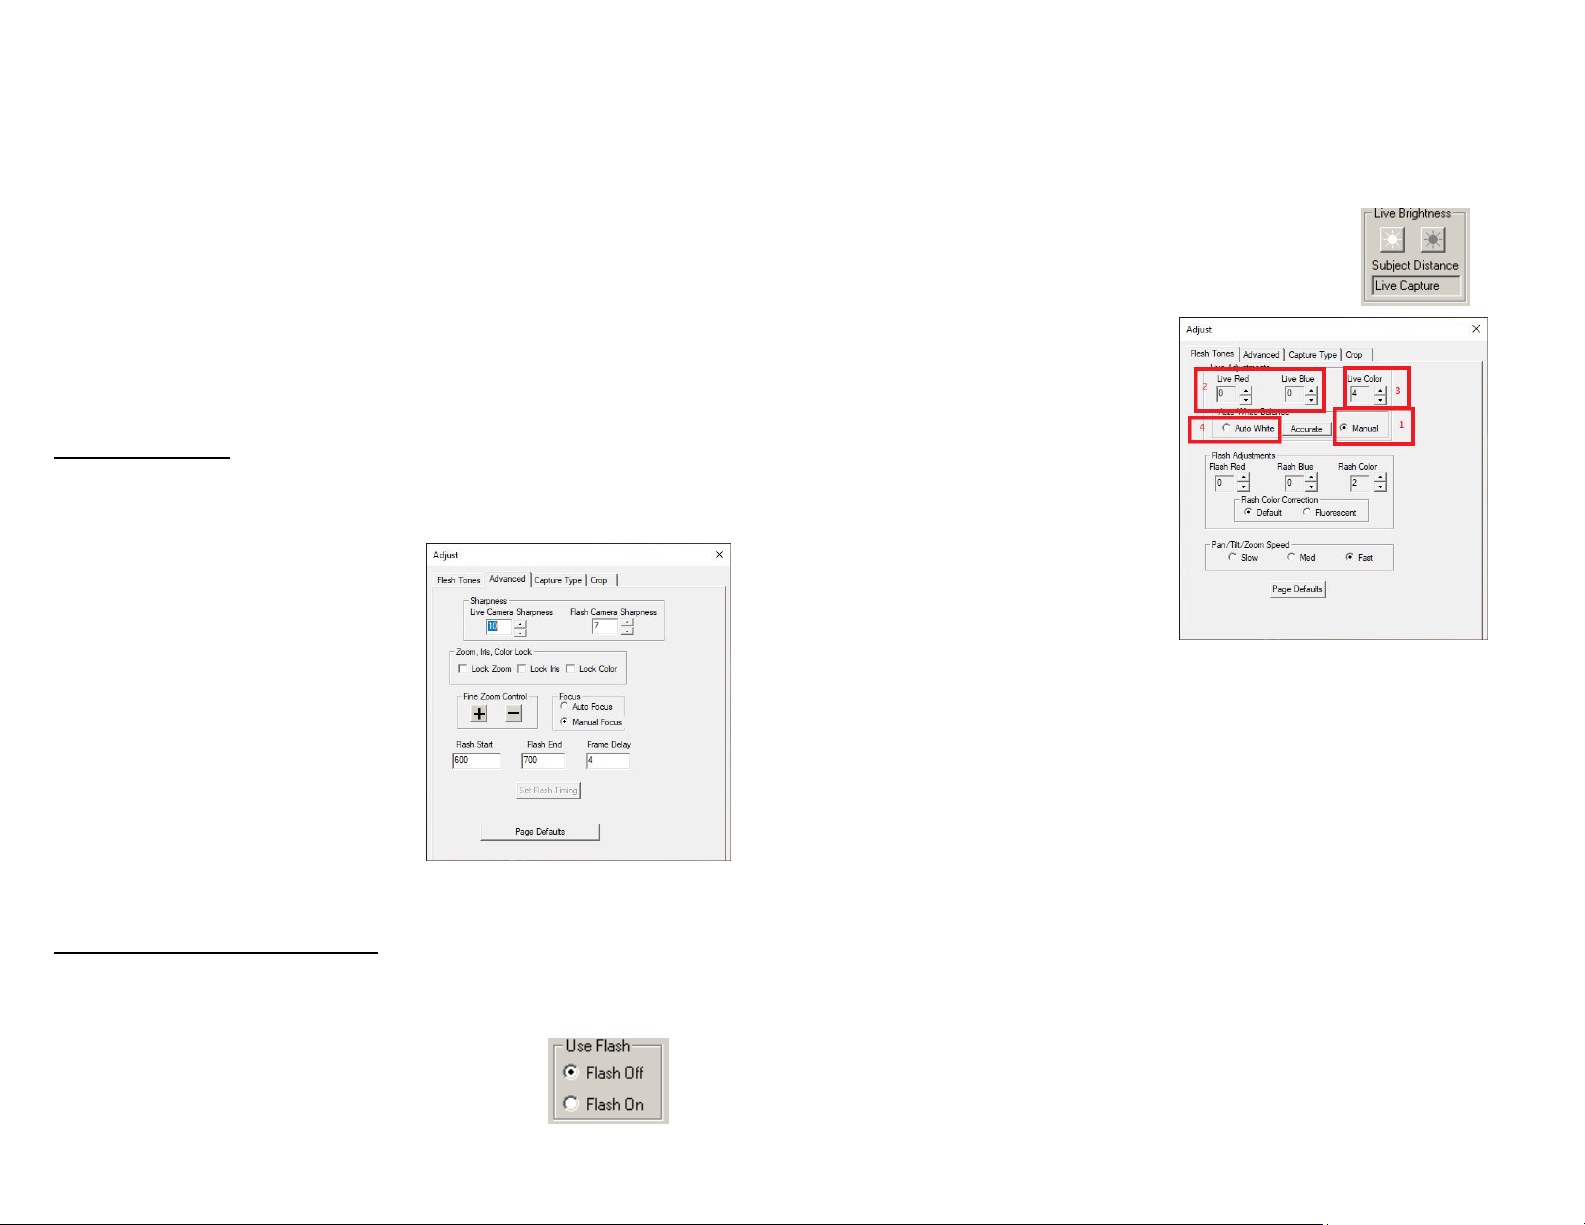
4. Click the Adjust button and select the “Fl sh Ton ” tab.
5. Click the “Manual” radio button (1)
to adjust the li e pre iew colors.
Adjust the Liv R d and Liv Blu
controls (2) up and down. Note the
changes in the image color balance.
These controls can be used to fine
tune image color for optimal quality.
These settings will be remembered
between sessions.
*Not – In most cas s you will not n d to
mak th s adjustm nts
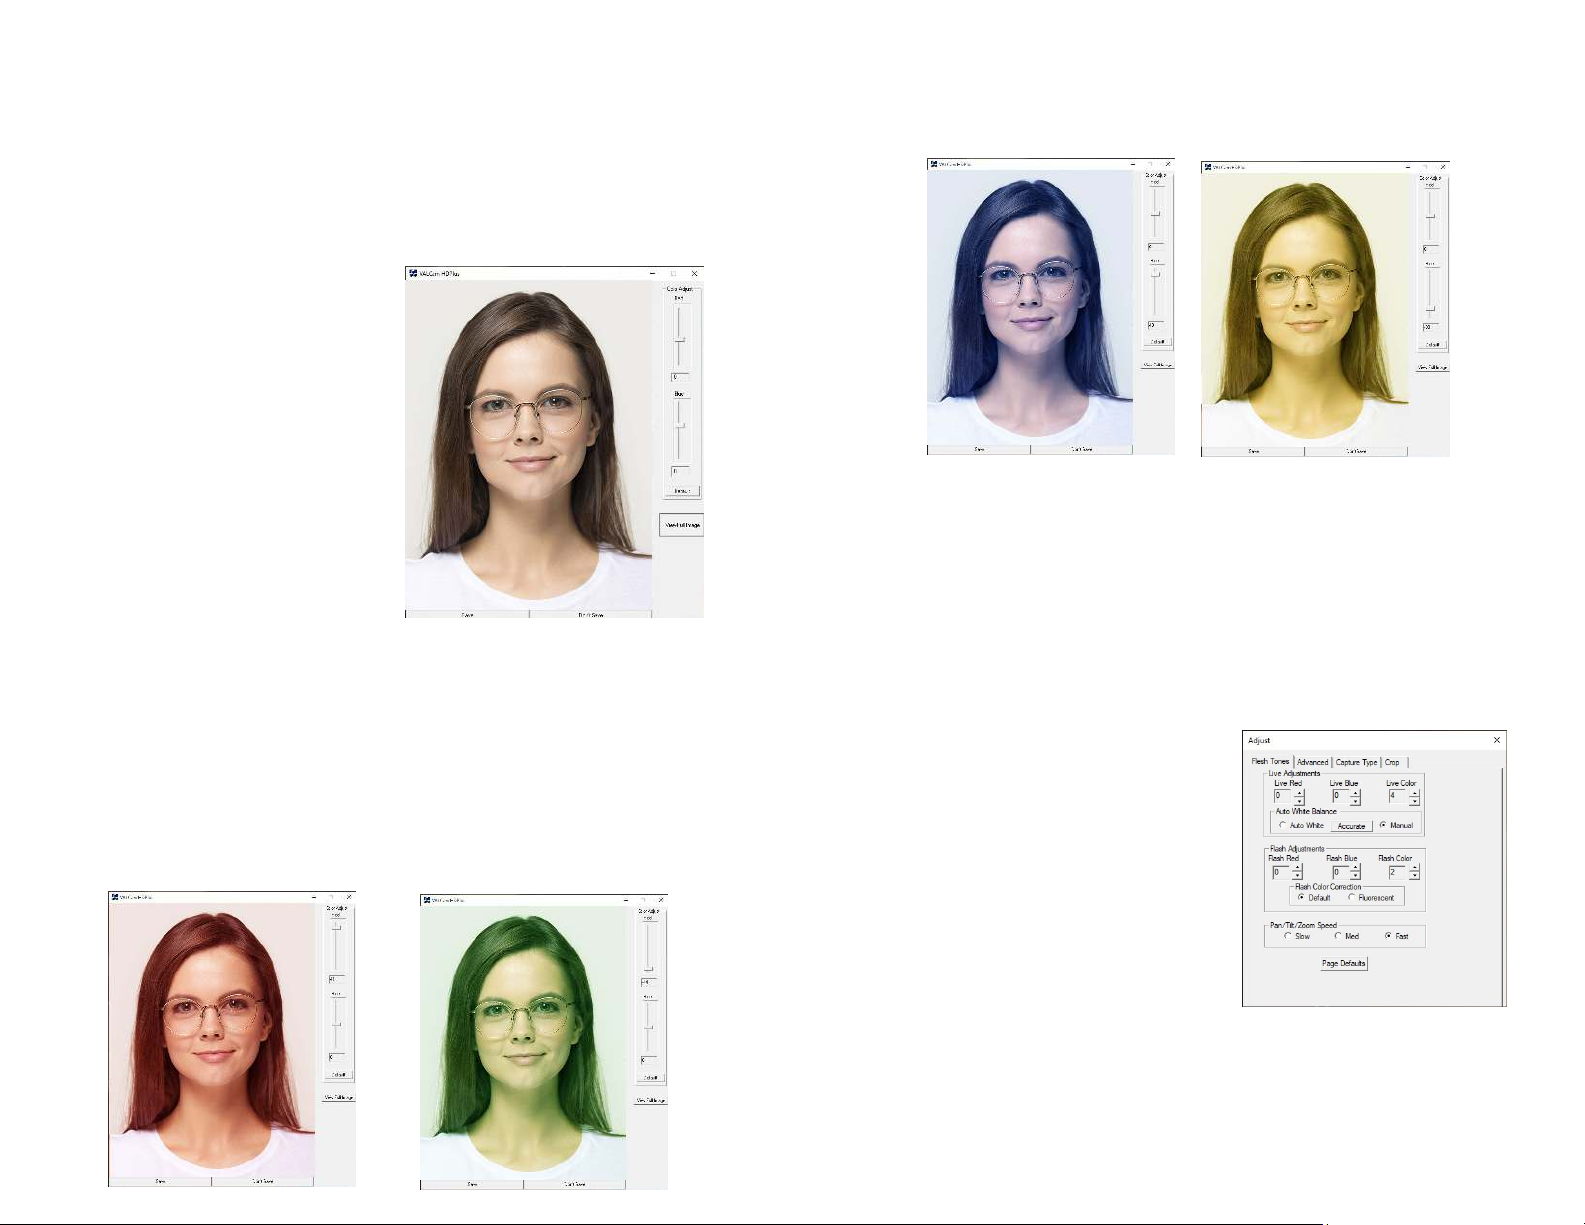
6. Adjust the Liv Color control (3) and note the changes in the image. This
control adjusts color intensity. The range is from 0-4 and the default setting is 4,
if the color is too intense it can be lowered.
7. To reset color adjustments click the “Auto Whit ” (4) radio button.
8. Zoom should be set for a fairly tight shot of your subject.
NOTE: B caus of th incr as d r solution of th ISG-Z100 HD this is not as
crucial as it is with low r r solution cam ras. B war of b ing xc ssiv ly zoom d
out from your subj ct.
9. After adjusting the Brightn ss, Fl sh Ton , and Sharpn ss controls for best
image quality click the Captur Button and the image will be displayed. The
Pre iew is a smaller replication of the capture image.

7
*Not - Th imag display d is a scal d down v rsion of th actual captur to fit in th
Us r Int rfac . To vi w th full v rsion of th Imag captur d click on th Vi w
Full Imag button on th low r right of th pr vi w imag . If vi wing th full
imag click on th “X” in th upp r right to l av th imag and r turn to th
application.
10. If you ha e already adjusted colors in the “Flesh Tone” Tab of the Adjust dialogue
box as described on page 5, these settings will not need to be changed. It is
recommended that you adjust colors for li e captures in that method and that the
Color adjust sliders be kept at the default settings of 0.
NOTE: Wh n in th liv captur mod typically th s controls should b k pt at a
“z ro” valu and color adjustm nt should b don in th “Fl sh Ton ” tab of th
Adjust box, th s controls ar mor us ful wh n taking Flash captur s.
11. Click the View Full Image button in the lower right side of the pre iew window to
see a full scale ersion of the captured image that will be sent to your ID badging
program. To return to the control screen click the “X” in the right hand corner.
8
12. Click the “Sav ” button to send the image to clipboard or your application. Click
the “Don’t Sav ” button to discard the image and prepare to take another capture.
This is ery useful when using the Twain dri er as you can immediately take
another capture without restarting the Twain interface.
Using th Photo-Flash
The photoflash is a useful tool in demanding lighting en ironments, you can e en
take a capture in a completely dark room with little image degradation.
On initial setup the flash intensity should be set by using the Brighten and Darken
buttons to optimize for your estimated camera to subject distance.
Once the flash intensity is set for a gi en subject distance this setting will not
generally need to be changed e en for arious skin tones. If the subject distance
changes this will need to be readjusted for the proper illumination.

9
Not : Th ISG-Z100 HD stor s diff r nt s ttings for Flash and non-Flash
captur s so both liv and Flash captur can b obtain d without us r
int rv ntion.
Taking a Flash Captur
1. Click the Us Flash button to Flash On.
The Flash will be triggered the next time the capture
button is clicked.
2. Frame the subject with the camera controls.
Not : R m mb r to b conscious of zoom s ttings and avoid xc ssiv ly wid
s ttings for b st captur s.
3. Adjust the and buttons for the estimated
subject distance from the camera. The button
increases the illumination of the capture while the
button decreases it.
*Not : Th Subj ct Distanc display d is a gu sstimat and should b fin -
tun d by th r sults of your actual captur . Onc s t it should not hav to b
r adjust d b tw n subj cts.
4. Click the Capture Button and after a short delay the flash will fire and the image
will be displayed. (Verify that Us Pr vi w is set to Y s)
Flash s t too dark Flash s t too Bright
10
5. Fine tune the and adjustments for optimal capture exposure
and take another capture.
If the image is to dark click the Brighten button a couple of times and take
another capture
If the image is to bright click the Darken button a couple of times and take
another capture
6. Repeat this process until optimal image exposure is obtained.
Not : Th Bright r and Dark r adjustm nts will not aff ct th Liv Pr vi w display
wh n th Us Flash is s t to Flash On.
Flash s t corr ctly
7. Once the proper setting is found it will only need to be readjusted if the
distance changes from the camera to the subject.
Adjusting Flash Captur Quality
The color balance of the captured flash image can be adjusted in real
time if needed. Any color changes made will be auto applied to further
captures.
There are two methods for adjusting the color of the flash capture.
The first method and the easiest is to adjust the color on the main screen
immediately post capture it is faster, more con enient, and will work for
most applications.

11
The second method in ol es adjusting the colors prior to taking a
capture and may offer better performance but is more difficult and time
consuming.
M thod 1 Post Captur
1. After the capture, the image is
displayed with the “Sa e” and
“Don’t Sa e” buttons
2. Red and Blue sliders appears
next to the captured image the
alues can be adjusted from -50
to +50.
Positi e alues increase Red or
Blue.
Negati e Values decrease Red or
Blue.
3. To adjust the image increase
the “Red” slider until the
image appears too Red.
Decrease the “Red” slider until the image appears to be lacking in
Red.
Then place the slider in the middle of that range
4. Repeat this procedure with the “Blue” slider
5. Iterate this procedure between both color bars until you ha e
optimized the image
Too Much Red Too Little Red
12
Too Much Blue Too Little Blue
Not : Y llow skin ton s indicat s too littl blu , so add blu to
corr ct
6. When finished you can click the Vi w Full Imag button to see a full
sized image or Sav the image.
M thod 2 Pr -Captur
1. This method is more difficult and time consuming.
2. Click on the Adjust button to open the
“Adjust” dialogue box and select the
“Flesh Tone” tab
3. Do not close the “Adjust” dialog box and
take a flash capture.
4. Adjust the “Flash Red” and “Flash Blue”
controls in the “Flash Adjustments” box
for color balance
Take another capture to see the results of
your adjustments
5. Continue making fine adjustments and
taking additional captures to see the results in the captured image.
Not : You hav to tak anoth r captur to s th ff cts of your adjustm nts
with this m thod.

13
6. Please note that the Flash color controls only effect flash captures and ha e no
effect on the li e pre iew.
Cropping Control
The ISG-Z100 HD allows the user to set cropping and sizing parameters that will
be reflected in both the li e pre iew and the captured image. Please be aware that
the li e pre iew display is a scaled down ersion of the capture, the cropping
dimensions and the aspect ratio are maintained accurately. The captured image will
be much larger but the same aspect ratio.
Optimally the aspect ratio (crop dimensions) of your capture should be set to match
the aspect ratio of your ID card in your badging application.
Standard cropping dimensions can be selected. (4/5, 3/4, or 2/3) In addition a
Custom option allows for any aspect ratio and size to be entered.
The size of the image can be reduced or increased 0% or 20% by selecting the
appropriate radio button in the Imag Siz R duction box to allow the li e
pre iew and full captured image to fit on your display. This can be helpful if using
monitors with a lower screen resolution.
Using Cropping Control
1. Click the Adjust button.
2. Click the “Crop” tab on the adjust
dialog box.
3. Note the arious options under
“Cropping Select” click the arious
“Cropping Select” choices and see how
the li e display changes to the new
aspect ratio.
*Not : Most ID programs us a 3/4 or 4/5
asp ct ratio.
4. Imag Siz R duction – If you wish to
reduce the Li e Pre iew and final
capture size.
14
*Not : Can b us ful for syst ms with low r scr n r solutions that th Liv
Display cannot accommodat .
*Not : Ent ring custom param t rs will s t th siz of th Liv Pr vi w and
th Captur d Imag .
5. “Custom” selection allows custom entries for image size and aspect ratio if
desired.
*Not : Th actual pix l siz of th imag is display d in th V rtical and
Horizontal t xt box s.
For Instance:
Select the Custom radio button in the “Cropping Select” box
To capture and image with an aspect ratio of 3/4 at a resolution of
675x900
Manually enter the size dimensions (675 in Horizontal and 900 in
Vertical)
Click the R siz button

15
Li e Pre iew window is scaled down (it maintains the aspect ratio
but is 1/2 the size of the captured image)
Take a capture and then click the Vi w Full Imag button on the
lower right side of the pre iew image to see the actual captured image
in your custom size and aspect ratio.
*Not : Typically only th Horizontal/V rtical ratio of th cam ra s ttings n d to
match your card d sign. It’s not n c ssary to match absolut pix l valu s and
usually und sirabl to do so.
Using th ISG-Z100 HD with Photo-ID Applications
Twain dri ers for the ISG-Z100 HD are loaded during the software installation
procedure. Using your application, select the ISG-Z100 HD dri ers as your Twain
source.
Alternati ely you can run the V
ALCam HD PLUS executable as a standalone application and capture images
directly to the Window’s clipboard or as a JPG file. You can then import these
images into any applications.
We also offer a 32 & 64 bit SDK at no charge, please contact your ISG Dealer for
info if you are interested.
Saving a Captur Using th ISG-Z100 HD Standalon App
You ha e multiple options to sa e your captures.
1. To start click on the Adjust button in the main capture window.
2. Click on the “Capture Type” tab.
3. You will see 3 options in the “Capture
Type” dialogue box that you select with the
radio buttons beside them.
A. Clip Board (Twain)
Images sa ed on the Clip Board
can be pasted in to any
application ( ia CTL+V or
selecting Paste after Right
Clicking the mouse)
This is the option that should be
selected when using the camera
as a TWAIN source.
16
B. JPG
.
Compr ssion Factor controls the Image File Size and Quality of the
sa ed Capture.
The range can be set from 1-255
A Higher number will result in a Smaller Image File Size but LOWER
Image Quality
Con ersely a Lower number will result in a Larger Image File Size but
with HIGHER Image Quality.
Generally a Compr ssion Factor under 25 will deli er ery high
quality image almost indistinguishable from the original capture.
Saving a JPG
1. If you want to sa e as a JPG erify that “User File Name” is selected in the “File
Name” box of the Capture Type tab.
2. The location where the captures will be sa ed must be selected. Click the “Select
Path” button.
3. Na igate to a location using the Fil Explor r window to where you would like
the captures to be sa ed and click Sa e.
*NOTE: Th “Fil Nam ” in th Explor r window will b VAL D fault.JPG DO
NOT CHANGE THIS NAME
4. The Fil Explor r Window will disappear.
5. Go to the main camera application window (with the li e pre iew image from
your ISG-Z100 HD) and click Capture
6. Click Sa e
7. A dialogue box will pop up and prompt you for a File Name to sa e the capture.
Enter the desired name and click OK.

17
*Not : You do not hav to nt r th fil xt nsion wh n naming (.jpg) as th
softwar will auto add that for you
Administrativ Lock Options.
The Flash, Zoom, and Color settings can be locked from the
Adjust menu. This can be useful to assure that operators will
not change the settings after they ha e been optimized
Click the Adjust button
The Adjust box pop up
appears. Click on
the “Ad anced”
tab.
Locate the Lock
Zoom, Lock Iris,
and Lock Color
check boxes.
One settings are
locked operators
cannot make
changes to these
settings from the
front panel
control.
If desired, a
password can be
set to only allow
the Admin access
to the Adjust
dialogue box, see below for instructions.
18
S tting an Administrators Password
An administrati e password can be applied to restrict using the Adjust dialog
box. This pre ents operators from changing parameters set up by the
Administer.
The following parameters can be locked from end users:
Zoom control
Flash Intensity
Pre iew adjustments
Color adjustments
Cropping parameters
S tting th Password:
1. Type “Registry Editor” in the search field of the Task Bar
2. Click on the R gistry Editor App.
3. Na igate to Computer\HKEY_CURRENT_USER\SOFTWARE\ISG-
Z100 HD in the left pane of the app.
4. You will see a number of entries in the right pane of the app listed
alphabetically, scroll down until you locate the “PassWord” entry.
5. Click on it, it will bring up an “Edit String” dialogue box
6. There is a text box labeled “Value Data:” this is where you enter your
desired Password. Exampl : ABC123
7. Restart the ISG-Z100 HD application and click the Adjust button.
5. A dialogue box will appear prompting you to enter your password
Enter your password Exampl : ABC123 to open the Adjust Dialog
box.

19
Print Spacer
Table of contents
Other ISG Digital Camera manuals