it 915 Instruction Manual

915/ 965 MOTHER BOARD WITH A 9500 VIDEO CARD GUIDE
915/965 MOTHERBOARD WITH A 9500 VIDEO CARD CONNECTION GUIDE
Golden Tee LIVE™www.itsgames.com 847.870.7027 8/20/09 1 | Page
©2009 Incredible Technologies, Inc. All Rights Reserved. Non-IT trademarks are the properties of their owners and used for illustration only.
All information herein is Confidential. Unauthorized duplication or disclosure may violate applicable laws or agreements.
915/965 Motherboard with a 9500 Video Card Connection Guide
Because the system box that originally shipped with your GT LIVE may need to be replaced,
some video connections that worked with the previous Nighthawk system box may now need to
be adjusted. The most recent motherboard is the DG31PR, which has a 9500 video card with an
HDMI port. Audio and video is provided via HDMI cable. The 9500 video card only works with
Golden Tee 2009 courses or higher.
This guide focuses on setting up system boxes with the 915/965 motherboard. HDMI audio is
not enabled for system boxes with the 915/965 motherboard.
To determine the correct video and audio connections for your new system box, it is necessary
to:
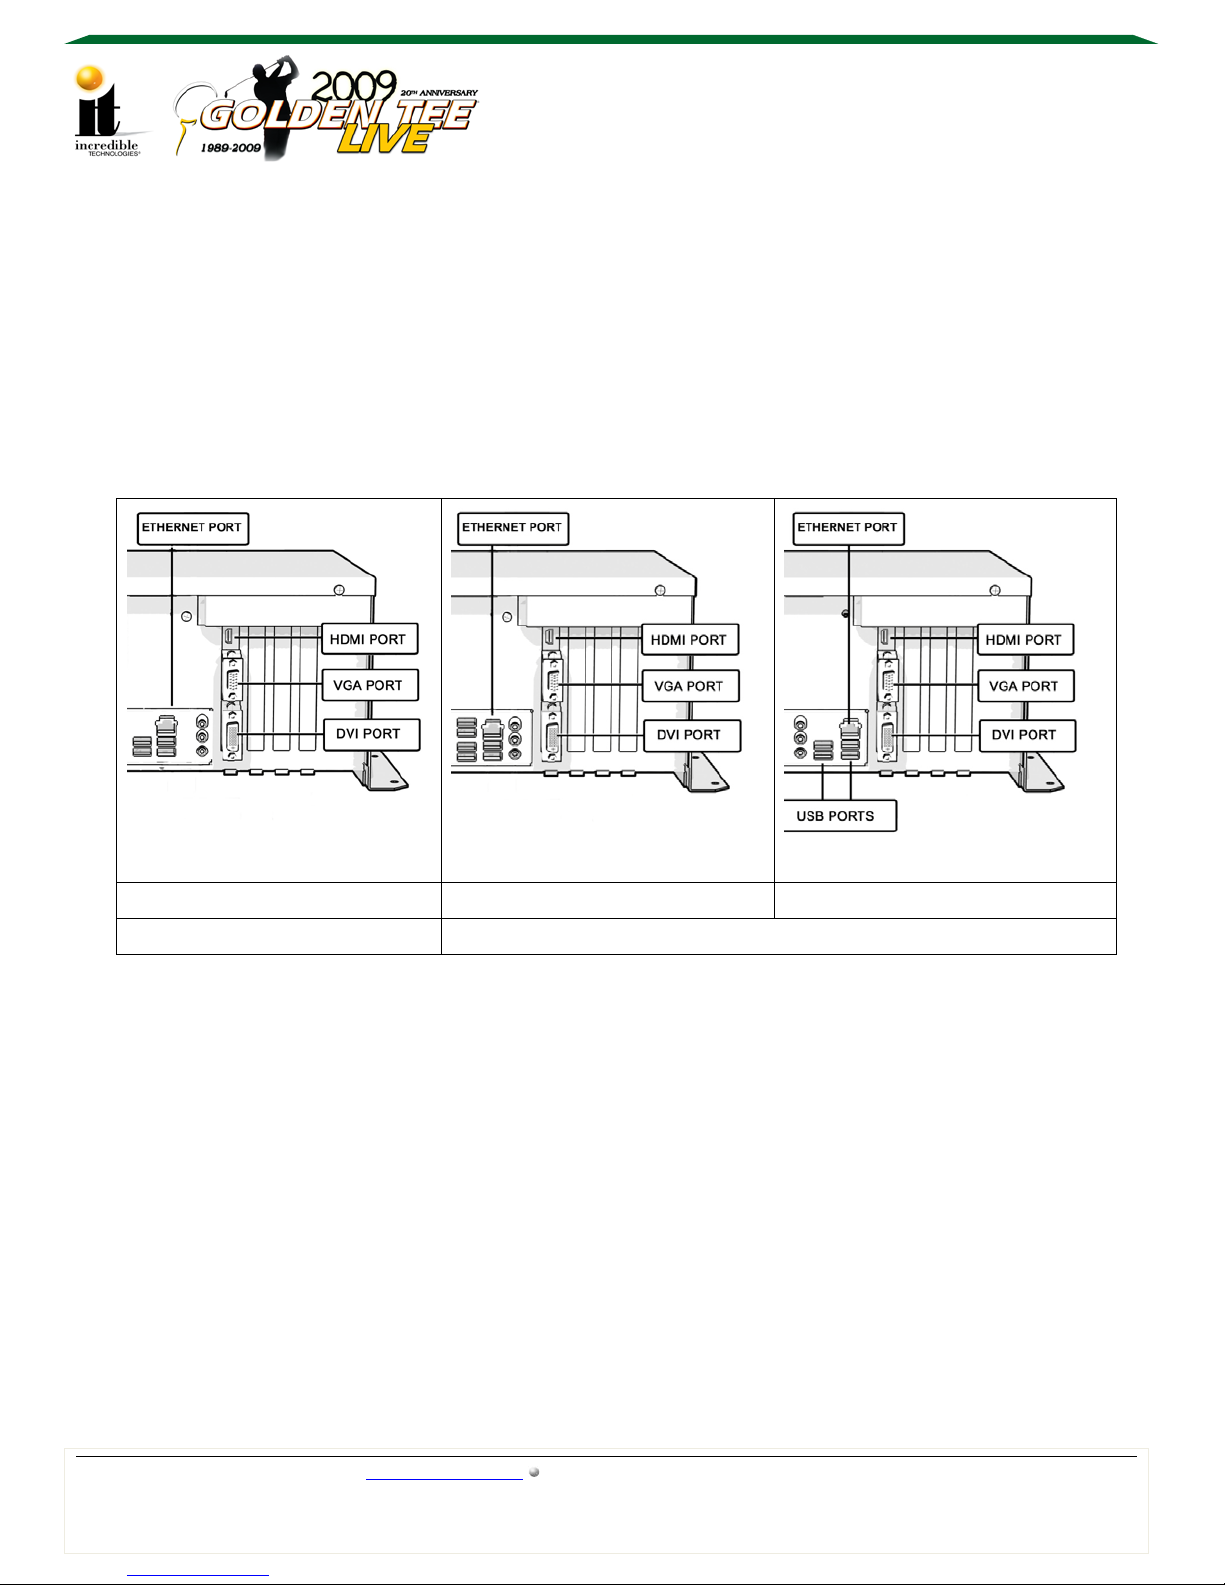
1. Identify the system box motherboard and video card combination. Use the Nighthawk
System Box Configuration Table on page 2 to help with identification.
Note: The 915 and 965 motherboards have a different arrangement of ports, but the
functionality is identical, so they are referred to as one type of motherboard:
915/965.
2. Identify the video card. A 9500 will have an HDMI port on the top. The older video cards,
7600 or 6600, will have a round display port above the 2nd monitor output for component
video.
7600 Video Card with Display Port 9500 Video Card with HDMI Port
3. Identify the best video and audio configuration for your equipment.
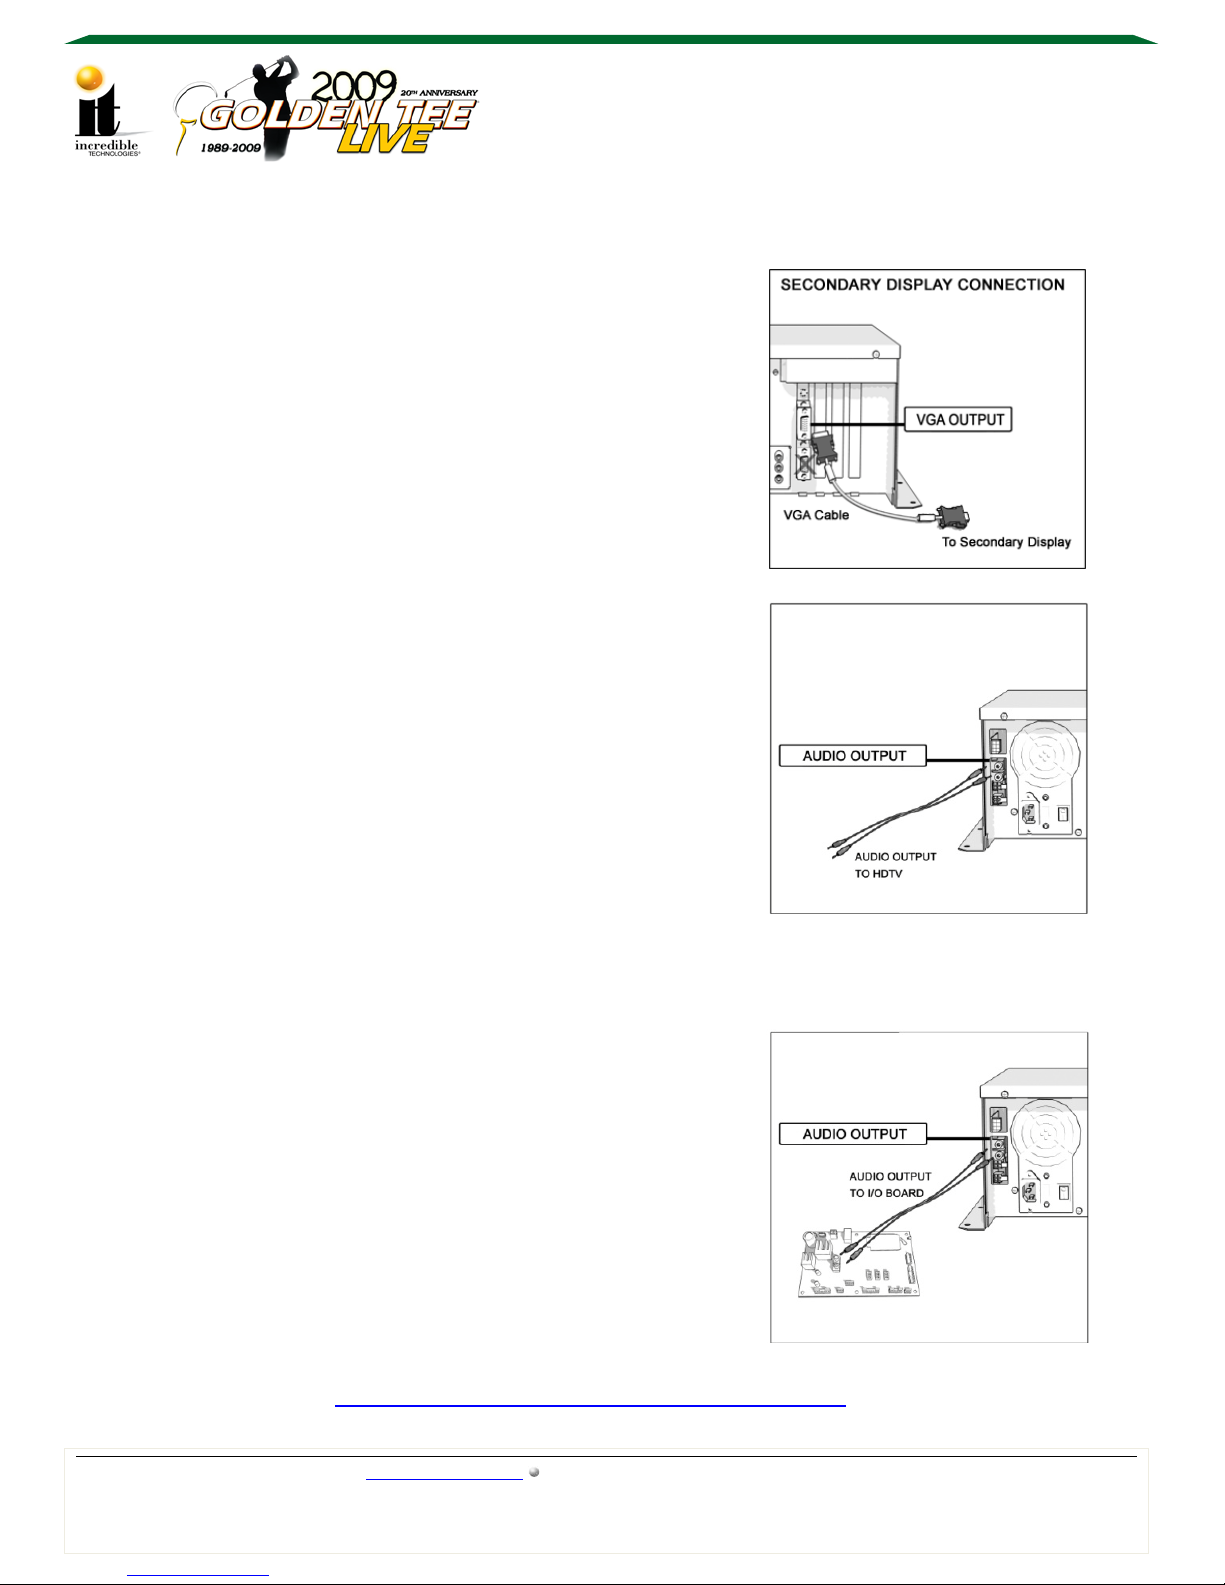
CRT MONITOR - Use the DVI to VGA adaptor from the DVI port on the system box
and connect to the VGA port on the monitor. Audio - Use the system box RCA audio
out to the I/O board RCA audio in, with speakers connected to the I/O board.
HDTV - Capable of VGA, DVI or DVI to HDMI video. Audio - Use the system box
RCA audio out directly to the HDTV audio system or to the I/O board, using cabinet
speakers connected to the I/O board.

915/ 965 MOTHER BOARD WITH A 9500 VIDEO CARD GUIDE
915/965 MOTHERBOARD WITH A 9500 VIDEO CARD CONNECTION GUIDE
Golden Tee LIVE™www.itsgames.com 847.870.7027 8/20/09 2 | Page
©2009 Incredible Technologies, Inc. All Rights Reserved. Non-IT trademarks are the properties of their owners and used for illustration only.
All information herein is Confidential. Unauthorized duplication or disclosure may violate applicable laws or agreements.
Identifying the Motherboard with a 9500 Video Card
With the box horizontal on a level surface, look closely at the rear right side of the Nighthawk
system box to determine which motherboard and video card combination you have. The location
of the Ethernet port and USB ports is the easiest way to identify the motherboard.
The diagrams below illustrate the differences between the three main types of system boxes
shown with a 9500 video card:
Nighthawk System Box Configuration Table
DG31PR D965 D915
*Updated Configuration Legacy Configuration
If the system box does not have an HDMI port, then it has a 7600 or 6600 video card. A system
box with 2009 courses or higher and a 7600 video card can use the top video port for
component video out. Proper cables and set up are required. The 9500 and 6600 video cards
are not capable of component video.
Once the configuration, and the replacement system box capabilities, are known, use the
appropriate method below to set up connections.
*Audio is possible through HDMI with the DG31PR configuration.

915/ 965 MOTHER BOARD WITH A 9500 VIDEO CARD GUIDE
915/965 MOTHERBOARD WITH A 9500 VIDEO CARD CONNECTION GUIDE
Golden Tee LIVE™www.itsgames.com 847.870.7027 8/20/09 3 | Page
©2009 Incredible Technologies, Inc. All Rights Reserved. Non-IT trademarks are the properties of their owners and used for illustration only.
All information herein is Confidential. Unauthorized duplication or disclosure may violate applicable laws or agreements.
Video Connections – Primary Monitor
HDTV VGA METHOD (Allows for dual monitors either secondary or duplicate video)
VIDEO: Use the DVI to VGA adaptor from the DVI port on the system box to connect a VGA
cable to the VGA port on the HDTV. Common input label names for VGA ports on HDTVs
are RGB, Computer or PC.
AUDIO: Using a 2-wire RCA cable (red and white)
connect the RCA audio out on the system box to the
appropriate audio in on the HDTV. It can also be
connected to the I/O board with speakers connected to
the I/O board. See Audio Connections for details.
CRT VGA METHOD (Allows for dual monitors either
secondary or duplicate video)
VIDEO: Use the DVI to VGA adaptor from the DVI port
on the system box to connect a VGA cable to the VGA
port on the CRT monitor.
AUDIO: Using a 2-wire RCA cable (red and white) connect the RCA audio out on the
system box to the RCA audio in on the I/O board with speakers connected to the I/O board.
DVI to HDMI METHOD (Allows for a second monitor displaying secondary or duplicate video)
VIDEO: Use a DVI to HDMI cable or adapter. Connect the DVI side of the cable to the
bottom DVI port on the system box and the HDMI side of the cable to an HDMI input on the
HDTV. Select the proper input on the HDTV.
AUDIO: If the HDTV has RCA audio L/R inputs associated
with an HDMI input, it is possible to use the HDTV
speakers.
Using a 2-wire RCA cable (red and white) connect the RCA audio outputs on the system
box to the audio L/R input next to the HDMI input on the HDTV.
DVI Output
DVI TO VGA CONNECTION

915/ 965 MOTHER BOARD WITH A 9500 VIDEO CARD GUIDE
915/965 MOTHERBOARD WITH A 9500 VIDEO CARD CONNECTION GUIDE
Golden Tee LIVE™www.itsgames.com 847.870.7027 8/20/09 4 | Page
©2009 Incredible Technologies, Inc. All Rights Reserved. Non-IT trademarks are the properties of their owners and used for illustration only.
All information herein is Confidential. Unauthorized duplication or disclosure may violate applicable laws or agreements.
HDMI to HDMI (This will allow for ONE monitor only)
VIDEO: Connect the HDMI cable from the system box to the
HDMI input on the HDTV. Select the proper input on the
HDTV.
AUDIO: Using a 2-wire RCA cable (red and white) connect
the RCA audio out on the system box to the RCA audio in on
the I/O board with cabinet speakers connected to the I/O
board. See Audio Connections for details.
The DIP switches on the I/O board must be set appropriately for the desired resolution.

915/ 965 MOTHER BOARD WITH A 9500 VIDEO CARD GUIDE
915/965 MOTHERBOARD WITH A 9500 VIDEO CARD CONNECTION GUIDE
Golden Tee LIVE™www.itsgames.com 847.870.7027 8/20/09 5 | Page
©2009 Incredible Technologies, Inc. All Rights Reserved. Non-IT trademarks are the properties of their owners and used for illustration only.
All information herein is Confidential. Unauthorized duplication or disclosure may violate applicable laws or agreements.
Video Connections – Secondary Monitor
A second monitor can be installed to display secondary
information or a duplicate image of the main monitor. When
duplicating the main video, the second monitor will match the
resolution of the main monitor.
The second monitor must be connected to the upper
VGA video port of the video card. The DIP switch
settings must be set appropriately for your application.
Note: When using HDMI to HDMI a second monitor is
not possible.
Audio Connections
HDTV Speakers
Connect the 2-wire RCA (red and white) audio cable
from the RCA audio out on the system box to the to
the appropriate audio input on the HDTV.
Note: If using VGA video, it may be necessary to use
a stereo 3.5mm male plug to 2 female RCA adapter.
Adjust the game volume to 75% and adjust the
television volume to the desired level.
External Speakers – Speakers Connected to the I/O Board.
Connect the 2-wire RCA (red and white) audio cable
from the RCA audio out on the system box to the RCA
audio input on the I/O board.
Speakers should already be connected to the audio
output from the I/O board.
See the most current manual for more information.
Available online at: http://www.itsgames.com/itsgames/Support/Manuals
This manual suits for next models
1
Table of contents