it ITVS-760B User manual

MODEL: ITVS-760B
WOODEN MUSIC CENTER
WITH BLUETOOTH AND RECORDABLE CD PLAYER / USB

2
Important Safety Instructions.......................................................................................3
Product Overview........................................................................................................ 4
Setup / Basic Operation...............................................................................................7
Remote Control........................................................................................................... 7
Listening to a Vinyl Record..........................................................................................9
Listening to a CD......................................................................................................... 9
Listening to the Radio..................................................................................................11
Listening to an External Audio Device (AUX Mode).................................................... 12
Listening to an External Audio Device (Bluetooth Mode)........................................... 12
Listening to a Cassette Tape ..................................................................................... 13
Recording to a CD-R / CD-RW .................................................................................. 13
USB Memory Stick Playback / Record ....................................................................... 17
Maintenance / Proper Handling ................................................................................. 21
Specifications ............................................................................................................ 22
Troubleshooting Guide ............................................................................................... 23
FCC Statement............................................................................................................24
INDUSTRY CANADA.................................................................................................. 25

3
CAUTION: To reduce the risk of fire or electric shock, do notexpose this appliance to rain or moisture.
WARNING: To prevent electric shock, do not use this (polarized) plug with an extension cord, receptacle
or other outlet unless the blades can be fully inserted to prevent blade exposure
WARNING: Invisible laser radiation when open and interlock failed or defeated. Avoid direct
exposure to laser beam.
PRODUCT COMPLIES WITH DHHS RULE 21 CFR SUBCHAPTER J IN EFFECT AT DATE
OF MANUFACTURE
This equipment is a Class II or double insulated electrical appliance. It has been designed in
such a way that it does not require a safety connection to electrical earth.
Important Safety Instructions
1. Read these instructions – All the safety and operating instructions should be read before this product
is operated.
2. Keep these instructions- The safety and operating instructions should be retained for future reference.
3. Heed all warnings – All warnings on the appliance and in the operating instructions should be adhered to.
4. Followall instructions– All operating and use instructions should be followed.
5. Do not use this apparatus near water – The appliance should not be used near water or moisture – for
example, in a wet basement or near a swimming pool, and the like.
6. Clean only with dry cloth.
7. Do not block any ventilation openings. Install in accordance with the manufacturer’s instructions.
8. Do not install near any heat sources such as radiations, heat registers, stoves, or other apparatus
(including amplifiers) that produce heat.
9. Do not defeat the safety purpose of the polarized or grounding plug. A polarized plug has two blades
with one wider than the other. A grounding plug has two blades and a third grounding prong. The wide
blade or the third prong isprovided for your safety. If the provided plug does not fit into your outlet,
consult an electrician for replacement of the obsolete outlet.
10. Protect the power cord from being walked on or pinched particularly at the plugs, convenience
receptacles, and at the point where theyexit from the apparatus.
11. Only use attachments/accessories specified by the manufacturer.
12. Use only with the cart, stand, tripod,bracket, or table specified by the
manufacturer, or sold with the apparatus. When a cart or rack is used, use
caution whenmoving the cart/apparatus combination toavoid injury from
tip-over.
13. Unplug the apparatus during lightning storms or when unused for a long
period of time.
14. Refer all servicing to qualified personnel. Servicing is required when the apparatus has been damaged
in any way, such as power supply cord or plug is damaged, liquid has been spilled or objects have
fallen into the apparatus has been exposed to rain or moisture, does not operate normally, or has
been dropped.

15.
-The lightning symbol within a triangle is intended to alert the user to the presence of non-insulated
“dangerous voltage” within the product’s enclosure. This presence may be of sufficient magnitude
to constitute a risk of electric shock.
-Warning: To reduce the risk ofelectric shock, do not remove cover (or back) as there are no
user-serviceable parts inside. Refer servicing to qualified personnel.
-The exclamation point within a triangle is intended to alert the user to the presence of
important operating and maintenance instructions in the manaul accompanying the device.
16. This equipment is a Class II or double insulated electrical appliance. It has been
designed so that it does not require a safety connection to electrical earth.
17. The main plug is used as disconnect device, the disconnected device shall remain readily operable.
18. To reduce the risk of fire or electric shock, do not expose this apparatus to rain or moisture. The
apparatus should not be exposed to dripping, splashing or objects filled with liquids.
19. The use of the equipment should be in a moderate climate.
20. The battery shall not beexposed to excessive heat such as sunshine, fire, etc.
ACCESSORIES INCLUDED
•REMOTE CONTROL
•3.5MM TO 3.5MM AUX CABLE
•RCA TO 3.5MM AUX CABLE
•INSTRUCTION MANUAL
•WARRANTY (BACK OF MANUAL)
•45 RPM ADAPTOR
Product Overview
Front View
4
Please note: Front faceplate of unit consists of man made materials

1. “TRACK INCREMENT” During recording, press to separate tracks.
2. “AUTO /MANUAL” Press to select mode of track number assignment for recording.
3. “ERASE” Press to erase or unfinalize a CD-R disc/USB
4. “FINALIZE” Press to finalize a CD-R/CD-RW disc.
5. “RECORD” Press to enter record/pause mode.
6. RADIO TUNER DISPLAY
7. “AUX/BLUETOOTH” Press to listen to an external source connected to the AUX IN jack and press
again to switch to Bluetooth.
8. “PHONO” Press to play a vinyl record.
9. “CD/USB” Press to play a CD, press again to switch to USB mode.
10. “TAPE” Press to play a cassette.
11. “AM/FM” Press to listen to the radio. Press again to switch between AM and FM mode.
12. “VOLUME” KNOB Turn to adjust volume. (Note: volume ranges from 00 to 32)
13. RADIO TUNER KNOB In AM/FM mode, turn to tune in a station.
14. “POWER ” Push to turn the unit on or off.
15. “EJECT” To open and close the disc tray.
(Note: This button will not work in AM/FM mode.)
16. “3.5mm HEADPHONE JACK” Accepts headphones/earphones.
17. “USB JACK”
18. STOP Press to stop playback or recording.
19/20. PREVIOUS/NEXT TRACK & REWIND/FF/
In CD Mode, press once to skip to the previous/next track. Press and hold to fast rewind/forward/.
21. PLAY/PAUSE Press to start playback, recording, finalizing or erasing. During playback,
press again to pause.
22&23. “REC LEVEL” BUTTON In record mode, turn to adjust the recording level.
24. “AUX-IN JACK” Connect an external source to the AUX IN socket.
25. “DISC TRAY”
Right Side View
26. CASSETTE FF & EJECT Press halfway to fast forward, press all the way to end and eject the tape.
5

Rear View
6
A. AUX IN jacks
For audio sources with RCA jacks, plug the RCA end of the cable into these jacks and the
other into the audio source. Be sure to connect the white plug to the white jack (Left) and the red
plug to the red jack (Right).
B. FM wire antenna
While tuned to a station in FM mode, extend the wire and reposition to adjust for best reception.
C. AC Power Cord
Plugs into a wall outlet.
A. Turntable.
B. Safety Screw (for transport) Before using the unit, turn the screw
clockwise using a coin or screwdriver.
Important: When you transport the unit, turn the screw counterclockwise to secure the turntable.
The silver screw on the back of the turntable is a balancer for both the turntable as well as for
the tone arm.
Please turn this screw with a coin to either left or right and test by moving your tone arm to the
middle of the spindle. Please note that this screw is a balancer and will have to be adjusted until
the tone arm moves freely to the end of the record (middle of the spindle). The Tone Arm should
move without any resistance before using the turntable phonograph.
C. Speed Selector.
D. Tone Arm holder.
E. Tone Arm. (Before use, completely loosen the fixed plastic tie on the tone arm and uplift tone arm.)
F. 45 RPM adaptor.
Parts of the Turntable

7
Setup / Basic Operation
Setup
1. Remove white protective needle cover by gently pulling towards front of unit.
2. Remove any packaging materials from the unit.
3. Connect the AC power cord
to a wall outlet.
Note: To prevent interference, avoid bundling audio signal cables together with the AC power cord.
Basic Operation
1. Press the POWER button to turn the unit on.
2. Select the source by pressing the corresponding mode
button (AUX/Bluetooth / PHONO / AM/FM / CD/USB / TAPE)
3. Rotate the VOLUME knob to adjust to the desired sound level.
The volume reading is “00-32” the volume will change along with the number.
Please note: Push the source and it will light up showing that you
have selected it. These are the only 5 buttons that will lightup.
Listening through Earphones/Headphones (not included)
For private listening, first reduce the volume level to minimum.
Insert your headphones’ plug into the HEADPHONE jack, then
adjust the volume up by turning the VOLUME knob.
Note: The speakers will automatically be deactivated while
headphones are plugged in.
CONDENSATION WARNING:
When the unit is moved from a cold or warm place, or is used following a sudden temperature change, there is the
danger that water vapor in the air may condense on the unit, preventing proper operation. In such cases, leave
the unit for 1-2 hours after plugging it into an AC outlet to allow it to stabilize at the temperature of its surroundings.
Remote Control
When using the remote control, point it towards the remote sensor on the front panel of the unit.
Notes:
- Even if the remote control is operated within the effective range, remote control operation may be
impossible if there are any obstacles between the unit and the remote control.
- If the remote control unit is operated near other devices which generate infrared rays, it may not
function properly. Conversely, the other devices may not function incorrectly.
Battery Installation
1. Remove the battery compartment cover.
2. Insert 2x “AAA” batteries.
Note: Make sure that they are oriented so their polarity
markings, “+” and “-” match the remote’s markings.
HEADPHONE

8
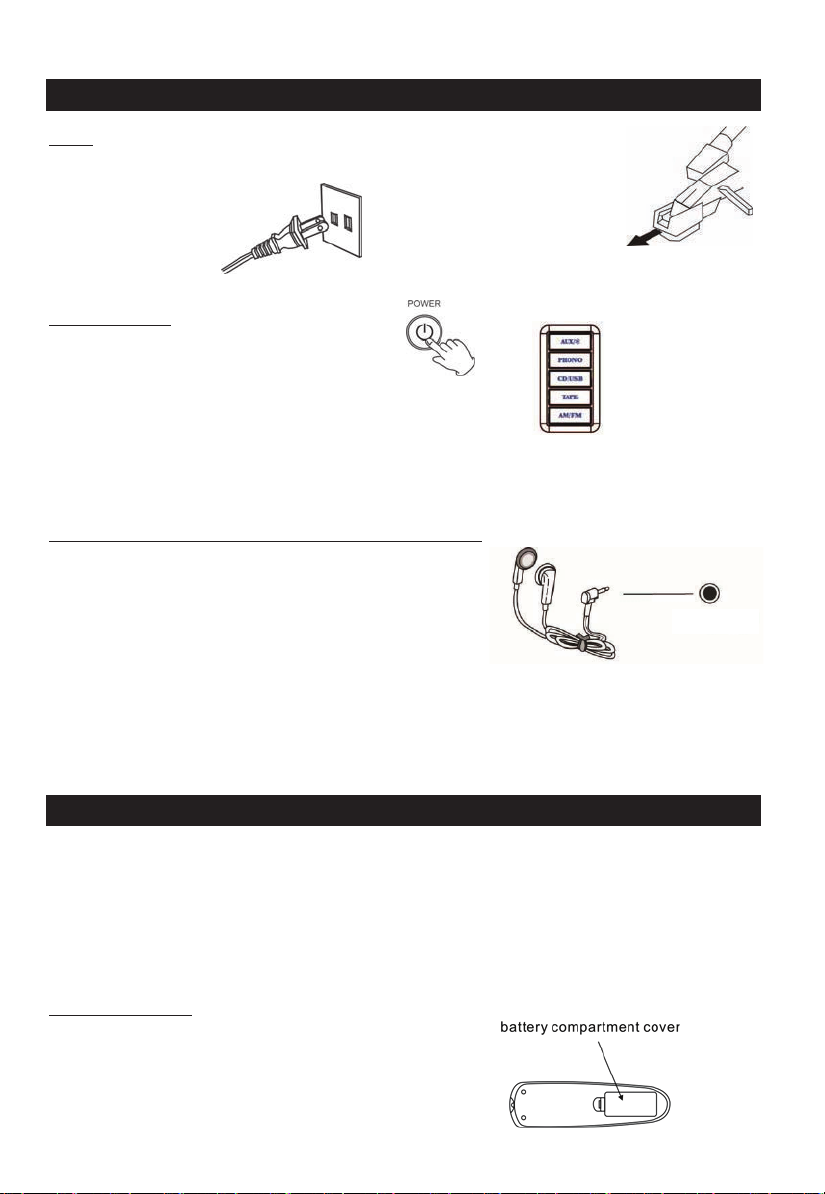
3. Replace the battery compartment cover.
Battery Replacement
When the distance required between the remote control unit and main unit decreases, it is necessary
to replace the batteries with new ones.
Battery Precautions
Be sure to insert the batteries with correct positive “+” and negative “-” orientation.
ALWAYS use batteries of the same type. Never mix different types of batteries together.
When using rechargeable batteries, refer to the precautions on their labels.
When the remote control unit is not to be used for a long time (more than a month), remove the
batteries to prevent them from leaking.
Do not heat or disa ssemble batteries, and NEVER dispos
Do not dispose batteries in standard garbage disposal sites. Dispose of batteries at available Battery
Recycling Sites after fully discharging battery. Not doing so may violate local disposal laws and regulations.
Please refer to local regulations for proper battery disposal.
e of old batteries by throwing them in a fire.
Remote Control Button Functions
1. “Remote Sensor”
2. “DISPLAY” In CD or USB mode, press to change the display.
3. “REPEAT” In CD or USB mode, press to select a repeat mode.
4. “PROGRAM” In CD or USB mode, press to program tracks.
5. “ERASE”.
Press to erase or unfinalize a CD-RW disc and erase USB.
6. “TRACK INCREMENT” During recording, Press to divide tracks.
7. “AUTO/ MANUAL INCREMENT”
Press to select the mode of track number assignment.
8. “STOP” Press to stop playback or recording.
9&23. “Previous/Next Track & Rewind/FF”
In CD or USB Mode, press once to skip to the previous/next track.
Press and hold to fast rewind/forward.
10&25. “Folder down & Folder up”In USB mode, press to choose
your desired folder.
11&21. “VOL+” / “VOL-” Press to adjust the volume.
12. “RADIO” Press to listen to the radio.
Press again to switch between AM and FM modes.
13. “TAPE” Press to listen to an audio cassette tape.
14. “BT” Press “Bluetooth ” to listen to an external source connected
with Bluetooth.
15. “OPEN/CLOSE” Press to open/close the disc tray.
16. “CLEAR” In CD or USB mode, Press to clear programmed tracks.
17. “SHUFFLE” In CD or USB mode, press for shuffle playback.
18. “FINALIZE” Press to finalize a CD-R/CD-RW disc.
19&20. “REC VOL+”/ “REC VOL –”
In record mode, turn to adjust the recording volume.
22. “RECORD” Press to enter record mode.
24. “PLAY/PAUSE”Press to play/pause recording, finalizing and erasing.
26. “PHONO” Press to play a vinyl record.
27. “CD/USB” Press to play a CD, press again to switch to USB mode.
28. “AUX” Press “AUX” to listen to an external source connected to the AUX IN jack.

9
Listening to a Vinyl Record
1. Press the “PHONO” function button.
2. Gently open the top cover and simply guide the hinge into place. (Follow diagram below)
*To lock the top cover in the open position, lift up the top
cover all the way so that the hinge is straight (Steps 2-3).
Be sure to push the hinge forward so that it will
lock securely (Step 4). Slowly lower the
top cover so that the hinge
will catch the cover
and remain open.
3. Place a vinyl record on the turntable. When playing a 45 RPM record, use the included adaptor.
4. Select the appropriate speed.
5. Gently push tone arm clip to the right to release the tone arm.
6. Move the tone arm gently to the edge of the record (or the starting point of a track).
The turntable will begin to turn. Slowly lower the tone arm onto the record.
7. When the record reaches the end, the tone arm will stop and you must lift and return the
tone arm to the tone rest manually. Lock the tone arm rest holder to protect the tone arm.
Important:
- Closing the top cover will help prevent dust from settling on the turntable.
- Always lock the tone arm clip before transporting the unit.
- Do not place anything on top of the turntabl
- Most records will stop spinning after the last track. In some circumstances, the record will continue
to spin, there is NO need for concern, as some records are designed this way.
e cover, especially while playing a record.
Listening to a CD
1. Press the “CD/USB” button repeatedly to select CD mode.
“--- busy CD” will appear for a few seconds.
Note:When no disc is set, “no cd” will appear on the display.
2. Press the EJECT button to open the tray.
(Note:This button will not work in AM/FM mode)
3. Place a disc on the tray with the printed
label face up.
4. Press the EJECT button to close the tray.
“--- busy CD” will appear for a few seconds and then the number of tracks will show on the display.
5. Press the PLAY/PAUSE button ( ) to begin playback from the first track.
6. To temporarily pause playback, press the PLAY/PAUSE button ( ). Press again to resume.
7. To skip tracks forward or backward, press the corresponding skip button ( or ).
Pressing button to skip to the previous track.
Pressing button to skip to the next track.
Note: Be careful not to pinch your finger when opening or closing the top cover.
SIDE VIEW SIDE VIEW SIDE VIEW SIDE VIEW
1 2 3 4

10
8. To fast forward / rewind within a track, press and hold down the corresponding skip button until
the desired position is reached.
9. To stop playback, press the STOP button
Important:
- Never place more than one disc on the tray.
- The disc must be placed in the center of the disc tray. An incorrectly loaded disc can
permanently damage the tray door mechanism.
- Do not push the CD tray – always use the OPEN/CLOSE button.
- It takes a moment for the unit to load a disc, during which all buttons will be temporarily
deactivated.
Display
Each time the DISPLAY button is pressed, the display mode will cycle
between the following options:
- Track Number + Track Play Time (Default Display Mode)
- Track Play Time Countdown
- Track Play Time
Repeat Playback
Each time the REPEAT button is pressed, the repeat mode will cycle through
the following options:
REPEAT ALL (Repeat the entire CD)
The entire CD will be played repeatedly.
REPEAT 1(Repeat one track)
The current track will be played repeatedly. If you press the ( or )
button to
select another track, the track you select will be played repeatedly.
Notes:
- If one of the following buttons is pressed, the repeat mode will be cancelled.
OPEN/CLOSE, POWER, AM/FM, PHONO, AUX/Bluetooth, TAPE, CD/USB
- Repeat playback works with finalized discs only.
Shuffle Playback
To play the tracks on a CD in a random sequence, press the SHUFFLE button during playback.
Notes:
- Pressing ()during shuffle playback will randomly select the next track.
- If one of the following buttons is pressed, shuffle mode will be cancelled.
OPEN/CLOSE, POWER, AM/FM, PHONO, AUX/Bluetooth, TAPE, CD/USB
- When the SHUFFLE playback of all the tracks has been finished, the unit
stops and the shuffle mode is cancelled.
- A track cannot be repeated during shuffle playback.
- Shuffle playback doesn’t work during programmed playback.
- Shuffle playback works with finalized discs only.

11
Programmed Playback
Up to 32 tracks can be programmed to play in the desired order.
Notes:
- Shuffle playback does not work during programmed playback.
- Programmed playback works with finalized disc only.
1. Press “CD/USB” button repeatedly to select CD mode, then load a CD.
2. While the CD is stopped, press the PROGRAM button.
3. “PROGRAM” indicator blinks, and “P-01” appears on the display.
4. Press ( or ) to select a track number.
5. Press the PROGRAM button again to set the current track.
6. “P-02” is displayed. Repeat steps 4 thru 5 to program the additional tracks.
7. When the selection of track numbers has been finished, press the PLAY button ( ) to start
program playback.
8. To cancel the program mode, press the STOP ( ) button twice.
To check the programmed order
In the stop mode, press ( or ) repeatedly to show the track numbers that have
been programmed.
To add a track to the end of the programmed order:
In the stop mode, press the PROGRAM button.
Select a track number by pressing ( or ), then press the PROGRAM button.
The current track will be added to the end of the program.
To delete the last track from the programmed order:
In the stop mode, press the CLEAR button to delete the last track from the program.
To clear the programmed order:
Press STOP when the CD is already stopped, or press OPEN/CLOSE, POWER, AM/FM,
PHONO, CD/USB, or AUX/Bluetooth.
Listening to the Radio
1. Press the “AM/FM” button(1).
Press again to switch between AM and FM
2. Tune to the desired station
using the Radio Tuner Knob(2).
Note: In FM Mode, The “TUNED/ST” indicator
lights up red when tuning in the stereo reception station.
In AM mode, The “TUNED/ST” indicator lights up red
when a station is correctly tuned in.

12
Adjusting for Best Reception
AM broadcast: Rotate the unit to find the best position.
FM broadcast: Extend and reposition the FM antenna.
Listening to an External Audio Device (AUX Mode)
In AUX (auxiliary) mode, this unit can play audio from an external audio source (iPod, MP3 Player,
Portable CD Player, etc.)
There are two AUX IN’s (front and rear). When connecting a device that has a headphone jack, use
the cable with 3.5mm plugs on either end with the front AUX IN jack.
The rear set of AUX IN jacks (red and white) can be used with devices that use RCA connections
(DVD players, etc.).
1. Plug one end of the AUX IN cable (included) into the AUX IN (on the front or back of the unit).
2. Plug the other end of the cable into the headphone jack (or RCA jacks) of the external audio
source.
3. Press “AUX/Bluetooth” button to select AUX-IN function, “AUX” will appear on the top right corner.
4. Turn your external device on to playback.
5. Rotate the VOLUME knob to adjust the sound level.
6. Adjust the volume level on you audio appliance if necessary.
7. You can control the playing process by operating your external device.
NOTE:All operations are only available on your external device.
Important: If both the front and rear AUX INs are connected to AUX IN cables at the same time, only
the front one will be active.
AUX OPERATION
Please use this function to record from other sources such as CDs, karaokes and radio.
We also recommend using this function to make the cassette tape to CD recording much easier.
Please use the included AUX cable and connect one end to the AUX jack on the front. Connect the
other side end to a portable boom box or any other stereo, CD player, MP3 players, Karaoke, etc…
to its headphone jack.
Please leave the function as AUX and follow the recording instructions.
Listening to an External Audio Device (Bluetooth Mode)
In BT (Bluetooth) mode, this unit can play music from external devices which have a built-in
Bluetooth feature.
GETTING CONNECTED USING BLUETOOTH
1. Press “AUX/Bluetooth” button twice to select Bluetooth mode and then the display will show “blue ”.
2. Set the Bluetooth function of your external device when the apparatus is on.
3. Set to search Bluetooth device on your external device.
NOTE: The effective distance between your external device and this apparatus is 10 meters (33 feet).
4. Wait for a moment then find the “Wooden Music Center” on the paired devices list on your external
device and press “Wooden Music Center”.
On some occasions a window will ask you a password. Fill in “0000” then press “OK” on your external
device.
5. A few seconds later your Bluetooth connection is success and you will hear a rising tune.
ENJOY MUSIC FROM AN EXTERNAL DEVICE
1. Get your external device paired. (See “Getting connected”)
2. Turn on the music player program on your external device and set it play.
•
•
•
•

13
Normally, you can control music playback with the PLAY/PAUSE, and button on the
apparatus. Please Note: Not all buttons/functions will work on all devices.
Listening to a Cassette Tape
1. Load an audio cassette tape into the unit (located on the
Right side of the unit). Playback will automatically begin.
2. Press button halfway to Fast Forward the tape.
Press button lightly and playback will resume.
3. Press button completely down to end playback and eject Tape.
Recording to a CD-R / CD-RW
About CD-R and CD-RW discs
- CD-R discs can be recorded once only, and cannot be erased or re-recorded. However, if space is
available on the disc (and the disc has not been finalized), additional material can be recorded.
- CD-RW discs allow you unfinalize the disc, and erase the last track or the entire CD. They may be
reused for new recordings.
Note: CD-RW discs may not play correctly on every CD-player. CD-R, by contrast, are playable on
most CD players.
Important: Never turn the power off or unplug the power cord while “--- busy” is displayed.
Whenever “--- busy” is displayed, all buttons will be temporarily deactivated.
Please read through all the steps below before beginning your recording.
BEFORE RECORDING
Audio from the PHONO, TAPE ,USB, AUX or Bluetoot
Note: When USB record to CD, songs format must be MP3 format and bit rate could not less
than 128kbps. If the format is not MP3, the display will show “Err”.
h sources can be recorded on the CD recorder.
Prepare the audio source for recording
1. Select the desired audio recording source by pressing the corresponding selector button.
(“PHONO,” “TAPE,” “CD/USB” or “AUX/Bluetooth”)
2. Prepare the appropriate audio source for normal play (external audio device / vinyl record /
cassette tape).
3. Load a CD-R / CD-RW and close the CD tray.
4. Make sure “NO TOC” and “CD-R”(or “CD-RW’) appear on the top left of the display. If they do not
appear, recording functions will not work.
Note: “NO TOC” is an abbreviation of “No table of contents,”
indicating a blank CD.
1
2/3

14
Select Auto Track Increment Selection Mode
Tracks can be set to assign automatically when the input sound level drops below a certain limit
(-20db/-30db/-40db ) for more than 2 seconds.
Press the AUTO/MANUAL button repeatedly ( or MANUAL/AUTO INCREMENT on the remote) to
cycle between the following modes:
“AUTO TRACK -20db”
A new track will be assigned automatically when the sound level
drops below -20db
“AUTO TRACK -30db”
A new track will be assigned automatically when the sound level
drops below -30db
“AUTO TRACK -40db”
A new track will be assigned automatically when the sound level
drops below -40db
Manual Track Selection
Tracks will not be assigned automatically. A new track will be
assigned whenever “TRACK INCREMENT” is pressed during
recording.
AUTO TRACKING function is to cut the separation for each music/song you are recording to CD by
recognizing the silence that is in between the songs on your records or cassette tapes. The decibels
(lowest 20-30-40highest) allow you to choose the level of minimal sound that may still exist between
the songs to be recognized as the separation before the next song to cut a track. If your source of the
recording quality is not of best quality it is recommended to use the “MANUAL TRACKING” function
for best result in recording.
RECORDING
1) First put the blank CD-R or CD-RW on the CD tray and close the tray.
2) Make sure that the display shows “NO TOC CD-R (or CD-RW).
3) Pick the source of music and press the button (Phono, Tape, Aux, USB or Bluetooth).
4) If using a record, put the vinyl on the turntable.
5) Press RECORD button to select CD Recording Mode.
6)
Adjust your recording volume to about middle (you can adjust on your next recording if too loud or too low).
7) Place the needle on the record and then press “play/pause” button ( ).
8) Now you are recording.
9) When the last song is recorded from the one side of vinyl, press the “play/pause” button ( ) to pause.
10) When paused, flip the record to the other side and place the needle back to play.
11) Press the “play/pause” button again to resume recording.
12) When all recording is done, wait for about 10 seconds and then press the stop button.
Note : Audio from USB record to CD, please follow up these steps:
1. First put the blank CD-R or CD-RW on the CD tray and close the tray.
2. Make sure that the display shows “NO TOC CD-R (or CD-RW).
3. Connect the USB memory stick into the USB slot and press the PLAY/PAUSE ( ) button to
begin playing.
Please Note: When making auto tracks, the recording level must be at " 0 ”, The track will be
intermittent if choosing recording level from “-3 to +8”.
However, some songs can’t make auto track at
recording level “0” due to original file converting issue. You need to reduce the recording level in between
-3 to -1 when song level is strong. Increase level in between +1 to +8 when song lev
el is weak.
4. Press AUTO/MANUAL button, “—AU” will appear on the display a few seconds, it can record
the whole track automatically onto the CD, “AUTO TRACK” will appear on the display.
5. Press AUTO/MANUAL button again, “---“ will appear on the display a few seconds, to record
a single track onto the CD, and then “AUTO TRACK” will disappear from the display.

Please Note: When auto track is activated, the record time will pause a moment (still go on for about
1 minute) for each finished recorded track. The song is converting the format and transferring to your
USB device. The converting time depends on the file size of the song.
15
Note: When Recording from USB to CD, only the STOP button will work.
Entering Recording (Paused) Mode
2. Test play the audio source to be recorded and press “RECORD LEVEL(- OR +)” button to set the
recording volume so that its loudest output does not exceed the “OVER” indicator on the meter
on the lower right of the display.
Note: Be sure not to set the recording volume too low – doing so will result in very low playback
volume levels.
3. Once the recording volume level is set, reset the audio source so it is ready for recording.
Entering Recording (Play) Mode
1. Press the PLAY/PAUSE ( ) button to begin recording.
( ) will appear on the left of the screen and “CD” will stay lit on the right of the screen,
indicating that recording is in progress.
2. Begin playing your audio source normally.
*Manual Track Increment Assignment
Note: “The TRACK INCREMENT” button works regardless of the MANUAL/AUTO REC setting.
During recording, press the TRACK INCREMENT to end the current track and begin a new one.
The current track number will be indicated on the display.
To Pause Recording Temporarily (Recording Paused Mode).
Press the PAUSE button ( ). The recording process will be temporarily paused.
To resume recording, press the PLAY/PAUSE button ( ) again.
Important: Every time recording is paused or stopped, a new track number will always be
assigned. It is not possible to record in two “stages” within one track.
3. Press the STOP button ( ) to stop recording.
Note: When the rotation of the turntable stops, the recording will stop automatically. However, to
avoid unwanted noise from the tone arm, stop the recording manually by using the STOP button.
FINALIZING A CD
1) After pressing stop, press the “CD/USB” button repeatedly to select CD mode.
2) After pressing the “CD/USB” button, “---busy” will show on the display.
3) After the “busy” display is gone the Display will show the number of
tracks and duration of the recorded time on your CD.
4) Press the “FINALIZE” button and screen will say “FIN-dic”,
quickly press the “PLAY/PAUSE” button to begin finalization.
5) The CD will turn and you will have “busy” again showing on the display.
1. Press the “RECORD” button to select CD Recording
Mode. (“ Rec” will appear on the left of the screen and
“---cd” will appear on the display.)
If an AUTO TRACK mode is selected, “AUTO TRACK” will
appear on the lower middle of the screen.
6. Press the AUTO/MANUAL button to assign a new track automatically. Press the AUTO/MANUAL
7. Then press RECORD button to beginning record, “REC” will show on the display.
button again to cancel.
Note : “---busy” will appear a few seconds on the display.
8. The “CD” will show and flash on the display, it indicates that recording mode is beginning.
9. The STOP button can cancel the recording at any time.
10. The display will show “ALL” and total track numbers after finished recording.
FIN-dic
NO TOC CD-R

16
6) When the CD is completely finalized, the CD tray will come out automatically and the recorded and
finalized CD can be played.
Before a CD-R or CD-RW can be played in a standard CD Player, it must be finalized. During
finalization, a Table of Contents (TOC) is written to the CD.
Once a CD-R disc is finalized, no more tracks can be recorded on it.
By contrast, a finalized CD-RW disc can be “unfinalized” to allow
additional recording.
1. Press the “FINALIZE” button when in stopped mode. If you are not in
stopped mode, press STOP ( ). “FIN—dic” will appear on the display.
Note: To cancel the finalizing process at this point, press STOP ( ).
2. Press the “PLAY” ( ) button to start finalizing. "--- busy" will appear
on the display. Wait until this message disappears. When finalization of the disc is complete, the
CD tray will open automatically.
Note: The finalization time is dependent on the contents that have been recorded, and may take a
few minutes in some cases.
ERASING A CD-RW (CD-RW ONLY)
Erasing processes will only work on an unfinalized CD-RW disc.
If a CD-RW disc has been finalized, you will need to unfinalize it prior to erasure.
With a CD-RW, it is possible to erase either the last recorded track, or the entire disc.
All erasing processes are permanent – they cannot be undone.
Unfinalizing a Finalized CD
Note: Skip this process if the CD-RW has not been finalized.
1. With a finalized CD-RW loaded, press the “ERASE” button while in stopped mode. “UNF-dic” will
appear on the display.
Note: To cancel the unfinalizing process at this point, press STOP ( ).
2. Press the PLAY ( ) button to start unfinalizing. "--- busy" will appear
on the display. When this message disappears, the disc is unfinalized.
Note: The unfinalization time is dependent on the contents that have been recorded, and may take a
few minutes in some cases.
Erasing the Last Recorded Track.
1. With an unfinalized CD-RW inserted, press the “CD/USB” button repeatedly to select CD function.
2. In stop mode, press the “ERASE” button. “ErS” and the last recorded track number will appear on
the display.
3. Press the ( ) button to begin erase the last track. “--- busy” will appear on the display. It will
disappear, indicating that the track has been erased permanently from the CD-RW.
4. Repeat steps 2 and 3 to continue erasing tracks one at a time.
Note: If there are no tracks on the CD-RW, the “ERASE” button will have no effect.
Note: You will not be able to erase the last recorded track from CD-RW discs copied from another
device.
2
Erasing All Tracks
1. With an unfinalized CD-RW inserted, press the “CD/USB” button repeatedly to select CD
function.
2. Press and hold the “Erase” button until “ErS ALL” appears on the display.
3. Press the ( ) button to begin erasing all the tracks on the CD. “--- busy” will appear on the
display. It will disappear, and “00:00” will appear to confirm that the disc is cleared.
Note: To cancel the erasing process at this point, press STOP( ).

17
USB MEMORY STICK PLAYBACK
1. Press CD/USB button repeatedly to switch to USB mode. “USB” will appear on the right corner.
“--- busy” will blink for a few seconds.
Note: When no USB is set, “NO USB” will appear on the display.
2. Connect the USB memory stick into the USB slot and then
the number of tracks will show on the display.
3. Press the PLAY/PAUSE button ( ) to begin playback from the first track.
4. To temporarily pause playback, press the PLAY/PAUSE button ( ). Press again to resume.
5. To skip tracks forward or backward, press the corresponding skip button ( or ).
Pressingbutton to skip to the previous track.
Pressingbutton to skip to the next track.
6. To fast forward / rewind within a track, press and hold down the corresponding skip button until
the desired position is reached.
7. To stop playback, press the STOP button
NOTE:
•Do not push both buttons together as this may damage the unit.
•As the unit is tracking quickly, forward or backward you will hear your selection playing at
a distorted speed. Simply release the depressed button to continue playing at normal
speed at the desired position in the selected track.
REPEAT PLAYBACK
Each time the DISPLAY button is pressed, the display mode will cycle
between the following options:
- Track Number + Track Play Time (Default Display Mode)
- Track Play Time Countdown
- Track Play Time
Each time the REPEAT button is pressed, the repeat mode will cycle through
the following options:
REPEAT ALL (Repeat the entire USB)
The entire USB will be played repeatedly.
REPEAT 1(Repeat one track)
The current track will be played repeatedly. If you press the ( or )
button to
select another track, the track you select will be played repeatedly.
23

18
Notes:
- If one of the following buttons is pressed, the repeat mode will be cancelled.
OPEN/CLOSE, POWER, AM/FM, PHONO, AUX/BLUETOOTH, TAPE, CD/USB.
Shuffle Playback
To play the tracks on a USB in a random sequence, press the SHUFFLE button during playback.
Notes:
- Pressing ()during shuffle playback will randomly select the next track.
- If one of the following buttons is pressed, shuffle mode will be cancelled.
OPEN/CLOSE, POWER, AM/FM, PHONO, AUX/BLUETOOTH, TAPE, CD/USB
- When the SHUFFLE playback of all the tracks has been finished, the unit
stops and the shuffle mode is cancelled.
- A track cannot be repeated during shuffle playback.
- Shuffle playback doesn’t work during programmed playback.
Programmed Playback
Up to 32 tracks can be programmed to play in the desired order.
Notes:
- Shuffle playback does not work during programmed playback.
1. Press “CD/USB” to enter USB mode, then insert a USB memory
stick into USB slot.
2. While the USB is stopped, press the PROGRAM button.
3. “PROGRAM” and “P-01” appears on the display.
4. Press ( or ) to select a track number.
5. Press the PROGRAM button again to set the current track.
6. “P-02” is displayed. Repeat steps 4 thru 5 to program the additional tracks.
7. When the selection of track numbers has been finished, press the PLAY button ( ) to start
program playback.
8. To cancel the program mode, press the STOP ( ) button twice.
To check the programmed order
In the stop mode, press ( or ) repeatedly to show the track numbers that have
been programmed.
To add a track to the end of the programmed order:
In the stop mode, press the PROGRAM button.
Select a track number by pressing ( or ), then press the PROGRAM button.
The current track will be added to the end of the program.
To delete the last track from the programmed order:
In the stop mode, press the CLEAR button to delete the last track from the program.

19
To clear the programmed order:
Press STOP button twice when the USB is already stopped, or press OPEN/CLOSE, POWER,
AM/FM, PHONO, CD/USB, or AUX/BLUETOOTH.
BEFORE RECORDING
Audio from the PHONO, TAPE, CD or AUX/BLUETOOTH sources can be recorded on the USB
memory.
Note: AUX/BT/PHONO/TAPE record to USB, the format is MP3.
Prepare the audio source for recording
1. Select the desired audio recording source by pressing the corresponding selector button.
(“PHONO,” “TAPE,” “CD/USB” or “AUX/Bluetooth”)
2. Prepare the appropriate audio source for normal play (external audio device / vinyl record /
cassette tape).
3. Insert a USB memory stick into USB slot .
Select Auto Track Increment Selection Mode
Tracks can be set to assign automatically when the input sound level drops below a certain limit
(-20db/-30db/-40db ) for more than 2 seconds.
Press the AUTO/MANUAL button repeatedly ( or MANUAL/AUTO INCREMENT on the remote) to
cycle between the following modes:
“AUTO TRACK -20db”
A new track will be assigned automatically when the sound level
drops below -20db
“AUTO TRACK -30db”
A new track will be assigned automatically when the sound level
drops below -30db
“AUTO TRACK -40db”
A new track will be assigned automatically when the sound level
drops below -40db
Manual Track Selection
Tracks will not be assigned automatically. A new track will be
assigned whenever “TRACK INCREMENT” is pressed during
recording.
AUTO TRACKING function is to cut the separation for each music/song you are recording to CD by
recognizing the silence that is in between the songs on your records or cassette tapes. The decibels
(-20dB, -30dB, -40dB) allow you to choose the level of minimal sound that may still exist between
the songs to be recognized as the separation before the next song to cut a track. If your source of the
recording quality is not of best quality it is recommended to use the “MANUAL TRACKING” function
for best result in recording.

20
RECORDING
1) First Insert a USB memory stick into USB slot .
2) Pick the source of music and press the button (Phono, Tape, Aux, Bluetooth or CD).
4) If using a record, put the vinyl on the turntable.
5) Press RECORD button to select USB recording mode.
6) Adjust your recording volume to about middle (you can adjust on your next recording if too loud or
too low).
7) Place the needle on the record and then press “play/pause” button ( ).
8) Now you are recording.
9) When the last song is recorded from the one side of vinyl, press the “play/pause” button ( ) to
pause.
10) When paused, flip the record to the other side and place the needle back to play.
11) Press the “play/pause” button again to resume recording.
12) When all recording is done, wait for about 10 seconds and then press the stop button.
Also Note: Only MP3 format can be recorded onto USB memory.
Entering Recording (Paused) Mode
1. Press the “RECORD” button to select to enter USB
Recording Mode. (“ Rec” will appear on the left of the screen
and ---USB will appear on the display. )
If an AUTO TRACK mode is selected, “AUTO TRACK” will
appear on the lower middle of the screen.
2. Test play the audio source to be recorded and press “RECORD LEVEL(- OR +)” button to set
the recording volume so that its loudest output does not exceed the “OVER” indicator on the meter
on the lower right of the display.
Note: Be sure not to set the recording volume too low – doing so will result in very low playback
volume levels.
3. Once the recording volume level is set, reset the audio source so it is ready for recording.
Entering Recording (Play) Mode
1. Press the PLAY/PAUSE ( ) button to begin recording.
( ) will appear on the left of the screen and USB will flash constantly on the right of the screen,
indicating that recording is in progress.
2. Begin playing your audio source normally.
*Manual Track Increment Assignment
Note: “The TRACK INCREMENT” button works regardless of the MANUAL/AUTO REC setting.
During recording, press the TRACK INCREMENT to end the current track and begin a new one.
The current track number will be indicated on the display.
Please Note: When making auto tracks, the recording level must be at " 0 ”, The track will be
intermittent if choosing recording level from “-3 to +8”.
When Recording from CD to USB, please follow up these steps:
1. First Connect the USB memory stick into the USB slot
2. Then put a CD-R or CD-RW on the CD tray and close the tray.
3. Press AUTO/MANUAL button, “—AU” will appear on the display for a few seconds, it can record
the whole track automatically into USB, “AUTO TRACK” will appear the display.
4. Press AUTO/MANUAL button again, “---“ will appear on the display for a few seconds, just record
single track into USB, and then “AUTO TRACK” will disappear from the display.
5. Press PLAY/PAUSE ( ) button to begin playing.
6. Then press RECORD button to beginning record, “REC” will show on the display.
Note : “---busy” will appear a few seconds on the display.
7. “USB” will show and flash on the display, it indicates that recording mode has begun.
8. Pressing the STOP button will cancel the recording at any time.
Note: When Recording from CD to USB, the audio format is WAV and only the
STOP button will work.
Table of contents
Other it Stereo System manuals