CONTENTS
INSTRUCTIONS
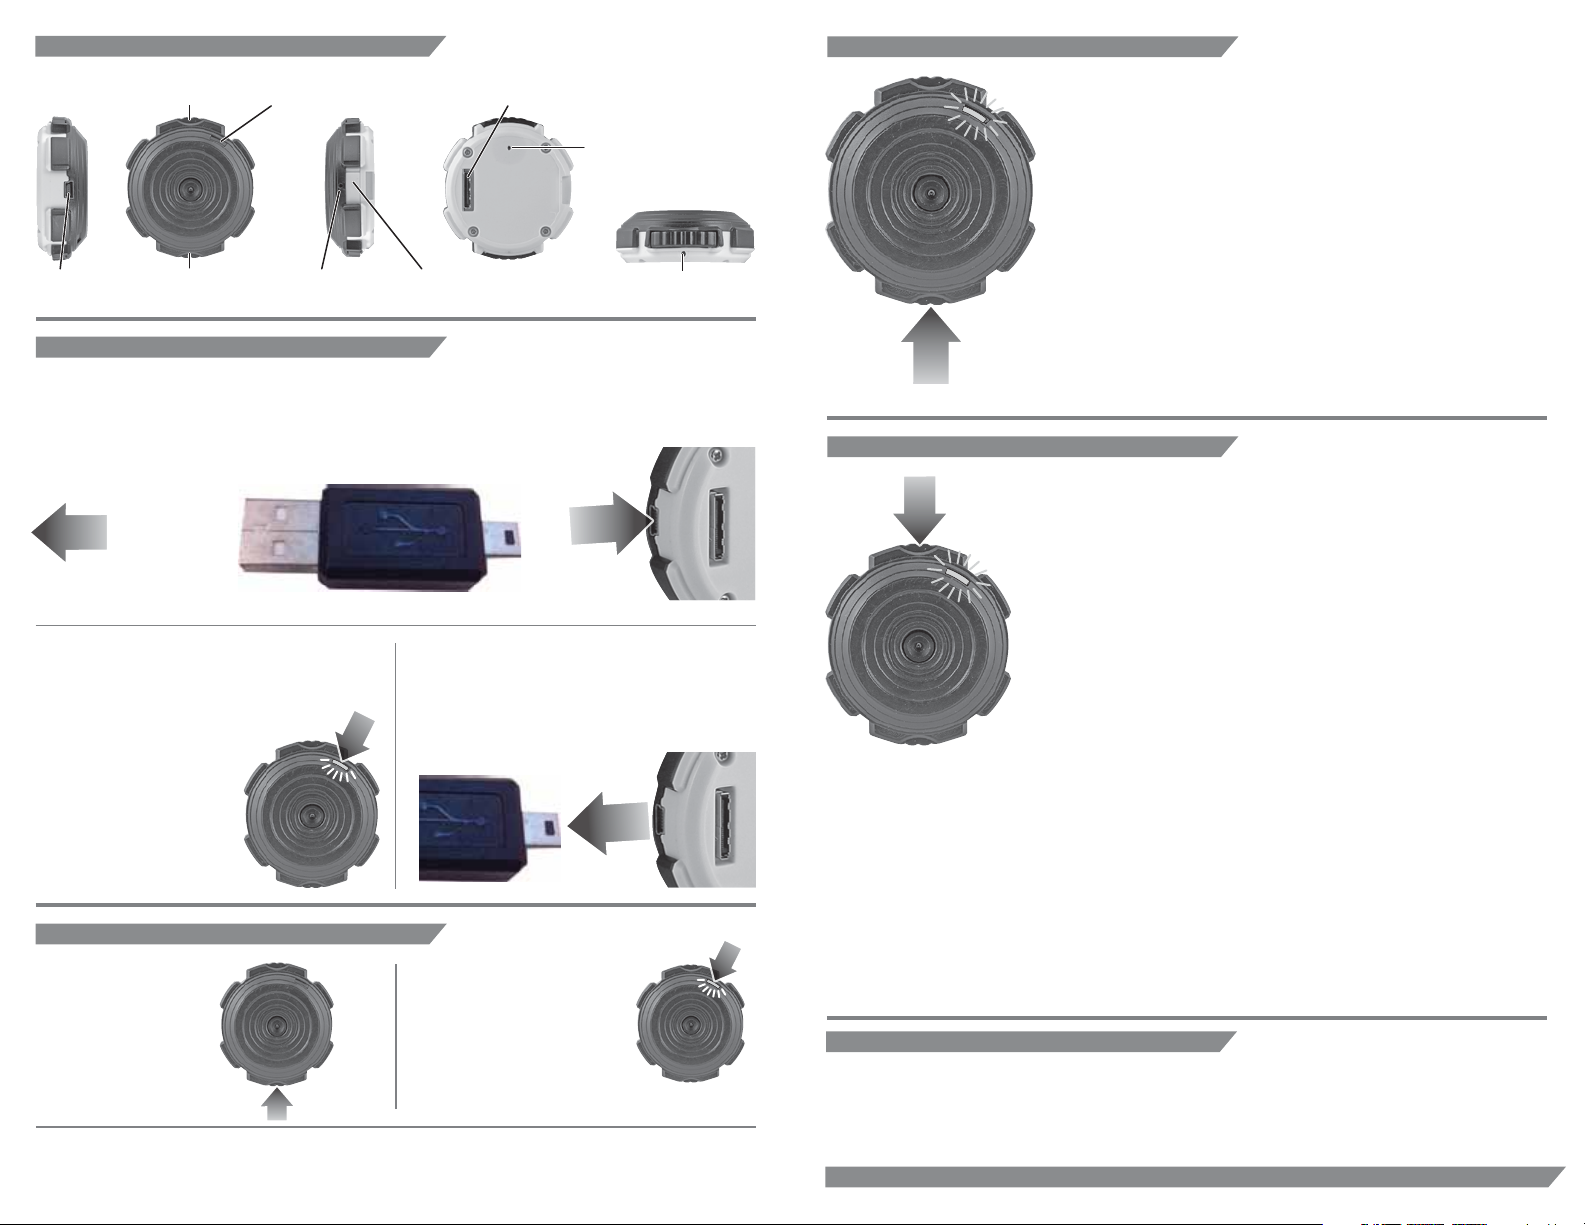
ACTION SHOT™
CAMERA
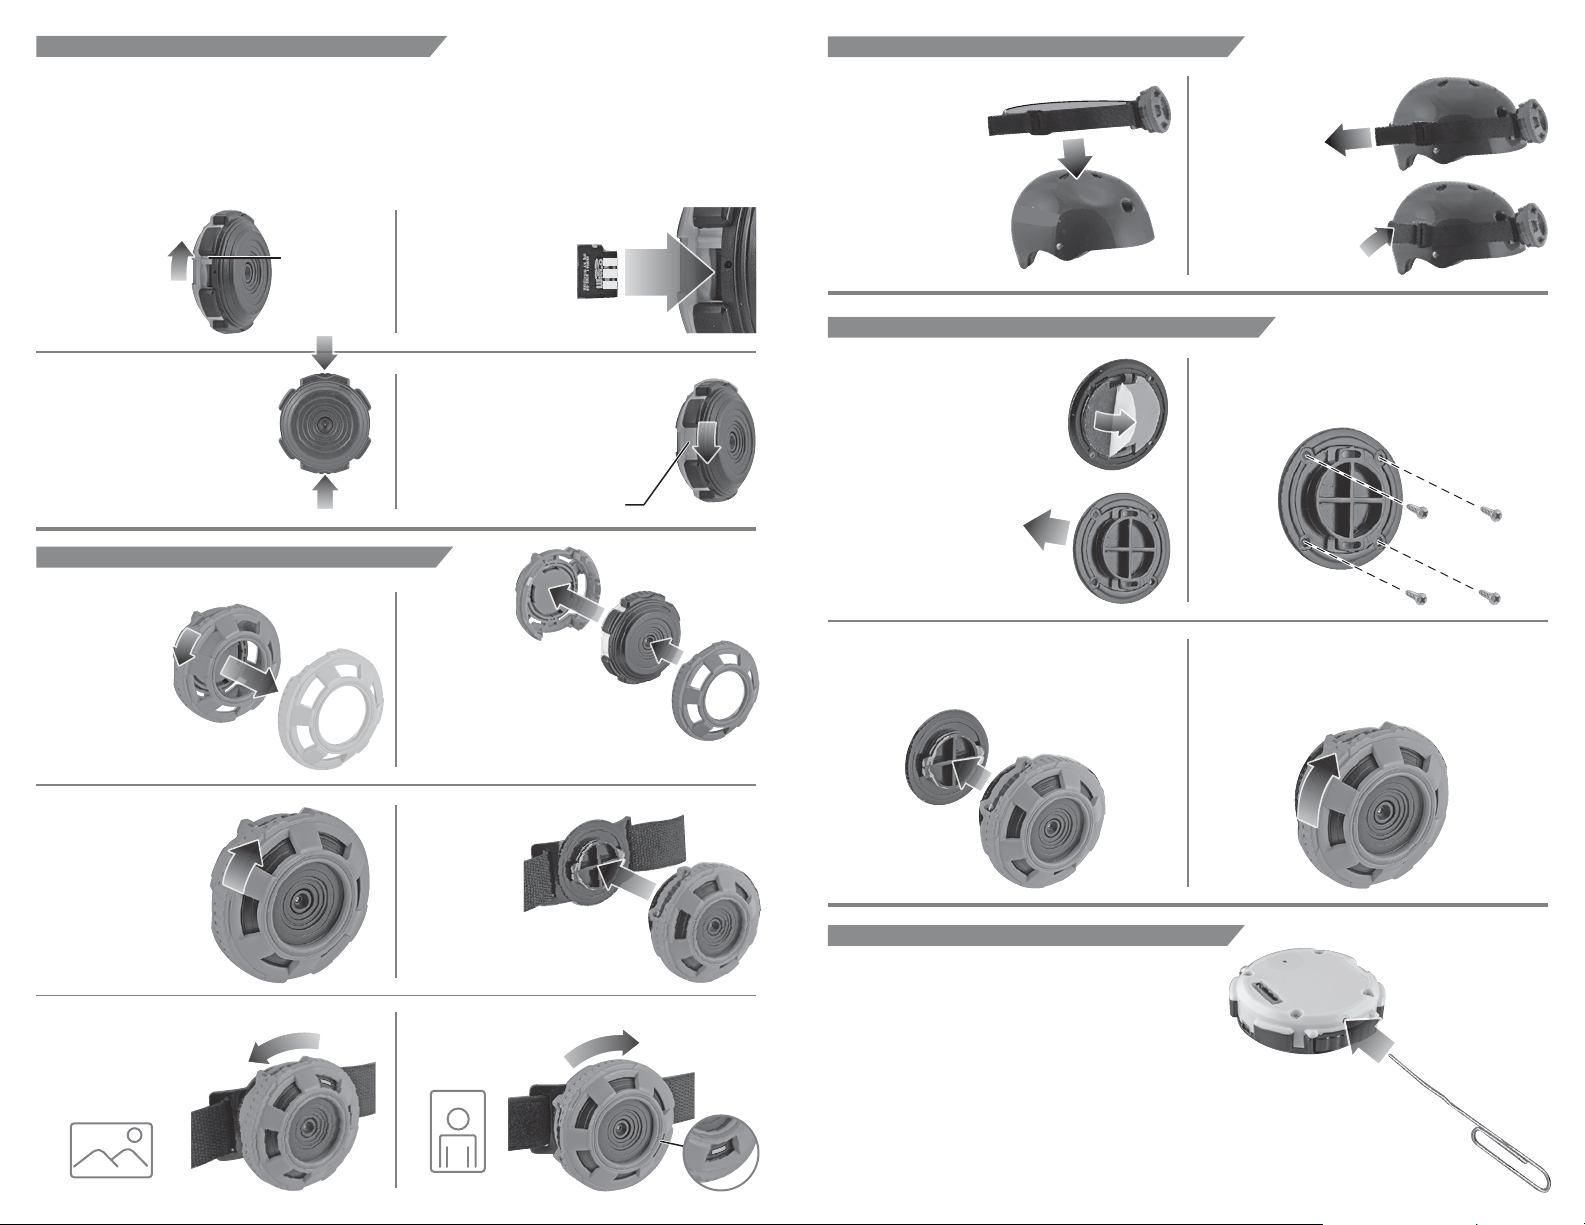
MOUNTING
CASE
USB CONNECTORHELMET MOUNTING
STRAP
ADHESIVE
MOUNT
IMPORTANT SAFETY INFORMATION BATTERY WARNINGS AND PROPER USE
WARNING: Battery acid leakage can cause personal injury and cause damage to the product and surrounding property. If battery leakage occurs,
thoroughly wash any affected skin, making sure to keep battery acid away from eyes, ears, nose and mouth. Immediately wash any clothing or other surface that
comes into contact with leaked battery acid. Leaking batteries may make “popping” sounds. Dispose according to Local, State and Federal Laws.
This device complies with Part 15 of the FCC Rules. Operation is subject to the following two conditions:
(1) this device may not cause harmful interference, and
(2) this device must accept any interference received, including interference that may cause undesired operation.
Warning: Changes or modications to this unit not expressly approved by the party responsible for compliance could void the user’s authority to operate the
equipment. This equipment has been tested and found to comply with the limits for a Class B digital device, pursuant to Part 15 of the FCC Rules. These limits are
designed to provide reasonable protection against harmful interference in a residential installation. This equipment generates, uses and can radiate radio
frequency energy and, if not installed and used in accordance with the instructions, may cause harmful interference to radio communications. However, there is
no guarantee that interference will not occur in a particular installation. If this equipment does cause harmful interference to radio or television reception, which
can be determined by turning the equipment off and on, the user is encouraged to try to correct the interference by one or more of the following measures:
< Reorient or relocate the receiving antenna.
< Increase the separation between the equipment and receiver.
< Connect the equipment into an outlet on a circuit dierent from that to which the receiver is connected.
< Consult the dealer or an experienced radio / TV technician for help.
JAKKS Pacic®Battery, Solar or Electrically-Operated Product 90 DAY LIMITED WARRANTY
Thanks for purchasing a great JAKKS Pacic®product!
Please immediately register your product online at www.jakks.com/warranty.
Registration is not required for the eectiveness of this limited warranty.
IMPORTANT NOTICE TO CONSUMER:
This 90 DAY LIMITED WARRANTY applies to the original product purchaser, provided the product: 1) was purchased from an authorized JAKKS™
distributor/dealer/retailer, and 2) is returned at your expense, postage pre-paid and insured, along with the original dated sales receipt to the address noted below.
Please save a copy of your original sales receipt, as the original receipt will not be returned to you. If you return the product to us without the original dated sales
receipt, this warranty coverage will not apply. If the product is determined by JAKKS to be defective and returned to JAKKS within the 90 day warranty period, we will (at
our option) repair or replace it. Return shipment to you may take up to 6 weeks, depending upon your location. If your product is repaired or replaced, it will be
warranted for the longer of the original warranty or for 30 days after warranty service.
SCOPE OF LIMITED WARRANTY: The product is warranted to be: a) tested and inspected before shipment, and b) free of defects in material and workmanship for
90 days from date of purchase. If a covered defect occurs within the warranty period, then at our sole option, we will repair or replace the product or provide you
with another product of equal value.
WHAT IS NOT COVERED BY LIMITED WARRANTY:
THIS WARRANTY IS VOID IF THE PRODUCT HAS BEEN MODIFIED OR REPAIRED BY USER OR OTHERS OR IF IT HAS BEEN
DAMAGED AS A RESULT OF ACCIDENT, IMMERSION IN WATER, NEGLECT, ABUSE, MISUSE, BATTERY LEAKAGE, IMPROPER BATTERY INSTALLATION, UNAUTHORIZED SERVICE,
LOSS OF PARTS, WEATHER, ACTS OF GOD, ANY ACTION OR OMISSION WHICH CONSTITUTES A DEVIATION FROM THE OPERATING INSTRUCTIONS, OR ANY OTHER CAUSES
NOT ARISING OUT OF DEFECTS IN WORKMANSHIP OR MATERIALS. EXCLUSIONS FROM LIMITED WARRANTY: THIS WARRANTY IS EXCLUSIVE OF AND IN LIEU OF ALL OTHER
EXPRESS OR IMPLIED WARRANTIES RELATED TO THIS PRODUCT, INCLUDING ANY IMPLIED WARRANTIES OF MERCHANTABILITY OR FITNESS FOR A PARTICULAR PURPOSE.
SPECIAL, INCIDENTAL AND CONSEQUENTIAL DAMAGES ARISING FROM POSSESSION, USE, OR MALFUNCTION OF THIS PRODUCT ARE EXCLUDED BOTH FOR PROPERTY
DAMAGE AND PERSONAL INJURY TO THE EXTENT LEGALLY PERMITTED.
ADDITIONAL LEGAL RIGHTS: This warranty provides specic legal rights. You may have other or dierent rights in your state or country.
QUESTIONS OR COMMENTS: If you experience product diculties or have questions or comments, you may contact our Consumer Relations department as
follows:
Phone: 877-875-2557 (toll-free, North America only) or 909-594-7771 x560 (Monday- Friday, 7:30AM-4:30PM Pacic/GMT -8).
Mail:
JAKKS Consumer Relations, 21749 Baker Parkway, Walnut, California USA 91789. Email: [email protected] NEVER immerse LiPo battery in water or other liquids.
NEVER handle or recharge LiPo battery until it has cooled to surrounding
temperature.
NEVER charge LiPo battery on or near combustible materials including paper,
plastic, wood, carpet, vinyl, leather, wood, or automobiles.
NEVER overcharge LiPo battery.
NEVER connect product to an electrical outlet.
NEVER use or recharge product if it appears damaged, cracked, becomes
discolored or deformed, gives off an odor, or otherwise appears abnormal.
NEVER strike or throw product against a hard surface.
Warnings and Cautions:
WARNING: ALWAYS handle LiPo battery with extreme care.
ALWAYS charge LiPo battery with included USB cable only.
NEVER remove LiPo battery from product.
NEVER disassemble, modify or solder LiPo battery.
NEVER puncture or cut battery
NEVER leave LiPo battery unattended at any time while being charged.
NEVER handle LiPo battery while wearing metallic objects such as a ring,
watch or bracelet.
NEVER allow LiPo battery internal electrolyte contents to get in eyes or
skin.
LITHIUM-ION POLYMER (LIPO) BATTERY SAFETY INFORMATION
WARNING: This LiPo battery is permanently installed in your Action Shot™ Camera. Any attempt to remove the LiPo battery will result in permanent
damage to the battery and product.
WARNING: LiPo battery is potentially volatile.
The user assumes all risks associated with use and charging of LiPo batteries. If you do not agree with these conditions, return the product prior to use.
Technical Specifications:
Type: Lithium-Ion Polymer (LiPo or Li-Poly) Capacity: 400 mAh Voltage: 3.7V
Storage and Transportation:
ALWAYS store product in a secure, dry, ventilated location.
NEVER leave product near heat source such as a re, oven or other high-temperature location.
NEVER expose product to direct sunlight for extended periods.
Recommended Temperature Ranges for Battery:
Storage: 14 °F / -10 °C and 95 °F / 35 °C
Charging: 32 °F / 0 °C to 113 °F / 45 °C
Usage: Recommended temperature range during use: 14 °F / -10 °C to 140 °F / 60 °C
Transporting in a vehicle: 14 °F / -10 °C and 113 °F / 45 °C
Charging and/or operating of product outside of its specied range can reduce battery performance and cause the battery to leak, overheat, or explode. Dispose
of or recycle product according to local, state, and federal regulations.
JAKKS Pacic, Inc. is not responsible in any way for any bodily injury(s) and/or property damage that may occur from any contrary use in any way of this product.
TM & © 2012 JAKKS Pacic, Inc., 22619 Pacic Coast HwyMalibu, CA 90265 USA.
JAKKS Pacic UK Ltd, Ascot, 5 Queens Square Ascot Business Park Lyndhurst Road U.K.
MADE IN CHINA.
Contents may vary in style, color, shape and decoration from images shown on package or in advertising.
Questions
or
comments?
www.jakks.com,
[email protected],
1-877-875-2557
in
North
America,
or
01344
638909 in the United Kingdom.
Always wear protective gear while riding.