Jamara Camara Full HD Pro Wifi V2 User manual

Camara
Full HD Pro Wi V2
No. 177890 black
No. 177891 white
06/19
FR - Notice
GB - Instruction
FR - Consignes générales
La société JAMARA e. K. n‘assume aucune responsabilité des dommages subis par le produit ou
occasionnés par le produit si ces dommages résultent d‘un emploi ou utilisation incorrects. Le
Client est lui-même responsable de l‘emploi et utilisation corrects, ceci comprenant en particulier
le montage, le processus de chargement, l‘application et le champ d‘application. Il faut prendre
connaissance du contenu du mode d‘emploi qui contient des informations importantes et des indi-
cations d‘avertissement.
GB - General information
Jamara e.K. is not liable for any damage caused to the product itself or by it, if this is due to improper
operation or handling errors. The customer alone bears the full responsibility for the proper use
and handling, including in particular, assembling, charging and using the model, and selecting the
area in which to use it. Please refer to the operating and user instructions, which contain important
information and warnings.
FR - Déclaration de conformité
Par la présente la société JAMARA e.K. déclare que l‘unité “Camara Full HD Pro Wi V2,
No. 177890, 177891“ est conforme aux exigences fondamentales et aux autres dispositions essen-
tielles des Directives 2014/53/UE, 2011/65/UE et 2009/48/CE.
Pour obtenir plus d‘informations consulter le site: www.jamara-shop.com/Conformity
GB - Certicate of Conformity
JAMARA e.K. hereby declares that “Camara Full HD Pro Wi V2, No. 177890, 177891“ follow the
regulations and requirements as well as other relevant directives of the EEC directive 2014/53/EU
and 2011/65EU.
Further information can also be found at: www.jamara-shop.com/Conformity
FR - Données techniques
• Fonction photo et vidéo
• Microphone intégré
• Format vidéo: 1080 P 30 FPS, 720 P 120 FPS, 720 P 60 FPS, 720 P 30 FPS
• Wi-Fi Edition (iOS App/Android Download)
• Photo format: 16 MP / 12 MP / 8 MP / 5 MP / 2 MP
• Supports Micro SD memory cards up to 10 - 64GB
• Lentille grand-angle 170°
• Etanche jusqu’au 30 m
• Ecran de couleur LCD 2 inch
• Diverses langues
• Input/Output: Micro USB / HDMI
• Belichtungskorrektur -3,0 ~ +3,0
• Abmessungen: 59,2 x 29,8 x 41 mm
• Poids: 58 g
GB - Technical data:
• Photo and video function
• Built-in microphone
• Video format:
1080 P 30 FPS, 720 P 120 FPS, 720 P 60 FPS, 720 P 30 FPS
• Wi-Fi Edition (iOS App / Android Download)
• Photo format: 16 MP / 12 MP / 8 MP / 5 MP / 2 MP
• Supports Micro SD memory cards up to 64GB Class10
• Wide angle lens 170°
• Waterproof up to 30 m with housing
• 2 inch LCD colour display
• Different Languages
• Input/Output: Micro USB / HDMI
• Exposure Compensation -3,0 ~ +3,0
• Dimensions: 59,2 x 29,8 x 41 mm
• Weight: 58 g
FR - ATTENTION!
Lors de prises de vues photos / vidéos:
Ne faite jamais de prises de vue photos ou vidéos de petrsonnes sans que celle-ci vous en
donne l‘autorisation. Un enregistrement non autorisé porte atteinte à la vie privée des per-
sonnes concer-nées et est considéré comme intrusion dans leur intimité, cela est punissable
par la loi!.
GB - ATTENTION!
Video and photo recording:
Never take photo and lm footage of people without their permission. The unauthorised
recordings violate the privacy and rights of the person and may be punishable by law!
123
10
12
11
13
14
15 16
17
19
9
4
5678
18
FR - Contenu du kit
1 Boîte en plastique protégé contre les chocs et l’eau
2 Caméra
3 - 7 Supports
8 Guidon/support guidon
9 Clip
10 Porte-casque
11 Boîtier ouvrant
12 Remplacement du boîtier en plastique
13 Chargeur
14 Tissu micro bre
15 Attache-câbles
16 Courroies
17 3M dosettes de colle
18 Attache-câbles
19 Câble d’acier de protetction
GB - Description of the part
1 Waterproof housing
2 Camara
3 - 7 Mounts
8 Handle Bar/Pole mount
9 Clip
10 Helmet Mount
11 Housing open
12 Protective Backdoor
13 Charger
14 Microber cloth
15 Cable ties
16 Bandages
17 Adhesives
18 USB Cable
19 Fuse wire

2
FR - Avant démarrage
Mise en marche : appuyer sur le bouton Power / Mode (1-2 secondes)
Eteindre : appuyer sur le bouton Power / Mode (1-2 secondes)
Allumez l‘appareil photo et appuyez plusieurs fois sur le bouton Power / Mode pour commuter les
modes de l‘appareil photo et les réglages. Les modes sont af chés dans l´ordre suivant :
GB- Overview
To press ON: Press the Power/Mode button
To press OFF: Press and hold the Power/Mode Button.
Turn camera ON and repeatedly press the Power/Mode Button to cycle through camera modes and
settings. The modes will appear in following order:
15 16
A
D
E
C
B
9
10
11
4
8
5
6
7
4
1
2
3
4
FR - Identi cation des caractéristiques
1. Con rmation / déclencheur / OK
2. On / off / Bouton Mode
3. Lentille de la caméra
4. Haut-parleur / Microphone
5. Carte Micro SD
6. Entrée Micro USB
7. Entrée Micro HMDI
8. Indicateur de charge WiFi
9. Basculez le Levier vers le haut (plusieurs fonctions)
10 Wi-Fi ON/OFF
11. Basculez le levier vers le bas (plusieurs fonctions)
12. Display
13. Indicateur de charge En charge : Diode s´allume en rouge
14. Af chage d´état
Appareil allumé : Diode s´allume
Enregistrement : Diode clignote
15. Couvercle de la batterie / piles
16. Mécanisme d‘ouverture du couvercle de la batterie
Boîtier étanche
A. Touche de con rmation / OK
B. On/ Off / Bouton Mode
C. Basculez le Levier vers le haut (plusieurs fonctions)
D. Basculez le levier vers le bas (plusieurs fonctions)
E. Verrouillage
GB - Description of Functions
1. Shutter/Select button / OK
2. Power/Mode button
3. Lens
4. Speaker / Microphone
5. MicroSD Slot
6. Micro USB Port
7. Micro HDMI Port
8. WiFi status Indicator (ashes when WiFi started)
9. Down/Shutter button (several functions)
10 Wi-Fi ON/OFF
11. Up button (several functions)
12. Display
13. Charging LED, red
14. Power LED, blue
Camera on: LED lights
Recording: LED blinking
15. Battery door
16. Battery door latch
Waterproof Housing
A. Shutter/Select button
B. Power/Mode button
C. Up/Wi-Fi ON/OFF button
(several functions)
D. Down/Shutter button (several functions)
E. Latch
12
14
13
FR - Attention!
Attention: dans la mesure où votre modèle dispose d´un interupteur marche / arrêt, eteignez
votre modèle aprés chaque utilisation. Si votre modèle dispose d´une batterie amovible et un
connecteur séparable pour la batterie, après chaque utilisation la batterie doit être déconnec-
tée du modèle immédiatement. La batterie peut-être totalement déchargée si celui-ci reste
allumé lors du chargement et peut être contaminé. Une décharge profonde peut entrainer
une perte de la puissance de la batterie et peut ainsi endommagé celle-ci, une charge ou dé-
charge est plus possible lorsque la batterie est en charge ou peut entainer une combustion
spontanné ( risque d´incendie). Ne tentez jamais de décharger profondément les batteries à
charger ou à décharger.
GB - Danger.
If your model has an on/ off switch, always turn off the model immediately after each use. If
your model has a removable battery or a disconnectable connector to the battery, the batte-
ry should be disconnected from the model immediately after each use. The battery can be
deep-discharged by accidentally turning it on or by leaving the battery plugged in. By deep
discharge the battery it loses power, can be damaged so much that charging or discharging
is no longer possible and the battery can ignite itself during charging or discharging (re
hazard). Never attempt to charge or discharge deep-discharge batteries.

3
Vidéo Photo Ralenti Lecture en arrière Paramétrage
Vidéo Photo Slow motion Play back Setting
Vidéo Enregistrement vidéo
Photo Photo unique
Ralenti Enregistrement des vidéos au ralenti
Intervalle de temps Prendre une série de photos avec des intervalles de temps dénis.
Lecture en arrière Lire les vidéos et photos
ParamètresModication des paramètres de l‘appareil photo
Video Record Video
Photo Capture a single photo.
Slow motion Slowly recording video
Time Lapse Shoot a series of photos at set time intervals.
Play back Play back Video and photo
Settings Adjust camera settings, resolution and more.
FR - Réglages
Allumez l‘appareil photo. Parcourez les différents Modi´s
jusqu‘aux paramètres et appuyez sur le bouton de conrmation
pour accéder au menu des paramètres. Appuyez plusieurs fois
sur la touche Marche/Arrêt / Mode pour passer d‘une option à
l‘autre, appuyez sur la touche Conrmer pour modier le réglage.
Vous pouvez également modier les réglages en appuyant sur le
commutateur à bascule vers le haut et vers le bas.
GB - Settings
Turn camera on. Change through the different modes to settings
and then press the OK button to get to the settings menu. Re-
peatedly press the on/off mode button to change through the
options. By pressing the OK button you can change the settings.
Alternatively you can change the settings by pressing the rocker
switch up and down.
FR - Réglages Vidéo
Résolution: 4K 30FPS / 2,7K 30FPS
İnterpolé: 1080P 60FPS / 1080P 30FPS / 720P 120FPS
Ton Vidéo: OFF/ON
Intervalle de temps : OFF / 0.5S / 1S / 2S / 5S / 10S / 30S / 60S
Enregitrement Loop: OFF / 2min / 3 min / 5 min
Enregistrement au ralenti: 1080P 60FPS / 720P 120FPS
détection des mouvements: OFF/ON
GB - Setting video
Video resolution: 4K 30FPS / 2,7K 30FPS interpoliert
1080P 60FPS / 1080P 30FPS / 720P 120FPS
Video Sound: OFF/ON
Time-laps: OFF / 0.5S / 1S / 2S / 5S / 10S / 30S / 60S
Loop recording: OFF / 2min / 3 min / 5 min
Slow motion: 1080P 60FPS / 720P 120FPS
Motion detection: OFF/ON
FR - Réglages Photos
Réglages Pixel: 16M / 12M / 8M / 5M / 2M
Saisie du temps: 3S / 5S / 10S / 20S / OFF
Automatique: OFF / 3S / 10S / 15S / 20S / 30S
Déplacer sur piste: 3P/S, 5P/S, 10P/S, 20P/S, OFF
Visibilité: -3 ~ +3
Équilibre du blanc: Auto / Ensoleillé / Nuageux / Incandescent / Fluorescent
WiFi: OFF/ON
Rotation des images: OFF/ON - pour montage en hauteur
Mode véhicule: OFF/ON - connectez l‘appareil photo à une source
d‘alimentation (voiture, prise de courant, etc.), l‘appareil
photo se connecte et lance automatiquement
l‘enregistrement vidéo. Si l‘appareil photo est déconnecté
de la source d‘alimentation, il s‘éteint automatiquement
après la durée réglée dans „Mise hors tension
automatique“.
Fréquence de la source lumineuse: Auto / 50Hz / 60Hz LED
Voyant lumineux: OFF/ON - La LED Power peut être éteinte.
Écran de veille automatique: 10 s / 20s / 30s / arrêt
Arrêt automatique: 1 min. / 3 min. / 5 min. / arrêt
Durée Filigrane: OFF/ON - Pour afchage les photos avec date et heure
GB - Setting photo
Pixel set: 16M / 12M / 8M / 5M / 2M
Timed: 3S / 5S / 10S / 20S / OFF
Auto: OFF / 0.5S / 1S / 2S / 5S / 10S / 30S / 60S
Drama shot: 3P/S, 5P/S, 10P/S, 20P/S, OFF
Exposure: -3 ~ +3
White balance: Auto / Sunny / Cloudy / Incandescent light / Flourescent light
WiFi: OFF/ON
Image rotation: OFF/ON - Mounting overhead
Driving mode: OFF/ON - Connect the camera to a power source (car, power
outlet, etc.), the camera will go on and automatically start a
video recording. If the camera is disconnected from the power
source, it will automatically turn off after the time set in the
„Auto shutdown“.
Light source frequency Auto / 50Hz / 60Hz
LED indicator light: OFF/ON - The power LED can be switched off.
Autom. screen saver: 10 s / 20s / 30s / OFF
Auto shutdown: 1 min. / 3 min. / 5 min. / OFF
Time watermark: OFF/ON - For photos with embedded date / time
FR - Installation
Langue : Anglais / Allemand / Francais / Espagnole / Italien / Portuguais /
traditionel / Chinois simplié / Chinois / Japonais / Russe
Date / Heure: 2017/01/01 12:00:00
Format: Conrmer / Annuler - Formater la carte mémoire
Réglage par défaut: Conrmer / Annuler - Réinitialisation de l‘appareil photo aux réglages
par défaut
Version du micrologiciel : Modèle de produit / Version / Update/ Heure / Fabricant
GB - Setting
Light source frequency English / German / French / Spanish / Italian / Portuguese /
traditional / Chinese simplied /Chinese / Japanese / Russian
Date-time: 2017/01/01 12:00:00
Format: Conrmation / Cancel - Format the memory card
Reset: Conrmation / Cancel
Firmware Version: Product Model / Version / Update/Time / Producer
FR - Camara Modi´s
Allumez l‘appareil photo et appuyez plusieurs fois sur la touche Marche/Arrêt / Mode. pour
passer d‘un mode et d‘un réglage à l‘autre. Le Modi´s s‘afchera dans l‘ordre suivant :
GB - Camara Modes
Turn camera ON and repeatedly press the Power/Mode Button to cycle through camera modes and
settings. The modes will appear in following order:

4
FR - Raccordement PC / processus de charge
Procédez comme suit :
► Branchez la che USB du câble de chargement (18) dans la prise USB de votre PC. Branchez
l‘appareil photo sur le connecteur USB.
► L‘appareil photo se met sous tension et les trois options suivantes s‘afchent à l‘écran :
• Mode U-Disk Vous pouvez visualiser vos photos et vidéos depuis l‘appareil photo sur le PC.
• Mode DV Pour utiliser l‘appareil comme webcam, appuyez sur le bouton de conrmation.
• Mode de charge Pendant la charge, le voyant de charge rouge de l‘appareil photo clignote.
Lorsque la charge est terminée, le témoin de charge s‘allume en permanence. Temps de
charge ~ 3 heures.
► Lorsque vous chargez avec un adaptateur de charge (en option), l‘appareil photo se met sous
tension et la charge commence.
GB - PC connection / charging
To charge the battery:
► Insert the USB plug from the USB cable (18) into the USB socket of your PC (optional charging
adapter). Connect the battery with USB charger.
► The camera turns on, and the following three options appear on the display:
• U disk mode
You can view your photos and videos from the camera on the PC.
• DV mode
To use the camera as a webcam, press the confirmation key.
• Lademodus
During charging, the red charge indicator on the camera flashes. When the charging process
is finished, the charging indicator lights up permanently. Charging time ~ 3 hrs
► When charging with a charging adapter (optional), The camera starts and the charging process
begins.
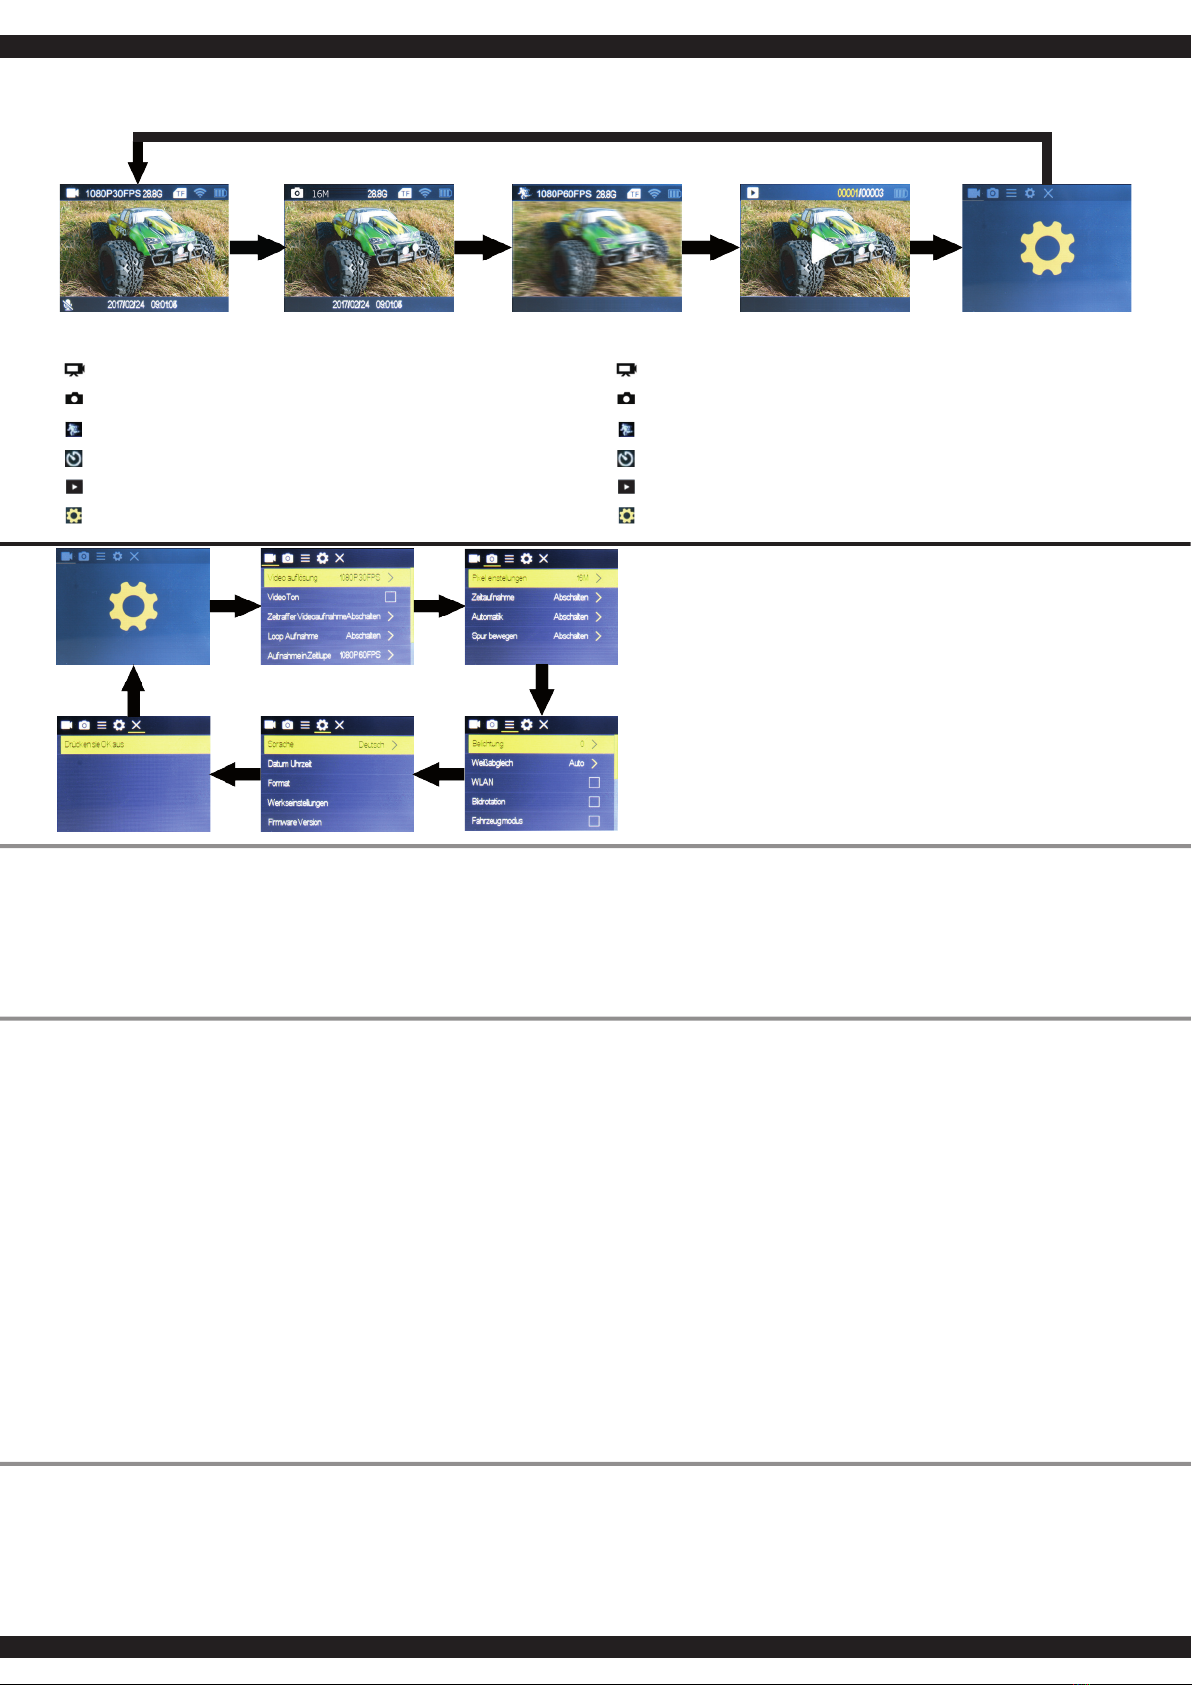
Lecture vidéo et photo
Pour accéder au menu Lecture, procédez comme suit.
1. Allumez l‘appareil photo.
2. Pour accéder au menu Lecture, appuyez sur la touche Marche/Arrêt et maintenez-la enfoncée
jusqu‘à ce que vous atteigniez le menu Lecture.
3. Appuyez sur les interrupteurs à bascule pour passer d‘une prise de vue à l‘autre.
4. Pour revenir aux autres modes, appuyez sur le bouton On/Off / Mode.
Playing back videos and photos.
To enter the Playback menu:
1. Turn on the camera.
2. Press the Power/Mode Button to enter the Playback menu.
3. Use Up / Playback Button or Down / Wi-Fi Button to cycle through the individual recordings.
4. To return to the other modes, press the Power/Mode Button.
FR - Attention!
Débranchez toujours après chaque arrêt la batterie du chargeur. Débranchez aussi toujours
le chargeur immédiatemment après avoir débranché la batterie de l´alimentation. Laissez
brancher la chargeur ou la batterie peuvent causer des dommages à la batterie, à votzre
chargeur ou câble d´alimentation ( risque d´incendie).
GB - Danger.
Always disconnect the battery from the charger immediately after charging. Always discon-
nect the charger from the power supply immediately after disconnecting the battery. Inser-
ting the rechargeable battery or charger after charging will result in damage to the battery,
charger or the power supply (re hazard).
Mode photo
Pour prendre une photo, vériez que l‘appareil est en mode photo. Si l‘icône de la photo
n‘apparaît pas sur l‘écran LCD de l‘appareil, appuyez plusieurs fois sur la touche Marche/Arrêt /
Mode jusqu‘à ce qu‘elle apparaisse.
Prends une photo :
Appuyez sur le bouton de conrmation. L‘appareil émet un son déclencheur.
Photo Mode
To capture a photo, verify the camera is in photo mode. If the Photo icon on your camera‘s LCD
screen is not showing, press the Power/Mode Button repeatedly until it appears.
To take a photo:
Press the OK Button. The camera will emit the camera shutter sound.
Ralenti
Pour prendre une photo au ralenti, vériez que l‘appareil est en mode ralenti.
dans le passé. Si l‘icône de ralenti n‘apparaît pas sur l‘écran LCD de l‘appareil,
Appuyez plusieurs fois sur la touche Marche/Arrêt / Mode jusqu‘à ce qu‘elle apparaisse.
Lancez l‘enregistrement au ralenti :
Appuyez sur le bouton de conrmation. Pendant l‘enregistrement, la barre d‘afchage inférieure
clignote un symbole rouge.
Arrêtez l‘enregistrement au ralenti :
Appuyer sur la touche de conrmation. Le symbole rouge cesse de clignoter. La caméra arrête
l‘appareil photo
Enregistrement automatique lorsque la batterie est faible. Pour économiser la batterie, éteignez
l‘appareil. L‘appareil photo s‘éteint après utilisation.
Slow motion
To capture a slow motion video, verify the camera is in slow motion mode. If the slow motion icon on
To take a slow motion:
Press the OK Button to start slow motion video, at the same time also has a red icon ashing.
Turning off time lapse:
Press the OK button. The red symbol will stop ashing. The camera stops the recording automati-
cally when the battery is low. To save battery, turn camera off after using.
Intervalle de temps
Pour prendre une série de photos en accéléré, vériez que l‘appareil photo est en mode vidéo et
que l‘icône d‘accéléré au bas de la barre LCD n‘est pas afchée. Si l‘icône d‘intervalle de temps
n‘apparaît pas, activez-la dans les paramètres du menu Vidéo. En mode time-lapse, l‘appareil
prend une série d‘images à des intervalles de 0,5 / 1 / 2 / 5 / 10 / 30 ou 60 secondes.
Démarrer l´intervalle de temps: Appuyez sur le bouton de conrmation. L‘appareil démarre la
fonction et prend une image à l‘intervalle de temps réglé (0,5 / 1 / 2 / 5 / 10 / 30 ou 60 s) qui est
enregistrée en vidéo.
Arrêt de l‘intervalle de temps: Appuyez sur le bouton de conrmation. Le symbole rouge cesse
de clignoter. L‘appareil arrête automatiquement l‘enregistrement si la batterie est faible. Pour
économiser la batterie, mettez l‘appareil hors tension après utilisation.
Fast Motion – Time Lapse
To record a series of photos in a time lapse, check whether the camera is in video mode and the
timelapse symbol is not displayed at the bottom of the bar of the LCD display. If the time-lapse icon
does not appear, turn it on in the video menu. In the time-lapse mode, the camera takes a series of
images in 0.5 / 1/2/5/10/30 or 60 seconds intervals.
Start Time Lapse:
Press the conrmation button. The camera starts the function and takes in the set time interval (0.5
/ 1/2/5/10/30 or 60 sec) a picture which is stored as a video.
Time Lapse:
Press the conrmation button. The red symbol stops blinking. The camera automatically stops
recording when the battery is too weak. To conserve the battery turn off the camera after use.
Mode vidéo
Pour enregistrer une vidéo, vériez que l‘appareil photo est en mode vidéo. Si l‘icône vidéo
n‘apparaît pas sur l‘écran LCD de l‘appareil, appuyez sur le bouton Marche/Arrêt / Mode jusqu‘à
ce qu‘elle apparaisse.
Pour commencer l‘enregistrement:
Appuyez sur le bouton de conrmation. Pendant l‘enregistrement, une icône rouge clignote dans la
barre d‘afchage inférieure.
Arrêtez l‘enregistrement:
Appuyez sur le bouton de conrmation. Le symbole rouge cesse de clignoter. L‘appareil arrête auto-
matiquement l‘enregistrement si la batterie est faible. Pour économiser la batterie, mettez l‘appareil
hors tension après utilisation.
Video Mode
To record Video, verify the camera is in Video mode. If the Video icon on your camera‘s LCD screen
is not showing, press the Power/Mode Button repeatedly until it appears.
To start recording:
Press the OK Button to start video, at the same time also has a red icon ashing.
To stop recording:
Press the OK Button. the red icon stop ashing, the recording has stopped. This camera automati-
cally stops recording when the battery is out of power. Your Video will be saved before the camera
powers OFF.
FR - Carte mémoire/carte microSD
Cet appareil photo est compatible avec les cartes mémoire MicroSD, MicroSDHC et MicroSDXC
d‘une capacité de 16 Go et 32 Go. Vous devez utiliser au moins une carte micro SD avec un indice
de vitesse de classe 10.
GB - Storage/MicroSD cards
This camera is comatible with 16GB and 32 GB capacity MicroSD, MicroSDHC and MicroSDXC
memory cards. You must use a Micro SD card with a Class 10 speed rating.

5
FR
1. téléchargez et installez l‘application gratuite sur votre téléphone
2. appuyez sur le bouton Marche/Arrêt / Mode (A) de l‘appareil photo. Assurez-vous que
l‘appareil photo est en mode appareil photo. Appuyez sur l‘interrupteur à bascule supérieur /
le bouton Wi-Fi pour activer le WiFi. Pour désactiver le Wi-Fi, appuyez et maintenez enfoncé
l‘interrupteur à bascule supérieur / le bouton Wi-Fi pour
3. Appuyer pendant 3 secondes. Ouvrez les „Paramètres“ de votre smartphone et allumez le
WlAN. Pour coupler votre smartphone/tablette avec la caméra, vous devez établir une
connexion WLAN avec la caméra. Sélectionnez „Camara Pro V2“ dans les paramètres WiFi
de votre smartphone ou tablette. Entrez le mot de passe „12345678“.
4. Ouvrez maintenant l‘application „Jamara Camara Pro V2“.
GB
1. Download & Install the free App to your smartphone.
2. Press the on/off mode button (A) on the camera. Verify the camera is in camera mode. Press
the top rocker switch / Wi-Fi button to turn Wi-Fi on. To turn Wi-Fi off keep the top rocker
switch /Wi-Fi button pressed for 3 seconds.
3. Open the setting on your smartphone and turn Wi-Fi on. To connect your smartphone/tablet
with your camera you need to have a Wi-Fi connection with your camera. Choose “Camara
Pro V2” in your Wi-Fi settings on your smartphone or tablet. Enter the password “12345678”.
4. Open the “Jamara Camara Pro V2” App.
iOS /Android
App Download
FR - Caméra WiFi App
L‘application vous permet de contrôler votre appareil photo avec un smartphone ou une tablette. Les
fonctions incluent le contrôle complet de l‘appareil photo, la prévisualisation en direct, la lecture des
photos, le partage du contenu et bien plus encore. L‘application Jamara Camara Full HD Pro V2 est
compatible avec les smartphones et tablettes énumérés ci-dessous.
pour Apple iOS:
● iPhone (à partir du iOS 8)
● iPad (à partir du iOS 8)
pour Android :
● Android 4X Quad-core devices
GB - Camera WiFi APP
The App lets you control your camera remotely using a smartphone or tablet. Features include full
camera control, live preview, photo playback and sharing of select content and more.
The Jamara Camara Full HD Pro V2App is compatible with smartphones and tablets listed below.
For Apple iOS:
● iPhone (from iOS 8)
● iPad (from iOS 8)
For Android:
● Android 4X Quad-core devices
A
B
Mode vidéo :
le mode vidéo est divisé en trois Modi´s
Normal: ici vous pouvez démarrer et arrêter un enregistrement en cliquant
sur l‘icône vidéo.
Loop: le mode Loop est démarré en cliquant sur le symbole Loopü puis
sur le symbole vidéo, et enregistre les séquences vidéo dans le
temps déni par vous et lance automatiquement une nouvelle
séquence vidéo après le temps entré. Les séquences sont
sauvegardées une à la fois et un clic sur l‘icône vidéo termine
l‘enregistrement.
Intervalle de Temps : cliquez sur l‘icône time-lapse puis sur l‘icône vidéo, la
Camara fait en fonction du réglage toutes les .5,1,2,5,5,10,30,60
secondes d‘une photo Et met automatiquement cela ensemble à
une vidéo. En cliquant sur le symbole vidéo, l‘enregistrement est
terminé.
Video mode:
There are three different modes in the video mode.
Normal: By pressing the video symbol you can start or end a recording.
Loop: You can start the Loop mode by rst pressing the loop symbol
and then the video symbol. It will now record video frequencies
in the time which you set and automatically start a new video
frequency after the inserted time. By pressing the video symbol
the recording will stop.
Time Lapse: Press the time lapse symbol and then the video symbol. Accor
ding to the setting the camera will take a picture every 0.5, 1,
2, 5, 10, 30, 60 seconds and automatically creates a video. By
pressing the video symbol the recording will stop.
Mode photo:
Le mode photo est divisé en quatre Modi´s
Normal: Ici, vous pouvez prendre une photo en cliquant sur
l‘icône photo.
Chronométrage : En cliquant sur le symbole de chronométrage puis sur
le symbole de la photo, l‘appareil photo lancera un
chronomètre en fonction des secondes dénies et le
déclenchera lorsque la photo expirera.
Mouvement: En cliquant sur l‘icône de mouvement puis sur l‘icône
de photo, la Camara créera de 3 à 10 images par
seconde en fonction du réglage.
Auto: Selon le réglage, après avoir cliqué sur le symbole de
la voiture et la touche puis le symbole de la photo
toutes les 3 à 30 secondes une image vous quittez
cette application en exécutant la commande Réglez les
secondes sur Arrêt.
Photo mode:
There are four different modes in photo mode.
Normal: Here you can take a photo by pressing the photo symbol.
Timing: By rstly pressing the timing symbol and then the photo
symbol the camera will start a timer with the set time and t
hen take a photo.
Movement: By rstly pressing the movement symbol and then the pho
to symbol the camera will take 3 -10 pictures per second
according to the settings.
Auto: Depending on the settings the camera will take a picture
every 3 – 30 seconds by rstly pushing the auto symbol
and then the photo symbol. You can stop this mode by
changing the seconds to off.

6
Slow-Motion - Modus
Cliquez sur l‘icône de ralenti pour commencer l‘enregistrement.
L‘enregistrement est automatiquement enregistré au ralenti. Selon le
réglage, le ralenti sera lent (1080p) ou très lent (720p).
En sélectionnant le mode 1080p / 720p, le Ca¬mara divise par deux
/ quatre la vitesse de la vidéo. La vidéo déjà ralentie est toujours
sauvegardée à 30 images par seconde.
Slow – Motion mode:
Press the slow motion mode, the recording will start. The recording
will be automatically saved in slow motion. Depending on the setting
the slow motion is either slow (1080p) or very slow (720p).
By choosing the 1080p/720p mode the camera halves or quarters
the speed of the video. The slowed down video will always be saved
with 30fps.
Catalogue média:
Vos médias (photos et vidéos) sont stockés ici.
Il y a le téléphone et les appareils (Camara) - la mémoire.
Tous les supports sont toujours stockés sur l‘appareil.
Copier le support de l‘appareil vers le téléphone :
Pour transférer des supports de la mémoire de votre terminal vers la
mémoire du téléphone, allez dans la mémoire du terminal, cliquez sur
la èche jaune en haut à droite et cliquez sur Télécharger.
Sélectionnez maintenant les images désirées et cliquez sur Conrmer
en bas à droite. Tous les supports sélectionnés sont maintenant copi-
és dans la mémoire du téléphone.
Supprimer média :
Pour supprimer un support, accédez à la mémoire de l‘appareil ou du
téléphone, cliquez sur la èche jaune en haut à droite et cliquez sur
supprimer. Sélectionnez maintenant les images désirées et cliquez
sur Conrmer en bas à droite. Tous les médias sélectionnés sont
maintenant supprimés.
Media catalogue:
This is where your media (photos and videos) will be saved. There is
a phone and appliance (Camara) – storage. All media is always saved
on your appliance.
Copy media from your appliance to your phone:
To copy media from your appliance storage to your phone storage, go
into your appliance storage, press the yellow arrow on the top right
and press download. Now you can choose the pictures and press
OK on the bottom right. All chosen media will now be copied to your
phone storage.
Delete media:
To delete media, go into your appliance – or phone storage, press the
yellow arrow on the top right and press delete. Now you can choose
the pictures and press OK on the bottom right. All chosen media will
now be deleted.
Réglages:
Dans les réglages, vous pouvez effectuer les mêmes réglages que
dans le Camara. (Voir page 3)
Settings:
In the settings you can change the same settings like in your camera.
(see page 3).

7
FR - Informations concernant la réutilisation ou le recyclage
Il est interdit de jeter les piles et les accumulateurs ensemble avec les déchets
ménagers, il faut les supprimer séparément. L‘utilisateur est censé supprimer
les piles épuisées en toute conformité avec les dispositions légales en vigueur
en cette matière (collecte séparée de déchets). Il est possible de rendre gratui-
tement les piles usées au magasin. Les piles contiennent des substances dont
l‘action est irritante, elle peut provoquer des allergies et elles sont hautement
réactives, c‘est pourquoi leur collecte séparée et leur récyclage sont importants
pour l‘environnement et pour votre santé. Si en dessous de la corbeille barrée pour les déchets sur
des roues les piles sont marquées avec le symbole chimique Hg, Cd ou Pb, cela signie qu‘elles
contiennent plus de 0,0005% de mercure (Hg), plus de 0,002% de cadmium (Cd) ou plus de 0,004%
de plomb.
GB - Disposal restrictions
Batteries and accumulators must not be disposed of in domestic waste. You are obliged to dispose
of batteries (seperate collection) appropriately. After use you can return batteries free of charge
to the retail store. As batteries contain substances that can be irritant, can cause allergy and are
highly reactive, separate collections and proper recycling is important to the environment and to
your health. If the batteries are marked with a chemical symbol Hg, Cd or Pb below the crossed-out
waste bin on wheels it refers to that more than 0.0005% of mercury (Hg), more than 0.002% o f
cadmium (Cd) or more than 0.004% Lead (Pb) is included.
FR - Informations concernant la réutilisation ou le recyclage. On ne doit pas
éliminer les équipements électriques ensemble avec les déchets ménagers, il
faut les supprimer séparément. L‘utilisateur est censé, si cela est possible, sortir
les piles et déposer l‘équipement au point communal de collecte de déchets. Si
l‘équipement comporte des données personnelles on peut le supprimer par ses
propres soins.
GB - Disposal restrictions
Electrical appliances must not be disposed of in domestic waste and must be disposed of separately.
You are obliged to take out the batteries, if possible, and to dispose of the electrical equipment at
the communal collection points. Should personal data be stored on the electrical appliance you must
remove them by yourself.
FR - Revendeur de service | GB - Service centre
Reitter Modellbau Versand
Patricia Reitter
Degerfeldstrasse 11
72461 Albstadt
Tel 07432 9802700
Fax 07432 2009594
Mail [email protected]
Web www.modellbauversand.de
Extra Trade
Rudolf Müller & Gerrit Müller GdbR
Lindenstraße 82
66787 Wadgassen
Tel 06834 9604952
Fax 06834 9604963
Mail [email protected]
Web www.extra-trade.de
Sigi‘s Modellbau Shop
Siegfried Costa
Bundesstr. 30
AT -6923 Lauterach
Tel +43 557483657
Fax +43 557483657
Mail [email protected]
Web www.playland-modellbau.at
Modellbau Zentral
Peter Hofer
Bresteneggstrasse 2
CH -6460 Altdorf
Tel +41 794296225
Fax +41 418700213
Mail [email protected]
Web www.modellbau-zentral.ch
Bay-Toy‘s
Martin Schaaf
Am Bahndamm 6
86650 Wemding
Tel 07151 5002192
Fax 07151 5002193
Mail [email protected]
Web www.bay-toys.de
DE DE
DE
CH AT

Fordern Sie noch Heute den aktuellen Hauptkatalog mit
unserem gesamten Warensortiment an.
Name _______________________________
Vorname _______________________________
Straße _______________________________
Wohnort _______________________________
Telefon _______________________________
E-mail _______________________________
Bitte senden Sie den Katalog für mich an folgenden
Fachhändler:
Ihr Fachhändler
_______________________________________________
_______________________________________________
_______________________________________________
_______________________________________________
Der Katalog wird mit der nächsten Bestellung des Händ-
lers auf Ihren Namen mitgeliefert.
Order the current catalogue with our complete
assortment of modelling goods today.
Name _______________________________
First name _______________________________
Street _______________________________
City _______________________________
Phone _______________________________
E-mail _______________________________
Please send the catalogue to the following specialist
dealer:
Your dealer
_______________________________________________
_______________________________________________
_______________________________________________
_______________________________________________
We will include a catalogue for your attention with the
next order placed by your dealer.
Gutschein Coupon
Irrtum und technische Änderungen vorbehalten. Copyright JAMARA e.K. 2015
Kopie und Nachdruck, auch auszugsweise, nur mit Genehmigung von JAMARA e. K.
All rights reserved. Copyright JAMARA e.K. 2015
Copying or reproduction in whole or part, only with the expressed permission of JAMARA e.K.
JAMARA e.K.
Inh. Manuel Natterer
Am Lauerbühl 5 - DE-88317 Aichstetten
Tel. +49 (0) 75 65/94 12-0 - Fax +49 (0) 75 65/94 12-23
Service - Tel. +49 (0) 75 65/94 12-66
kundenservice@ jamara.com
Irrtum und technische Änderungen vorbehalten. Copyright JAMARA e.K. 2019
Kopie und Nachdruck, auch auszugsweise, nur mit Genehmigung von JAMARA e. K.
All rights reserved. Copyright JAMARA e.K. 2019
Copying or reproduction in whole or part, only with the expressed permission of JAMARA e.K.
This manual suits for next models
2
Other Jamara Camcorder manuals
Popular Camcorder manuals by other brands

Samsung
Samsung 8 SCL540 Owner's instruction book

Panasonic
Panasonic NV-MX1B operating instructions

Panasonic
Panasonic NV-G202A operating instructions

Sony
Sony DCR-SR42A - Handycam Hard Disc Drive Digital Video Camera... manual

Samsung
Samsung VP-M2100S Owner's instruction book

Panasonic
Panasonic 456 Guidelines