JAUNT ONE User manual
COPYRIGHT 2016, JAUNT INC. UPDATED SEPTEMBER 27, 2016
USER GUIDE
ONE

ONE
Getting Started......................................................................................................3
Getting to Know the Camera ...........................................................................3
Case Layout ..........................................................................................................4
Handling ............................................................................................................... 5
Creating Your First Recording........................................................................ 5
Compatibility......................................................................................................... 6
Power................................................................................................................6
Data........................................................................................................................ 7
Mounting................................................................................................................7
Usage......................................................................................................................... 8
Removing/Replacing Lens Caps .......................................................................8
Inserting/Ejecting SD Cards ............................................................................8
Connecting Power............................................................................................9
Power On/Off.....................................................................................................9
Record Start/Stop................................................................................................9
Default Capture Settings................................................................................10
Connecting USB..............................................................................................10
Connecting Accessories..................................................................................10
Wired Remote Trigger .....................................................................................11
Reviewing Data.................................................................................................11
Camera Module Numbering............................................................................12
Status...........................................................................................................12
Troubleshooting.........................................................................................13
Specifications...............................................................................................14
Functional..........................................................................................................14
Mechanical......................................................................................................... 15
Regulatory Compliance ................................................................................16
CONTENTS
2COPYRIGHT 2016, JAUNT INC.

ONE
GETTING STARTED
Getting to Know the Camera
3
COPYRIGHT 2016, JAUNT INC.
Camera module
16 equatorial, 4 top, 4 bottom
Microphone
24 microphones, one for each module
SD card slot
24 full-size SD slots,
one for each module
Status indicator LED
24 LEDs, one for
each module
Lens - glass optical element
On/off switch
Power connector
for use with Jaunt ONE
power cable only
Accessory port
for use with Jaunt ONE
wired remote trigger and
other Jaunt-approved accessories
USB 2.0 (Type B) connector
for use with Jaunt ONE
Controller application
Serial number label
Tripod mount points
5x 3/8"-16 mount points
Record button
with ring status LED
Handle
Lens cap
24 caps, one for each module

Case Layout (Pelican 1640)
ONE
GETTING STARTED
4COPYRIGHT 2016, JAUNT INC.
Jaunt ONE
Camera
Anton Bauer Battery Charger
USB Cable
SD Card Rolls
Portable Hard Drive
Wired Remote Trigger
Tascam AA Batteries (spare)
Pens
Camera Battery Plate/Cable
Mic Cable Set
Flashlight
Camera Battery Packs
(2) Anton Bauer Digital 150 Gold Mount
(1) Anton Bauer Digital 90 Gold Mount
SD Card Readers
Spare Module
and Hardware
Tascam Audio
Recorder
Microphone
Screwdriver Set
Color Checker
Microphone Cover
and Windscreen
Lens Cleaning Kit
Microphone
Clip

Jaunt ONE should always be handled with care. Follow the guidelines below when handling the camera:
Always lift Jaunt ONE using the handle, using one hand to support the base of the camera.
Take care to protect the lenses from impact during movement.
When not in use, always replace lens caps on all 24 modules to protect the glass lenses.
Jaunt ONE is not waterproof and should not be used in rain, underwater, or in environments
with high moisture or humidity.
When outdoors under direct sunlight, shield Jaunt ONE from sun when not in use. This will
help ensure the camera does not overheat.
Smudges on lenses can easily ruin a shot. Frequently monitor lenses and wipe off any smudges
or debris using lens wipes.
Only transport Jaunt ONE in an approved transport case.
Refer to the Jaunt ONE Step By Step Tutorial for details on creating your first recording. For best
practices refer to the Jaunt Cinematic VR Field Guide: A Guide to Best Practices for Shooting 360°.
Creating Your First Recording
Handling
ONE
GETTING STARTED
5
COPYRIGHT 2016, JAUNT INC.

Jaunt ONE can be powered by standard cinema batteries or via a custom AC adapter. Always use the
supplied Jaunt ONE power cable to power the camera. The following batteries/power supplies have
been tested and are fully supported for use with Jaunt ONE:
Power
The power supply (battery/AC adapter) must provide the following power to Jaunt ONE:
Battery
• Anton Bauer Digital 90 Battery (93Wh)
• Anton Bauer Digital 150 Battery (156Wh)
AC Adapter
• Meanwell GST160A15 with XLR connector (144W)
Voltage: 15V nominal (input range 12-17V)
Current: ≥9A continuous power draw
ONE
COMPATIBILITY
6COPYRIGHT 2016, JAUNT INC.

SanDisk Extreme PRO SD UHS-I Card, 32GB (est. record duration: 1h10m)
SanDisk Extreme PRO SD UHS-I Card, 64GB (est. record duration: 2h20m)
SanDisk Extreme PRO SD UHS-I Card, 128GB (est. record duration: 4h40m)
SanDisk Extreme PRO SD UHS-I Card, 256GB (est. record duration: 9h20m)
SanDisk Extreme PRO SD UHS-I Card, 512GB (est. record duration: 18h40m)
While recording, each Jaunt ONE module writes data to its SD card. Jaunt ONE’s high quality
recordings require SD cards that can support high data rates. The following SD cards have been
tested and are fully supported for use with Jaunt ONE. Take care not to mix and match different
SD card sizes or brands. Only use cards listed below:
Data
The base of Jaunt ONE is designed with five
3/8"-16 steel mounting holes for mounting
to standard tripod adapter plates. Always
use at least two bolts for mounting to
prevent the camera from rotating and
unscrewing itself from the plate. One bolt
should always be fastened to the central
mount point. Use 15 to 20 N-m (11 to 15
ft-lb) of torque to fasten bolts to the base.
The combined data rate across all 24 modules is:
180 MB per second of recording
10.8 GB per minute of recording
648 GB per hour of recording
Mounting
ONE
COMPATIBILITY
7
COPYRIGHT 2016, JAUNT INC.
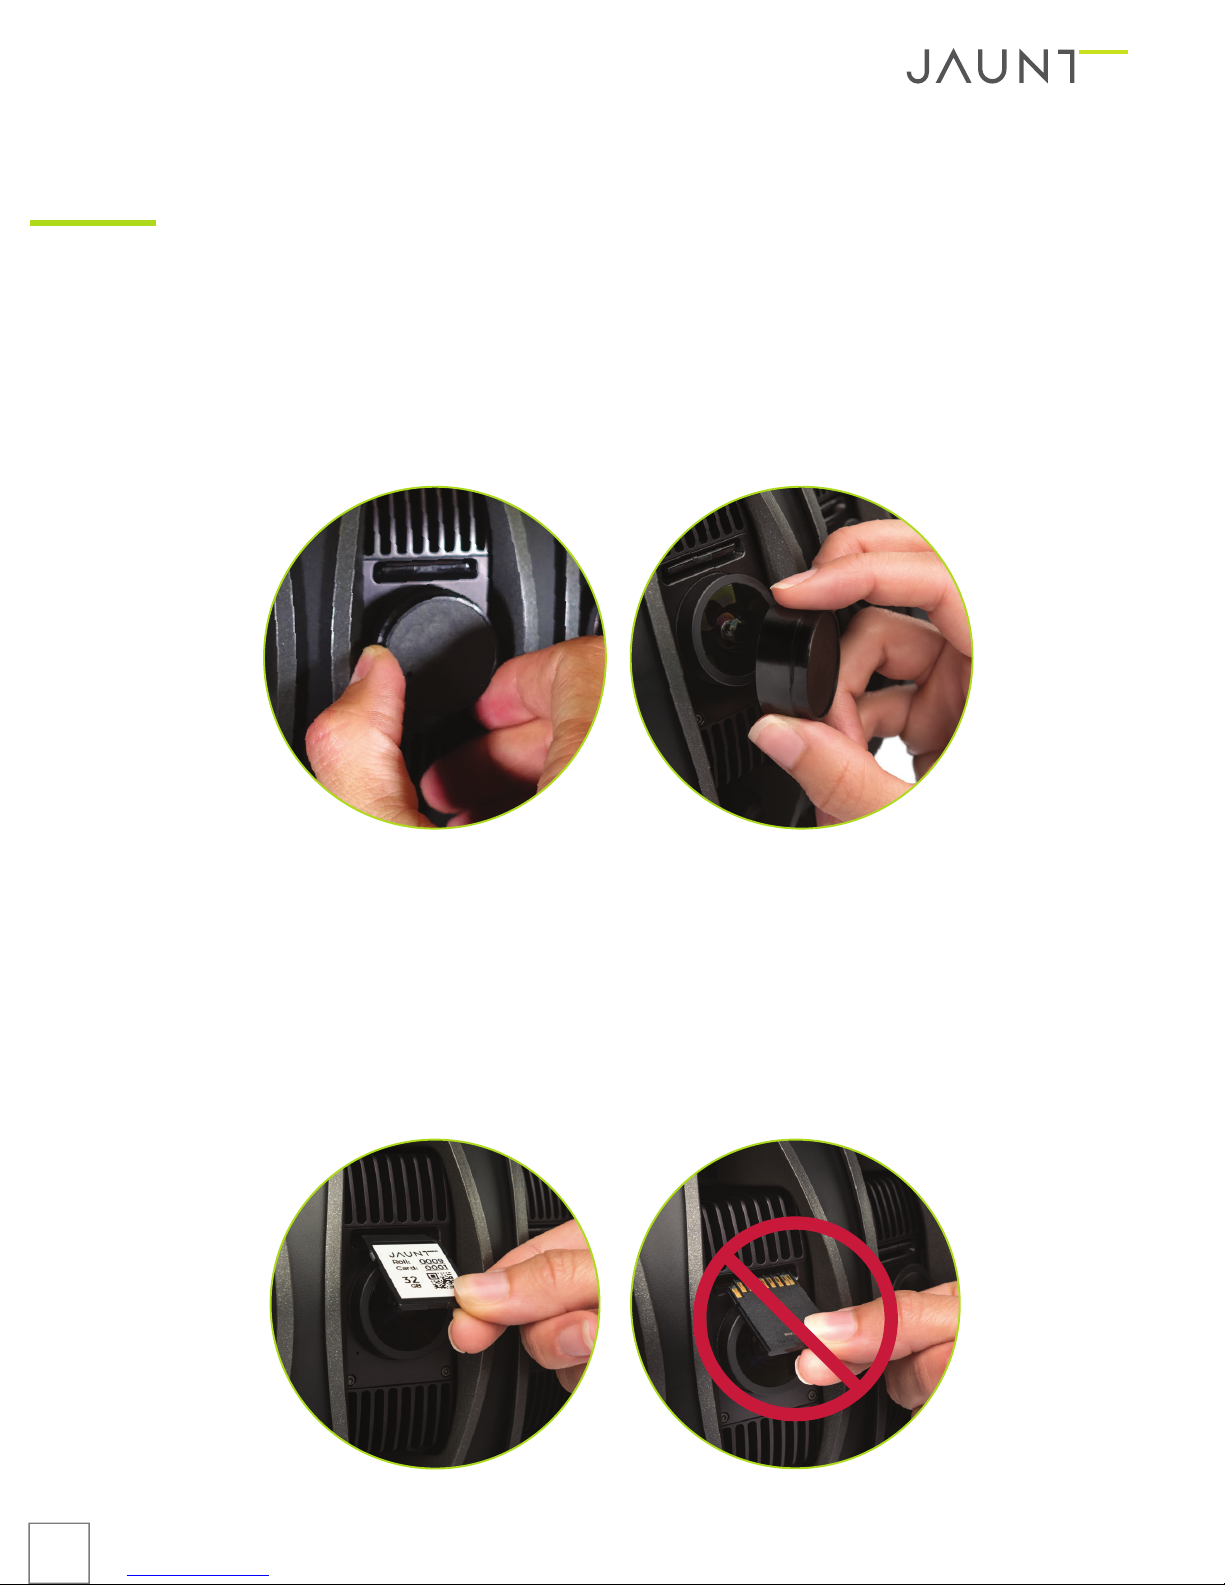
Gently grip the sides of each lens cap and pull outward to remove the cap. Applying a slight twisting
force can be helpful if a cap is not easily removed.
To replace, press the lens cap gently around the lens until it is seated against the module. Take care
not to contact the glass lens surface with the cap or a finger.
Removing/Replacing Lens Caps
Insert SD cards with the gold contacts facing down toward the lens. Push the card into the module
until it clicks into place. Do not apply excessive force if a card does not insert. Remove it, check the
orientation, and try again. Take care to insert the card with the correct orientation on the top and
bottom modules.
Eject the SD card by pushing inward on the card until it clicks and disengages. Do not attempt to
directly remove the card without first pushing inward to disengage it. Remove the card and store in
the supplied card case.
Inserting/Ejecting SD Cards
ONE
USAGE
8COPYRIGHT 2016, JAUNT INC.

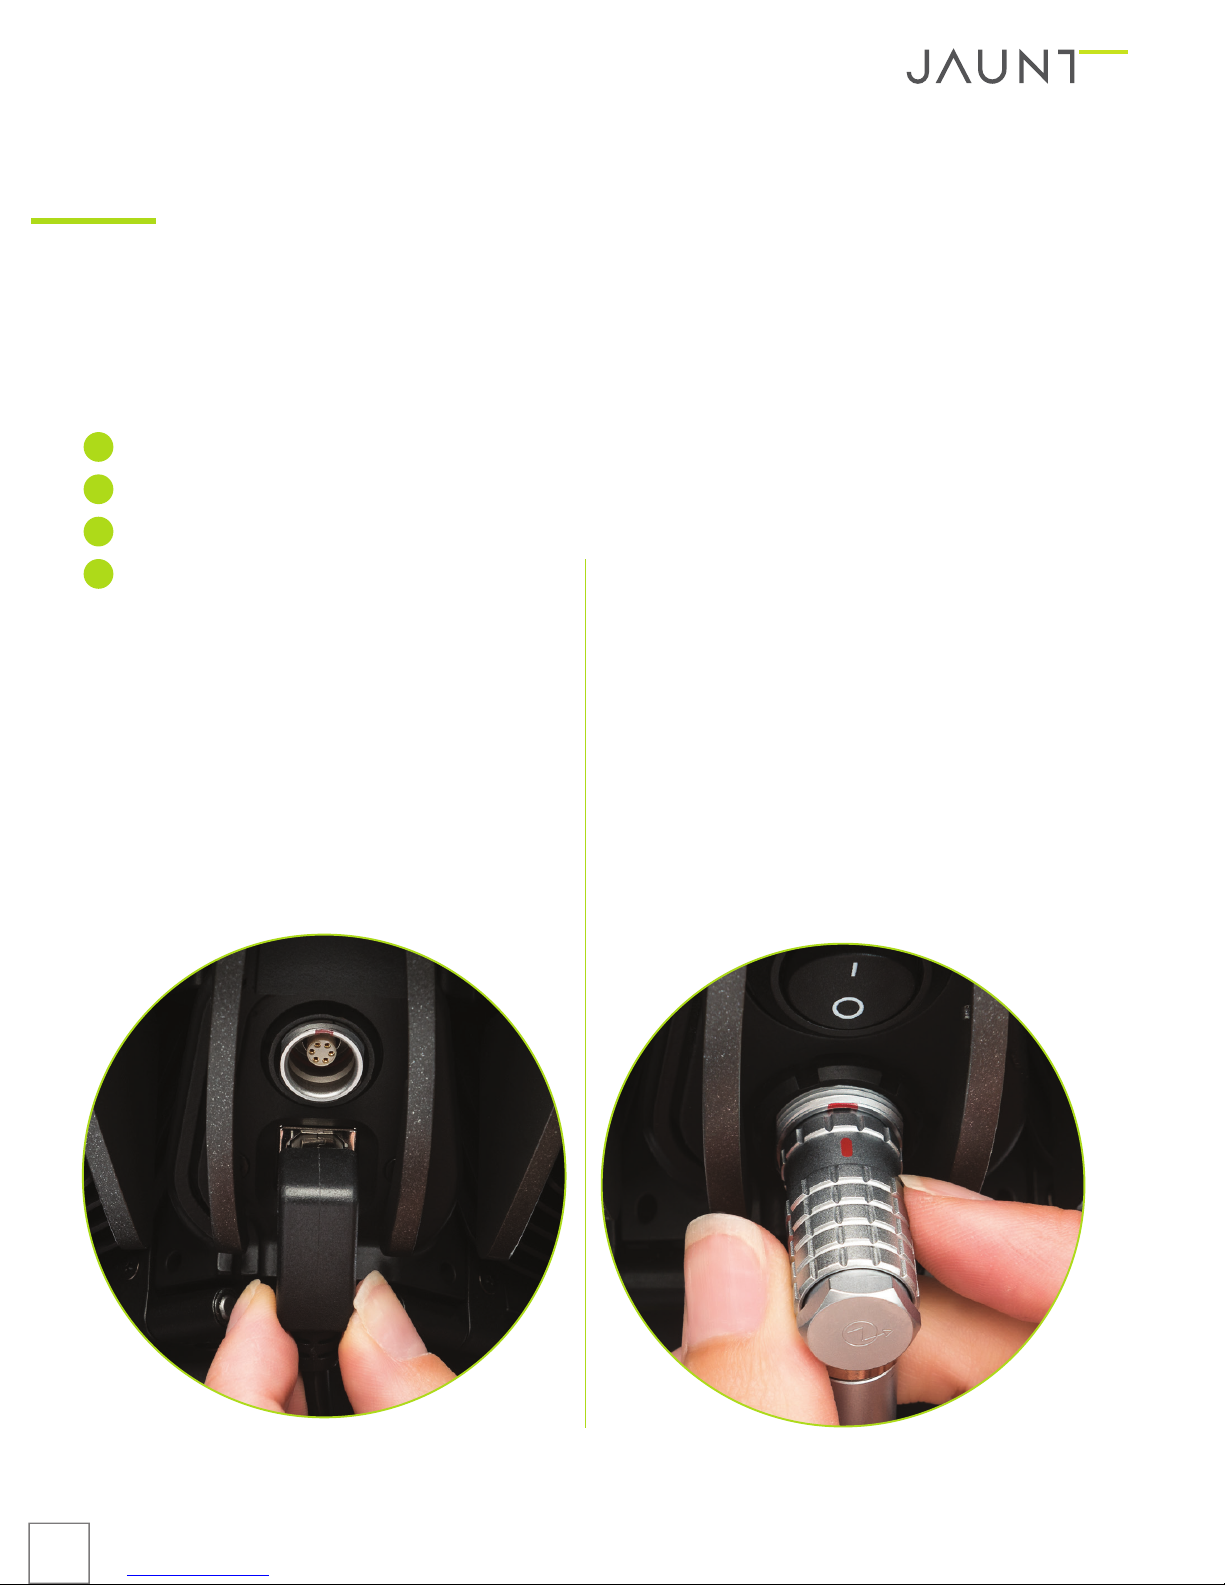
The power cable has two connectors: a smaller right-angle LEMO connector that plugs into the camera, and a
larger XLR connector for connecting to the power source.
Align the red indicator on the right angle power connector with the red indicator on the power receptacle. Insert
the connector until it clicks into place. Do not apply excessive force if the connector does not engage. Remove it,
check the orientation, and try again.
To remove the right angle connector, grip the textured outer sheath of the plug and pull away from the camera.
Align the male pins of the XLR connector with the female pins of the XLR connector on the battery adapter plate
or AC power supply. To remove the XLR connector, press on the latching button and pull apart.
Connecting Power
Ensure that the power cable is connected to the camera, a battery or AC power supply is connected
to the power cable, and SD cards are loaded in all modules. Flip the power switch from the “O” to “I”
position to power on the camera. You will see the module LEDs light up, turn off briefly, then flash
green for a longer sequence (no longer than 10 seconds), before settling to solid green. See the
“Troubleshooting” section if any other LED indicators are seen during power up.
Power On/Off
Ensure that the camera is powered on and that the ring status LED on the handle record button is
green. To start recording, press the record button on the handle. The record button LED and the
camera module LEDs will turn red to indicate that the camera is now recording.
To stop recording, press the record button on the handle. The record button LED and the camera
module LEDs will turn green to indicate the camera has stopped recording.
Record Start/Stop
ONE
USAGE
9
COPYRIGHT 2016, JAUNT INC.
The following are the default capture settings. These settings can be adjusted by connecting a
computer to the camera and using the Jaunt ONE Controller application. Additional information can
be found in the Jaunt ONE Controller documentation.
1920x1200 resolution per module (J1-24G)
59.94 fps video frame rate
Automatic exposure
Automatic white balance
Default Capture Settings
ONE
USAGE
10 COPYRIGHT 2016, JAUNT INC.
Jaunt ONE can be connected to a computer
using a USB 2.0 cable with a Type B connector.
Check the orientation of the cable before
inserting it into the USB receptacle. Take care
to gather the cable against the tripod to
prevent it from entering the camera field of
view. Using a right-angle USB cable can help
keep the cable out of sight.
Connecting USB
Align the red indicator on the accessory
connector with the red indicator on the
accessory port. Insert the connector until it
clicks into place. Do not apply excessive
force if the connector does not engage.
Remove it, check the orientation, and try
again. Take care to gather the cable against
the tripod to prevent it from entering the
camera field of view.
To remove the connector, grip the textured
outer sheath of the plug and pull away from
the camera.
Connecting Accessories
Table of contents


