Jay-tech VideoShot TDV2160 User manual


1. PARTS OF THE VIDEO CAMERA 4
2. PREPARING FOR USING 5
INSTALLING THE BATTERY 5
INSERTING THE MEMORY CARD 5
SETTING THE LANGUAGE 7
SETTING THE DATE AND TIME 8
MONITOR SCREEN DISPLAY 9
3. USING THIS VIDEO CAMERA 12
TURNING THE CAMERA ON AND OFF 12
CHANGE THE MODE 12
RECORDING VIDEO CLIP 13
TAKING STILL IMAGES 14
USING THE SELF-TIMER AND BURST SNAPSHOT 15
USING THE ZOOM FUNCTION 16
RECORDINGAUDIO 17
4. USING THE MENU IN RECORD MODE 18
1

MENU IN CAPTURE MODE 18
MENU IN VIDEO MODE 20
SETUP MENU 21
5. PLAYBACK 24
PLAYBACK STILL IMAGE 24
PLAYING BACK MOVIE CLIPS 24
PLAYING BACK AUDIO FILES 25
OTHER FUNCTION IN PLAYBACK MODE 25
6. MAKING CONNECTIONS 31
CONNECTING THE CAMERA TO A TV 31
CONNECTING THE CAMERA TO A PC 31
7. SOFTWARE INSTALLATION 33
INSTALLING THE SOFTWARE 33
8. TROUBLESHOOTING 36
9. TECHNICAL SPECIFICATIONS 38
2

Thank you for purchasing this digital video camera. Please read these
operating instructions carefully in order to use the digital video camera
correctly. Keep the instructions in a safe place after reading so that you can
refer to them later.
Precautions
Before using the video camera, please ensure that you read and
understand the safety precautions described below.
• Do not try to open the case of the video camera or attempt to modify this
video camera in any way. Maintenance and repairs should be carried out
only by authorized service providers.
• Keep the video camera away from water and other liquids. Do not use the
video camera with wet hands. Never use the video camera in the rain or
snow. Moisture creates the danger of electric shock.
• Use only the recommended power accessories. Use of power sources
not expressly recommended for this equipment may lead to overheating,
distortion of the equipment, fire, electrical shock or other hazards.
3

1. Parts of the Video Camera
1: Lens
2: Microphone
3: Compensating lamp
4: Self-Timer LED
5: Delete
6: Playback
7: Mode
8: TFT LCD Screen
9: Left / Self-Timer
10: Power
11: Down button
12: Menu
13: AV Out port
14: USB port
15: Right / LED on or off
16: OK
17: Shutter
18: Up / Display
19: W/Zoom in button
20: T/Zoom out button
21: Speaker
22: Tripod socket
23: Card slot
24: Battery cover
4

2. Preparing for Using
Installing the Battery
1. Open the video camera battery door.
2. Insert three AAA-size batteries with the positive (+) and negative (-)
poles matching the directions indicated on the battery cover.
3. Close the battery door.
Inserting the Memory Card
SD or MMC card can be used in this video camera. Turn off the camera
before inserting or removing the memory card. Be sure to orient the card
correctly when inserting it. Never try to force the memory card into the slot
5

when you feel resistance. The memory card
has a write protect switch, which used to
protect data from accidental deletion.
Therefore, whenever you want to record,
format or delete files in the SD card, disable
the write protection beforehand.
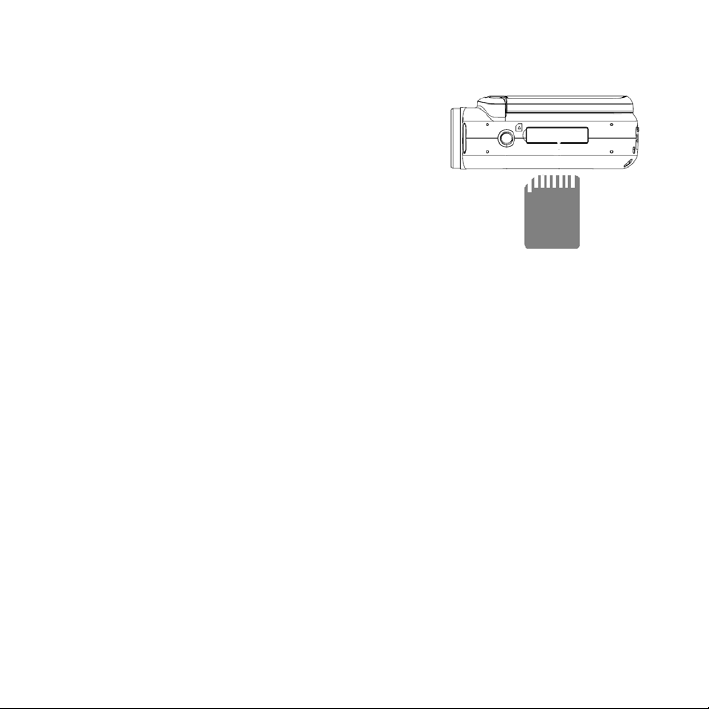
1. Turn off the video camera.
2. Find the rubber at the bottle of the video camera , and then undraw the
rubber you will see the SD card slot.
3. Insert the memory card as illustrated.
• Never insert any other object which is not a SD/MMC card into the
camera’s SD card slot.
• Never remove the SD card from the camera while the camera is
powered on.
Format the Memory Card
All data will be deleted including protected files. Be sure to download
important files to your computer before formatting.
1. Turn the power on, press the MENU button to display the menu, and
6

then press the RIGHT button to select [setup] .
2. Press the UP or DOWN button to select [Format..] then press the OK
or RIGHT button to launch the submenu.
3. Press the UP or DOWN button to select the item [YES] and then press
the OK button to erase all data.
Setting the Language
When using the video camera for the first time after purchasing it, be sure
to choose a language before using the video camera.
1. Turn the power on, press the MENU button to display the menu, and
then press the RIGHT button to select [setup] .
2. Press the UP or DOWN button to select [Language] then press the OK
or RIGHT button to launch the submenu.
3. Press the UP or DOWN button to select the desired language and then
press the OK button to confirm the setting.
4. Press the MENU button to close the menu.
7

Setting the Date and Time
1. Turn the power on, press the MENU button to
display the menu, and then press the RIGHT
button to select [setup] .
2. Press the UP or DOWN button to select
[Date&Time] then press the OK or RIGHT
button to launch the submenu.
3. Press the UP or DOWN button to change the highlighted value. Press
the LEFT or RIGHT button to move the cursor between settings.
4. Press the OK button to confirm the setting.
5. Press the MENU button to close the menu.
8

Monitor Screen Display
A. When shooting movies
9

B. When shooting still images
10

C. When recording audio file
D. When playing back
11

3. Using This Video Camera
Turning the Camera On and Off
1. Open the LCD panel.
2. To turn on the camera, press the POWER button the LCD screen turns
on.
3. Press the POWER button again will turn the camera off.
To save battery power, the video camera automatically turns off a period of
time after the last control accessed. Press the POWER button to power the
camera back on. You can change the power-off time by setting the function
[Power Save] in the Setup menu.
Change the Mode
There are three record modes in this video camera.
1. Press the POWER button to turn on the camera, and the camera get
into the default video mode.
2. Press the MODE button to change the record mode. Each time the
12

MODE button is pressed the mode icon is changed.
Display Title Description
Capture mode For taking still photos.
Video mode For recording movie clips.
Audio mode For recording audio files.
• If you want to preview the record files you can press the
PLAYBACK button to set the video camera to playback mode .
• When the video camera is in playback mode you must press
the PLAYBACK button to change it to record mode firstly then you
can use the MODE button to change mode.
Recording Video Clip
1. Turn the video camera on and its default mode is video record mode.
2. Press the SHUTTER button to start recording. Press the UP button to
have a pause and press it again to continue.
3. Press the SHUTTER button again to end the recording. If the memory
13

is full the video camera will stop recording automatically.
• The LCD monitor displays the recorded time.
•When the light is insufficient press the RIGHT/ LED ON or OFF
button to turn on the compensating lamp and when the light is
enough press the LED ON/OFF button to turn off the
compensating lamp.
Taking Still Images
1. Turn on the video camera.
2. Press the MODE button to set the video camera to capture mode, the
icon appears on the LCD screen.
3. Use the LCD screen to frame your subject.
4. Hold the video camera steady and then press the SHUTTER button
completely down to take a picture.
• Automatically the number displayed on the screen is decreased by
one. For example, if the screen displays 018 when the camera is
power on , after one photo has been captured, 017 will appear. If
the memory is full, “Memory Full” will appear on screen.
14

• When the light is insufficient press the RIGHT/ LED ON or OFF
button to turn on the compensating lamp and when the light is
enough press the RIGHT/ LED ON or OFF button to turn off the
compensating lamp.
• Make sure that your fingers do not cover the lens.
• Do not take the memory card or battery out when the video camera
is saving the image, otherwise the image will not be saved
completely.
Using the Self-timer and Burst Snapshot
Use the self-timer to set a delay from the time the shutter button is pressed
to the time the image is shot. Use the burst snapshot to take pictures
continuously.
1. Turn the power on, and set the video camera to the Capture mode.
2. Press the LEFT button to change the self-timer mode: each time the
LEFT button is pressed the icon on the up right corner is changed.
Off: Take photos without delay.
15

2 seconds: The shutter release will delay for 2 seconds.
10 Seconds: The shutter release will delay for 10 seconds.
Burst snapshot: Press the SHUTTER button once to take three
pictures continuously
3. Press the SHUTTER button to take picture.
•You can also set the self-timer and burst snapshot by the capture
menu. See the details on page 19.
Using the Zoom Function
This video camera has a digital zoom function that allows you to zoom in or
zoom out on subjects. The digital zoom enlarges or shrinks the image using
a software process.
1. Turn the video camera on and set it to capture mode or video record
mode.
2. Press the Wor T button to compose the image.
16

W: zoom out for a wide-angle shot.
T : zoom in for a telephoto shot.
• When the zoom button is pressed, the value of magnification level
appears on the LCD monitor.
Recording Audio
1. Turn the video camera on and set it to audio record mode.
2. Press the SHUTTER button to start recording. Press the UP button to
have a pause and press it again to continue.
3. Press the SHUTTER again to end the recording. If the memory is full
the video camera will stop recording automatically.
• On the center of the LCD monitor displays the recorded time.
• There is no menu in audio record mode.
17

4. Using the Menu in Record Mode
When a menu is displayed, the UP, DOWN, LEFT, RIGHT and OK buttons
is used to make the desired setting. The audio record mode doesn’t have a
menu.
Menu in Capture Mode
1. Turn on the video camera and set it to capture
mode.
2. Press the MENU button to display the menu.
3. Use the UP or DOWN button to select an item.
4. Press the OK or RIGHT button to enter the submenu.
5. Use the UP or DOWN button to select the desired item.
6. Press the OK button to confirm the setting.
7. Press the MENU button to close the menu.
Capture Menu List
Menu item Function
Resolution There are five options for choice: [2592x1944] /
18

[2048x1536] / [1600x1200] / [1024x768] / [640x480]
Quality Select a lower image quality to decrease the image size
in order to capture more images. There are three
options for choice: [Super Fine] / [Fine] / [Normal].
Metering Change the metering method to change the brightness
of the picture.
[Center]: The exposure will be calculated based on
light in the center area and this is suitable for
general use.
[Multi]: The exposure will be calculated based on the
average light.
[Spot]: Only the spot in the center of the LCD screen
will be metered for light.
White
Balance
Adjust the white balance to suit different light sources.
There five items for option: [Auto] / [Daylight] / [Cloudy] /
[Fluorescent] / [Tungsten].
Exposure Set the exposure value manually to compensate for
unusual lighting conditions such as indirect indoor
19
Table of contents
Other Jay-tech Camcorder manuals