JDW BS700LB User manual

BS700LB 18042017
Disco Ball Sound Tower
Instruction Manual
Model Ref: BS700LB / Cat Number: MM346

Introduction
Thank you for choosing this Disco Ball Sound Tower.
This product is manufactured to the highest standards of
performance and safety.
Before use, please read this manual carefully. It gives
important instructions about safety, use and maintenance of
your appliance.
Remove all packaging material. You may wish to keep
the packaging for future use or storage of your appliance.
Alternatively, dispose of accordingly.
01

Important Safety Information
When using electrical appliances, basic precautions should
always be followed, including the following;
1. This appliance is for domestic use only. Do not use
outdoors or on wet surfaces.
2. Do not handle the plug or appliance with wet hands.
3. Do not immerse the main body in water.
4. This appliance can be used by children aged from 8
years and above and persons with reduced physical,
sensory or mental capabilities, or lack of experience
and knowledge, if they have been given supervision or
instruction concerning the use of the appliance in a safe
way and understand the hazards involved.
5. Children must not play with the appliance.
6. Cleaning and user maintenance shall not be made by
children unless they are older than 8 and supervised.
7. Keep the appliance and its cord out of reach of children
less than 8 years.
8. This product is not a toy.
9. Do not use the appliance if any parts appear to be
faulty, missing or damaged.
10. Always switch off at the mains supply before carrying
out any cleaning, performing user maintenance or
changing accessories.
11. Do not use the appliance if it has been dropped or
damaged in any way.
12. Check to ensure that the electricity supply matches that
shown on the rating plate.
13. Only use the attachments/accessories supplied with the
product or recommended by JDW.
14. If the supply cord is damaged, it must be replaced by a
qualied service agent in order to avoid a hazard
02
15. Only use this appliance for its intended domestic use.
JDW will not accept any liability if the appliance is
subject to improper use, or failure to comply with these
instructions.
16. Keep the appliance and its power supply cord away
from heat or sharp edges that could cause damage.
17. Keep the power supply cord away from any parts of the
appliance that may become hot during use.
18. Do not disconnect the appliance from the mains power
supply by pulling the cord, switch it off and remove the
plug by hand.
19. Do not move the appliance when it is in use.
20. Use of an extension cord with the appliance is not
recommended.
21. This appliance should not be operated by means of an
external timer or separate remote control system.
22. Keep the appliance away from ammable materials.
04
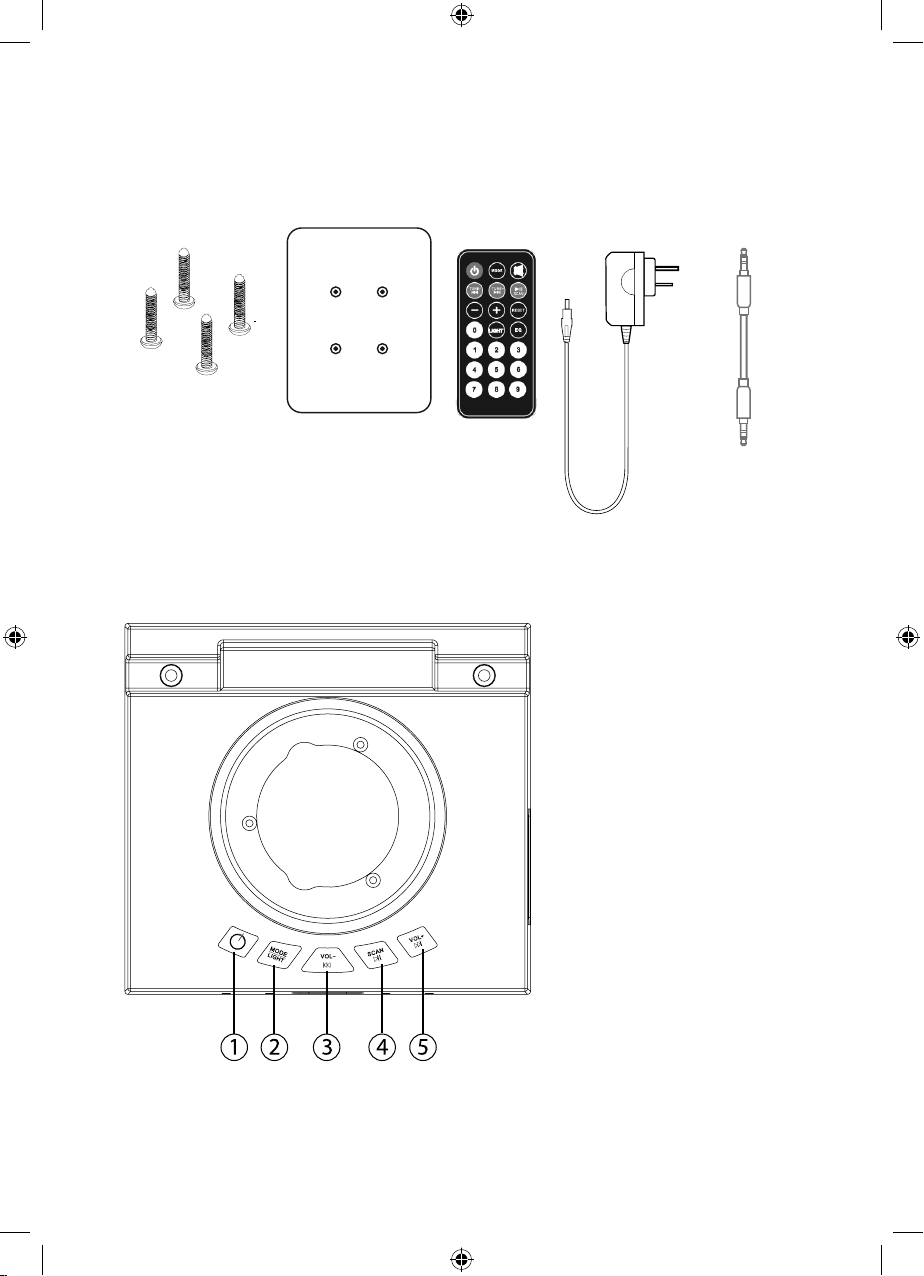
Accessories
Media Controls
4 X Screws Tower Base Remote
Control
A/C
Adapter
3.5mm Aux
Cable
1. Power Button: On/Off
2. Mode/Light:
Quick Press - Bluetooth, AUX
in, FM Radio.
Long press - Activate light
3. Volume Down/Fast Rewind:
Quick Press - Previous song /
tune FM radio down
Long Press - Decrease
Volume
4. Scan & Play/Pause:
Quick Press - Play / Pause
Long Press - Scan FM Radio
5. Volume Up & Fast Forward:
Quick Press - Skip song /
Tune FM Radio up
Long Press - Increase Volume
Top Panel
05
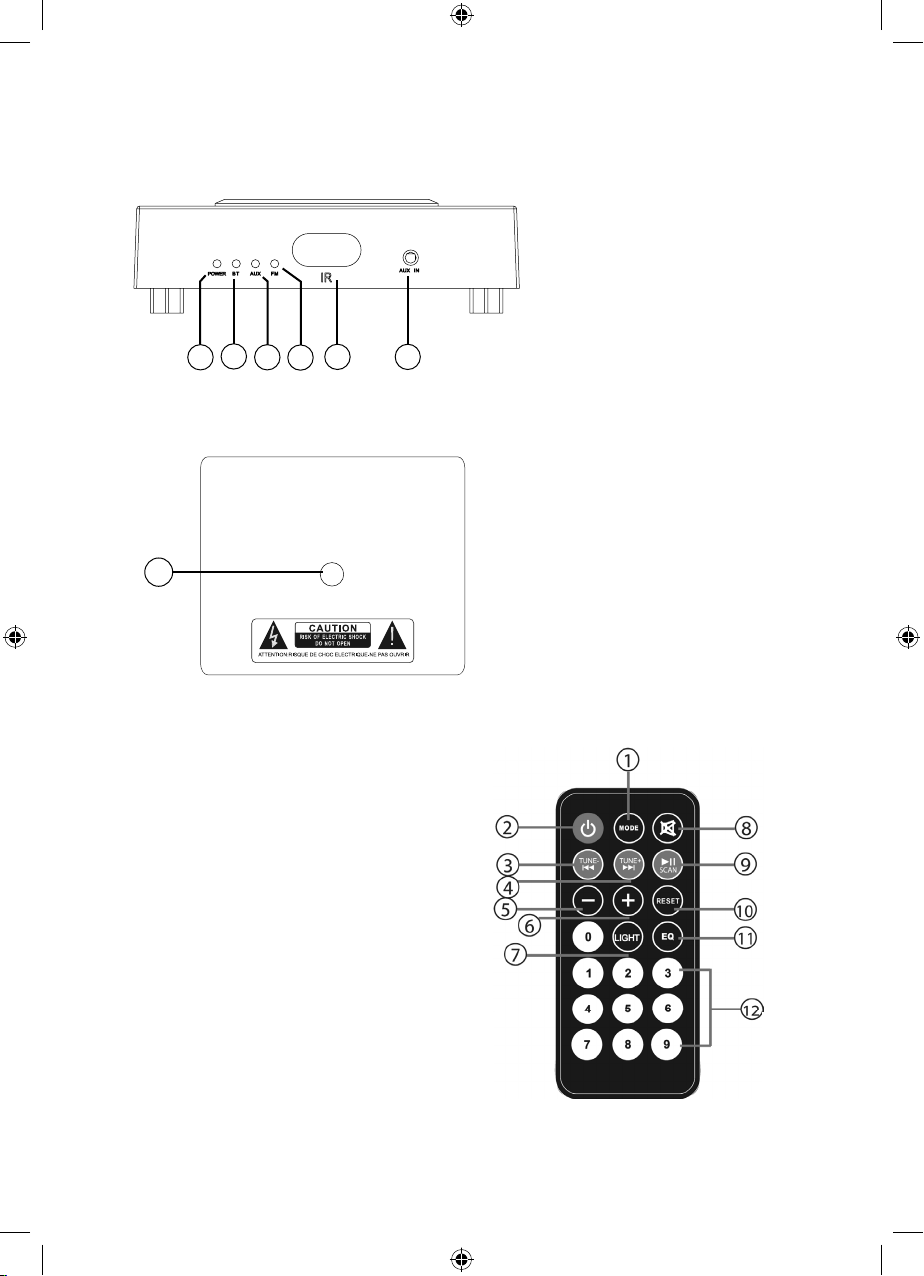
Media Controls Cont...
Front Panel
06
6. LED Power indicator light
7. LED bluetooth indicator light
8. LED AUX Indicator Light
9. LED FM Radio Indicator Light
10. Infrared Sensor
11. AUX in port
12. DC Power Input Socket
6 7 8 9 10 11
12
Back Panel
Remote Control
1. Mode Button: Bluetooth, AUX in, FM radio
2. Power Button: On/Off
3. Tune Up / Fast Rewind:
Quick Press - Previous Song
Long Press - Tune FM Radio up
4. Tune Up / Fast Forward:
Quick Press - Skip song
Long Press - Tune FM radio down
5. Volume Down
6. Volume Up
7. Activate Disco ball
8. Mute Audio
9. Play / Pause
Quick Press - Play / Pause
Long Press - Scan FM Radio
10. Reset button
11. Sound Equaliser
12. Numeric buttons
06

Installing the Battery In the Remote Control
NOTE: The battery for the remote control (1 CR20S lithium
battery) is included. To activate the battery pull out and
remove the plastic insulating strip. Replace the battery,
push and slide out the battery door in the remote control.
Replace the battery with a new CR2025 battery with the
polarity”+”facing up. Slide the door back.
Setting up the Speaker
1. Connect the wooden tower base to the
speaker using the supplied screws (Fig 1).
2. Connect the small end of the AC adapter
to the AC adapter port on the back of the
speaker. Connect the other end to an
available wall power outlet (Fig 2).
1
2
07
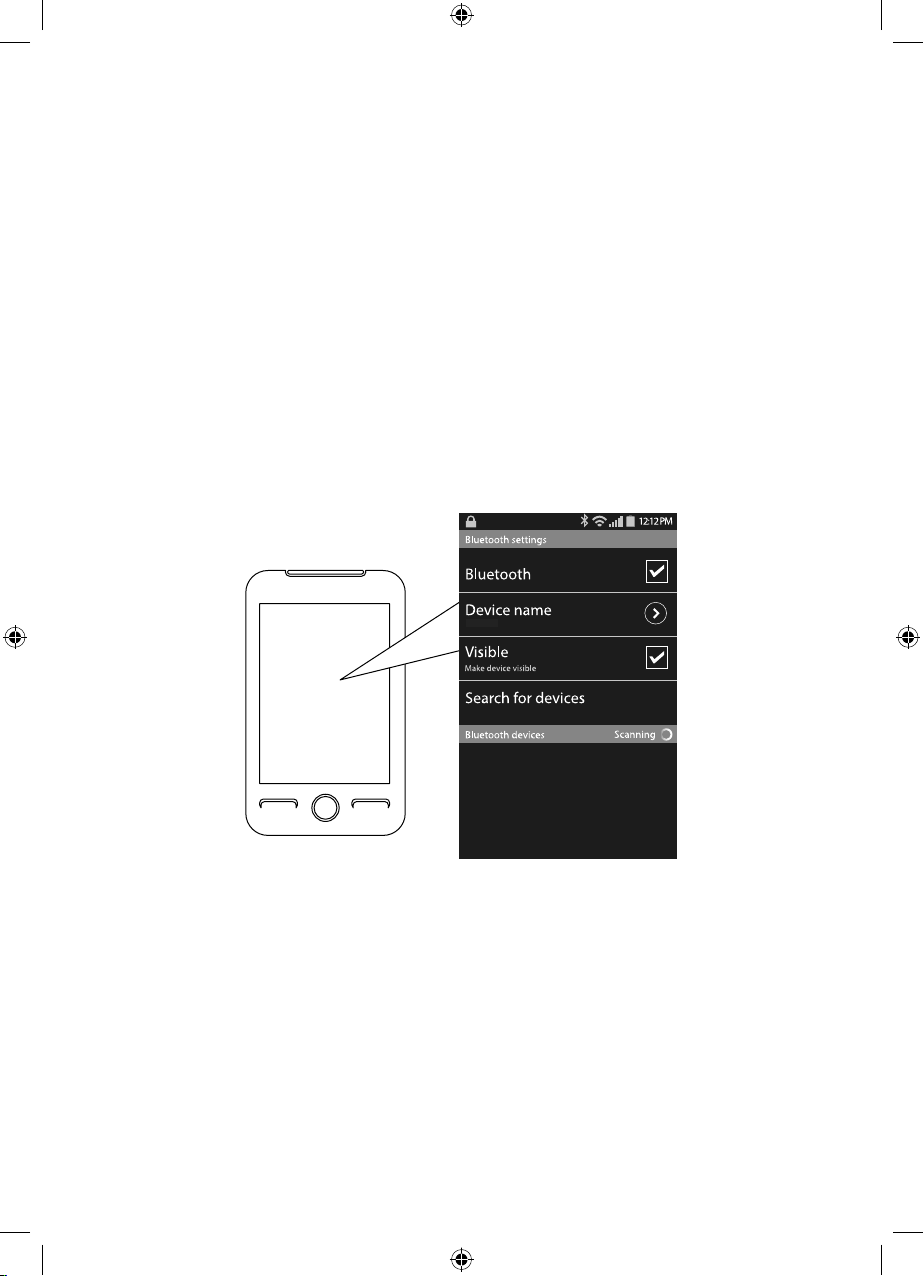
Pairing the Speaker
1. Plug the speaker into a power source.
2. Press the Power button on the top panel or by using the
remote control.
3. Press the Mode/Light button on the speaker or the Mode
button on the remote control repeatedly until the LED
Bluetooth indicator light ashes green and a tone is
heard.
4. Keep the speaker and Bluetooth enabled device within 3
feet of each other during the pairing process.
5. Set your mobile device to search for Bluetooth devices.
6. Select and pair with the device named MM346
Note: If a paired device is in range the speaker will connect
to it automatically when Bluetooth mode is enabled. In order
to connect to a different device the already connected device
must be unpaired before a new device can be connected.
08
MM346

Using the Speaker
Powering On/Off
Turn the speaker on by pressing the Power button on the top
panel or by using the remote control. Press again to turn off.
Adjusting the Volume
• Long press the Volume Up / Fast Forward button the
speaker or the Volume Up button on the remote control to
gradually increase the volume.
• Long press the Volume Down / Fast Backward button
the speaker or the Volume Down button on the remote
control to gradually decrease the volume.
• Press the Mute button on the remote control to mute the
sound. Press again to turn the sound back on.
Note: You may also adjust the volume from your connected
device’s volume control.
Switching Modes
Press the Mode/Light button on the speaker or the Mode
button on the remote control repeatedly to switch between
modes. The LED indicator light will light up accordingly:
Bluetooth, AUX and FM radio.
Disco Light
To turn on the Disco Light, long press the Mode/Light button
on the speaker or the light Light button on the remote control.
Long press again to turn off.
09

Playing Wireless music
To enjoy wireless music on your Wireless Tower Speaker,
make sure you are connected to a Bluetooth enabled
device. Once connected, press Play on the device. When
the playback has begun, you can control the music with your
connected device or the buttons on the Bluetooth speaker
Play / Pause
• Quick Press the Scan & Play/Pause button on the
speaker or the remote control to pause the music.
• To resume music playback, quick press the Scan/Play
button again.
Skipping songs
• Quick press the Volume down / Fast backwards button on
the speaker or the remote control to skip to the previous
song.
• Quick press the Volume Up / Fast Forwards button on the
speaker or the remote control to skip to the next song.
Equalizer
Press the EQ button on the remote control to adjust the
equalizer settings
Playing Music
10

FM Radio Mode
To listen to the radio by scanning
1. Press the Mode/Light button on the speaker or the Mode
button on the remote control repeatedly until the LED FM
radio indicator light turns green.
2. Press and hold the Scan & Play/Pause button on the
speaker for a second and then release, or press the Scan
& Play/Pause button on the remote control. All available
stations will be searched and then stored into the memory
automatically.
3. After scanning, press the numeric buttons on the remote
control to select 1-20 pre-set stations. Eg. Pressing 1
means pre-set station 1, pressing 2 and 0 means pre-set
station 20 etc.
Note: After scanning and saving stations, if the Wireless
Tower Speaker is turned off and then back on, be sure to
select your preset stations with the numeric buttons. If you
press the Scan & Play/Pause button again, the scanning
process will start again.
Listening to the radio by manual search
Quick press the Volume Down/Fast Backwards and Volume
Up/Fast Forwards buttons on the speaker or the remote
control to go to the next station
Note: To enhance radio reception, fully unwind and extend
the FM antenna wire located on the back of the speaker.
11

1. Quick press the Mode/Light button on the speaker or the
Mode button on the remote control repeatedly until the
LED AUX indicator light turns green.
2. Connect one end of the 3.5mm auxiliary cable to the
AUX in port on the front of the speaker, and the other
end of the cable to an external device’s headphone port
(smartphone, tablet, MP3 player).
3. Use the controls on your connected device to control
music playback and volume.
Note: When a device is plugged into the AUX in jack, only
the volume can be controlled by the buttons on the speaker
and remote control. You must use your connected device to
control music playback.
Using as a Wired Speaker
12
Troubleshooting
I can pair the Disco
Ball Sound Tower
with my Bluetooth
device, but I cannot
hear any music.
Make sure your Bluetooth device
supports Bluetooth prole.
Turn up the volume on your Bluetooth
Device
You may have to un-pair the speaker,
then re-pair to your device.
Use your connected device to increase
the volume
My Bluetooth
Device is not able
to pair with the
Disco Ball Sound
Tower
Make sure the Disco Ball Sound Tower
is turned on before beginning the
pairing process
Keep the Disco Ball Sound Tower
and Bluetooth enabled device within
3 feet of each other during the pairing
process.
Press the Mode/Light button on the
speaker or the Mode button on the
remote control repeatedly until the LED
Bluetooth indicator light ashes green
and a tone is heard.
Check that your device’s Bluetooth
feature is turned on.
Try repeating the pairing process, see
“Pairing the Speaker”.
I cannot get the
Disco Ball Sound
Tower into pairing
mode.
Make sure the Disco Ball Sound Tower
is turned ON before beginning the
pairing process.
Press the Mode/Light button on the
speaker or the Mode button on the
remote control repeatedly until the LED
Bluetooth indicator light ashes green
and a tone is heard.
The turntable is now in pairing mode.
13
JD Williams Ltd.
Table of contents


