Tibo Plus 1.1 User manual

Plus 1.1 / Plus 2.1 / Plus 3.1
User Manual

Plus 1.1 / 2.1 / 3.1
User Manual
Page 1 / 15
Contents
1. Safety Information .............................................................................................2
1.1. Installation location..........................................................................................3
1.2. Warning...........................................................................................................3
1.3. Cleaning and maintenance..............................................................................3
1.4. Before moving the appliance ...........................................................................3
1.5. Storm...............................................................................................................3
1.6. Do not drop small items or a liquid into the appliance......................................3
1.7. Repacking the appliance .................................................................................4
1.8. Batteries ..........................................................................................................4
2. First time speaker setup ...................................................................................5
2.1. In the box.........................................................................................................5
2.2. Rear panel layout.............................................................................................6
2.3. Remote Control................................................................................................7
2.4. Setting up your speakers.................................................................................8
2.5. Volume/Input Select Knob ...............................................................................9
3. Connecting Audio Sources.............................................................................10
3.1. Analogue Inputs / Digital Inputs.....................................................................10
3.2. Connecting a Subwoofer ...............................................................................11
4. Bluetooth mode ............................................................................................... 12
5. Line In mode.....................................................................................................13
6. Troubleshooting ..............................................................................................14
7. Specifications ..................................................................................................15

Plus 1.1 / 2.1 / 3.1
User Manual
Page 2 / 15
1. Safety Information
Do not share the power socket with another appliance
Do not disassemble or attempt to repair the appliance on your
own.
If you are not using the appliance, pull the power cord out of the
mains socket.
Be careful of the power cord and maintain it as appropriate. To
ensure safety, do not twist the power cord, do not pull it out of the
socket, do not compress it or stretch its length.
Do not use the appliance if the supply voltage is lower than 90V
or higher than 240V. If the supply voltage is lower than 90V, the
appliance may not work, and its lifetime may be affected. If the
voltage is higher than 240V, the appliance may catch on fire or
cause a fire.
Do not wash the appliance or use it in the bathroom, or it may
cause potential injuries and other problems.

Plus 1.1 / 2.1 / 3.1
User Manual
Page 3 / 15
1.1. Installation location
Leave sufficient space around the appliance of at least 5 cm from any wall/obstacle to
ensure proper ventilation and prevent the appliance from overheating.
The following places are not suitable installation locations for the appliance:
▪An unstable location
▪A location near a heat source or in direct sunlight.
▪In a wet or dusty environment
1.2. Warning
To prevent suffering an electrical shock or another accident, do not operate the
appliance in a rainy or humid environment.
1.3. Cleaning and maintenance
Use a soft cloth or cotton dipped in a neutral solution for cleaning the surface of
appliances. Do not use the type of cloth that you use for washing dishes or aggressive
chemical agents.
1.4. Before moving the appliance
Before moving the appliance to a different location, please take the disc out of the
appliance so that the disc and appliance will not be damaged.
1.5. Storm
If the appliance is not working properly during a storm, please disconnect the plug
from the power socket and reinsert it after a minute.
1.6. Do not drop small items or a liquid into the appliance
In the event that you find small items or a liquid inside the appliance, you see smoke
or smell an odour, immediately disconnect the appliance from the power grid. Send
the appliance to an authorised service centre.

Plus 1.1 / 2.1 / 3.1
User Manual
Page 4 / 15
1.7. Repacking the appliance
When sending the appliance by a transport company, use the original packaging to
prevent its damage during transport.
1.8. Batteries
When installing the batteries into your remote control, ensure
they are inserted correctly according to the diagram. Plus with
plus and minus with minus.

Plus 1.1 / 2.1 / 3.1
User Manual
Page 5 / 15
2. First time speaker setup
2.1. In the box
▪Plus+ Active Speaker x 1
▪Plus+ Passive Speaker x 1
▪Remote Control x 1
▪Speaker Cable x 1
▪3.5mm to RCA Cable x 1
▪Standard UK plug x 1
▪Standard EU plug x 1
▪User Guide x 1

Plus 1.1 / 2.1 / 3.1
User Manual
Page 6 / 15
2.2. Rear panel layout
1. Volume and Mode select knob
2. Speaker output binding post to connect to passive speaker
3. Optical output
4. Subwoofer output
5. 3.5 mm Stereo mini-jack AUX input
6. RCA L/R Input
7. AC Input Connection (100 V - 240 V 50/60 Hz)
8. ON / OFF Switch
Plus 1.1 / 2.1 / 3.1
User Manual
Page 7 / 15
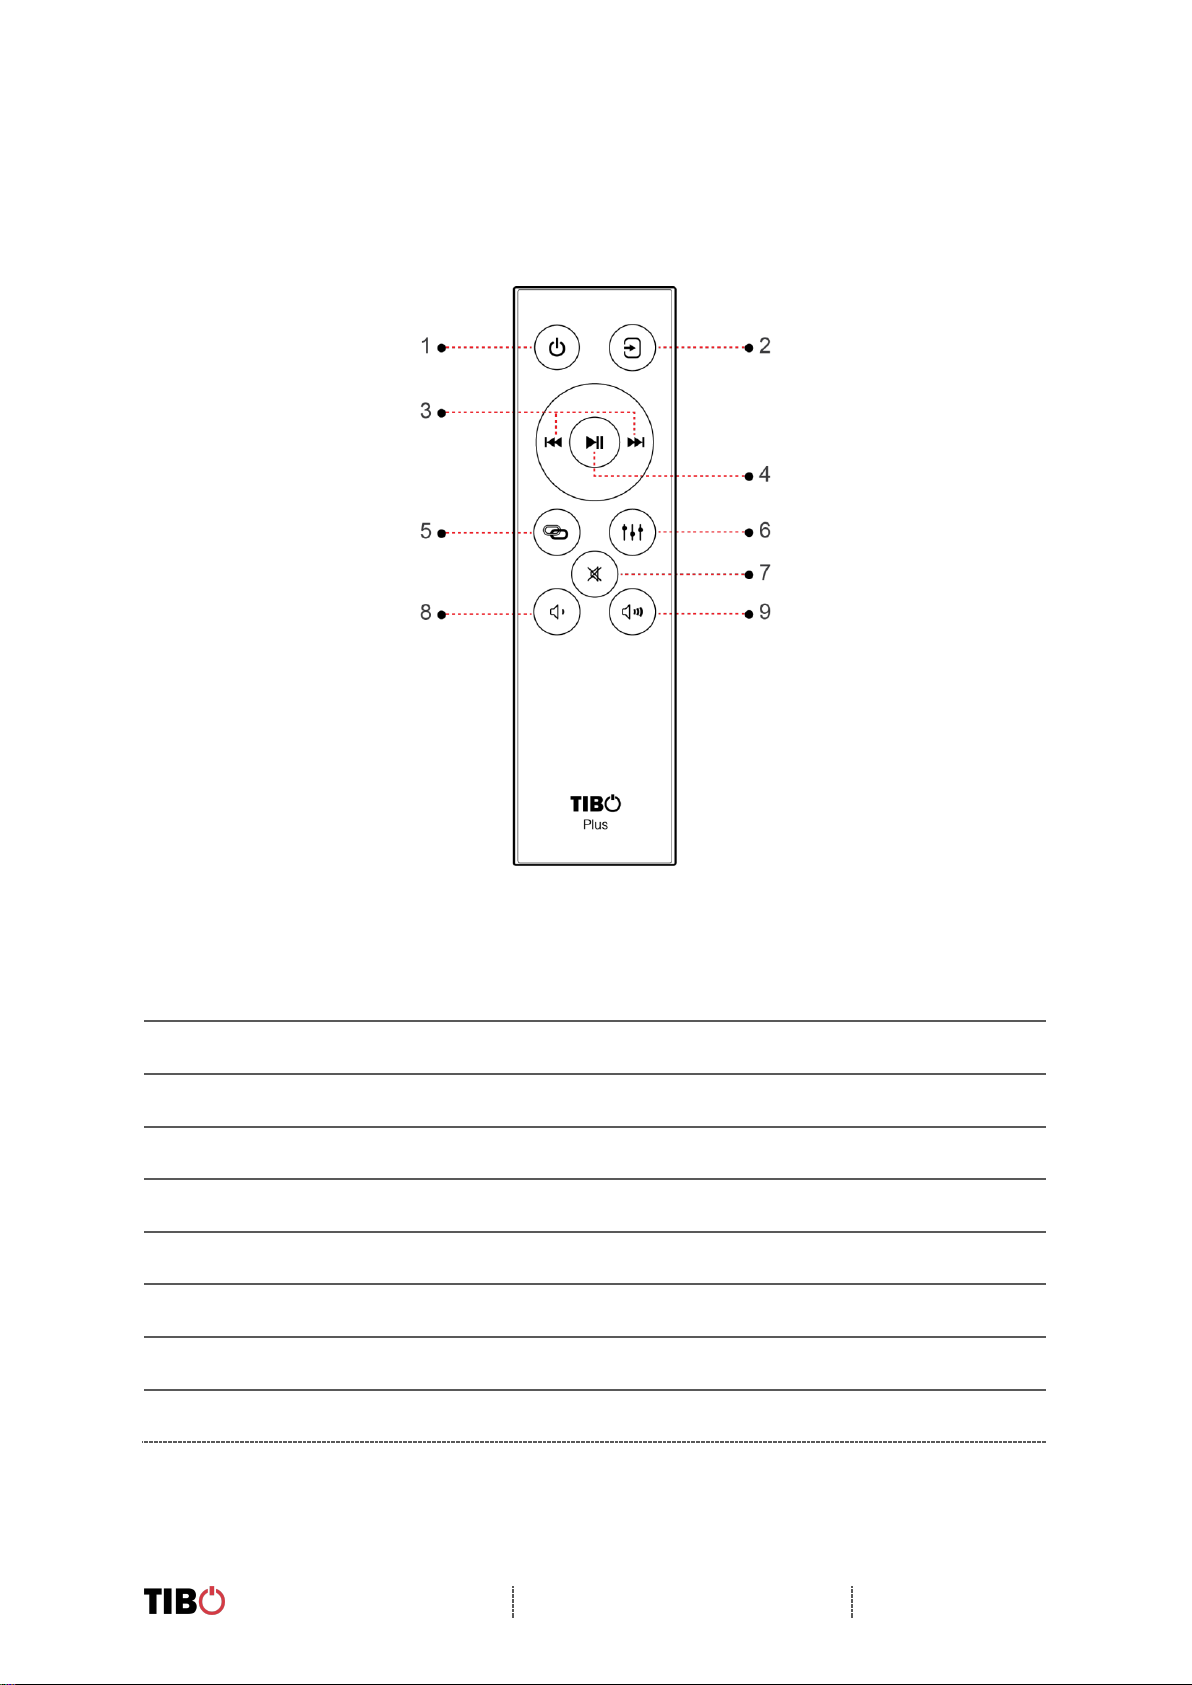
2.3. Remote Control
1. Power On / Standby
2. Mode Select
3. Skip Track Forward / Backward
4. Play / Pause
5. Pair / Unpair From Bluetooth
6. Bass / Treble Adjustment
7. Mute Function
8. Decrease Volume
9. Increase Volume

Plus 1.1 / 2.1 / 3.1
User Manual
Page 8 / 15
2.4. Setting up your speakers
The powered speaker system is designed for either bookshelf or stands mounting.
The stands should be of rigid construction, between 45 cm to 69 cm high and
preferably have spikes.
The space between the two speakers and the distance from the listener is important.
If the speakers are positioned too close or too far apart, stereo imaging will not be
fully developed. Speakers are designed to perform optimally positioned at least 20
cm from the rear wall in an average listening room. However, it may not be possible
to install the speakers in this position and since rooms vary in shape, size, and
furnishing, a certain amount of experimentation is necessary to determine the most
suitable position.
Moving the speakers very close to the rear wall will enhance the bass frequencies
but will tend to reduce soundstage depth, while moving the speakers away from the
rear wall will tend to have the opposite effect. Avoid positioning the speakers close to
or in the corners of the room, as this will excite undesirable room coupling in the low
and middle frequencies.
If the width of the rear wall is limited, then toe-in the speakers slightly to reduce
reflections. Room characteristics and positioning have a profound effect on the
performance of the speakers, so time and effort devoted to achieving the optimum
positions will be rewarded.
Ensure that the ON/OFF Switch is in the OFF position. Connect the two speakers
together as shown below using the supplied speaker cable. Connect the RED (+)
and BLACK (−) terminals from the active speaker (left channel) to the corresponding
terminals on the passive speaker (right channel).

Plus 1.1 / 2.1 / 3.1
User Manual
Page 9 / 15
If you wish to place your speakers further apart than the supplied cable will reach,
we recommend that you purchase a heavier gauge of speaker cable to minimize
signal loss.
Follow the instructions on the ensuing pages to connect your audio sources to
speakers. The examples in the following pages are not meant to be exhaustive - just
examples. Connect the power cord from active speaker to the wall outlet.
2.5. Volume/Input Select Knob
The volume knob on the active speaker functions as an input select knob as well.
Push the knob to select an input source, it cycles through the following inputs
depending on what input source was last used. RCA, LINE-IN, OPT and
BLUETOOTH.
Press and hold volume knob for few seconds to switch Plus system ON of OFF.
Note: The Plus speakers feature an auto standby function as this saves power
consumption. Auto Wake-Up Off: power consumption < 0.5 W Auto Wake-Up On:
power consumption < 3 W
Plus 1.1 / 2.1 / 3.1
User Manual
Page 10 / 15
3. Connecting Audio Sources
TIBO Plus speakers feature a high-quality DAC (digital-to-analogue converter) that
supports data streams up to 24-bit/48 kHz resolution.
TIBO Plus speakers support Bluetooth technology.
Use the appropriate audio cable to connect your audio source components to your
speakers. Refer to the following diagrams on connectivity options.
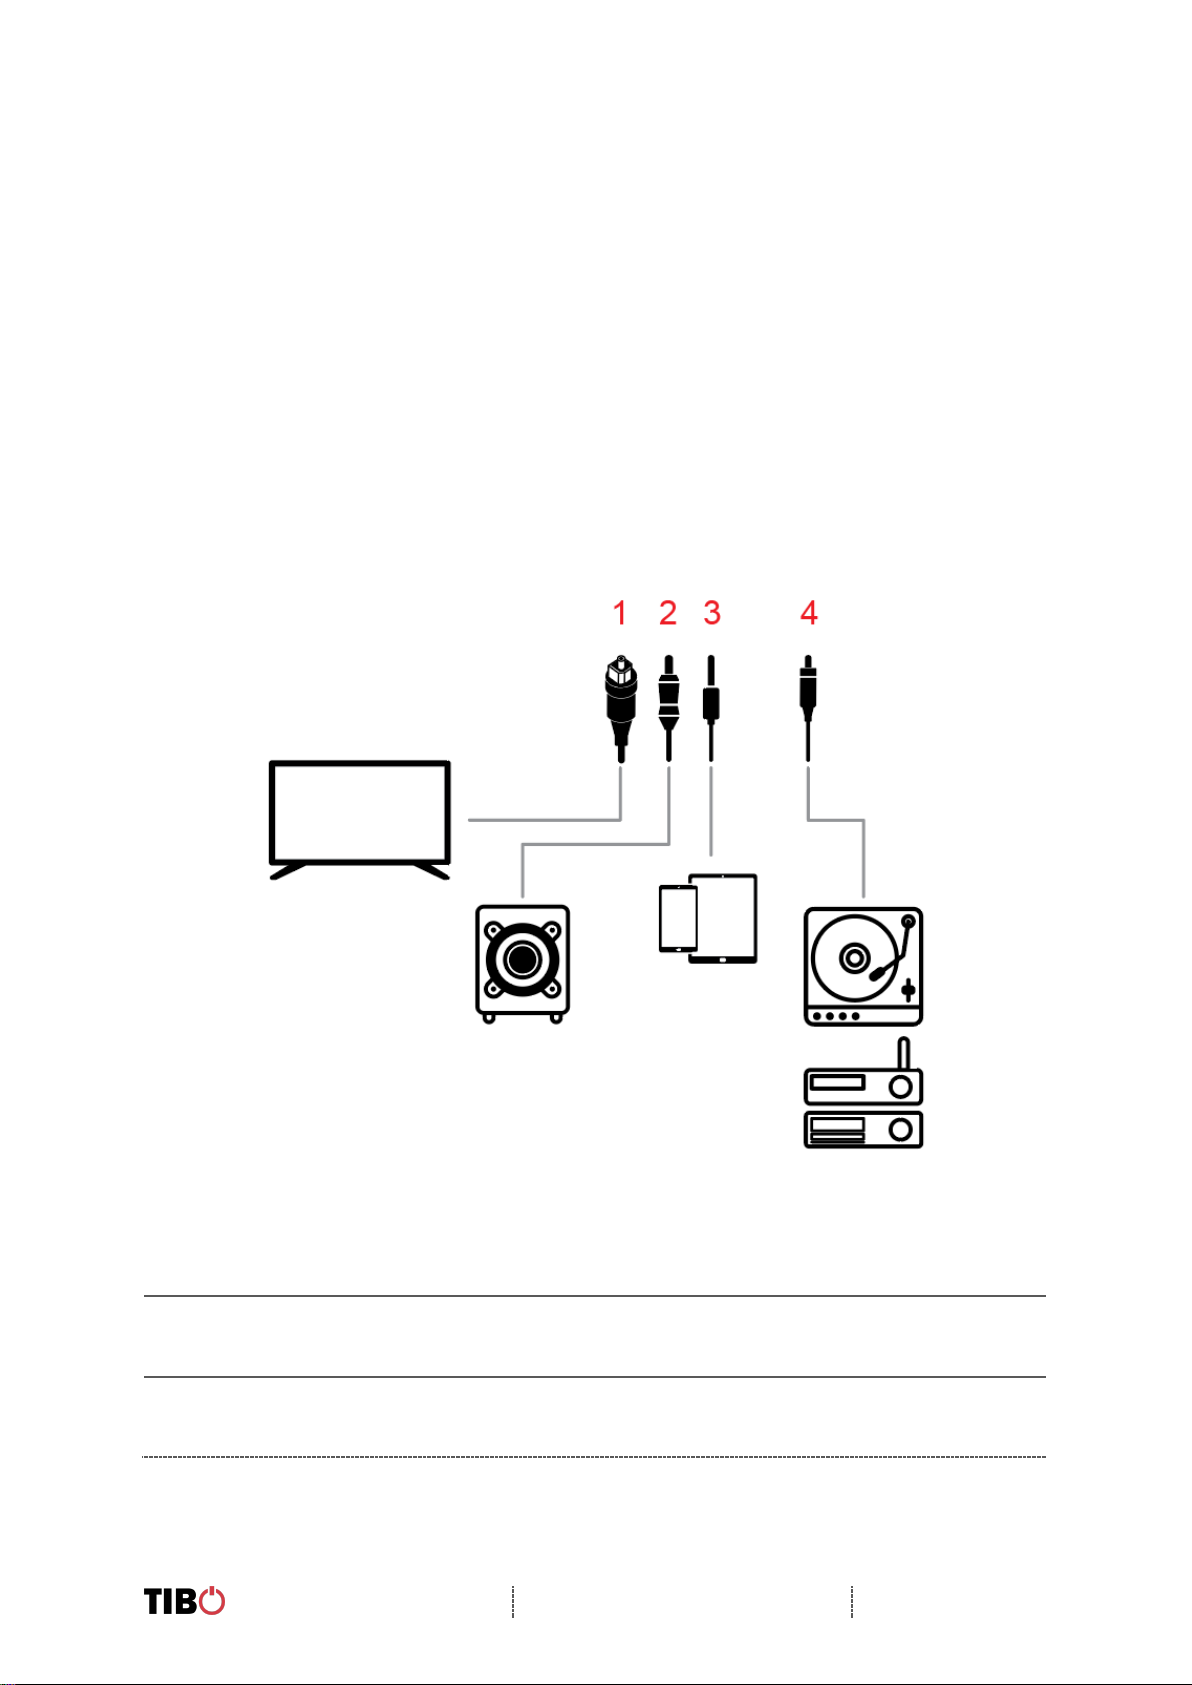
3.1. Analogue Inputs / Digital Inputs
The Plus speakers have two options for analogue audio connections.
1. Digital Optical Input - TOSLINK® connector for connection to the digital optical
output on a TV or other source.
2. 3.5 mm Stereo mini jack - The 3.5mm input jack is ideal for connecting to the
headphone output of an external audio source such as a Phone or Tablet.
3. RCA - Connect the RCA L&R audio output from a Turntable, Amplifier or other
source to the RCA sockets.

Plus 1.1 / 2.1 / 3.1
User Manual
Page 11 / 15
3.2. Connecting a Subwoofer
Plus speakers are equipped with an RCA connector to provide output signal to a
powered subwoofer. Simply connect a single RCA subwoofer cable from the SUB
OUT connection on the Speakers to the AUDIO INPUT on your subwoofer. If your
subwoofer has a stereo L/R RCA input, either left or right inputs will work.

Plus 1.1 / 2.1 / 3.1
User Manual
Page 12 / 15
4. Bluetooth mode
•With your Bluetooth device and the TIBO Plus speakers system both turned
ON, press the Mode button on the Plus speakers or the remote controlto make
the Plus speakers system enter Bluetooth mode. The speakers will reply
saying “Bluetooth mode”.
•The blue light will flash on the Plus speakers to show that Bluetooth mode is
active, and the speakers are discoverable.
•Set your Bluetooth device to discoverable so it can discover (refer to your
Bluetooth device guide for details) TIBO Plus speakers system. Locate the
Bluetooth device list in the user interface of your device.
•From the Bluetooth device list, select the device named “TIBO Plus 2.1 or Plus
3.1” (depending on which model you have).
•If your Bluetooth device prompts you for an access code, enter digits 0000
(four zeros) and press OK. Some devices also ask you to accept the
connection. Your Bluetooth device indicates when pairing is complete.
•The Plus speaker system indicates pairing is complete with welcome jingle.

Plus 1.1 / 2.1 / 3.1
User Manual
Page 13 / 15
5. Line In mode
•Whilst the Kameleon 4 / 6 is turned off, connect a 3.5mm jack cable to the
‘Line in’ port at the rear of the speaker and the other end of the cable to your
Android/iOS device. This is to avoid speaker pop when the speaker is turned
on.
•Hold the power/mode button to turn on. If performed correctly, speaker will
respond by saying “Power on.” The speaker will then tell you what mode is
currently activated. E.g. Wi-Fi mode.
•Short press the mode button until the speaker responds saying “Line In mode.”
The mode light will also turn green.
•You can now play music to the Kameleon speaker via your source, Spotify
etc.

Plus 1.1 / 2.1 / 3.1
User Manual
Page 14 / 15
6. Troubleshooting
Problem
Possible Cause
No power
▪AC power cord is not connected to the power
▪supply or is not connected to a power supply
correctly.
No sound or distorted
▪The audio cables aren’t connected correctly.
▪The volume is set to the minimum level.
▪The sound is switched OFF.
Plus speakers produce
humming sound
▪Signal lines from source device to Plus
speakers are too long.
▪Signal line used is not fault-protected or the
protection has been damaged (defective).
▪Ground loop (ripple pickup) generated.
▪Another piece of equipment on the same
circuit has no interference suppression (e.g.
fridge).
The remote control does not
function
▪There is no battery in the remote control.
▪The batteries are flat.
▪The remote control isn’t pointed to the remote
sensor.
▪The remote control is out of operating range.
▪The unit is turned Off.
No playback via Bluetooth
▪There is no connection between the Plus
speakers and the Bluetooth end device.
▪The Bluetooth end device is paired but no
playback takes place.

Plus 1.1 / 2.1 / 3.1
User Manual
Page 15 / 15
7. Specifications
Product name
Plus 1.1
Power supply
AC 100-240V
Max output
power
2 x 25W
Frequency
response
20Hz –20kHz
Impedance
4ohms
Bluetooth range
10 meters
Dimensions
105 x 172 x 135mm
Weight (kg)
1.4 (Active speaker)
1.1 (Passive speaker)
Sound resolution
24 bit/192kHz
Product name
Plus 3.1
Power supply
AC 100-240V
Max output
power
2 x 55W
Frequency
response
20Hz –20kHz
Impedance
4ohms
Bluetooth range
10 meters
Dimensions
165 x 265 x 205mm
Weight (kg)
3.3 (Active speaker)
2.9 (Passive speaker)
Sound resolution
24 bit/192kHz
The Bluetooth® word mark and logos are registered trademarks owned by Bluetooth SIG Inc. and any
use of such marks by TIBO is under license. Other trademarks and trade names are those of their
respective owners.
Product name
Plus 2.1
Power supply
AC 100-240V
Max output
power
2 x 35W
Frequency
response
20Hz –20kHz
Impedance
4ohms
Bluetooth range
10 meters
Dimensions
130 x 223 x 185mm
Weight (kg)
2.5 (Active speaker)
2.0 (Passive speaker)
Sound resolution
24 bit/192kHz
Other manuals for Plus 1.1
1
This manual suits for next models
2
Table of contents
Other Tibo Speakers manuals


